

Power Your Software Testing with AI Agents and Cloud
The Native AI-Agentic Cloud Platform to Supercharge Quality Engineering. Test Intelligently and Ship Faster.


- TestMu AI (Formerly LambdaTest)
- /
- Learning Hub
- /
- How to Install Playwright: A Comprehensive Guide for 2026
How to Install Playwright: A Comprehensive Guide for 2026
Learn how to install Playwright with this step-by-step guide. Covers setup, install commands, and troubleshooting tips to kickstart end-to-end testing.
Last Updated on:
Whether you're just starting with end-to-end testing or migrating from other automation testing tools, this step-by-step guide will help you install Playwright framework to get started.
Overview
To install Playwright, run npm init playwright@latest in your terminal for a quick command-line setup, or use the official VS Code extension for an interactive, editor-integrated installation. Both methods automatically configure your project, download required browser binaries, and prepare your environment for end-to-end web testing.
Installation Methods
- Command Line Installation: Running npm init playwright@latest in the terminal initializes a Playwright project, lets you select your programming language, and automatically downloads Chromium, Firefox, and WebKit browser binaries.
- VS Code Extension: Installing the official Playwright Test extension allows you to configure browsers, run tests, and debug scripts directly within the Visual Studio Code editor.
Language-Specific Setup
- JavaScript Setup: Developers can install Playwright using npm or yarn, then run npx playwright install to download browser binaries for fast automation in Node.js environments.
- TypeScript Setup: Installing Playwright via npm or yarn enables type-safety, better IntelliSense, and cleaner code for scalable end-to-end testing in TypeScript environments.
- Python Setup: Installing Playwright via pip and executing playwright install combines Python's simplicity with powerful cross-browser automation capabilities for simple scripting.
- Java Setup: Adding the Playwright Maven dependency to your project and generating browser binaries enables fast UI testing with strong type safety in enterprise frameworks.
- .NET Setup: Installing Playwright via NuGet and running the install command integrates tests with MSTest, NUnit, or xUnit frameworks within .NET ecosystems.
CI/CD and Deployment
- Docker Containers: Using the official Ubuntu-based Playwright Docker image with pre-installed browsers and system dependencies ensures reproducible containerized test runs.
- GitHub Actions: Configuring a workflow file using npx playwright install --with-deps automatically installs operating system dependencies and runs Playwright tests on every push.
- Jenkins Pipelines: Adding a test execution stage to your Jenkinsfile allows you to run Playwright tests in headless mode within your continuous integration pipeline.
Post-Installation Configuration
- Configuration File: Creating a playwright.config.ts or playwright.config.js file allows you to adjust test directories, naming conventions, and environment settings for project customization.
- UI Test Runner: Running npx playwright test --ui allows you to visually inspect, debug, and trace your Playwright test executions in an interactive interface.
What Is the Fastest Way to Install Playwright?
If you want to install Playwright and run your first test immediately, here are the three commands you need:
Step 1: Create a new Playwright project
npm init playwright@latestYou will be prompted to choose JavaScript or TypeScript, a test folder name, and whether to install browsers. Accept the defaults to get started quickly.
Step 2: Run the example test
npx playwright testThis executes the sample tests in headless mode across Chromium, Firefox, and WebKit.
Step 3: View the test report
npx playwright show-reportThis opens an HTML dashboard showing passed, failed, and skipped tests with full execution details.
That is it. You now have a working Playwright setup with browsers installed, sample tests passing, and a report to verify results. If you are using VS Code, Python, Java, or .NET, or need detailed configuration guidance, continue reading below.
What Is Playwright?
Playwright is an open-source browser automation framework built by Microsoft. It lets you write end-to-end tests for web applications using a single API that works across Chromium, Firefox, and WebKit. You can use Playwright with JavaScript, TypeScript, Python, Java, and .NET.
It has built-in reliability features like auto-wait, trace viewer, and browser context isolation. Playwright also supports headless and headed modes, parallel execution, and full CI/CD integration. This makes it a solid choice for developers and QA engineers working in fast-paced teams.
If you want to learn more and get hands-on with Playwright, follow the Playwright tutorial, this guide will walk you through everything you need to get started quickly, even if you're new to browser automation.
How to Install Playwright?
Installing Playwright isn’t just about running a command, it’s about understanding what’s required, why each step matters, and how the setup leads to real browser automation. A good installation approach helps you prepare your development environment, ensures system compatibility, and sets you up to write and execute tests without confusion.
What Are the Prerequisites for Installing Playwright?
Before installing Playwright, make sure you have a few things in place.
System Requirements:
- Node.js Version: Requires Node.js 18 or higher along with npm, which comes bundled with Node.js for smooth installation.
- Operating System Support: Works on Windows 10+, macOS 12+, and Ubuntu 20.04+ ensuring reliable execution across modern platforms.
- Storage Requirement: Needs at least 2GB of free disk space for downloading and running browser binaries.
- Editor Recommendation (Optional): Visual Studio Code is recommended for easier debugging, file navigation, and project development.
- Additional Tooling Support: Git helps with version control and CI workflows, and Python, Java or .NET environments may be required when using those specific Playwright language bindings.
How to Install Playwright via Command Line?
Installing Playwright via CLI is quick and developer-friendly, allowing you to set up the framework directly from the terminal with minimal steps. With a simple Playwright install command, you can pull in the core package and be ready to run automated tests within minutes.
This method is best if you're setting up Playwright from scratch or want full control over your environment.
- Initialize a New Project: Set up a Playwright project with configuration, sample tests, and browser binaries ready for use.
npm init playwright@latestIf you are using yarn, run the given command below:
yarn create playwrightOr using pnpm, run the given command below:
pnpm create playwrightYou will be prompted to choose a language (JavaScript or TypeScript), a test folder, and whether to install recommended browsers and GitHub Actions config.
Once completed, you will get a Playwright config file, sample tests, and installed browser binaries.
npx playwright testTo watch the browser in action, run the given command below:
npx playwright test --headednpx playwright test --ui
Note: Run Playwright tests across 50+ real desktop browsers . Try TestMu AI Today!
How to Install Playwright in VS Code ?
Installing Playwright in Visual Studio Code provides a more interactive and user-friendly way to set up your testing environment. With the dedicated VS Code extension, you can configure browsers, choose your preferred language, and add sample tests, all without leaving the editor.
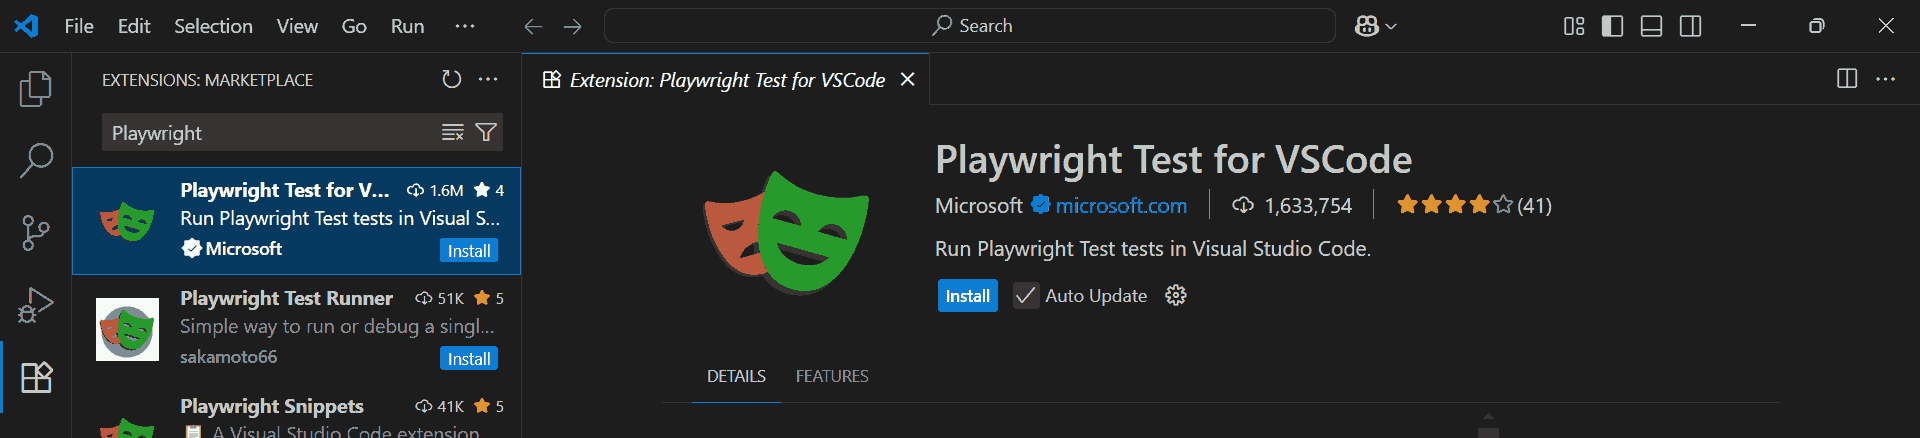
- Install Playwright Test for VSCode: Add the official Microsoft extension via the Extensions tab to enable Playwright support and access the install button directly in VS Code.
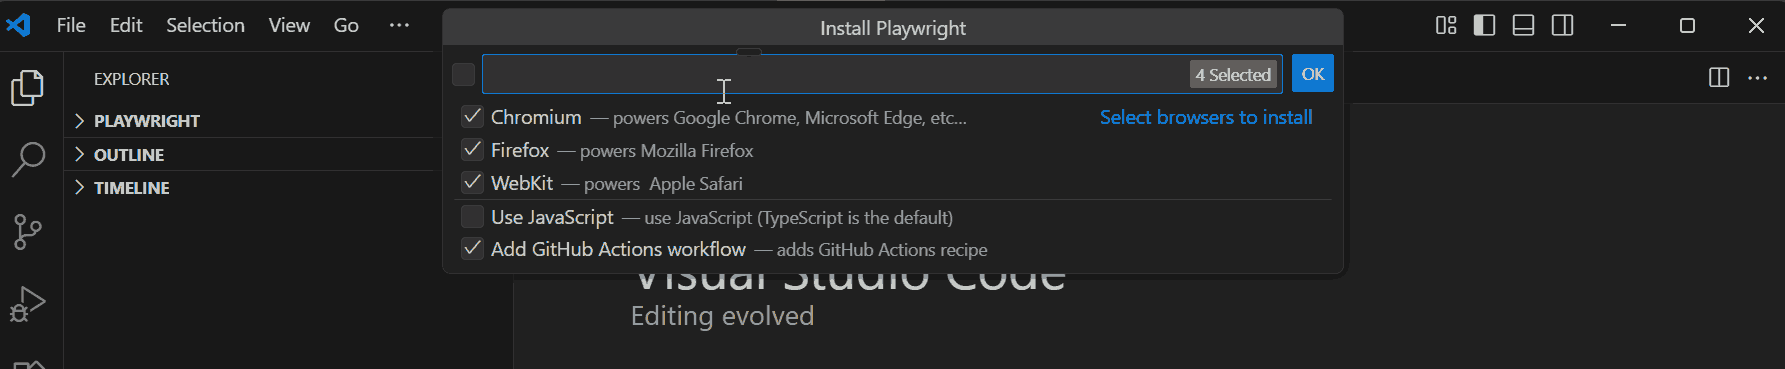
- Open an Empty Folder and Run Install Playwright Command: Open a folder in VS Code, then launch the command palette (Ctrl+Shift+P or Cmd+Shift+P) and search for “Install Playwright.”
- Follow the Prompts: The extension will guide you to choose browsers (Chromium, Firefox, WebKit), select JavaScript or TypeScript, add sample tests, and optionally set up GitHub Actions.
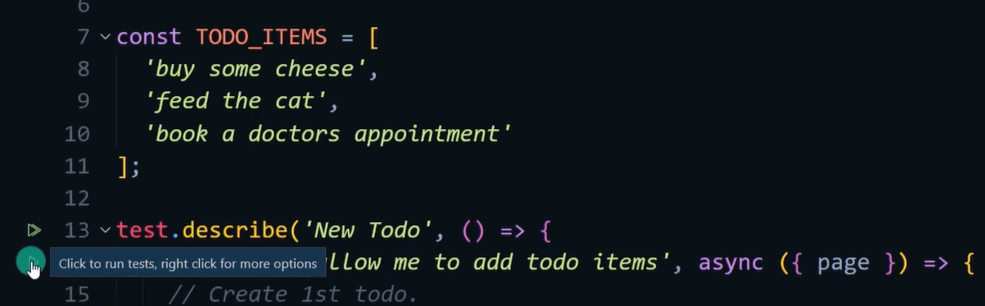
- Run or Debug Tests: After setup, you can use VS Code and Playwright to run tests or debug them directly from the sidebar using the green play and debug icons. The extension also supports Trace Viewer and displays test output logs.

You can also check out this video tutorial on setting up Playwright by Koushik Chatterjee. He is a Founder of LetCode and Senior Software Test Automation Engineer. Koushik brings close to 10 years of experience in test automation, specializing in building reliable frameworks and driving quality at scale.
How to Install Playwright in Other Languages?
Playwright is not limited to JavaScript and TypeScript; it also supports Python, Java, and .NET, making it versatile across different development environments.
Installing Playwright on these platforms allows you to write end-to-end tests in your preferred language while leveraging the same reliable browser automation features.
Each language has its own package manager and setup process, but the core concepts, browser support, and automation capabilities remain consistent. This enables teams to integrate Playwright into existing projects and CI/CD pipelines seamlessly.
For JavaScript:
Playwright JavaScript is one of the most common ways to run end to end tests. You can install Playwright using npm or yarn, and once installed, you may run npx playwright install to download browser binaries and start writing test scripts instantly.
npm i -D @playwright/test
npx playwright install
Playwright JavaScript provides fast automation and integrates smoothly with frameworks like Jest, Mocha, and CI pipelines.
For TypeScript:
Playwright works seamlessly with TypeScript, offering type-safety and better IntelliSense for end-to-end testing. You can install Playwright using npm or yarn, then run npx playwright install to download the required browser binaries before writing tests.
npm i -D @playwright/test typescript ts-node
npx playwright install
Playwright TypeScript enables scalable end-to-end testing with cleaner code, better predictability, and powerful developer tooling support.
For Python:
Playwright Python is widely used for reliable end to end testing. You can install Playwright via pip and then execute the playwright install command to download browser binaries and begin writing tests quickly.
pip install playwright
playwright install
Playwright Test framework combines with Python’s simplicity for end-to-end testing, and to get started you can follow a Playwright Python tutorial.
For Java:
Playwright Java offers strong cross browser automation support. You can install Playwright by adding its Maven dependency, making it easy to manage builds and run tests within Java based frameworks.
<dependency>
    <groupId>com.microsoft.playwright</groupId>
    <artifactId>playwright</artifactId>
    <version>1.58.0</version>
</dependency>
Once the dependency is added, generate the browser binaries using:
playwright installPlaywright Java enables fast UI testing with strong type safety and easy integration into enterprise CI/CD workflows.
For .NET:
With Playwright .NET you can automate end to end tests across multiple browsers. Use NuGet to install Playwright, then run the playwright install command to set up necessary browser binaries for execution.
dotnet add package Microsoft.Playwright
playwright install
Playwright .NET integrates cleanly with MSTest, NUnit, and xUnit for smooth debugging, parallel execution, and seamless test automation.
Stop configuring Playwright manually. Let Playwright Skill do it for you.

How to Install Playwright in Docker and CI/CD Pipelines?
Running Playwright in Docker containers and CI/CD pipelines requires a slightly different setup than local installation. Containers need browser dependencies pre-installed, and CI environments often run in headless mode with no display server.
Using the Official Playwright Docker Image
Microsoft provides official Docker images with Playwright and all browser dependencies pre-installed. This is the fastest way to run Playwright in any containerized environment.
FROM mcr.microsoft.com/playwright:v1.58.0-noble

WORKDIR /app

COPY package.json package-lock.json ./

RUN npm ci

COPY . .

RUN npx playwright install --with-deps

CMD ["npx", "playwright", "test"]
The official image is based on Ubuntu and includes Chromium, Firefox, and WebKit browsers along with all required system libraries. Using a version-tagged image (v1.58.0) ensures your CI builds are reproducible.
Note: Always match the Docker image version to your project's Playwright version in package.json. Mismatched versions are the most common cause of CI failures.
Setting Up Playwright in GitHub Actions
Playwright provides a built-in GitHub Actions configuration. If you selected this option during npm init playwright@latest, a workflow file was already created. If not, add the following to .github/workflows/playwright.yml:
name: Playwright Tests
on:
  push:
    branches: [main]
  pull_request:
    branches: [main]
jobs:
  test:
    runs-on: ubuntu-latest
    steps:
      - uses: actions/checkout@v4
      - uses: actions/setup-node@v4
        with:
          node-version: 20
      - name: Install dependencies
        run: npm ci
      - name: Install Playwright browsers
        run: npx playwright install --with-deps
      - name: Run tests
        run: npx playwright test
      - uses: actions/upload-artifact@v4
        if: ${{ !cancelled() }}
        with:
          name: playwright-report
          path: playwright-report/
          retention-days: 30
This workflow installs dependencies, downloads browser binaries with system-level packages (---with-deps), runs all tests, and uploads the HTML report as an artifact on every push and pull request. For ready-to-copy configs across GitHub Actions, GitLab CI, and Jenkins, along with sharding tests for faster pipeline runs and fixing failures that only appear in CI, see this guide on running Playwright tests in CI/CD pipelines.
Setting Up Playwright in Jenkins
For Jenkins pipelines, add the following stage to your Jenkinsfile:
stage('E2E Tests') {
    agent {
        docker {
            image 'mcr.microsoft.com/playwright:v1.58.0-noble'
        }
    }
    steps {
        sh 'npm ci'
        sh 'npx playwright install --with-deps'
        sh 'npx playwright test'
    }
    post {
        always {
            archiveArtifacts artifacts: 'playwright-report/**', allowEmptyArchive: true
        }
    }
}
Key Considerations for CI Environments
When running Playwright in CI, keep these points in mind:
- Use ---with-deps flag: The command npx playwright install ---with-deps installs both browser binaries and operating system dependencies (fonts, libraries) required for rendering. Skipping this flag is the most common reason tests pass locally but fail in CI.
- Install only the browsers you need: If your tests only target Chromium, use npx playwright install chromium ---with-deps to reduce install time and image size.
- Set appropriate timeouts: CI machines are often slower than local development machines. Increase the default timeout in your playwright.config to avoid false failures.
- Cache browser binaries: In GitHub Actions, browser binaries can be cached between runs to speed up pipelines. Use actions/cache with the path ~/.cache/ms-playwright.
- Corporate proxy and SSL: If your CI environment uses a proxy or custom certificate authority, set HTTPS_PROXY and NODE_EXTRA_CA_CERTS environment variables before running npx playwright install.
Why Test Playwright Scripts on Real Browsers?
To ensure your Playwright tests behave as expected in real-world usage, it's important to run them on actual browsers rather than relying solely on headless mode or local execution.
Real browser testing helps expose browser-specific rendering differences, performance variations, and compatibility issues that emulation alone may not uncover.
A cloud-based platform allows you to run Playwright tests on real browsers, eliminating the need to manage local browser environments while ensuring accurate cross-browser testing. One such platform is TestMu AI.
TestMu AI is an automation testing platform that allows you to perform both manual and automated Playwright testing at scale across 3000+ browser and OS combinations.
It provides an easy and scalable way to execute Playwright tests on real browsers hosted in the cloud. Instead of maintaining local environments or downloading browser binaries manually, you can run your tests directly on Chrome, Firefox, Edge, and multiple browser versions using TestMu AI’s cloud grid.
By testing Playwright scripts on TestMu AI, teams can identify browser-specific issues early, ensure reliable cross-browser compatibility, and ship applications with higher confidence, all without the overhead of managing their own infrastructure.

To get started, check out this guide on Playwright testing with TestMu AI.
Troubleshooting Common Playwright Installation Issues
Troubleshooting Playwright installation issues is often simple once you know where problems typically occur. Most errors stem from missing dependencies, blocked scripts, or browser binaries failing to download.
Below are the most common installation problems and how to resolve them quickly.
- PowerShell Execution Policy Error: If you see the message "File cannot be loaded because running scripts is disabled", it means PowerShell is blocking script execution. Run the setup using the following command or use Command Prompt instead:
powershell -ExecutionPolicy Bypass -Command "npm init playwright@latest"
node -v
npm -v
Restart your terminal if versions still do not appear.
npx playwright install
export NODE_TLS_REJECT_UNAUTHORIZED=0
npx playwright install chromium
What Should You Configure After Installing Playwright?
After installing Playwright, a few quick configurations help prepare your environment for smooth testing and debugging.
The steps below ensure you have browsers, config settings, and optional UI tooling ready to use.
- Generate Playwright Config File: Playwright automatically creates a config during project setup, but if missing, generate one manually:
npx playwright init npx playwright install
npx playwright install chromium
npx playwright install firefox
npx playwright install webkit npx playwright test --ui npx playwright test Conclusion
Installing and configuring Playwright properly is the first step toward building reliable, scalable end-to-end tests across multiple browsers and platforms. By following this guide, you can set up Playwright on JavaScript, TypeScript, Python, Java, and .NET, handle common installation issues, and leverage both local and cloud-based browser testing environments like TestMu AI.
With the post-installation configurations, interactive test runner, and cloud execution options, teams can catch browser-specific issues early, ensure cross-browser compatibility, and accelerate their testing workflows. Whether you are just starting with automation or scaling tests in a CI/CD pipeline, Playwright provides a robust and versatile solution for modern web application testing.
Start experimenting with Playwright today, run your first tests, and take advantage of real-browser testing to deliver high-quality web experiences with confidence.
Citations
- Playwright Installation Documentation: https://playwright.dev/docs/intro
- Playwright Supported Languages: https://playwright.dev/docs/languages
- Playwright Docker: https://playwright.dev/docs/docker
Author

Salman Khan
Blogs: 138


Salman is a Test Automation Evangelist and Community Contributor at TestMu AI, with over 6 years of hands-on experience in software testing and automation. He has completed his Master of Technology in Computer Science and Engineering, demonstrating strong technical expertise in software development, testing, AI agents and LLMs. He is certified in KaneAI, Automation Testing, Selenium, Cypress, Playwright, and Appium, with deep experience in CI/CD pipelines, cross-browser testing, AI in testing, and mobile automation. Salman works closely with engineering teams to convert complex testing concepts into actionable, developer-first content. Salman has authored 120+ technical tutorials, guides, and documentation on test automation, web development, and related domains, making him a strong voice in the QA and testing community.
Reviewer

Sri Harsha
Reviewer
Sri Harsha is Engineering Manager of the Open Source Program Office at TestMu AI (formerly LambdaTest), where he leads open-source engineering behind the Selenium and Appium automation grid and builds agentic AI systems for quality engineering. He is a member of the Selenium Technical Leadership Committee and a committer to WebdriverIO and Appium, and was recognized with the LambdaTest Delta Award 2023 for Best Contributor in open-source testing. He brings over 10 years of experience in software testing and automation, with earlier roles at EPAM Systems and ZenQ. Sri Harsha holds a B.Tech in Computer Science from Jawaharlal Nehru Technological University.
On This Page
- Fastest Way to Install Playwright
- What Is Playwright?
- Install Playwright
- Install Playwright via CLI
- Install Playwright in VS Code
- HInstall Playwright in Other Languages
- Install Playwright in Docker & CI/CD
- Test Playwright Scripts on Real Browsers
- Troubleshoot Common Playwright Issues
- Configure Playwright After Installation
- Conclusion
- Citations
Installing Playwright FAQs
Did you find this page helpful?
More Related Learning Hubs
TestMu AI forEnterprise
Get access to solutions built on Enterprise
grade security, privacy, & compliance
- Advanced access controls
- Advanced data retention rules
- Advanced Local Testing
- Premium Support options
- Early access to beta features
- Private Slack Channel
- Unlimited Manual Accessibility DevTools Tests