

Power Your Software Testing with AI Agents and Cloud
The Native AI-Agentic Cloud Platform to Supercharge Quality Engineering. Test Intelligently and Ship Faster.


- TestMu AI (Formerly LambdaTest)
- /
- Blog
- /
- How to Use Playwright Locators: A Detailed Guide
How to Use Playwright Locators: A Detailed Guide
Learn every Playwright locator with runnable examples: get_by_role, test IDs, CSS and XPath, filtering, chaining, and how to fix a strict mode violation.
Last Updated on:
Most flaky end-to-end tests fail for one of two reasons: the test acted before the element was ready, or it targeted the element by something the developers changed. Playwright locators are built to remove both. A locator re-resolves against the live DOM every time you use it, and it waits for the element to be actionable before it clicks or types, so there is nothing to sleep on and nothing to retry by hand.
This guide covers every built-in Playwright locator with runnable Python examples, the methods you call on a locator such as fill(), first, nth, all, and evaluate(), and the filtering and chaining you need when one locator matches more than a single element. Each example runs against the TestMu AI eCommerce Playground, so you can copy it and see the same result.
Key Takeaways
A Playwright locator is an object that describes how to find an element and re-resolves it against the live DOM every time you act on it. Before each action it waits until the element is visible, stable, enabled, editable, and able to receive events, which removes most timing flakiness from end-to-end tests.
Which Playwright locator should you use first?
- get_by_role(): The recommended first choice, and resilient to DOM changes: yes. It matches on ARIA role plus accessible name, so it survives a redesign that changes classes or DOM depth. Example: page.get_by_role("button", name="Search").
- get_by_test_id(): The explicit contract for elements with no stable visible text. Playwright reads the data-testid attribute by default, and set_test_id_attribute() points it at a different attribute.
- page.locator(): Takes a raw CSS or XPath string and should be the last resort. Resilient to DOM changes: no, because structural selectors break when markup changes. Playwright has no get_by_id(), so an id is targeted as page.locator("#input-email").
- Strict mode: A locator matching more than one element raises an error instead of acting on the first match. Narrow it with first, nth(index), or filter() before calling an action.
- Playwright's fill() method: Clears an input and types a value in one call, after waiting for the field to be visible, enabled, and editable. Use press_sequentially() when a field needs per-character key events.
- Playwright's evaluate() method: Runs a JavaScript function against the matched element and returns the result, for values no built-in method exposes. evaluate_all() does the same across every match.
- Locator versus selector: A selector is the string that describes an element. A locator is the object wrapping that string, and only the locator adds auto-waiting, re-resolution, and strict mode.
Running locator suites at scale
Auto-waiting is built in, so no fixed sleeps are needed and no separate wait call is required before an action. What locator choice cannot fix is wall-clock time on a large suite: TestMu AI runs Playwright tests in parallel across 3,000+ real browser and OS combinations, so a locator-heavy suite finishes in minutes rather than hours.
What Are Playwright Locators?
Playwright locators allow your test scripts to interact with a specific element on a web page. They are equipped with auto-wait and retry abilities. This means the locator will wait for the elements to load and keep retrying automatically before throwing TimeoutError.
Playwright gives you two ways to create a locator. The page.locator() method takes a CSS or XPath selector, while built-in locators such as get_by_role() and get_by_text() target elements by role, text, and other user-facing attributes. Both are valid, but the built-in locators are recommended for most cases because they are easier to read and hold up better when the DOM changes.

Key features of Playwright locators
- Built-in support for auto-wait and retry, helping write resilient and non-flaky tests.
- Built-in methods are available to perform various actions on located elements.
- The page object offers the Playwright wait for navigation to pause until specific actions on a web page are completed or a timeout/exception occurs.
- For tests that depend on a specific backend call rather than a navigation event, Playwright waitForResponse synchronizes locator-driven actions with the matching API response, removing flakiness in workflows that load data after a click or form submission.
- When the backend isn't available or you need to test failure paths, pair locators with Playwright mock API testing, which uses page.route() to fulfill, modify, or block requests with custom responses.
- Locators work on the most up-to-date DOM every time action is performed, ensuring reliable tests.
- Built-in locators capable of locating elements using ARIA roles, text, alt-text, placeholders, titles, labels, and custom test-ids.
- Ability to chain and filter locators provides precision to narrow the search for the element.
Enhance your testing strategy with our detailed guide on Playwright Headless Testing. Explore further insights into Playwright's capabilities in this guide.
How Playwright Identifies Elements
A Playwright locator does not query the page the moment you define it. It is a lazy description of how to find an element, and it resolves only when you perform an action such as a click, fill, or assertion, always against the latest DOM. This is why locators stay reliable on dynamic pages where elements load, move, or re-render after the first paint.
Before acting on the element it found, Playwright runs a set of auto-wait actionability checks and keeps retrying until they pass or the action times out. According to the Playwright actionability documentation, the core checks are:
- Visible - the element has a non-empty bounding box and is not set to visibility: hidden.
- Stable - the element has kept the same bounding box for at least two consecutive animation frames, so it is not mid-animation.
- Receives Events - the element is the actual hit target at the action point, not hidden behind an overlay or modal.
- Enabled - the element is not disabled.
- Editable - for input actions like fill(), the element is enabled and not read-only.
Because these checks are built into every locator, you rarely need manual sleeps or explicit waits. The same auto-wait behavior powers the assertions used throughout this guide: when a test calls expect(locator).to_be_visible(), Playwright polls the DOM until the condition holds or the timeout expires, which is what keeps the examples below stable across browsers.
Types of Playwright Locators
Playwright ships seven built-in locators. Every one of them is shown below against the same snippet of markup, so you can match the locator to the thing you can actually see on the page.
<form>
  <label for="email">E-Mail Address</label>
  <input id="email" type="text" placeholder="you@example.com">
  <img src="/logo.png" alt="Poco Electro">
  <a href="/help" title="Help">Need help?</a>
  <button type="submit" data-testid="signin">Sign in</button>
</form>| Locator | What it matches | Example against the markup above |
|---|---|---|
| get_by_role() | ARIA role plus accessible name | page.get_by_role("button", name="Sign in") |
| get_by_label() | A form control by its associated label text | page.get_by_label("E-Mail Address") |
| get_by_placeholder() | An input by its placeholder text | page.get_by_placeholder("you@example.com") |
| get_by_text() | Any element by the text it contains | page.get_by_text("Need help?") |
| get_by_alt_text() | An image by its alt attribute | page.get_by_alt_text("Poco Electro") |
| get_by_title() | An element by its title attribute | page.get_by_title("Help") |
| get_by_test_id() | The data-testid attribute, or another attribute you configure | page.get_by_test_id("signin") |
Anything those seven cannot reach falls to page.locator(), which takes a raw CSS or XPath string.
Playwright Locators vs Selectors
The two words are often used interchangeably, which causes real confusion when reading the docs. A selector is a string that describes how to find an element, such as "#input-email" or "xpath=//button". A locator is an object that wraps a selector and adds the behaviour that makes Playwright reliable: it re-resolves against the live DOM on every action, applies auto-waiting, and enforces strict mode.
You create a locator from a selector by passing the string to page.locator(). The built-in methods such as get_by_role() build the selector for you, which is why they read better and break less often.
| Aspect | Selector | Locator |
|---|---|---|
| What it is | A string describing how to find an element | An object that wraps a selector and knows how to act on it |
| Example | "#input-email" | page.locator("#input-email") |
| When it resolves | Only when something passes it to a query | Lazily, and again on every action against the current DOM |
| Auto-waiting | No, it is only a string | Yes, it runs actionability checks before acting |
| Multiple matches | Undefined until it is used | Raises a strict mode error unless narrowed with first, nth, or filter |
The practical consequence is that a locator survives a re-render and a selector string does not carry any of that behaviour on its own. Storing page.locator("#input-email") in a variable and reusing it after the page updates is safe, because it looks the element up again each time you act on it.
CSS vs XPath vs Role-Based Locators
Playwright lets you find the same element in more than one way: through built-in, user-facing locators like get_by_role(), or through raw CSS and XPath selectors passed to page.locator(). Choosing the right approach is what keeps a suite readable today and resilient when the UI changes tomorrow.
The table below compares the three approaches using the same kind of button we located earlier on the TestMu AI eCommerce Playground.
| Approach | Example (Python) | How it matches | Best for |
|---|---|---|---|
| Role-based | page.get_by_role("button", name="Search") | Accessibility tree (ARIA role plus accessible name) | User-facing elements like buttons, links, and inputs; most resilient to markup changes |
| CSS selector | page.locator("css=button.type-text") | DOM structure, classes, and attributes | Fast, familiar targeting when a stable class or id exists |
| XPath | page.locator("xpath=//button[@type='submit']") | DOM tree traversal and axes | Traversals CSS cannot express; the most brittle option |
When to Use Which Locator
The Playwright locators guide recommends prioritizing role locators because they reflect how users and assistive technology perceive the page. A practical order of preference looks like this:
- get_by_role() - matches what assistive technology sees. Survives class, id, and DOM-depth changes. Use it for every button, link, checkbox, and heading.
- get_by_label() - the correct way to reach a form input, because the label is the thing the user actually reads.
- get_by_placeholder() - use only when a field has no label. A placeholder is not a label substitute, but it is more stable than a CSS class.
- get_by_text() - best for non-interactive copy in a div, span, or paragraph. Avoid it for buttons, where role plus name is stricter.
- get_by_alt_text() - for images, since alt text is required for accessibility and therefore rarely deleted.
- get_by_title() - narrow use. The title attribute is often absent and is invisible to touch users.
- get_by_test_id() - an explicit contract for elements with no stable user-facing text. It never breaks on a redesign, but it is invisible to users, so it tests nothing about accessibility.
- page.locator() with CSS or XPath - the last resort. It is the only option that depends on markup structure, so it is the only one a redesign can silently break.
Walk that list from the top and stop at the first entry that can identify your element. The ordering is not stylistic: entries 1 to 6 describe the element the way a user perceives it, entry 7 is a contract you own, and entry 8 is the only one coupled to markup.
The reason for this order is stability. Playwright notes that CSS and XPath selectors are tied to the DOM structure and can break when that structure changes, while role and text locators track what the user actually sees. A button keeps its role and label through a redesign far more often than it keeps its nth-child position or CSS class.
Installing and Setting Up Playwright
In this section, we will learn how to install Playwright and set it up in a dedicated virtual environment:
- Create a dedicated folder for our project called playwright locators (This step is not mandatory but good practice).
- Inside the folder we just created, use the built-in venv module to create a virtual environment named playwright locators.
- Activate the virtual environment by calling the activate script.
- Install the Playwright module using pip install pytest-playwright.
- Lastly, install the required browsers using the playwright install.

All tests in this blog were run on Playwright 1.62.0 for Python with pytest-playwright 0.8.0.
These examples use Playwright's Python sync_api, which wraps the async API and drives the event loop for you. Reach for async_api only when your test code is already asynchronous or you need concurrent control of several pages; for the locator work in this guide the sync API keeps the examples readable.
When executed, the Python test generates code using sync_api, as shown in the screenshot below:
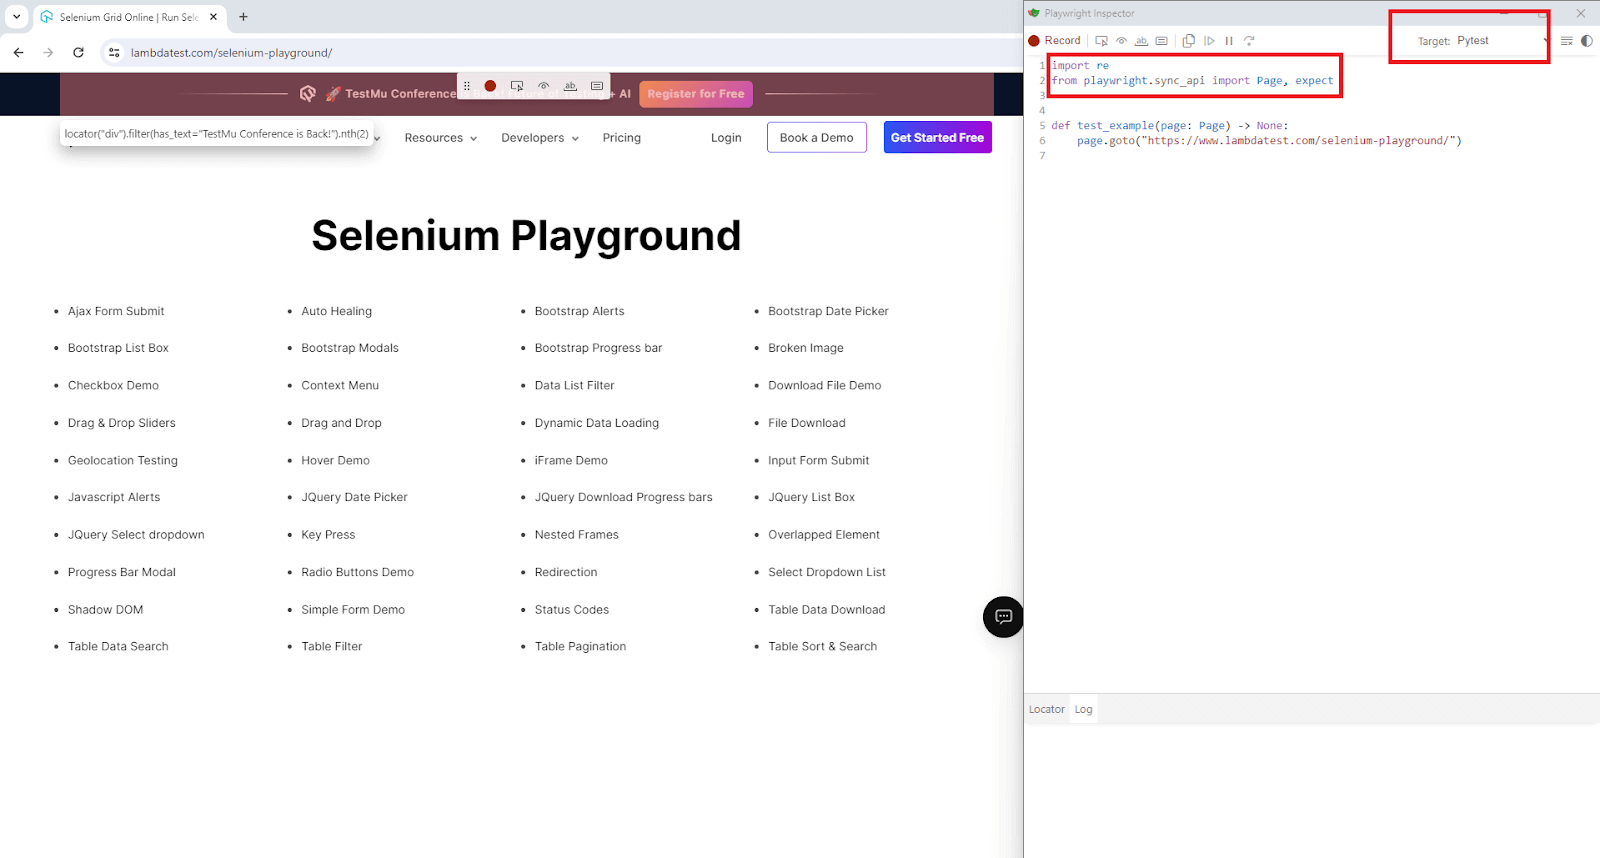
So, when running the Playwright test, feel free to use sync_api unless you need fine control over the request behavior in which you can use async_api.
How to Use Playwright Locators?
Every locator works the same way in three steps: create it, act on it, then assert on it. This is the smallest complete test that does all three, and it runs as written once you have installed pytest-playwright.
from playwright.sync_api import expect

def test_search_button_is_visible(page):
    page.goto("https://ecommerce-playground.lambdatest.io/")
    search = page.get_by_role("button", name="Search")   # 1. create the locator
    expect(search).to_be_visible()                        # 2. assert on it
    search.click()                                        # 3. act on it
The page argument is the fixture pytest-playwright provides, so there is nothing to wire up. Nothing is queried when the locator is created on the second line: Playwright resolves it when expect() and click() run, which is why the same locator object stays valid even if the page re-renders in between.
Every example that follows uses that same page fixture against the TestMu AI eCommerce Playground, so you can paste any of them into a test file and run it. To run the identical tests across web browsers online instead of your laptop, see the cloud grid section near the end.

Locating Elements by Role in Playwright
The locator get_by_role() allows locating elements by their ARIA role, ARIA attributes, and accessible name. ARIA stands for Accessible Rich Internet Applications. It's a set of attributes that can be added to HTML elements to help people who use assistive technologies, like screen readers, navigate and understand web content more easily.
ARIA roles are like labels for different parts of a website, like headings, buttons, and links. These labels help people who use assistive technologies understand the different parts of the website and how to use them.
Let's understand the get_by_role() locator using the TestMu AI eCommerce Playground website.
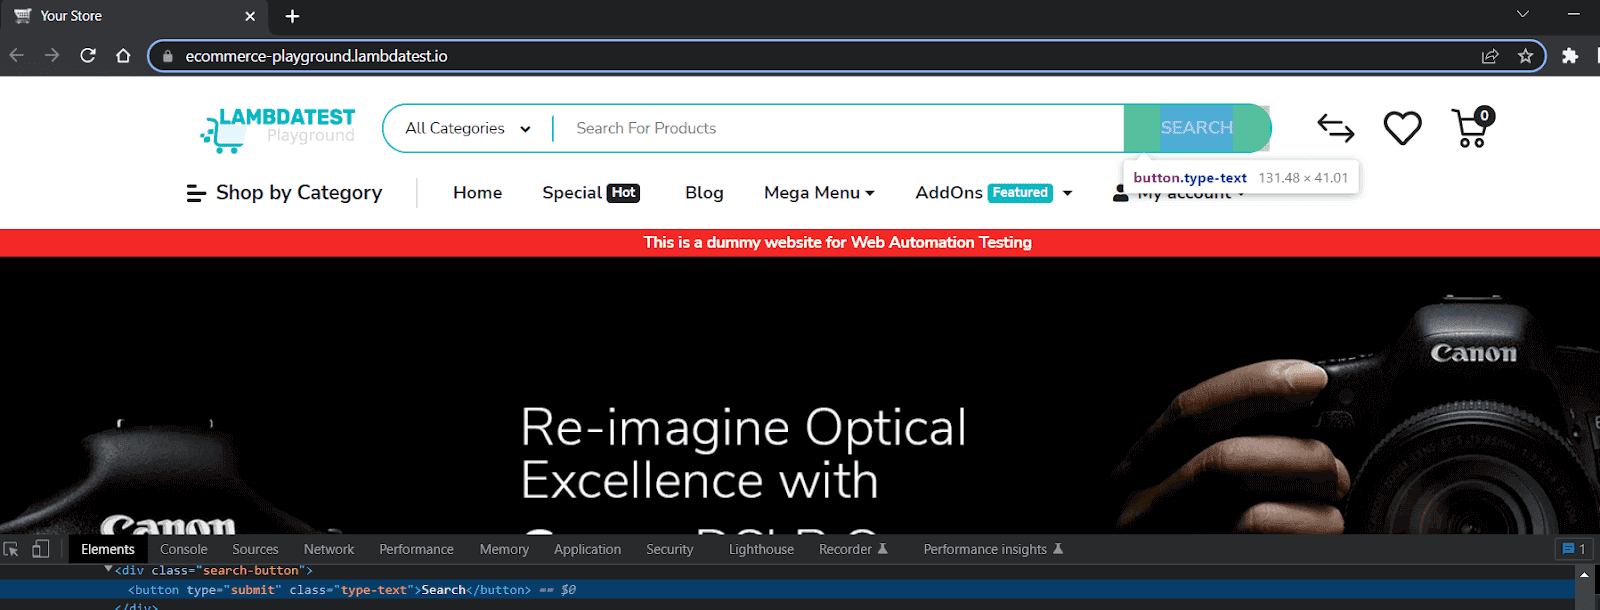
Test Scenario:
- The demo website home page should contain the Search button.
- The Search button should have a CSS class type-text.
Implementation:
def test_homepage_contains_search_button(page):
    page.goto("https://ecommerce-playground.lambdatest.io/")
    search_button_locator = page.get_by_role(role="button", name="Search")
    expect(search_button_locator).to_have_class("type-text")
Code Walkthrough:
- Upon inspecting the homepage, we see that Search is a button for the type submit with a CSS class "type-text" assigned to it.
- Use the Playwright locator get_by_role() with arguments as role="button" and name="Search".
- The expect() method then checks if the located element has class type-text using the to_have_class() method.
For get_by_role(), only the role argument is mandatory. All other arguments are optional, including the name we used. An important optional argument is exact. It can be used to force an exact case-sensitive and whole-string match.
Run any single example with pytest -k and the test name:
pytest -v -k "test_homepage_contains_search_button"
Locating Elements by Text in Playwright
The locator get_by_text() allows finding elements by the text it contains. This Playwright locator can match exact string and substring and allows using regular expressions.
It is recommended to find non-interactive elements such as those contained within HTML tags div, span, and p. Let's see this Playwright locator in action using a few scenarios to explore exact matches and regular expressions.
For this, we will again use the TestMu AI eCommerce Playground website.
Test Scenario:
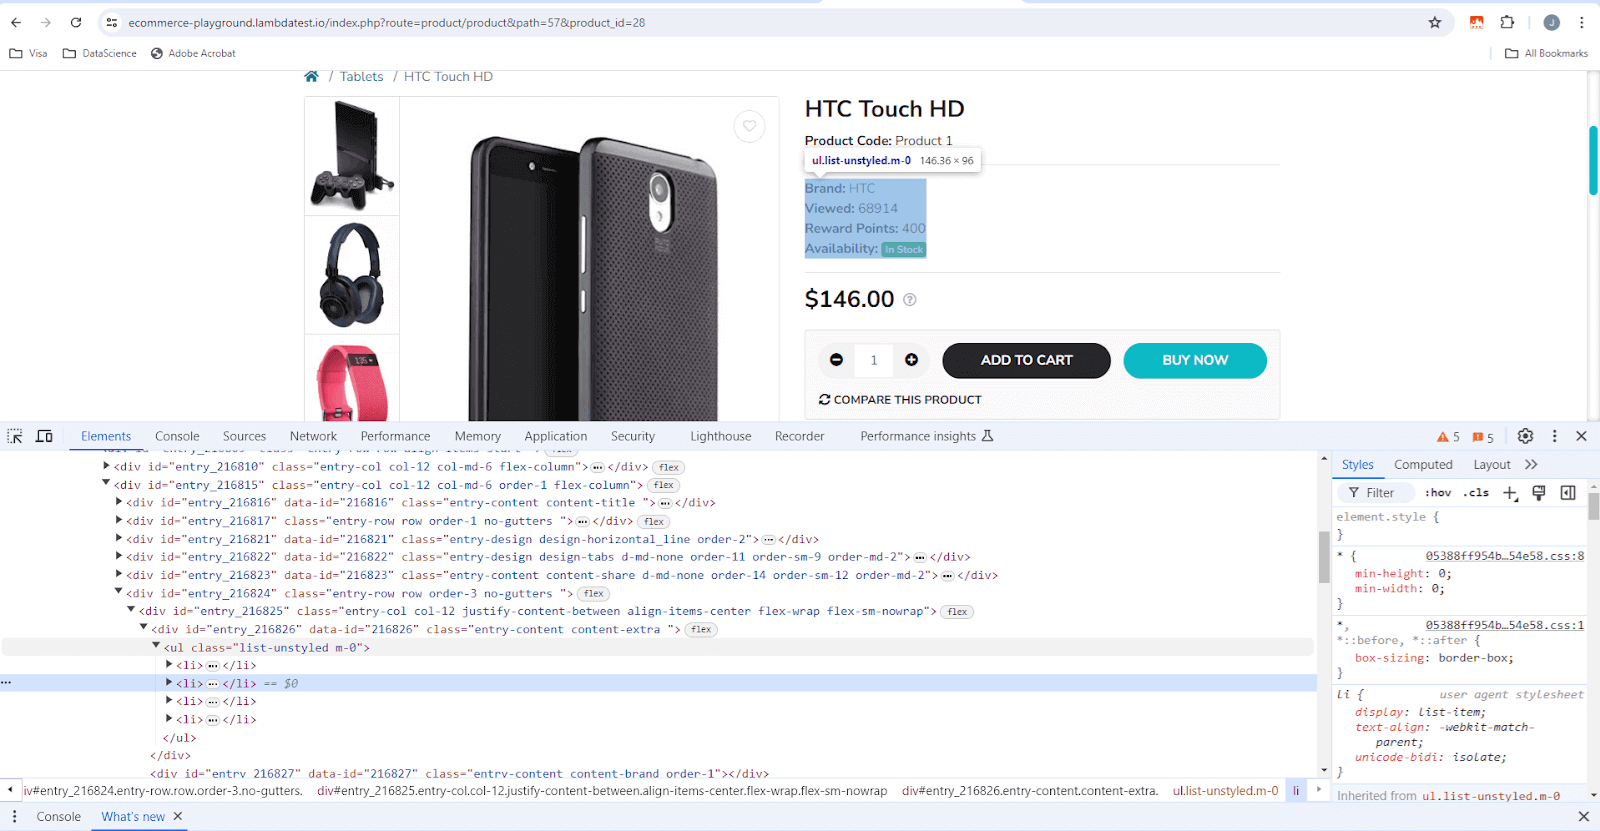
- The product page of the TestMu AI eCommerce Playground website should contain the exact text for these product details: Brand, Viewed, Reward Points, and Availability.
Implementation:
def test_product_details_text_should_be_visible(page):
    page.goto(
        "https://ecommerce-playground.lambdatest.io/index.php?route=product/product&path=57&product_id=28"
    )
    brand_text_locator = page.get_by_text(text="Brand:", exact=True)
    viewed_text_locator = page.get_by_text(text="Viewed:", exact=True)
    points_text_locator = page.get_by_text(text="Reward Points:", exact=True)
    availability_text_locator = page.get_by_text(text="Availability", exact=True)
    expect(brand_text_locator).to_be_visible()
    expect(viewed_text_locator).to_be_visible()
    expect(points_text_locator).to_be_visible()
    expect(availability_text_locator).not_to_be_visible()
Code Walkthrough:
- Upon inspecting the product page, we see the details within the <span> tag.
- The steps to navigate the product page remain the same as in the previous test case.
- In the next steps, we use the get_by_text() Playwright locator to match the texts for Brand:, Viewed:, and Reward Points:. We use the expect() assertion on each of the three locators and call the to_be_visible() method.
- For the 'Availability', we exclude the ':' to demonstrate that the exact argument works. Since we know the exact match, in this case, the test will fail on the expect() assertion, and we call the not_to_be_visible() method.
pytest -v -k "test_product_details_text_should_be_visible"
Locating Form Elements by Label in Playwright
Almost all websites have form fields, and most form controls usually have dedicated labels that could be conveniently used to interact with the form. Playwright locators provide a convenient way of locating form elements using the get_by_label() locator.
Let's jump into a demo using the TestMu AI eCommerce Playground website.
Test Scenario:
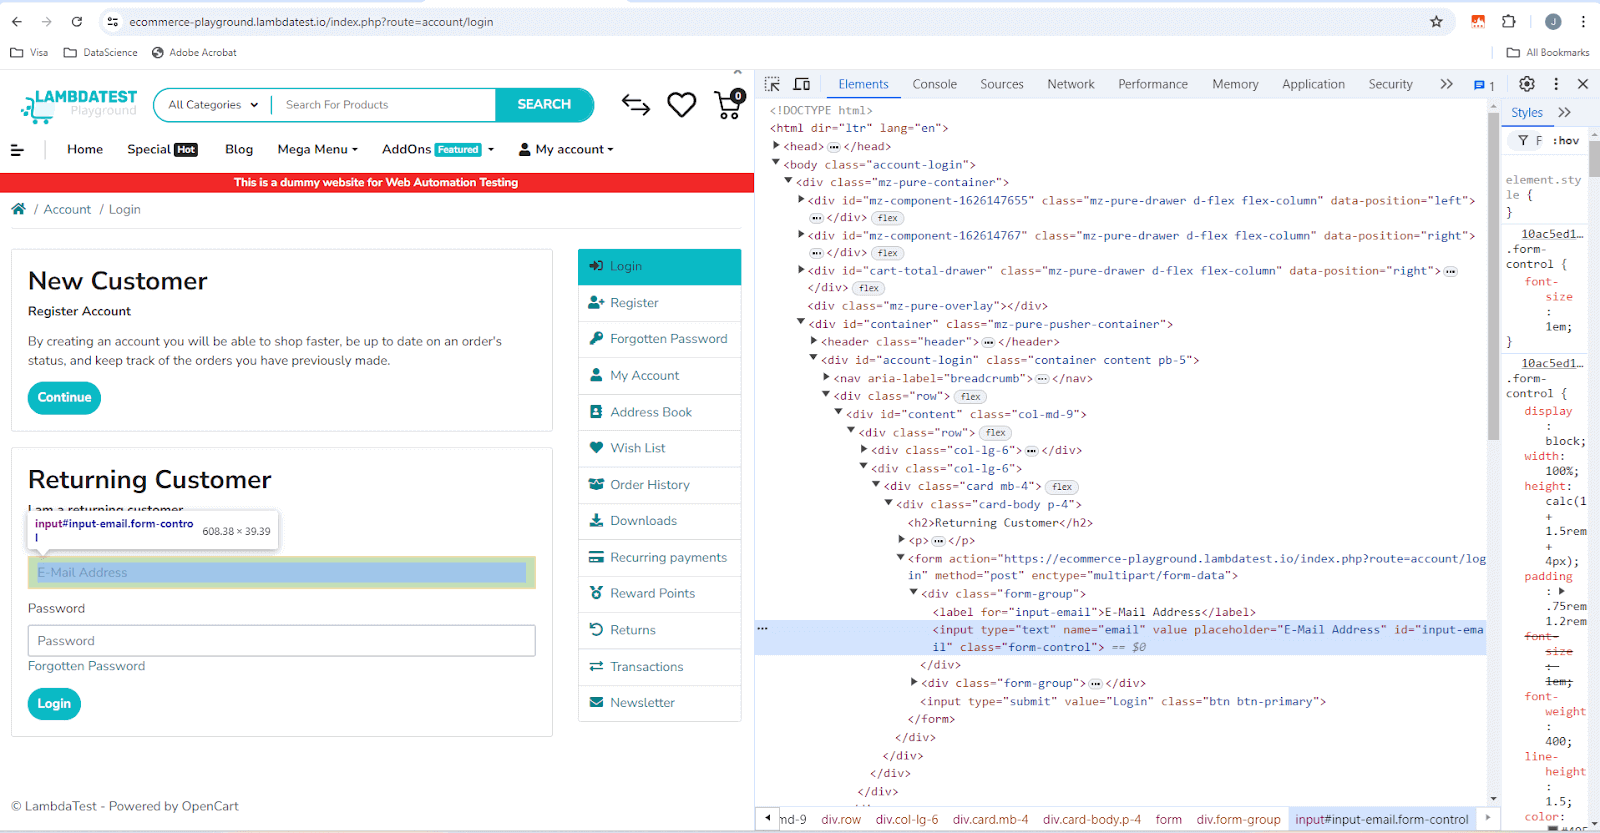
- The login form should have exactly one Email Address label.
- The login form should have exactly one Password label.
Implementation:
def test_exactly_one_email_and_password_field(page):
    page.goto(
        "https://ecommerce-playground.lambdatest.io/index.php?route=account/login"
    )
    email_address_locator = page.get_by_label(text="E-Mail Address", exact=True)
    password_locator = page.get_by_label(text="Password", exact=True)
    expect(email_address_locator).to_have_count(1)
    expect(password_locator).to_have_count(1)
Code Walkthrough:
- The code snippet until the goto() method will keep the login page the same.
- Initialize two locators using get_by_label(), one of which is an email and password with the exact=True, to confirm that only one login form element exists.
- On the expect() assertion, we call the method to_have_count(1) to test only one of each email and password field.
pytest -v -k "test_exactly_one_email_password_field"
Locating Input Elements by Placeholder in Playwright
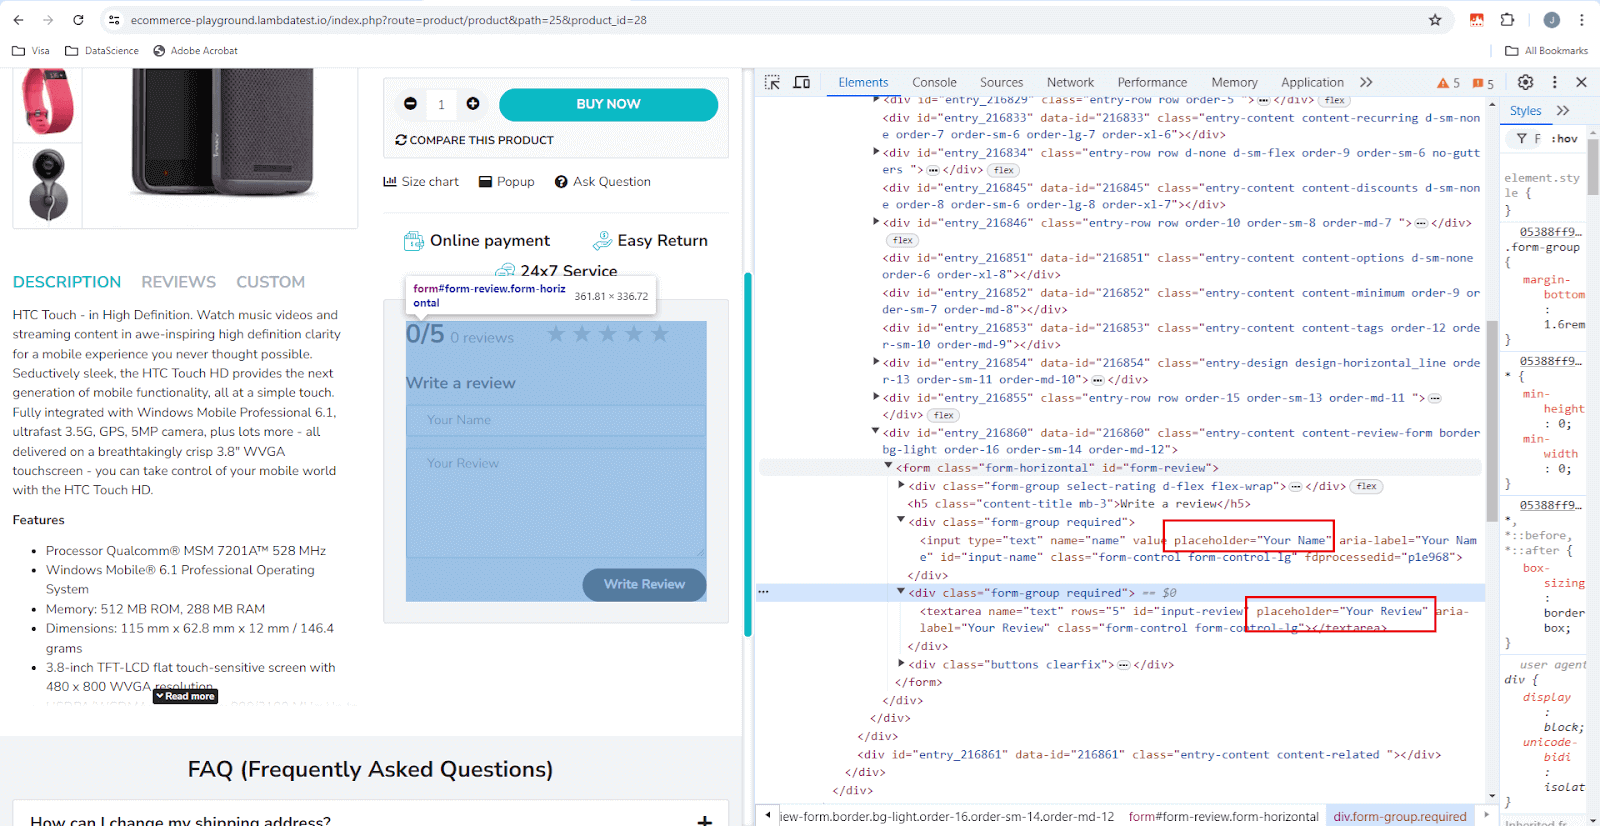
Most websites have several forms for login, registration, reviews, and customer support. Forms usually have a placeholder text to assist the user in correctly filling out forms.
Playwright locator get_by_placeholder() comes in handy when locating elements using the placeholder text. The TestMu AI eCommerce Playground website has a review form that can be used to explore this locator.
Test Scenario:
- The review form should have one field for the customer name.
- The review form should have one field for customer review.
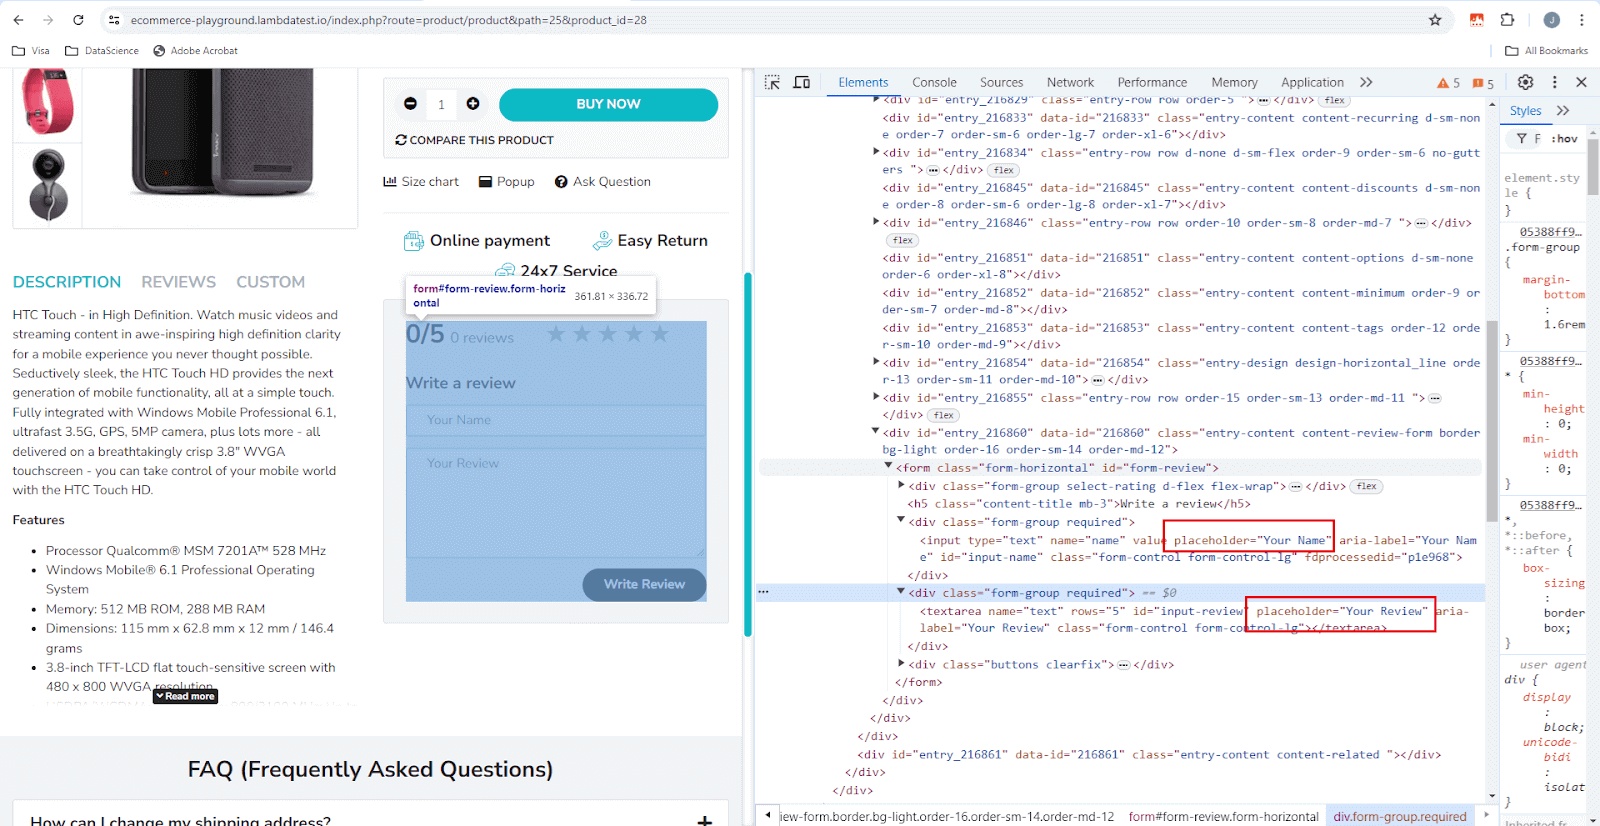
Implementation:
def test_review_form_has_customername_customerreview_fields(page):
    page.goto(
        "https://ecommerce-playground.lambdatest.io/index.php?route=product/product&path=25&product_id=28"
    )
    name_locator = page.get_by_placeholder(text="Your Name", exact=True)
    review_locator = page.get_by_placeholder(text="Your Review", exact=True)
    expect(name_locator).to_have_count(1)
    expect(review_locator).to_have_count(1)
Code Walkthrough:
- We use the name of the placeholders as an argument to the get_by_placeholder() locator. We also only look for an exact matching by setting the argument exact=True.
- Calling to_have_count(1) on the expect() assertion helps to test our scenario of only one reviewer name field and review input field.
pytest -v -k "test_review_form_has_customername_customerreview_fields"
Locating Image Elements by Alt Text in Playwright
All websites have images, and all images must have an alt-text. The reason it's important to have alt-text is beyond the scope of this blog. Still, to provide a brief explanation, alt-text is important for accessibility, user experience, and image search SEO.
Playwright has an efficient get_by_alt_text() locator to locate image and area elements using the alt-text attribute.
Test Scenario:
- The logo with alt-text="Poco Electro" should be visible.
Implementation:
def test_logo_with_alt_text_should_be_visible(page):
    page.goto(
        "https://ecommerce-playground.lambdatest.io/index.php?route=common/home"
    )
    logo_locator = page.get_by_alt_text(text="Poco Electro", exact=True).first
    expect(logo_locator).to_be_visible()
Code Walkthrough:
- We just get the alt-text from the Chrome Developer Tools and pass it onto the get_by_alt_text() locator.
- Since there could be multiple uses of the same alt-text, we use the attribute first to narrow down our results to the first element.
- The expect() then asserts if the selected element by the locator is visible.
pytest -v -k "test_logo_with_alt_text_should_be_visible"
Locating Elements by Title in Playwright
The HTML title attribute specifies additional information about an element. It is most commonly used on the <a> and <img> elements to provide a text description for screen readers and other assistive technologies. The text within the title attribute will typically appear as a tooltip when the mouse pointer hovers over the element.
We can use the get_by_title() Playwright locator to locate elements by title. The TestMu AI eCommerce Playground uses the same title text for every image in a product gallery. Hence, our locator will return more than one element(20).
Test Scenario:
- Twenty elements with title='HTC Touch HD' should be present.
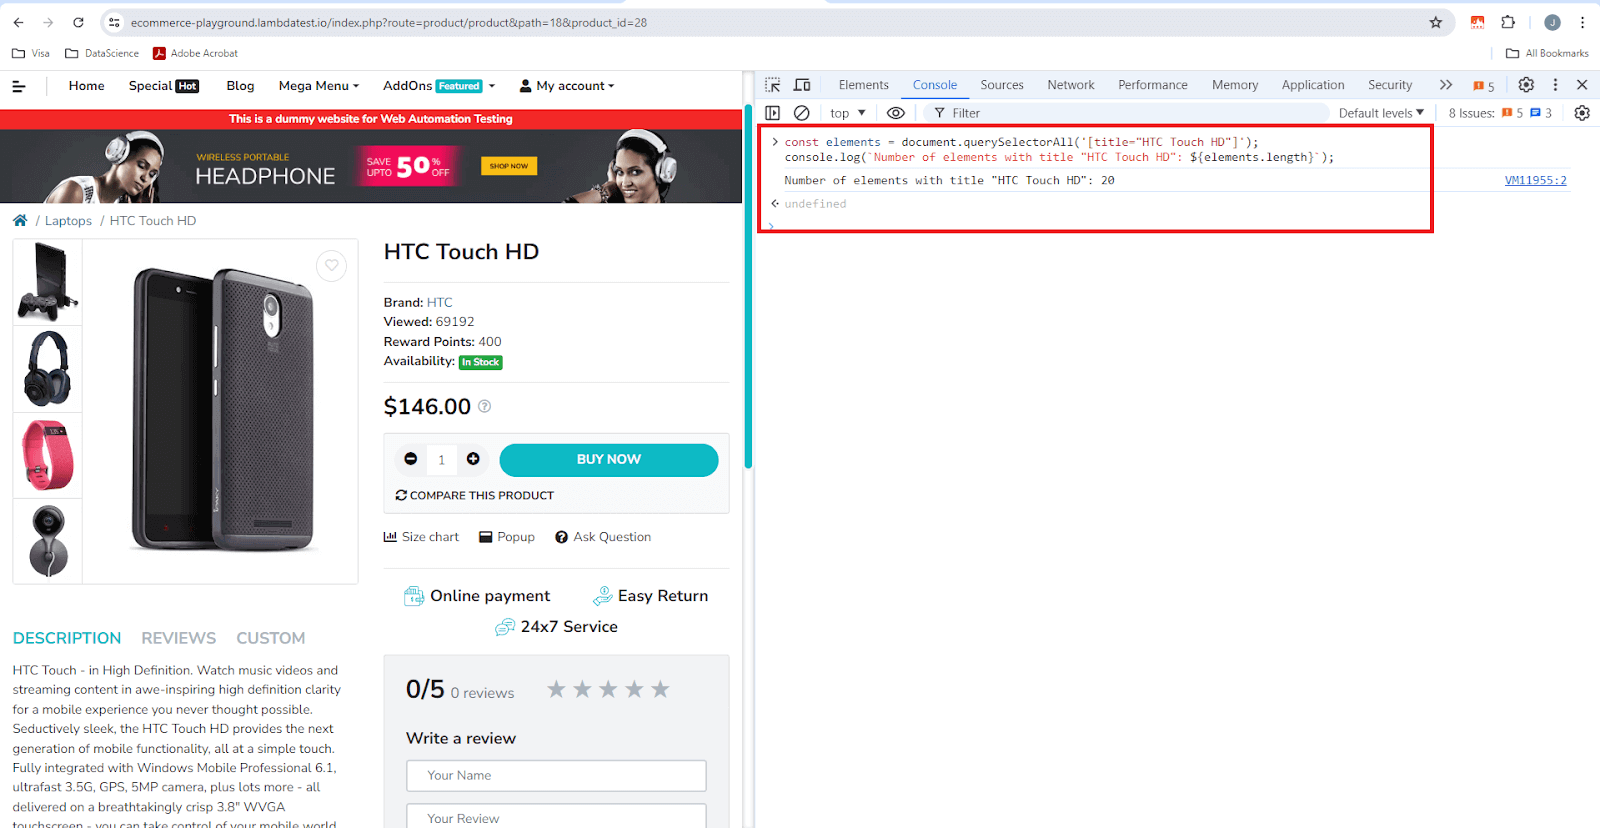
Implementation:
def test_display_count_of_all_elements_with_title_htc_touch_hd(page):
    page.goto(
        "https://ecommerce-playground.lambdatest.io/index.php?route=product/product&path=18&product_id=28"
    )
    alt_text_locator = page.get_by_title(text=re.compile("htc touch hd", re.IGNORECASE))
    expect(alt_text_locator).to_have_count(20)
Code Walkthrough:
- As usual, we open the product page using the page.goto() method.
- Next, we pass the title text we want to locate. Notice the use of the regex Python module to ignore the case.
- The expect() assertion then verifies if the locator can detect all 20 elements.
pytest -v -k "test_display_count_of_all_elements_with_title_htc_touch_hd"
Locating Elements by Test ID in Playwright
The Playwright locators are based on HTML tags or attributes assigned to each element. However, the challenge with this approach is that these tags, such as roles and attributes may change over time. If this happens, our tests will fail and must be refactored to account for the changes.
To avoid this, Test IDs are the most resilient way of testing a web application. Testers can define explicit Test IDs for elements. Using these Test IDs to query the elements ensures that our tests continue to work even if the role, text, or title of the elements changes.
Playwright provides the get_by_test_id() locator for locating elements by predefined Test IDs. The default attribute that the get_by_test_id() locator looks for is data-testid. This behavior can be easily changed by setting a custom attribute to look for playwright.selectors.set_test_id_attribute("data-pw").
Locating Elements by CSS and XPath
Playwright is fully flexible, and while the recommended locators should always be used, there might be scenarios of personal preferences for using CSS or XPath to locate elements. For such cases, we need to use the page locator(), which takes a selector to describe how to find the element on the page.
Below are some examples of creating locators using the page.locator() method using CSS and XPath. We can omit the CSS and XPath prefixes, which will work fine.
# CSS selectors - the css= prefix is optional
page.locator("css=button.type-text").click()
page.locator("button.type-text").click()
page.locator("#input-email").fill("user@example.com")

# XPath selectors - the xpath= prefix is optional when the string starts with // or ..
page.locator("xpath=//button[@type='submit']").click()
page.locator("//button[@type='submit']").click()
As evident from the examples above, CSS and XPath-based locators are tied to the Document Object Model (DOM) and quickly become complicated to read, maintain, and unreliable. The DOM is subject to change; hence, the locators that use them lead to non-resilient tests.
So, it's best to develop tests using the recommended built-in locators such as role and text, or even better, define explicit testing contracts using Test IDs.
Locating Multiple Elements by Regular Expressions in Playwright
While we saw exact matches while testing modern web applications, we frequently may need to look for approximate matches, and Playwright locators have us covered.
We can use regular expressions to locate multiple elements. Let's look at an example.
Test Scenario:
- On the product page of TestMu AI eCommerce Playground, there should be multiple occurrences of the brand HTC.
- There should be ten matches.
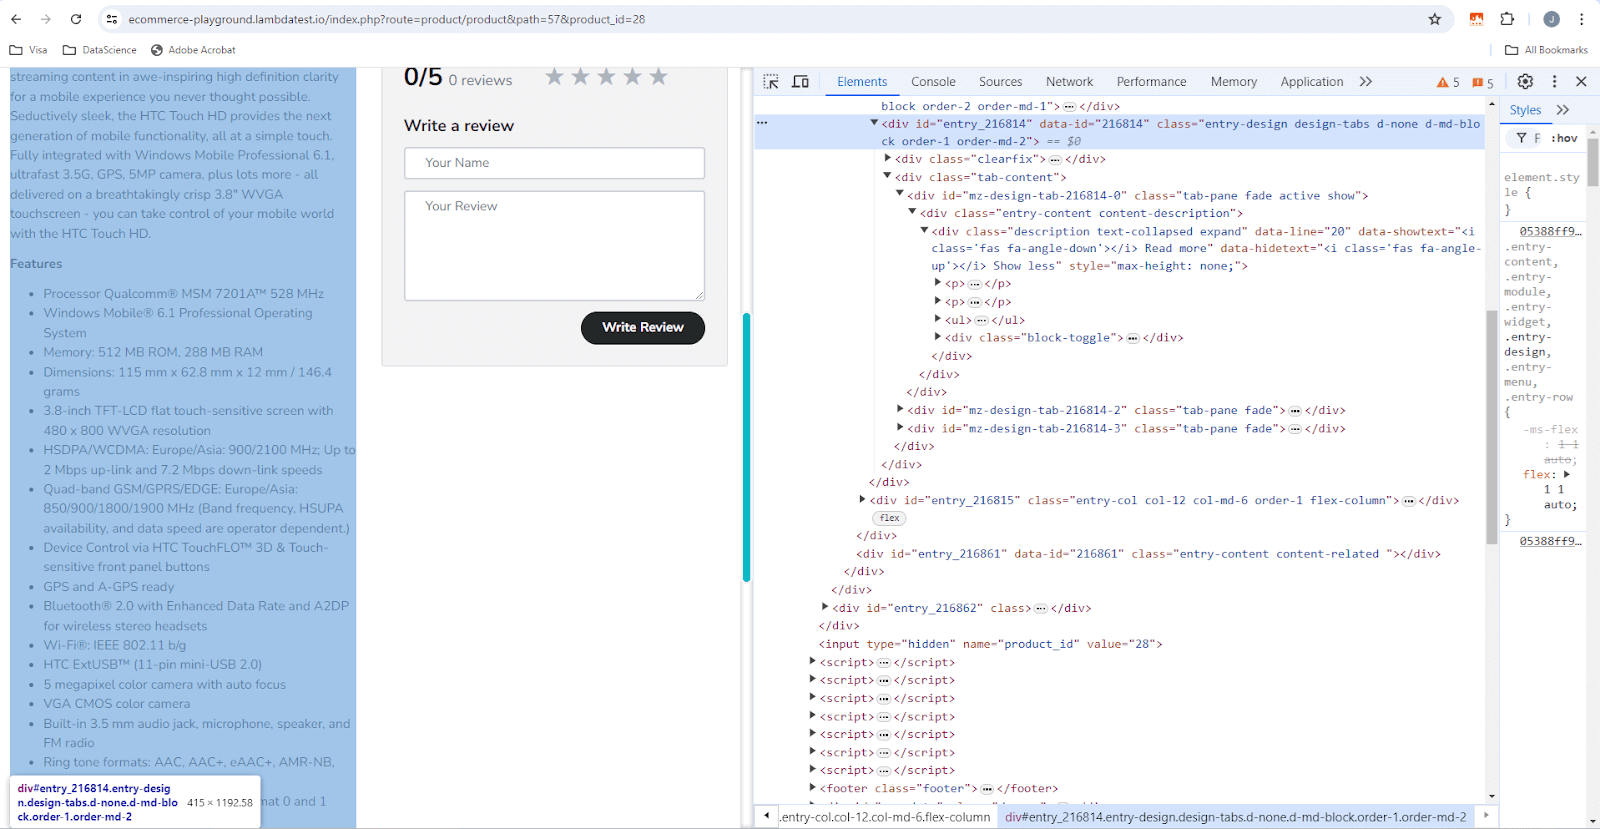
Implementation:
def test_product_name_to_appear_more_than_once(page):
    page.goto(
        "https://ecommerce-playground.lambdatest.io/index.php?route=product/product&path=57&product_id=28"
    )
    brand_name_locator = page.get_by_text(re.compile("htc", re.IGNORECASE))
    expect(brand_name_locator).to_have_count(10)

Code Walkthrough:
- Upon inspecting the product page, there are ten brand name 'htc' occurrences.
- In preparing the locator, we use the Python re module to match all occurrences and IGNORECASE.
- On the expect() assertion, we call the to_have_count() method to complete our test.
pytest -v -k "test_product_name_to_appear_more_than_once"
Locating Elements Using Playwright Test Generator
We have been writing the tests manually by inspecting the DOM. But since we are talking about an automation framework, it only makes sense that Playwright has something which can assist and automate part of locating elements on a web page. Playwright has a powerful feature called the Test Generator, which can help you locate the elements and make it easier to write tests.
The tool carries three names in practice: the docs call it Test Generator, the command is codegen, and the window that opens is titled Playwright Inspector. They all refer to the same thing.
To start the Test Generator, we simply use the command shown below:
playwright codegen https://ecommerce-playground.lambdatest.io/
Feel free to replace the URL with the website you intend to write tests for.
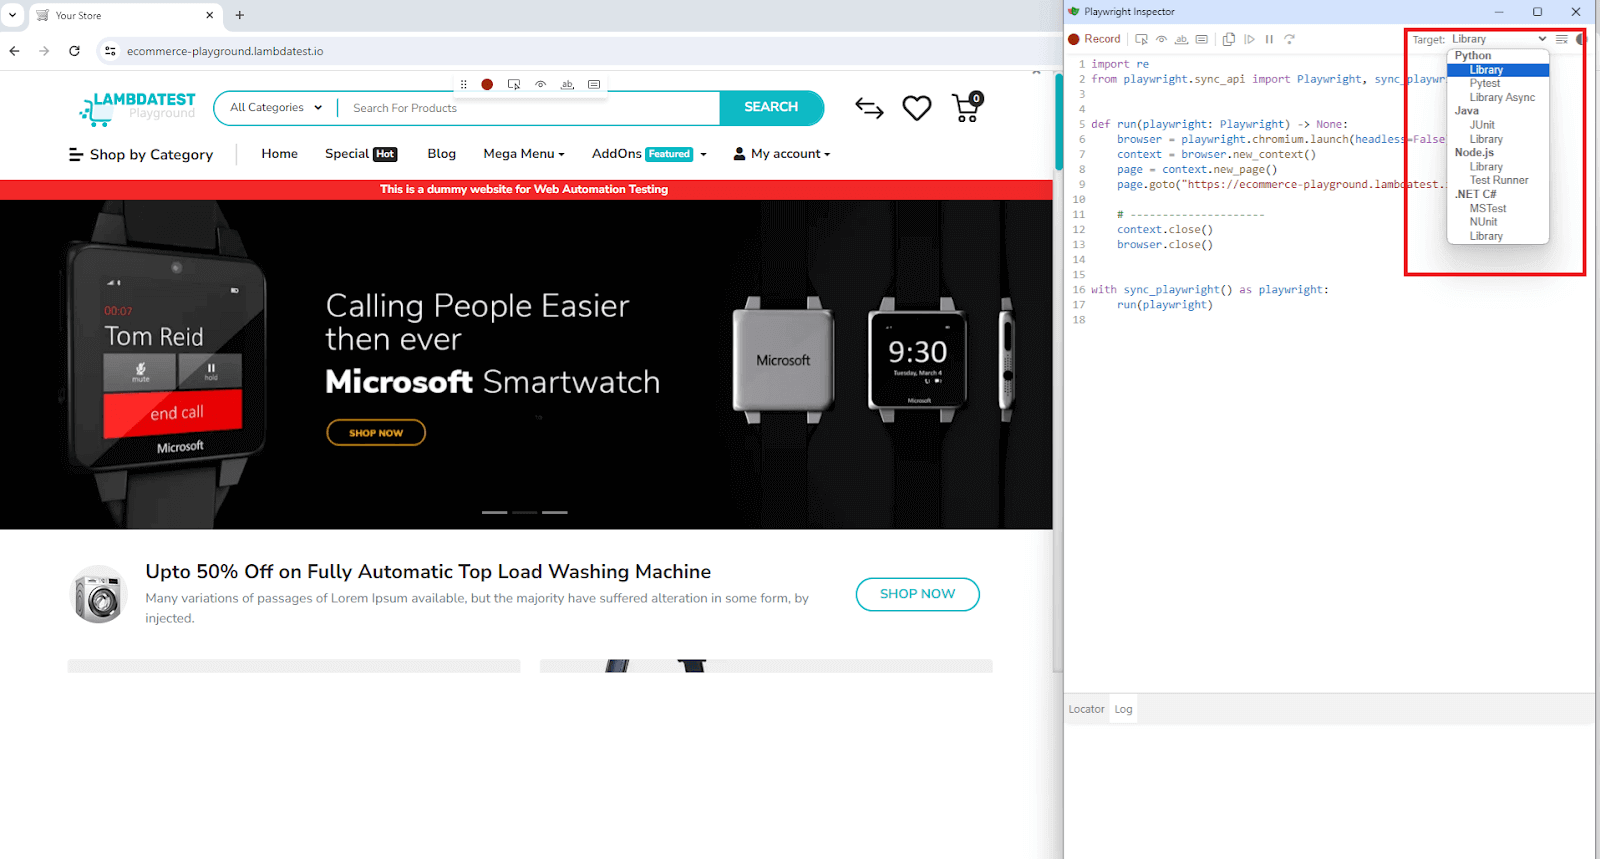
The Test Generator will generate the code for us based on our actions. The best thing about the Test Generator is that you can choose your intended programming language. I have chosen Python for this blog, but Playwright allows you to choose whichever you wish from the drop-down highlighted in red.
Based on your selection, the Test Generator will write the code for us.
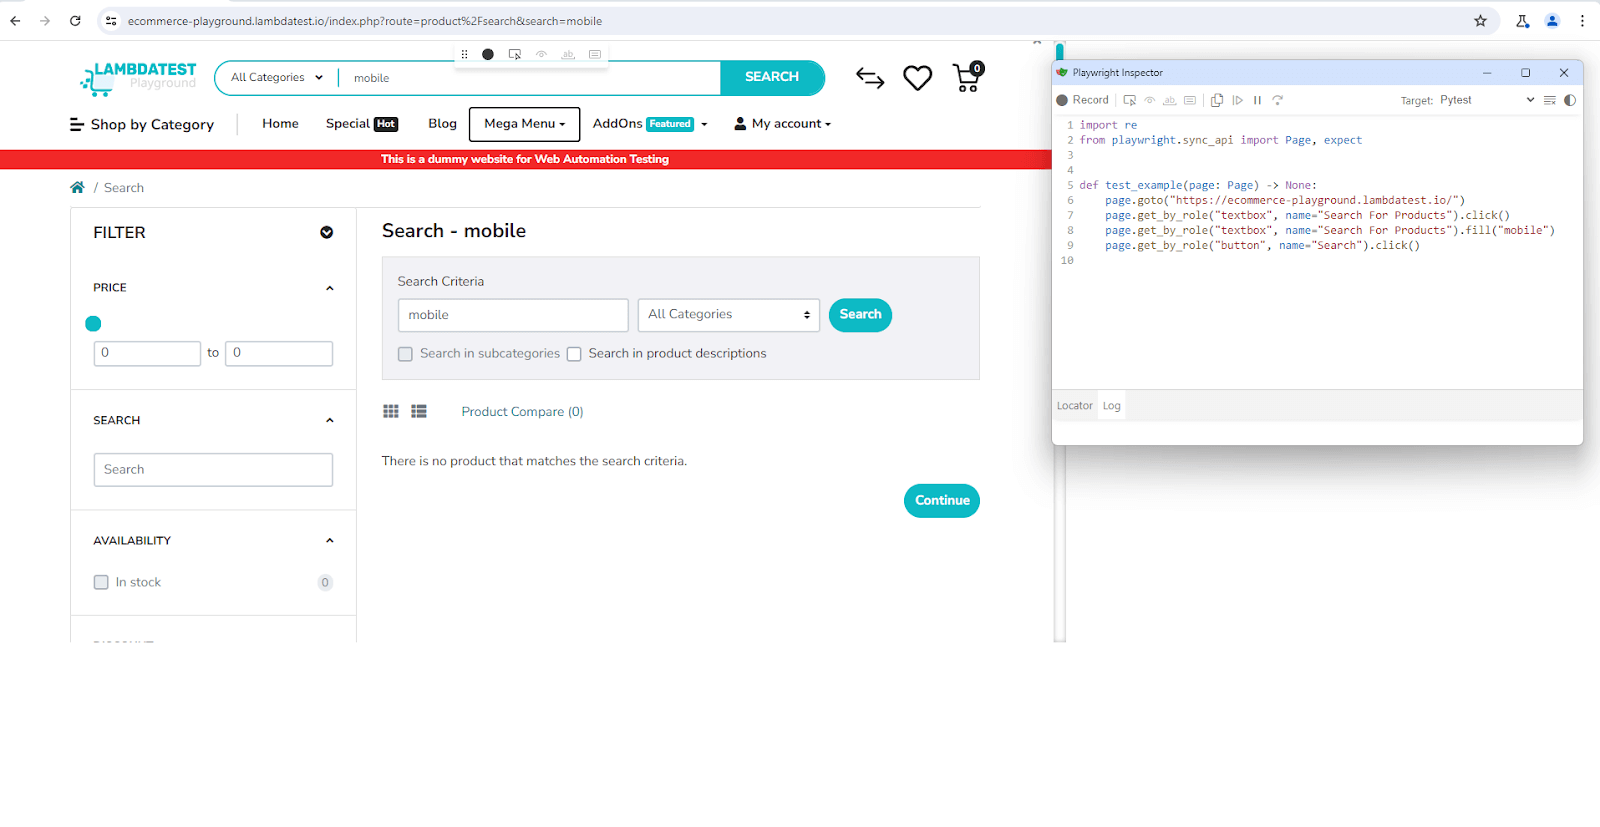
We want to locate the search bar, type in mobile, and hit the Search button. Here is the snapshot of the actions performed and the code the Test Generator was able to write code for us with all the locators. We can then use these locators to run tests using the expect() assertion.
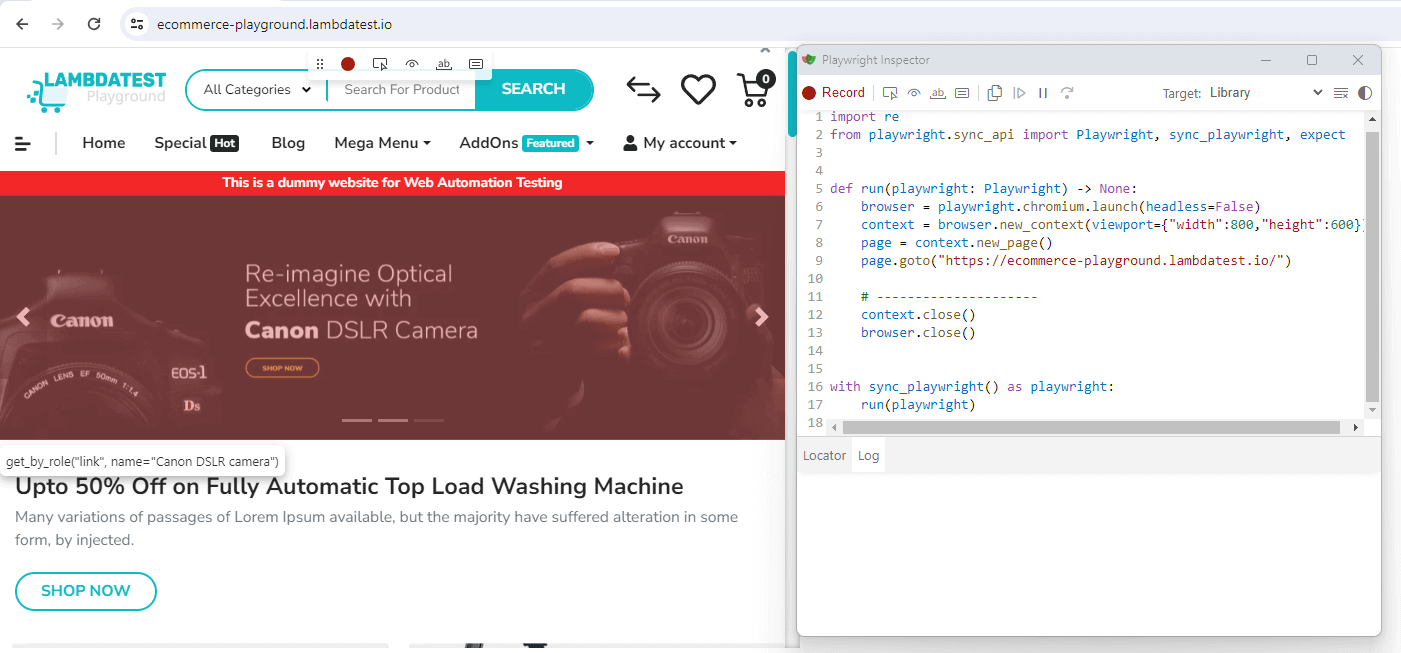
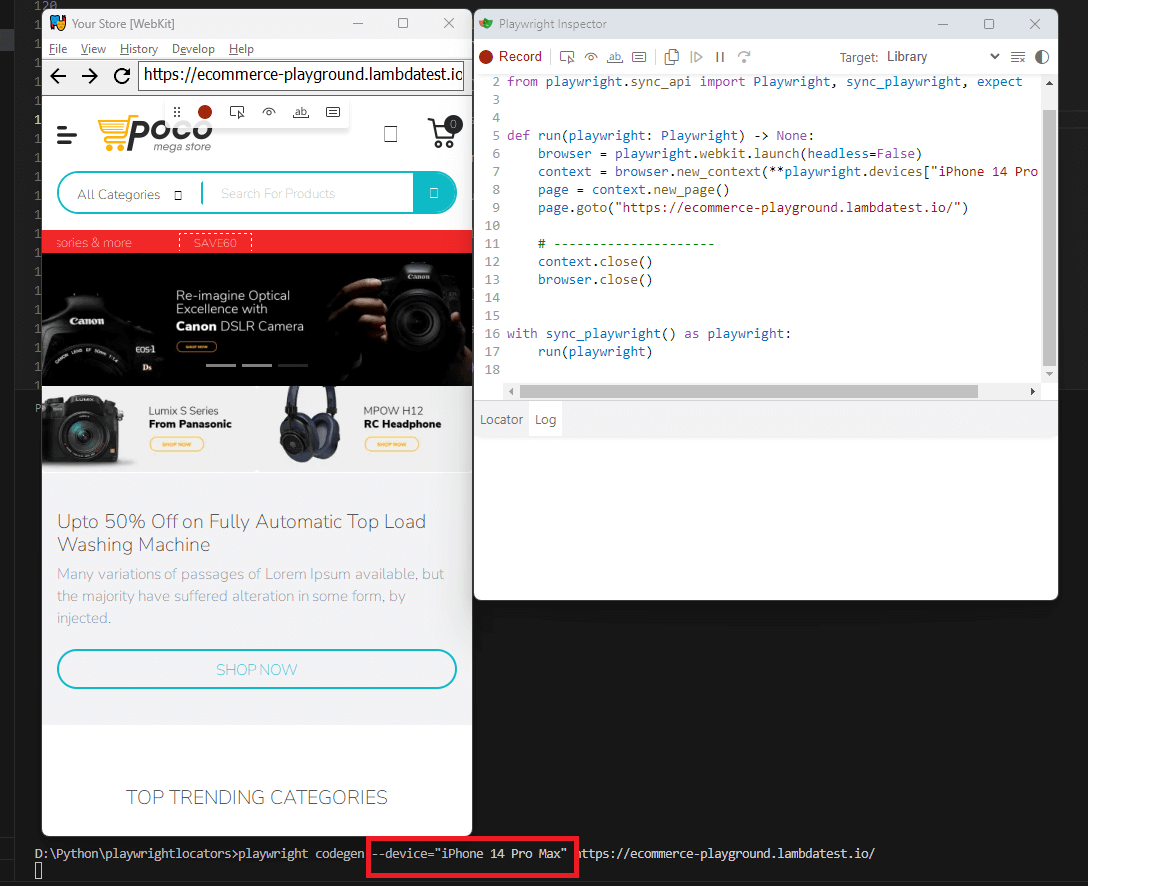
The Playwright Test Generator also has several built-in options to emulate devices, such as viewport sizes, color schemes, geolocation, time zones, etc.
- Emulate a viewport size - Playwright writes the boiler-plate that sets the viewport as a fixture.
- Emulate a device - Playwright writes the boiler-plate that sets the selected device as a fixture.
playwright codegen --viewport-size=800,600 https://ecommerce-playground.lambdatest.io/
playwright codegen --device="iPhone 14 Pro Max" https://ecommerce-playground.lambdatest.io/
Locators reach most elements a test needs. Three cases need an API on top of them: alerts and dropdowns, which are handled with dialog events and select_option(); iframes, which need frame_locator() before the locator resolves; and multiple windows, which need the new page to be captured from a context event first.

Note: Run automated Playwright tests online. Try TestMu AI Now!
Playwright Locator Methods and Actions
Once a locator points at an element, you call methods on it to interact with the page or read its state. Because a locator resolves lazily, these methods trigger the same auto-wait actionability checks covered earlier, so you rarely need an explicit wait before them. Here are the methods you will reach for most, shown with the Python sync API.
| Method | What it does | Example (Python) |
|---|---|---|
| fill(value) | Clears an input and types the given text | page.locator("#input-email").fill("user@example.com") |
| click() | Clicks the element after auto-wait | page.get_by_role("button", name="Login").click() |
| first / last / nth(i) | Selects one element when the locator matches many | page.get_by_role("listitem").nth(2) |
| all() | Returns a list of locators, one per match, to loop over | page.get_by_role("listitem").all() |
| count() | Returns how many elements the locator matches | page.get_by_role("listitem").count() |
| text_content() | Reads the text content of the element | page.get_by_role("listitem").first.text_content() |
Filling and Submitting a Form With fill()
The fill() method clears an input and types a value in a single call, which is the quickest way to complete a form field. On the TestMu AI eCommerce Playground login page, the email and password inputs carry the ids input-email and input-password, so you can target them by CSS id and fill them before clicking Login:
def test_fill_login_form(page):
    page.goto(
        "https://ecommerce-playground.lambdatest.io/index.php?route=account/login"
    )
    page.locator("#input-email").fill("user@example.com")
    page.locator("#input-password").fill("Password123")
    page.get_by_role("button", name="Login").click()
fill() waits for the field to be visible, enabled, and editable before typing, so no manual wait is needed. When you need to trigger key events character by character, use press_sequentially() instead of fill().
Selecting One Element With first, nth, and all
When a locator matches several elements, use first, last, or nth(index) to pick one, and all() to loop over every match. The product list on the TestMu AI eCommerce Playground is a good example:
products = page.get_by_role("listitem")
products.first.click()          # the first match
products.nth(2).click()         # the third match (nth is zero-based)
print(products.count())         # how many elements matched
for product in products.all():  # iterate over every match
    print(product.text_content())
nth() is zero-based, so nth(0) is the same as first. Use count() to check how many elements a locator found, as the earlier tests did with the to_have_count() assertion.
Locating Elements by CSS Class
A common question is how to locate an element by its CSS class. Pass a standard class selector to page.locator(). On the TestMu AI eCommerce Playground login page the Login control is an input element carrying the classes btn and btn-primary, so tag plus class targets it exactly:
# The Login control is an input[type=submit] carrying the classes btn and btn-primary
page.locator("input.btn-primary").click()      # 1 match - unambiguous
page.locator("css=input.btn-primary").click()  # explicit css= prefix, same element

# ".btn-primary" alone matches 4 elements on this page (Edit cart, Continue,
# Login, back-to-top) and raises a strict mode violation.
A bare class selector is rarely specific enough. Playwright runs in strict mode by default, so a locator that resolves to more than one element raises an error instead of silently acting on the first match. Narrowing to input.btn-primary avoids that. Class-based locators are still tied to the DOM and break when styling changes, so prefer a role or test-id locator when the class exists only for styling.
Locating Elements by ID
Playwright has no get_by_id() method, which is the first thing to know if you came from Selenium's By.ID. An id is targeted with the standard CSS id selector passed to page.locator(). On the TestMu AI eCommerce Playground login page the email field is id="input-email":
page.locator("#input-email").fill("user@example.com")   # CSS id selector
page.locator("css=#input-email").fill("user@example.com")  # explicit css= prefix
page.locator("[id='input-email']").fill("user@example.com")  # attribute form
All three resolve to the same element. Use the attribute form when the id contains characters that are not valid in a CSS identifier, such as a leading digit or a colon from a framework-generated id.
An id is only a good target when it is stable. Frameworks that generate ids at build time produce values like id="mat-input-3", which shift as soon as a component is reordered. When that is the case, ask a developer for a data-testid and use get_by_test_id() instead, which is the explicit contract Playwright recommends for exactly this situation.
Reading the DOM With evaluate()
When you need a value that no built-in method exposes, locator.evaluate() runs a JavaScript function against the located element inside the browser and returns the result to your Python test. A common use is reading the tag name to confirm what a locator actually matched:
def test_search_control_is_a_button(page):
    page.goto("https://ecommerce-playground.lambdatest.io/")
    search = page.get_by_role("button", name="Search")
    tag_name = search.evaluate("el => el.tagName")
    assert tag_name == "BUTTON"
The expression receives the matched element as its argument and must be serialisable on return, so return a string, number, or plain object rather than a DOM node. To operate on every match instead of one, use evaluate_all(), which receives the whole array:
classes = page.get_by_role("listitem").evaluate_all(
    "els => els.map(el => el.className)"
)
Reach for evaluate() only after the built-in methods come up short. It runs arbitrary script in page context, so it bypasses the actionability checks that make the rest of your locators reliable, and a test that leans on it is harder to read than one built from get_by_role() and expect().
Filtering and Chaining With Playwright Locators
A broad locator such as get_by_role("listitem") often matches dozens of elements. Playwright runs in strict mode, so acting on a multi-match locator raises an error instead of silently picking the first one. Filtering and chaining are the two built-in ways to narrow a locator down to exactly one element.
Filtering is used to narrow down the search for elements on a web page by specifying additional conditions that must be met. For example, you can use the filter(has_text=) to find an element containing a specific text piece.
Chaining is used to combine multiple locators in a single search. For example, you can use the get_by_text() and get_by_role() locators to find an element with a specific text and a specific role.
Filtering Playwright Locators
Playwright locators can be filtered by text. This search is case-insensitive and can also be done via regular expression. Playwright locators can also be filtered by not having text. For both cases, the method used is the locator.filter().
Filtering by Text
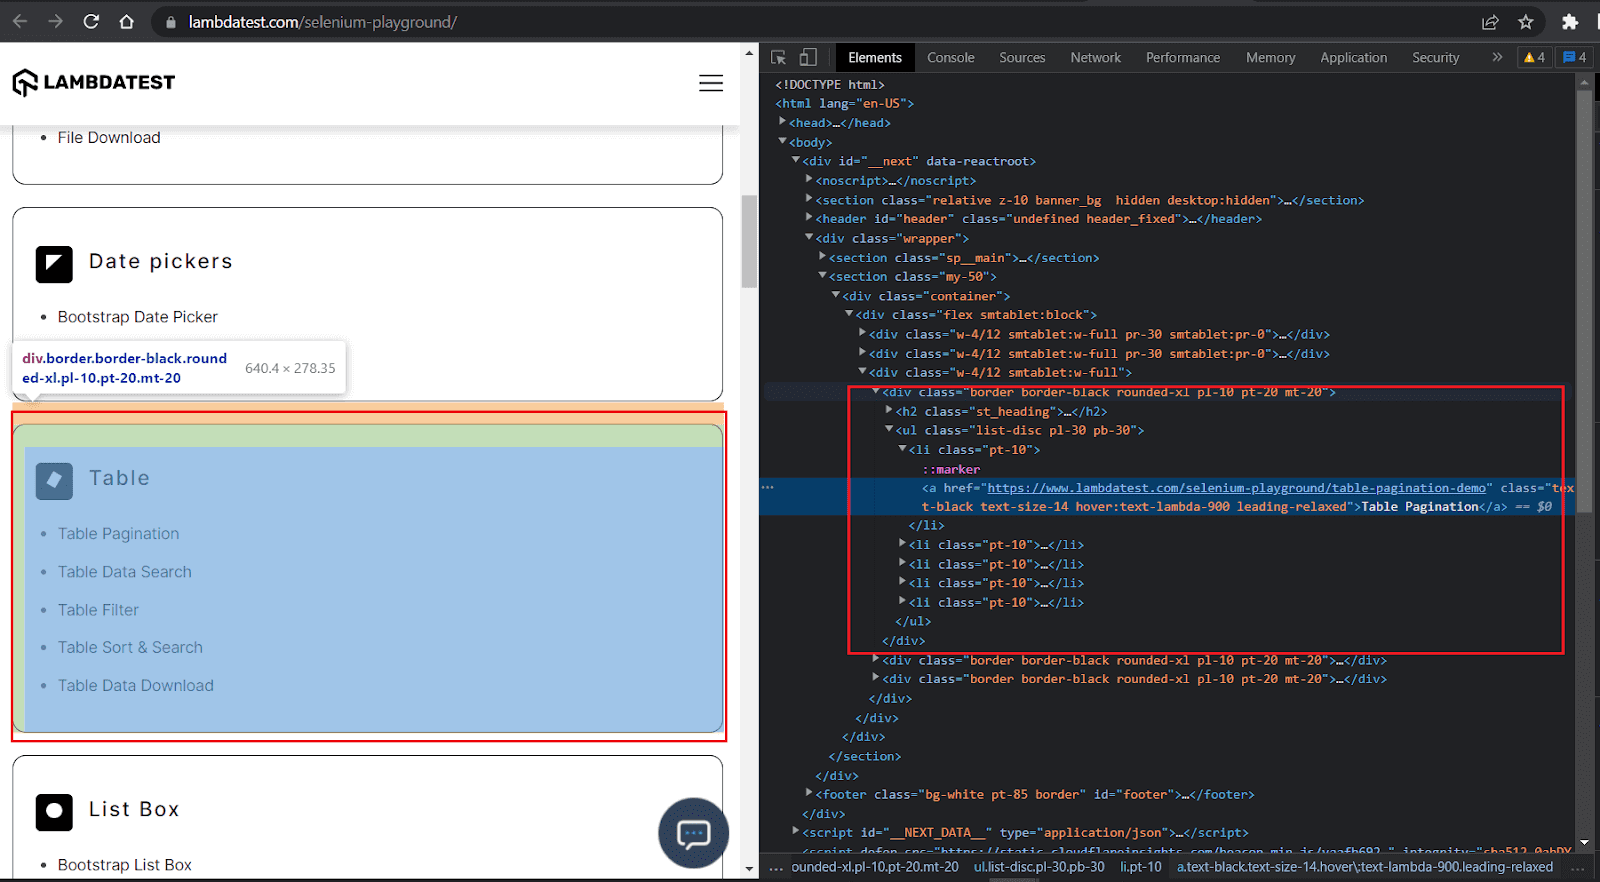
To understand filtering by text, let's use the TestMu AI Selenium Playground, which has a list containing several items with the word Table.
Test Scenario:
- Locate the list containing the word Table.
- Ensure the list has five items.
Implementation:
def test_locator_filter_by_text(page):
    page.goto(
        "https://www.testmuai.com/selenium-playground/"
    )
    base_locator = page.get_by_role("listitem")
    table_list_locator = base_locator.filter(
        has_text=re.compile("table", re.IGNORECASE)
        )
    expect(table_list_locator).to_have_count(5)
Code Walkthrough:
- The steps till we set up the base_locator remain the same.
- From there, instead of using another locator-based filter, we filter based on text='table' by passing it to the filter() method.
- The demo website inspection clearly shows the table list has five items, which is what we assert in the expect() method.
pytest -v test_playwright_locators.py::test_locator_filter_by_text.
Filtering by a Child Locator
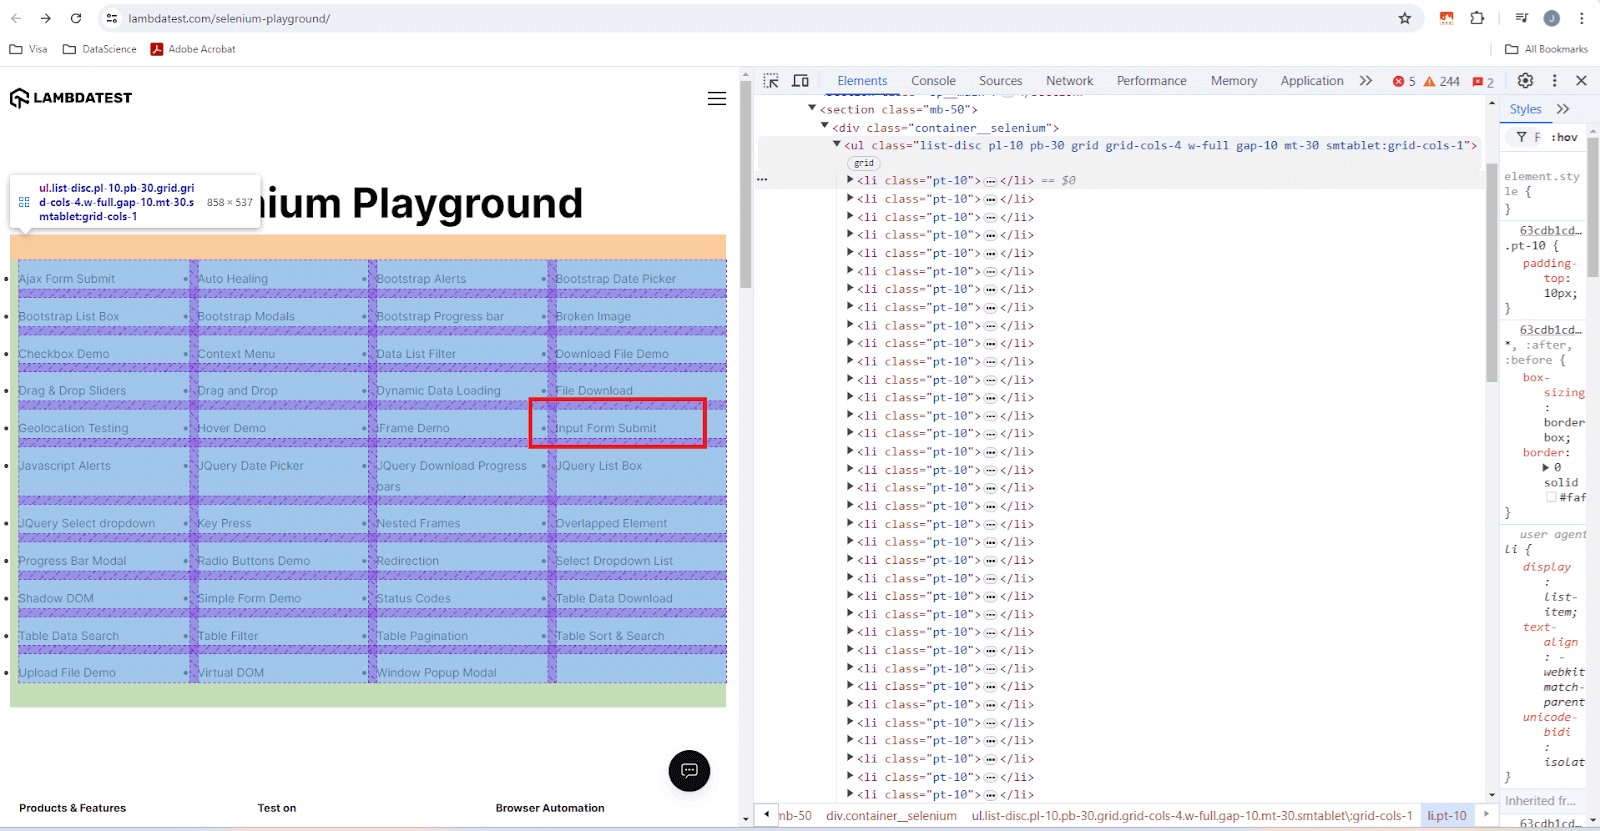
The filter() method also accepts has=, which keeps only those elements that contain another locator. Use it when the text you can match sits on a child element rather than on the element you actually want. This example uses the TestMu AI Selenium Playground.
Test Scenario:
- Locate the list containing input forms.
- Filter and locate the Input Form Submit list item.
Implementation:
def test_locator_filter_by_another_locator(page):
    page.goto(
        "https://www.testmuai.com/selenium-playground/"
    )
    base_locator = page.get_by_role("listitem")
    list_heading_locator = base_locator.filter(
        has=page.get_by_text(text=re.compile("input form submit", re.IGNORECASE))
        )
    expect(list_heading_locator).to_have_text('Input Form Submit')
Code Walkthrough:
- We form the base_locator using the get_by_role() locator and the ARIA role listitem.
- The base_locator will contain all the lists on the page.
- We narrow our lookup by calling the filter() method on our base_locator.
- In the filter, we use the recommended get_by_text() locator and also make sure we handle case sensitivity using regular expressions by searching for the text 'input for submit'. This filtered locator is called list_heading_locator.
- On the filtered list_heading_locator, we call the expect() assertion and ensure we have only located the exact list item (for input form submission) that we intended to locate.
pytest -v -k "test_locator_filter_by_another_locator"

The Other filter() Variants
filter() takes four more arguments that between them cover most narrowing problems, and each is the inverse or complement of one you have already seen.
rows = page.get_by_role("listitem")

# keep only rows that do NOT contain the text
rows.filter(has_not_text="Out of stock")

# keep only rows that do NOT contain a matching child locator
rows.filter(has_not=page.get_by_role("button", name="Disabled"))

# keep only the elements that are actually visible
page.locator("button").filter(visible=True).click()

# filters stack, and each one narrows the previous result
rows.filter(has_text="HTC").filter(has_not_text="Out of stock")
filter(visible=True) is the one that most often removes a strict mode failure: pages frequently ship a duplicate element in a hidden mobile menu, and filtering to the visible match picks the one the user can actually reach. It was added in Playwright 1.51, so check your version if it raises a TypeError.
Chaining Playwright Locators
It's not always possible for a single locator to locate the exact element on a web page. In such scenarios, chaining is the second method to narrow the search to a specific element by combining multiple Playwright locators.
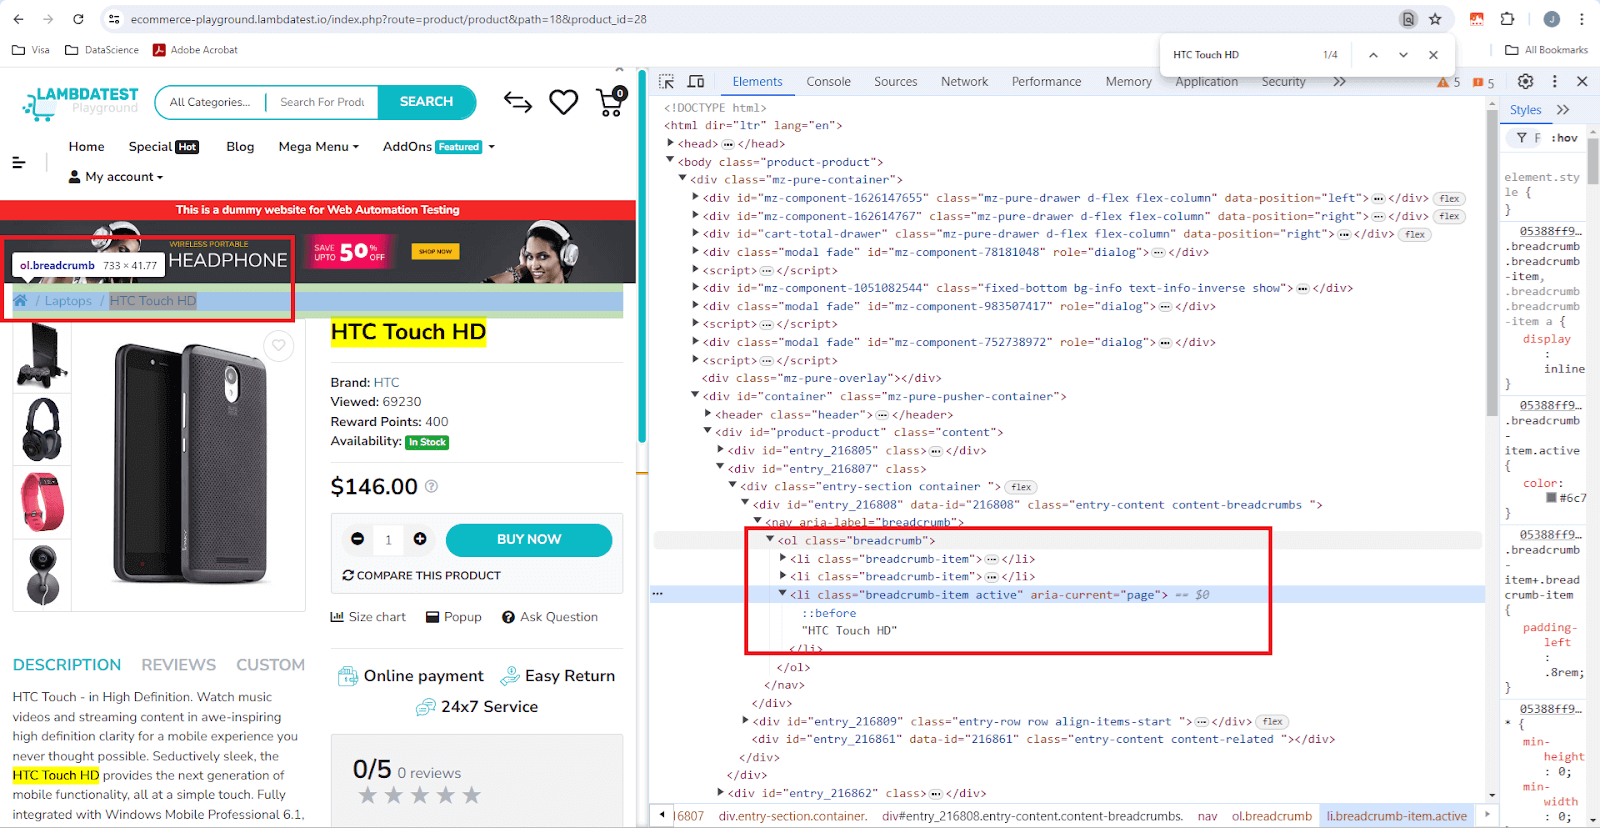
Test Scenario:
- Locate the HTC Touch HD active breadcrumb on the TestMu AI eCommerce website.
- Expect it to be visible.
Implementation:
def test_locator_chaining(page):
    page.goto("https://ecommerce-playground.lambdatest.io/index.php?route=product/product&path=18&product_id=28")
    breadcrumb_locator = page.get_by_label("breadcrumb").get_by_text("HTC Touch HD")
    expect(breadcrumb_locator).to_be_visible()
Code Walkthrough:
- The first locator get_by_label("breadcrumb") will locate the breadcrumbs section as shown on the top left.
- The get_by_text("HTC Touch HD") will filter out the exact one from the three that are visible.
- Lastly, the expect() assertion checks if the located breadcrumb is visible.
pytest -v -k "test_locator_chaining".
Filtering and chaining both resolve down to a selector string, which the video below walks through in more detail.

Fixing a Playwright Strict Mode Violation
This is the error that sends most people looking for help with locators:
Error: strict mode violation: locator("button") resolved to 4 elements:
    1) <button type="submit">Search</button> aka get_by_role("button", name="Search")
    2) <button>Continue</button> aka get_by_role("button", name="Continue")
    3) ...
Playwright runs every locator in strict mode. A locator that matches more than one element raises this error instead of silently acting on the first match, which is deliberate: acting on an arbitrary match is how a test passes for months while asserting against the wrong element.
The error message is the most useful part. Playwright prints every element it matched and, for each, the locator that would target it uniquely. The fix is usually sitting in that list.
Four Ways to Resolve It
buttons = page.get_by_role("button")

# 1. Be more specific - almost always the right fix
page.get_by_role("button", name="Search").click()

# 2. Scope to a container, so the match is unique within it
page.get_by_role("navigation").get_by_role("button").click()

# 3. Filter down to the one you want
buttons.filter(has_text="Search").click()

# 4. Pick by position - the last resort
buttons.first.click()
buttons.nth(2).click()
Reach for the first three before the fourth. Adding .first makes the error disappear without making the test correct: it silences a signal that your locator is ambiguous, and the element at position zero can change the next time someone adds a button above it.
Two cases deserve their own treatment. When the duplicate lives in a hidden responsive menu, filter(visible=True) targets the one the user can reach. When you genuinely mean to act on all matches, loop over all() rather than defeating strict mode.
Strict mode also applies to assertions, with one exception worth knowing: expect(locator).to_have_count(n) is designed for multi-element locators and does not raise, which makes it the quickest way to confirm how many elements your locator really matches before you decide how to narrow it.
How to Debug a Playwright Locator
When a locator matches nothing, or matches the wrong thing, these are the tools that answer the question fastest, roughly in the order you should reach for them. All of them ship with the Python package; UI Mode and the VS Code extension are exclusive to the Node runner, so Python users get the Inspector and Trace Viewer instead.
| Tool | How to run it | Use it when |
|---|---|---|
| Playwright Inspector | PWDEBUG=1 pytest -s | You want to step through the run and edit locators live |
| Pick Locator | Click Pick Locator inside the Inspector, or run playwright codegen and use the button there | You want Playwright to suggest the locator rather than writing one by hand |
| locator.highlight() | Call it in the test, then run pytest --headed | You want to see on screen exactly what a locator matched |
| page.pause() | Insert into the test and run with PWDEBUG=1 | You want to stop mid-test and try locators in the Inspector |
| Trace Viewer | pytest --tracing on, then playwright show-trace trace.zip | The failure happened in CI and you cannot reproduce it locally |
| codegen | playwright codegen URL | You are writing a new test and want the recorded locators as a starting point |
def test_debug_a_locator(page):
    page.goto("https://ecommerce-playground.lambdatest.io/")
    search = page.get_by_role("button", name="Search")

    print(search.count())        # how many elements matched
    search.highlight()           # outline them on screen (run with --headed)
    page.pause()                 # stop here and try locators in the Inspector
Run that with PWDEBUG=1 pytest -s to open the Inspector. The Playwright docs are explicit that highlight() is a debugging aid you should not commit, so strip both calls before the test lands on a branch. count() is the fastest first move. A count of 0 means the locator is wrong or the element has not rendered yet; a count above 1 explains a strict mode violation before you have to read the stack trace. Trace Viewer is the one that matters most in CI, because it records the DOM snapshot at each step, so you can inspect the page as it was when the locator failed rather than as it is now.
Running Locator Tests on the Cloud Grid
The tests above run on one browser on one machine. Pointing them at the TestMu AI cloud grid runs the same files across 3,000+ real browser and OS combinations without editing a single test, because only the page fixture changes.
When running tests in the cloud, efficient and reliable element identification is crucial due to the variety of browsers and environments involved. To use Playwright locators, you must set up the necessary imports and dependencies along with the username and access key to run the test on the TestMu AI cloud grid.
The load_dotenv() reads the username and access key required to access the Playwright on the TestMu AI Playwright grid. The username and access key are available in your TestMu AI Profile > Account Settings > Password & Security.
import json
import os
import re
import subprocess
import sys
import urllib

import pytest
from dotenv import load_dotenv
from playwright.sync_api import sync_playwright, expect

load_dotenv()
Setting Up the Capabilities
The capabilities dictionary contains the configuration of our test environment on the TestMu AI Playwright grid. The configurations encompass various parameters, such as the preferred browser, its specific version, the operating system required to execute the tests, and other relevant settings.
capabilities = {
    'browserName': 'Chrome',  # Browsers allowed: `Chrome`, `MicrosoftEdge`, `pw-chromium`, `pw-firefox` and `pw-webkit`
    'browserVersion': 'latest',
    'LT:Options': {
        'platform': 'Windows 10',
        'build': 'Playwright Locators Demo Build',
        'name': 'Playwright Locators Test For Windows 10 & Chrome',
        'user': os.getenv('LT_USERNAME'),
        'accessKey': os.getenv('LT_ACCESS_KEY'),
        'network': True,
        'video': True,
        'visual': True,
        'console': True,
        'tunnel': False,   # Add tunnel configuration if testing locally hosted webpage
        'tunnelName': '',  # Optional
        'geoLocation': '', # country code can be fetched from https://www.testmuai.com/capabilities-generator/
    }
}
Setting Up the pytest Fixtures:
Every example in this guide takes Playwright's built-in page fixture, so the tests run as written with no extra setup. The two fixtures below override page when you want to control the browser yourself or run on the cloud grid.
A local fixture runs the tests on your own machine:
@pytest.fixture(name="local_grid_page")
def playwright_local_grid_page():
    with sync_playwright() as playwright:
        browser = playwright.chromium.launch(headless=True)
        page = browser.new_page()
        yield page
        browser.close()
Overriding the same page fixture points every test above at the TestMu AI cloud grid without changing a single test:
@pytest.fixture(name="page")
def playwright_cloud_grid_page():
    with sync_playwright() as playwright:
        playwrightVersion = str(subprocess.getoutput('playwright --version')).strip().split(" ")[1]
        capabilities['LT:Options']['playwrightClientVersion'] = playwrightVersion
        lt_cdp_url = 'wss://cdp.lambdatest.com/playwright?capabilities=' + urllib.parse.quote(json.dumps(capabilities))
        browser = playwright.chromium.connect(lt_cdp_url)
        page = browser.new_page()
        yield page
        browser.close()
Best Practices for Stable and Fast Playwright Locators
The locators you choose decide how often your suite breaks on a harmless UI change and how much time you lose to flaky reruns. These practices keep Playwright tests both resilient and quick.
- Prefer user-facing locators - reach for get_by_role(), get_by_text(), and get_by_label() before CSS or XPath. They map to what the user sees and survive redesigns that shift the DOM.
- Add a data-testid for dynamic elements - when text or roles change at runtime, an explicit get_by_test_id() contract is the most stable target.
- Let auto-wait replace fixed sleeps - never pad tests with time.sleep(). Playwright's actionability checks already wait for the element to be ready, so fixed delays only make suites slower and more brittle.
- Chain and filter instead of writing long selectors - combine get_by_role() with filter() or a second locator to narrow results, rather than a deep, fragile CSS or XPath path.
- Keep any CSS or XPath shallow - if you must use them, target a single stable attribute rather than a long nth-child chain that breaks when a wrapper element moves.
- Scale speed with parallelism, not shorter waits - the fastest way to cut suite runtime is running locators across many browsers at once, not trimming the waits that keep them stable.
That last point is where cloud execution pays off. TestMu AI's Automation Cloud runs your existing Playwright scripts across 3,000+ real browser and OS combinations in parallel, so a locator-heavy suite finishes in minutes instead of hours. It also supports Auto Healing, which reformulates a Playwright locator when the DOM shifts so that locator drift does not immediately break a pipeline. Treat it as a maintenance aid rather than a correctness guarantee, since it matches heuristically and can recover onto a similar but different element. Point an existing suite at the grid using the Playwright testing documentation.
Conclusion
Start by opening your worst-offending flaky spec and replacing its CSS and XPath selectors with get_by_role(), falling back to get_by_test_id() where an element has no stable accessible name. Those two changes remove the majority of locator breakage caused by markup churn, and you can confirm the replacement targets exactly one element by running expect(locator).to_have_count(1) before you change any assertions.
Once the suite is stable, the remaining cost is wall-clock time. Running it on TestMu AI Automation Cloud spreads the same Python tests across 3,000+ real browser and OS combinations in parallel, and enabling Playwright auto healing lets a build recover when a locator drifts, so a DOM change surfaces as a warning rather than a red pipeline.
For a closer look at how selector strings behave underneath the locator API, read the guide to Playwright functions and selectors.
Author

Jaydeep Karale
Blogs: 6


Jaydeep is a software engineer with 10 years of experience, most recently developing and supporting applications written in Python. He has extensive with shell scripting and is also an AI/ML enthusiast. He is also a tech educator, creating content on Twitter, YouTube, Instagram, and LinkedIn.
Reviewer

Himanshu Sheth
Reviewer
Himanshu Sheth is the Director of Marketing (Technical Content) at TestMu AI, with over 8 years of hands-on experience in Selenium, Cypress, and other test automation frameworks. He has authored more than 130 technical blogs for TestMu AI, covering software testing, automation strategy, and CI/CD. At TestMu AI, he leads the technical content efforts across blogs, YouTube, and social media, while closely collaborating with contributors to enhance content quality and product feedback loops. He has done his graduation with a B.E. in Computer Engineering from Mumbai University. Before TestMu AI, Himanshu led engineering teams in embedded software domains at companies like Samsung Research, Motorola, and NXP Semiconductors. He is a core member of DZone and has been a speaker at several unconferences focused on technical writing and software quality.
On This Page
- What Are Playwright Locators?
- How Playwright Finds Elements
- Types of Playwright Locators
- Locators vs Selectors
- CSS vs XPath vs Role
- Installing Playwright
- How to Use Playwright Locators?
- Locator Methods & Actions
- Filtering and Chaining
- Fixing Strict Mode Errors
- Debugging Locators
- Running on the Cloud Grid
- Locator Best Practices
- Conclusion
Playwright Locators FAQs
Did you find this page helpful?
More Related Blogs
TestMu AI forEnterprise
Get access to solutions built on Enterprise
grade security, privacy, & compliance
- Advanced access controls
- Advanced data retention rules
- Advanced Local Testing
- Premium Support options
- Early access to beta features
- Private Slack Channel
- Unlimited Manual Accessibility DevTools Tests