

Power Your Software Testing with AI Agents and Cloud
The Native AI-Agentic Cloud Platform to Supercharge Quality Engineering. Test Intelligently and Ship Faster.


- TestMu AI (Formerly LambdaTest)
- /
- Learning Hub
- /
- What Is Visual Regression Testing? A Complete Guide
What Is Visual Regression Testing? A Complete Guide
Visual regression testing catches UI bugs functional tests miss. Learn how it works, its methods, visual AI testing, and how to automate it with TestMu AI.
Last Updated on:
Overview
Visual regression testing prevents unintended user interface changes by capturing screenshots of your application and comparing them against approved baseline images. For automated cross-browser and cross-resolution coverage, use TestMu AI to capture and compare screenshots across multiple operating systems directly from your existing test suite.
How Does It Work?
- Baseline: Approve a known-good screenshot of your user interface to serve as the reference for future comparisons.
- Capture: Take a new screenshot of the user interface on each build or commit to detect rendering differences.
- Compare: Diff the newly captured screenshot against the approved baseline image to highlight visual changes, layout shifts, or color differences.
- Analyze: Classify each detected visual difference and score its potential impact on the user experience to prioritize critical issues.
- Approve or Reject: Accept intended user interface changes into the baseline to update references, or reject regressions to fail the build.
What Do You Need to Run It?
- TestMu AI SmartUI: TestMu AI SmartUI captures and compares screenshots across multiple browsers, operating systems, and resolutions directly from your existing test suite.
- Visual AI Comparison: Visual AI comparison uses computer vision to filter out rendering noise like anti-aliasing and sub-pixel font variations, reducing false alerts by up to 95%.
- Manual Visual Testing: Manual visual testing relies on developers scanning pages by eye, which is useful during early development but does not scale to frequent releases.
What is Visual Regression Testing?
Visual regression testing verifies that a code change did not alter the user interface in an unintended way. It compares screenshots taken before and after a change, and reports any visual difference for review. It is also called visual snapshot testing, visual validation, or simply visual testing.
If you are not familiar with the term regression testing, it ensures that changes you introduce to the software do not break anything that was working before. Visual regression testing is one technique within the broader discipline of visual testing, and it narrows that idea to what the user actually sees: layout, spacing, typography, color, and element position.
The distinction matters because a functional test asserts on the DOM, not on rendered output. A checkout button that has moved behind the footer still exists in the DOM, still has the right label, and still fires its click handler, so every functional assertion passes while no user can reach it. visual regression testing tools close exactly that gap.
Why perform Visual Regression Testing?
Rendering is fragmented and functional tests are blind to it. The same CSS produces different output across browsers, operating systems, and screen widths, and a purely visual defect ships silently.
That fragmentation is measurable. According to StatCounter GlobalStats, worldwide browser share in June 2026 was 69.65% Chrome, 15.31% Safari, 5.21% Edge, and 3.33% Firefox. Chrome's lead does not let you skip the rest. Safari runs WebKit and Firefox runs Gecko, both different rendering engines from Chrome's Blink, and together they lay out CSS, fonts, and sub-pixel spacing on their own terms for roughly one in five of your users.
Screen width is the second axis. The HTTP Archive Web Almanac 2022 CSS analysis found that 83% of pages use a max-width media query and 79% use min-width, with the single most common breakpoint being a max-width of 767px, used on 51% of pages. Every breakpoint is a place where a layout can overflow or truncate, and every one of them needs a screenshot to prove it does not.
Once teams adopt continuous integration and ship several times a week, manual screenshot review stops being viable. Visual regression tests move that review into the pipeline, where it runs on every commit instead of whenever someone remembers.
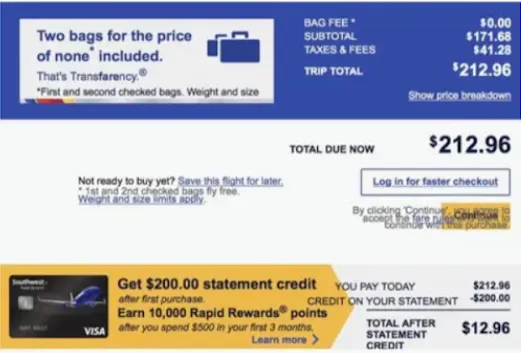
The screenshot above shows the failure mode precisely. Every page element loaded successfully, so every functional assertion passes, yet the overlapping buttons make it impossible to continue to checkout. This is the class of defect functional testing lets through and visual testing catches.
Benefits of Visual Regression Testing
A single screenshot assertion replaces dozens of brittle element-level checks, which is where most of the value comes from.
- One assertion covers the whole screen: Labels, fonts, alignment, layout, color, and element position are all validated by a single snapshot, instead of one selector-based assertion each.
- Catches what selectors cannot express: A 40px layout shift or a wrong brand color has no natural DOM assertion, but it is obvious in a diff.
- Cross-browser coverage in one run: The same snapshot is compared across browser and resolution combinations, so a Safari-only flex bug surfaces before release.
- Cheaper test maintenance: When a design changes, you approve a new baseline once rather than rewriting every affected selector assertion.
- Protects shared components: A change to one button component used on 50 screens is verified across all 50, catching design-system regressions that would otherwise appear only in production.

Different Methods of Visual Regression Testing
The five comparison methods are manual review, layout comparison, pixel-by-pixel comparison, DOM or structural comparison, and visual AI comparison. They differ in what they compare and which failures they miss.
| Method | What It Compares | Main Weakness |
|---|---|---|
| Manual review | A human looking at the screen | Slow, does not scale, human error |
| Layout comparison | Size and position of elements | Misses color and content changes |
| Pixel-by-pixel | Raw pixel values | False positives from anti-aliasing and font rendering |
| DOM / structural | HTML markup and element tree | Flaky; misses purely visual CSS regressions |
| Visual AI | Rendered output, interpreted like a human | Requires a trained engine; not a raw pixel guarantee |
Manual Visual Testing
Developers scan pages and check for visual defects by eye on each release, without automation testing tools. It is useful in early development because it supports exploratory and ad hoc testing of a UI that is still changing shape. It stops working the moment the surface area exceeds what one person can review each release.
Layout Comparison
This approach compares the size and position of interface elements rather than pixels. If an element moves or resizes, the test fails. It is resilient to font rendering noise, but a button that turns the wrong color passes.
Pixel-by-Pixel Comparison
This method compares two screenshots at the pixel level and alerts on any discrepancy. It flags everything, which is both its strength and its failure mode: anti-aliasing, sub-pixel rendering, and one-pixel margin differences all report as failures. Teams that cannot tune the threshold end up ignoring the output entirely.
Structural and DOM-Based Comparison
This approach compares the Document Object Model before and after a change to detect markup differences, then checks element sizes and positions. It surfaces code-level alterations well, but results can be flaky, and a CSS-only regression that never touches the DOM slips through.
Visual AI Comparison
This method uses computer vision to interpret the interface the way a person does, so it can run on dynamic pages without a brittle baseline. It suppresses the false positives that make pixel diffing painful, and flags only regions with unexpected changes. It is covered in depth in the next section, and Visual AI explains how it improves accuracy in UI testing.
Visual AI Testing
Visual AI testing compares rendered screenshots using computer vision rather than raw pixel values. It filters rendering noise and reports only changes a user would notice, which removes the false-positive problem that makes pixel diffing unusable at scale.
A pixel diff has no concept of what it is looking at. It cannot tell a button from a background, so a font that renders one sub-pixel bolder after an OS update produces thousands of "failures", none of which are product regressions. QA teams learn to ignore the report, and real defects go unreviewed alongside the noise. That is the actual cost of an unintelligent comparison engine: not the false positives themselves, but the trust they destroy.
A visual AI engine solves this by filtering before it reports. The SmartUI Visual AI engine in TestMu AI discards anti-aliasing differences at element edges, sub-pixel font rendering variation across operating systems, animation and transition states that resolved differently between captures, image compression artifacts, and dynamic regions you have configured to ignore. Its Smart Ignore capability reduces false positives by up to 95%.
What survives the filter is then classified rather than merely reported. Each remaining difference is labeled by type, which is what makes the result actionable:
- Layout shift: An element moved from its baseline position.
- Color change: A fill, border, or text color differs from the approved value.
- Element addition or removal: Something appeared or disappeared entirely.
- Size change and positional drift: An element resized or moved by a measurable offset.
- Content change: The text or image inside an element differs.
Each change is then scored by likely user impact, so a CTA button that disappeared ranks above a button sitting two pixels lower. That ordering is what turns a wall of diffs into a triage queue a reviewer can actually work through.

Note: Run visual regression tests across 3,000+ browser and OS combinations and 10,000+ real devices with TestMu AI SmartUI. Start testing free
Visual Regression Analysis
Visual regression analysis is the review step after a comparison runs. You inspect each flagged difference, decide whether it is intended, and either approve it into the baseline or reject it as a bug. Detection is automatic; the decision is human.
Most teams underestimate this step. Running the comparison is the easy part; a visual testing program lives or dies on whether the review queue stays small enough that someone actually reads it. The analysis workflow has four moves.
- Inspect side by side. View the baseline, the new screenshot, and the diff overlay together. Toggling between the three is faster than reading a highlighted overlay alone.
- Approve, reject, or ignore. Approve accepts the change and promotes the new screenshot to baseline. Reject marks it a bug and keeps the old baseline. Ignore dismisses a known transient difference for this run only, without touching the baseline.
- Bulk-approve global changes. When a brand color or font token changes, dozens of screens shift at once. Approving them individually is the fastest way to make a team abandon visual testing; bulk approval updates every affected baseline in one action.
- Gate the build. In CI, hold the build status until every detected change is approved or rejected. A rejected change fails the build, which is what makes the whole exercise more than a report nobody opens.
An AI-native analysis engine also sorts the queue by severity before a human ever opens it. TestMu AI's SmartUI, for example, buckets every detected change into four tiers: Critical for core functionality elements like navigation, CTAs, and form inputs; High for layout structure or content visibility changes; Medium for spacing and alignment shifts that affect quality perception but not function; and Low for sub-pixel differences a user would never notice. A reviewer working through 200 flagged screenshots checks the Critical and High tiers first instead of scanning the list top to bottom.
Baselines then propagate along your branching model. A feature branch keeps its own baseline so parallel work does not conflict, and merging the branch merges the baseline. Because baselines are versioned, any previously approved snapshot can be restored if a bad baseline gets approved by mistake.
Implementing Visual Regression Testing
Start by deciding what to capture and when. Then pick how the snapshot enters your test suite. There are three common integration strategies, in ascending order of effort.
Insert Visual Checkpoints Into Existing Tests
You already have functional tests that navigate to the screens you care about. Adding a snapshot call at each meaningful state reuses that navigation code and is the cheapest way to get coverage. The limit is that your visual coverage can only reach screens your functional tests already visit, which constrains test coverage tools.
Add Implicit Visual Validation
A few lines of configuration in the existing framework capture a snapshot automatically at every page load or step. It is the lowest-effort option and gives broad generic coverage, but you give up control over exactly which states are captured.
Write Dedicated Visual Tests
Purpose-built visual tests give complete control over which components and states are captured, including states your functional tests never reach, such as error banners and empty states. They cost more to write and maintain.
A Working Example
The snippet below adds a single visual checkpoint to a Playwright test using the TestMu AI SmartUI driver. It navigates to the Selenium Playground and captures one named snapshot, which SmartUI compares against the branch baseline.
const { chromium } = require('playwright');
const { smartuiSnapshot } = require('@lambdatest/playwright-driver');

(async () => {
  const browser = await chromium.launch();
  const page = await browser.newPage();

  await page.goto('https://www.testmuai.com/selenium-playground/');

  // Capture a named snapshot; SmartUI diffs it against the baseline.
  await smartuiSnapshot(page, 'selenium-playground-home');

  await browser.close();
})();
Run it through the SmartUI CLI so the snapshot is uploaded and compared against the project baseline:
export PROJECT_TOKEN="<your-smartui-project-token>"
npx smartui --config .smartui.json exec -- node tests/visual.spec.js
The first run has no baseline to compare against, so it becomes the baseline automatically. Every run after that reports a diff for review. The SmartUI Playwright SDK documentation covers the configuration options and the equivalent calls for other frameworks.
Manual vs. Automated Visual Regression Testing
Manual visual testing suits early, fast-changing UIs and exploratory checks. Automated visual regression testing is the only approach that scales to frequent releases across many browsers and screen sizes.
| Aspect | Manual | Automated |
|---|---|---|
| Best for | Early development, exploratory spot checks | Every build, regression protection |
| Browser coverage | Whatever one person can open | Every configured browser and resolution in one run |
| Cost profile | Low upfront, rises with every release | Higher upfront, flat afterwards |
| Main risk | Human error and missed screens | False positives if the engine is unintelligent |
Manual review also cannot keep up with changes you do not control. A browser auto-updates, an OS changes font rendering, a third-party widget ships new CSS, and your layout shifts without a single commit on your side. With manual testing you would need someone re-checking every screen across every test environment continuously, and the problem compounds if the product uses a responsive design with many breakpoints.
Automated visual testing runs the same comparison on every commit, at the same cost each time. The practical path is a cloud grid driving a framework you already use, such as Selenium, so you inherit browser coverage without maintaining the machines.

Choosing a Visual Regression Testing Tool
Match the tool to your release cadence, browser matrix, and UI volatility. The decisive question is how the engine handles false positives, because that determines whether your team keeps reading the reports.
There is no single best visual regression testing tool for every team, since a managed AI platform and a free framework-native assertion solve different problems. For most teams evaluating options, TestMu AI SmartUI is the strongest all-around pick: it runs AI-based comparison across browsers and real devices with Smart Ignore noise filtering built in, so the review queue holds real regressions instead of rendering artifacts a team has to filter out by hand.
For a side-by-side breakdown of specific products, see our guide to the best visual testing tools linked above. Before you shortlist anything, work through these criteria.
- False-positive handling: Ask how the engine treats anti-aliasing, font rendering, and dynamic content. A tool without noise filtering will be switched off within two sprints.
- Static or dynamic UI: Mostly static pages are well served by simple pixel comparison. Frequently changing or user-generated content needs an AI engine or configurable ignore regions.
- Browser and device coverage: If you do not validate across browsers and resolutions, you are only testing the one rendering engine on your laptop.
- Framework fit: The tool should drop into the framework you already run, not force a parallel visual suite you have to maintain separately.
- Baseline management: Look for per-branch baselines, bulk approval, and versioned rollback. Without them, a single global design change becomes days of clicking.
- Screenshot stabilization: Screenshot testing must handle pixel offsets and anti-aliasing without failing the build.
- Integrations: It has to fit your CI provider and issue tracker, or the results never reach the people who fix them.
Visual Regression Testing using TestMu AI
The visual testing tool is TestMu AI's AI-native visual regression testing platform. It automates screenshot capture, comparison, and analysis across browsers, operating systems, and resolutions, and applies the Visual AI engine described above so the review queue contains real regressions rather than rendering noise.
You add it to the suite you already run. SmartUI provides SDKs for Selenium, Playwright, Cypress, Puppeteer, WebdriverIO, and TestCafe, so a functional test gains visual coverage with one extra call. Beyond the SDK, it captures from other sources:
- CLI and Storybook: The SmartUI CLI captures static sites or every component in a Storybook instance with Storybook visual testing, without a full test framework.
- Figma import: Use design files as the baseline to catch design-to-code drift before it accumulates.
- Branch-based baselines: Each branch keeps its own baseline, and merging a branch merges the baseline, so parallel feature work does not fight over approvals. A full walkthrough of running this across every browser and branch is in this guide to visual regression testing at scale.
- CI/CD and PR gates: Jenkins, GitHub Actions, GitLab, CircleCI, and Azure DevOps are supported, with GitHub pull-request integration to hold a merge until visual changes are reviewed.
As a single visual testing software, it keeps data encrypted with AES-256 at rest and TLS 1.3 in transit, and it is SOC 2 Type II and GDPR compliant.
The Visual AI engine's noise filtering is what keeps that review queue short in practice; the mechanics of Smart Ignore, Root Cause Analysis, and bulk approval are covered in this guide to cutting visual QA review time with AI-powered screenshot comparison.
Running Visual Regression Tests With AI Agent Skills
Wiring up the SDK call from the section above still means installing packages, writing a config file, and placing the snapshot at the right point in your test by hand. An SmartUI Agent Skill hands that work to your AI coding agent instead. It is an instruction pack that Claude Code, Cursor, GitHub Copilot, or Gemini CLI reads before generating code, so a plain-language request produces the same working SmartUI setup a person would otherwise write.
Copy the skill into your agent's skills directory and it loads automatically on the next session:
git clone https://github.com/LambdaTest/agent-skills.git
cp -r agent-skills/smartui-skill .claude/skills/
Swap .claude/skills/ for .cursor/skills/, .github/skills/, or .gemini/skills/ depending on which agent you run. Then export your TestMu AI credentials and SmartUI project token so the agent can execute on the cloud:
export LT_USERNAME="YOUR_LAMBDATEST_USERNAME"
export LT_ACCESS_KEY="YOUR_LAMBDATEST_ACCESS_KEY"
export PROJECT_TOKEN="YOUR_SMARTUI_PROJECT_TOKEN"
From there, describe the coverage you want instead of writing it:
"Add SmartUI visual regression tests to my Playwright suite. Capture the homepage and the login page across Chrome, Firefox, and Safari at desktop and mobile viewports."
The agent installs the SmartUI CLI plus the driver for your framework, such as @lambdatest/playwright-driver, then does the setup work:
- Creates a smartui.config.json with the browsers, viewports, and wait conditions you asked for.
- Adds the snapshot call at the right point in the test, for example smartuiSnapshot(page, 'Homepage') for Playwright.
- Wires up the npx smartui exec command that runs the suite against the branch baseline on the TestMu AI cloud.
Run it yourself, or ask the agent to run it:
npx smartui exec -- npx playwright testResults land in the same SmartUI dashboard covered in the review workflow above, and you keep iterating in plain language from there, for example asking the agent to add a snapshot of the checkout page and re-run, or to treat an intentional header change as the new baseline. The same pattern extends past SmartUI: the Selenium Skill applies it to functional test generation, so one agent session can write the Selenium test and wire up its visual coverage together. For a full walkthrough with a debugging table for false positives, see how to use the SmartUI agent skill to run visual tests.
Best practices for Visual Testing
These five practices separate a visual suite people trust from one they mute.
- Pick a test execution tool that filters false positives. It must absorb anti-aliasing and pixel offsets without failing the build.
- Mask dynamic regions explicitly. Timestamps, ads, and user-generated content should be ignored by configuration, not by raising the global threshold.
- Do not tune by error ratio alone. What matters is whether a human would notice the change and whether it harms the experience, not whether 0.3% of pixels moved.
- Validate whole pages, not just isolated components. Component-only checks miss regressions that appear when components are composed together.
- Gate the build on rejected changes. A visual report that cannot fail a build is documentation, not a test.
Conclusion
Start with one screen that has broken before. Add a single snapshot call to the functional test that already visits it, approve the first run as your baseline, and let the next commit tell you whether anything moved. That one checkpoint will catch more visual defects than any amount of manual review.
From there, widen coverage across your browser matrix and breakpoints, then gate the build so a rejected diff blocks the merge. TestMu AI SmartUI runs that entire loop inside the framework you already use, and the SmartUI Selenium SDK documentation walks through the setup. Visual quality is what your users actually see, so it belongs in the pipeline next to your functional tests, not in a manual checklist before release.
Author

Veethee Dixit
Blogs: 9


Veethee Dixit is a seasoned content strategist and freelance technical writer specializing in SaaS platforms and AI-driven testing technologies. She has over 8 years of hands-on experience writing SEO focused technical content, simplifying complex topics in software testing, and collaborating with product marketing teams to develop high converting blogs, documentation, whitepapers, and tutorials. She holds a Bachelor of Engineering in Computer Science and has authored 50+ learning hub articles in the software testing domain. Her work has been featured in leading software testing newsletters and cited by top technology publications. Veethee has played a key role in translating complex testing workflows into actionable guides, helping audiences implement automation strategies with clarity and confidence.
Reviewer

Parth Mistry
Reviewer
Parth Mistry is a Member of Technical Staff at TestMu AI (formerly LambdaTest), building SmartUI, the visual regression testing product. He developed and owns the SmartUI CLI, a modular TypeScript tool built on Playwright for multi-browser automation, and built the Storybook CLI for visual regression of UI components. He maintains cross-language SDKs in Python, Java, Ruby, C#, and Node.js, and engineered a Node-based visual rendering service on Kafka, Redis, MySQL, and S3. His migration of that service to an event-driven, KEDA-autoscaled architecture improved execution speed by 60% and cut annual infrastructure cost by $9,600. He also built the end-to-end SmartUI integration with KaneAI. Parth is a Google Summer of Code 2024 contributor and an alumnus of IIT Jodhpur.


Visual Regression Testing FAQs
Did you find this page helpful?
More Related Blogs
TestMu AI forEnterprise
Get access to solutions built on Enterprise
grade security, privacy, & compliance
- Advanced access controls
- Advanced data retention rules
- Advanced Local Testing
- Premium Support options
- Early access to beta features
- Private Slack Channel
- Unlimited Manual Accessibility DevTools Tests