

Power Your Software Testing with AI Agents and Cloud
The Native AI-Agentic Cloud Platform to Supercharge Quality Engineering. Test Intelligently and Ship Faster.


- TestMu AI (Formerly LambdaTest)
- /
- Learning Hub
- /
- Playwright Visual Regression Testing: Setup, Thresholds, CI
Playwright Visual Regression Testing: Setup, Thresholds, CI
Playwright visual regression testing explained: every toHaveScreenshot option and default, all four snapshot update modes, and why baselines fail on CI.
Last Updated on:
Playwright visual testing catches the bugs your assertions never will: a nav bar that wraps, a button that loses its padding, a logo that renders two pixels off. Playwright visual regression testing does it by comparing a screenshot of the current build against a stored baseline image, using the toHaveScreenshot() assertion that ships with the test runner. This guide is a complete reference for visual regression testing for Playwright: the full option set, how to manage baselines with the four Playwright CLI update modes, and why the same test passes on your laptop and fails in CI.
The examples here run on Playwright visual comparisons, verified against version 1.62.1 of the @playwright/test package. If you are new to the wider discipline, start with the visual regression testing primer, then come back here for the Playwright specifics.
Overview
Playwright visual regression testing compares a screenshot of your UI against a stored baseline image using the built-in toHaveScreenshot() assertion, which is powered by the pixelmatch library. Failures write actual, expected, and diff images into the HTML report. Running the same suite on TestMu AI's visual testing tool, SmartUI, keeps baselines stable across browsers and machines.
What Are the Valid Values for --update-snapshots in Playwright?
- missing: Creates snapshots that do not exist yet and leaves every matching baseline alone. Playwright uses this mode when the suite runs with no update flag at all, so a new test seeds its own baseline while existing baselines stay protected.
- changed: Updates every snapshot that did not match and creates missing ones, leaving matching baselines untouched. Passing the flag with no explicit value, as in npx playwright test -u, selects this mode.
- all: Rewrites every snapshot the run touches, whether it matched or not. Reach for it after an intentional global redesign, then review the resulting image diff in version control before committing.
- none: Updates nothing, so a missing baseline fails the test instead of being silently created. Set updateSnapshots to none in the Playwright config for CI so an absent snapshot can never pass by default.
What Is the Difference Between maxDiffPixels and maxDiffPixelRatio?
- threshold: Decides whether a single pixel counts as different at all, measured as perceived color distance in the YIQ color space between zero (strict) and one (lax). Playwright defaults it to 0.2.
- maxDiffPixels: Caps the absolute number of pixels allowed to differ before the assertion fails. It is unset by default and does not scale, so the same value is far stricter on a small element than on a full page.
- maxDiffPixelRatio: Caps the share of total pixels allowed to differ, on a scale of 0 to 1. It is unset by default and scales with image size, which makes it the safer choice for full-page screenshots.
What is visual regression testing?
Visual regression testing focuses on image and pixel comparison. It allows us to define the view, area, or component of a website where we would like to perform visual analysis. We start with our baseline image, our master branch equivalent, and what we expect the site to look like. We then compare it with our current screenshot, which may have been taken in a different environment or branch.
Here is an example. We have taken two screenshots from the Playwright homepage. We will label them A and B.
- A is what the website looks like right now.
- B is what it looks like after we have made some changes on the local machine.
Can you tell the visual or styling issues in less than 10 seconds?
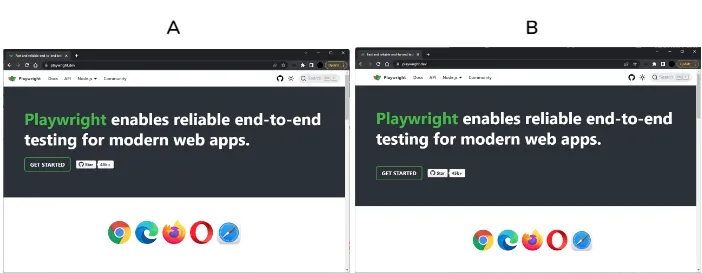
Did you find them? Three styling issues have been raised in our visual comparison below: the header navigation, hero buttons, and browser logos.
This comparison was executed with Playwright. It was run once to create a baseline and then edited for the purposes of this example. Finally, it was run the second time to compare our baseline to how the Playwright homepage looks.
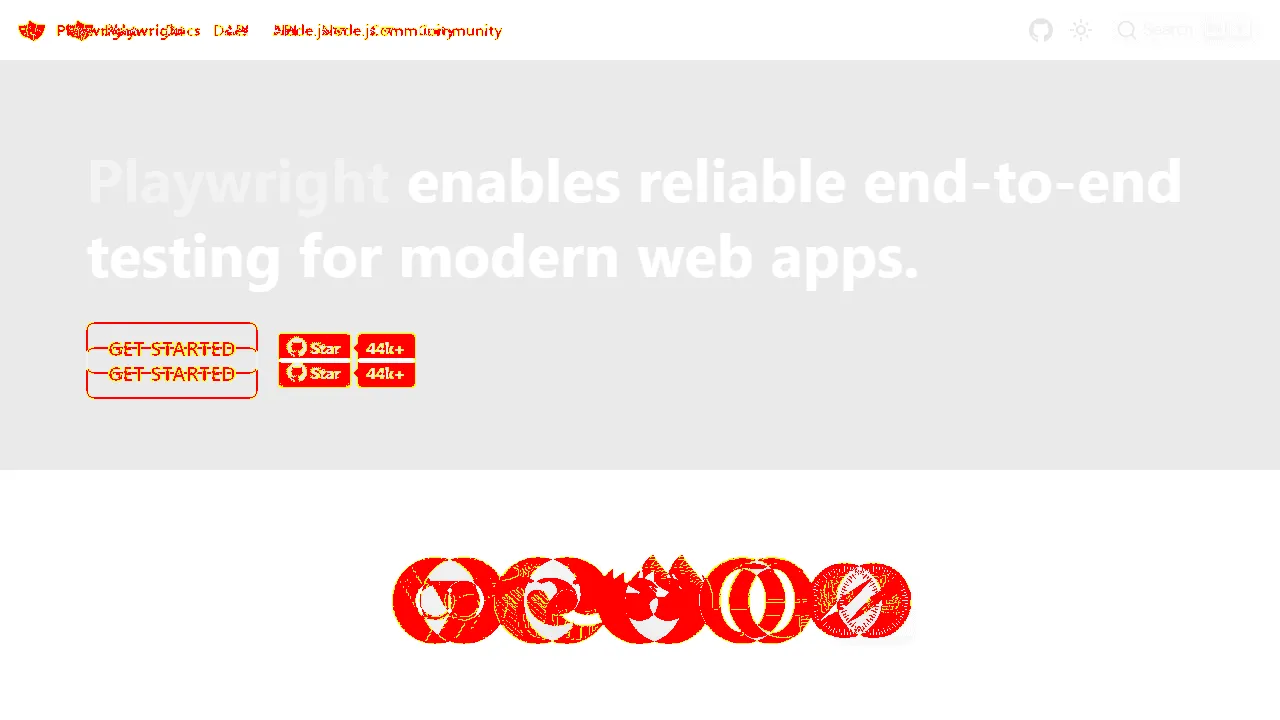
Maybe some of you found 1 or 2, and maybe some of you found all 3. It should start to become clear that, as humans, we are not designed to pick up on these small visual changes in small spaces of time. The reason to find them in less than 10 seconds is how fast our visual tools can find them. Dedicated visual testing tools automate this comparison across browsers, devices, and screen sizes.
Benefits of visual regression testing
Four things make visual testing worth adding to a Playwright suite that already has functional coverage.
- Nothing to install. toHaveScreenshot() ships inside @playwright/test, so a visual assertion is one line added to a spec file you already have. No plugin, no separate service, no extra dependency in package.json.
- One assertion replaces many. A single full-page comparison covers every element on the page at once, which retires the class of UI test that only checks whether an element is displayed.
- Failures need no debugging. Playwright writes three images per failure, actual, expected, and diff, plus the exact pixel count and ratio that differed. A designer or product manager can read the report without knowing the framework.
- It runs where your tests already run. Because it is part of the test runner, visual comparison inherits your existing projects, retries, sharding, and reporters instead of needing a parallel pipeline.
What will visual regression testing not catch?
Visual regression will not replace your existing test suites. Here is a quick list of bugs or issues it will not pick up on:
- Functional issues such as clicking on links, buttons, and general interactions with your website
- API or network issues, meaning requests for content or data in the background
- Performance or security issues such as response times or code vulnerabilities
Those are just a few, but you get the idea. Visual testing focuses on the appearance and layout of the website and does not dig deeper than that.
Implementing Playwright visual testing for a single web page
In this Playwright visual regression testing section, we will be using Playwright for our visual testing, so ensure you have the relevant frameworks and dependencies installed before we get started.
Once set up, delete unnecessary folders, so your structure looks like the one below. The example.spec.js contains a basic code snippet to get us started with Playwright visual regression testing:
// example.spec.js
const { test, expect } = require('@playwright/test');
test('example test', async ({ page }) => {
  await page.goto('https://ecommerce-playground.lambdatest.io/');
  await expect(page).toHaveScreenshot();
});
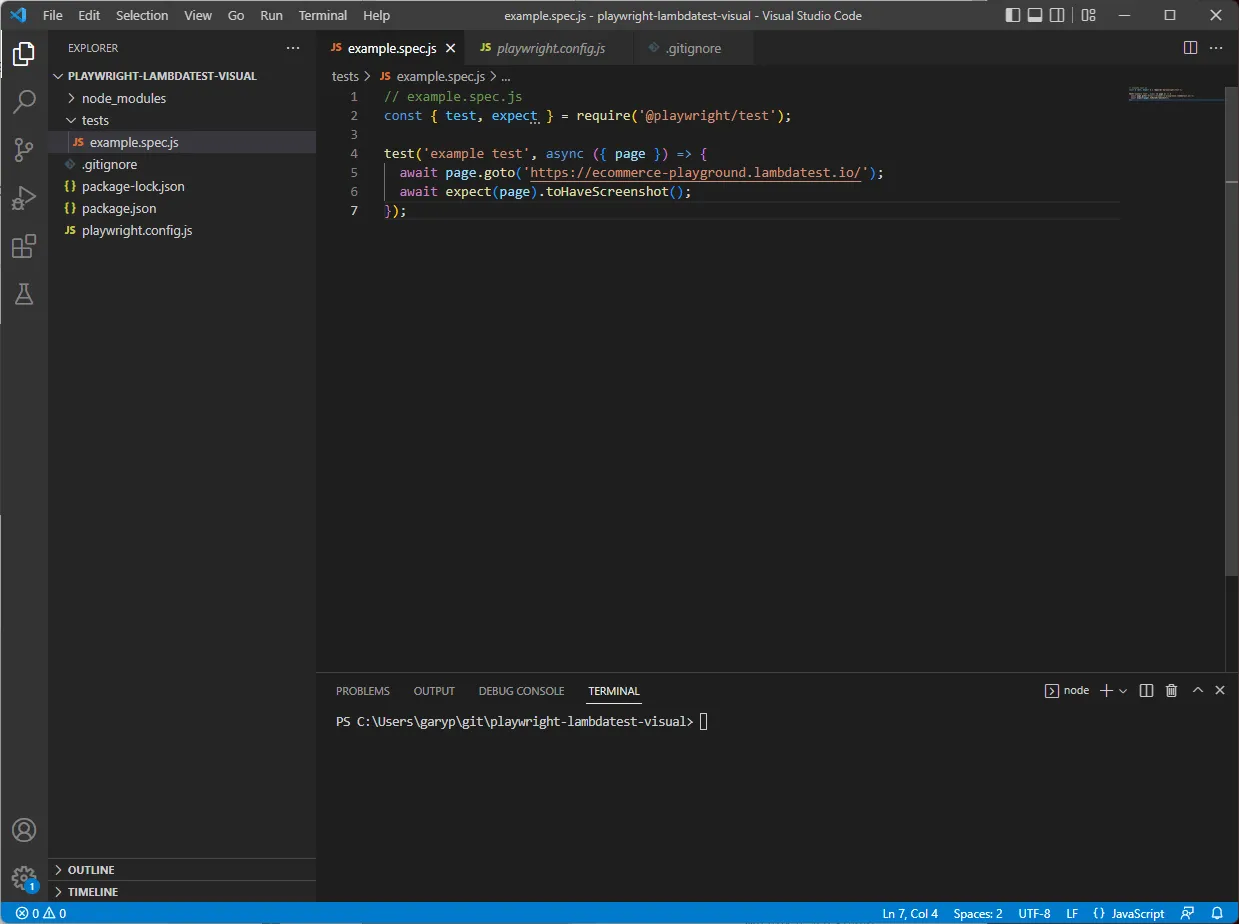
To run our basic visual test, we execute the following (these tests run headless, so you will not be able to see the test running):
npx playwright testYou should notice a few things. First, all our tests failed, which is fine. And that we have some new folders created. The first execution has no baselines to run against, so the tests fail, and the baselines are created for us. This is the default missing mode described in the baseline section further down.
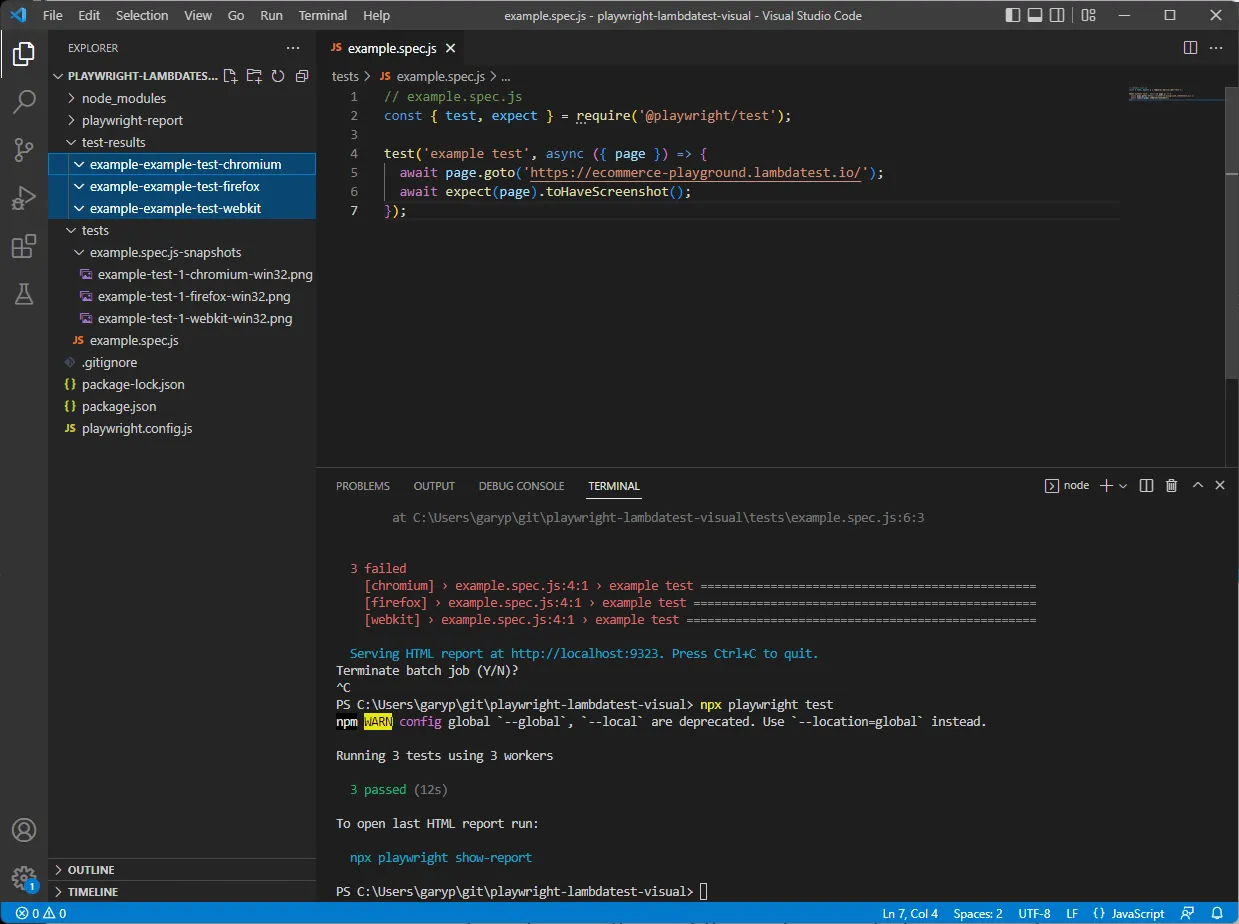
The folder tests/example.spec.js-snapshots is where our baseline .png files are stored, and the test-results folder is where we can see our Playwright visual regression testing results. You will also notice we have run our visual tests across three different browsers: Chromium, Firefox, and Webkit.
A saved baseline is named like example-test-1-chromium-darwin.png. That name is three parts joined together: the auto-generated snapshot name, the browser or project name, and the platform. Pass a name as the first argument, as in toHaveScreenshot('landing.png'), to replace the auto-generated part, or give it a .webp extension to store the baseline losslessly in WebP instead of PNG. The whole path is configurable through snapshotPathTemplate in the Playwright config, added in version 1.28.
// playwright.config.js
const { defineConfig } = require('@playwright/test');

module.exports = defineConfig({
  testDir: './tests',
  snapshotPathTemplate: '{testDir}/__screenshots__/{testFilePath}/{arg}{ext}',
});
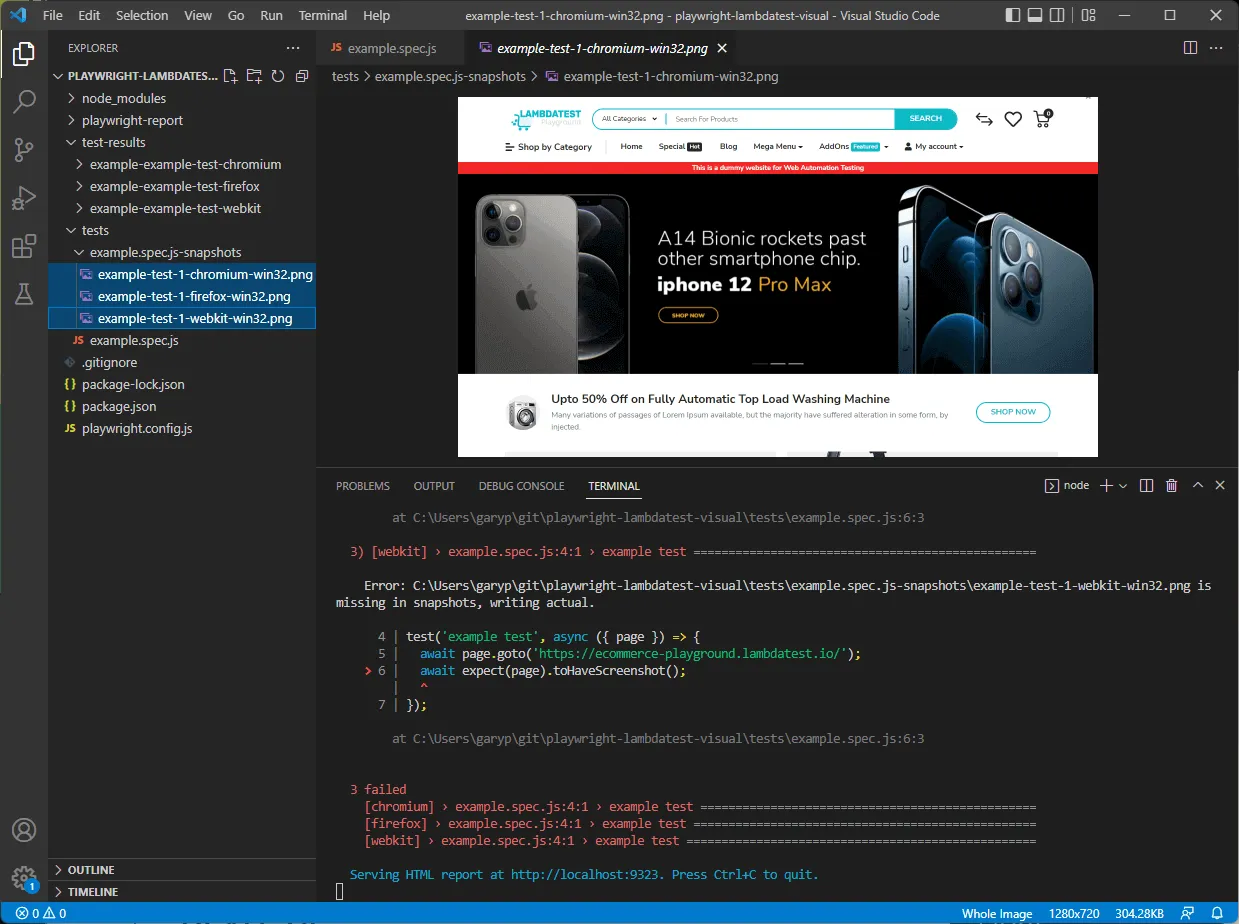
Let us run the tests a second time. This time we will notice all of our tests have passed, which is to be expected. The baseline images we took are being compared to the website in its current state, which is the same. You will also notice that our test-results sub-folders are empty this time (highlighted blue). This is because there were no failures to report on.
Next, let us check that our Playwright visual regression testing is working correctly by making some small manual changes to one of our snapshot baselines. The changes we have made are meant to simulate a real-world situation where elements are ordered incorrectly, or missing entirely, due to a code change.
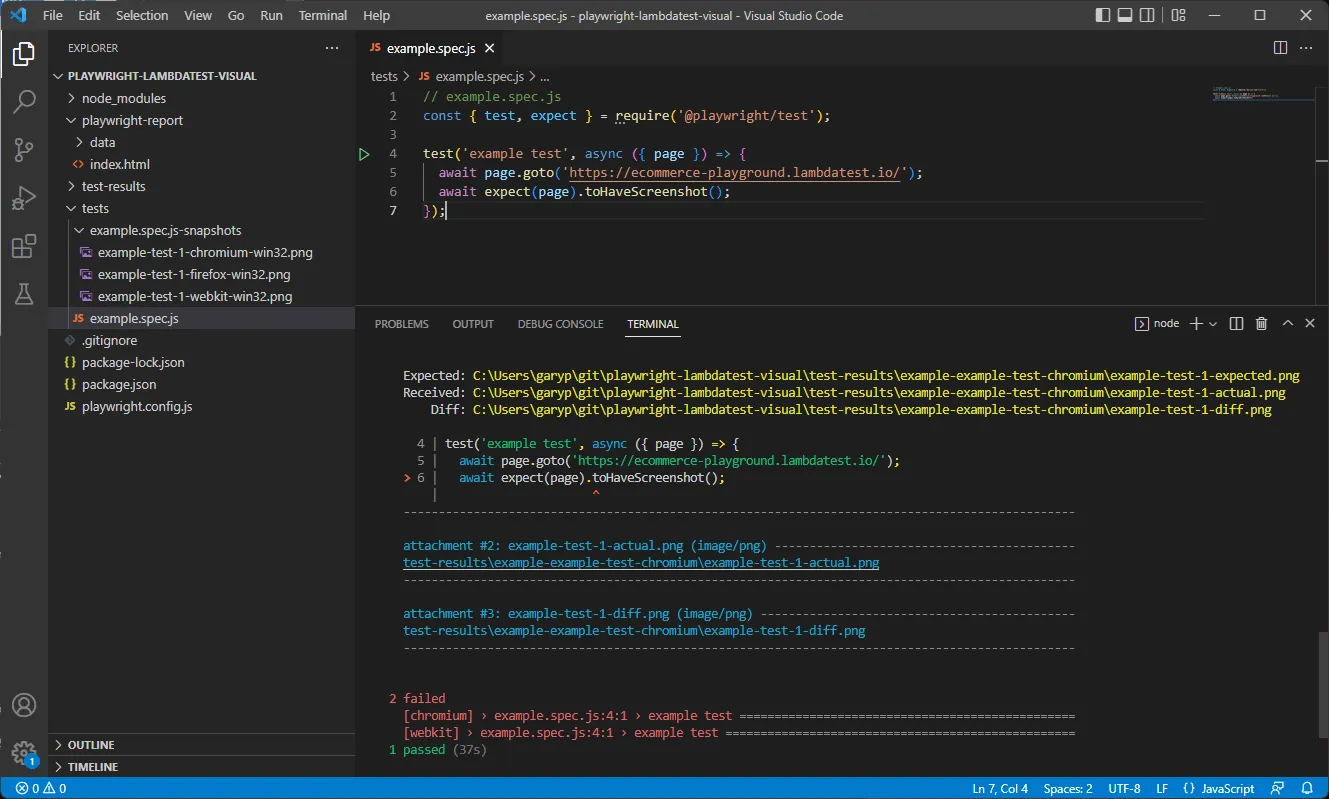
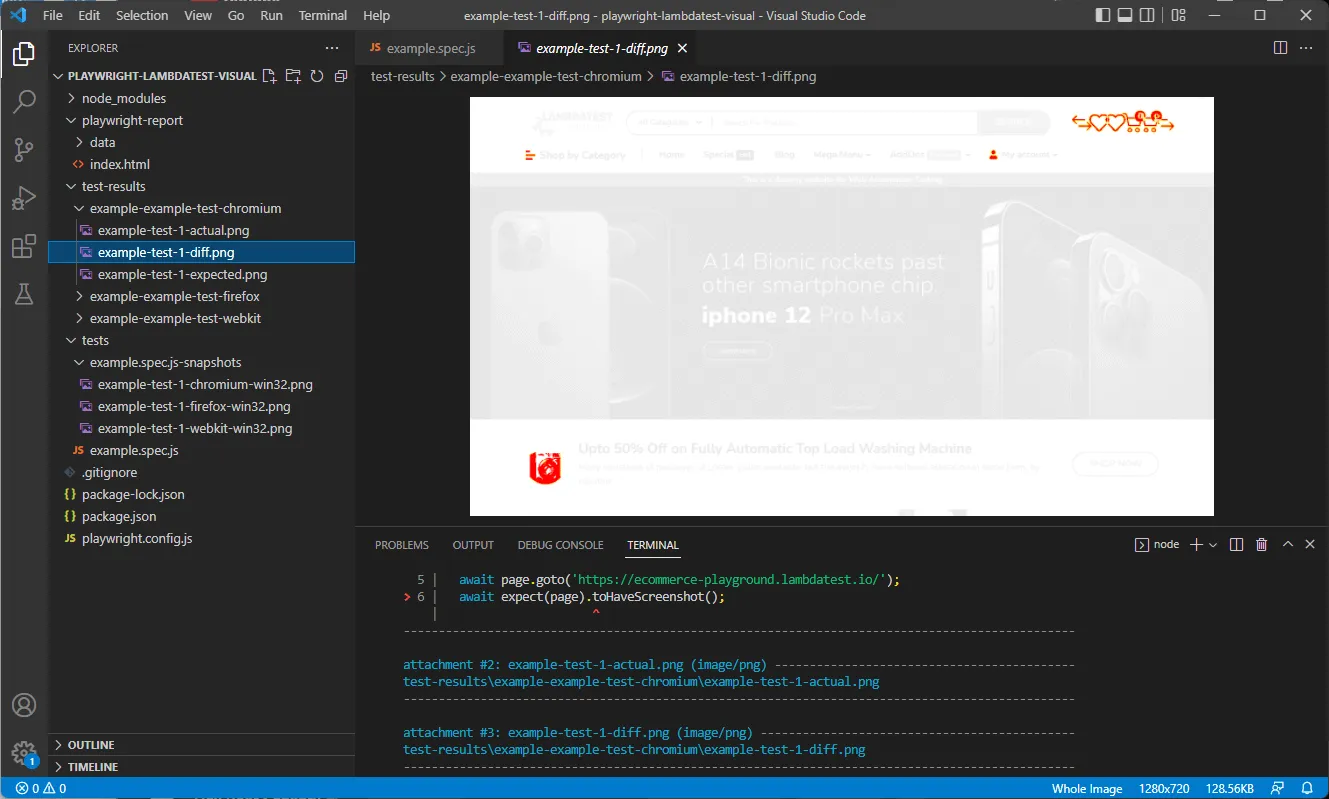
Although we have only made a breaking change to one image in this Playwright visual regression testing tutorial, two of them have failed. Let us look into both failures further and see what happened. There are two places where we can check the visual results: directly in the test results folder by opening the files that end with diff.png, and in the generated HTML report.
This is the file view within Visual Studio Code. As you can see by the red highlights, we have locators out of place or missing entirely. This is good for a quick check, and we can switch between the actual, expected, and diff files to see what has changed.
There is also a nicer way of viewing it within the Playwright report. When your test execution finishes, another window should appear which contains the HTML report:
Serving HTML report at http://localhost:9323. Press Ctrl+C to quit.If we open that page, we will see more useful information. The first is the error logs. It tells us that 744 pixels are different than what was expected, and the ratio comparison of all other pixels in total. Those two numbers map directly onto the maxDiffPixels and maxDiffPixelRatio options covered in the thresholds section below.
- 744 pixels (ratio 0.01 of all image pixels) are different.If we scroll further down the page, we will see similar actual, expected, and diff images, plus a nice additional feature which lets us swipe between views. Screenshot comparison is one of several Playwright assertions that auto-retry until they pass or time out, which is why toHaveScreenshot() waits for two consecutive identical captures before comparing.
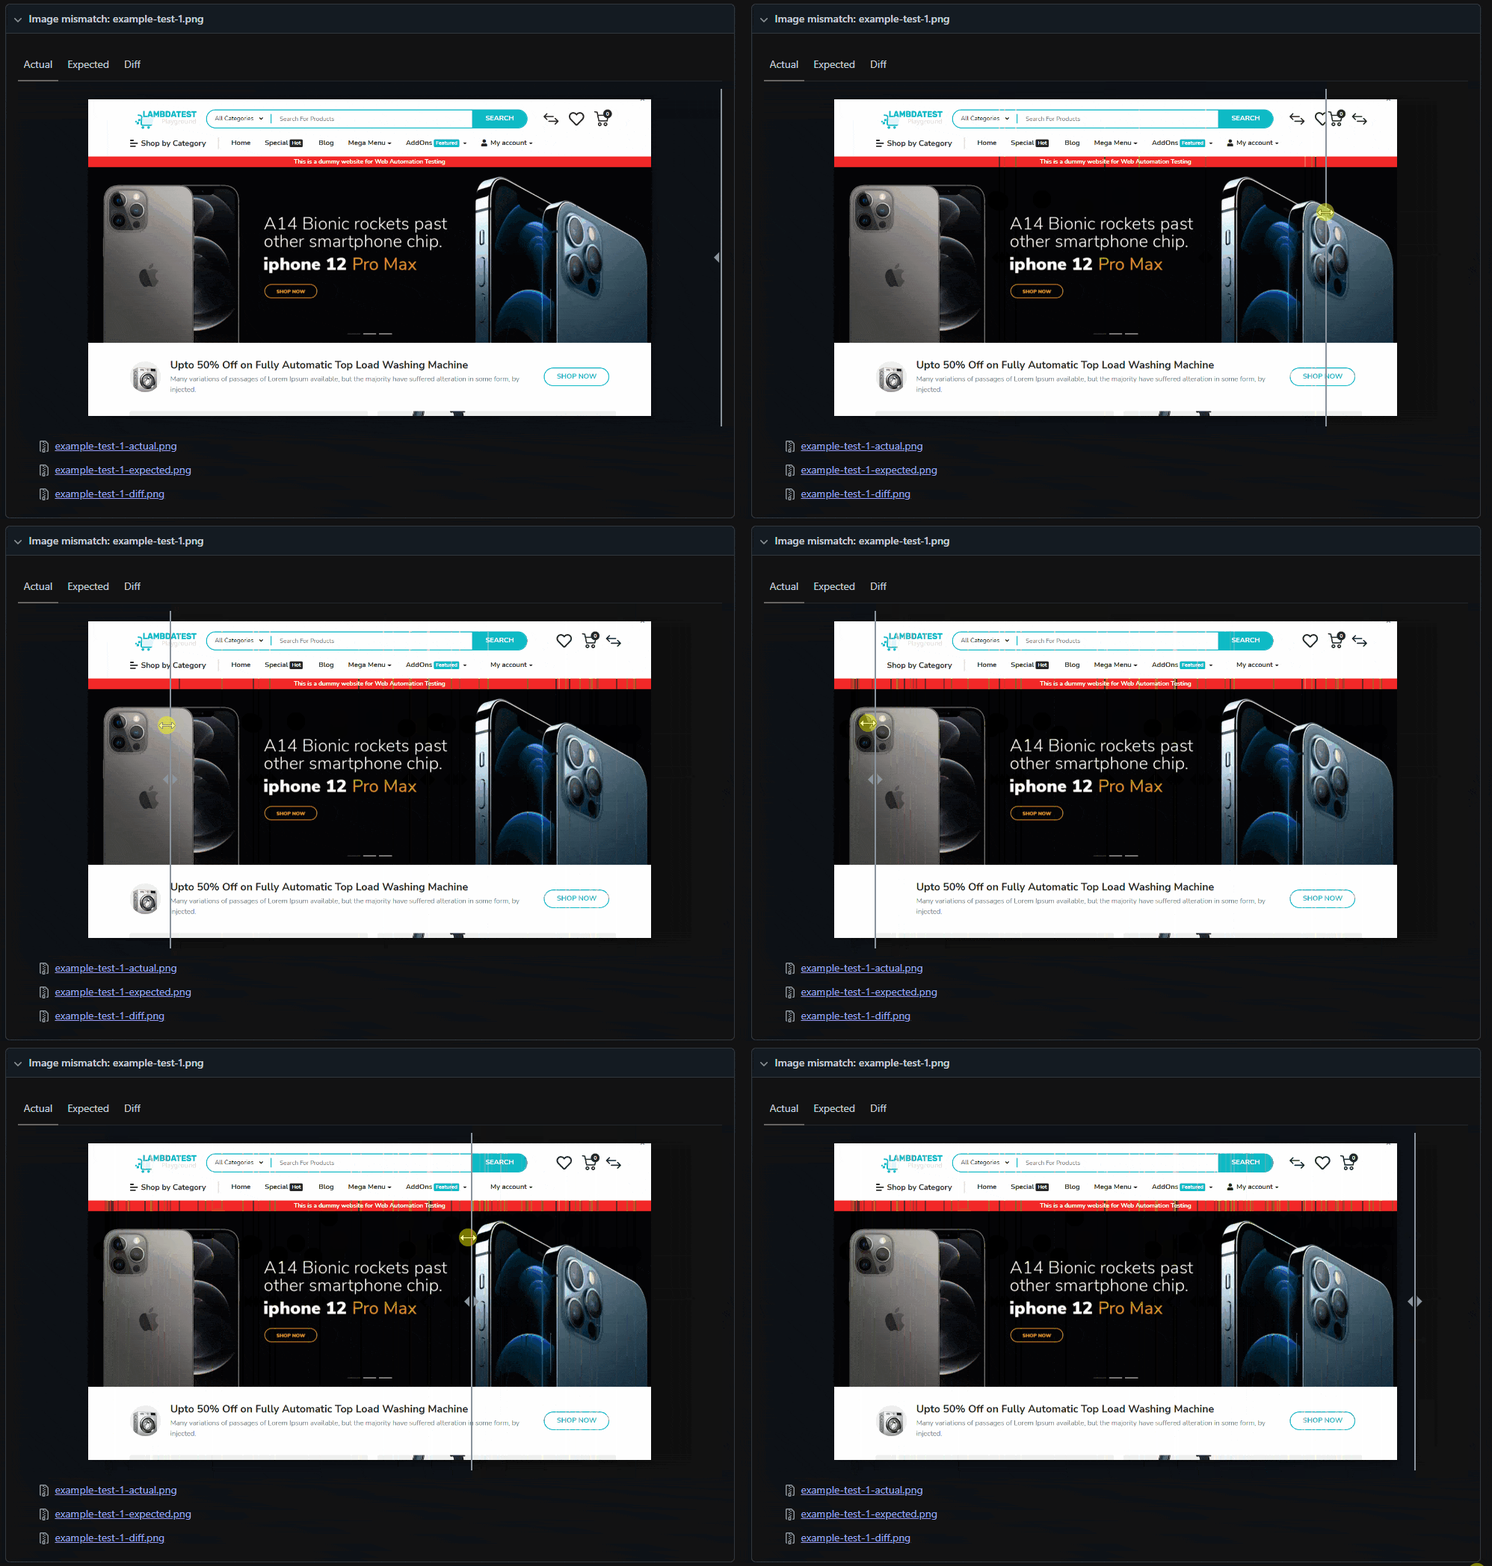
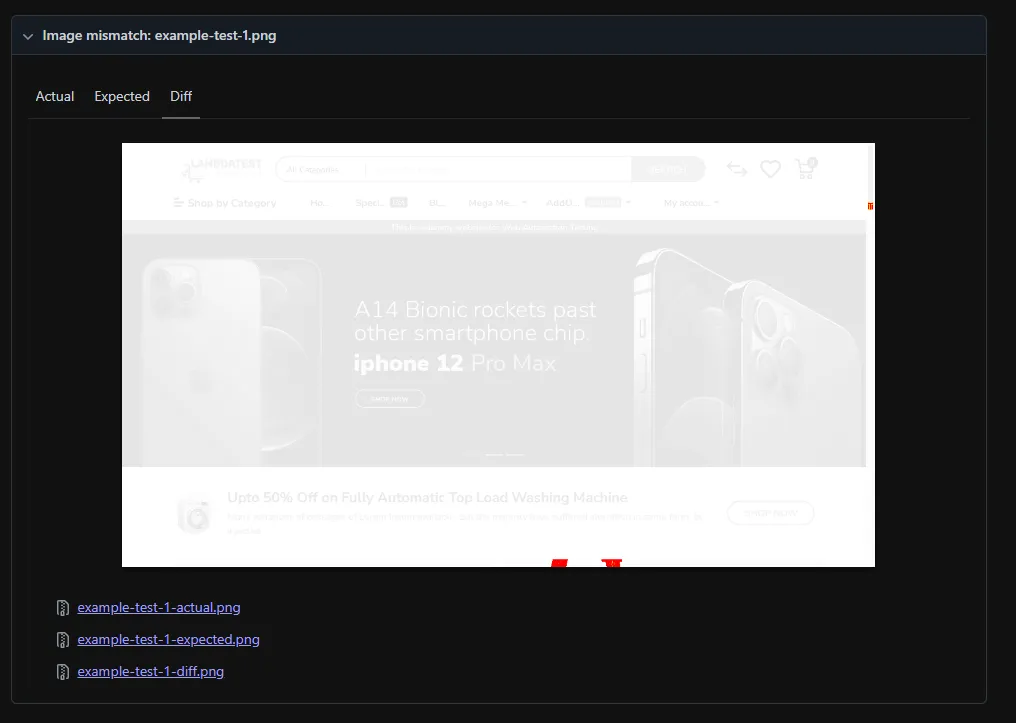
That test was the one we intentionally changed. Let us look at the comparison for the file we did not change. As you can see, there is a small red highlighted area near the bottom of the web page. This could be due to the layout or elements on the page loading differently from the baseline, as it is a small banner image that has come into view.
This can happen occasionally and is another reason why it is good to tweak the thresholds at which the tests break and narrow the focus of our image comparison.
Implementing visual testing for a single element
Leading from our flaky visual test, let us instead hone down our Playwright visual regression testing to a single element rather than the whole web view. We have updated our test to focus on the header logo:
// example.spec.js
const { test, expect } = require('@playwright/test');
test('example test', async ({ page }) => {
  await page.goto('https://ecommerce-playground.lambdatest.io/');

  const headerLogo = page.locator('#entry_217821 > figure > a > img');
  await expect(headerLogo).toHaveScreenshot();
});
Before we perform Playwright visual regression testing, we will need to update our baseline images. We can do that by running this simple command:
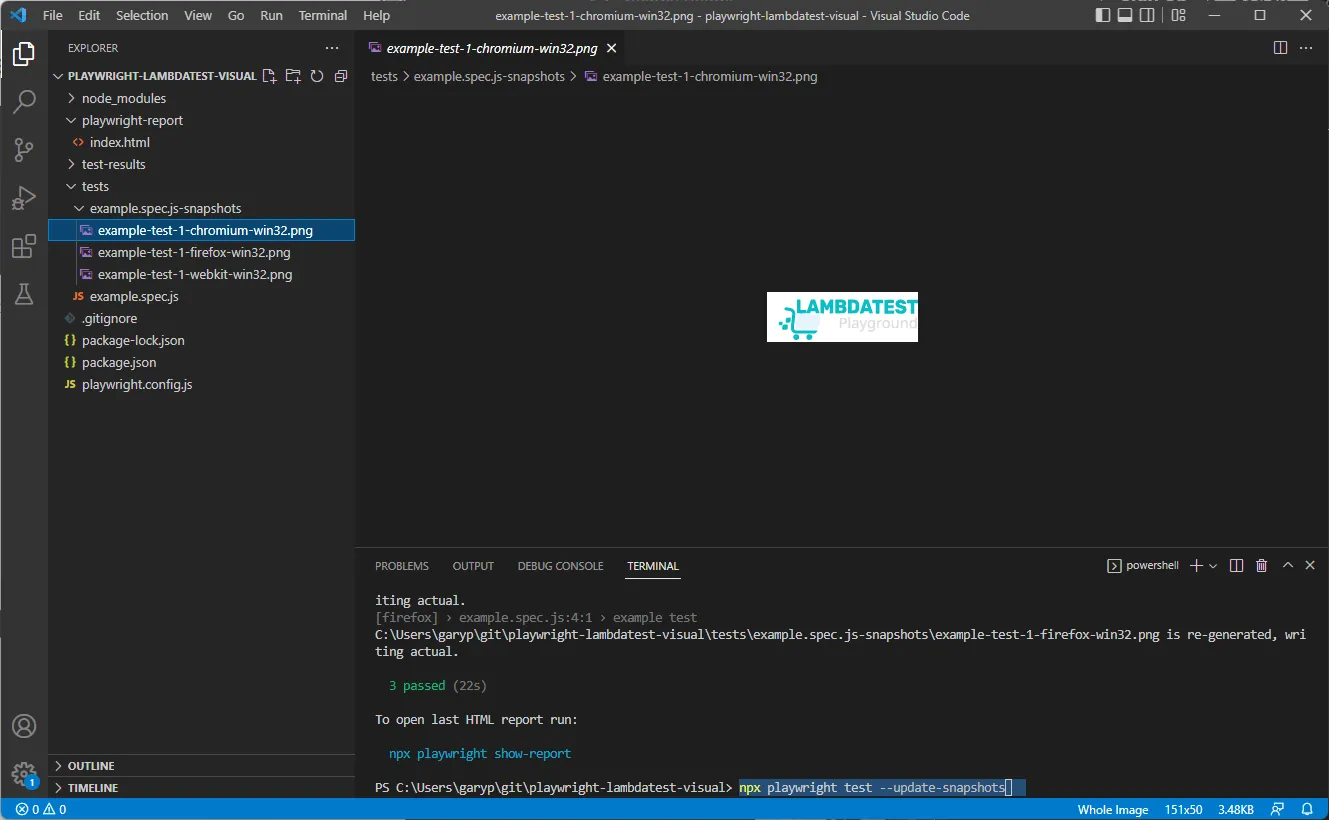
npx playwright test --update-snapshotsIf we check our snapshots folder, you will see the nice little icon for the TestMu AI Playground website:
Now, if we run our tests with the usual command, a visual comparison will be made just for the header logo locator snapshot:
npx playwright testThe test results should be three passing tests and an empty test results folder, as no discrepancies between the header logo visual comparison were found. We could break the whole website into smaller components for visual regression and minimize flakiness. That trade is the core of Playwright screenshot comparison strategy: narrower captures are more stable, wider captures cover more ground.
It would also bring the same benefits of breaking down UI tests into smaller chunks. We get more focused test results and outcomes, and finding the area for failure becomes easier.
Local Playwright gives you three browser engines. Your users have thousands of combinations.

Working with thresholds and screenshot options
With Playwright visual regression testing, as with any type of automation testing, there will always be a margin for error. Two different controls handle it, and mixing them up is the usual reason a suite is either too noisy or too permissive.
- threshold decides whether an individual pixel counts as different at all. It measures perceived color difference in the YIQ color space, runs from zero (strict) to one (lax), and defaults to 0.2.
- maxDiffPixels and maxDiffPixelRatio decide how many already-different pixels the assertion will tolerate before it fails. Both are unset by default, so with only a threshold set, a single differing pixel fails the test.
Set threshold first to control sensitivity per pixel, then add a count or a ratio to control how much drift the whole image is allowed. Prefer maxDiffPixelRatio on full-page captures, because a fixed pixel count that is sensible for a 200px logo is meaningless on a 12,000px-tall page.
await expect(headerLogo).toHaveScreenshot({ threshold: 0.1 });
await expect(headerLogo).toHaveScreenshot({ maxDiffPixels: 100 });
await expect(page).toHaveScreenshot({ maxDiffPixelRatio: 0.01 });
Those three are the options most guides stop at. toHaveScreenshot() accepts a good deal more, and several of the remaining ones do more to stabilize a suite than any threshold tweak. Here is the full set, with the default Playwright applies when you leave the option out.
| Option | Accepted values | Default | What it controls |
|---|---|---|---|
| threshold | 0 to 1 | 0.2 | Perceived color difference in the YIQ color space allowed for a single pixel before it counts as different. |
| maxDiffPixels | Any number | Unset | Absolute count of differing pixels tolerated before the assertion fails. |
| maxDiffPixelRatio | 0 to 1 | Unset | Share of total pixels tolerated. Scales with image size, unlike maxDiffPixels. |
| animations | disabled, allow | disabled | Fast-forwards finite CSS animations to completion and resets infinite ones to their initial state. |
| caret | hide, initial | hide | Hides the text caret so a blinking cursor in a focused input cannot fail the comparison. |
| scale | css, device | css | One image pixel per CSS pixel, or per device pixel. Using device doubles image size on high-DPI machines. |
| fullPage | true, false | false | Captures the entire scrollable page instead of the current viewport. |
| clip | x, y, width, height | Unset | Crops the capture to a fixed rectangle, useful when a locator does not map cleanly to the region you want. |
| mask | Array of locators | Unset | Covers matched elements with a solid box before the comparison, including elements that are invisible. |
| maskColor | Any CSS color | #FF00FF | Color of the mask overlay. Change it when the default pink appears in the page itself. |
| stylePath | File path or array | Unset | Injects a stylesheet before capture. It pierces the shadow DOM and applies to inner frames. |
| omitBackground | true, false | false | Drops the default white background so transparency is preserved. Not applicable to JPEG. |
| timeout | Milliseconds | expect timeout | How long the assertion keeps retrying before it gives up. |
Two defaults in that table are worth reading twice. animations is already disabled, so adding it to a test changes nothing, and caret is already hidden. Guides that present either as a fix for flakiness are describing behavior Playwright gives you for free.
Repeating these values in every test gets old quickly. Define them once in the Playwright config, either globally or per project:
// playwright.config.js
const { defineConfig } = require('@playwright/test');

module.exports = defineConfig({
  expect: {
    toHaveScreenshot: {
      threshold: 0.2,
      maxDiffPixelRatio: 0.01,
      scale: 'css',
      stylePath: './screenshot.css',
    },
  },
  projects: [
    { name: 'chromium', use: { browserName: 'chromium' } },
    { name: 'firefox',  use: { browserName: 'firefox'  } },
    { name: 'webkit',   use: { browserName: 'webkit'   } },
  ],
});
Ignoring sections of the webpage during comparison
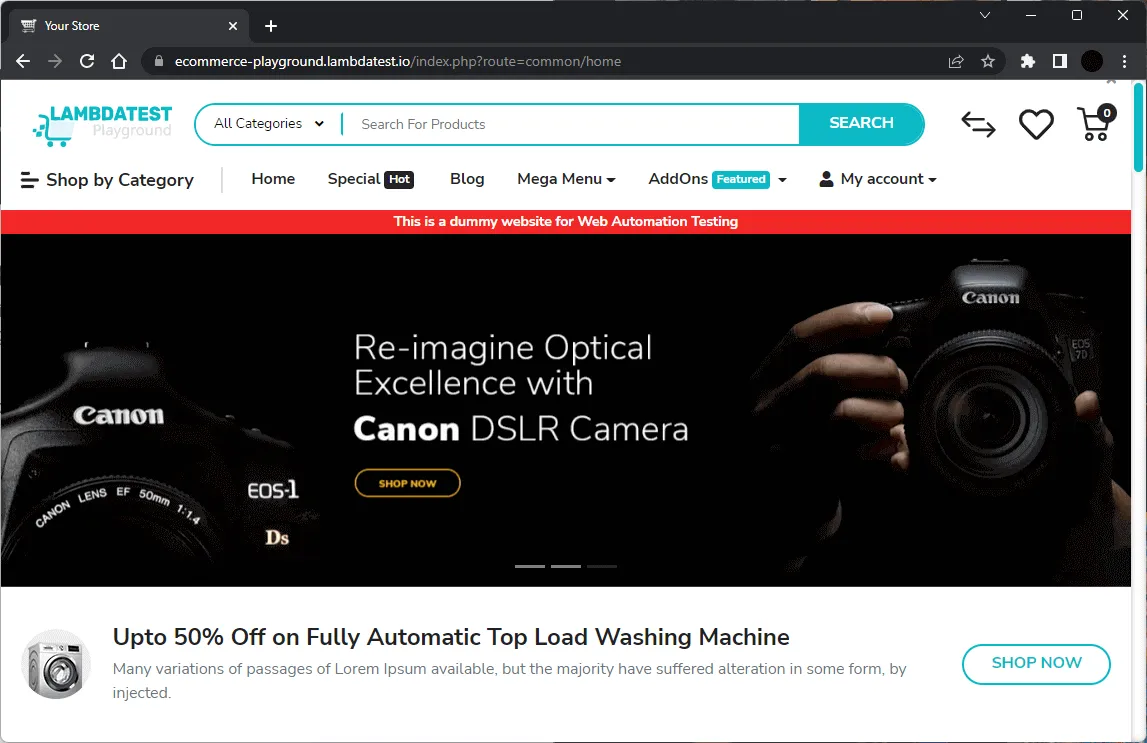
Most websites have some form of dynamic content, like a hero carousel, gallery feed, or list of headings. In most cases this could change on a daily or weekly basis, and constantly updating your baseline images is not feasible.
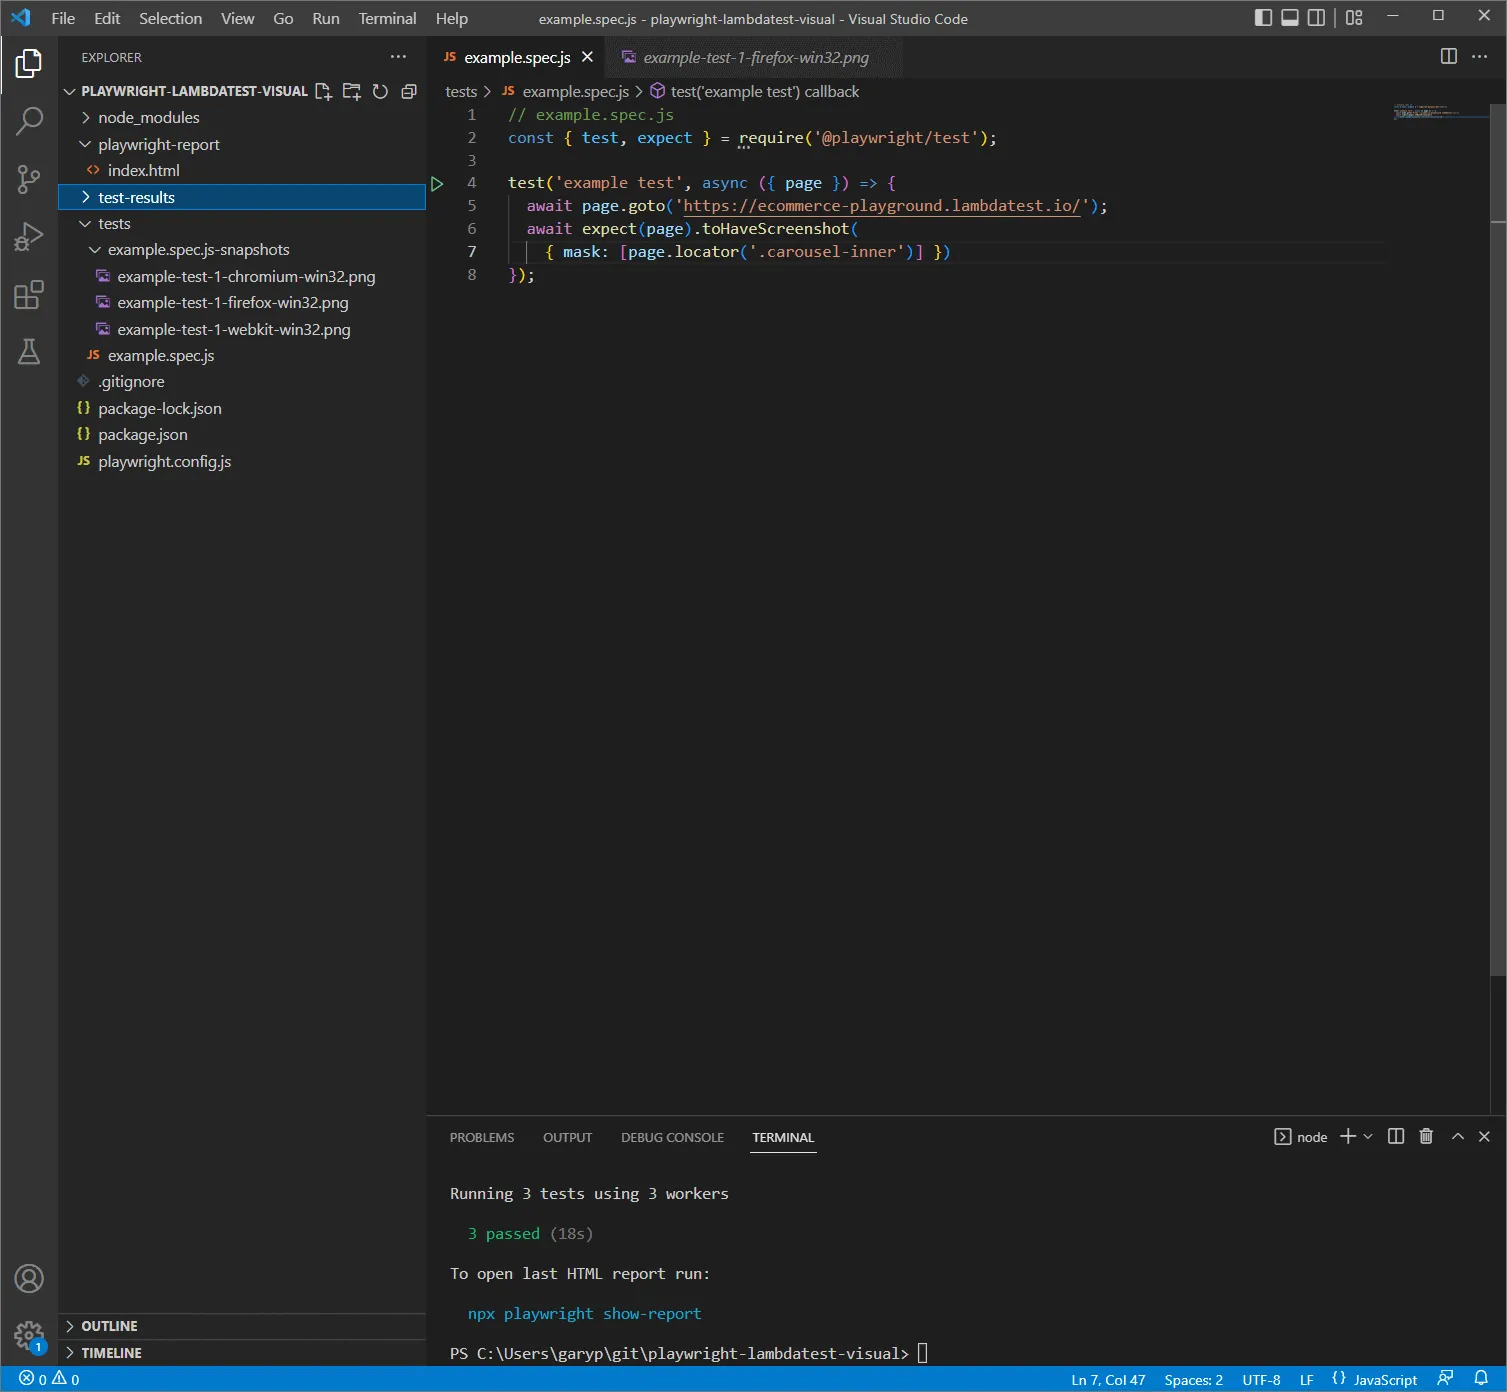
The solution is an option called mask, which lets us exclude a locator or group of locators from our comparison. For this Playwright visual regression testing tutorial, let us continue to use the eCommerce website. The main area that stands out is the image carousel, which constantly rotates between different products.
If we update our test to the following and run:
npx playwright test --update-snapshots// example.spec.js
const { test, expect } = require('@playwright/test');
test('example test', async ({ page }) => {
await page.goto('https://ecommerce-playground.lambdatest.io/');
await expect(page).toHaveScreenshot({ mask: [page.locator('.carousel-inner')] });
});
We will have new baseline images generated which look like this:
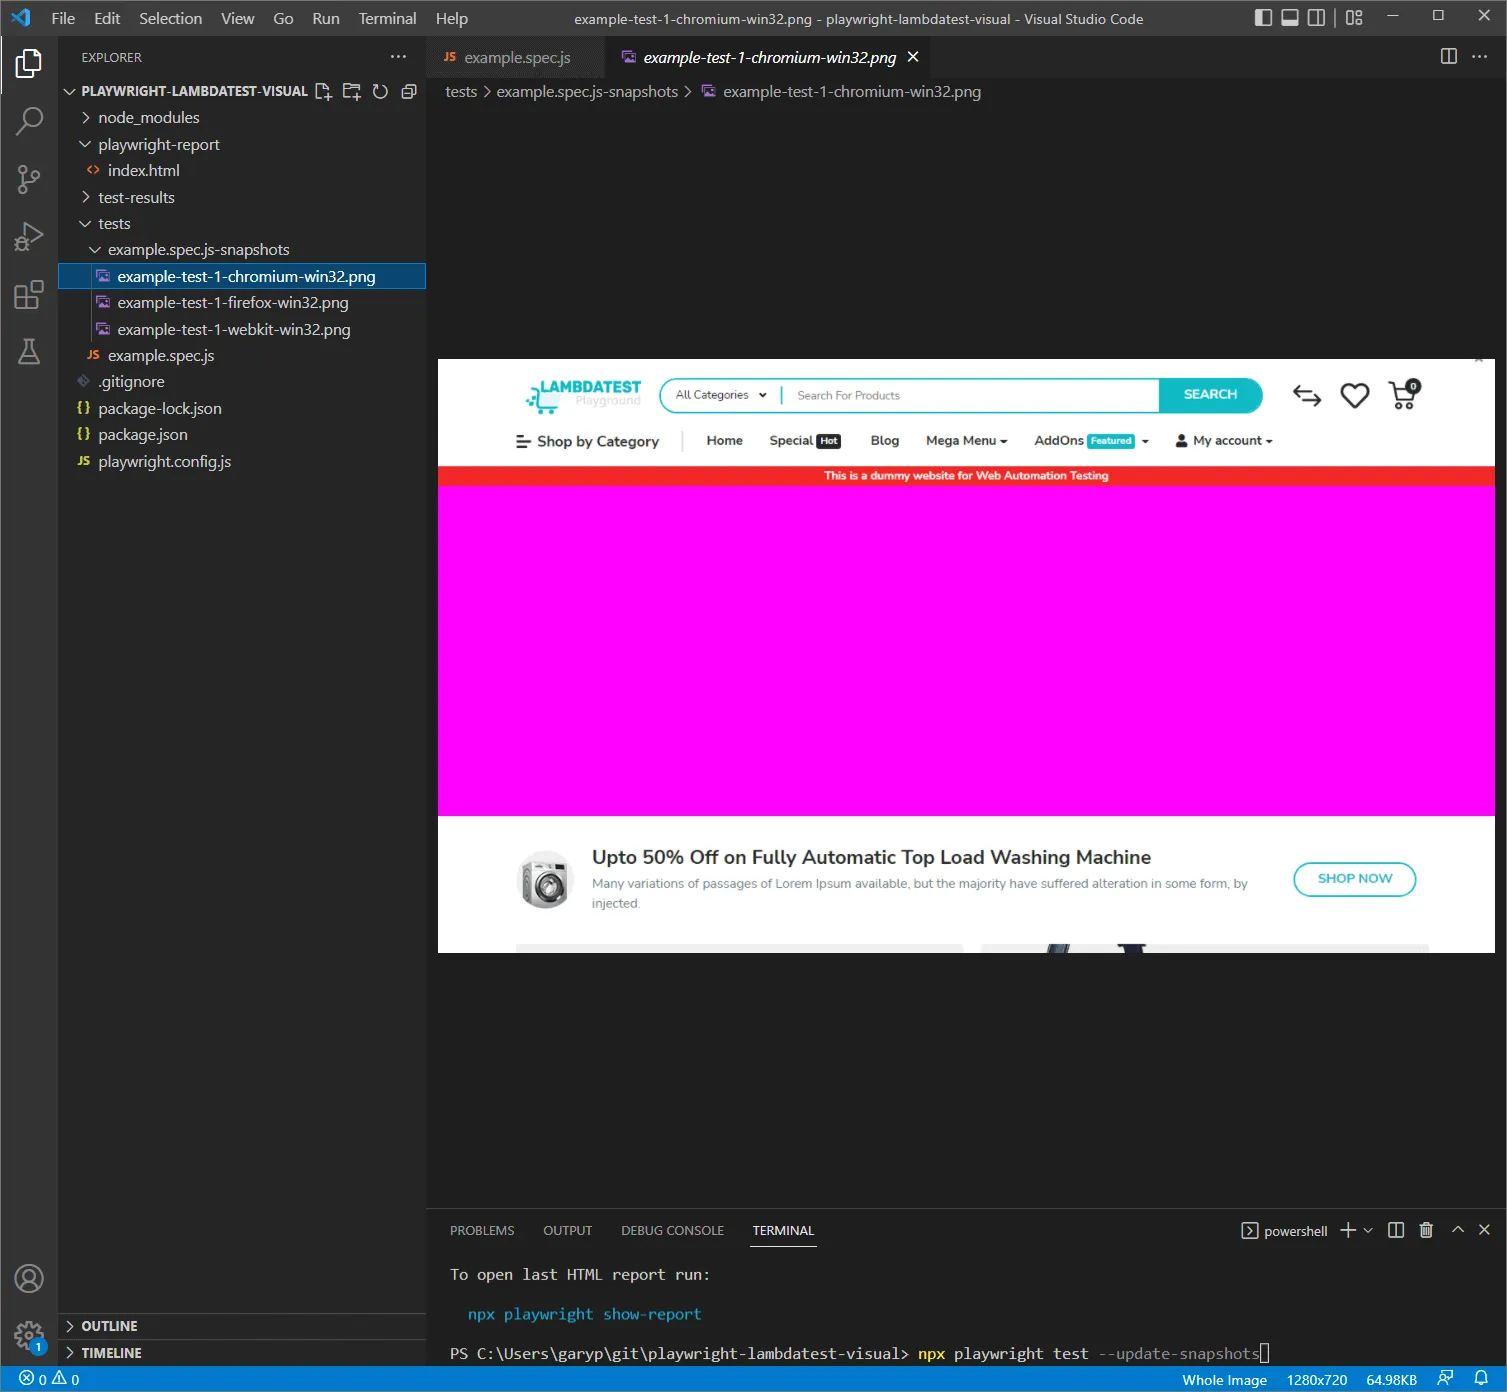
The bright pink area is the locator we masked, which will be ignored from all test runs. That color is the #FF00FF default, and maskColor overrides it when your own UI happens to use the same shade. So let us perform Playwright visual regression testing with our new baseline.
npx playwright testAnd we should have three passing tests. Now we can perform Playwright visual regression testing against the elements of our website which we know are static, and any issues raised will be genuine and not the result of content changes.
A mask covers a rectangle, which is blunt when the volatile thing is a font, an embedded iframe, or an animation that never settles. For those, stylePath injects a stylesheet immediately before capture, and because it pierces the shadow DOM it reaches web components that a locator cannot. The Playwright documentation uses exactly this technique to hide iframes.
/* screenshot.css */
iframe,
[data-testid="live-chat"] {
  visibility: hidden;
}

*,
*::before,
*::after {
  animation-duration: 0s !important;
  transition-duration: 0s !important;
}
const path = require('path');

await expect(page).toHaveScreenshot({
  stylePath: path.join(__dirname, 'screenshot.css'),
});
Implementing full page visual comparisons
Another visual comparison we can perform is a full page, which captures the full height of the webpage. This is useful if your website has a lot of scrollable components or content you need to verify.
Remember that as we capture a larger area, the chance of failure rises with it. A ratio tolerance absorbs that, and pinning scale keeps the image size identical between a Retina laptop and a CI runner.
- maxDiffPixelRatio of 0.01 allows one percent of pixels to drift, which absorbs lazy-loaded images and CSS animations that resolve a frame late.
- scale set to css produces one image pixel per CSS pixel, so a high-DPI developer machine and a standard-DPI CI runner generate images of the same dimensions.
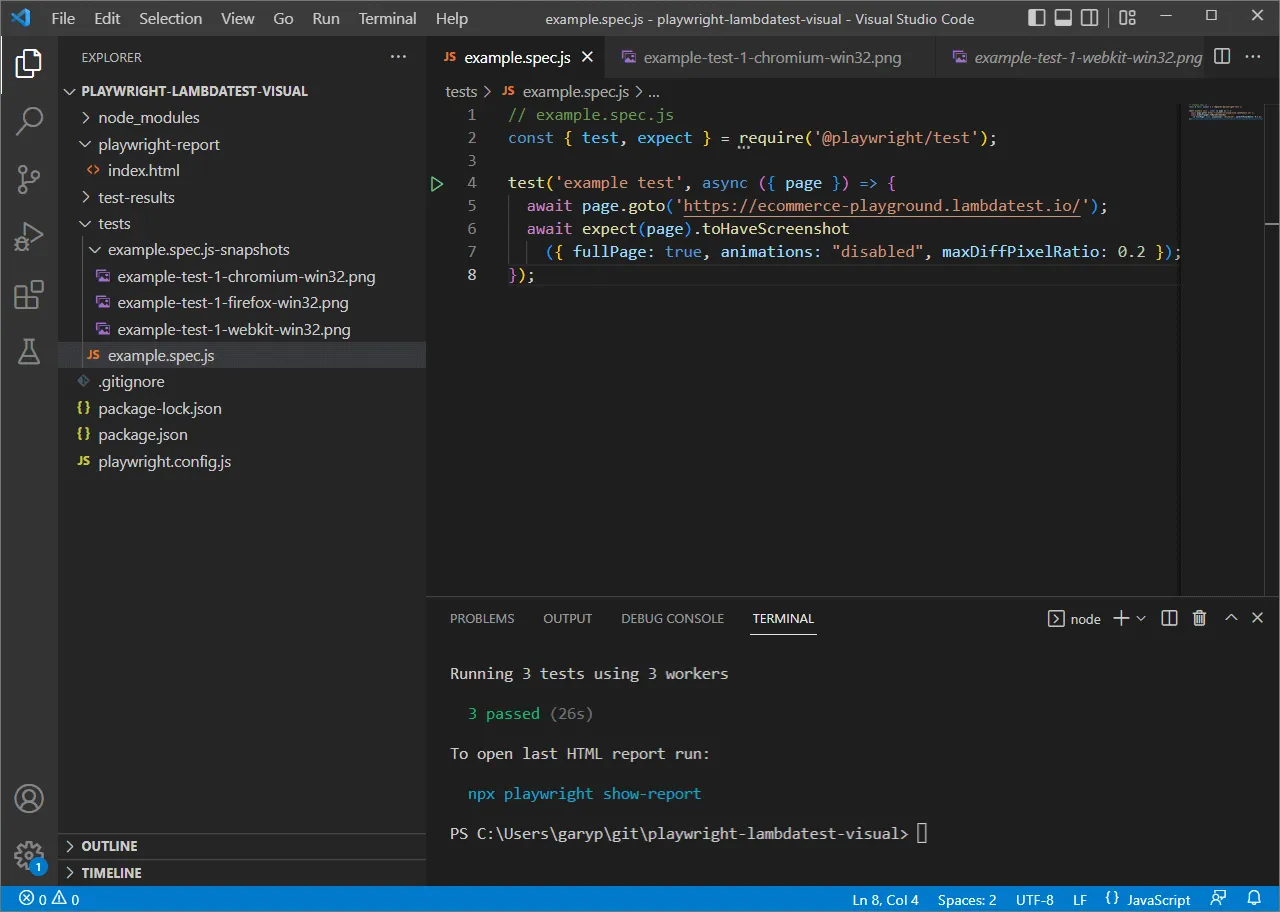
This is what the test looks like with the additional parameters added.
// example.spec.js
const { test, expect } = require('@playwright/test');
test('example test', async ({ page }) => {
  await page.goto('https://ecommerce-playground.lambdatest.io/');
  await expect(page).toHaveScreenshot({
    fullPage: true,
    scale: 'css',
    maxDiffPixelRatio: 0.01,
  });
});
And if we execute the update snapshots command, we can see how the baseline will look. Some content and animations have been suppressed, but the core components of the website have been rendered. So our visual test will cover quite a lot while remaining stable.
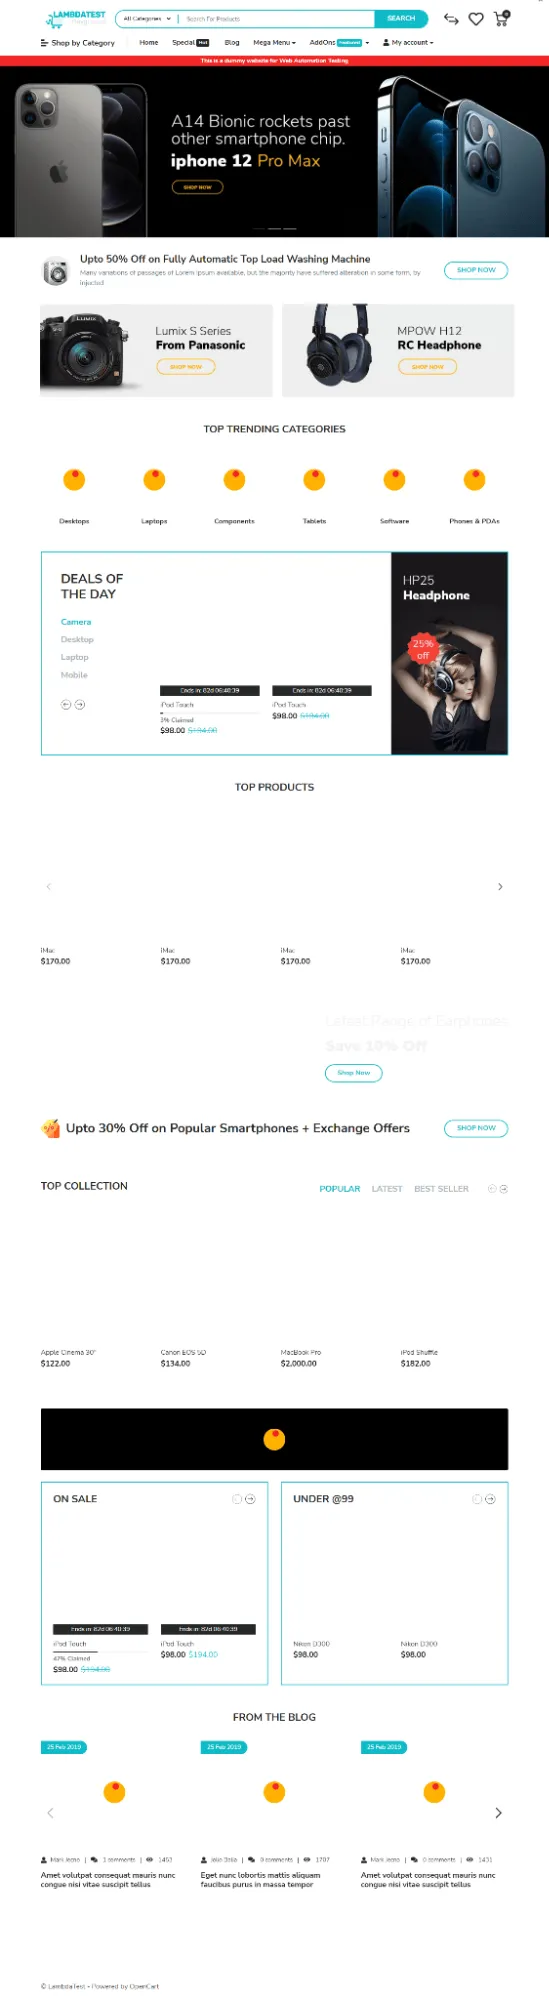
The test execution will be the same as before, covering Chromium, Firefox, and Webkit for the full page view. If we perform Playwright visual regression testing, we should see a successful output for all 3.
Updating and managing baseline snapshots
Every command so far has used the bare --update-snapshots flag, which hides the most useful thing about it. The flag takes a mode, and the four modes behave differently enough that picking the wrong one either rewrites baselines you meant to keep or silently creates baselines that should have failed.
| Mode | What it does | When to use it |
|---|---|---|
| missing | Creates snapshots that do not exist yet. Everything else is left alone. This is what runs when you pass no flag at all. | Local development, where a brand new test should seed its own baseline on first run. |
| changed | Updates snapshots that did not match and creates missing ones. Matching snapshots are untouched. This is what a bare -u with no value selects. | After an intentional UI change, when you want only the affected baselines rewritten. |
| all | Rewrites every snapshot the run touches, matching or not. | After a global redesign or a browser version bump that shifts rendering everywhere. |
| none | Updates nothing. A missing snapshot fails instead of being created. | CI, where a baseline that quietly writes itself turns a real gap into a green build. |
# create only what is missing (same as running with no flag at all)
npx playwright test --update-snapshots=missing

# update mismatches and create missing ones (same as a bare -u)
npx playwright test --update-snapshots=changed
npx playwright test -u

# rewrite everything the run touches
npx playwright test --update-snapshots=all

# update nothing, fail on a missing baseline
npx playwright test --update-snapshots=none
The same four values are available as the updateSnapshots key in the config, where the default is missing. Setting it to none for CI is the single highest-value line in this article: it turns an absent baseline into a failure instead of a pass, which is the difference between a suite that guards your UI and one that only appears to.
// playwright.config.js
const { defineConfig } = require('@playwright/test');

module.exports = defineConfig({
  updateSnapshots: process.env.CI ? 'none' : 'missing',
});
A companion flag, --update-source-method, controls how inline snapshot values are written back into your source. It accepts patch, which is the default and writes a unified diff file you can apply later, 3way, which leaves merge conflict markers for you to resolve in the editor, and overwrite, which rewrites the source in place. Wire the whole thing into a pipeline with the Playwright CI/CD guide.
npx playwright test -u --update-source-method=3wayWhichever mode you use, commit the snapshots directory to version control and review the image diff in the pull request. A baseline update that nobody looked at is how a regression becomes the new expected state.
Why baselines drift between your machine and CI
Every suite eventually hits the same wall: green locally, red on the first CI run. The Playwright documentation states the cause plainly, warning that browser rendering can vary based on the host OS, version, settings, hardware, power source, headless mode, and other factors, and advising that you run tests in the same environment where the baselines were generated.
Three specific things go wrong in practice.
- Snapshot filenames embed the platform. A baseline written on macOS lands as example-test-1-chromium-darwin.png, while Linux CI looks for example-test-1-chromium-linux.png. CI is not comparing against your baseline at all, it is looking for one that does not exist.
- Font rendering is not portable. Sub-pixel anti-aliasing differs between macOS, Windows, and Linux, and a headless container often lacks the fonts installed on your laptop, so text renders at a different weight and every paragraph reports as changed.
- Device pixel ratio doubles the image. A Retina display captures at 2x unless scale is set to css, so the two images are not even the same dimensions and the comparison fails before pixel one.
There are two honest ways out. The first is to make every machine identical by generating and comparing baselines inside the official Playwright Docker image, so your laptop run and your CI run share one operating system and one font set. It works, and it costs you a container build on every local snapshot update.
The second is to stop fighting the rendering variance and filter it instead. TestMu AI SmartUI runs the comparison on a hosted grid rather than on the machine that ran the test, and its Visual AI Engine is built around exactly this problem: anti-aliasing adjustment discards the one and two pixel differences at element edges that vary by GPU and OS, and noise reduction filters the sub-pixel font rendering variation that makes a Linux container disagree with a Mac. Smart Ignore layers on top of that for genuinely dynamic content, and cuts false positives by up to 95%.
SmartUI also solves the branching problem that a git-committed snapshots folder does not. Each branch holds its own baseline, inherited from its parent when the branch is created, so two feature branches can both restyle the same page without either one poisoning the other. The baselines merge when the pull request merges, and a screen both branches changed surfaces as a conflict to resolve rather than a silent overwrite.

Note: A baseline that only matches on the machine that generated it is an infrastructure problem, not a Playwright problem. Move the comparison to a grid where the rendering environment does not change between runs. Start visual testing free on TestMu AI
Running your Playwright suite on cloud with SmartUI
Local snapshots answer one question: did this page change on this machine. A cloud grid answers a different one: does this page render correctly across the browsers and viewports your users actually have. TestMu AI provides 3,000+ browser and OS combinations, SmartUI captures across the browsers, viewports, and named mobile devices you list in one config file, and the comparison, approval, and baseline history all live outside your repository.

The table below is the practical difference between the local workflow you built above and the same suite pointed at SmartUI.
| Local execution | TestMu AI SmartUI |
|---|---|
| Baselines live in a git folder, one file per browser and platform combination. | Baselines are versioned per project and per branch, and any previous baseline can be restored. |
| Every browser you want to cover has to be installed and kept current on the runner. | Latest and legacy browsers and OS versions are provided, with no local maintenance. |
| Approving a change means running an update command and committing binary files. | Approve or reject each change in the dashboard, with bulk approval for a global redesign. |
| Anti-aliasing and font rendering differences show up as real failures. | The Visual AI Engine filters them before the diff reaches the review queue. |
| You get the actual, expected, and diff PNGs in a folder. | Side by side, overlay, and slider views, plus change classification by type and impact. |
| Results are shared by sending someone the HTML report. | Results are a shared dashboard, exportable to Jira, Slack, and other trackers. |
Neither approach wins outright. Local snapshots are the right call for a proof of concept, a single-browser component library, or any project where committing PNGs to git is genuinely fine. Once more than one person approves baselines, or you need more than the three bundled browser engines, the local model starts costing more than it saves.
Getting started with SmartUI testing using Playwright
SmartUI plugs into an existing Playwright script through a driver package and a CLI wrapper, so the test logic you already have does not change. Full setup details are in the SmartUI Playwright SDK documentation.
Step 1: Install the SmartUI CLI and the Playwright driver.
npm install @lambdatest/smartui-cli @lambdatest/playwright-driver playwrightStep 2: Create a SmartUI project in the dashboard and export its project token. The token is the only credential the SDK path needs.
export PROJECT_TOKEN="<your-project-token>"Step 3: Generate the SmartUI config and choose which browsers and viewports to capture. This file is what replaces the three bundled engines from the local setup.
npx smartui config:create .smartui.json{
"web": {
"browsers": ["chrome", "firefox", "safari", "edge"],
"viewports": [[1920], [1366], [1028]]
},
"mobile": {
"devices": ["iPhone 14", "Galaxy S24"],
"fullPage": true,
"orientation": "portrait"
},
"waitForTimeout": 1000,
"enableJavaScript": false,
"allowedHostnames": []
}
Two details in that config are worth noting against the local setup. Web viewports take a width only, and full page screenshots are captured by default for them, so there is no fullPage flag to remember. Mobile devices are named rather than sized, which is how the same run covers an iPhone 14 and a Galaxy S24 without you managing either device.
Step 4: Add a smartuiSnapshot call wherever you previously called toHaveScreenshot. The same playground page from the local walkthrough works here.
// playwright-smartui.js
const { chromium } = require('playwright');
const smartuiSnapshot = require('@lambdatest/playwright-driver');

(async () => {
  const browser = await chromium.launch();
  const page = await browser.newPage();

  await page.goto('https://ecommerce-playground.lambdatest.io/');
  await page.waitForLoadState('networkidle');
  await smartuiSnapshot.smartuiSnapshot(page, 'Ecommerce Playground Home');

  await browser.close();
})();
Step 5: Run the script through the SmartUI CLI. The first run sets the baseline for every browser and viewport in the config; later runs compare against it and hold the build for approval.
npx smartui exec node playwright-smartui.js --config .smartui.jsonA working end-to-end project is available in the Playwright sample repository if you would rather clone than assemble. If you want to formalize the Playwright skills this guide assumes, the Playwright 101 certification covers the framework end to end.

Conclusion
Start with one page. Add a single toHaveScreenshot() call, run the suite once to seed the baseline, then set updateSnapshots to none for CI so a missing baseline fails loudly instead of writing itself. Add maxDiffPixelRatio before you touch threshold, mask the carousel, and only reach for stylePath when a mask is too blunt.
When the suite outgrows three local browser engines, or when two people need to approve the same baseline, move the comparison off the machine that ran the test. Point the same script at SmartUI through the driver package above, or explore the wider Playwright testing platform to run the rest of your suite alongside it.

Author

Gary Parker
Blogs: 1


Gary Parker is a Staff Quality Engineer with 12+ years of experience in QA strategy, test automation, and developer productivity. He specializes in front-end web and mobile testing and has built scalable automation frameworks and CI/CD pipelines. A former Senior Test Architect at Betway Group, Gary authored a series of Playwright tutorials on TestMu AI (formerly LambdaTest) and maintains 20+ open-source testing projects on GitHub.
Reviewer

Salman Khan
Reviewer
Salman is a Test Automation Evangelist and Community Contributor at TestMu AI, with over 6 years of hands-on experience in software testing and automation. He has completed his Master of Technology in Computer Science and Engineering, demonstrating strong technical expertise in software development, testing, AI agents and LLMs. He is certified in KaneAI, Automation Testing, Selenium, Cypress, Playwright, and Appium, with deep experience in CI/CD pipelines, cross-browser testing, AI in testing, and mobile automation. Salman works closely with engineering teams to convert complex testing concepts into actionable, developer-first content. Salman has authored 120+ technical tutorials, guides, and documentation on test automation, web development, and related domains, making him a strong voice in the QA and testing community.
Playwright Visual Testing FAQs
Did you find this page helpful?
More Related Learning Hubs
TestMu AI forEnterprise
Get access to solutions built on Enterprise
grade security, privacy, & compliance
- Advanced access controls
- Advanced data retention rules
- Advanced Local Testing
- Premium Support options
- Early access to beta features
- Private Slack Channel
- Unlimited Manual Accessibility DevTools Tests