

Power Your Software Testing with AI Agents and Cloud
The Native AI-Agentic Cloud Platform to Supercharge Quality Engineering. Test Intelligently and Ship Faster.


- TestMu AI (Formerly LambdaTest)
- /
- Blog
- /
- How to Write and Run Your First Playwright Test
How to Write and Run Your First Playwright Test
Learn how to write your first Playwright test, run it locally and on a remote grid, and fix the errors that stop Playwright working with Selenium Grid.
Last Updated on:
The hard part of building a test suite is rarely writing the tests. It is running hundreds of them across browsers your laptop does not have, in an amount of time your pipeline can tolerate. That is the point where you stop running Playwright locally and start running it on a grid.
This tutorial writes a first Playwright test against a live demo store, runs it in headed mode so you can watch it work, then takes the same suite out to a self-hosted Selenium Grid and a cloud grid. Every command and locator here comes from a suite that actually runs, and the errors are the ones you will hit rather than the happy path.
Overview
To write your first Playwright test, set a baseURL in playwright.config.js, create a spec file, then use test() with the page fixture to navigate, act, and assert. Run it with npx playwright test, adding --headed to watch the browser work. The same suite then runs unchanged on a remote grid.
Writing your first Playwright test
- Base URL config: Setting baseURL in playwright.config.js lets every Playwright spec start from the same origin, so page.goto('/') resolves without repeating the full address in each test file.
- Text locators: Playwright matches elements by visible text, which stays readable as the DOM shifts. When several elements share a string, narrow the match with nth=0 or the .first() method instead of a brittle CSS path.
- User-visible assertions: Assert on what a person would actually notice, such as the product name appearing on the cart page, rather than an internal attribute that can pass while the feature is visibly broken.
- Headed mode: Adding --headed to the Playwright test command opens a visible browser, which is the fastest way to see why a locator is not matching on a first run.
Taking the suite to a Selenium Grid
- SELENIUM_REMOTE_URL: Pointing this variable at a Selenium 4 hub root, such as http://localhost:4444, sends Playwright tests to the grid with no change to test code. The /wd/hub suffix from Selenium 3 examples breaks the connection.
- WebSocket buffer flag: Selenium Grid builds from 4.5.2 onward need -Djdk.httpclient.websocket.intermediateBufferSize=3000000 set on the hub and on every node, or the Chrome DevTools Protocol connection Playwright depends on drops mid-test.
- Playwright treats the Selenium Grid integration as experimental and drives only Google Chrome and Microsoft Edge through it, so Firefox and WebKit coverage has to come from somewhere other than the grid.
Taking the suite to a cloud grid
- Projects matrix: Each browser and OS target is one entry in the projects array of playwright.config.js, so Playwright multiplies specs by projects. Six specs across five configurations became thirty parallel sessions in this walkthrough.
- Session artifacts: TestMu AI's test automation cloud captures video, network logs, console logs, and command logs on every session automatically, which is how the Edge viewport failure and the WebKit hover failure below were diagnosed.
- Engine coverage: The cloud grid supplies 3,000+ browser and OS combinations, including the Firefox and WebKit engines that the Selenium Grid path cannot launch at all.
Selenium Grid distributes tests across machines you control, and for a WebDriver suite it remains a sensible default. The awkward question is where those machines come from. Hardware you own and VMs you rent both carry patching, driver upgrades, and capacity planning.
A cloud grid removes that question by renting maintained browsers instead of machines, one of the more practical benefits of cloud testing. You send tests, they run in parallel, you get results and artifacts back.
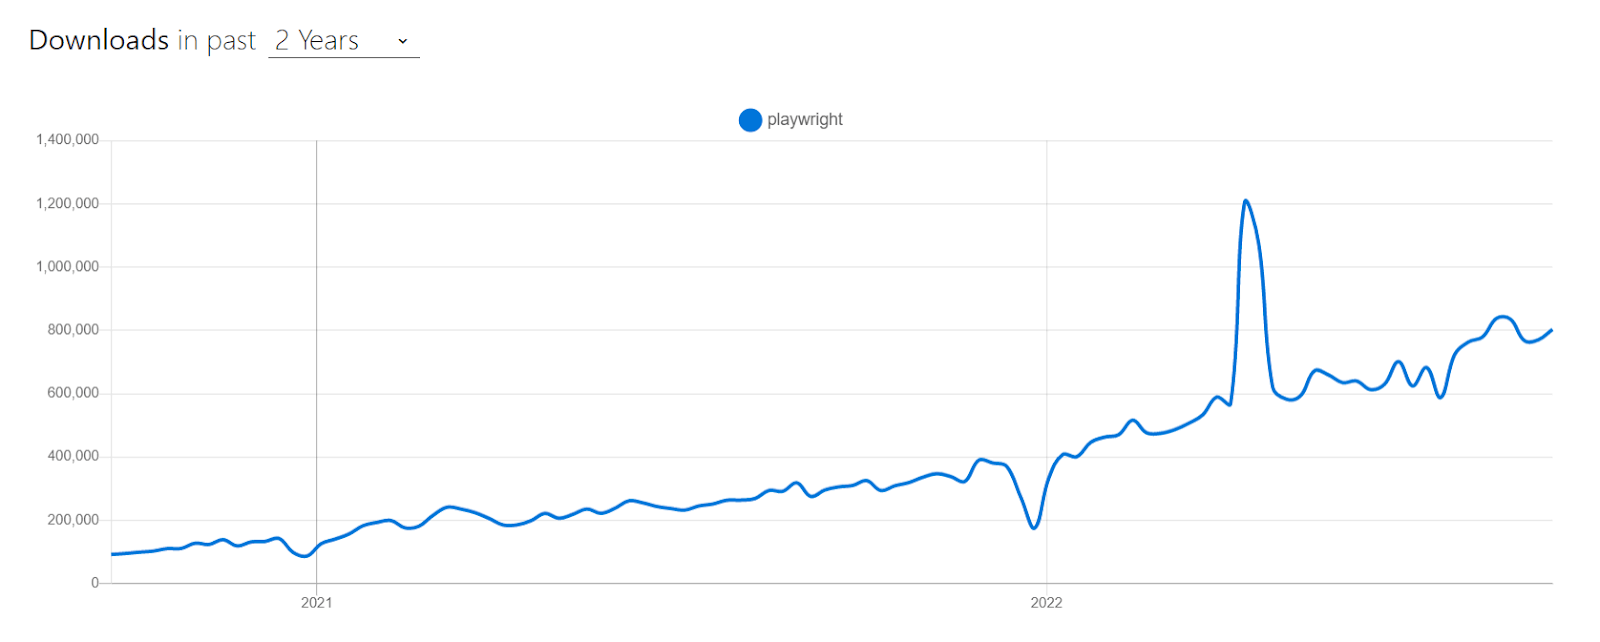
Playwright is a reasonable place to test this, because adoption is no longer in question. The @playwright/test package on npm records over 53 million weekly downloads at version 1.62.1, so the execution problem below is one a very large number of teams hit.
This Playwright tutorial walks through building a small suite and then running it in three places, so you can see exactly where each option stops. If you are preparing for an interview, Playwright interview questions covers the theory side.
Here is what this guide on Playwright testing covers:
- Build a small but realistic test suite.
- Run it on your local machine, on a self-hosted Selenium Grid, and on a cloud grid.
- Fix the version and browser limits that stop the Selenium Grid route working.
- Decide which of the two remote options your team actually needs.
Building a Playwright test suite
We will build the suite with Playwright itself. Microsoft ships it on a roughly monthly cadence, and it now pulls far more npm traffic than the WebDriver-based automation testing frameworks it competes with. In the week of 30 July 2026, npm recorded 53,203,510 downloads of @playwright/test against 2,036,262 for selenium-webdriver.
You need two things installed before the setup steps below.
- Ensure you have NodeJS installed.
- Install a code editor. I will be using Visual Studio Code.
If you need to get up to speed with installation and setup, follow my earlier blog on getting started with the Playwright framework.
For this tutorial on running your first Playwright test, we will be writing tests for the TestMu AI eCommerce Playground with dummy data and content - perfect for experimenting with test automation.
Headed mode is useful while writing a test, but CI runs it headless by default, which is covered in Playwright headless testing.
For tests that need to wait on specific backend calls instead of full page navigations, this guide to Playwright waitForResponse covers the predicate patterns, click-then-await ordering, and response object methods that make API-driven UI tests deterministic in CI.
Test approach for writing your first Playwright test
Two journeys drive this Playwright end to end testing suite, both common enough that you have probably written something similar.
- The first is 'ADD TO CART,' the site's core functionality as a user. We should be able to select an item, add it to our cart and progress to the checkout journey. Any discrepancies in product items or selection along the way should be caught by our test.
- The second combines 'SEARCH' and 'FILTERING.' We should be able to search for a particular item or category of items and then filter the list returned. The common filtering techniques could be by most popular, lowest price, or most recently added.
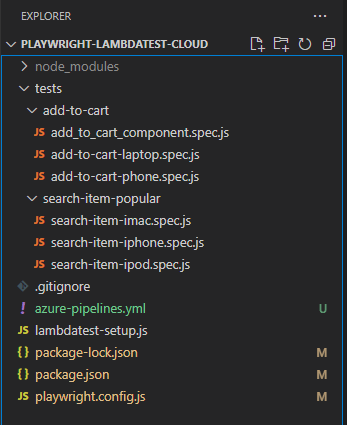
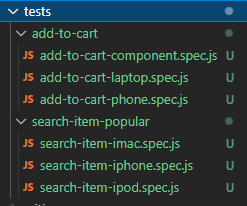
Variations on these journeys then add test coverage while reusing the same code. The final project structure:

Watch this Playwright tutorial that covers everything you need to get you up and running with the Microsoft Playwright framework with TypeScript.
Writing your first Playwright test
This is a fairly standard user journey, I'd like to choose an item to purchase, add it to my cart, and the item should be visible when I go to checkout.
In the playwright.config.js, I've defined the eCommerce playground base URL, so all of our tests will start from here.
  use: {
    /* Maximum time each action such as `click()` can take. Defaults to 0 (no limit). */
    actionTimeout: 0,
    /* Base URL to use in actions like `await page.goto('/')`. */
    // baseURL: 'http://localhost:3000',

    /* Collect trace when retrying the failed test. See https://playwright.dev/docs/trace-viewer */
    trace: 'on-first-retry',
    baseURL: 'https://ecommerce-playground.lambdatest.io'
  },
And in the lambdatest-setup.js, which is referenced in our test files, we are defining our test platform capabilities, which will be used for local and remote execution.
 // LambdaTest capabilities
 const capabilities = {
   'browserName': 'Chrome', // Browsers allowed: `Chrome`, `MicrosoftEdge`, `pw-chromium`, `pw-firefox` and `pw-webkit`
   'browserVersion': 'latest',
   'LT:Options': {
     'platform': 'Windows 10',
     'build': 'Playwright Build - Full suite',
     'name': 'Playwright Test',
     'user': process.env.LT_USERNAME,
     'accessKey': process.env.LT_ACCESS_KEY,
     'network': true,
     'video': true,
     'console': true,
     'tunnel': false, // Add tunnel configuration if testing locally hosted webpage
     'tunnelName': '', // Optional
     'geoLocation': '', // country code can be fetched from https://www.lambdatest.com/capabilities-generator/
   }
 }
This is the complete test file for add-to-cart.spec.js, I'll walk through each step and explain why we have taken this approach.
// @ts-check
const { test } = require('../../lambdatest-setup')
const { expect } = require('@playwright/test')

test.describe('Add to cart', () => {
  test('Add to cart', async ({ page }) => {

    // Navigate to base url
    await page.goto('https://ecommerce-playground.lambdatest.io')

    // Click Shop by Category
    await page.locator('text=Shop by Category').click();

    // Click Laptops & Notebooks
    await page.locator('text=Laptops & Notebooks').click();

    // Hover over product
    await page.locator('text=Add to Cart Add to Wish List HTC Touch HD $146.00 HTC Touch - in High Definition').hover()

    // Wait for element
    await expect(page.locator('text=Add to Cart Add to Wish List HTC Touch HD $146.00 HTC Touch - in High Definition >> button >> nth=0')).toBeVisible()

    await page.waitForTimeout(2000)

    // Click add to cart
    await page.locator('text=Add to Cart Add to Wish List HTC Touch HD $146.00 HTC Touch - in High Definition >> button').first().click()

    // Click view cart
    await page.locator('text=View Cart').click()

    // Assert correct product added to cart
    await expect(page.locator('#content >> text=HTC Touch HD')).toBeVisible()
    })
  });
The completed test suite we will be referencing is on GitHub if you want to follow along.
There is a simple goto navigation, which extends upon our base URL. This is useful if we navigate to sub-pages within the website, as we won't need to type the full base URL every time.
// Navigate to base url
      await page.goto('/')

The store offers several ways to reach a product: the 'Shop by Category' sub-menu, the search bar, the banners, and product icons further down the page.
We will use the 'Shop by Category' menu, so the first action is a click to expand it. Text identifiers read well and still let you drill down when several elements share a name.
Note - To find the elements, I like to use a mix of Playwright Codegen and manual inspection in DevTools. The Python equivalent is walked through in this Playwright Python tutorial.
// Click Shop by Category
      await page.locator('text=Shop by Category').click();
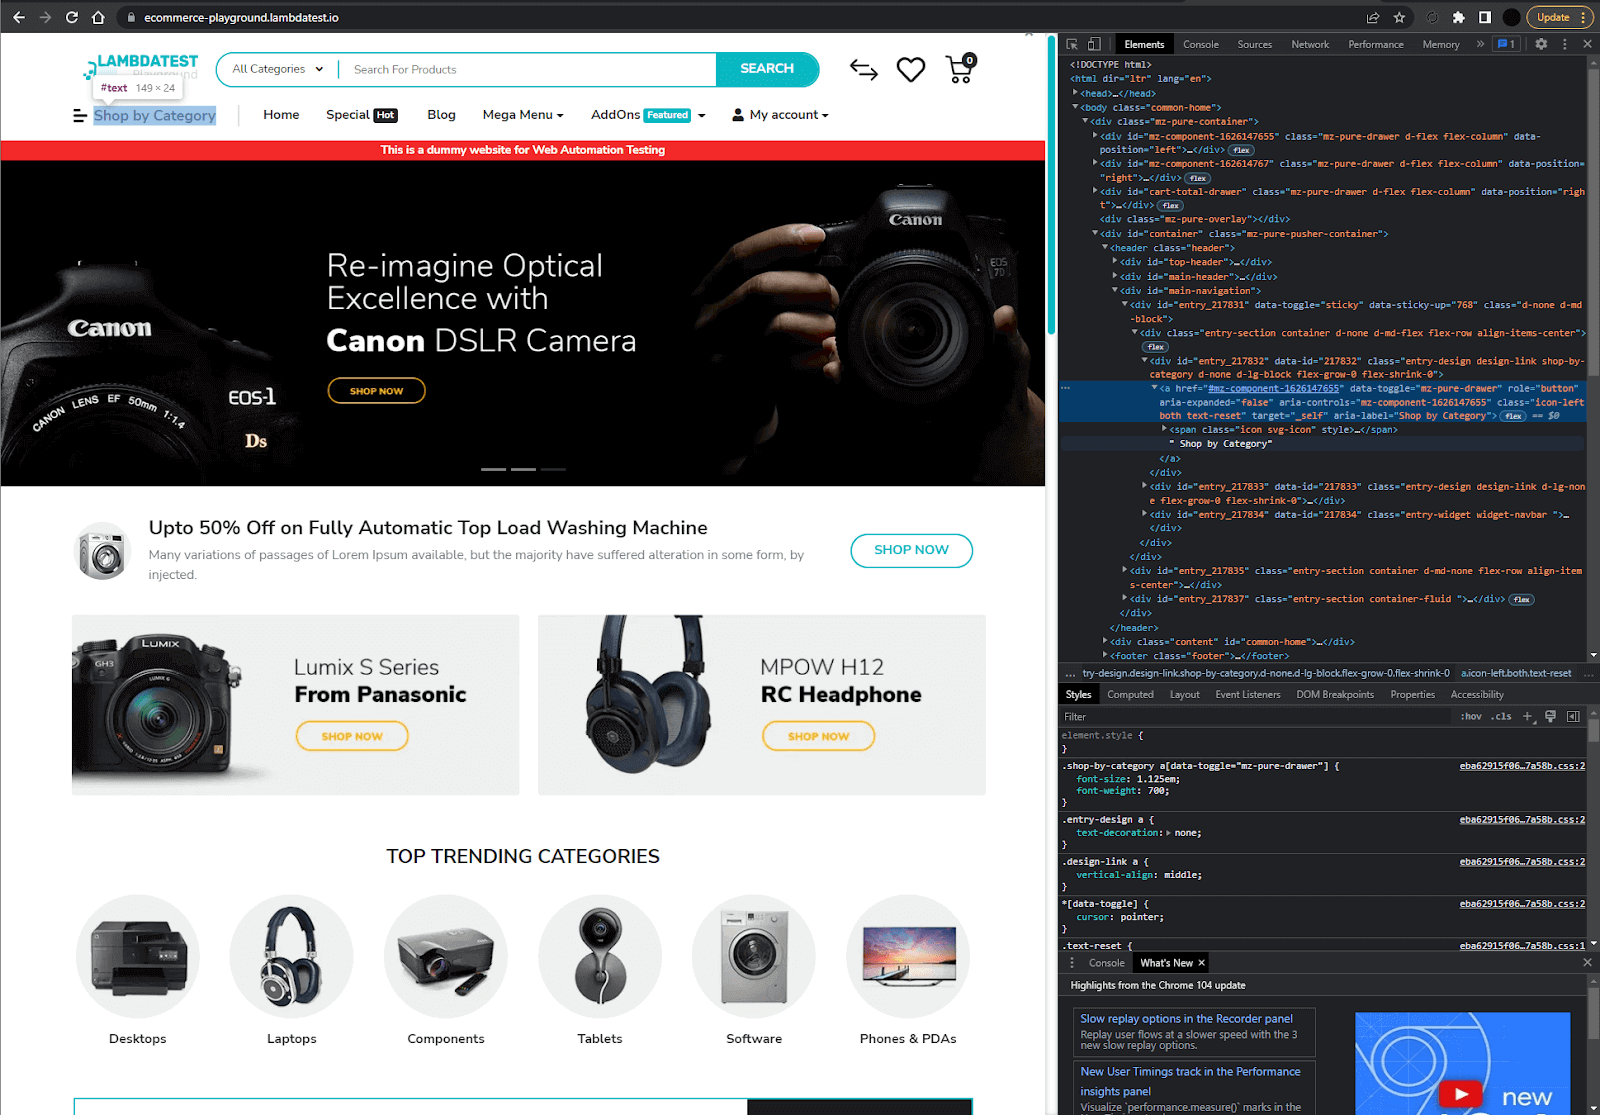
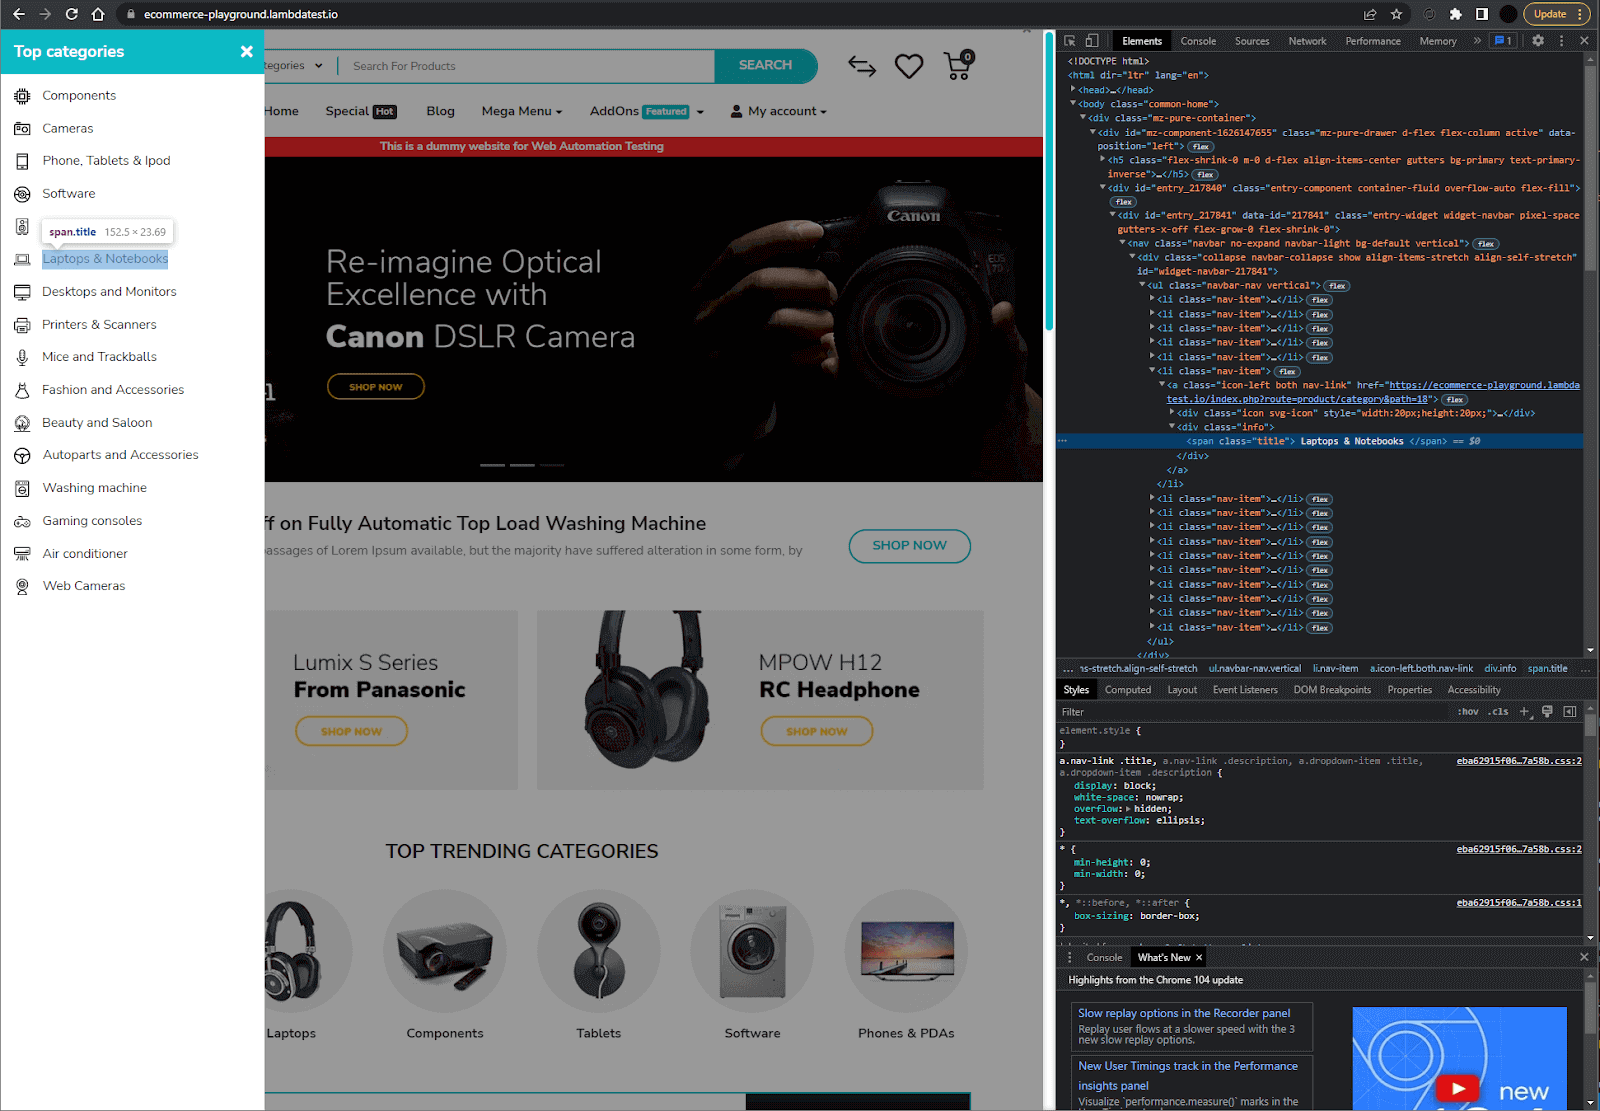
With the menu expanded, pick a category. Let's use the same text locator approach as before. The same idea in WebDriver is covered in locators in Selenium WebDriver.
// Click Laptops & Notebooks
      await page.locator('text=Laptops & Notebooks').click();
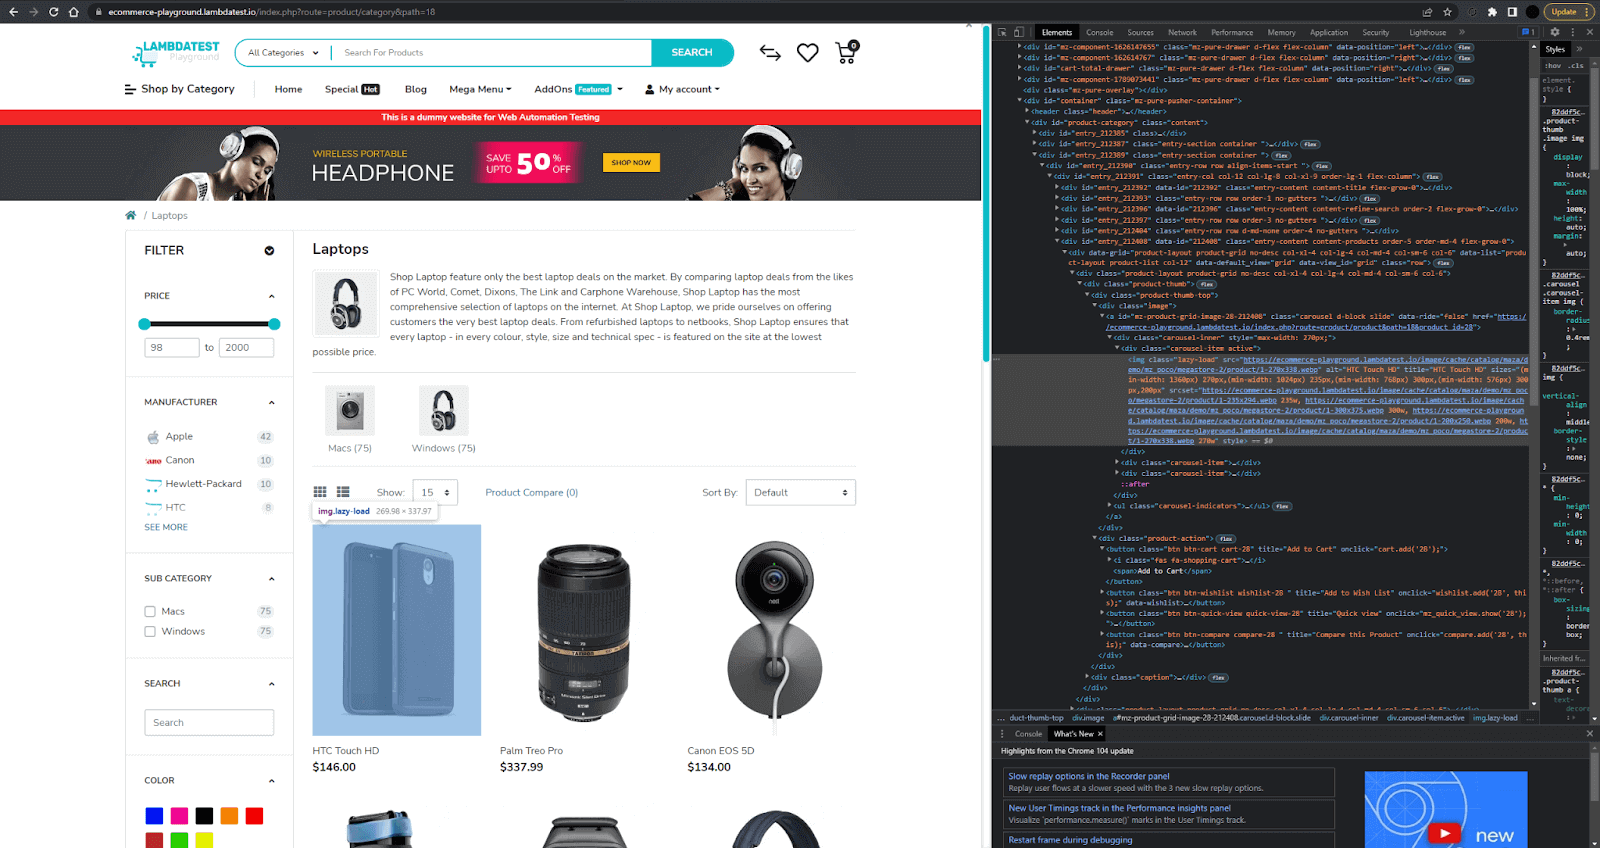
That lands on the Laptops & Notebooks page. The non-laptop images are placeholder content, which is normal on a demo store.
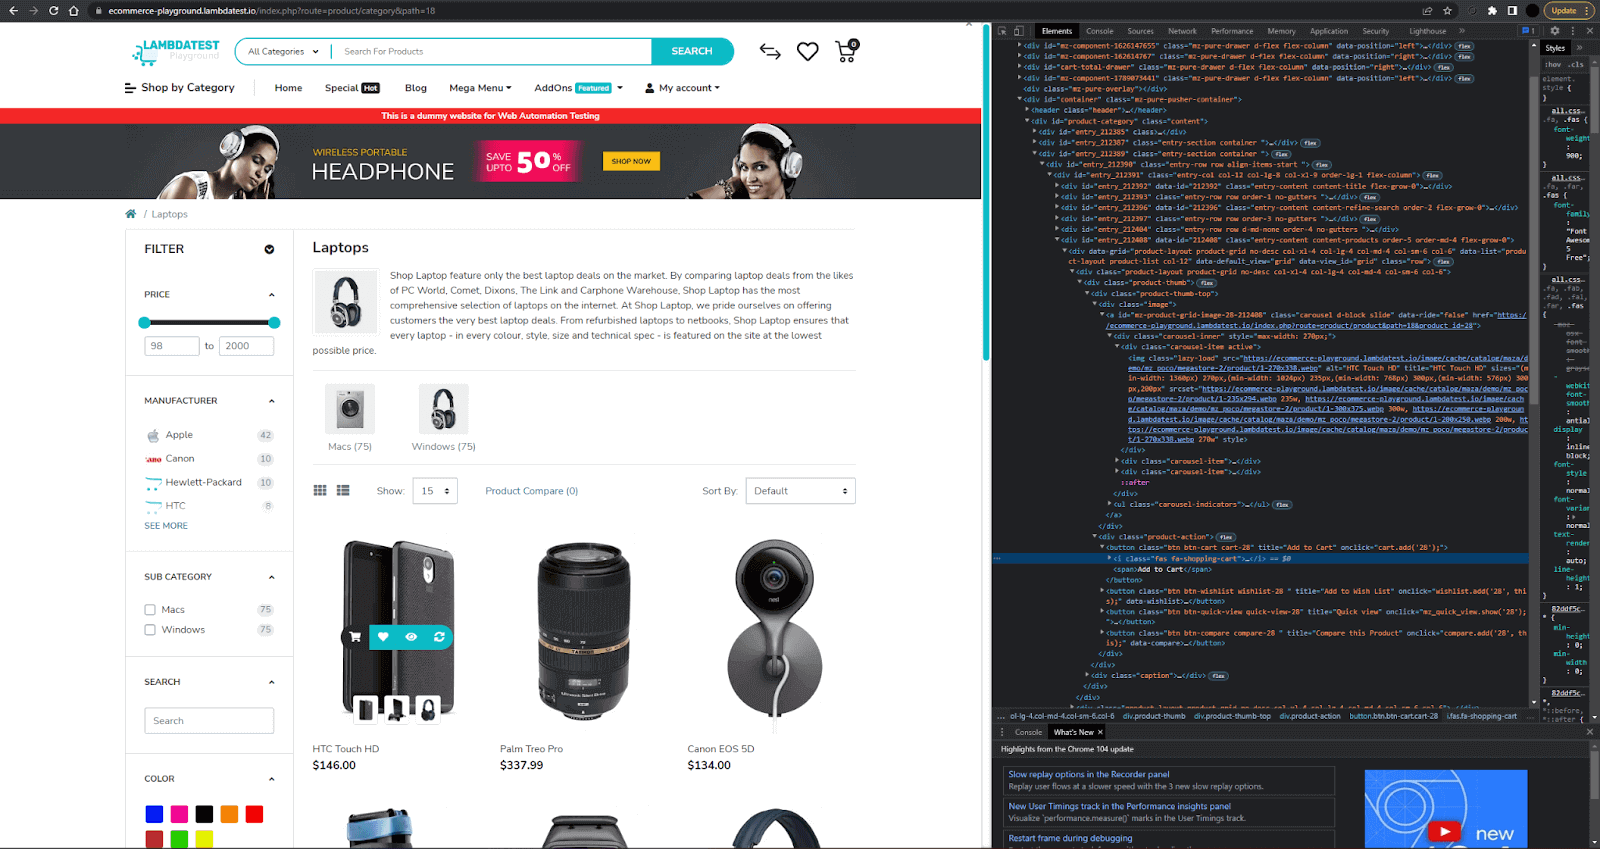
Hovering a gallery item reveals a small menu. The first icon adds the product to the cart, so the test hovers, then clicks it.
// Hover over product
      await page.locator('text=Add to Cart Add to List HTC Touch HD $146.00 HTC Touch - in High Definition').hover()

      // Wait for element
      await expect(page.locator('text=Add to Cart Add to Wish List HTC Touch HD $146.00 HTC Touch - in High Definition >> button >> nth=0')).toBeVisible()

      // Click add to cart
      await page.locator('text=Add to Cart Add to Wish List HTC Touch HD $146.00 HTC Touch - in High Definition >> button').first().click()
The hover takes the product locator followed by .hover(), using a text locator because this string is unique.
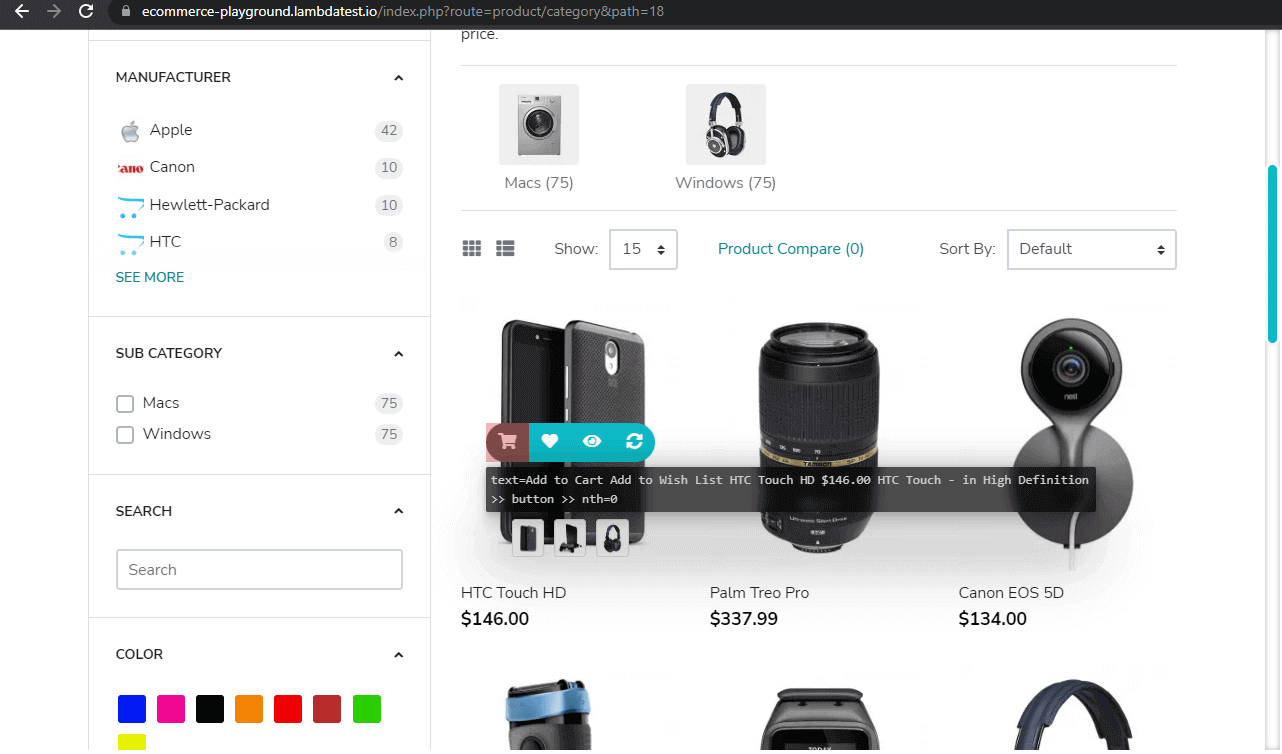
The wait and the click each extend that locator, deliberately in two different ways so you can compare them.
The wait appends >> nth=0 to the path, selecting the first of the four buttons.
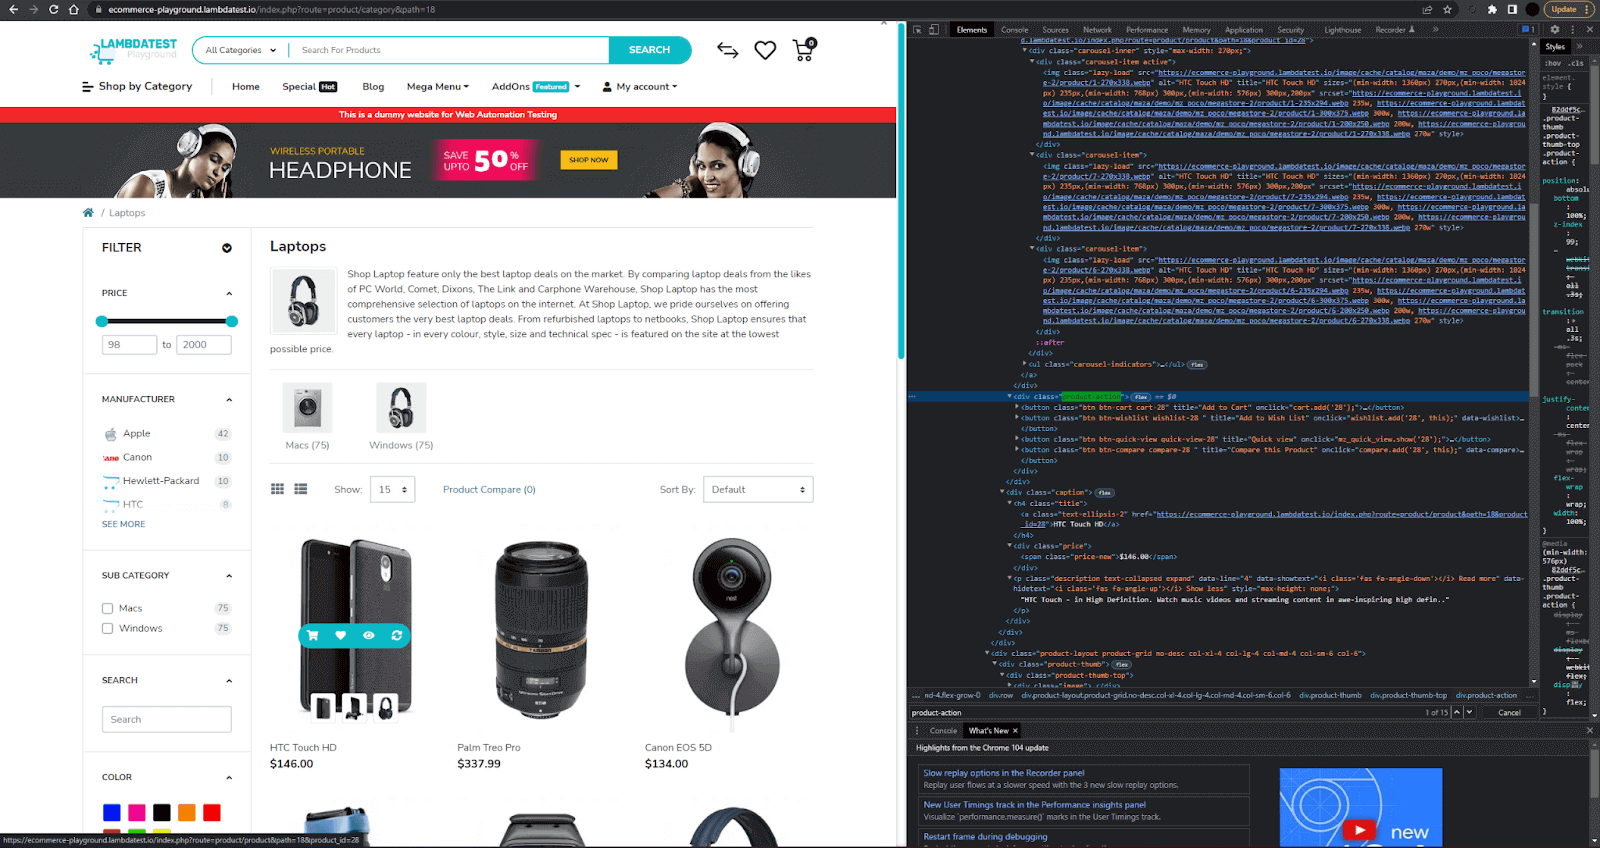
The click uses the same locator with .first() instead, reaching the same element by a different route.
The locator approach above breaks down into five steps:
- Identify product locator.
- Hover over the product.
- Identify the actionable element we want to select.
- Drill down into the group of elements.
- Make use of the Playwright index options and nth locator options.
Prefer the second form for lists, where locator.nth(index), .first() and .last() all apply.
Running to this point pops a confirmation in the top right offering View Cart and Checkout.
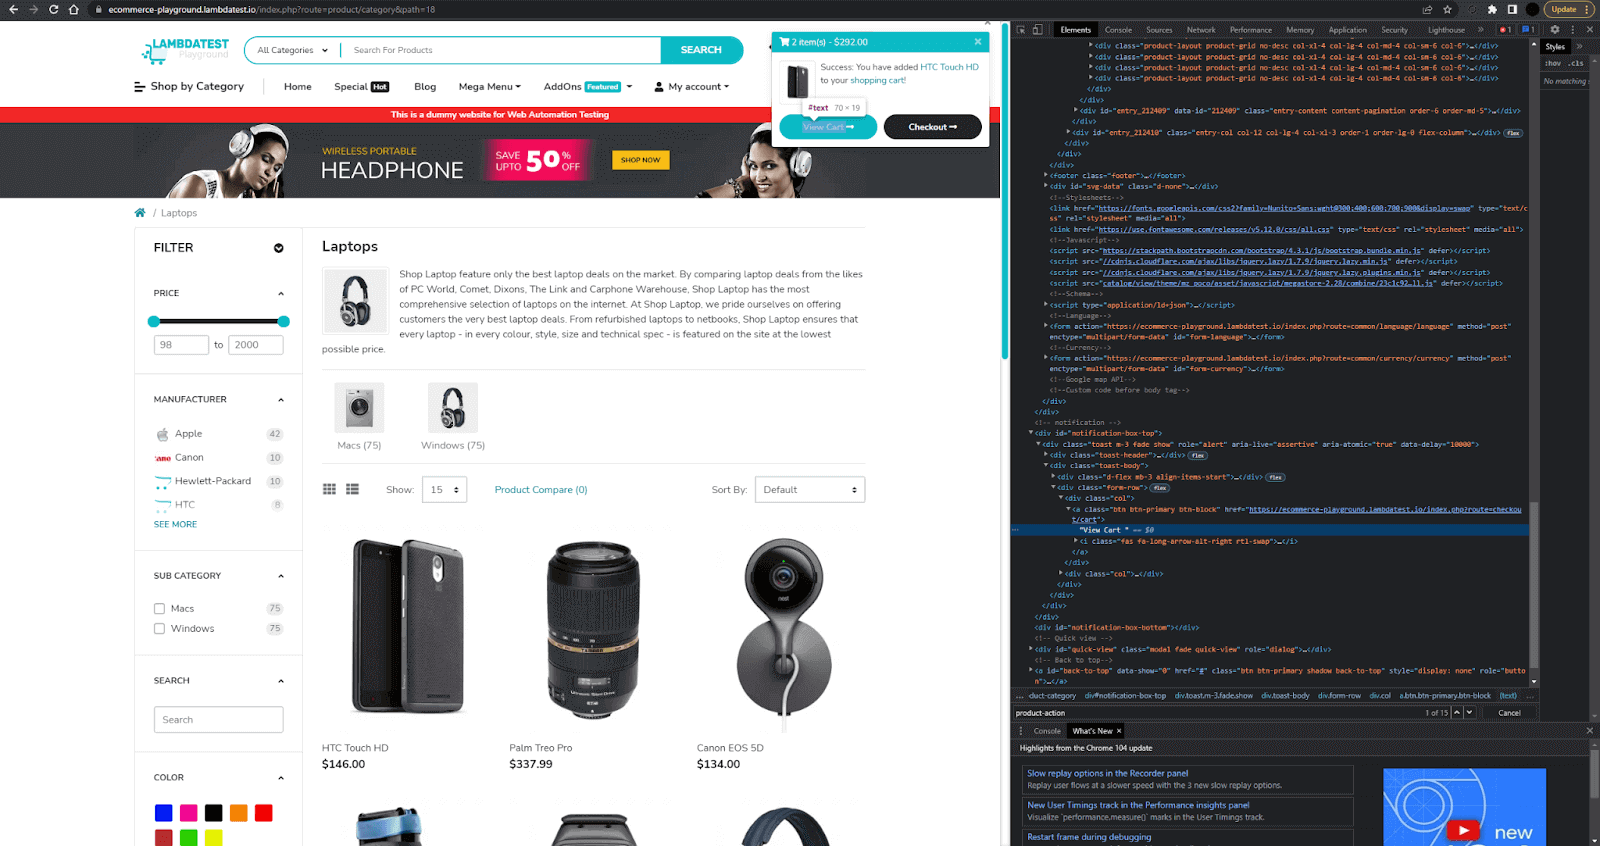
This test only checks the product reached the cart, so click View Cart. If the popup is slow, wait for it first:
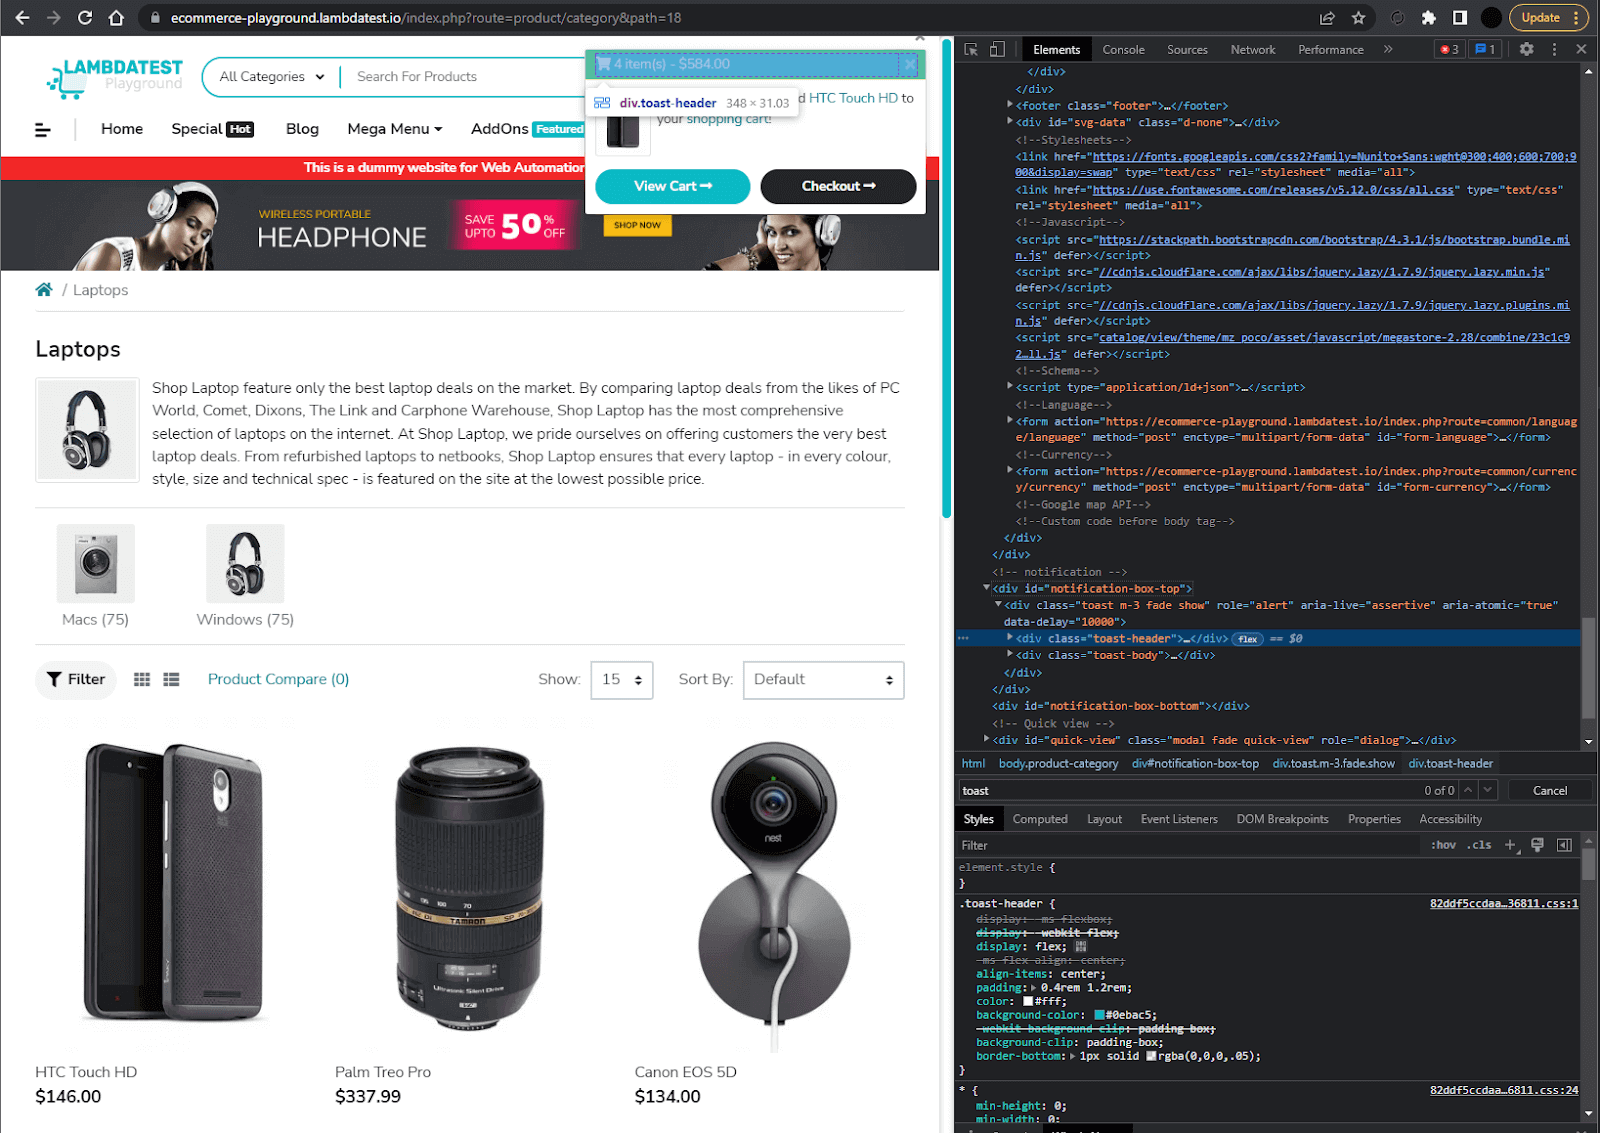
// Wait for element
        await expect(page.locator('.toast-header')).toBeVisible()
// Click view cart
      await page.locator('text=View Cart').click()
The final step asserts on the cart page itself.
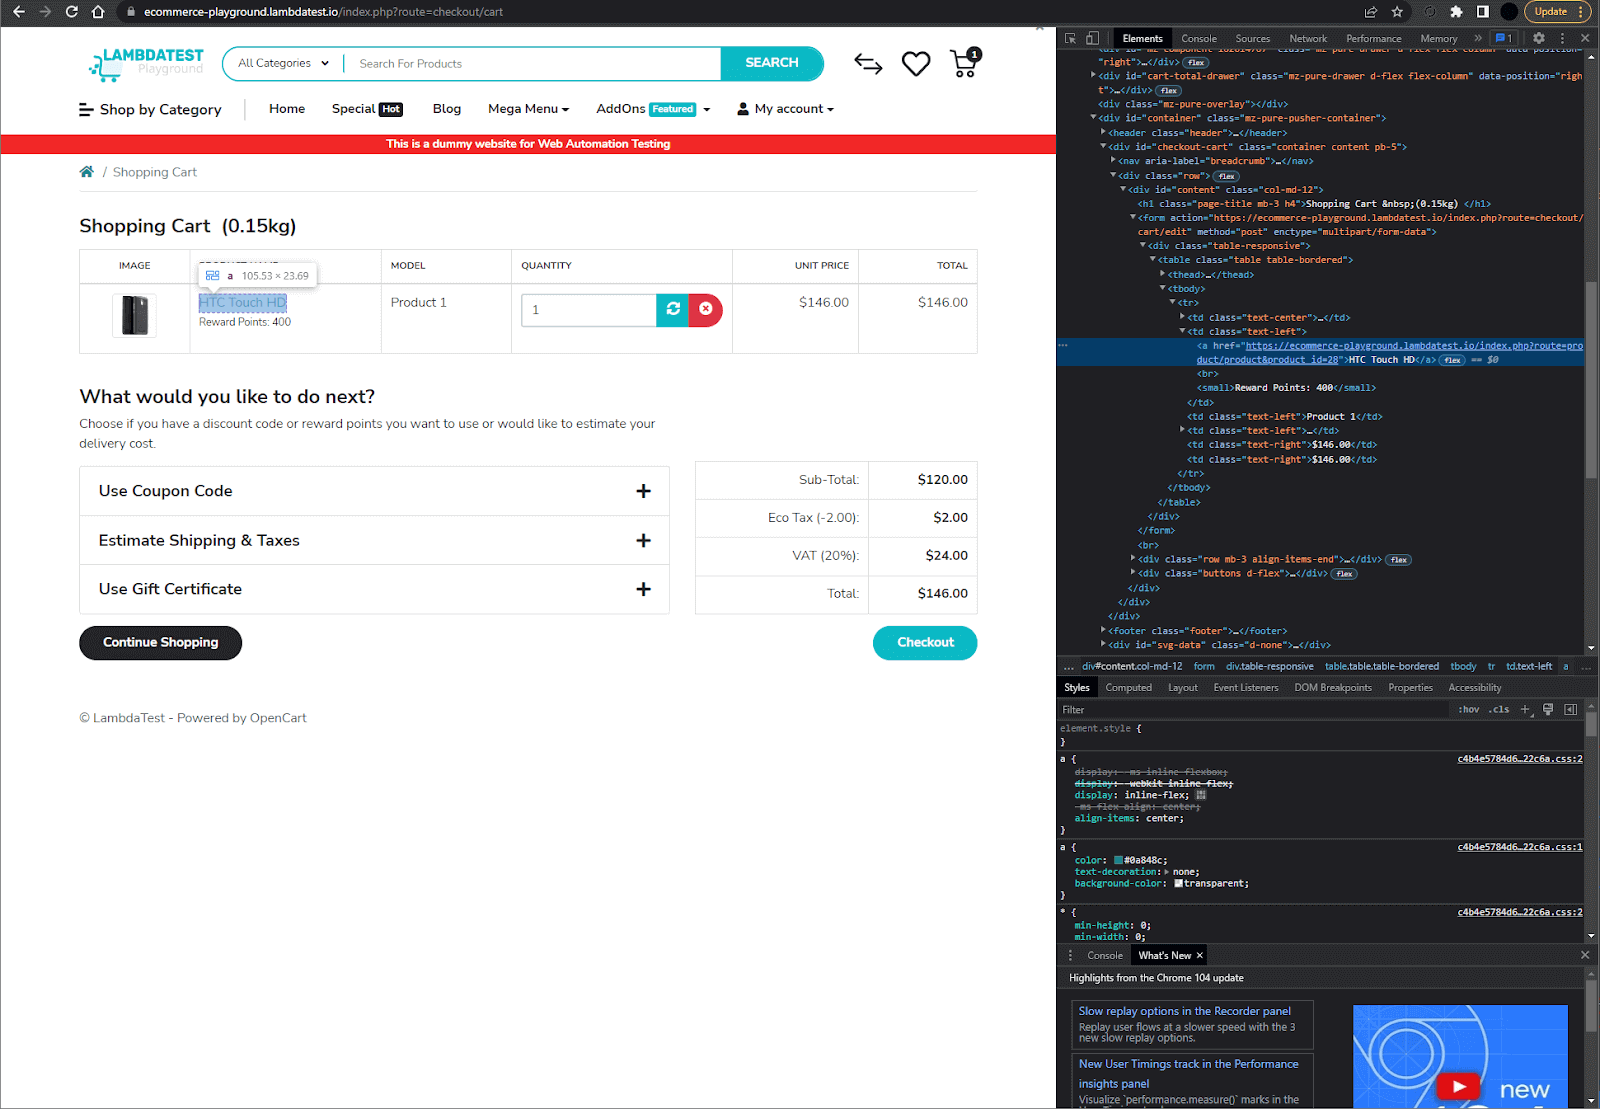
Matching on the product name proves both that something was added and that it was the right item.
// Assert correct product added to cart
      await expect(page.locator('#content >> text=HTC Touch HD')).toBeVisible()
That covers a full journey with several interaction and assertion types.
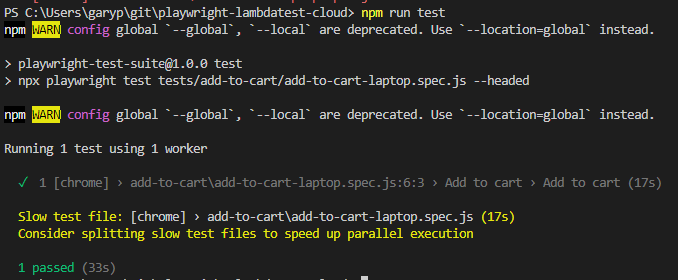
This script runs the laptop test in headed mode. In the terminal, type npm run test.
"scripts": {
        "test": "npx playwright test tests/add-to-cart/add-to-cart-laptop.spec.js --headed"
      },
With a base test in place, variations follow cheaply.
Run your Playwright tests with AWS marketplace directly on the cloud.
Expanding the Playwright test suite
The store has enough categories and products to expand coverage with little more than locator changes.
The files and locators here are duplicated for readability. In a real suite the Page Object Model (POM) removes that duplication and keeps maintenance manageable.
  // Hover over product
  await page.locator('text=Add to Cart Add to Wish List Nikon D300 $98.00 Engineered with pro-level feature').hover()

  // Wait for element
  await expect(page.locator('text=Add to Cart Add to Wish List Nikon D300 $98.00 Engineered with pro-level feature >> button >> nth=0')).toBeVisible()

  // Click add to cart
  await page.locator('text=Add to Cart Add to Wish List Nikon D300 $98.00 Engineered with pro-level feature >> button').first().click()
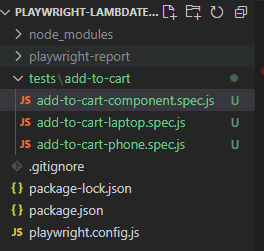
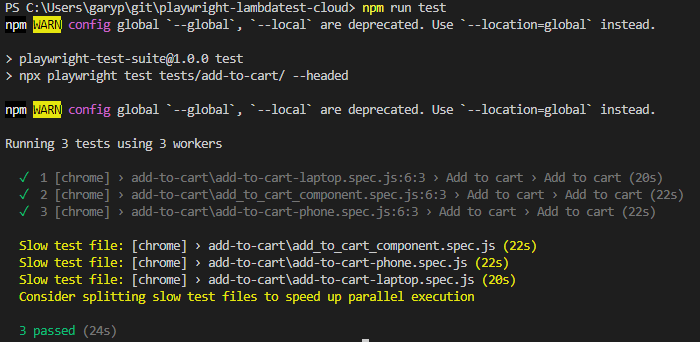
These still run quickly locally. The script now points at the whole test folder:
"scripts": {
        "test": "npx playwright test tests/add-to-cart/ --headed"
      },
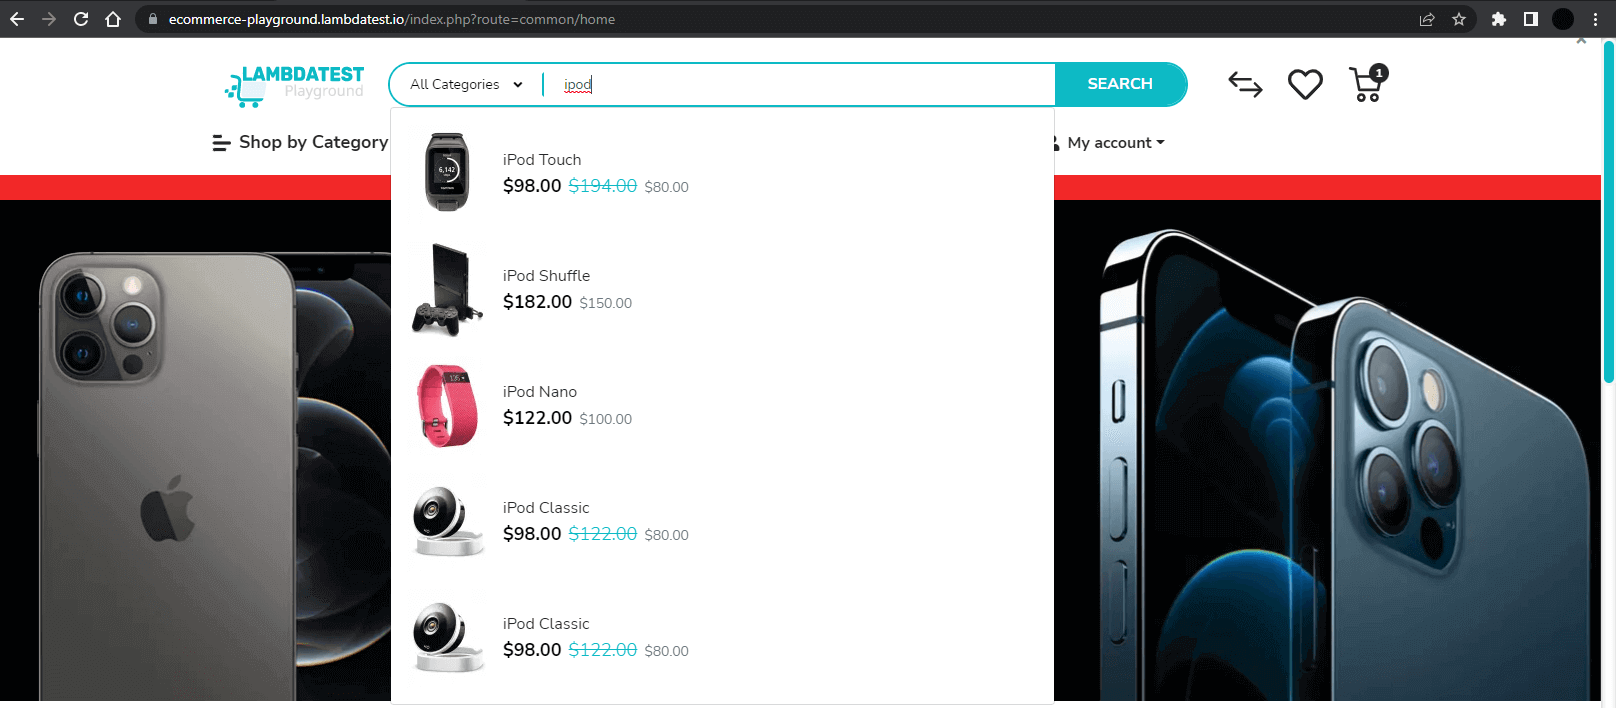
Next, a test that searches for an item, sorts by most popular, and adds the top result to the cart. It reuses code that page objects or helper classes should eventually own.
The search field is matched on its placeholder text, filled with 'ipod', then submitted.
// Fill [placeholder="Search For Products"]
      await page.locator('[placeholder="Search For Products"]').first().fill('ipod');
// Click text=Search
      await page.locator('text=Search').click()
On the results page, select 'Popular' from the 'Sort by' dropdown, here by index rather than text.
// Click sort by 'Popular'
      await page.locator('#input-sort-212464').selectOption({index: 2})
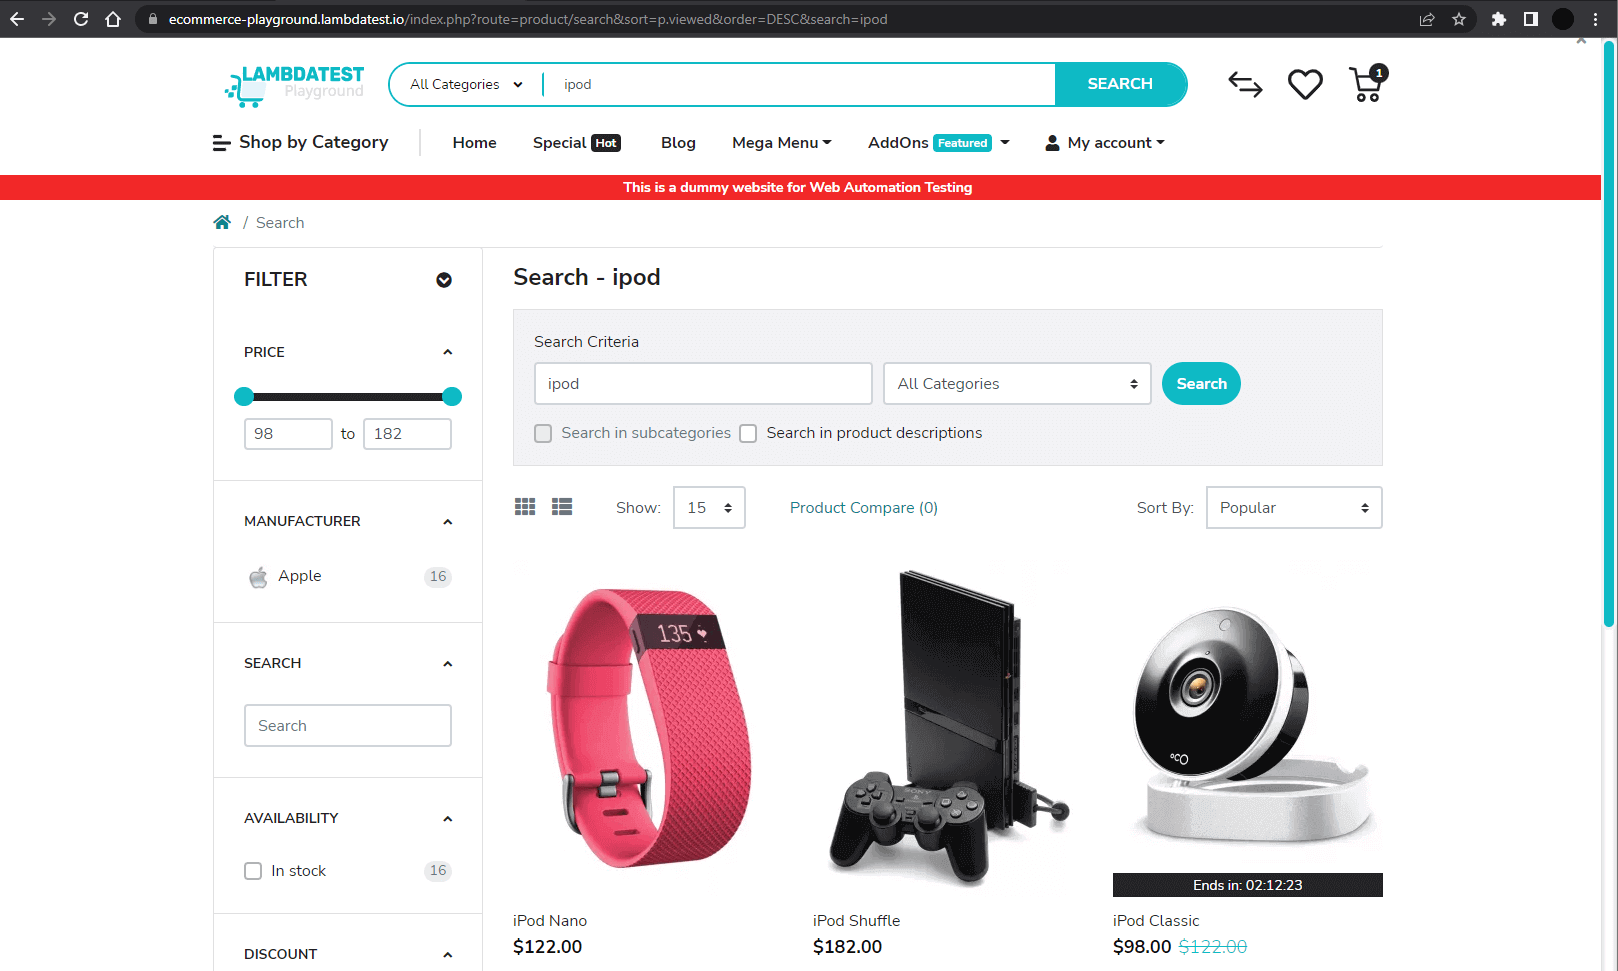
That reorders the list, so the test takes the first product and adds it to the cart.
// Wait for element
      await expect(page.locator('.product-action > button').first()).toBeVisible()

      // Click add to cart
      await page.locator('.product-action > button').first().click()
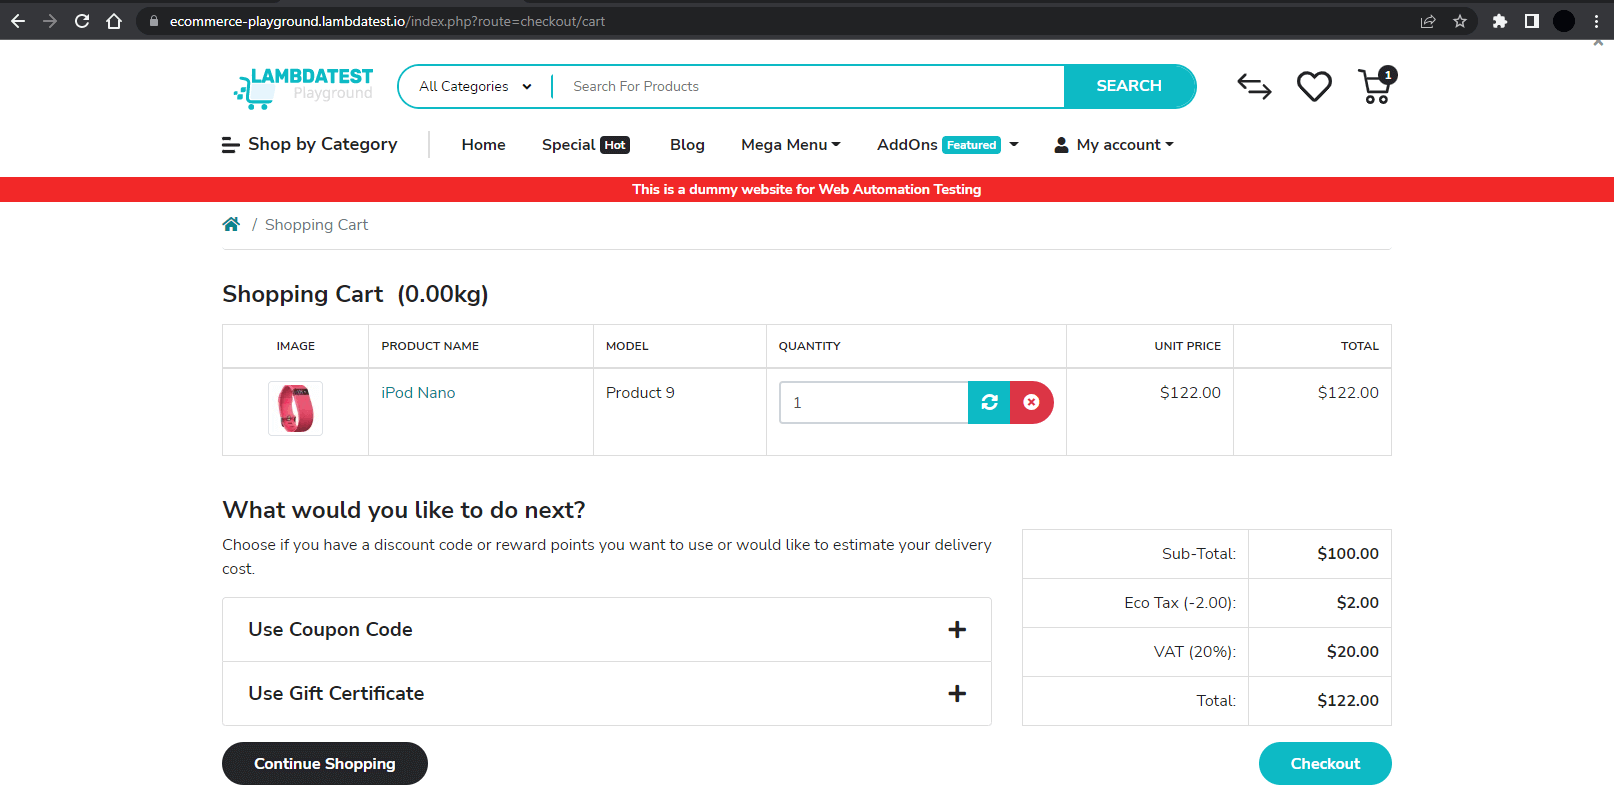
That gives a second journey to iterate on, six tests in total. Running them in parallel is where the local machine starts to strain.
When running 6 tests, I started to see intermittent failures, despite adding waits and timeouts - this is where we start approaching the limits of a single machine for test execution and need to look towards a distributed solution.

A Selenium Grid has three parts: a client, a hub, and the nodes that own the browsers.
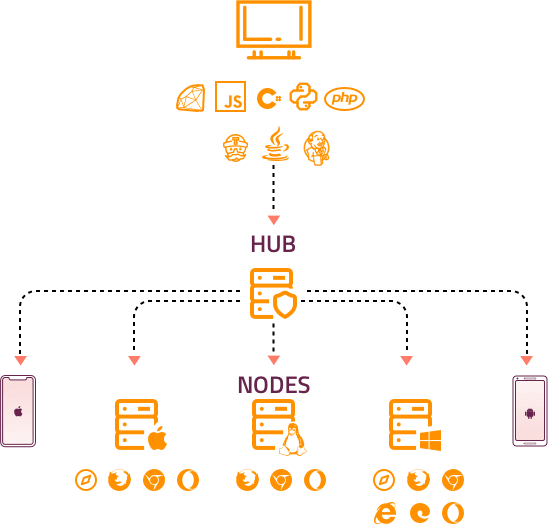
The client sends tests to the hub, and the hub distributes them across nodes. With 9 tests and 3 Chrome instances per node, each node runs 3 in parallel.
Running Playwright tests on Selenium Grid
Playwright can hand execution to a Selenium Grid 4 hub by setting a single environment variable, with no change to the test code. Before you build a pipeline on it, read the two constraints the Playwright Selenium Grid documentation states plainly.
- The integration is experimental. Playwright says the feature "is experimental and is prioritized accordingly" and warns there is a risk of it breaking, because it depends on Selenium continuing to expose the Chrome DevTools Protocol.
- It drives Google Chrome and Microsoft Edge only. Firefox and WebKit cannot be launched through the Selenium Grid path, so a grid alone will not give you the cross-engine coverage Playwright is usually chosen for.
We will run the grid locally. That is not the intended architecture, but it shows the routing and where it stops.
Selenium Grid setup and test execution
You need Java on the PATH and the Selenium Server (Grid) jar. Chrome and Edge drivers are managed by Selenium Manager in current Selenium 4 releases, so the manual Chromedriver and Geckodriver downloads older tutorials ask for are no longer required, and Geckodriver will not help here in any case because Playwright cannot drive Firefox through the grid.
Start the grid from the folder holding the jar. Selenium's latest stable server release is 4.46.0, so substitute whichever version you downloaded.
java -jar selenium-server-4.46.0.jar standalone
In the terminal, you should see the following:

The console reports the processors and drivers it detected and registers browser instances against them. The grid console is then served at http://localhost:4444/, and opening it shows the registered nodes:
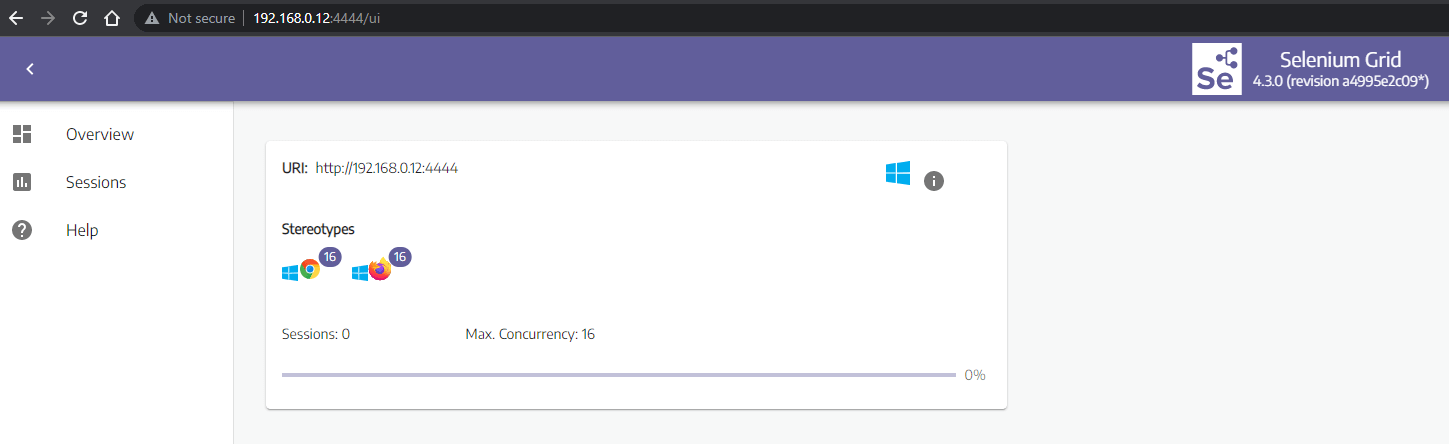
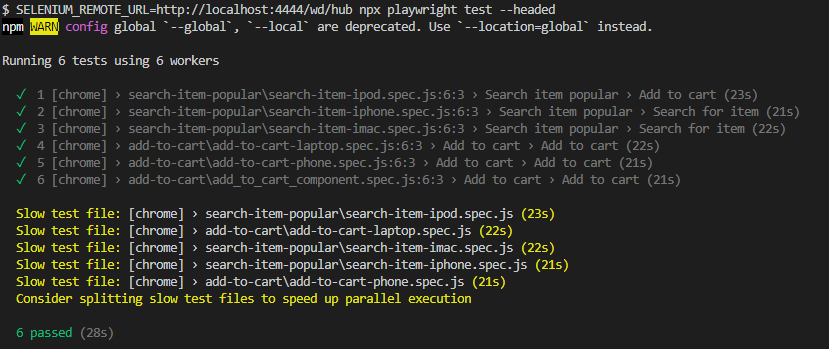
Now send tests to the grid. Point SELENIUM_REMOTE_URL at the hub root. Playwright does not use the /wd/hub suffix that Selenium 3 examples append, and adding it is one of the most common reasons this step fails.
SELENIUM_REMOTE_URL=http://localhost:4444 npx playwright test
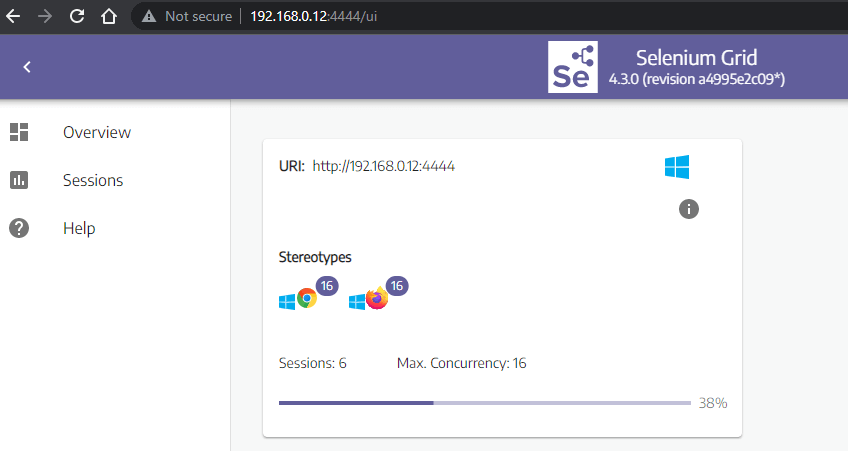
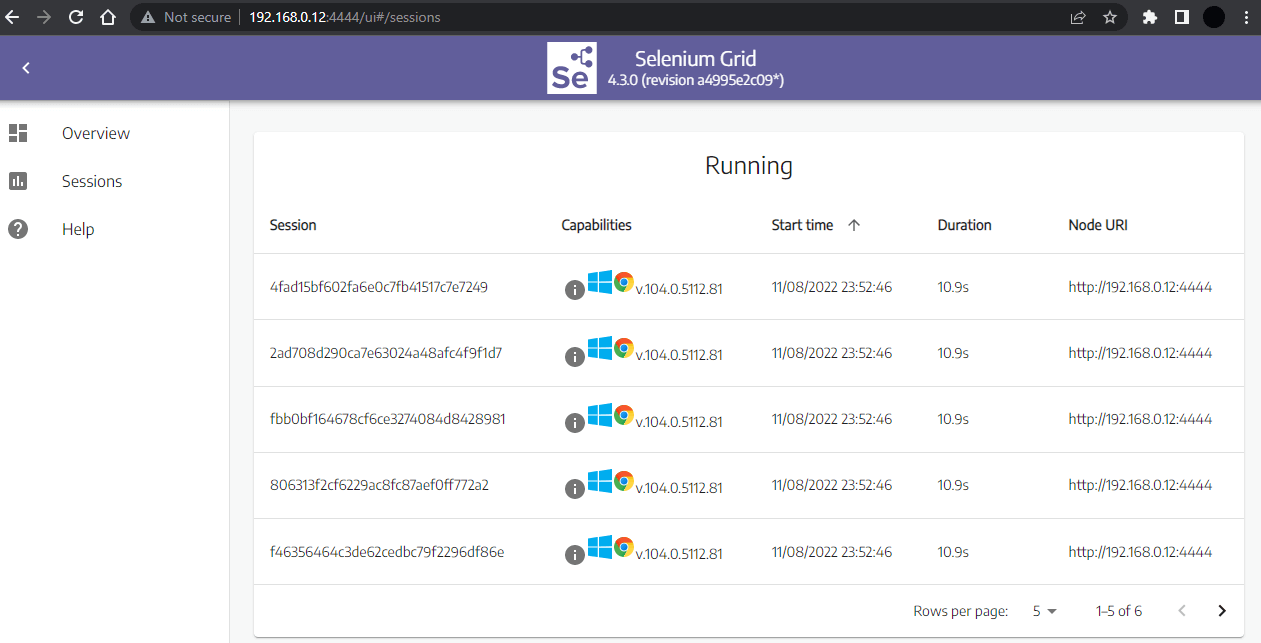
Playwright will execute its tests on the Selenium Grid remote URL, and we should be able to see 6 sessions actively running.
That covers the basics. Larger setups use multiple VMs, with Docker images and compose templates to spin them up.
Scaling out from here means running more tests concurrently, limited by hardware cost and by how much grid maintenance your team wants to own.
Selenium Grid limits and version compatibility
If you follow the steps above against a current Selenium release rather than an old one, the run can fail with a dropped WebSocket connection rather than a test failure. This is the part most Playwright grid tutorials leave out, and it costs people an afternoon.
Selenium Grid builds from 4.5.2 onward carry a bug where a multi-frame WebSocket message is treated as final, tracked as WebSocket incorrectly assumes final frame in multi-frame text send in the Selenium repository. Playwright pushes Chrome DevTools Protocol traffic that exceeds the default buffer, so the connection breaks mid-session. The workaround recorded on that issue is to raise the intermediate buffer size on the hub and on every node.
java -Djdk.httpclient.websocket.intermediateBufferSize=3000000 -jar selenium-server-4.46.0.jar standalone
Running the grid in Docker means setting the same flag through JAVA_OPTS on the hub service and on each node service, not just on the hub.
services:
  selenium-hub:
    image: selenium/hub:4.46.0
    environment:
      - JAVA_OPTS=-Djdk.httpclient.websocket.intermediateBufferSize=3000000
  chrome:
    image: selenium/node-chrome:4.46.0
    shm_size: 2gb
    environment:
      - JAVA_OPTS=-Djdk.httpclient.websocket.intermediateBufferSize=3000000
      - SE_EVENT_BUS_HOST=selenium-hub
Two further constraints are worth knowing before you commit. Playwright requires a Selenium 4 hub, with Selenium 3 supported only on a best-effort basis, and the grid nodes must be reachable directly from the machine running Playwright because the CDP WebSocket connects to the node rather than through the hub.
Add those together and the self-hosted grid gives you Chrome and Edge, on machines you patch, with a documented risk of breaking on upgrade. Whether that trade is worth it depends on how much browser coverage you actually need, which the cloud run below makes concrete.

Note: Skip the grid maintenance. TestMu AI runs your existing Playwright specs on Chrome, Edge, Firefox, and WebKit across 3,000+ browser and OS combinations, with video, network, and console logs on every session. Start running tests free
Running your first Playwright test on cloud grid
Now run the same suite across more platforms and browsers. These examples use the TestMu AI cloud grid, which needs two things configured first.
To run these Playwright tests on the TestMu AI HyperExecute grid using JUnit, refer to the Playwright JUnit on HyperExecute guide.
Cloud testing platforms like TestMu AI help you perform cross browser testing at scale. The online browser farm covers 3,000+ browser and OS combinations, including Chrome, Chromium, Microsoft Edge, Mozilla Firefox, and WebKit, so the engines Selenium Grid could not give you are available from the same config file.
Subscribe to the TestMu AI YouTube Channel, stay updated with the latest playwright tutorial, and discover tutorials around topics like automated browser testing, Cypress E2E testing, mobile app testing, and more.
Prerequisites to run your first Playwright test on cloud
We will use a new configuration file that references LT_USERNAME AND LT_ACCESS_KEY environment variables.
'user': process.env.LT_USERNAME,
        'accessKey': process.env.LT_ACCESS_KEY
You can find this information under Dashboard, Automation, or User settings. Copy the values and set them as your local machines environment variables.
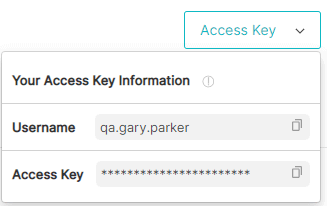
Playwright test configuration on cloud
In our playwright.config.js, we have now set a few new projects:
projects: [
    {
      name: 'chrome:latest:MacOS Catalina@lambdatest',
      use: {
        viewport: { width: 1920, height: 1080 }
      }
    },
    {
      name: 'chrome:latest:Windows 10@lambdatest',
      use: {
        viewport: { width: 1920, height: 1080 }
      }
    },
    {
      name: 'MicrosoftEdge:90:Windows 10@lambdatest',
      use: {
        viewport: { width: 1920, height: 1080 }
      }
    },
    {
      name: 'pw-firefox:latest:Windows 10@lambdatest',
      use: {
        viewport: { width: 1920, height: 1080 }
      }
    },
    {
      name: 'pw-webkit:latest:MacOS Catalina@lambdatest',
      use: {
        viewport: { width: 1920, height: 1080 }
      }
    }
  ]
There is logic in the lambdatest-setup.js file, which runs our tests based on the following format: browserName:browserVersion:platform (separate by colons). You can edit and change these values or add new configurations if needed. You can also modify the viewport size and device emulation values.
Playwright test execution on cloud
With the variables and project configurations in place, we are ready to run the tests. Run the npm run test, and you should see tests executing in the terminal.
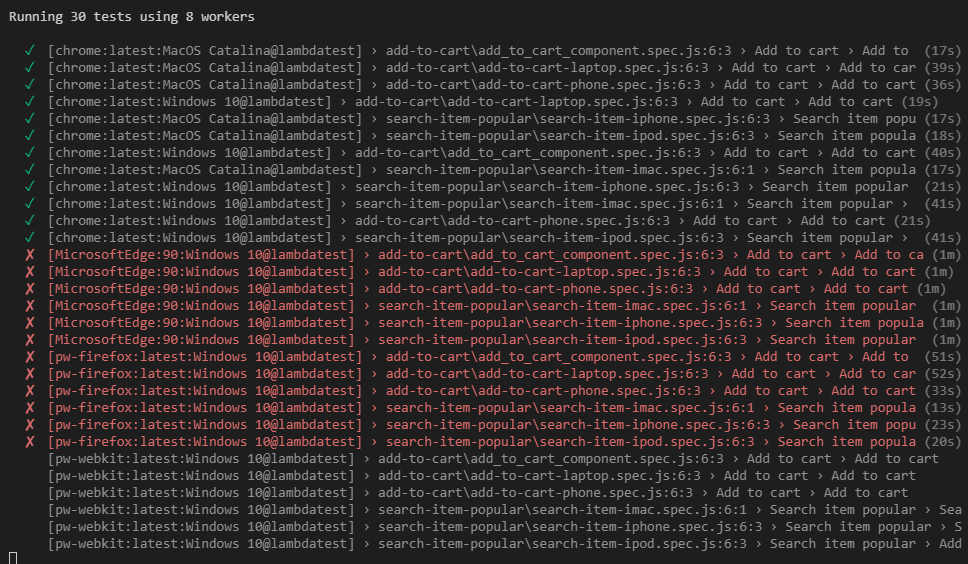
You should see 30 tests this time, 6 specs against 5 configurations. Chrome passes as it did locally, and the untested platforms produce a lot of red.
For running accessibility tests with Playwright on the TestMu AI cloud, refer to the Playwright accessibility test documentation.
For Python-based Playwright tests on the TestMu AI cloud, refer to the Python with Playwright documentation.
The red is useful: the suite has caught real environment differences. The logs show the Edge project running a mobile viewport, where the main menu collapses into a hamburger and the locators no longer match.
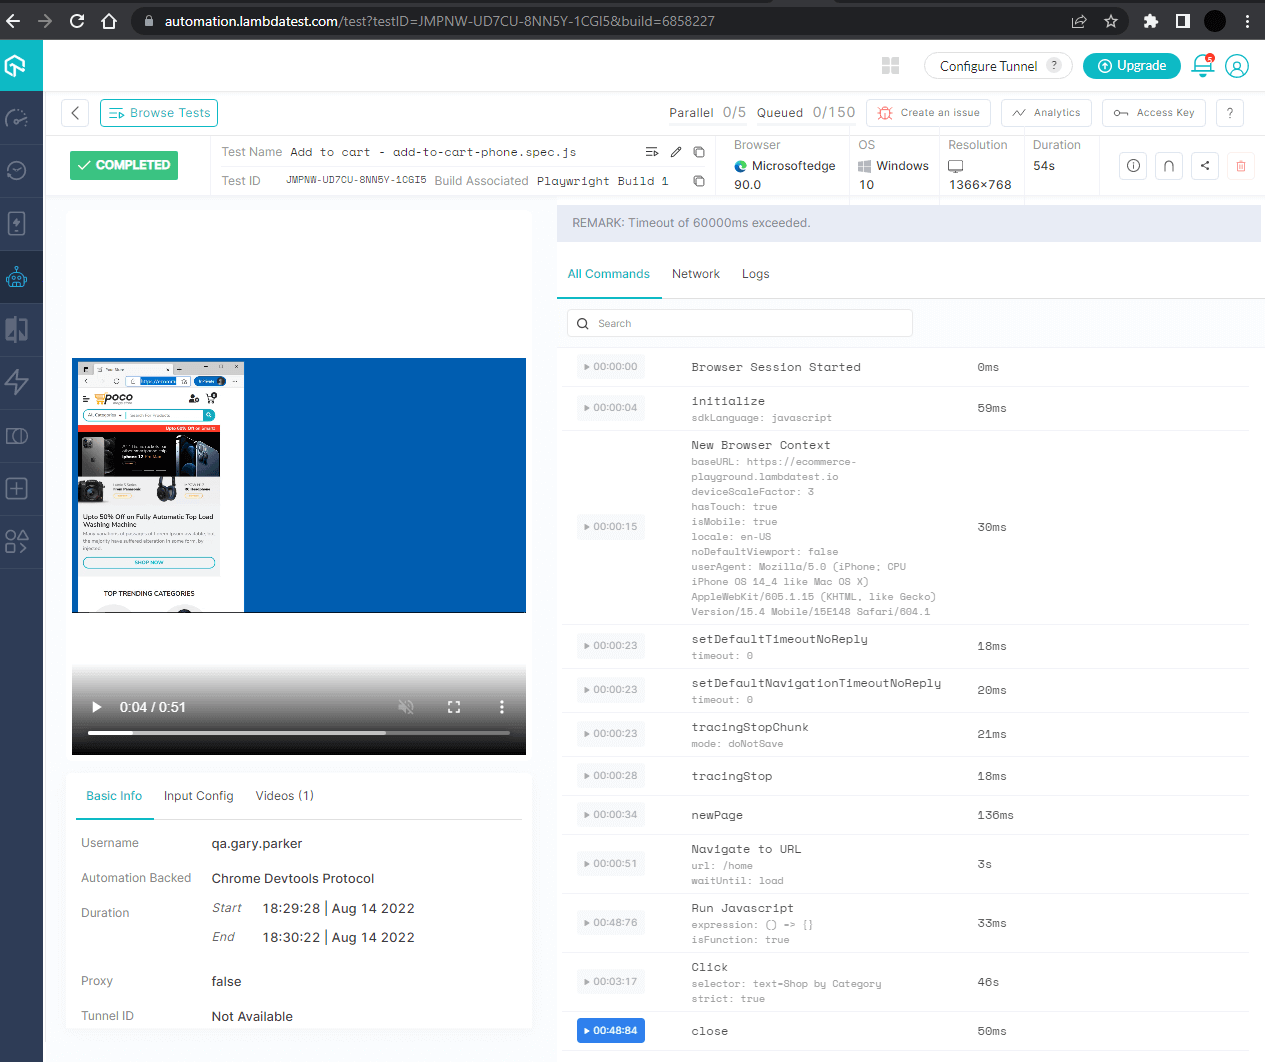
The quick fix is to match the viewport to the other projects and keep desktop coverage on Edge. The durable fix is a separate mobile suite.
WebKit failed differently: hover-then-click never reached add to cart, on Windows and macOS alike. Reproducing on both rules out a platform quirk and points at a real WebKit behaviour worth debugging by hand.

On the local grid, 6 tests ran on Chrome and Windows only, because the Selenium Grid path cannot launch Firefox or WebKit. On the cloud grid, the same 6 specs became 30 sessions across Windows and macOS on Chrome, Firefox, Edge, and WebKit, from a config change rather than new hardware.

Which grid should you use?
For this tutorial the answer follows from what you just saw. The self-hosted grid ran the suite on Chrome and Edge, and the cloud grid ran the same six specs as thirty sessions across Chrome, Firefox, Edge, and WebKit on Windows and macOS.
Stay on the self-hosted grid when the app must not leave your network and Chrome plus Edge is genuinely enough coverage. Move to a cloud grid when you need Firefox or WebKit, need macOS without buying Macs, or do not want browser upgrades sitting on your team backlog.
Migrating is a small change rather than a rewrite: keep the test code, swap the endpoint for the remote hub, add LT_USERNAME and LT_ACCESS_KEY, generate the capabilities block, run one config to confirm the wiring, then fan out the matrix. For the full comparison of grid options, including sharding and worker tuning, see Playwright grid.
Troubleshooting Playwright grid errors
Four failures account for most of the time lost when moving Playwright onto a remote grid. Each has a specific cause rather than a general flakiness explanation.
- The connection drops part-way through a test on Selenium Grid 4.5.2 or newer. Set
-Djdk.httpclient.websocket.intermediateBufferSize=3000000on the hub and on every node, not just the hub. - Playwright cannot reach the hub at all. Drop the
/wd/hubsuffix, becauseSELENIUM_REMOTE_URLpoints at the hub root for Playwright. - Firefox or WebKit projects never start on the grid. That is expected, since the Selenium Grid integration launches Chrome and Edge only, so those engines need a cloud grid or local execution.
- Tests connect but time out on a node. Confirm the node is reachable directly from the Playwright machine, because the CDP WebSocket connects to the node rather than being proxied by the hub.
Treat a failure that appears on only some configurations as a real defect until proven otherwise. In the cloud run above, the Edge project failed because it used a mobile viewport where the menu collapses to a hamburger, and WebKit failed on the hover-then-click interaction on both Windows and macOS. Each one was a genuine platform bug the local Chrome run could never have surfaced.
For grid-side execution problems, the Playwright JUnit on HyperExecute guide linked earlier covers orchestration and retries, and Playwright sharding explains how to split a suite across workers once concurrency is no longer the bottleneck.
Conclusion
Start by running one spec against a single remote configuration. Export LT_USERNAME and LT_ACCESS_KEY, add one entry to the projects array, and confirm the session appears in the dashboard before you widen the matrix. Wiring problems are far easier to read on one config than on thirty.
If your coverage stops at Chrome and Edge, the self-hosted grid is doing its job and you can stay there. If you need Firefox, WebKit, or macOS, the config in this guide runs unchanged on TestMu AI's Playwright cloud, and the parallel testing with Playwright documentation covers how concurrency is allocated once the matrix grows.
The complete suite used here is on the GitHub repository linked earlier in this guide, so you can clone it and run the same comparison yourself.
Author

Srinivasan Sekar
Blogs: 18


Srinivasan Sekar is Director of Engineering at TestMu AI (formerly LambdaTest), where he leads engineering and open-source initiatives behind the Selenium and Appium automation grid and owns TestMu AI's MCP Server. A committer to Appium and a contributor to Selenium, WebdriverIO, Taiko, and AppiumTestDistribution, he brings over 15 years of experience in quality engineering and open-source technologies. He is the author of the Apress book 'The MCP Standard: A Developer's Guide to Building Universal AI Tools with the Model Context Protocol,' a Certified Kubernetes and Cloud Native Associate, and an international conference speaker. Before TestMu AI he spent over eight years at Thoughtworks as a Principal Consultant and Quality Architect. Srinivasan holds a B.Tech in Information Technology from Anna University.
Reviewer

Harshit Paul
Reviewer
Harshit Paul is Director of Product Marketing at TestMu AI (formerly LambdaTest), with over 8 years of experience in product and growth marketing for developer and QA tools, leading the Agentic AI in Quality Engineering space. He has authored 80+ technical articles for TestMu AI on software testing and automation, and hosted webinars on Selenium, automation testing, browser compatibility, DevOps, and continuous testing. He has led go-to-market and technical marketing initiatives across software testing products, contributing to SEO, content strategy, and developer marketing. He began his career as a certified Salesforce developer at Wipro Technologies, where he worked for 2 years before moving into marketing. Harshit holds a degree in computer programming from Vivekananda Institute of Professional Studies.


First Playwright Test FAQs
Did you find this page helpful?
More Related Blogs
TestMu AI forEnterprise
Get access to solutions built on Enterprise
grade security, privacy, & compliance
- Advanced access controls
- Advanced data retention rules
- Advanced Local Testing
- Premium Support options
- Early access to beta features
- Private Slack Channel
- Unlimited Manual Accessibility DevTools Tests