

Power Your Software Testing with AI Agents and Cloud
The Native AI-Agentic Cloud Platform to Supercharge Quality Engineering. Test Intelligently and Ship Faster.


- TestMu AI (Formerly LambdaTest)
- /
- Blog
- /
- How To Integrate Playwright With Cucumber
How to Integrate Playwright With Cucumber
Learn how to integrate Playwright with Cucumber for efficient, readable, and maintainable end-to-end testing. Set up, write tests, and run on a cloud grid.
Last Updated on:
Playwright with Cucumber pairs Microsoft's Node.js browser automation library, which supports Chromium, Firefox, and WebKit, with Cucumber's Gherkin syntax of Feature, Scenario, Given, When, and Then blocks so testers without deep coding experience can contribute automated scripts. A cucumber.js config file wires the two together and loads a TypeScript transpiler so step definitions written in TypeScript run against the feature files.
Every command and code sample below was re-run in September 2026 on @cucumber/cucumber 13.2.1 and @playwright/test 1.63.0, locally and on the TestMu AI cloud grid. That run surfaced two setup breaks the original version of this guide did not cover, and both fixes are included.
TL;DR
- Cucumber-JS runs Gherkin feature files, while step definitions drive the browser through the Playwright library.
- Cucumber-JS 13 needs Node.js 22 or later and fails at startup on Node.js 20.
- TypeScript step definitions load through tsx, because ts-node 10.9.2 crashes with TypeScript 7.
- playwright-bdd runs Gherkin scenarios on the Playwright Test runner, keeping fixtures, sharding, and traces.
- cucumber-html-reporter turns Cucumber's JSON output into an HTML report with screenshots of failed scenarios.
- Swapping chromium.launch() for chromium.connect() moves a Cucumber suite onto the TestMu AI cloud grid.
What Is Playwright?
Playwright is a Node.js library developed by Microsoft to automate Chromium, Firefox, and WebKit with a single API, and it ships with its own test runner, Playwright Test. Its GitHub repository shows 96.8k stars, and Playwright runs all three browser engines on Linux, macOS, and Windows in both headless and headed modes.
That split between the library and the test runner matters for Cucumber: Cucumber brings its own runner, so a Cucumber-JS suite uses Playwright only as a library.
What Is Cucumber?
Cucumber is a testing library for Behavior Driven Development (BDD) that lets teams write tests in plain English. It reads human-readable descriptions of software behavior and runs matching code to check that the software behaves as described.
Behavior Driven Development (BDD) is a software development process that encourages collaboration between developers, QA, and non-technical stakeholders. Stakeholders can describe expected behavior without knowing how to write code, using a shared language called Gherkin.
What Is Gherkin?
Gherkin is a domain-specific language written in plain English that describes software behavior without specifying how it's implemented. The Gherkin reference defines its primary keywords, including Feature, Scenario, Given, When, Then, And, and But. For a deeper walkthrough of the syntax, see this guide to Gherkin testing.
Example of a Gherkin Feature File:
Feature: Perform Google Search
 As a user,
 I want to use Google to search for terms
 So that I can find relevant information quickly.
 Scenario: Execute a Search Using a Specific Keyword
   Given the user is on the Google homepage
   When the user enters "Playwright" into the search field
   Then the search results related to "Playwright" should be displayed
Breakdown of the Gherkin feature file:
- Feature - Describes the feature being tested. In this case, performing a Google search.
- Scenario - A specific use case under the feature. Here, it describes performing a search with a keyword.
- Given - Sets up the initial context. The user is on the Google homepage.
- When - Describes the action taken by the user. The user enters a search term.
- Then - Describes the expected result. The search results related to the keyword should be displayed.
The remaining keywords, And and But, chain extra steps onto the previous one: And adds another condition or outcome, while But adds a negative one, such as "But the error banner should not be displayed".

Note: Write your Playwright scenarios in Gherkin and run them across 3,000+ browser and OS combinations on the TestMu AI cloud grid. Try TestMu AI Today!
Why Integrate Playwright With Cucumber?
The pairing earns its extra layer when non-developers write or review scenarios. Product owners and manual testers read and edit .feature files, while engineers own the step definitions underneath, so one scenario serves as both the acceptance criteria and the automated check.
The cost is what you give up from Playwright Test. The Playwright docs on Playwright Library vs Playwright Test list what the library alone lacks:
- Built-in fixtures - Playwright Test hands each test an isolated page and context and closes them for you; with Cucumber-JS you create and close them in hooks.
- Runner features - Configuration projects, parallelization, retries, reporting, and one-line tracing belong to the Playwright Test runner, so Cucumber-JS substitutes its own options for most of them.
- Web-first assertions - The expect() matchers that auto-wait still work in Cucumber step definitions when imported from @playwright/test, as the step definitions later in this guide do.
If only engineers will ever touch the tests, plain Playwright Test with a Playwright Page Object Model gives readable tests without the Gherkin layer. If business-readable scenarios are the requirement, the next choice is which runner executes them.
Cucumber-JS vs playwright-bdd: Which Should You Use?
Use Cucumber-JS when your team already runs Cucumber elsewhere or depends on its reporters and formatters; use playwright-bdd when you want Gherkin scenarios without losing the Playwright Test runner. playwright-bdd is an MIT-licensed open-source project that TestMu AI sponsors, and its README describes how it converts .feature files into native Playwright tests.
| Aspect | Cucumber-JS + Playwright library | playwright-bdd |
|---|---|---|
| Who runs the scenarios | The cucumber-js CLI reads feature files and calls your step definitions directly. | The bddgen command generates Playwright test files, and npx playwright test runs them. |
| Browser lifecycle | You launch and close the browser yourself in Before and After hooks. | Playwright fixtures create and clean up the browser, context, and page automatically. |
| Parallel runs | The --parallel option starts separate worker processes, each with its own hooks. | Playwright workers and sharding, configured in playwright.config.ts. |
| Reports and debugging | Cucumber formatters, such as JSON output fed into cucumber-html-reporter. | Playwright's HTML reporter, traces, screenshots, and videos. |
| Step syntax | Given, When, and Then from @cucumber/cucumber, reading the page from a shared module or World. | Given, When, and Then from createBdd(), receiving the page as a fixture argument. |
The rest of this guide uses Cucumber-JS. For comparison, here is the same form scenario written for playwright-bdd, following the config and step shape in its getting-started docs. In the September 2026 re-run it passed on the TestMu AI cloud grid after adding connectOptions with the cloud WebSocket endpoint under use in the config.
// playwright.config.ts
import { defineConfig } from '@playwright/test';
import { defineBddConfig } from 'playwright-bdd';

const testDir = defineBddConfig({
  features: 'tests/features/*.feature',
  steps: 'tests/steps/*.ts',
});

export default defineConfig({
  testDir,
  reporter: 'html',
});
// tests/steps/submit-form.ts
import { expect } from '@playwright/test';
import { createBdd } from 'playwright-bdd';

const { Given, When, Then } = createBdd();

Given('the user is on the form page', async ({ page }) => {
  await page.goto('https://www.testmuai.com/selenium-playground/simple-form-demo/', { waitUntil: 'networkidle' });
});

When('the user enters {string} into the message field', async ({ page }, message: string) => {
  await page.getByPlaceholder('Please enter your Message').fill(message);
});

When('the user clicks the submit button', async ({ page }) => {
  await page.locator('#showInput').click();
});

Then('the message {string} should be displayed on the page', async ({ page }, message: string) => {
  await expect(page.locator('#message')).toHaveText(message);
});
Install it with npm i -D @playwright/test playwright-bdd, then generate and run the tests with npx bddgen && npx playwright test.
How to Set Up Playwright With Cucumber?
Before starting, check your Node.js version with node -v. The @cucumber/cucumber package manifest for version 13.2.1 declares Node.js 22, 24, or 26 and later; on Node.js 20.12 it fails at startup with an ERR_REQUIRE_ESM error.
- Install Playwright if it's not already installed on your system.
- Use any IDE; this guide uses VS Code.
- In VS Code, add the following extensions:
- Cucumber VS Code extension - A language server for Cucumber with auto-completion, "go to definition", and warnings for undefined steps.
- Cucumber (Gherkin) Full Support - Syntax highlighting, auto-completion, and snippets for Gherkin.
Setting Up Playwright
- Playwright provides a CLI tool to create a new project with a single command. You can use npm, yarn, or pnpm; this guide uses pnpm.
Run the following command, replacing <project-name> with your preferred project name:
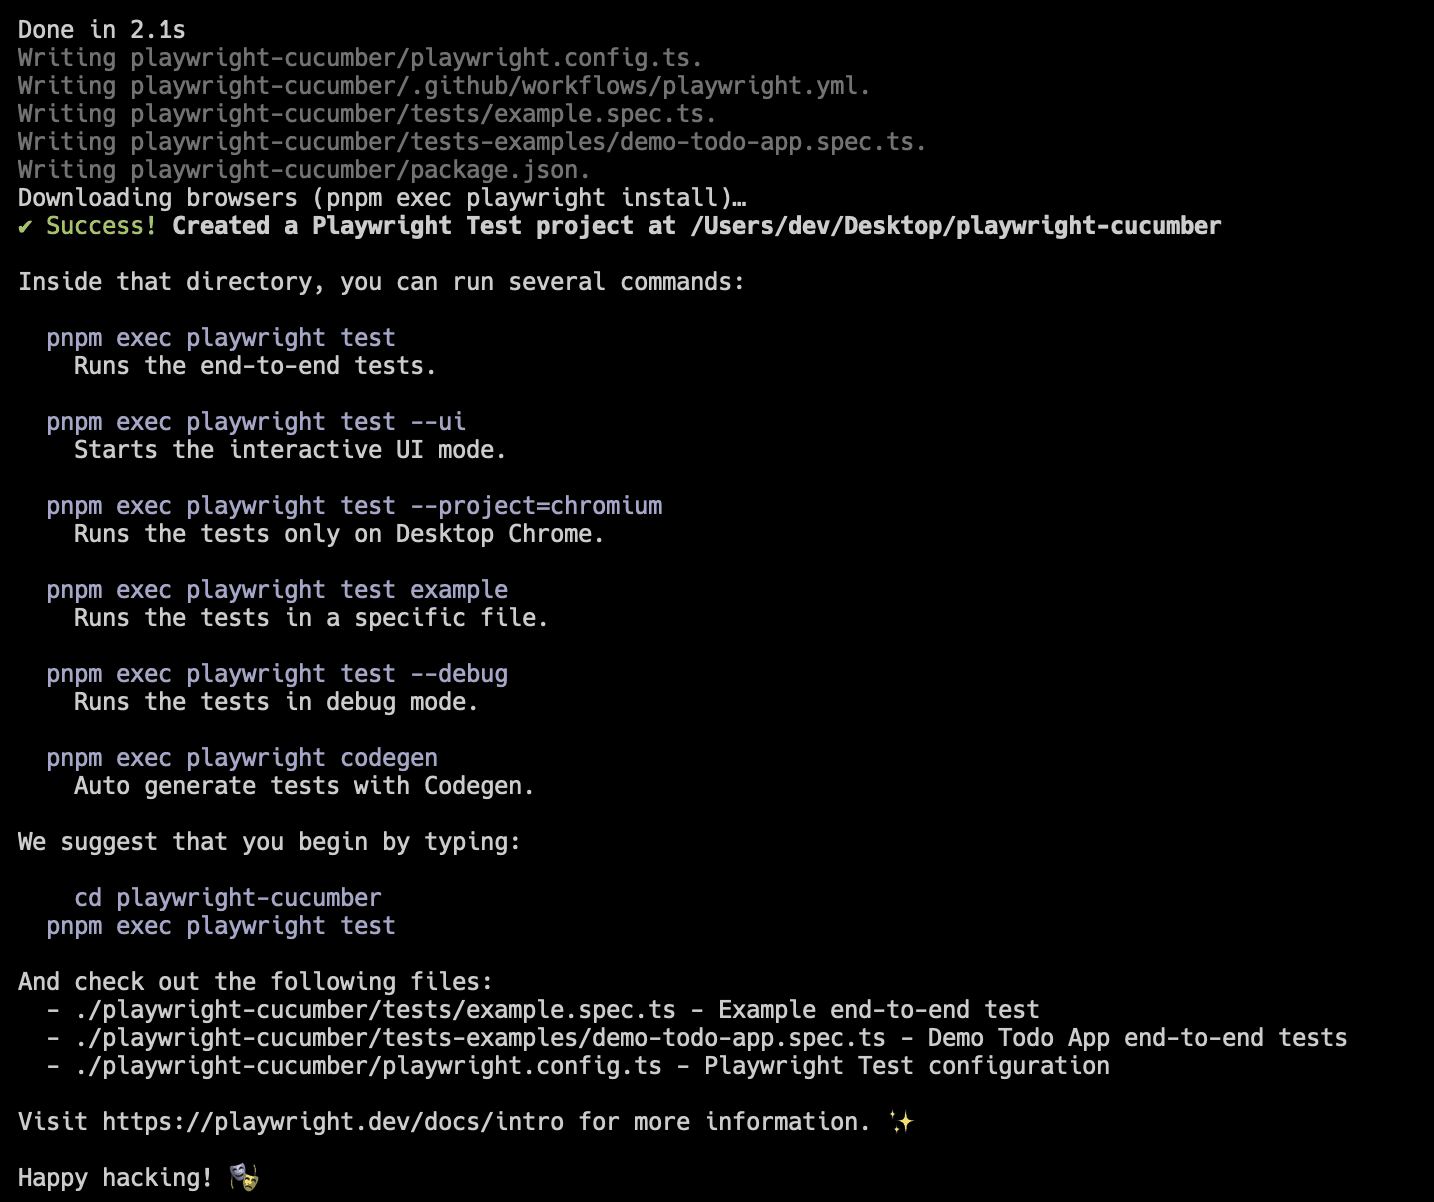
pnpm create playwright playwright-cucumber - Answer Playwright's setup questions:
- Do you want to use TypeScript or JavaScript? - This guide uses TypeScript.
- Where to put your end-to-end tests? - The default folder is tests. You can leave it as is.
- Add a GitHub Actions workflow file? - Choose yes if you want a starter CI workflow. The Playwright CI/CD guide covers pipeline setup in depth.
- Install Playwright browsers? - Choose yes, or run
pnpm exec playwright installlater. - Playwright downloads the dependencies it needs and prints the commands you can use to run tests:
- Here is the project structure that Playwright creates:
.
└── playwright-cucumber
   ├── .github
   │   └── workflows
   │       └── playwright.yml
   ├── node_modules
   ├── tests
   │   └── example.spec.ts
   ├── tests-examples
   │   └── demo-todo-app.spec.ts
   ├── .gitignore
   ├── package.json
   ├── playwright.config.ts
   └── pnpm-lock.yaml
Setting Up Cucumber
- Install Cucumber to start writing tests in Gherkin:
pnpm add -D @cucumber/cucumber
ts-node, but ts-node 10.9.2 is its latest release and crashes on load with TypeScript 7.0.2 ("Cannot read properties of undefined (reading 'fileExists')"). Use tsx instead:pnpm add -D tsx
module.exports = {
  default: {
    paths: ['tests/features/'],
    requireModule: ['tsx/cjs'],
    require: ['tests/steps/**/*.ts'],
    format: ['progress'],
  },
};
In this configuration:
- paths points Cucumber at the feature files in tests/features/.
- requireModule loads tsx before any step file, so TypeScript compiles on the fly.
- require loads every step definition in tests/steps/.
- format sets the console output; the reports section adds a JSON formatter here.
- The default profile is picked up whenever
pnpm exec cucumber-jsornpx cucumber-jsruns.
How to Write Tests Using Playwright With Cucumber?
A Playwright Cucumber test has three parts: a feature file with the scenario, a world file with hooks that own the browser, and step definitions that call Playwright. For conventions on keeping scenarios maintainable as the suite grows, see these Cucumber best practices.
Feature Files
Create a directory called features inside tests, then add a file named submit-form.feature:
└── playwright-cucumber
   ├── ...
   ├── tests/
   │   ├── features/  # Add this directory
   │   │   └── submit-form.feature  # Add this file
   │   └── ...
   └── ...
Write a feature that submits a form with a message:
Feature: Display a message when a form is submitted
  As a user,
  I want to submit a form with a message
  So that I can see the message displayed on the page.
Scenario: Submit a form with a message
  Given the user is on the form page
  When the user enters "Hello, World!" into the message field
  And the user clicks the submit button
  Then the message "Hello, World!" should be displayed on the page
The scenario breaks down into four steps:
- Given - The user is on the form page.
- When - The user enters "Hello, World!" into the message field.
- And - The user clicks the submit button.
- Then - The message "Hello, World!" should be displayed on the page.
The World Object in Cucumber
Cucumber creates a new World object for each scenario and binds it to this inside step definitions and hooks, which makes it the place for per-scenario state. Hooks defined next to it run code before and after each scenario.
Create a file called world.ts in the tests/steps directory:
└── playwright-cucumber
   ├── ...
   ├── tests/
   │   ├── steps/  # Add this directory
   │   │   └── world.ts  # Add this file
   │   └── ...
   └── ...
In world.ts, add a Before and an After hook that run around each scenario:
import { After, Before, setDefaultTimeout } from '@cucumber/cucumber';
import { Browser, Page, chromium } from '@playwright/test';
let page: Page;
let browser: Browser;
setDefaultTimeout(60000);
Before(async () => {
  browser = await chromium.launch();
  page = await browser.newPage();
});
After(async () => {
  await browser.close();
});
export { page, browser };
The Before hook launches Chromium and opens a new page; swap in firefox or webkit to test another engine. The After hook closes the browser, and setDefaultTimeout raises Cucumber's step timeout to 60 seconds.
The file exports page and browser so step definitions can import them. Because the exports are module-level variables, each Cucumber worker process gets its own copy when you later run with --parallel.
Setting a Custom World Object
To keep the page on the World instead of in module variables, register your own World class with setWorldConstructor:
import { setWorldConstructor, World, IWorldOptions } from '@cucumber/cucumber';
class CustomWorld extends World {
  customProp = "I'm a custom prop";
  constructor(options: IWorldOptions) {
    super(options);
  }
}
setWorldConstructor(CustomWorld);
Step definitions then read custom properties through this:
import { When } from '@cucumber/cucumber';
When('I do something', async function () {
  console.log(this.customProp);
});
To use this in step definitions, declare them with the function keyword; arrow functions do not bind the World. The rest of this tutorial uses the simpler module exports from world.ts.
Writing Step Definitions
Step definitions are the code that performs each action described in the feature file. To have Cucumber print snippet stubs for every undefined step without opening a browser, run a dry run:
pnpm exec cucumber-js --dry-run
Cucumber reads the feature files in tests/features, reports the four steps as undefined, and prints a stub for each. Copy them into a new file, tests/steps/submit-form.ts:
└── playwright-cucumber
   ├── ...
   ├── tests/
   │   ├── steps/
   │   │   └── submit-form.ts  # Add this file
   │   └── ...
   └── ...
Then fill each stub with Playwright calls against the Simple Form Demo on the TestMu AI Selenium Playground:
import { page } from './world';
import { Given, When, Then } from '@cucumber/cucumber';
import { expect } from '@playwright/test';
Given('the user is on the form page', async function () {
  await page.goto('https://www.testmuai.com/selenium-playground/simple-form-demo/', { waitUntil: 'networkidle' });
});
When('the user enters {string} into the message field', async function (message: string) {
  await page.getByPlaceholder('Please enter your Message').fill(message);
});
When('the user clicks the submit button', async function () {
  await page.locator('#showInput').click();
});
Then('the message {string} should be displayed on the page', async function (message: string) {
  await expect(page.locator('#message')).toHaveText(message);
});
Code Walkthrough:
- The file imports Given, When, and Then from @cucumber/cucumber, expect from @playwright/test, and the shared page from world.ts. The hooks in world.ts already open and close the browser.
- The Given step opens the form page and waits for network activity to settle. In the re-run, a fill that ran before the page finished loading its scripts was lost and the result stayed empty; waiting for networkidle made the scenario pass on every repeat.
- The first When step fills the message field by its placeholder. On the current playground, the ID #user-message matches three elements, so Playwright's strict locators reject it; a unique locator avoids that.
- The second When step clicks the Get Checked Value button, whose ID is #showInput.
- The Then step uses the auto-waiting toHaveText assertion, which retries until the message appears instead of reading the text once.
Running the Tests
Run the following command to execute the tests:
pnpm exec cucumber-js
The progress formatter prints one dot per passing step, including the two hooks. This is the output from the September 2026 re-run of this exact scenario on Chrome 153:
......

1 scenario (1 passed)
6 steps (6 passed)
0m 19.824s (0m 19.798s executing your code)
Running Scenarios by Tag and Checking Step Mapping
Tag a scenario by adding a line such as @smoke above it in the feature file. Then use these cucumber-js options, all listed in its --help output, to control what runs:
# Run only scenarios tagged @smoke
pnpm exec cucumber-js --tags @smoke

# Check that every step has a definition, without opening a browser
pnpm exec cucumber-js --dry-run

# Run scenarios across 2 worker processes
pnpm exec cucumber-js --parallel 2

# Retry a failing scenario once before marking it failed
pnpm exec cucumber-js --retry 1
Running the Tests in Headed Mode
To watch the browser while tests run, launch it in headed mode in world.ts:
Before(async () => {
  browser = await chromium.launch({
    headless: false, // <-- Change this to false
  });
  page = await browser.newPage();
});
Note: Headed mode helps with debugging, but keep CI runs headless: most CI runners have no display, and headed runs are slower.

How to Generate Reports Using Playwright With Cucumber?
The cucumber-html-reporter package turns Cucumber's JSON output into an HTML report that shows which scenarios passed and failed. Install it along with dayjs, which timestamps the report file name:
pnpm add -D cucumber-html-reporter && pnpm add dayjs
Create a file called report.js in the root of the project:
const reporter = require("cucumber-html-reporter");
const dayjs = require("dayjs");
const fs = require("fs");
const currentDate = dayjs().format("YYYY_MM_DD_HH_mm_ss_SSS");
const options = {
  brandTitle: "Feature Test Report",
  theme: "bootstrap",
  jsonFile: "Reports/cucumber_report.json",
  output: "Reports/cucumber_report_" + currentDate + ".html",
  screenshotsDirectory: "./Screenshots/",
  storeScreenshots: true,
  reportSuiteAsScenarios: true,
  launchReport: true,
};
// Making the directory if it doesn't exist
if (!fs.existsSync("Reports")) {
  fs.mkdirSync("Reports");
}
if (!fs.existsSync("Screenshots")) {
  fs.mkdirSync("Screenshots");
}
reporter.generate(options);
The options control the report:
- brandTitle - The title of the report.
- theme - The visual theme of the report.
- jsonFile - The location of the JSON file that contains the test results.
- output - The location of the generated HTML report.
- screenshotsDirectory - Where screenshots taken on failure are stored.
- storeScreenshots - Whether to store screenshots.
- reportSuiteAsScenarios - Whether to report the suite as scenarios.
- launchReport - Whether to open the report in your browser once it's generated.
Next, add a JSON formatter to the format list in cucumber.js:
module.exports = {
  default: {
    paths: ['tests/features/'],
    requireModule: ['tsx/cjs'],
    require: ['tests/steps/**/*.ts'],
    format: ['progress', 'json:Reports/cucumber_report.json'],
  },
};
After the tests run, Cucumber writes the results to the JSON file named in the json:Reports/cucumber_report.json entry, and report.js converts that file into HTML. Add both steps as a script in package.json:
{
  "scripts": {
    "test": "cucumber-js && node report.js"
  }
}
Run the tests with pnpm test. The report lands in the Reports directory as cucumber_report_<date>.html and opens in your default browser:
.
└── playwright-cucumber
   ├── ...
   ├── Reports/
   │   └── cucumber_report_<date>.html
   └── ...
Taking Screenshots on Failure
A screenshot of the browser at the moment of failure shows what the page looked like when the assertion broke. Update the After hook in world.ts to capture one:
After(async function (scenario) {
  if (scenario.result?.status === 'FAILED') {
    const screenshot = await page.screenshot({
      path: `./Screenshots/${scenario.pickle.name}.png`,
    });
    this.attach(screenshot, 'image/png');
  }
  await browser.close();
});
The hook checks scenario.result.status. On failure, page.screenshot saves an image named after the scenario to the Screenshots directory, and this.attach embeds it in the report.
To simulate a failure, change the expected message in submit-form.ts:
Then('the message {string} should be displayed on the page', async function (message: string) {
  await expect(page.locator('#message')).toHaveText('Hello, World'); // <-- Changed this to "Hello, World"
});
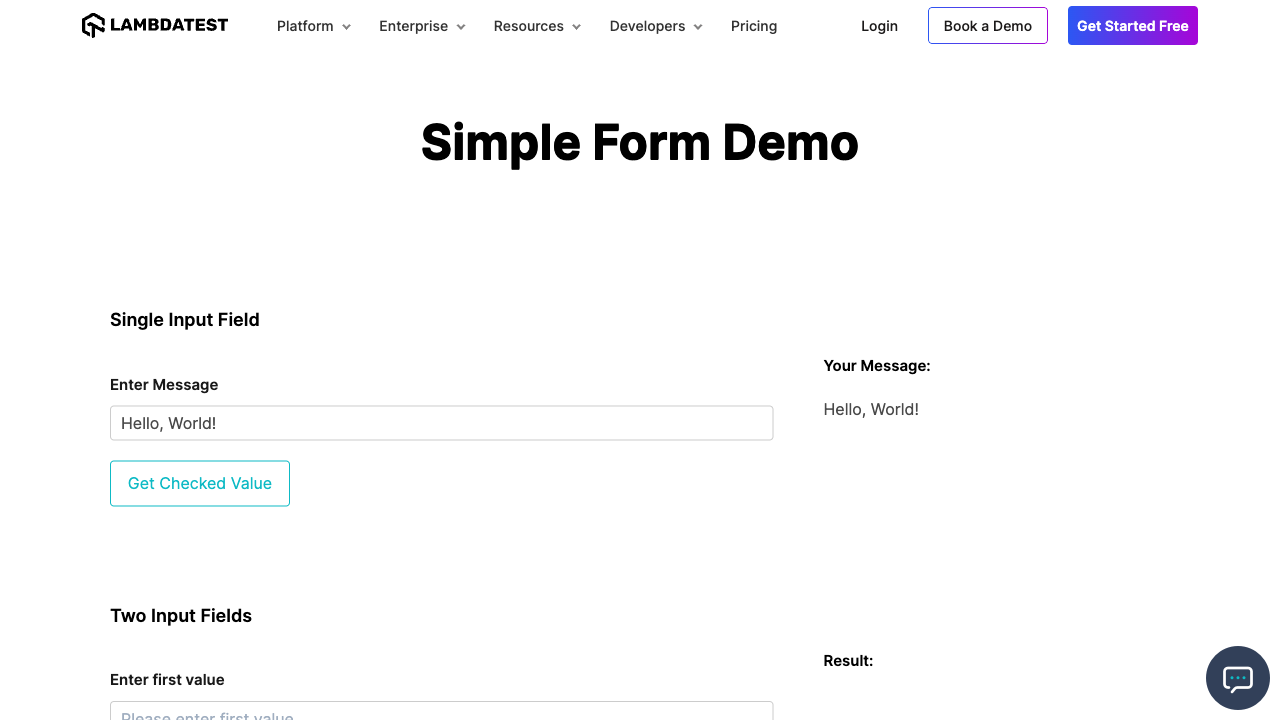
Run pnpm test again. The scenario fails, and a new screenshot appears in the Screenshots directory with the name of the scenario:
└── playwright-cucumber
   ├── ...
   ├── Screenshots/
   │   └── Submit a form with a message.png
   └── ...
Here is the screenshot generated when the test failed:
How to Run Tests Using Playwright With Cucumber on Cloud?
A local run covers one browser on one machine. TestMu AI's Automation Cloud runs existing Playwright scripts, unchanged apart from the connection, across 3,000+ browser and OS combinations in parallel, and records network logs, console logs, video, and screenshots for every session. For a Cucumber suite, that means replacing one line in the Before hook.
- In your TestMu AI account, go to Account Settings > Password & Security to copy your username and access key.
- Create a .env file in the root of the project with those credentials:
LT_USERNAME=<your-username>
LT_ACCESS_KEY=<your-access-key>dotenv so Node.js can read the .env file:pnpm add dotenvimport { config } from "dotenv"
config()
import { After, Before, setDefaultTimeout } from "@cucumber/cucumber"
import { Browser, Page, chromium } from "@playwright/test"
let page: Page
let browser: Browser
setDefaultTimeout(60000)
Before(async ({ pickle }) => {
const capabilities = {
browserName: "Chrome", // Browsers allowed: `Chrome`, `MicrosoftEdge`, `pw-chromium`, `pw-firefox` and `pw-webkit`
browserVersion: "latest",
"LT:Options": {
platform: "Windows 11",
build: "Playwright Cucumber Tutorial",
name: pickle.name,
user: process.env.LT_USERNAME,
accessKey: process.env.LT_ACCESS_KEY,
network: true,
video: true,
console: true,
},
}
browser = await chromium.connect({
wsEndpoint: `wss://cdp.lambdatest.com/playwright?capabilities=${encodeURIComponent(
JSON.stringify(capabilities)
)}`,
})
page = await browser.newPage()
})
After(async function (scenario) {
const passed = scenario.result?.status === "PASSED"
await page.evaluate(_ => {}, `lambdatest_action: ${JSON.stringify({
action: "setTestStatus",
arguments: { status: passed ? "passed" : "failed", remark: passed ? "Scenario passed" : "Scenario failed" },
})}`)
if (!passed) {
const screenshot = await page.screenshot({
path: `./Screenshots/${scenario.pickle.name}.png`,
})
this.attach(screenshot, "image/png")
}
await browser.close()
})
export { page, browser }
Here is what changed from the local version:
- dotenv at the top - config() loads the .env file before anything reads the credentials.
- Capabilities in the Before hook - The object sets the browser, version, platform, build name, and test name (taken from the scenario via pickle.name), plus network, video, and console logging.
- connect() instead of launch() - chromium.connect() opens a browser on the cloud grid through the wsEndpoint, with the capabilities encoded as a query parameter.
- setTestStatus in the After hook - The cloud browser cannot see Cucumber's result, so the hook reports pass or fail through a lambdatest_action call; without it the dashboard does not show the scenario's final status.
Run pnpm test as before. In the September 2026 re-run, the scenario ran as a Playwright session on Chrome 153 on Windows 11 in the "Playwright Cucumber Tutorial" build and passed 3 of 3 runs, each taking 20 to 25 seconds. Track progress in the Web Automation tab, where each scenario appears by name:
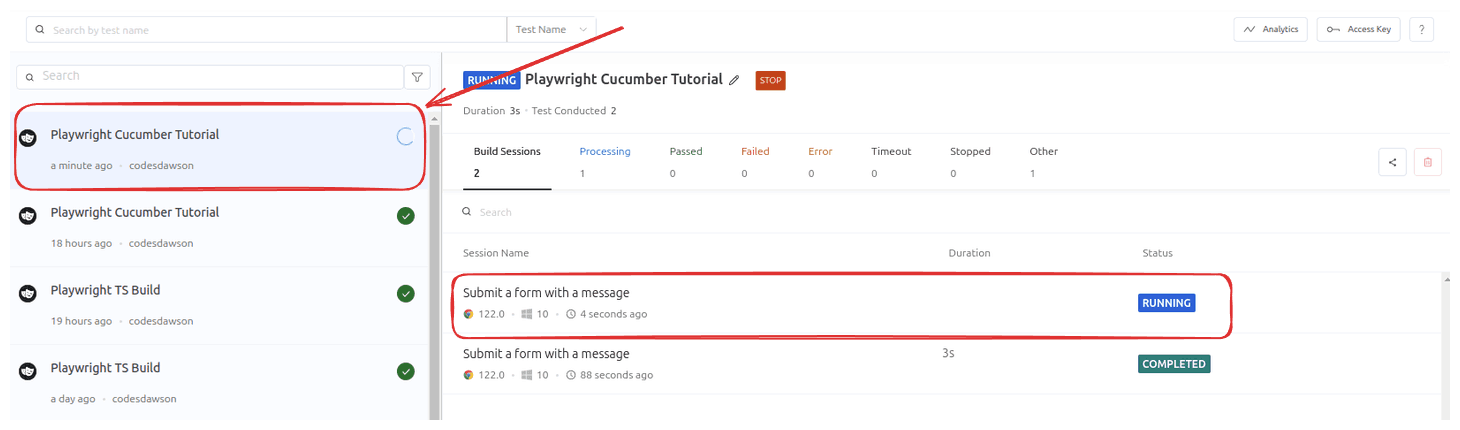
Click a test to see its logs and a video of the run:
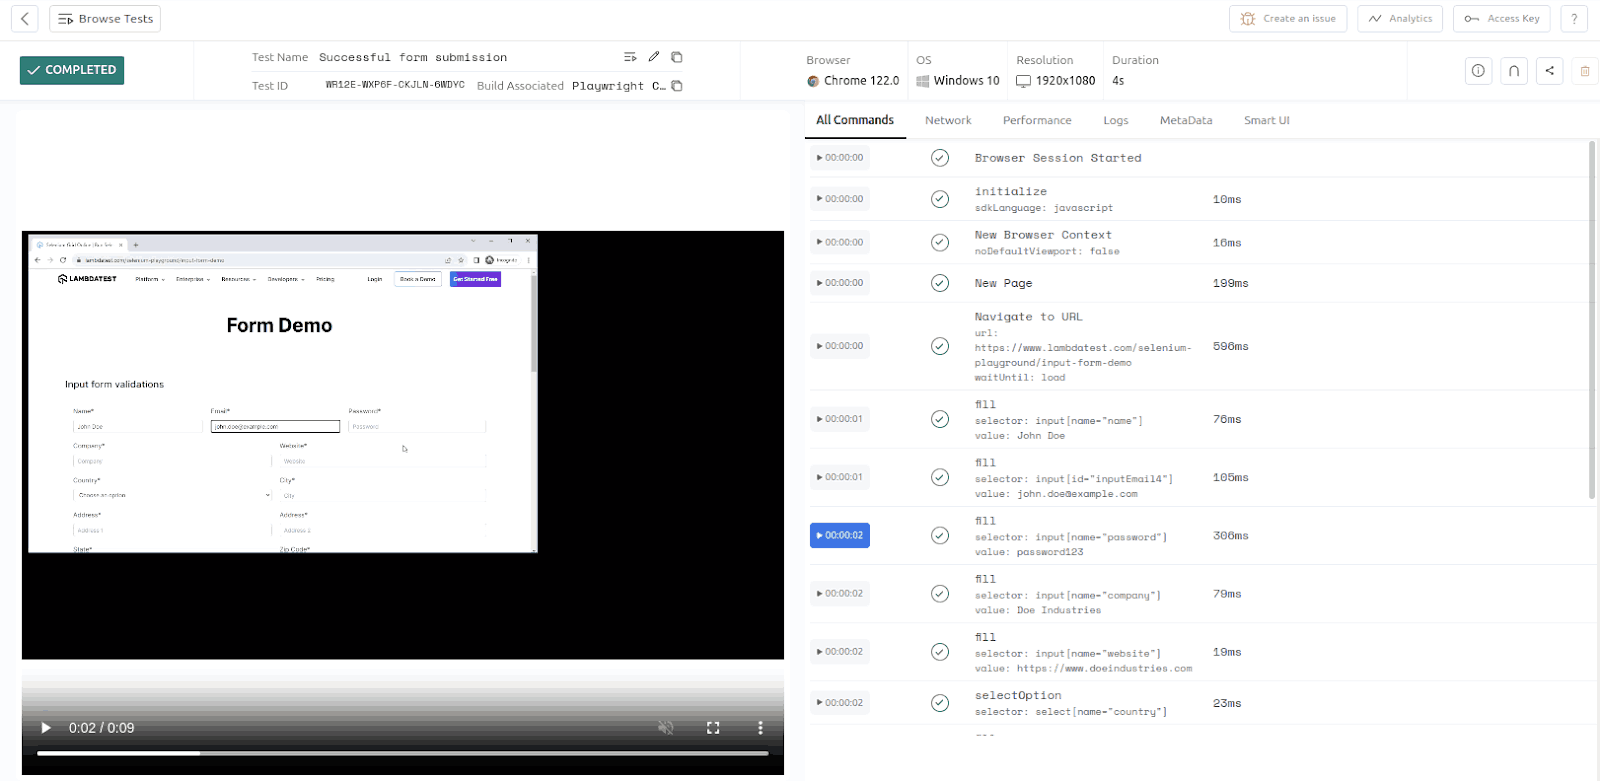
The author's original project for this tutorial is on GitHub (it predates the tsx and locator fixes above), and TestMu AI's Playwright Cucumber JS sample repository has a second working setup for the cloud grid.

Subscribe to the TestMu AI YouTube channel for more Playwright tutorials in TypeScript and JavaScript.
How Do AI Coding Agents Write Playwright Cucumber Step Definitions in 2026?
AI coding agents fill in step definition stubs by reading the live page through a browser tool, then writing the Playwright calls for each Gherkin step. The Playwright AI guide covers the wider tooling; these are the pieces that apply to a Cucumber suite:
- Playwright MCP server - Microsoft's Model Context Protocol server for Playwright exposes the open page's accessibility tree to an agent, so it can pick a real element for a step like "When the user clicks the submit button" instead of guessing a CSS selector.
- Dry-run stubs as the agent's task list - An agent such as Claude Code or Cursor can run
npx cucumber-js --dry-run, read the undefined-step snippets it prints, and fill each one with calls in the style of the world.ts and submit-form.ts files above. - playwright-bdd step export - playwright-bdd can export the project's existing step definitions for an AI assistant and ships an agent skill, so generated scenarios reuse steps that already exist instead of inventing near-duplicates.
None of these tools knows a project's selectors or business rules in advance. The duplicate #user-message ID on the playground is the kind of trap a generated step walks into, so run each generated step once and confirm it targets the right element before committing it.
Conclusion
Start by running the submit-form scenario from this guide locally on Node.js 22 or later with tsx, then move it to the cloud by swapping chromium.launch() for chromium.connect() in world.ts. The TestMu AI documentation for Playwright with Cucumber.js covers the full cloud setup, and a free TestMu AI account gives you the username and access key the .env file needs.
Author

Dastan
Blogs: 4
Dastan, known online as dcodes, is a full-stack developer and technical writer with several years of experience in software engineering. On TestMu AI (formerly LambdaTest), he authored tutorials on Cypress testing, Cypress best practices, Cypress debugging, Playwright with Cucumber, and Podman versus Docker containerization. He also publishes developer tutorials on his platform dcodes.dev and founded rustfinity.com, a platform for learning the Rust programming language.
Reviewer

Srinivasan Sekar
Reviewer

Srinivasan Sekar is Director of Engineering at TestMu AI (formerly LambdaTest), where he leads engineering and open-source initiatives behind the Selenium and Appium automation grid and owns TestMu AI's MCP Server. A committer to Appium and a contributor to Selenium, WebdriverIO, Taiko, and AppiumTestDistribution, he brings over 15 years of experience in quality engineering and open-source technologies. He is the author of the Apress book 'The MCP Standard: A Developer's Guide to Building Universal AI Tools with the Model Context Protocol,' a Certified Kubernetes and Cloud Native Associate, and an international conference speaker. Before TestMu AI he spent over eight years at Thoughtworks as a Principal Consultant and Quality Architect. Srinivasan holds a B.Tech in Information Technology from Anna University.


Playwright Cucumber FAQs
Did you find this page helpful?
More Related Blogs
TestMu AI forEnterprise
Get access to solutions built on Enterprise
grade security, privacy, & compliance
- Advanced access controls
- Advanced data retention rules
- Advanced Local Testing
- Premium Support options
- Early access to beta features
- Private Slack Channel
- Unlimited Manual Accessibility DevTools Tests