World’s largest virtual agentic engineering & quality conference


- TestMu AI (Formerly LambdaTest)
- /
- Blog
- /
- Vibe Testing with Playwright MCP: Testing UX with AI Agents
Vibe Testing with Playwright MCP: Testing UX with AI Agents
Learn how to perform vibe testing with Playwright MCP and Claude to validate user experience. Run AI-driven browser tests, generate scripts, and use Kane AI.

Faisal Khatri
Author
Last Updated on: June 25, 2026
With the rapid adoption of AI coding agents like Claude and GitHub Copilot, modern AI test automation is no longer just about writing scripts. It is about working alongside AI to generate, maintain, and optimize tests faster, with quick feedback loops, smart test generation, and self-healing capabilities that keep AI-generated scripts stable and reliable.
As vibe coding reshapes how teams build software using AI, vibe testing with Playwright has emerged as its natural counterpart. With the rise of MCP and AI agents, AI testing tools can now connect directly with AI systems, allowing tests to be generated, analyzed, and refined through natural language interactions.
This approach helps teams validate not just what was built, but how it feels to use, including visual consistency, layout alignment, accessibility, performance feel, and even small UI details that impact user perception.
Overview
How Can You Perform Vibe Testing with Playwright MCP with Claude?
Vibe testing with Playwright MCP allows Claude to simulate real user journeys and evaluate interaction flow, UI behavior, and feedback. Instead of writing scripts, testers describe scenarios in natural language and let the AI execute and validate the experience.
- Define Scenario: Describe a realistic user journey, including navigation, search actions, cart interaction, validation checks, and screenshot capture.
- Paste Prompt in Claude: Open Claude Desktop, start a new chat, paste the scenario prompt, and allow the AI agent to initiate testing.
- Connect to Playwright MCP: Claude communicates with Playwright MCP server to translate instructions into structured browser automation actions.
- Execute Browser Actions: The agent sequentially performs navigation, searches, hover actions, clicks, and text validation inside a visible browser session.
- Detect UI Elements: Claude dynamically identifies elements such as buttons, fields, and messages using contextual understanding rather than fixed selectors.
- Validate Expected Outcomes: After execution, Claude compares observed page behavior against defined expectations and generates a summarized pass or fail report.
How to Run Vibe Tests with Kane AI?
KaneAI by TestMu AI uses natural language prompts to generate browser workflows, simplifying AI test automation for end-to-end testing.
- Access Kane AI Agent: Log into the TestMu AI dashboard and open the Kane AI Agent workspace to begin AI-assisted test orchestration.
- Provide Testing Intent: Submit a natural-language scenario describing navigation, product discovery, cart interaction, and validation checkpoints for the workflow.
- Initiate Automated Execution: The agent converts the prompt into structured Playwright MCP instructions that control the browser and simulate user interactions.
- Observe Runtime Actions: Each action runs sequentially in a live browser session, showing navigation, hover events, input entries, and page transitions.
- Contextual Element Recognition: Kane AI interprets UI labels, placeholders, and semantic structure to identify elements without predefined selectors or brittle locators.
- Analyze Execution Results: After completion, the system generates a detailed run summary with logs, screenshots, environment details, and behavioral insights.
What Is Vibe Testing?
Vibe testing evaluates how an app feels to users, not just if it works. With Claude and Playwright MCP, you describe a user journey and AI executes and validates it in a real browser.
Vibe testing with Playwright focuses on evaluating the overall user experience, not just whether the app works correctly. Instead of just checking whether the app works as expected, vibe testing looks at the overall experience from a user's point of view, and it asks questions like:
- Is the navigation intuitive?
- Does the flow feel smooth?
- Are there jarring interruptions like unexpected pop-ups or layout shifts?
When paired with an AI agent like Claude, vibe testing becomes conversational. You describe a user journey in plain English, the AI executes it in a real browser, validates the outcomes, and reports back. No scripting required.
Note: Create, author, and evolve tests using NLP with KaneAI. Book a Demo!
What is Playwright MCP, and How Does it Work?
Playwright MCP is a Model Context Protocol server that lets AI agents control a browser using Playwright, Microsoft's open-source automation framework.
The AI sends high-level instructions to the MCP server, which performs browser actions like opening pages, clicking elements, and filling forms, then returns structured results including pass/fail status, text output, or screenshots.
Teams that want explicit control over the agent loop instead of using a pre-built MCP server can follow this guide to Playwright LangChain, which wraps Playwright actions as LangChain tools and runs a ReAct loop with configurable recursion limits, SSRF allowlists, and per-tool descriptions.
It runs in two modes:
| Mode | How it works | When to use it |
|---|---|---|
| Snapshot Mode (Default) | Reads the browser's accessibility tree, a structured map of page elements by role, name, and value | Most tasks, such as navigation, forms, and content extraction |
| Vision Mode | Uses screenshots and coordinate-based interactions | Edge cases where the accessibility tree is not enough |
Snapshot Mode covers the vast majority of vibe testing scenarios, whereas the Vision Mode is a fallback.
Setting Up and Installing Playwright MCP
Playwright MCP integrates with tools like Claude Desktop, Cursor IDE, and GitHub Copilot in Visual Studio Code, allowing AI assistants to interact with web applications in a structured, reliable way.
What Claude can do once connected:
- Open and control a browser session
- Navigate across web pages
- Fill forms and click elements
- Validate application behavior in real time
The following step-by-step guide will allow us to install Playwright MCP with Claude:
Step 1: Install Node and npm
Make sure Node.js and npm are installed on your system. If you haven't set up Playwright yet, check out our Playwright Install guide before proceeding.
node -v
npm -v
Step 2: Install Claude Desktop and Configure Playwright MCP
- Install Claude Desktop: Depending on the operating system, download and install the Claude desktop from Claude Download.
- Locate the config file: The Playwright MCP server needs to be defined in the config file, which can be located as given below:
- MacOS: ~/Library/Application Support/Claude/claude_desktop_config.json
- Windows: %AppData%\Claude\claude_desktop_config.json
- Add Playwright MCP server to the config file:
{
  "mcpServers": {
    "playwright": {
      "command": "npx",
      "args": [
        "-y",
        "@playwright/mcp@latest"
      ]
    }
  }
}
This tells Claude Desktop how to start the Playwright MCP server. It uses npx and runs @playwright/mcp@latest automatically with the -y flag to skip confirmation prompts.
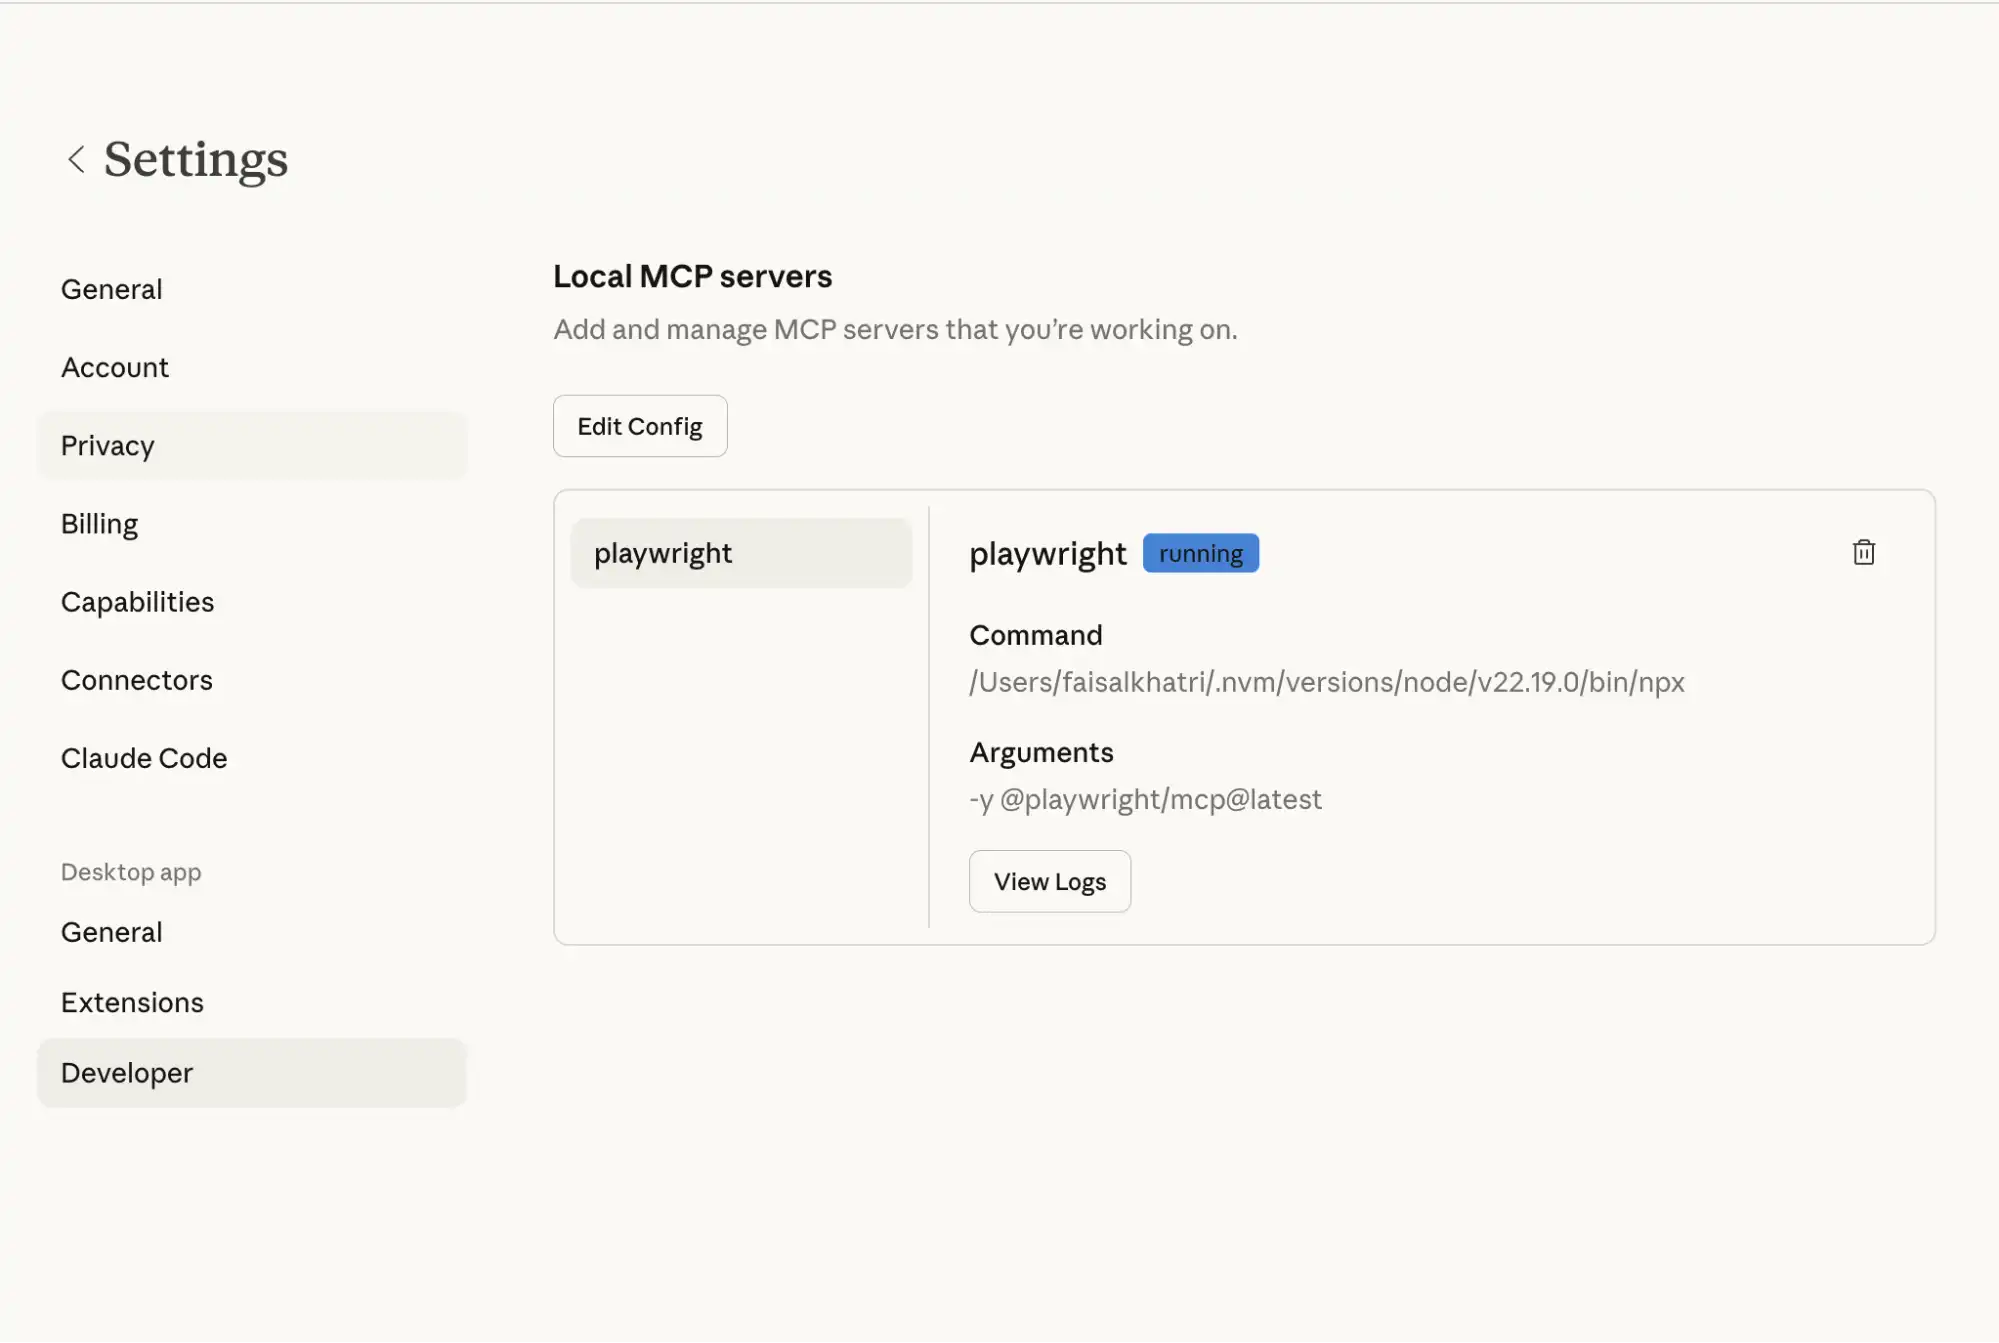
- Restart Claude Desktop: It should detect the Playwright MCP server. To check that the server is up and running, navigate to Claude Settings > Developer.
Step 3: Run a Basic Command to Verify the Setup
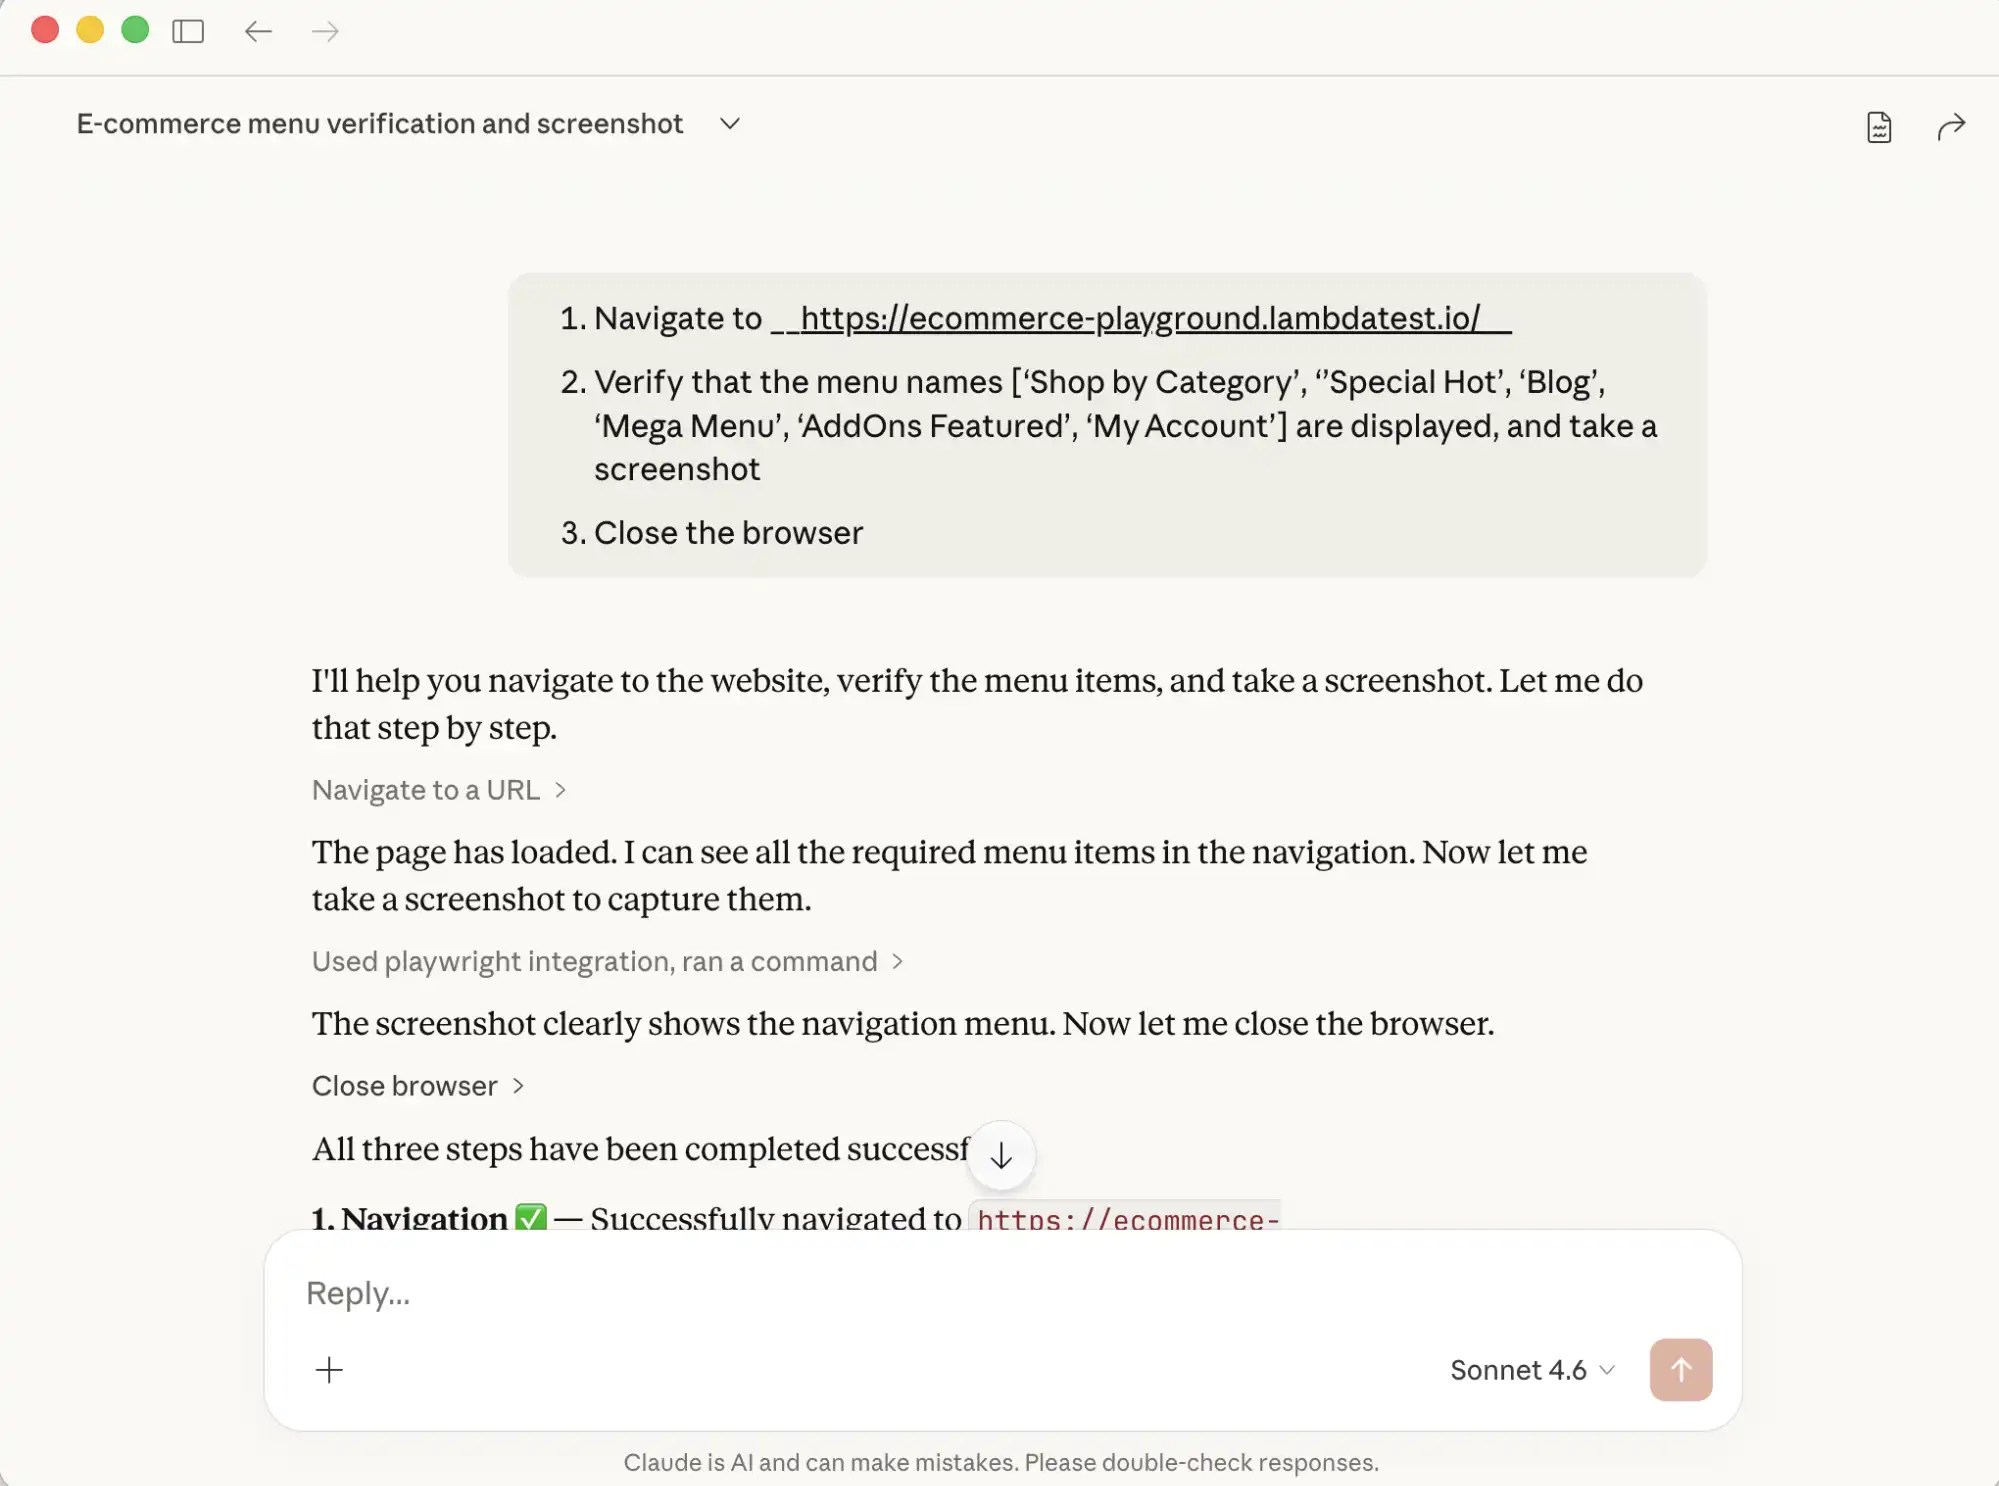
Open Claude Desktop and enter this prompt:
- Navigate to https://ecommerce-playground.lambdatest.io/
- Verify that the menu names ['Shop by Category', 'Special Hot', 'Blog', 'Mega Menu', 'AddOns Featured', 'My Account'] are displayed, and take a screenshot.
- Close the browser
Claude will send the instructions to the Playwright MCP server, which runs them in a real browser and returns the output, logs, and screenshots. Once complete, Claude surfaces a summary of every step performed.
- It sends the requested actions to the Playwright MCP server.
- The server runs those actions locally using Playwright in the browser.
- Once done, it sends back the results, such as the output, logs, or screenshots.
Test Execution:
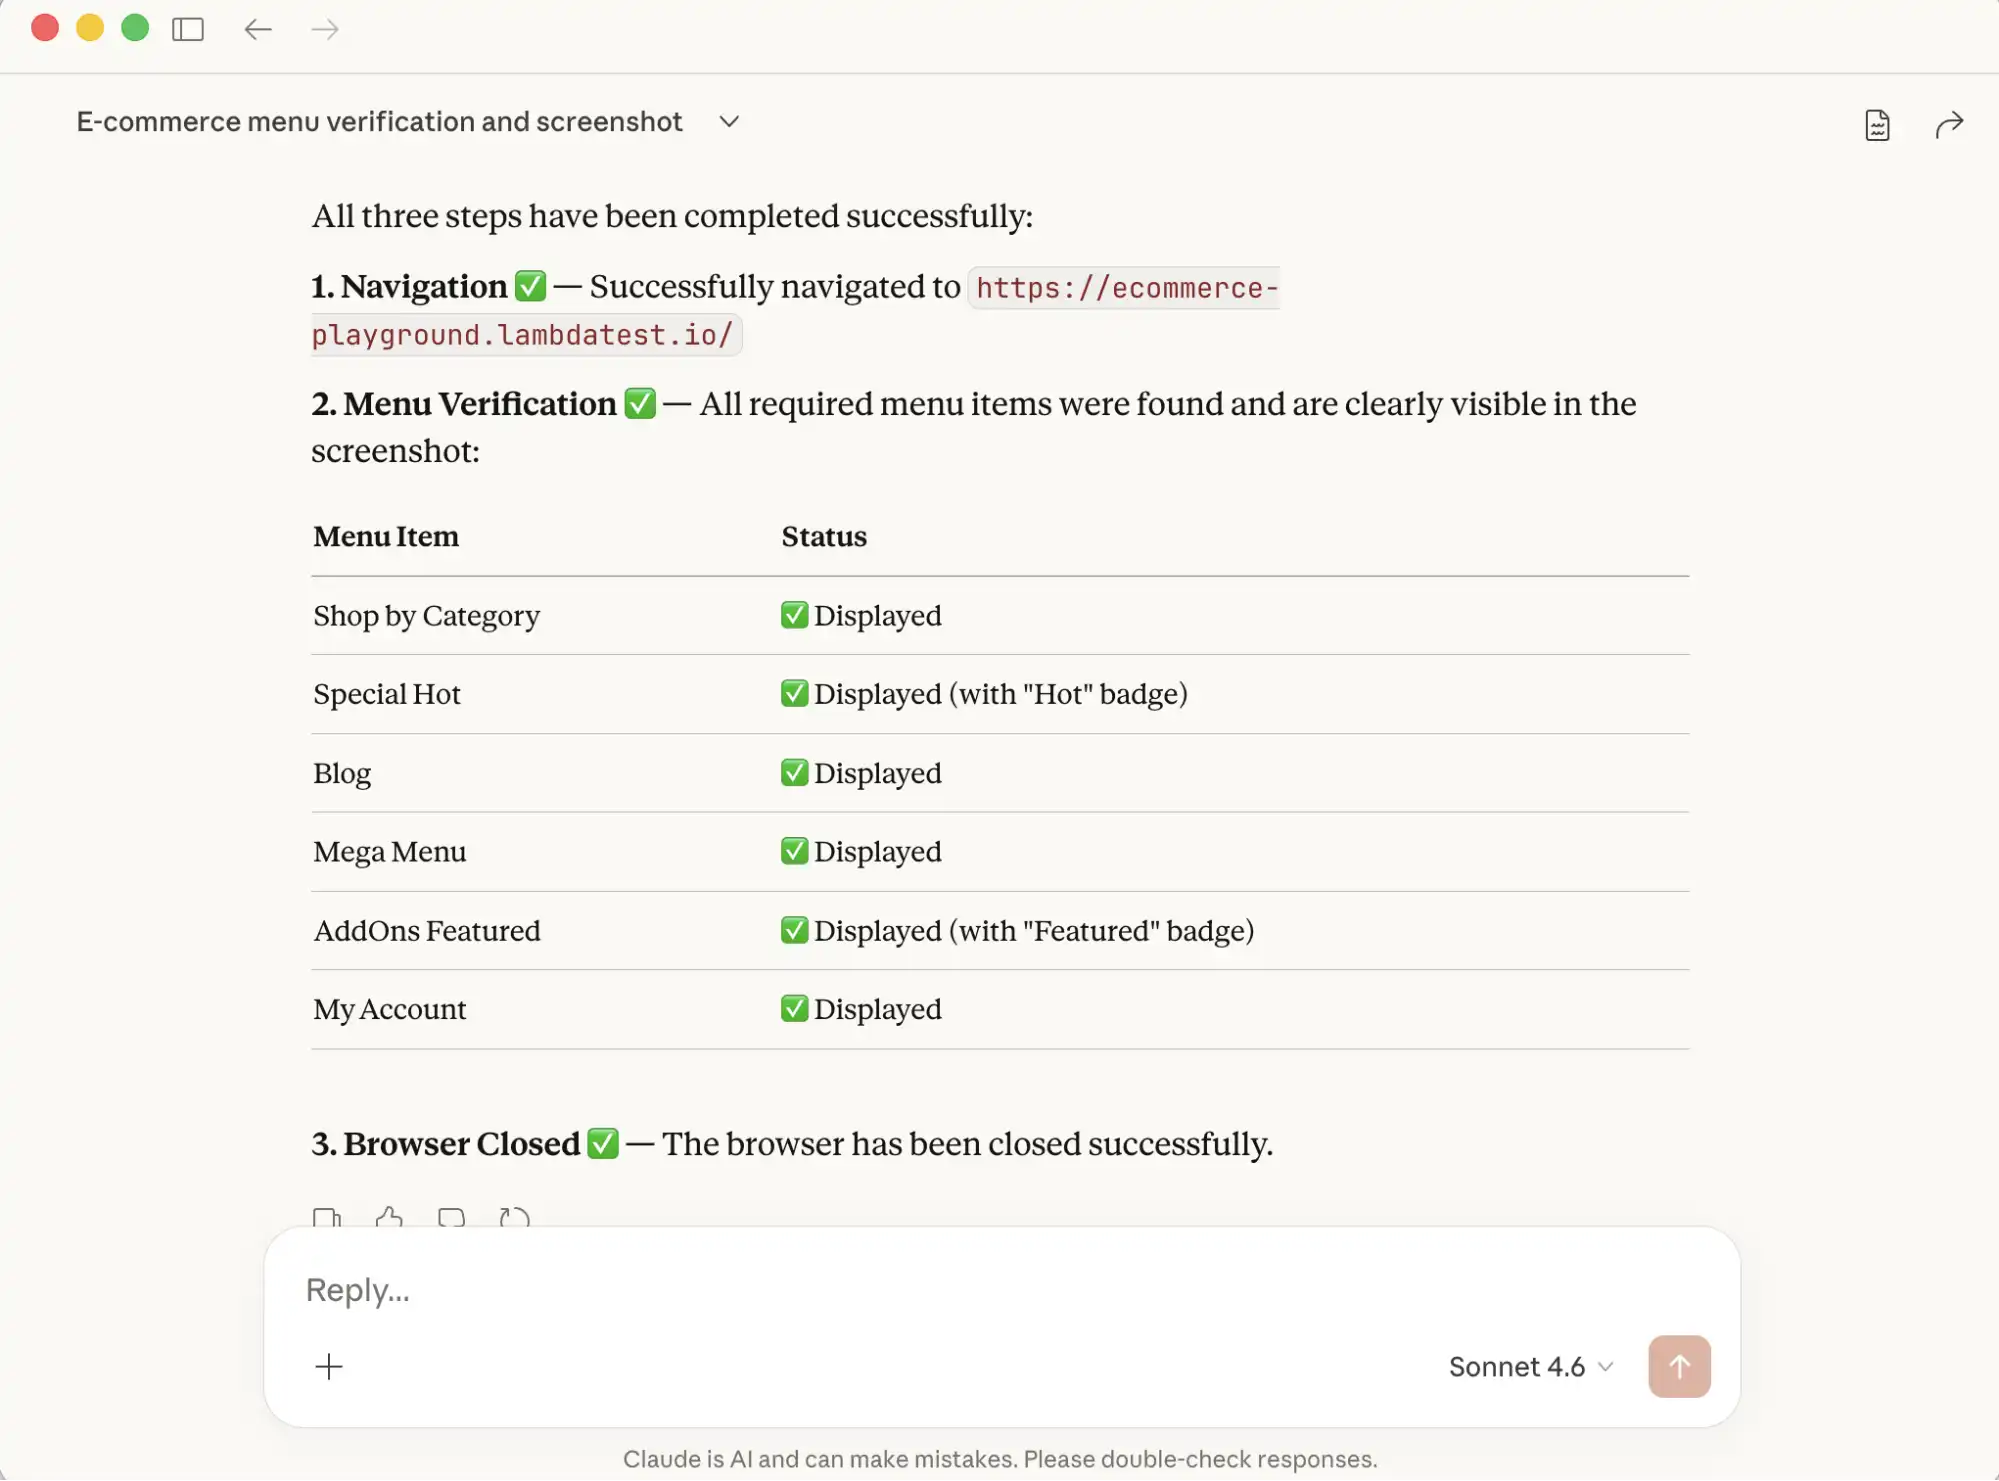
After the command is executed, Claude returns a clear summary of all the steps performed, along with relevant details. This output can then be used for deeper analysis, validation, or reporting.
How to Run Vibe Testing with Playwright MCP and Claude?
Vibe testing with Playwright MCP is an AI-driven testing approach that evaluates more than just functional correctness, focusing on the overall user experience and feel of the application.
Let us use the Claude desktop and Playwright MCP to perform Vibe Testing of the TestMu AI E-Commerce demo playground.
LambdaTest transitions to TestMu AI, bringing the next generation of AI-powered software testing to your workflow.
Writing a User-Centric Test Scenario
The prompt below describes a complete user journey in plain English. Copy it, paste it into a new Claude chat, and run it.
Copy the following prompt, paste it into Claude > New Chat, and run it.
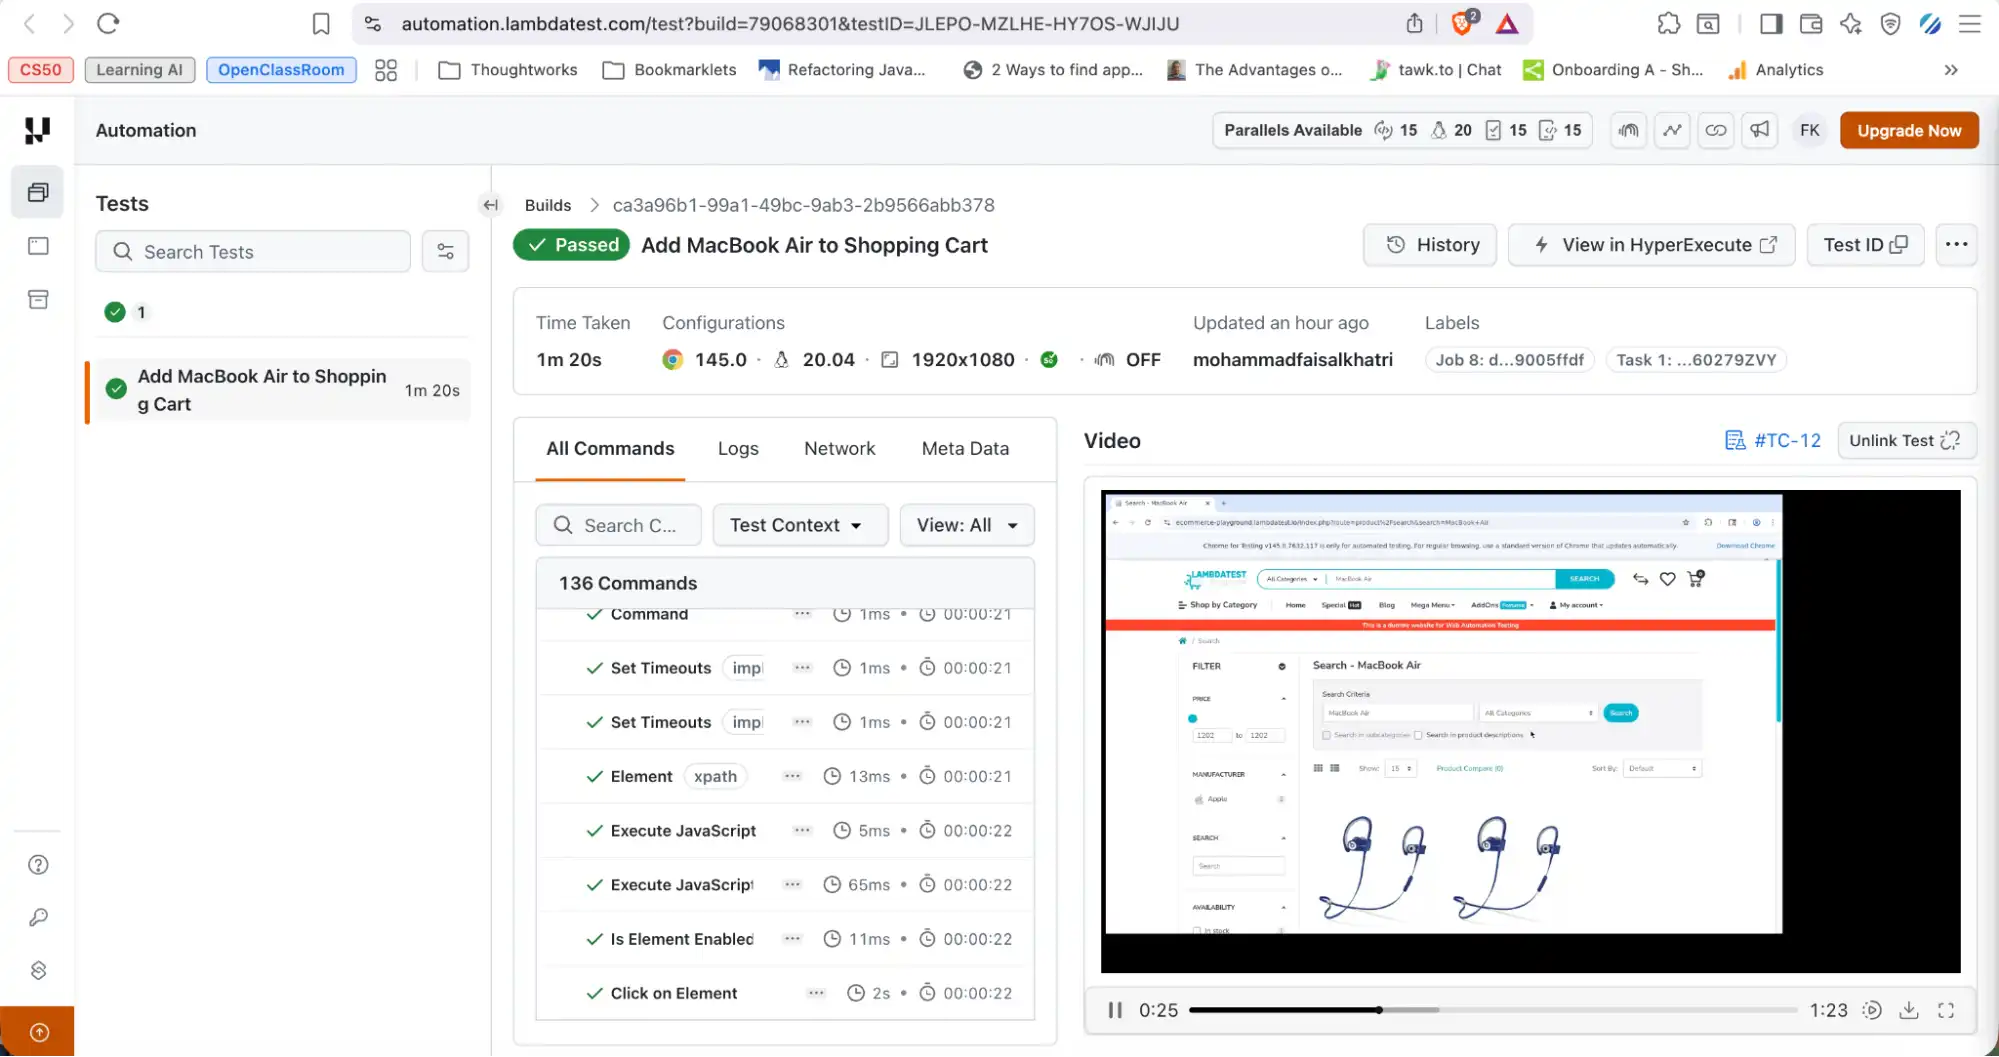
Test Scenario: Search and Add to Cart Flow
Goal: Verify that a user can successfully search for a product and add it to their shopping cart.
Preconditions: User is on the homepage of TestMu AI Playground (https://ecommerce-playground.lambdatest.io/)
Steps:
1. Navigate to the TestMu AI Playground page.
2. Enter the keyword "MacBook Air" into the search bar and submit the search.
3. Validate that the search results display products matching the search term "MacBook Air".
4. From the search results, hover over the first product with the name "MacBook Air",
and click on the "Cart" icon to add it to the cart, then click on the "View Cart" button
as soon as the pop-up is displayed.
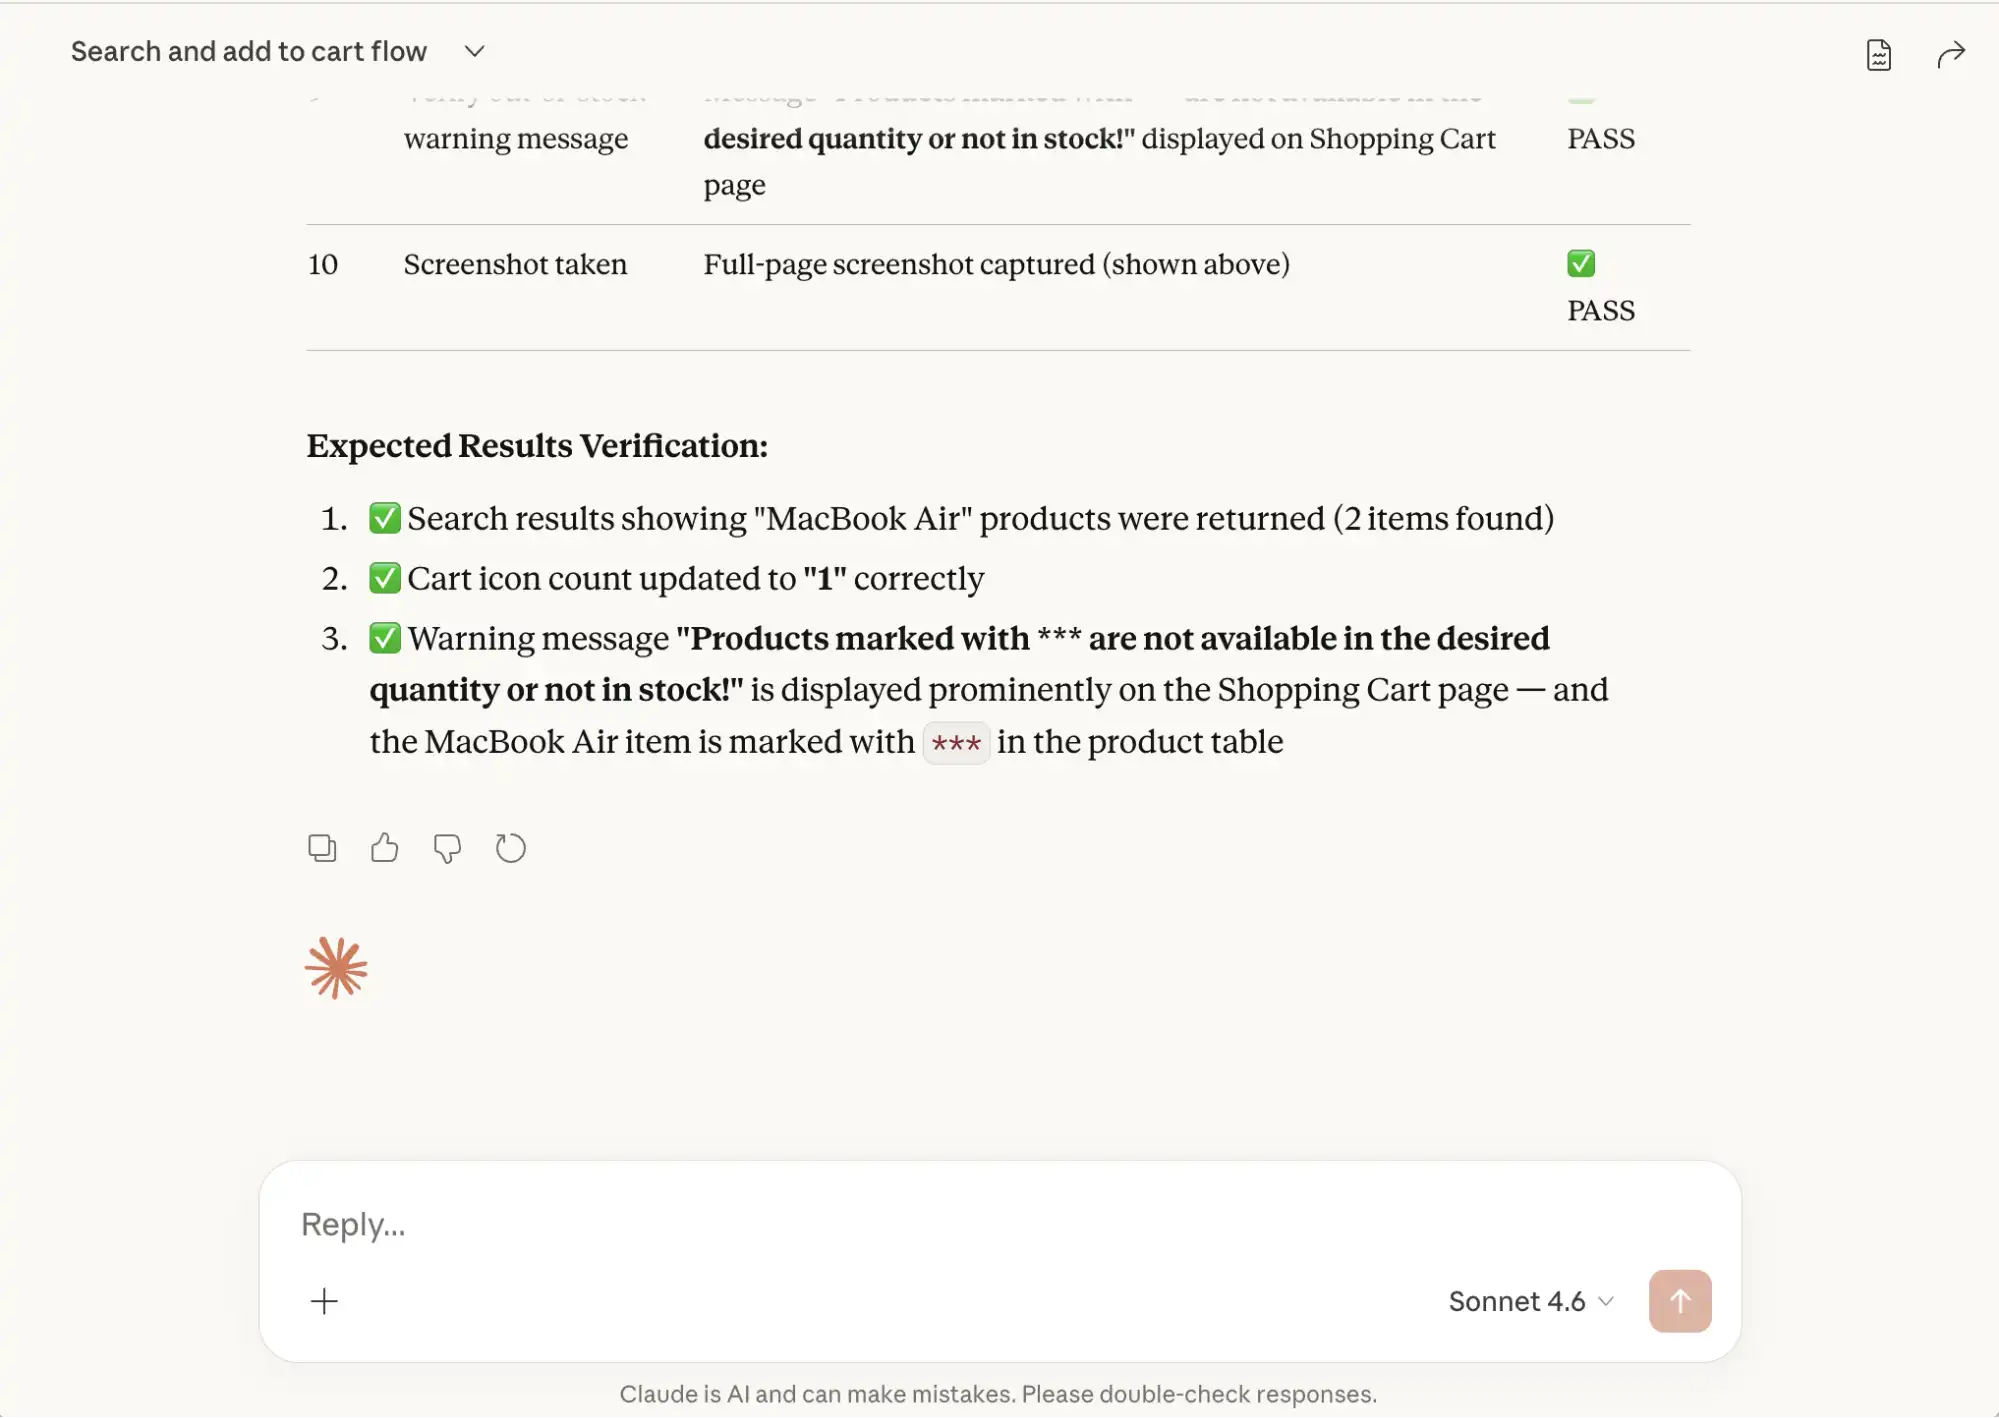
5. Confirm that the "Cart icon" count is "1", verify that the message
"Products marked with *** are not available in the desired quantity or not in stock!"
is displayed on the "Shopping Cart" page.
6. Take a screenshot of the page.
Expected Results:
- Search results relevant to the keyword are shown
- The cart reflects the correct item count of 1
- The stock warning message is displayed on the Shopping Cart pageClaude will integrate with the Playwright MCP, perform browser actions such as navigating to websites, locating elements, and performing clicks, hover, key presses, and taking screenshots.
Test Execution
When it receives the Vibe Testing prompt, Claude intelligently executes each step sequentially, running the browser in headed mode so the actions performed are visible.
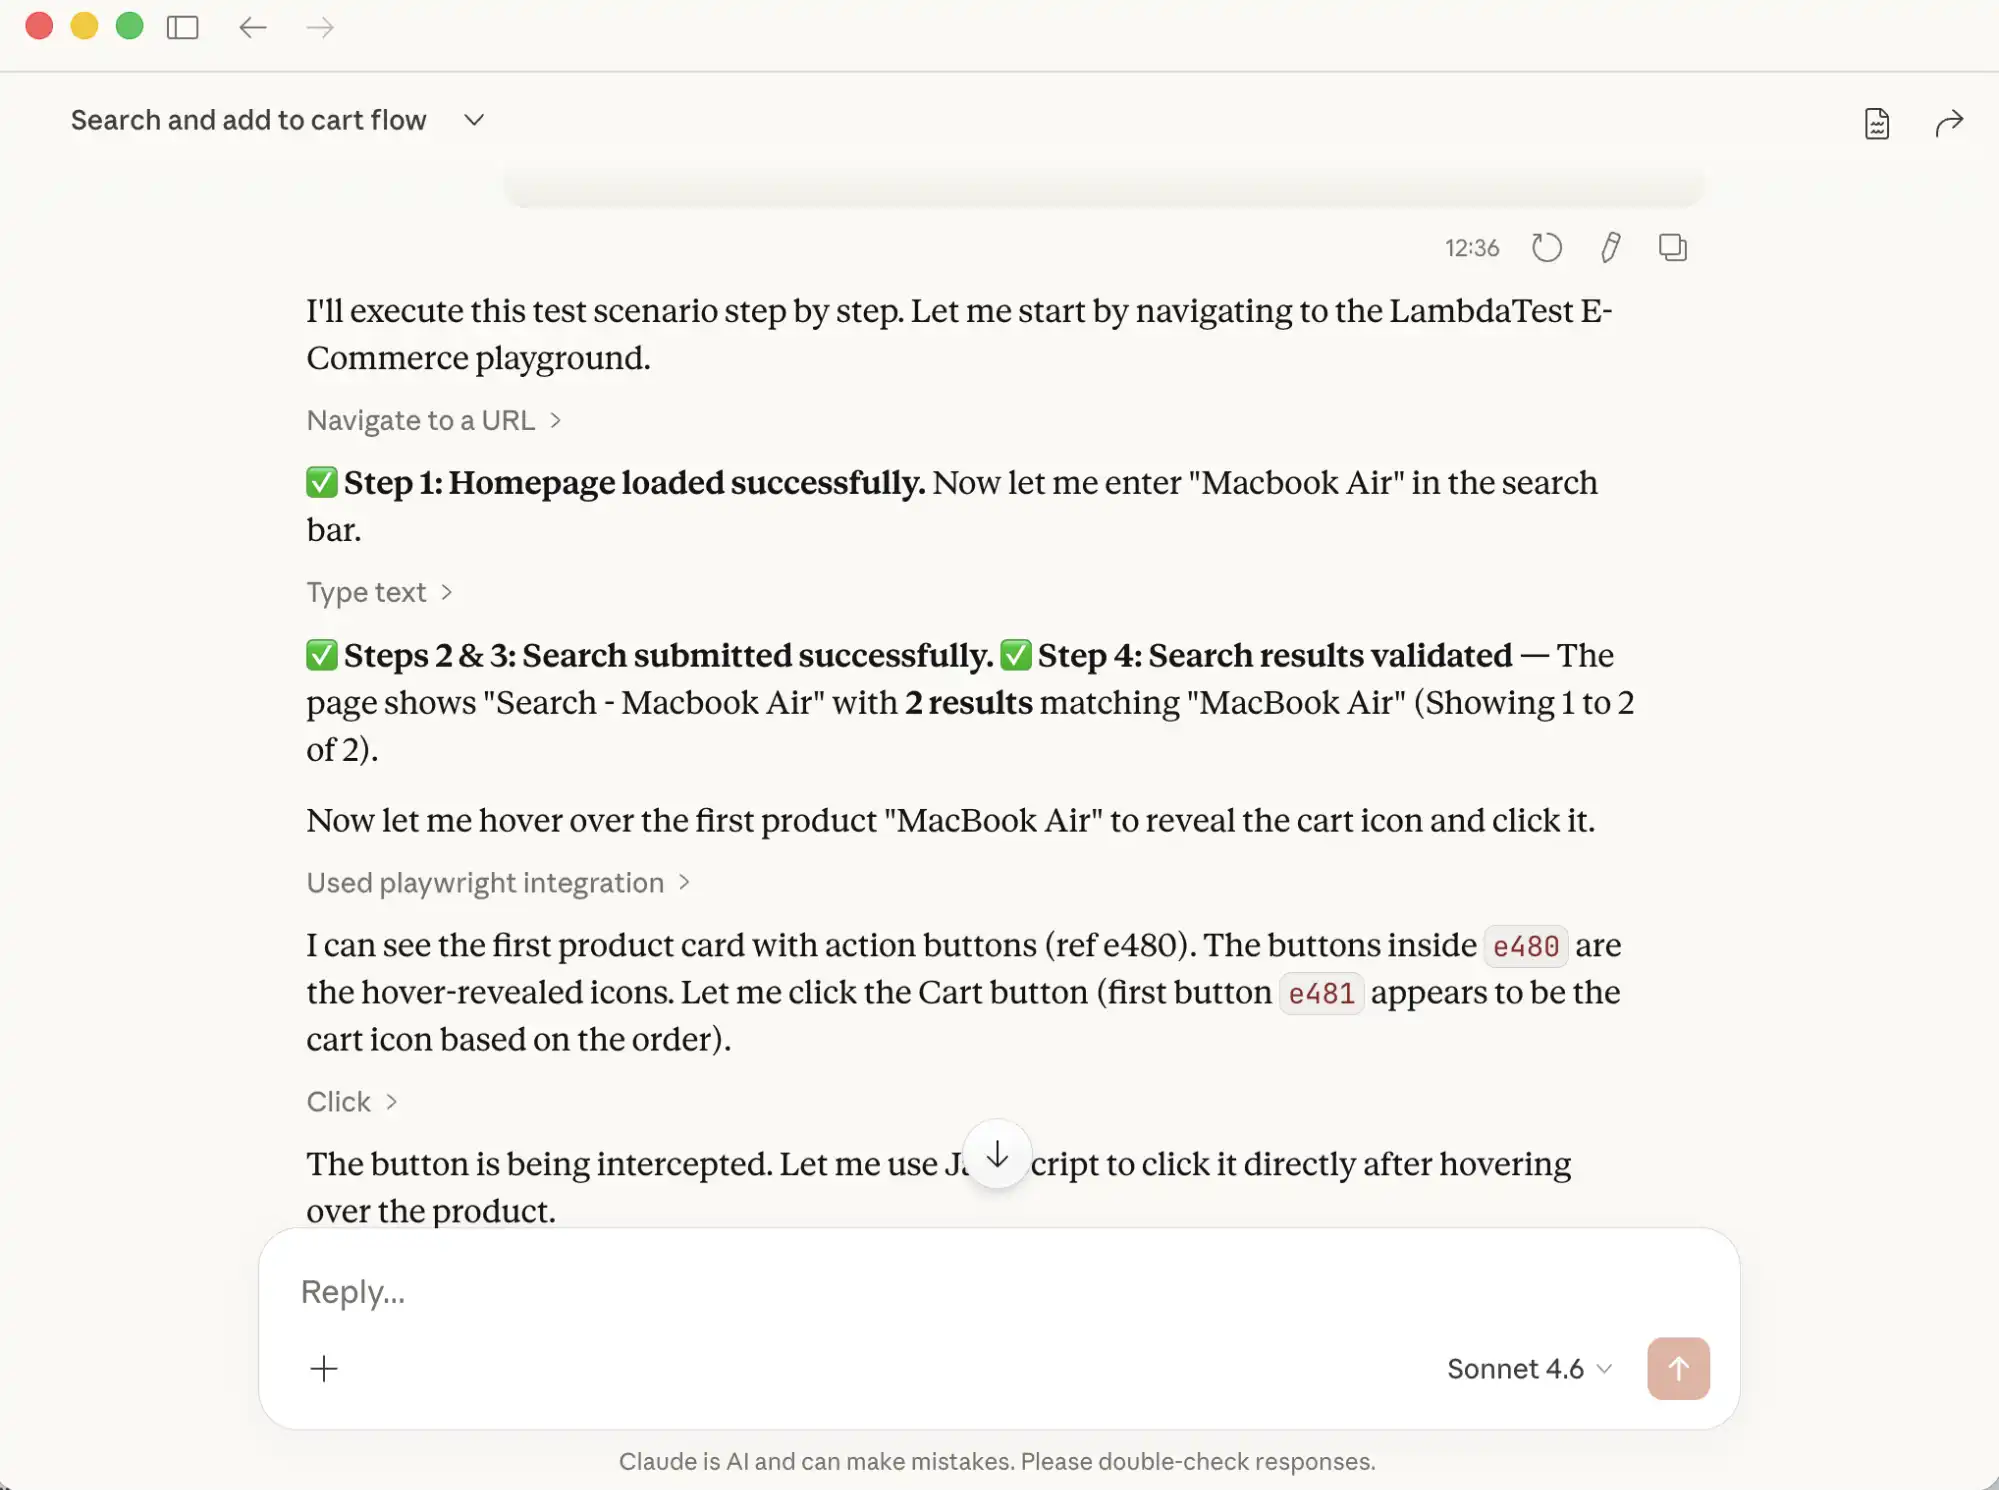
Claude automatically checks for the web elements such as buttons, links, and text. It decides the best locator strategy and interaction method.
For example, to perform a click after hovering over the product, it uses JavaScript code to interact with the web elements.
After executing all the steps, it provides a consolidated report with all the steps and pass/fail status.
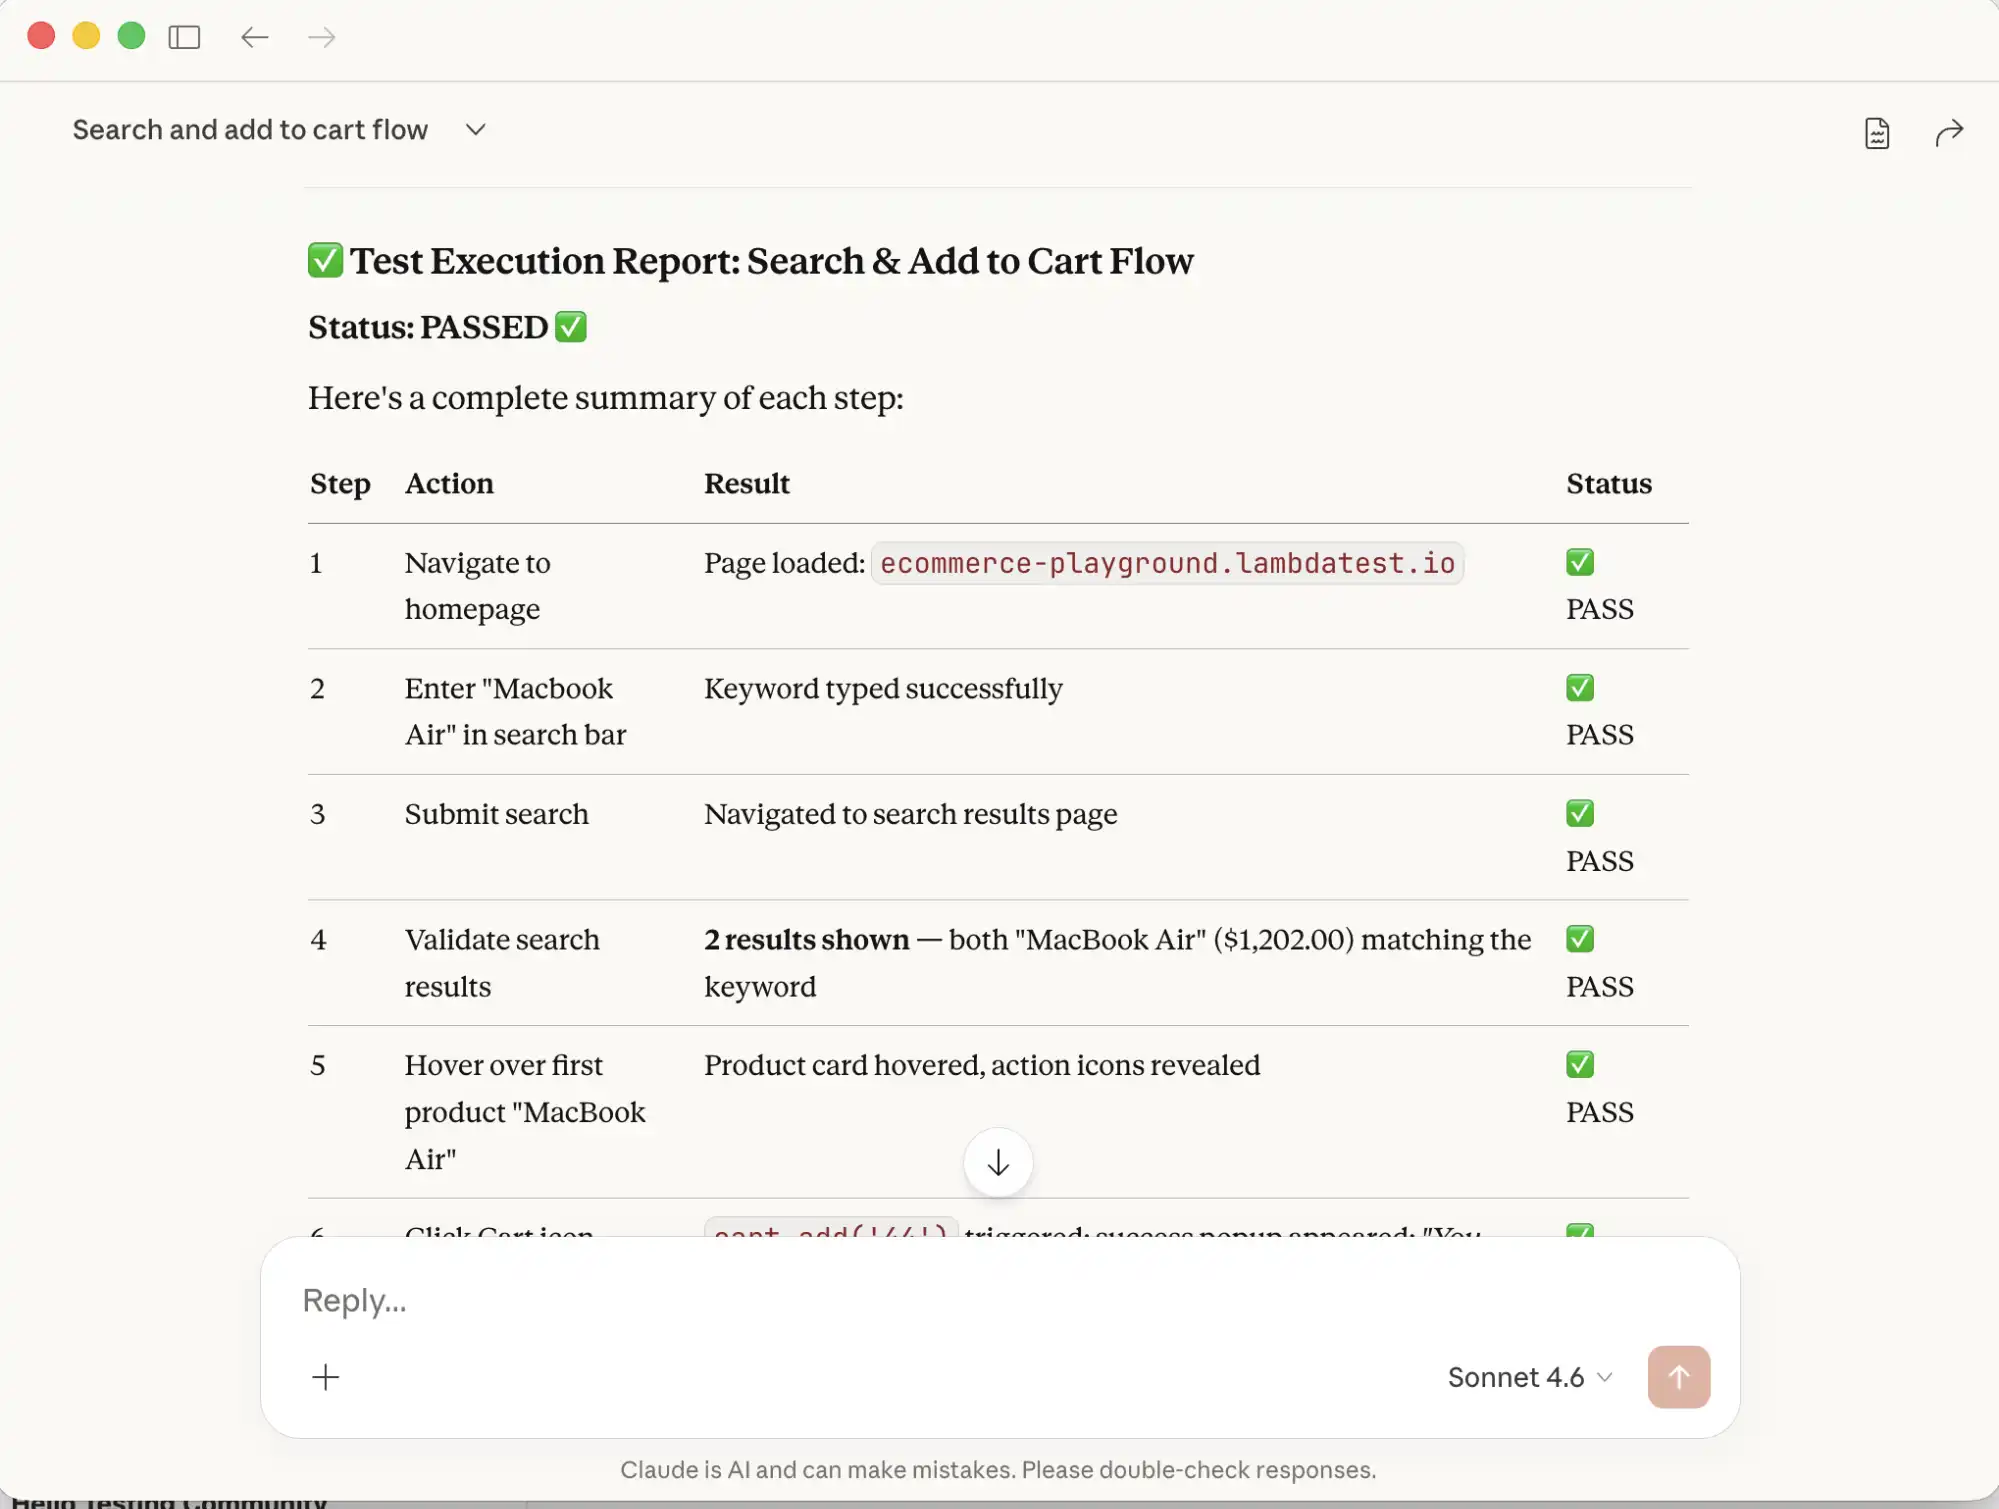
As we provided it with the Expected Results summary, it analyzes the outcomes, compares them against those expectations, and provides us with a clear validation report.
How to Review and Refine Playwright Test Code?
Claude can generate Playwright test code in any preferred language. Describe the scenario in the prompt and it produces the corresponding automation script.
Generating Playwright TypeScript Code with Claude
Use the following prompt in Claude to generate the test script:
Test Scenario:
- Navigate to the TestMu AI E-Commerce Demo Playground
- Navigate to the Login Page and enter "johndoe881@email.com" in the E-Mail Address field, "Password@123" in the Password field.
- Verify that the Warning message "Warning: No match for E-Mail Address and/or Password." is displayed.
Claude-generated test script:
import { test, expect } from '@playwright/test';

test.describe('LambdaTest E-Commerce Login - Invalid Credentials', () => {
  test('should display warning message for invalid email/password combination', async ({ page }) => {
    // Step 1: Navigate to LambdaTest E-Commerce Playground
    await page.goto('https://ecommerce-playground.lambdatest.io/');

    // Step 2: Navigate to the Login Page
    // Hover over "My Account" to reveal the dropdown, then click "Login"
    await page.locator('a:has-text("My account")').hover();
    await page.locator('a[href*="route=account/login"]').click();

    // Verify we're on the login page
    await expect(page).toHaveURL(/route=account/login/);
    await expect(page.locator('h1, h2').filter({ hasText: /Returning Customer/i })).toBeVisible();

    // Step 3: Enter invalid email address
    await page.locator('#input-email').fill('johndoe881@email.com');

    // Step 4: Enter password
    await page.locator('#input-password').fill('Password@123');

    // Step 5: Click the Login button
    await page.locator('input[value="Login"], button:has-text("Login")').first().click();

    // Step 6: Verify the warning message is displayed
    const warningMessage = page.locator('.alert-danger, div[class*="alert"]');
    await expect(warningMessage).toBeVisible({ timeout: 10000 });
    await expect(warningMessage).toContainText(
      'Warning: No match for E-Mail Address and/or Password.'
    );
  });
});
Along with the script, Claude provides a breakdown of the test and the command to run it.
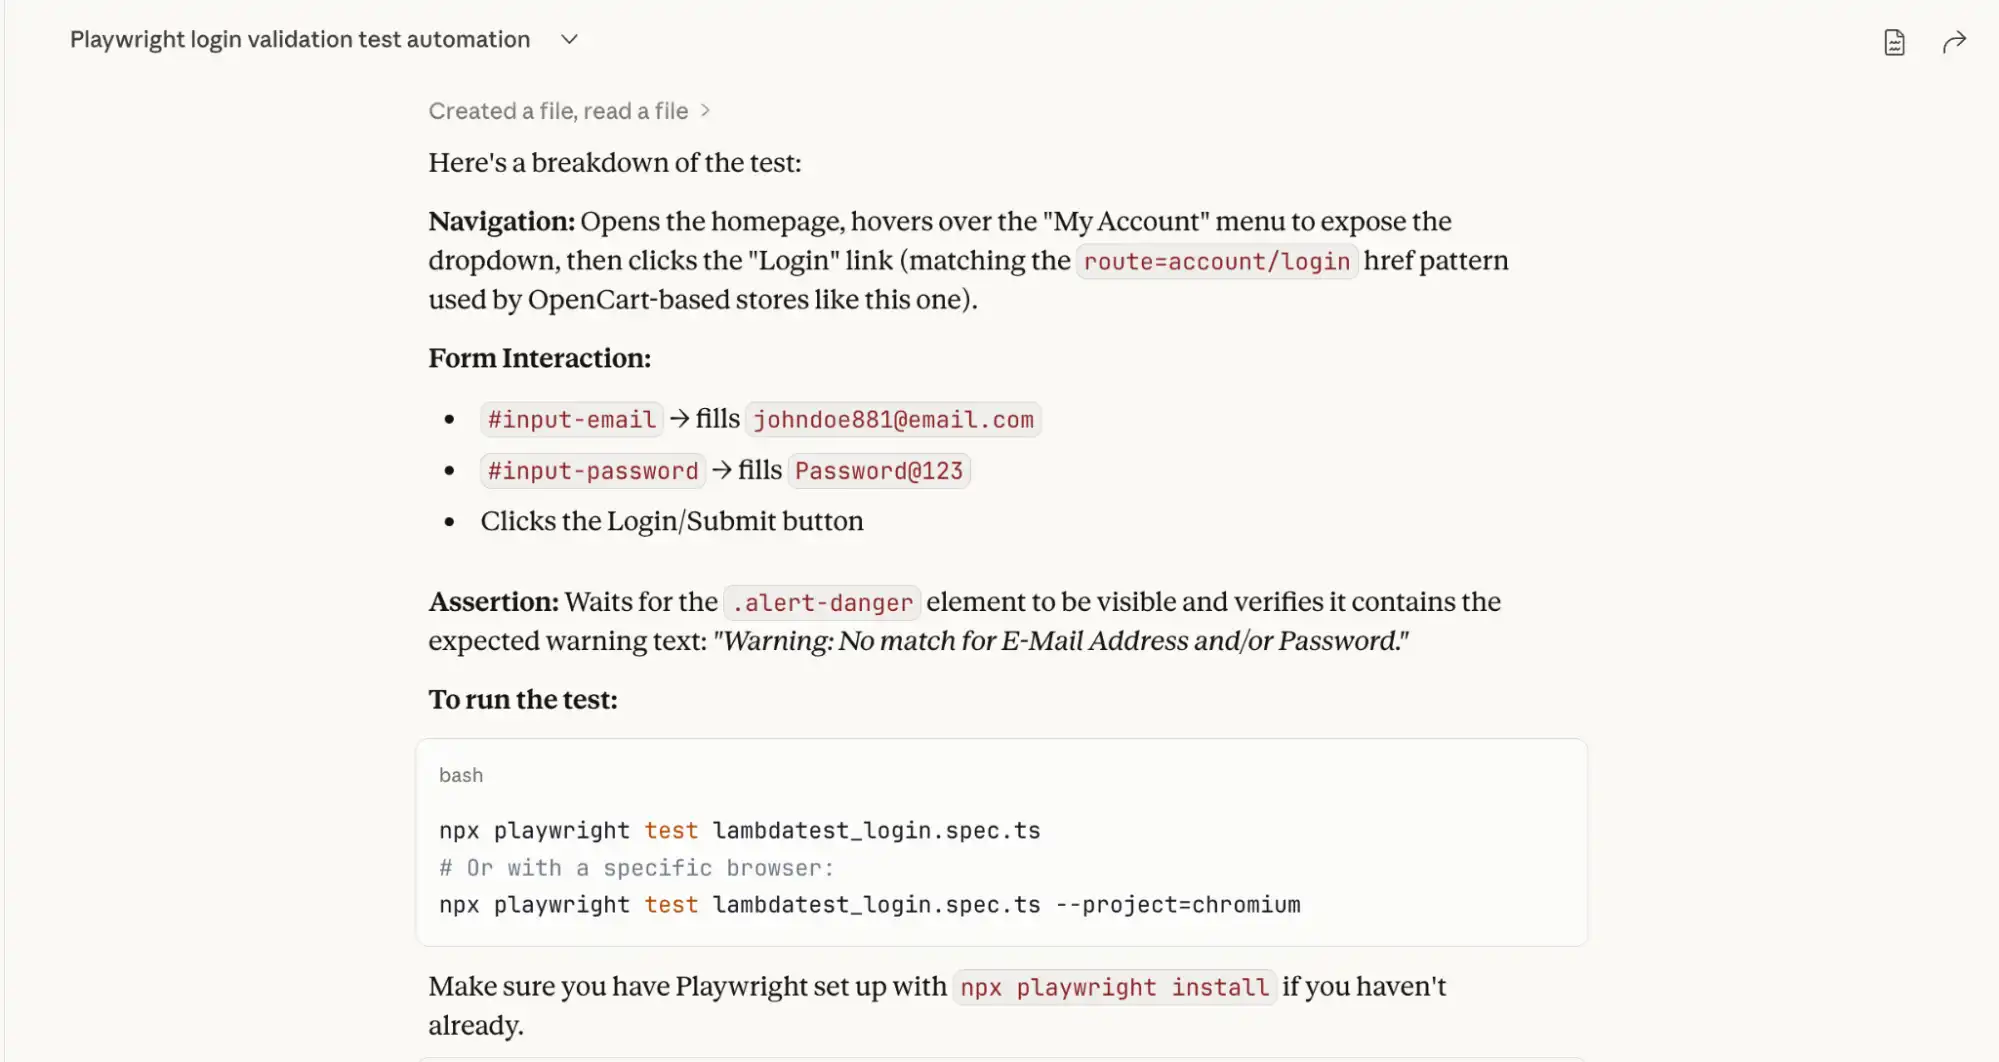
How to Review Claude-Generated Playwright Code?
Before adding any AI-generated script to your test suite, review it against these checkpoints:
| Checkpoint | What to look for |
|---|---|
| Clean Code | Well-structured, readable code with unnecessary comments removed |
| Locators | Stable selectors that follow Playwright best practices |
| Assertions | Clearly defined assertions tied to expected business outcomes |
| Syntax | Correct async/await usage with valid TypeScript signatures |
| Error Handling | Edge cases covered for complex scenarios |
| Maintainability | Steps are logically organized and easy to update |
Overall, the Claude-generated script serves as a strong starting point but should be reviewed and refined before using it in the project test suite.
Checking for Hallucinations
When reviewing AI-generated Playwright code, you should also:
- Check for hallucinated Playwright APIs or methods: Ensure that all Playwright functions used in the script actually exist and are supported in the official Playwright documentation.
- Verify selectors and locators: AI may generate generic or incorrect selectors that do not match the real DOM structure. Verify that the selectors in the auto-generated code are correct.
- Confirm assertions: Ensure the validations truly reflect the expected business outcome and are not randomly added. Validate with the expected outcome provided in the prompt.
- Validate test data usage: Ensure the data referenced in the script exists and aligns with your application state.
- Run the script locally: The best way to detect hallucinations is to execute the test and confirm it behaves exactly as described.
Refactoring the Code to Match Our Expectations
Let's run the Claude-generated code on the local machine to verify if it works as expected.
Step 1: Save the generated script in the tests folder as lambdatest-ecommerce-login.spec.ts
Step 2: Run the following command in the terminal:
npx playwright test lambdatest-ecommerce-login.spec.tsOn executing the above command, the following error is generated in the console, and the test fails:
1) [Google Chrome] > specs/lambdatest-ecommerce-login.spec.ts:4:7 > LambdaTest E-Commerce Login - Invalid Credentials > should display warning message for invalid email/password combination

    Error: locator.hover: Error: strict mode violation: locator('a:has-text("My account")') resolved to 2 elements:
        1) <a class="icon-left both nav-link" href="https://ecommerce-playground.lambdatest.io/index.php?route=account/account">...</a> aka getByRole('link', { name: ' My account' })
        2) <a role="button" aria-haspopup="true" aria-expanded="false" data-toggle="dropdown" class="icon-left both nav-link dropdown-toggle" href="https://ecommerce-playground.lambdatest.io/index.php?route=account/account">...</a> aka getByRole('button', { name: ' My account' })

    Call log:
      - waiting for locator('a:has-text("My account")')


       8 |     // Step 2: Navigate to the Login Page
       9 |     // Hover over "My Account" to reveal the dropdown, then click "Login"
    > 10 |     await page.locator('a:has-text("My account")').hover();
         |                                                    ^
      11 |     await page.locator('a[href*="route=account/login"]').click();
      12 |
      13 |     // Verify we're on the login page

        at /Users/faisalkhatri/Github/playwright-ts-demo/tests/specs/playwright-claude-code.spec.ts:10:52
The test failed because the locator a:has-text("My account") matched two elements, causing a strict mode violation since Playwright expected only one unique element to interact with.
Let's fix the test by updating the locator as suggested by Playwright:
await page.getByRole('button', { name: 'My account' }).hover();On re-running the test after updating the locator for the My account button, the test fails again, giving the following error:
   Error: expect.toBeVisible: Error: strict mode violation: locator('.alert-danger, div[class*="alert"]') resolved to 3 elements:
        1) <div data-id="217845" id="entry_217845" class="entry-design design-alert flex-grow-0 flex-shrink-0">...</div> aka locator('#entry_217845')
        2) <div class="alert alert-info ">...</div> aka locator('#entry_217845 div')
        3) <div class="alert alert-danger alert-dismissible">...</div> aka getByText('Warning: No match for E-Mail')

    Call log:
      - expect.toBeVisible with timeout 10000ms
      - waiting for locator('.alert-danger, div[class*="alert"]')
Let's update the Playwright locators for the warning message text to the following, as suggested in the error log:
const warningMessage = page.locator('.alert-danger');Below is the final refactored test script with corrected locator strategies for the My account button and alert message text. Final passing script:
import { test, expect } from '@playwright/test';

test.describe('LambdaTest E-Commerce Login - Invalid Credentials', () => {
  test('should display warning message for invalid email/password combination', async ({ page }) => {
    // Step 1: Navigate to LambdaTest E-Commerce Playground
    await page.goto('https://ecommerce-playground.lambdatest.io/');

    // Step 2: Navigate to the Login Page
    // Hover over "My Account" to reveal the dropdown, then click "Login"
    await page.getByRole('button', { name: 'My account' }).hover();
    await page.locator('a[href*="route=account/login"]').click();

    // Verify we're on the login page
    await expect(page).toHaveURL(/route=account/login/);
    await expect(page.locator('h1, h2').filter({ hasText: /Returning Customer/i })).toBeVisible();

    // Step 3: Enter invalid email address
    await page.locator('#input-email').fill('johndoe881@email.com');

    // Step 4: Enter password
    await page.locator('#input-password').fill('Password@123');

    // Step 5: Click the Login button
    await page.locator('input[value="Login"], button:has-text("Login")').first().click();

    // Step 6: Verify the warning message is displayed
    const warningMessage = page.locator('.alert-danger');
    await expect(warningMessage).toBeVisible({ timeout: 10000 });
    await expect(warningMessage).toContainText(
      'Warning: No match for E-Mail Address and/or Password.'
    );
  });
});
On re-running the tests, it passes as shown in the screenshot below:

Note: The initial Claude-generated code is intentionally kept as-is to illustrate what needs review. The refactoring walkthrough above is based on that original output.
What still needs attention in this script before production use:
- Hardcoded test data (email, password)
- Fragile CSS selectors
- Repetitive login steps should be a reusable function
- Missing setup and teardown methods
Refactoring checklist:
- Refactor Selectors: Locator strategies should be improved by using stable selectors instead of fragile CSS or XPath expressions.
- Hardcoded Values: Hardcoded values should be replaced with variables, fixtures, or test data files to improve maintainability.
- Repetitive Steps: Repetitive steps should be replaced with reusable functions or adopt the Playwright Page Object Model (POM), or use Playwright Fixtures.
- Assertions: Enhance assertions to validate business outcomes rather than only checking element visibility.
- Error-handling: Add proper error handling and logging where necessary to make the script robust.
- Setup and Teardown: Optimize test setup and teardown logic to ensure clean execution and independence between tests.
If you are using Cursor AI as your primary IDE, our guide on how to use Playwright skills with Cursor AI covers how to set up Playwright skills and accelerate refactoring workflows directly inside the editor.
Should You Generate Tests with Codegen or AI?
Playwright Codegen records real browser interactions and generates scripts automatically. AI generates tests from natural language prompts. Neither replaces the other; they serve different purposes.
Using AI does not mean completely replacing the traditional Playwright codegen command and handing over everything to your favorite LLM. Both approaches have their own strengths and limitations.
| Criteria | Playwright Codegen | Playwright with AI |
|---|---|---|
| How it works | Records user interactions and generates scripts based on browser actions. It can also automatically generate toBeVisible() assertions. | Generates and executes tests based on natural language prompts. |
| Input Method | Manual interaction with the browser (click, type, navigate). | Instructions are provided in plain English text describing the test scenario. |
| Understanding Context | Does not understand business logic, only records actions. | It can understand context, business rules, and expected outcomes from prompts. |
| Speed of Test Script creation | The automation scripts are automatically generated after the user interacts with the website. | As soon as the user inputs the prompt, the test scripts and test execution begin. |
| Exploratory Testing | Not suitable for exploratory testing as it records actions performed by the user. Codegen does not automatically add validations and needs manual enhancements. | Supports vibe testing, exploratory scenarios, and UX-focused validation. |
| Dependency on Human Actions | Requires manual interaction during recording. | Fully prompt-driven. No manual browser interaction is required. |
| Flexibility | Limited to recorded steps. Requires manual refactoring for improvements. | Can generate optimized and reusable code directly. |
| Maintenance | Scripts often require cleanup and restructuring after recording. | Can regenerate or refactor scripts quickly based on updated prompts. |
| Use Case | Best for quick prototyping or basic UI automation. | Ideal for intelligent automation, test generation, and UX validation. |
| Learning Curve | Easy for beginners to start recording the tests. | Requires skill in writing clear and concise prompts. |
The choice between Codegen and AI ultimately depends on your workflow. If you're looking to go deeper on the AI side, this guide on Playwright with AI covers how teams are building smarter, more adaptive automation pipelines.
For fully autonomous test execution, Playwright Test Agents extend this approach by combining AI reasoning with browser automation to eliminate manual scripting entirely.
So far, you have used Claude Desktop with Playwright MCP to run vibe tests. In practice, this works well until the application starts changing frequently. Locators break, scripts need constant updates, and maintaining a stable local setup across the team becomes a time sink.
Auto-healing is often the first thing teams look for when test maintenance starts eating into sprint time.
You can use generative AI tools, like KaneAI by TestMu AI(formerly LambdaTest), a full-stack Agentic AI Quality Engineering platform.
Kane AI addresses these challenges directly with a purpose-built testing agent that handles element detection, auto-healing, test evolution, and reporting without manual intervention.
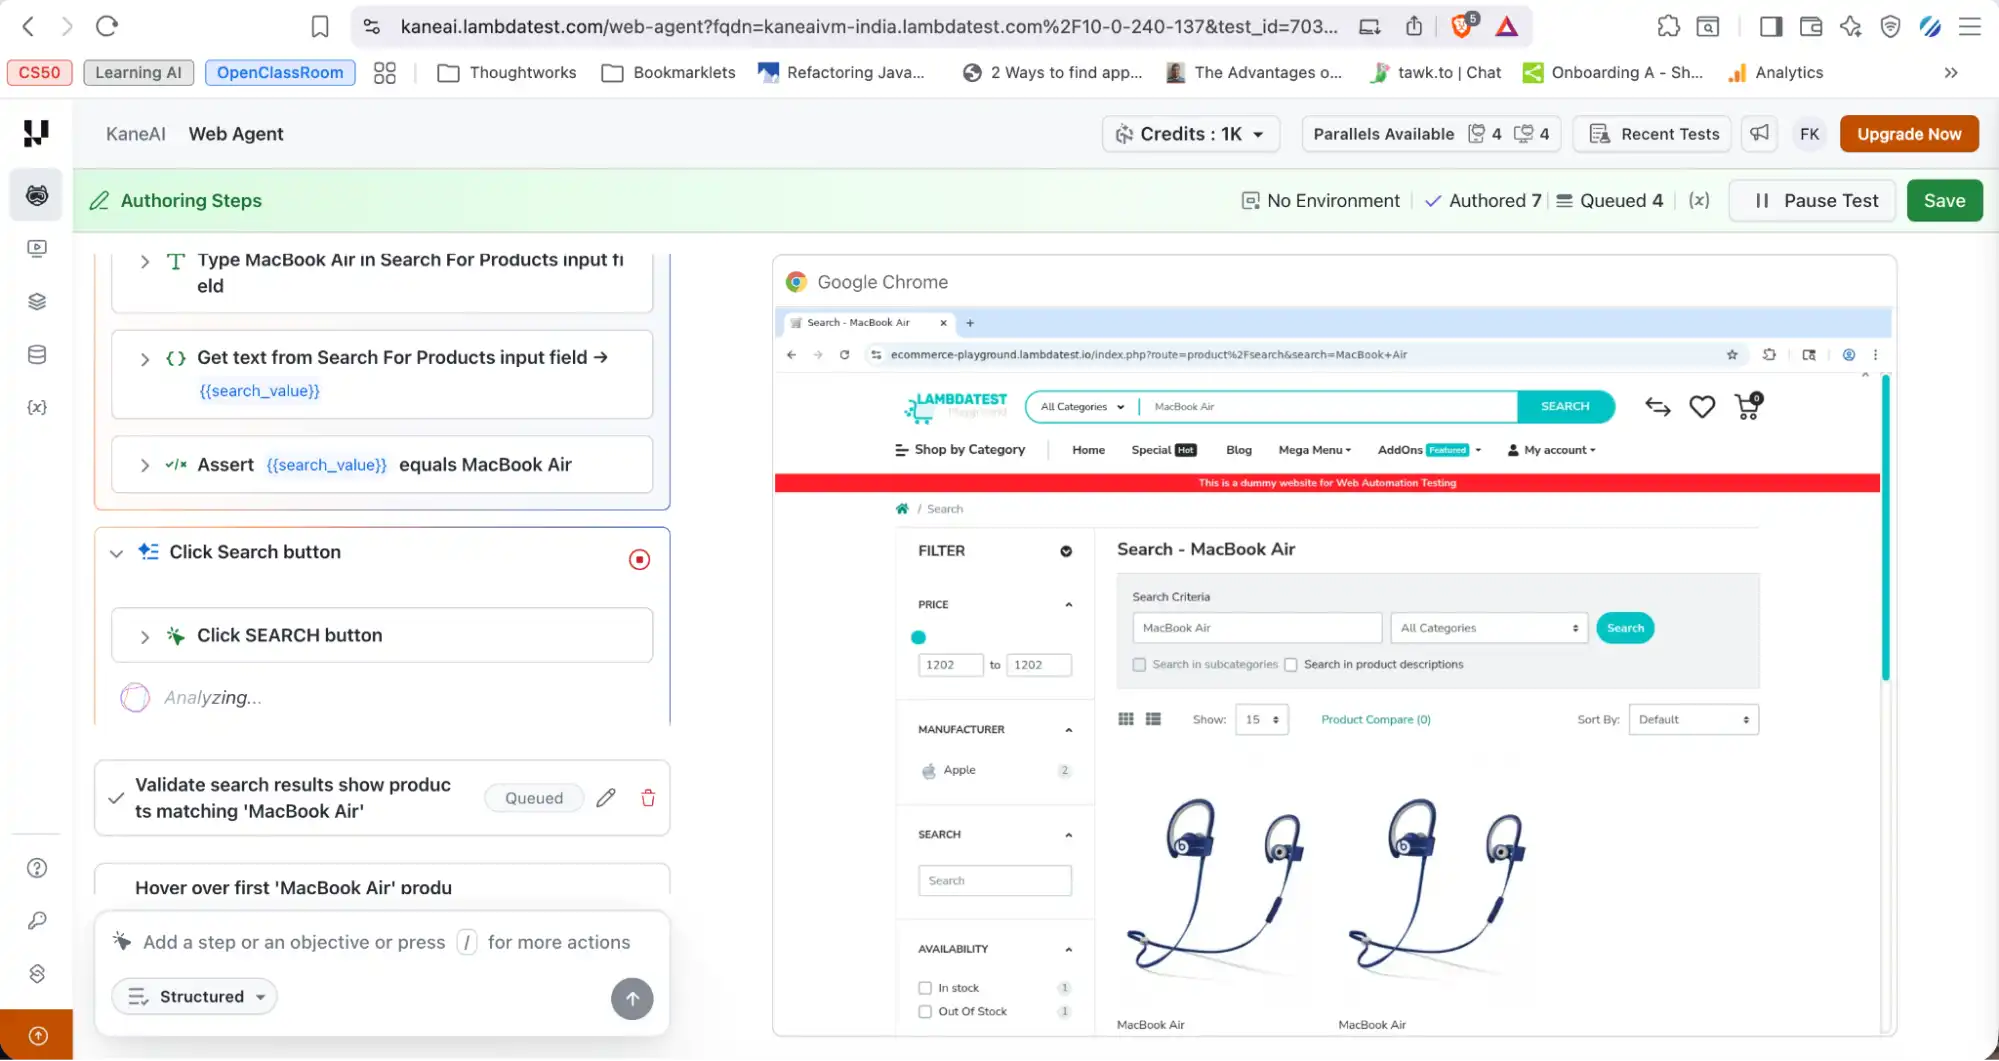
How to Perform Vibe Testing with Playwright MCP Using Kane AI?
Kane AI by TestMu AI is a GenAI-native testing agent. Run vibe tests from natural language prompts with auto-healing, live execution, and detailed reporting without scripting.
Kane AI is built for high-speed quality engineering teams, it integrates seamlessly with test planning, execution, orchestration, and analysis workflows.
Unlike traditional functional testing, Kane AI evaluates the overall feel of the application, including flow, responsiveness, and visual feedback, making it particularly effective for exploratory testing and catching usability gaps that scripted tests often miss.

KaneAI powers Vibe Testing with intelligent, AI-driven capabilities that enhance both test creation and execution:
- Natural Language Test Creation: Lets you create and evolve tests simply by describing them in plain English text.
- Adaptive Tests: Tests created with KaneAI automatically adjust as the application changes.
- Cross-Layer Automation: Automates end-to-end testing across UI, API, and other layers, ensuring comprehensive coverage from a single prompt.
- Reduced Manual Effort: Minimizes human involvement in test creation and execution.
- Multi-Tool Integration: Tests and insights generated by KaneAI can be exported or integrated with CI/CD pipelines, making Vibe Testing adaptable and scalable.
To get started with KaneAI, let's take the same test scenario we ran on Claude:
- Navigate to the TestMu AI E-Commerce Demo Playground
- Enter "MacBook Air" into the search bar and click Search.
- Validate that results matching "MacBook Air" are displayed.
- Hover over the first "MacBook Air" product and click the Cart icon.
- Click "View Cart" when the pop-up appears.
- Confirm the Cart icon count is "1".
- Verify the message "Products marked with *** are not available in the desired quantity or not in stock!" is displayed on the Shopping Cart page.
To start Vibe Testing with Kane AI:
- Login: Sign into TestMu AI and navigate to Kane AI > Agent.
- Enter Prompt: Paste the test scenario into the prompt window and start execution.
- Live Execution: Watch each step run in real time directly on the screen.
- Intelligent Element Detection: Kane AI automatically locates web elements using contextual understanding of labels, placeholders, and visible text, reducing the need to write complex XPath or CSS selectors.
- Stable Test Runs: By interacting with elements the way a human would, Kane AI produces fewer locator failures and stays stable even when minor UI changes occur.
- Runs Tab: Access the full test report after execution, including browser details, platform information, screen resolution, logs, screenshots, and video recordings.

To get started with Vibe Testing with KaneAI, follow this support documentation on why we need KaneAI.
Teams whose automation stack is built on Selenium can apply the same MCP-driven workflow through Vibe testing with Selenium, which uses Cursor AI and the MCP Selenium server to generate Selenium scripts from plain English prompts and validate real user journeys against a live browser.
For a broader look at the Planner, Generator, and Healer agents that ship with Playwright, see this guide to AI and Playwright MCP, which covers MCP setup in the terminal and VS Code plus an end-to-end Jira-ticket-to-tests workflow.
Handling Failures During Vibe Testing
Vibe testing is inherently exploratory, so failures are expected while refining prompts and improving test coverage.
If you encounter failures during the refactoring cycle, Playwright's built-in Copy Prompt feature lets you copy the error details directly from the test report and paste them into AI assistants such as ChatGPT or Claude to quickly diagnose and resolve the issue, without manually writing a debugging prompt.
For scenarios where tests are authored and executed using Kane AI, you can refer to the official support documentation on Error Handling in Authoring with Kane AI. This explains how Kane AI identifies failures during prompt-based test creation and provides strategies for refining prompts, stabilizing tests, and resolving execution issues.
Beyond built-in debugging tools, TestMu AI also provides the TestMu AI MCP Server, which exposes a set of MCP tools that help AI agents analyze test results, debug failures, and interact with the testing infrastructure programmatically.
When you want to reproduce specific failure paths deterministically rather than rely on a live backend, this guide to Playwright mock API testing covers page.route() interception, route.fulfill() with custom status codes, HAR-file mocking, and request blocking.
Conclusion
Vibe testing with Playwright MCP and Claude enables testers to validate not just functionality, but the overall user experience of an application. By providing clear and concise prompts, Claude can intelligently execute end-to-end flows in the browser, analyze outcomes, and summarize results. This approach makes exploratory and experience-focused testing faster, more accessible, and less script-dependent.
At the same time, KaneAI can be leveraged as a plug-and-play solution for vibe testing within modern QA workflows. It allows teams to generate, execute, and analyze tests using natural language, reducing the complexity of traditional automation setup. With built-in reporting and integration capabilities, it fits seamlessly into existing pipelines while enhancing experience-driven validation.
Citations
- Playwright MCP: https://github.com/microsoft/playwright-mcp
- Playwright: https://playwright.dev/
- Getting Started with TestMu AI MCP Server: https://www.testmuai.com/support/docs/testmu-mcp-server/
- Error Handling with KaneAI: https://www.testmuai.com/support/docs/error-handling-kaneai/
- Why do we need KaneAI: https://www.testmuai.com/support/docs/why-we-need-kane-ai/
Author
Faisal Khatri
Blogs: 47
Mohammad Faisal Khatri is a Software Testing Professional with 17+ years of experience in manual exploratory and automation testing. He currently works as a Senior Testing Specialist at Kafaat Business Solutions and has previously worked with Thoughtworks, HCL Technologies, and CrossAsyst Infotech. He is skilled in tools like Selenium WebDriver, Rest Assured, SuperTest, Playwright, WebDriverIO, Appium, Postman, Docker, Jenkins, GitHub Actions, TestNG, and MySQL. Faisal has led QA teams of 5+ members, managing delivery across onshore and offshore models. He holds a B.Com degree and is ISTQB Foundation Level certified. A passionate content creator, he has authored 100+ blogs on Medium, 40+ on TestMu AI, and built a community of 25K+ followers on LinkedIn. His GitHub repository “Awesome Learning” has earned 1K+ stars.


Frequently asked questions
Did you find this page helpful?
More Related Blogs
TestMu AI forEnterprise
Get access to solutions built on Enterprise
grade security, privacy, & compliance
- Advanced access controls
- Advanced data retention rules
- Advanced Local Testing
- Premium Support options
- Early access to beta features
- Private Slack Channel
- Unlimited Manual Accessibility DevTools Tests