

Power Your Software Testing with AI Agents and Cloud
The Native AI-Agentic Cloud Platform to Supercharge Quality Engineering. Test Intelligently and Ship Faster.


- TestMu AI (Formerly LambdaTest)
- /
- Blog
- /
- Playwright vs Selenium vs Cypress: Which to Choose in 2026
Playwright vs Selenium vs Cypress: Which to Choose in 2026
Playwright vs Selenium vs Cypress compared on speed, language support, flakiness, and parallel runs, with a decision guide for picking one in 2026.
Last Updated on:
Picking between Playwright vs Selenium vs Cypress shapes how your team writes tests for years, and reversing that call later is expensive.
Selenium has anchored browser automation for two decades, but Cypress and Playwright now take a large share of new projects.
TL;DR
Playwright is the strongest default for a new web test suite in 2026. Selenium stays the right call when you need the widest language and browser coverage, and Cypress suits front-end teams who want the shortest path from install to a passing test. Your existing stack usually decides more than raw speed does.
How Do Playwright, Selenium, and Cypress Differ?
- Playwright: Drives Chromium, Firefox, and WebKit over a WebSocket connection that stays open for the whole run, with auto-waiting, trace viewer, and parallel workers included. Best fit for new JavaScript or TypeScript suites that want speed without assembling a toolchain.
- Selenium: Implements the W3C WebDriver standard across Java, Python, C#, Ruby, PHP, and JavaScript on every major browser. Choose it when your team needs a language the other two do not offer, or already runs an established grid.
- Cypress: Executes tests inside the browser next to your application, bundling the runner, Chai assertions, automatic waiting, and video capture in one npm install. Strongest developer experience for front-end teams working in JavaScript.
How Do You Run Any of Them at Scale?
All three hit the same ceiling on a laptop, where one machine runs a handful of browsers at a time. TestMu AI executes Playwright, Selenium, and Cypress suites in parallel across 3,000+ browser and OS combinations, so the framework you pick stops being an infrastructure decision.
I have shipped suites in all three: Selenium first in Java, then Cypress for about four years, and Playwright most recently.
When I switched from Selenium to Cypress, flaky failures dropped sharply. Tests that had timed out locally and in CI started passing without application code changes.
Playwright later closed the browser-coverage gap that kept Cypress out of some projects, which is why this stays a three-way comparison.
This Cypress vs Playwright vs Selenium comparison covers each framework and its architecture, then compares all three on installation, runners, element selection, parallel execution, flakiness, reporting, and API testing.
Weighing broader options first? The guide to automation testing frameworks maps the wider field, and the alternatives to Selenium and Cypress guide covers tools outside these three.
Preparing for a role that expects one of these frameworks? The curated Playwright interview questions cover the topics hiring teams ask about most.
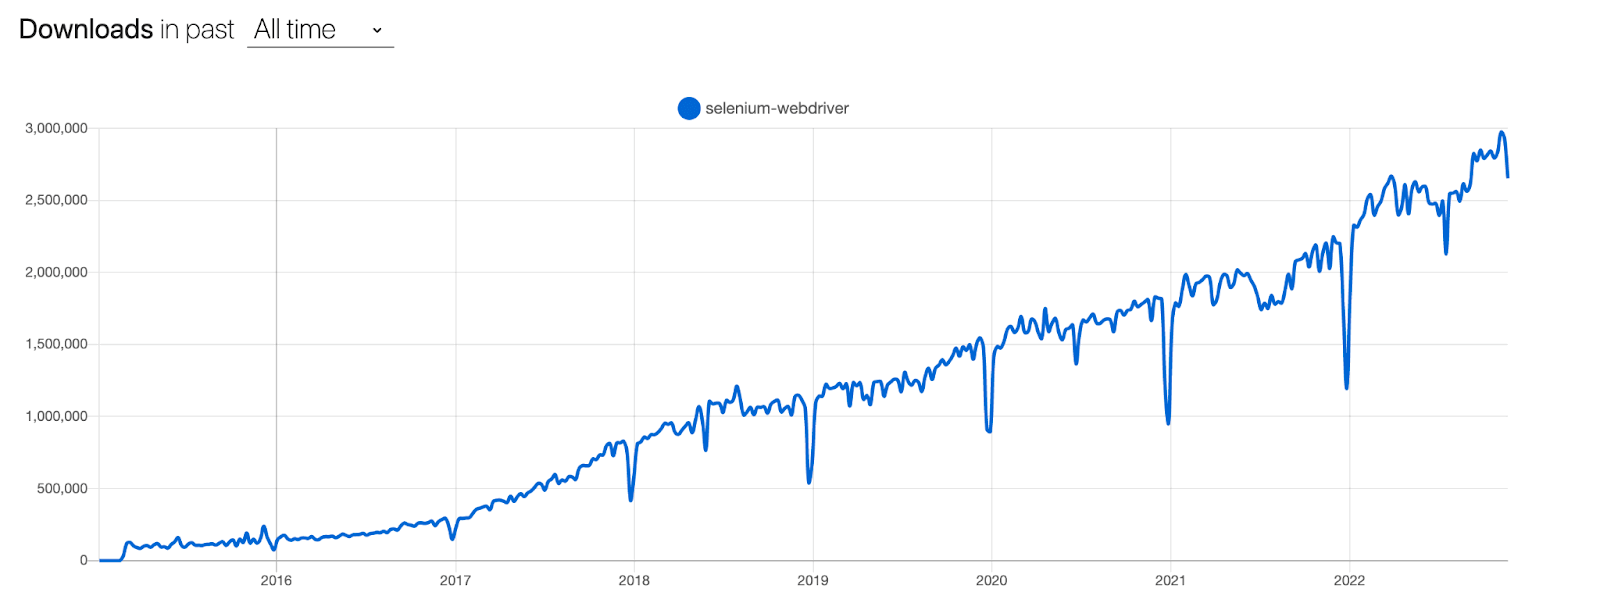
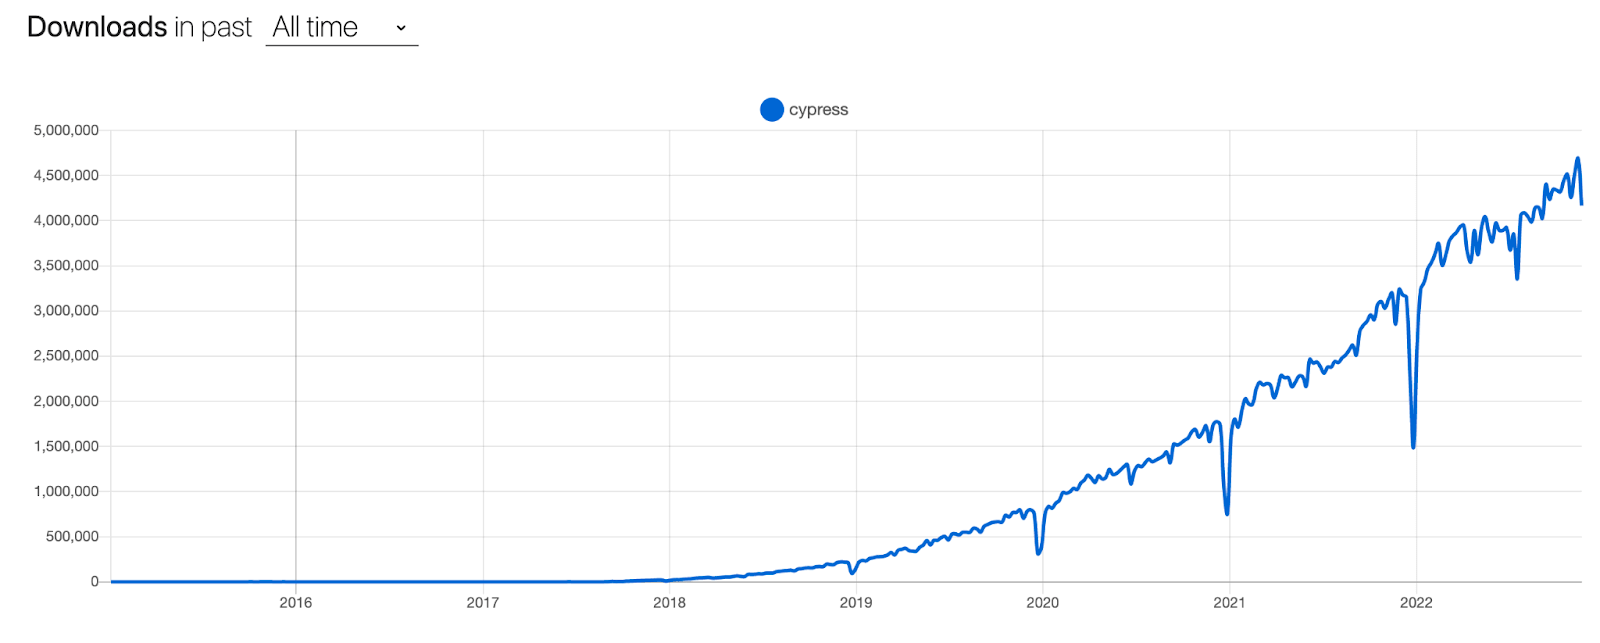
npm download trends show how the three compare on adoption:
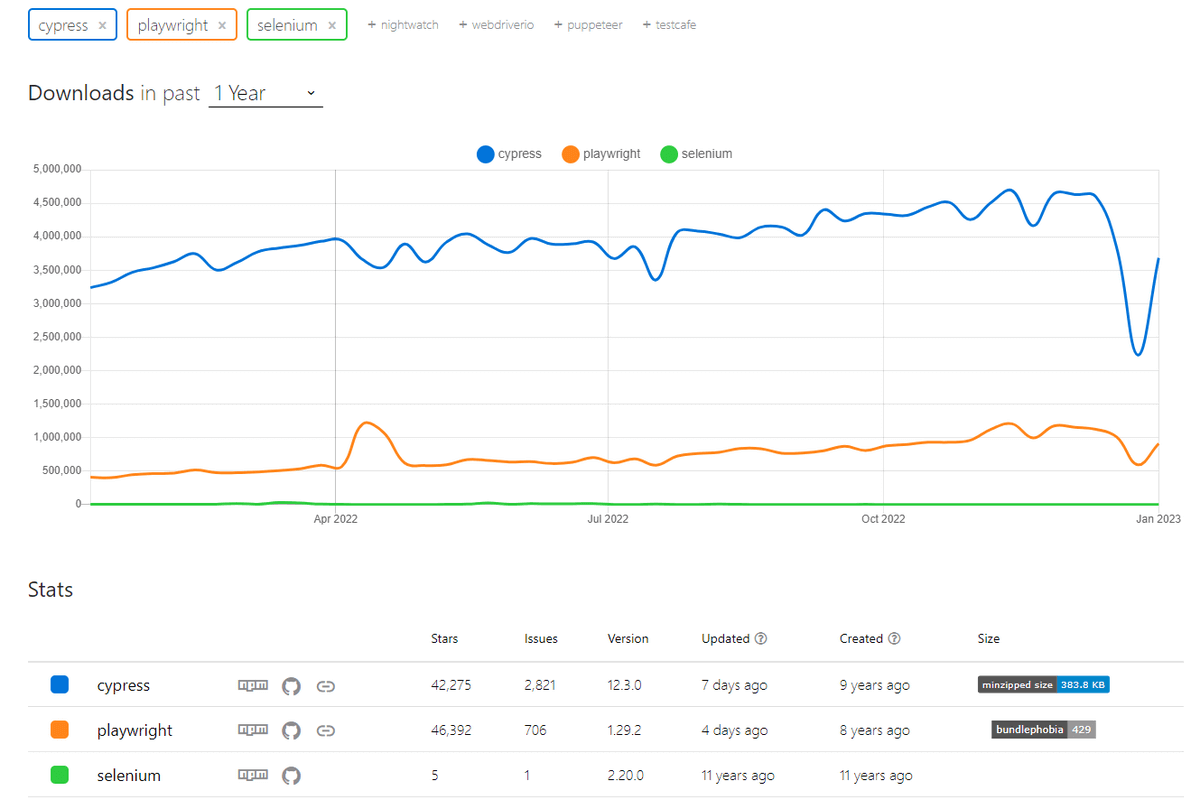
Note: I have used tools and frameworks interchangeably throughout this blog on Playwright vs Selenium vs Cypress.
What is Playwright?
Playwright is an open-source end-to-end testing framework from Microsoft that drives Chromium, Firefox, and WebKit through a single API, with auto-waiting and tracing built in by default.
It is a Node library that automates the Chromium, WebKit, and Firefox browsers through a single API, which keeps one script running across all three engines instead of maintaining a variant per browser.
Playwright Test framework supports Jest, Mocha, Jasmine, and other prominent CI servers using a single API. Playwright offers cross-language support, which includes TypeScript, JavaScript, Python, .NET, and Java.
Here are some of the prominent features of Playwright automation framework:
- One API for any browser/platform - Playwright drives Chromium, Firefox, and WebKit on Windows, Linux, and macOS.
- It also emulates Chrome for Android and Mobile Safari natively.
- Reduced flakiness - Playwright waits for elements to become actionable before acting, and adds retries, trace capture, video, and screenshots.
- Test Case Execution in Isolation - every test gets its own browser context, equivalent to a fresh browser profile, at no overhead.
- Powerful Tooling - Playwright comes bundled with tools like Codegen, Playwright inspector, and Trace Viewer:
- Codegen - records test cases and saves them in JavaScript, Python, .NET, Java, or TypeScript.
- Recording helps beginners learn, but recorded scripts are a poor basis for a live project because they are hard to maintain.
- Playwright inspector - Using Playwright inspector, you can inspect the page, see click points, and explore execution logs.
- Trace Viewer - Capture all the information that helps investigate the test failure.
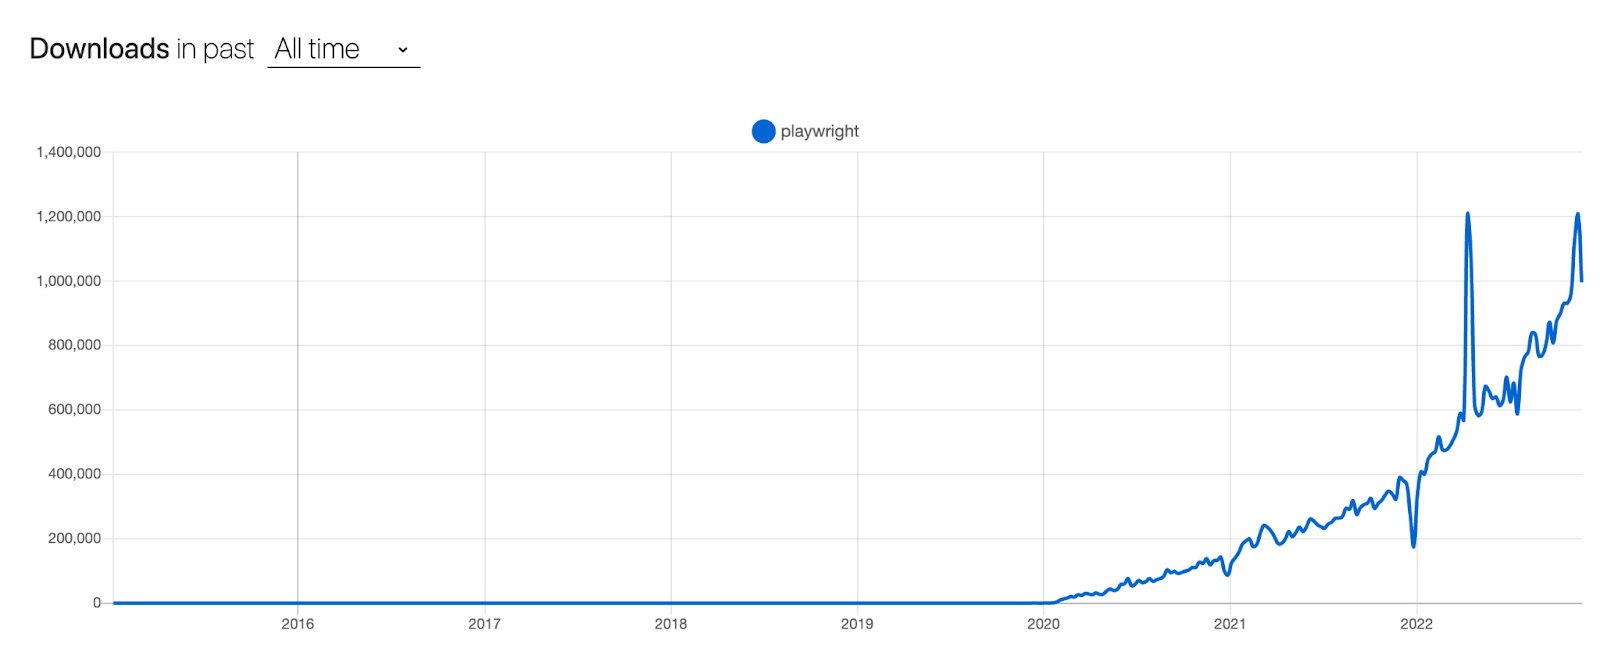
As per the Playwright GitHub repository, Playwright continues to attain popularity with:
- Stars - 94,000
- Forks - 6,200
- Latest release - Playwright 1.62.1
Enhance your testing strategy with our detailed guide on Playwright Headless Testing. Explore further insights into Playwright's capabilities in this guide.
Playwright Architecture
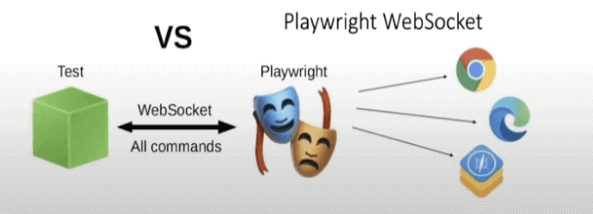
Playwright talks to the browser over a WebSocket. Trigger a test and the code is converted to JSON, then sent to the server using the WebSocket protocol.
Once the handshake completes, commands flow between your test and the Playwright server on that open connection.
Connections stay active until one side closes them, at which point the link terminates at both ends.
That persistent connection is one reason Playwright runs fast, because there is no per-command reconnection cost.
To learn more about Playwright automation testing, you can refer to this blog on the Playwright framework.
What is Selenium?
Selenium is an open-source browser automation framework implementing the W3C WebDriver standard, driving Chrome, Firefox, Safari, and Edge from Java, Python, C#, Ruby, PHP, or JavaScript.
Selenium lets testers run test cases in parallel across a grid of browser instances, which shortens the testing phase.
Finishing that phase faster shortens the whole CI/CD pipeline, so the development cycle moves quicker.
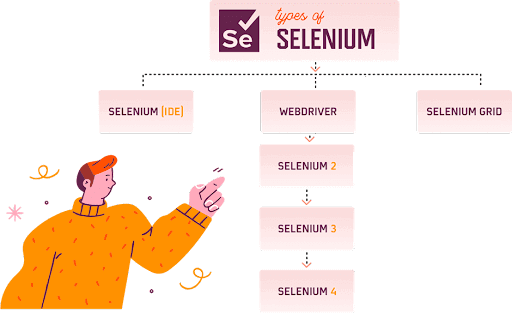
We're not going to do a long explanation of Selenium's tool suite here. Instead, I will give you a brief overview of the Selenium suite:
Selenium WebDriver
Selenium WebDriver is a library whose APIs are called from your code, after which commands run on the browser you choose.
Using Selenium locators, you identify and locate elements to build test cases, then act on them through the WebDriver APIs.
Your script interacts directly with the browser, which is one reason it runs significantly faster than the deprecated Selenium RC.
Each browser has its own driver, which interprets the script you write for it.
Selenium IDE
Selenium IDE lets you record, edit, and replay test steps. It is a Firefox, Chrome, and Edge add-on for building and running test cases.
The tool creates and executes automated tests without requiring you to write any code.
Record actions in the browser, such as clicking elements and filling forms, then play them back to test your web application.
Selenium IDE also edits scripts, adds assertions to verify behaviour, and exports to HTML, Java, Python, and C#.
Selenium Grid
Selenium Grid runs your tests on different machines, operating systems, and browsers in parallel.
That matters most with a large test suite you need to finish quickly.
The setup is one master system, the hub, controlling child systems called nodes.
The hub is the central point managing test execution across connected nodes, and you can attach any number of them.
Each node represents one combination of operating system, browser, and version, and you specify which tests run where.
For example, set up a hub with three nodes: Chrome on Windows, Firefox on macOS, and Safari on iOS.
Selenium Grid then runs your tests concurrently on all three, covering every platform and browser at once.
How Selenium Grid Works:
- You set up a hub, a central point of communication for the nodes that will execute your tests.
- You set up one or more nodes, the machines that run the tests. Each covers a different browser or operating system.
- You configure the nodes to connect to the hub.
- You write tests and use a client library such as Selenium WebDriver to send commands to the hub.
- The hub forwards each command to the right node, which executes the test and returns results.
Using Selenium Grid can significantly speed up your test execution time, allowing you to run tests in parallel on multiple machines and browsers.
Selenium Trends on GitHub:
As per the Selenium GitHub repository, Selenium persists in acquiring popularity with:
- Stars - 34,300
- Forks - 8,600
- Latest release - Selenium WebDriver 4.46.0
Selenium Architecture
Selenium is an open-source framework for web automation testing. Selenium 4 dropped the JSON Wire Protocol for the W3C WebDriver Protocol, now the official browser-control standard.
The team still supports the older protocol through Selenium-supported language bindings and Selenium Server.
The new protocol, WebDriver W3C, carries World Wide Web Consortium acceptance.
Selenium 4 architecture shows direct client-to-server communication with no JSON Wire Protocol in between. WebDriver and browsers speak the same protocol, which keeps execution quick and flakiness low.
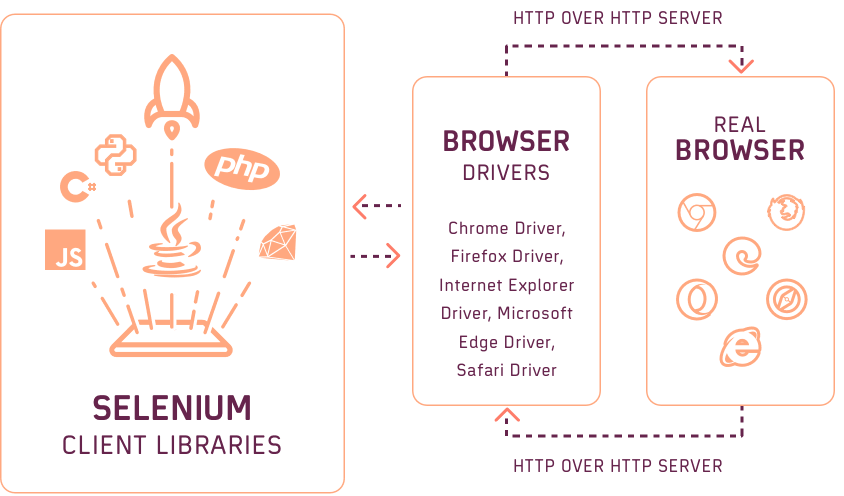
The W3C protocol is richer than the JSON Wire Protocol it replaced, and the Actions API was rebuilt to match the WebDriver spec.
Action APIs now handle multi-touch gestures, zoom in and out, and simultaneous key presses.
For example, the Pinch-zoom sequence in W3C Protocol is represented by an action sequence consisting of three ticks and two-pointer devices of type-touch.
What is Cypress?
Cypress tutorial is a front-end testing tool that runs specs inside the browser beside your application, bundling its test runner, Chai assertions, automatic waiting, and video capture in one install.
End-to-end specs run on the Mocha test framework, which handles asynchronous testing without extra plumbing.
Cypress bundles nearly everything needed to write test cases, so there are no separate dependencies to install.
Because the suite runs inside the browser, Cypress executes faster than frameworks like Selenium.
The bundle ships an in-built Chai assertion library supporting Mocha, which supplies the syntax for Behavior-Driven Development (BDD) style tests.
Cypress automation tool addresses the following key pain points developers and QA engineers face when testing modern applications.
- Easy installation - install Cypress through npm or the desktop application, with no extra libraries, dependencies, or drivers to add.
- Real-time reloads - Cypress detects changes to a test case and re-runs it automatically, so no manual reload is needed.
- Write test cases faster - Cypress runs tests inside the browser, giving results close to what real users experience.
- Automatic waiting - Cypress UI automation waits for commands and assertions on its own, so tests need no sleeps.
- Screenshots and videos - the suite is recorded automatically, and failures are captured as screenshots when running headlessly.
- Instructive Dashboard - Using Cypress testing on TestMu AI, we can run your test cases in CI/CD providers and record test results.
Cypress Trends on GitHub:
As per the Cypress GitHub repository, Cypress persists in acquiring popularity with:
- Stars - 50,800
- Forks - 3,600
- Latest release - Cypress 15.20.0
Cypress Architecture
Cypress automates web applications through an architecture built for speed and reliability.
In Cypress UI testing, every command executes inside the browser with no driver binaries. The screenshot below shows tests running in-browser, so execution avoids network lag.
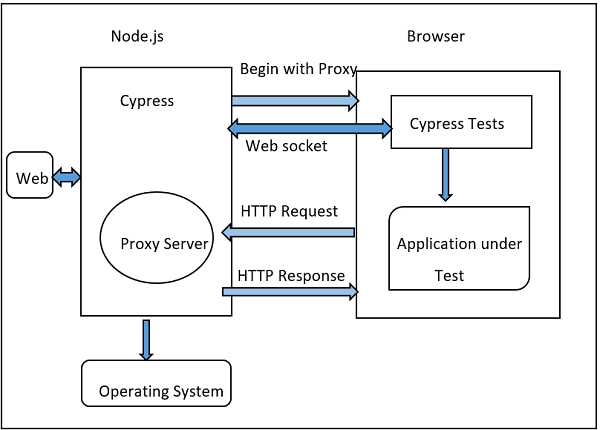
A Node server sits behind Cypress, and the two processes constantly communicate and synchronise work on each other's behalf.
Server and browser talk over WebSocket, which opens once the proxy is created.
Since tests are running inside the browser, it's very easy to work directly on:
- DOM
- Local storage
- Network layer
- Window object
As the things mentioned above are very simple to access in Cypress, this is a significant advantage when running tests on Cypress in comparison to other test automation frameworks.
To learn more about Cypress testing, you can refer to this blog on Cypress test automation.
Comparing Playwright vs Selenium vs Cypress Features
The twelve sections below compare Playwright, Selenium, and Cypress one capability at a time, from installation through API testing, with the code and configuration each framework needs.
Installation & Configuration
In this section, we will take a look at how to install and configure each of these tools, and what benefits they offer in terms of installation and setup.
Playwright:
When comparing Cypress vs Playwright vs Selenium installation and configuration, Playwright is easy to install and set up. There are different ways to install Playwright, some of which are explained below:
Here are some basic prerequisites for Playwright:
- Ensure you have NodeJS installed.
- Install a code editor. I will be using Visual Studio Code.
There are two ways of installing the Playwright:
- Using the VS Code extension.
- Using the init command.
Using the VS Code extension
- Create a folder, e.g., Install_playwright.
- Open the folder in VS Code.
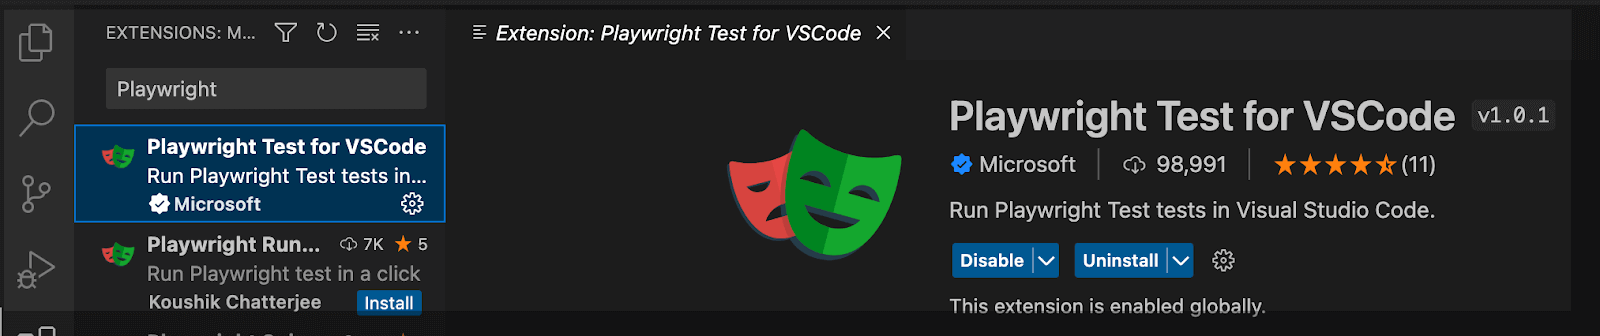
- Search Playwright extension in VS Code and install it.
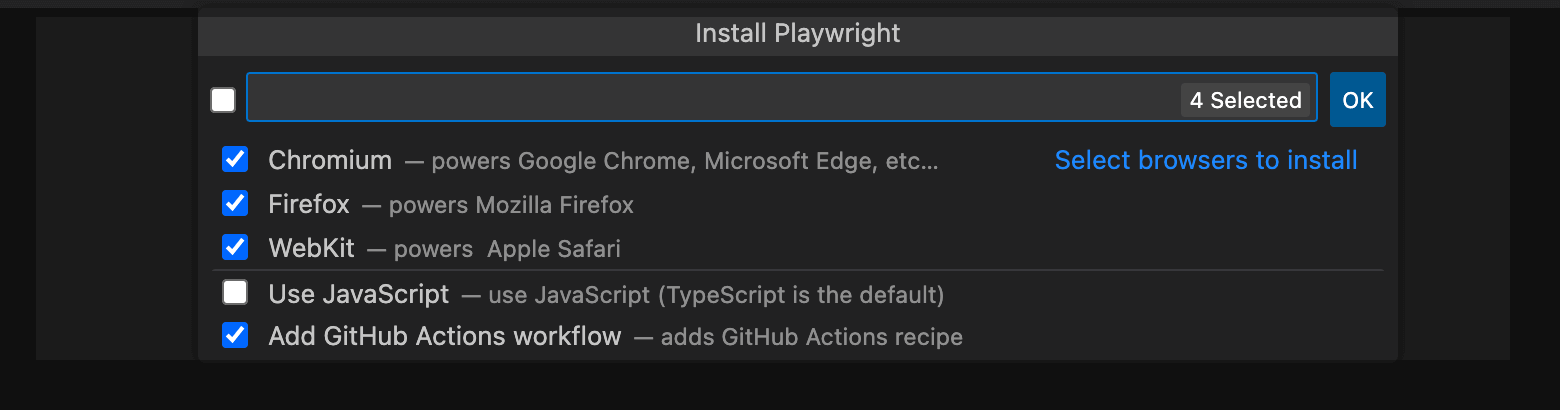
- Now Press command+shift+P (in Mac) and finally click on the OK button.
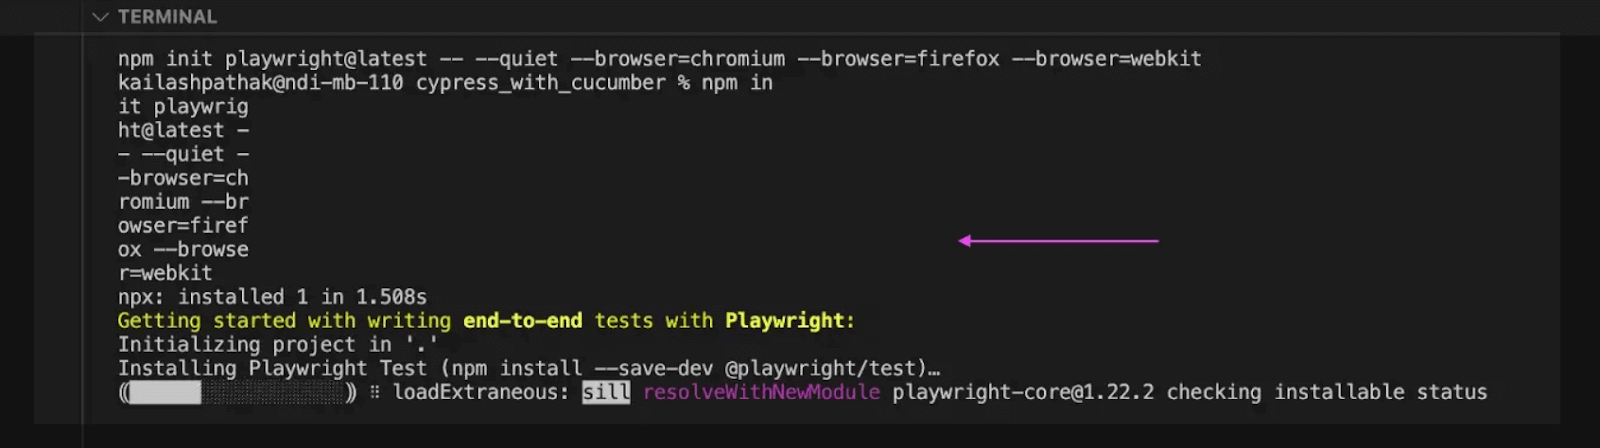
- As we click on the OK button, the Playwright installation will start.

Using the init command
- Create a folder, e.g., playwright_new_script.
- Open the folder in VS Code.
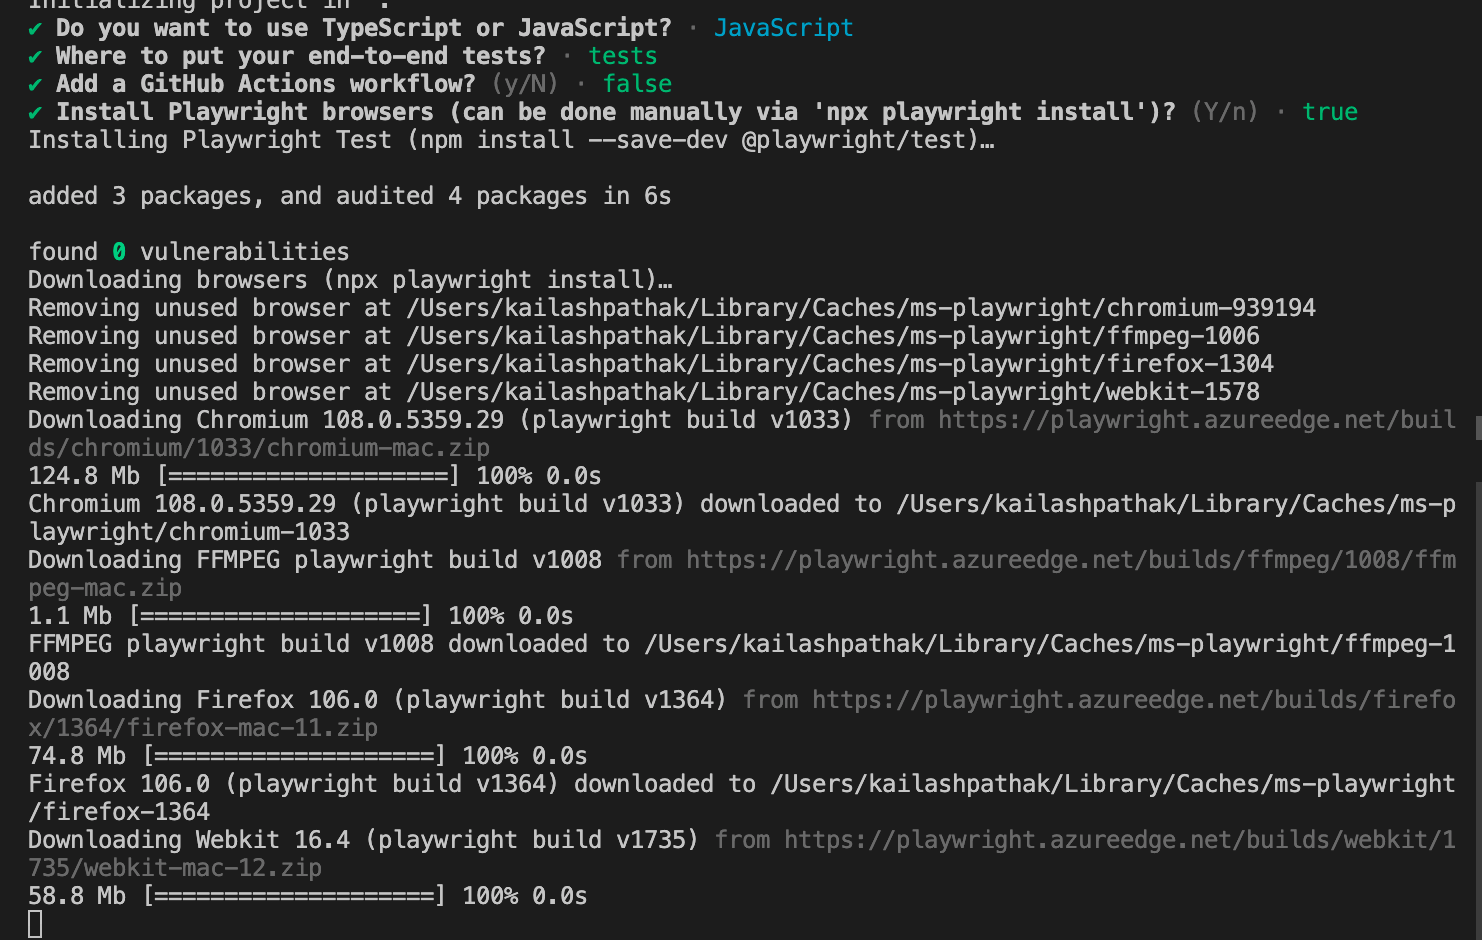
- Run from the project's root directory npm init playwright@latest.
As we run the above commands, Playwright starts installing. (Playwright 1.62.1 is the current release at the time of writing).
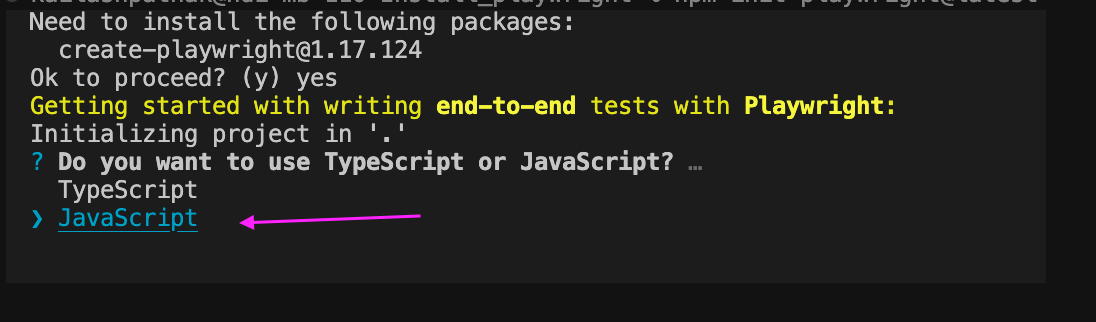
In the below screenshot, you can see we have two options. You can select either TypeScript or JavaScript.
We can see the default .spec file after successful installation.
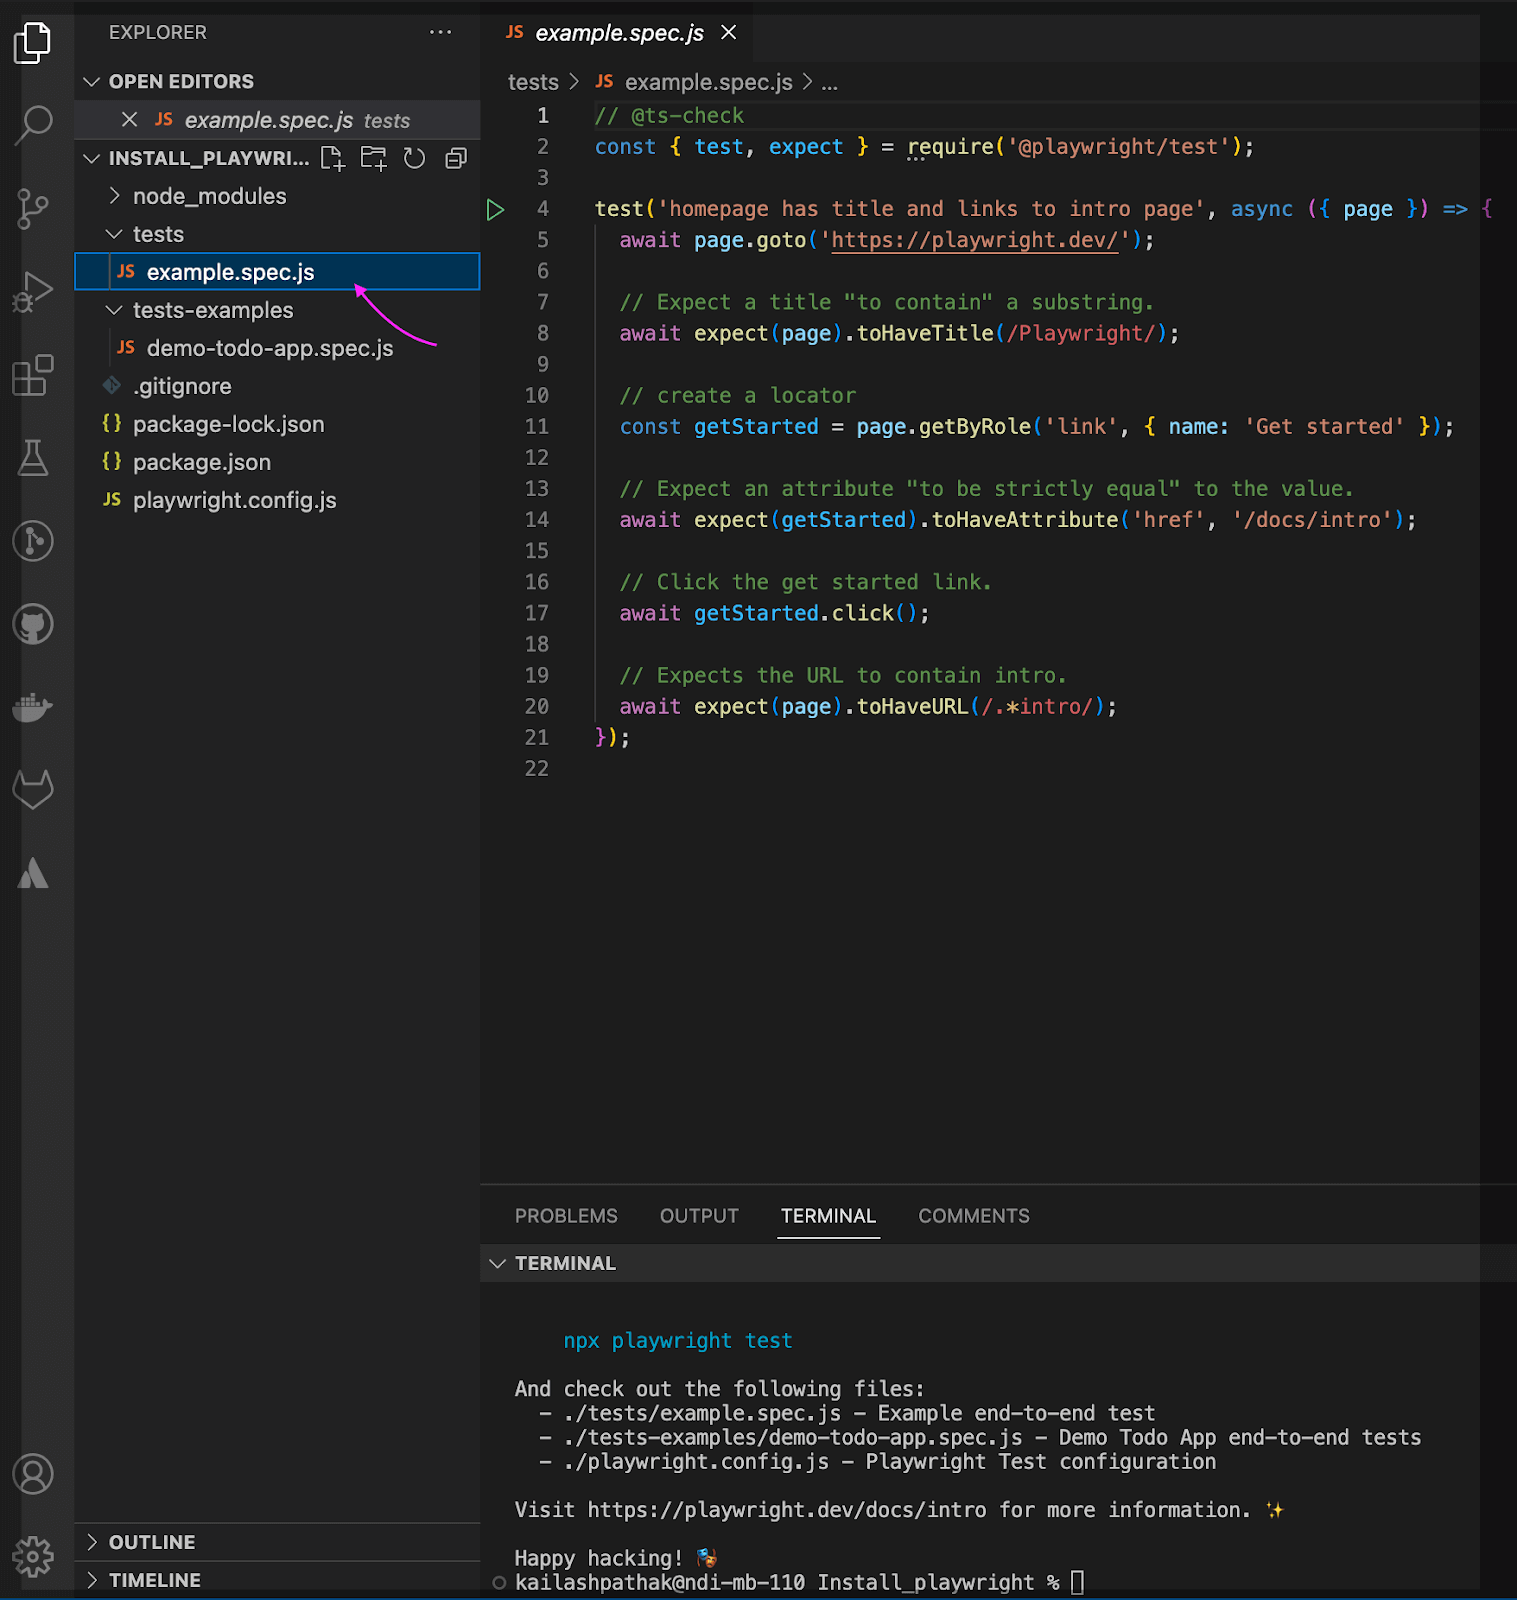
To know more about how to set up and run the test cases in Playwright, you can follow this blog on how to install Playwright.
Selenium:
Setting up Selenium locally takes the steps below, which apply to the local Selenium Grid.
These steps also cover Python and other Selenium-supported languages. Cloud Selenium Grids need no Grid or Server installation.
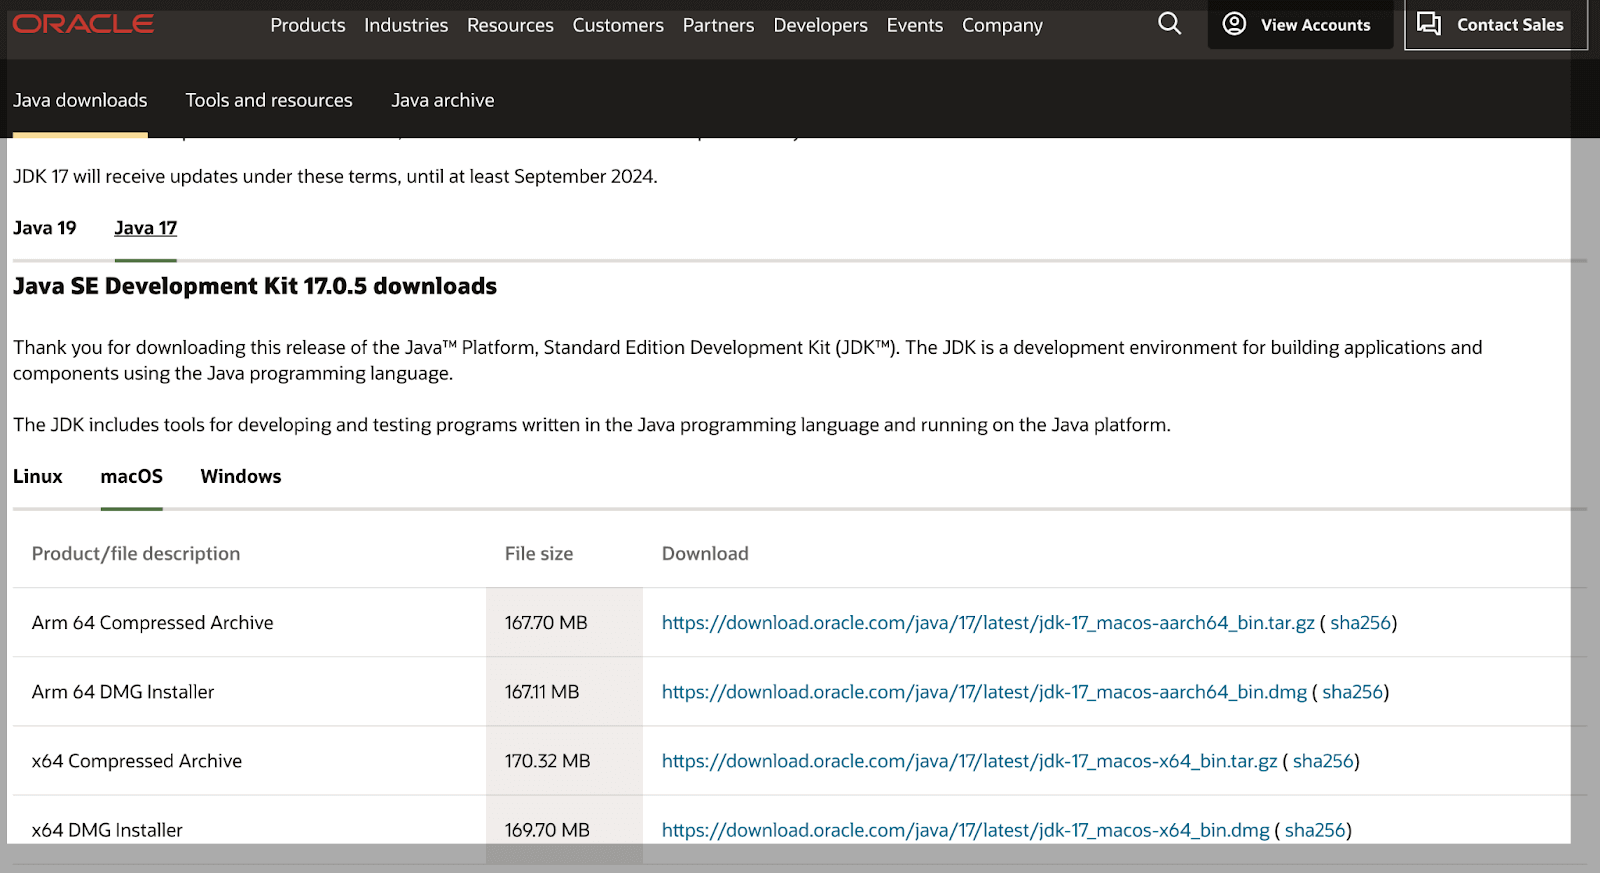
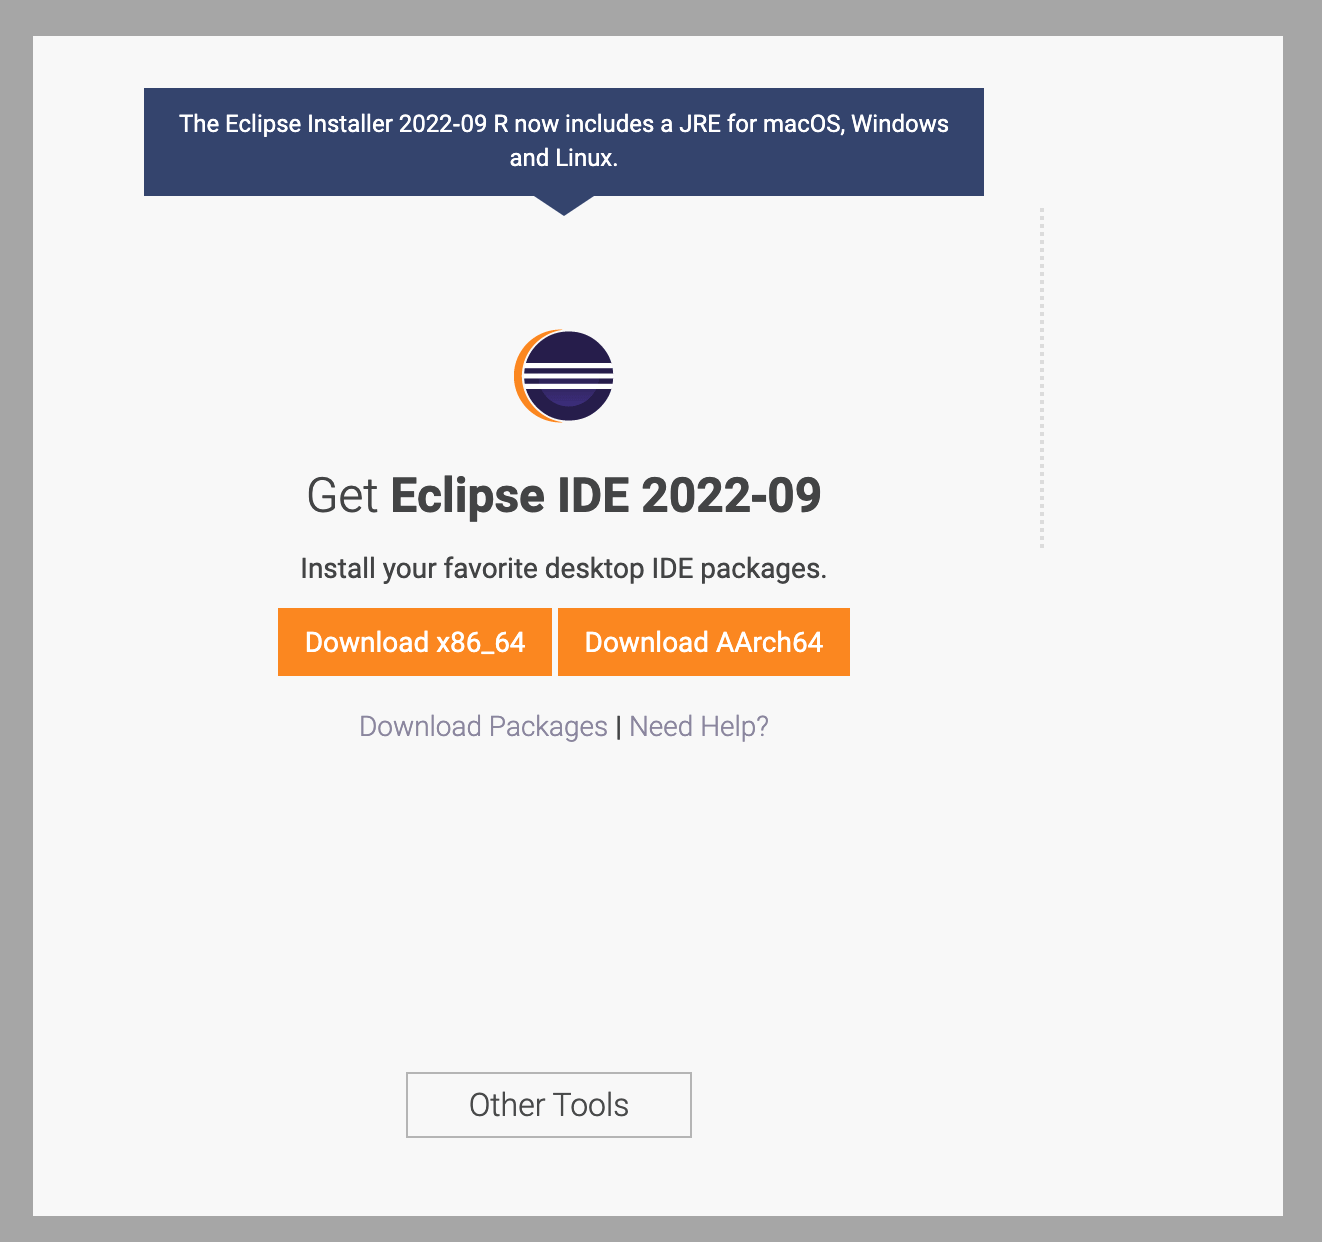
- Install a JDK, then install an IDE. The Eclipse downloads page covers the IDE step.
- Install IDE. You can learn more about it through this blog on configuring Eclipse and IntelliJ.
- Download Selenium WebDriver and Java Client Driver to be set up in Eclipse.
- Create a TestNG project and run the Selenium test script. See creating TestNG project in Eclipse.
Cypress:
Cypress installation is straightforward, and the tool ships a fixed folder structure.
Follow that structure and you can start writing test cases immediately, using it as the basis for your project framework.
To set up Cypress, follow the steps below:
- Pre-requisites - Node should already be installed.
- Generate package.json using the command npm init.
- npm install cypress --save-dev installs the current release, Cypress 15.20.0 at the time of writing.
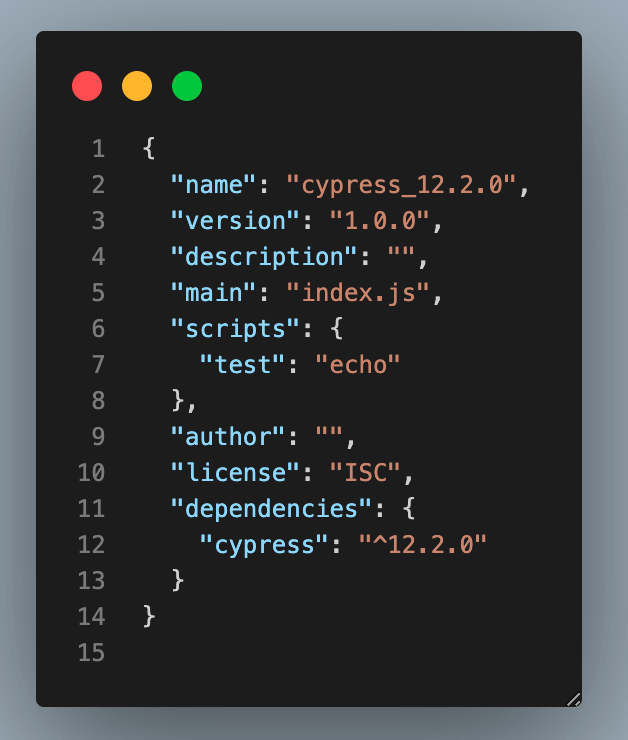
- Once installed, package.json looks like the one below.
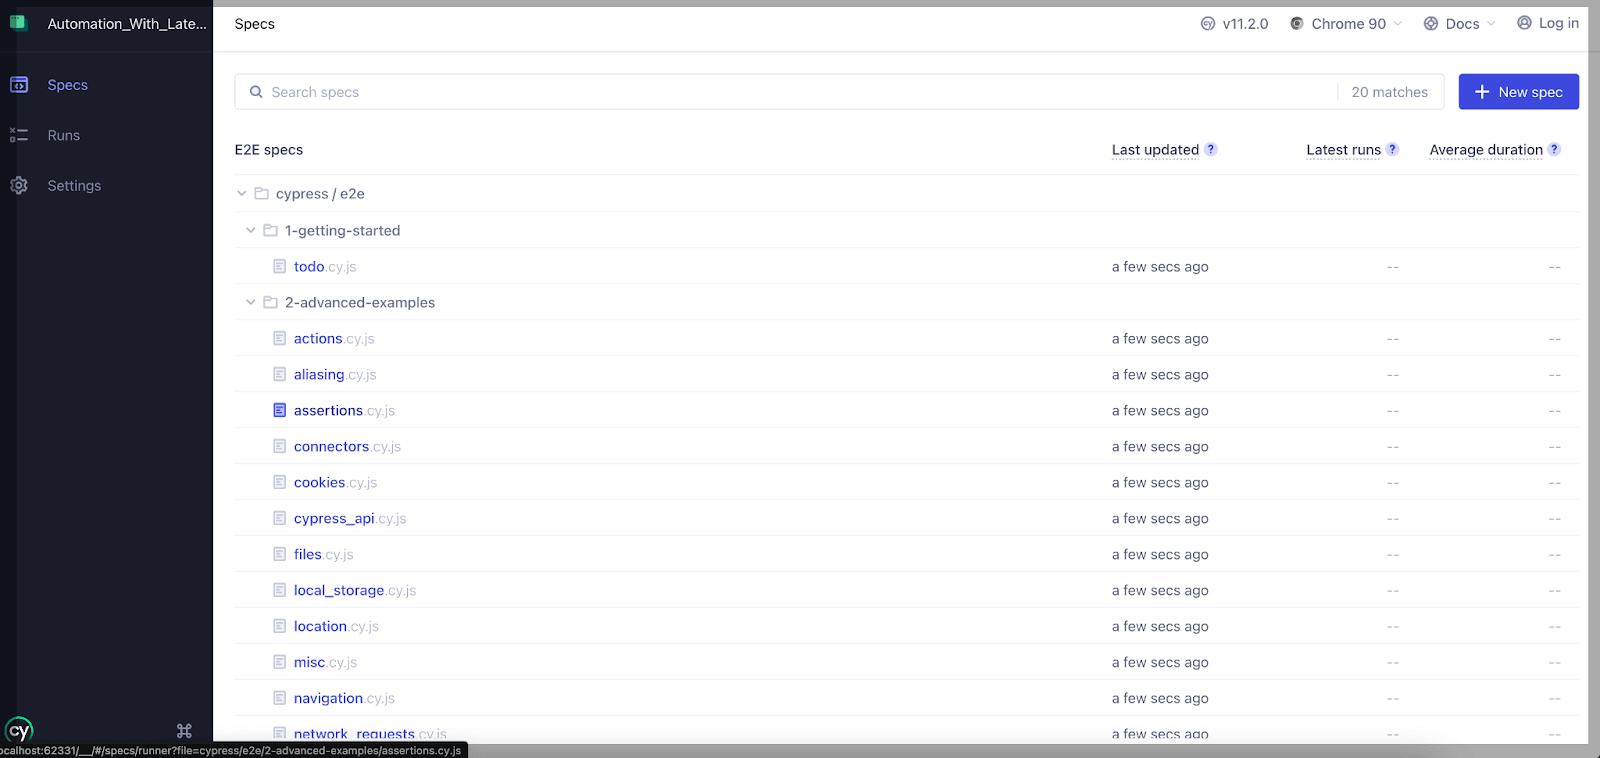
- Once the setup is done, open the Cypress, which will open with all default .spec files.
To perform end-to-end testing using Cypress, follow the blog on Cypress end to end Testing to know in detail.
Runner
Runner is a tool you can use to run/execute test cases. After executing the test cases, you can view and export the test execution results.
Playwright:
Playwright has its own runner and also works with third-party runners including Jest, Jasmine, AVA, Mocha, and Vitest, across multiple browsers.
Connecting Playwright to an existing JavaScript test runner takes a few lines of code.
- Playwright Test - First-party suggested test runner for Playwright is called Playwright Test runner.
- Jest/Jasmine - use jest-playwright, or simply require Playwright directly. Jasmine shares Jest syntax, so the same approach applies.
- AVA - tests run concurrently, so a single page variable cannot be shared. Use a macro function to create new pages.
- Mocha - Mocha functions similarly to the Jest/Jasmine configuration and has a similar appearance.
- Vitest - Vitest looks similar to the Jest/Jasmine setup and functions similarly.
- Multiple Browsers - We can execute the test cases using an environment variable in multiple browsers.
Playwright runs a single test case, a set, or the whole suite, in headless mode by default.
Tests run in the terminal and results appear there only. The commands below cover each case.
- Performing Playwright browser testing in headless mode:
npx playwright test
npx playwright test fileName.spec.js
npx playwright test tests/page/home-page/
npx playwright test home-page.spec.js --headed
Playwright also runs test cases in debug mode through Playwright Inspector, a built-in tool.
The Inspector steps through Playwright API calls, shows debug logs, explores selectors, and finds locators when you hover over an element.
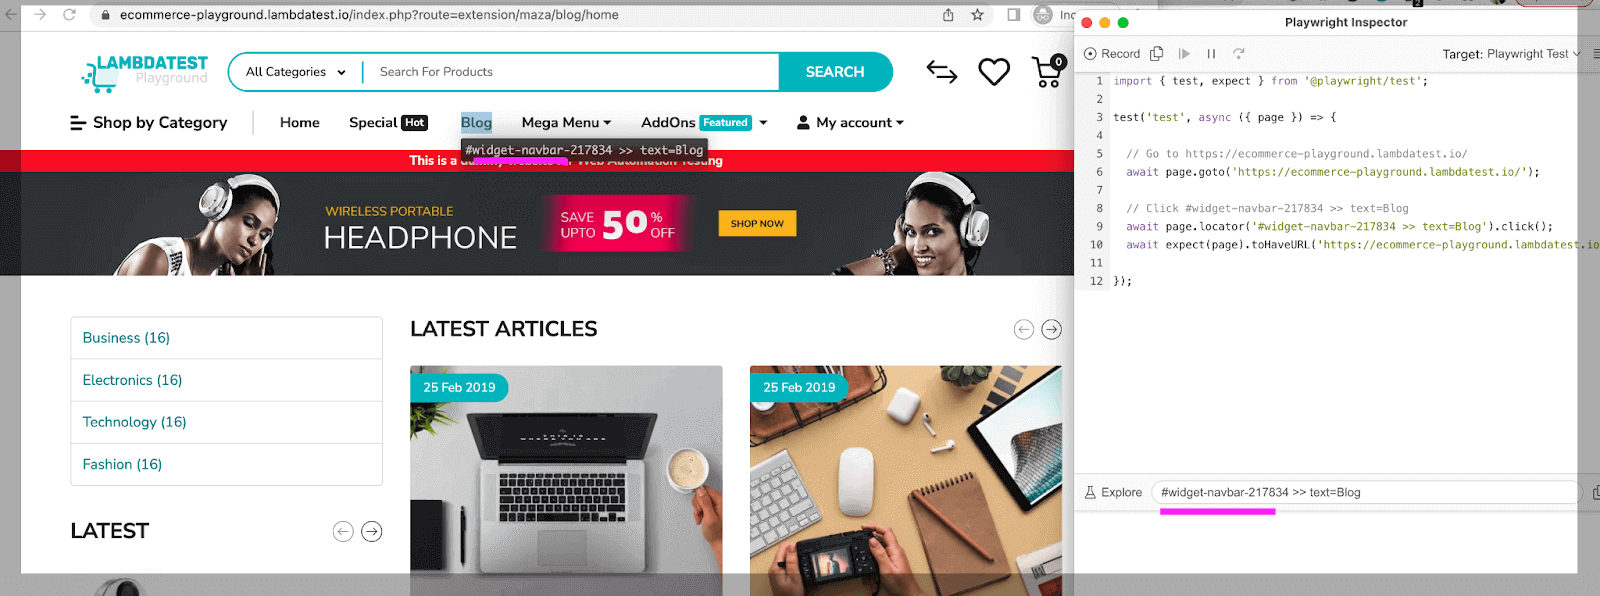
In debug mode, Playwright opens the "Playwright Inspector," where we can go line-wise and easily check the reason for the failure of the test case in the Inspector itself.
Selenium:
Selenium Runner is a command-line tool for running Selenium scripts.
Several runners exist, each with its own capabilities. The list below covers the ones commonly used.
- Selenium WebDriver - the most widely used runner, automating clicks, form fills, and navigation between pages.
- Selenium Grid - runs scripts on a remote machine or in the cloud, in parallel across browsers and operating systems.
- TestNG - a popular framework for creating test cases, defining suites, and running tests in parallel.
- JUnit tutorial - another widely used framework covering test cases, suites, and parallel runs.
- Jenkins - a continuous integration tool that automates build, test, and deployment, with parallel support.
- Maven - a build automation tool that manages dependencies, builds and tests your code, and handles deployment.
Cloud grids also act as a test runner, executing the same Selenium scripts across operating systems and browsers you do not maintain locally. This widens coverage without adding nodes.
That removes the driver and browser-version drift that makes a self-hosted grid expensive to keep alive, and it is the usual reason teams stop running cross browser testing on their own hardware.

Cypress:
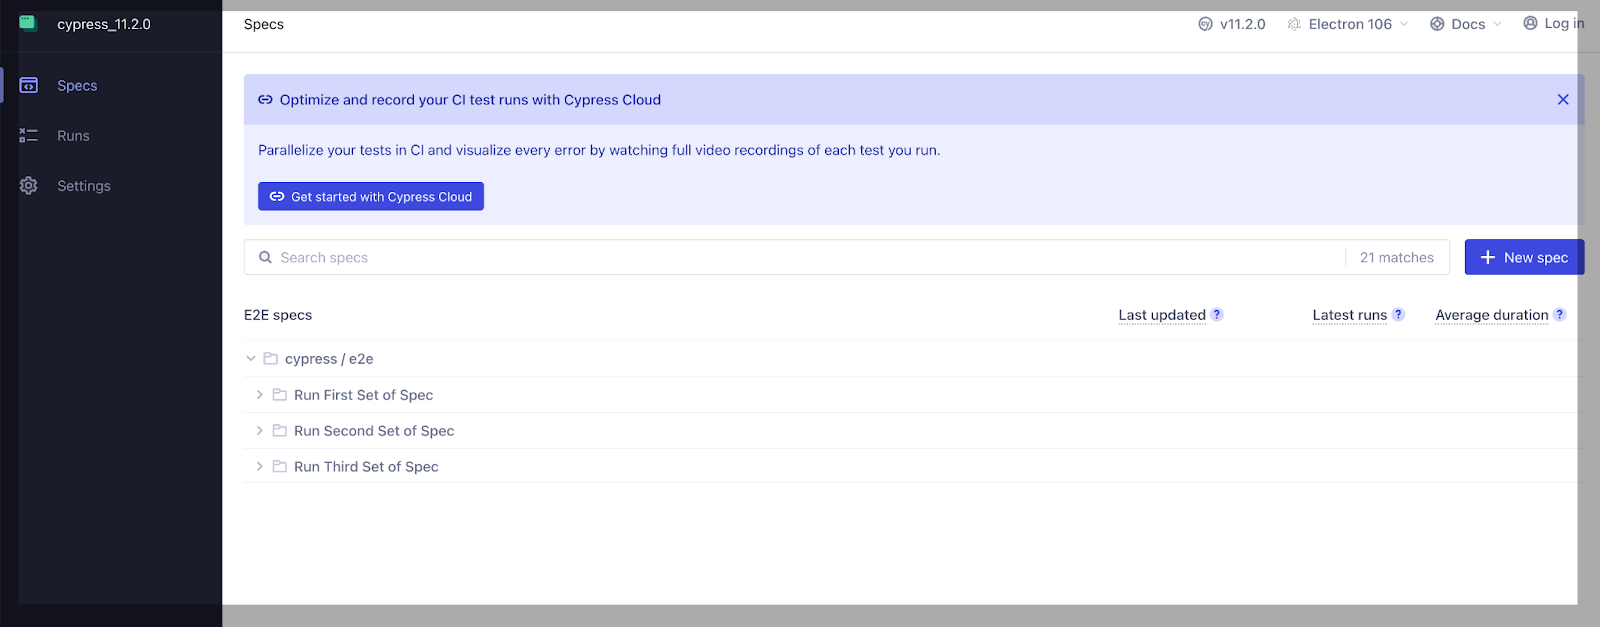
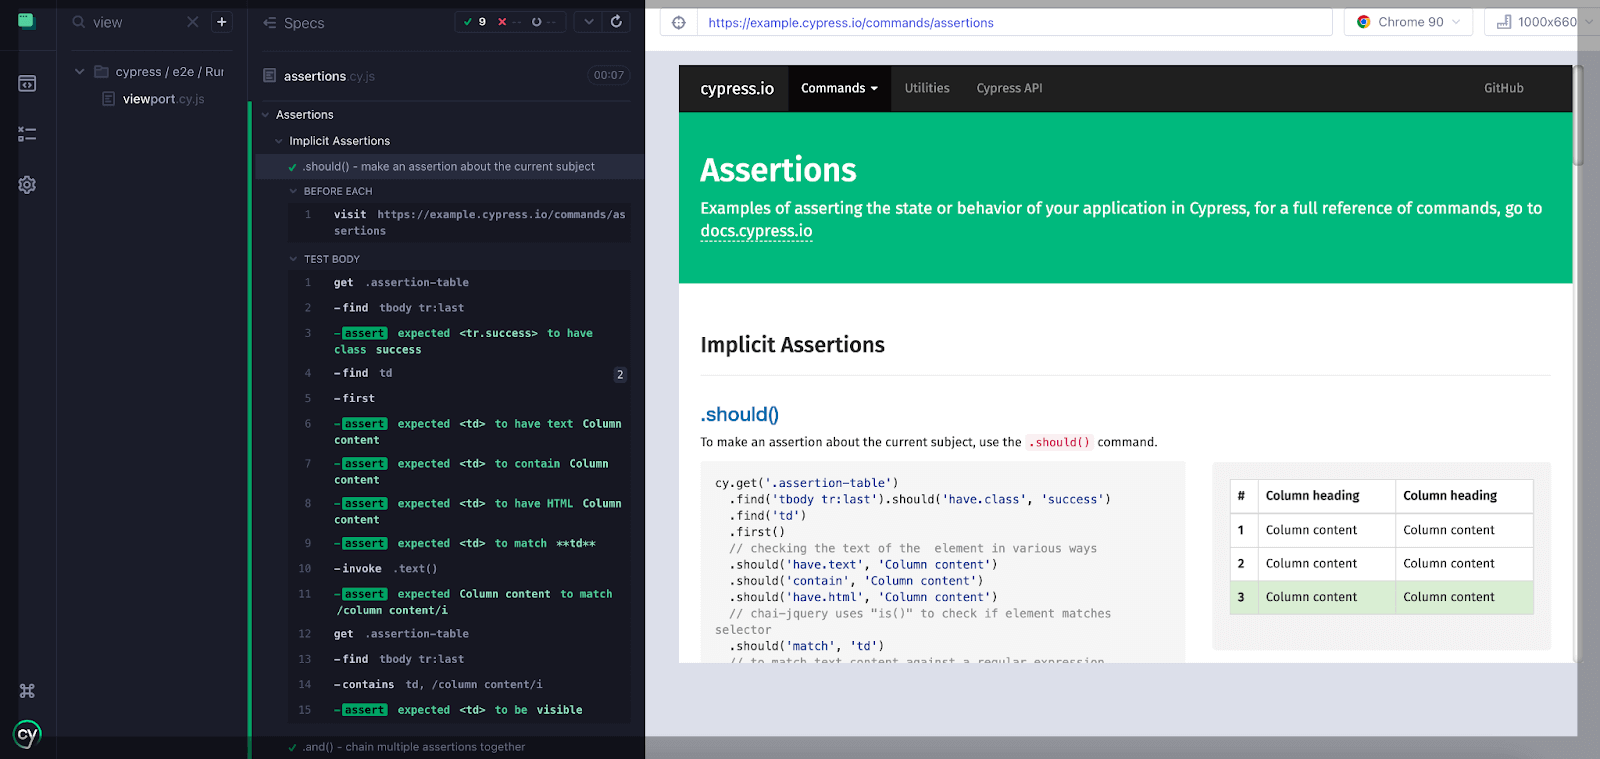
Cypress has a test runner that displays executing commands alongside the application under test with real-time data.
Hovering over a log entry in the command log shows the matching UI state.

Note: TestMu AI captures video, console logs, and network logs on every run, so a failed spec is debuggable without reproducing it locally. Try TestMu AI Now!
Record & Playback
All three frameworks ship a record and playback feature, which helps first-time users most.
The tool records new tests, edits existing ones, and replays the recorded steps.
All three tools, i.e., Playwright vs Selenium vs Cypress, include Record & Playback, which are described in more depth below.
Playwright:
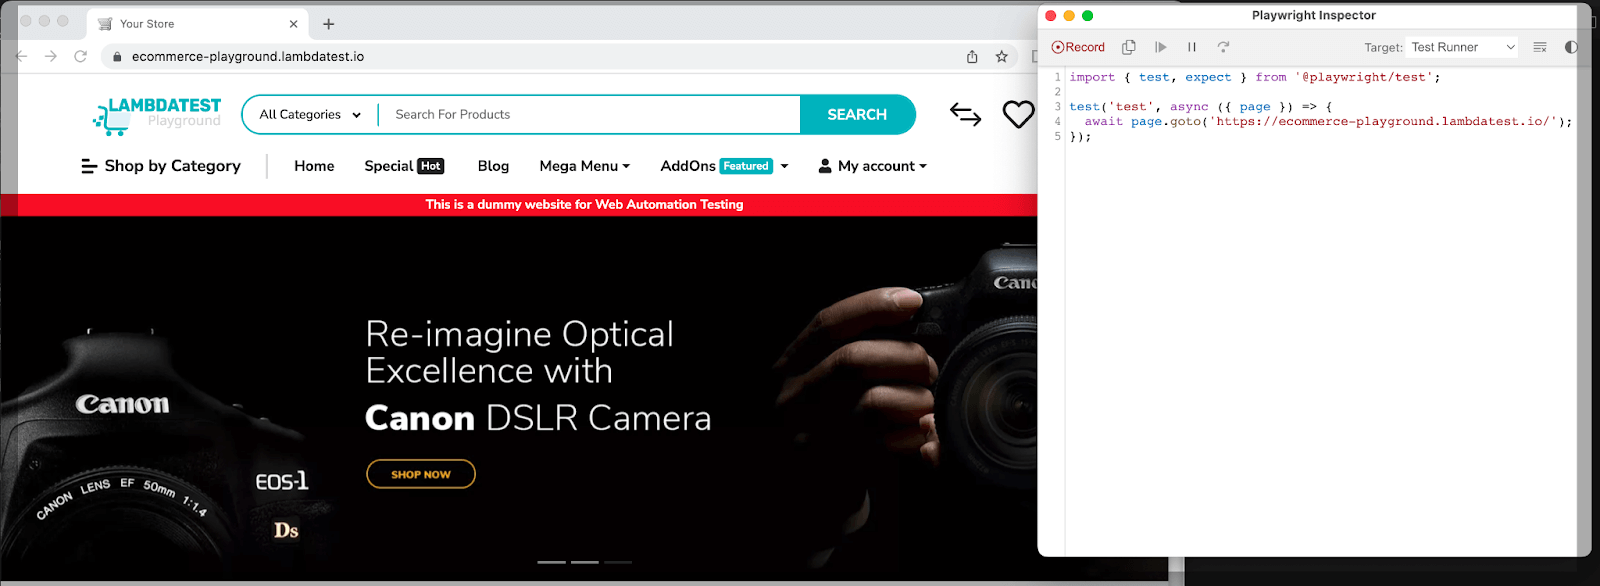
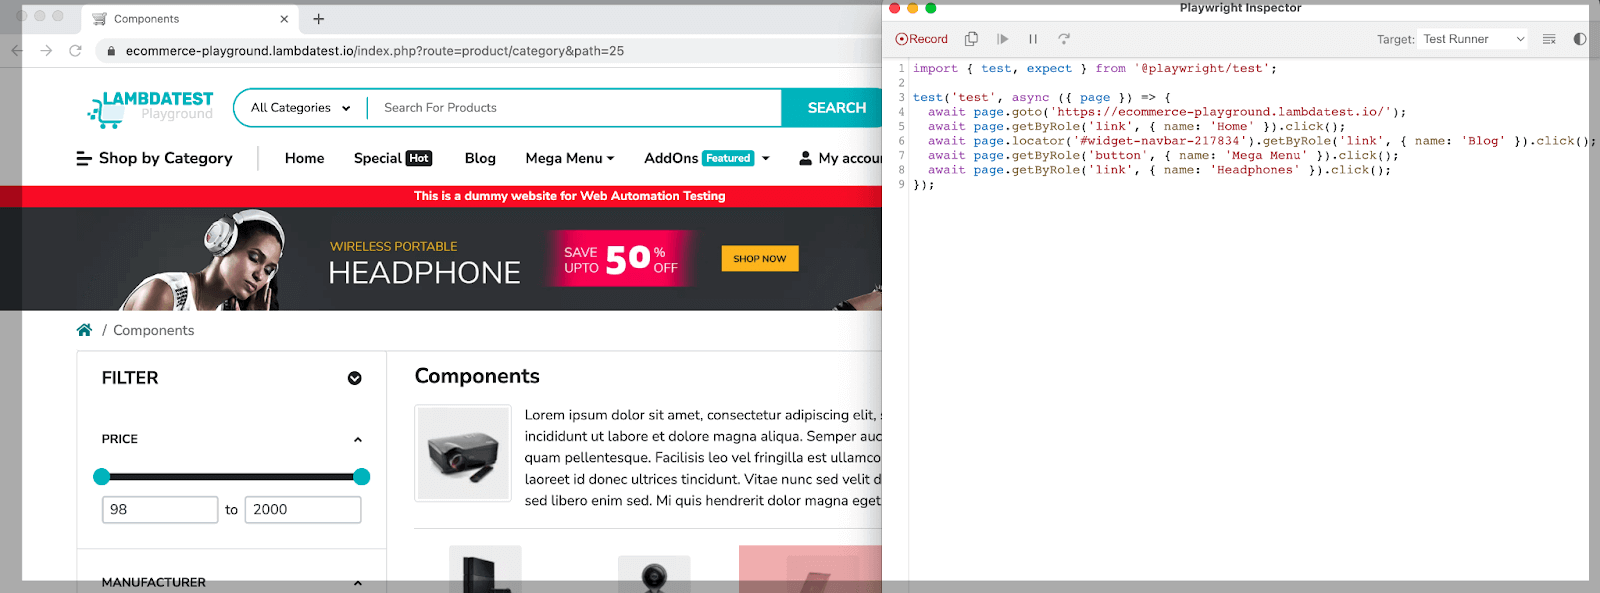
Playwright generates code from your interactions. CodeGen records the actions you perform in the browser and writes the matching test code.
The commands below open the Playwright Inspector.
In the below screenshot, you can see code is generated when you click on the Home, Blog, and Mega Menu link.
npx playwright codegen https://ecommerce-playground.lambdatest.io.
Selenium:
We have Selenium IDE to record and playback the code in Selenium. Selenium IDE doesn't need any additional setup before usage other than installing the plugin in your browser.
Unlike Selenium WebDriver and RC, Selenium IDE needs no programming logic to build test scripts.
Record your browser interactions to create test cases, then use playback to rerun the scenarios.
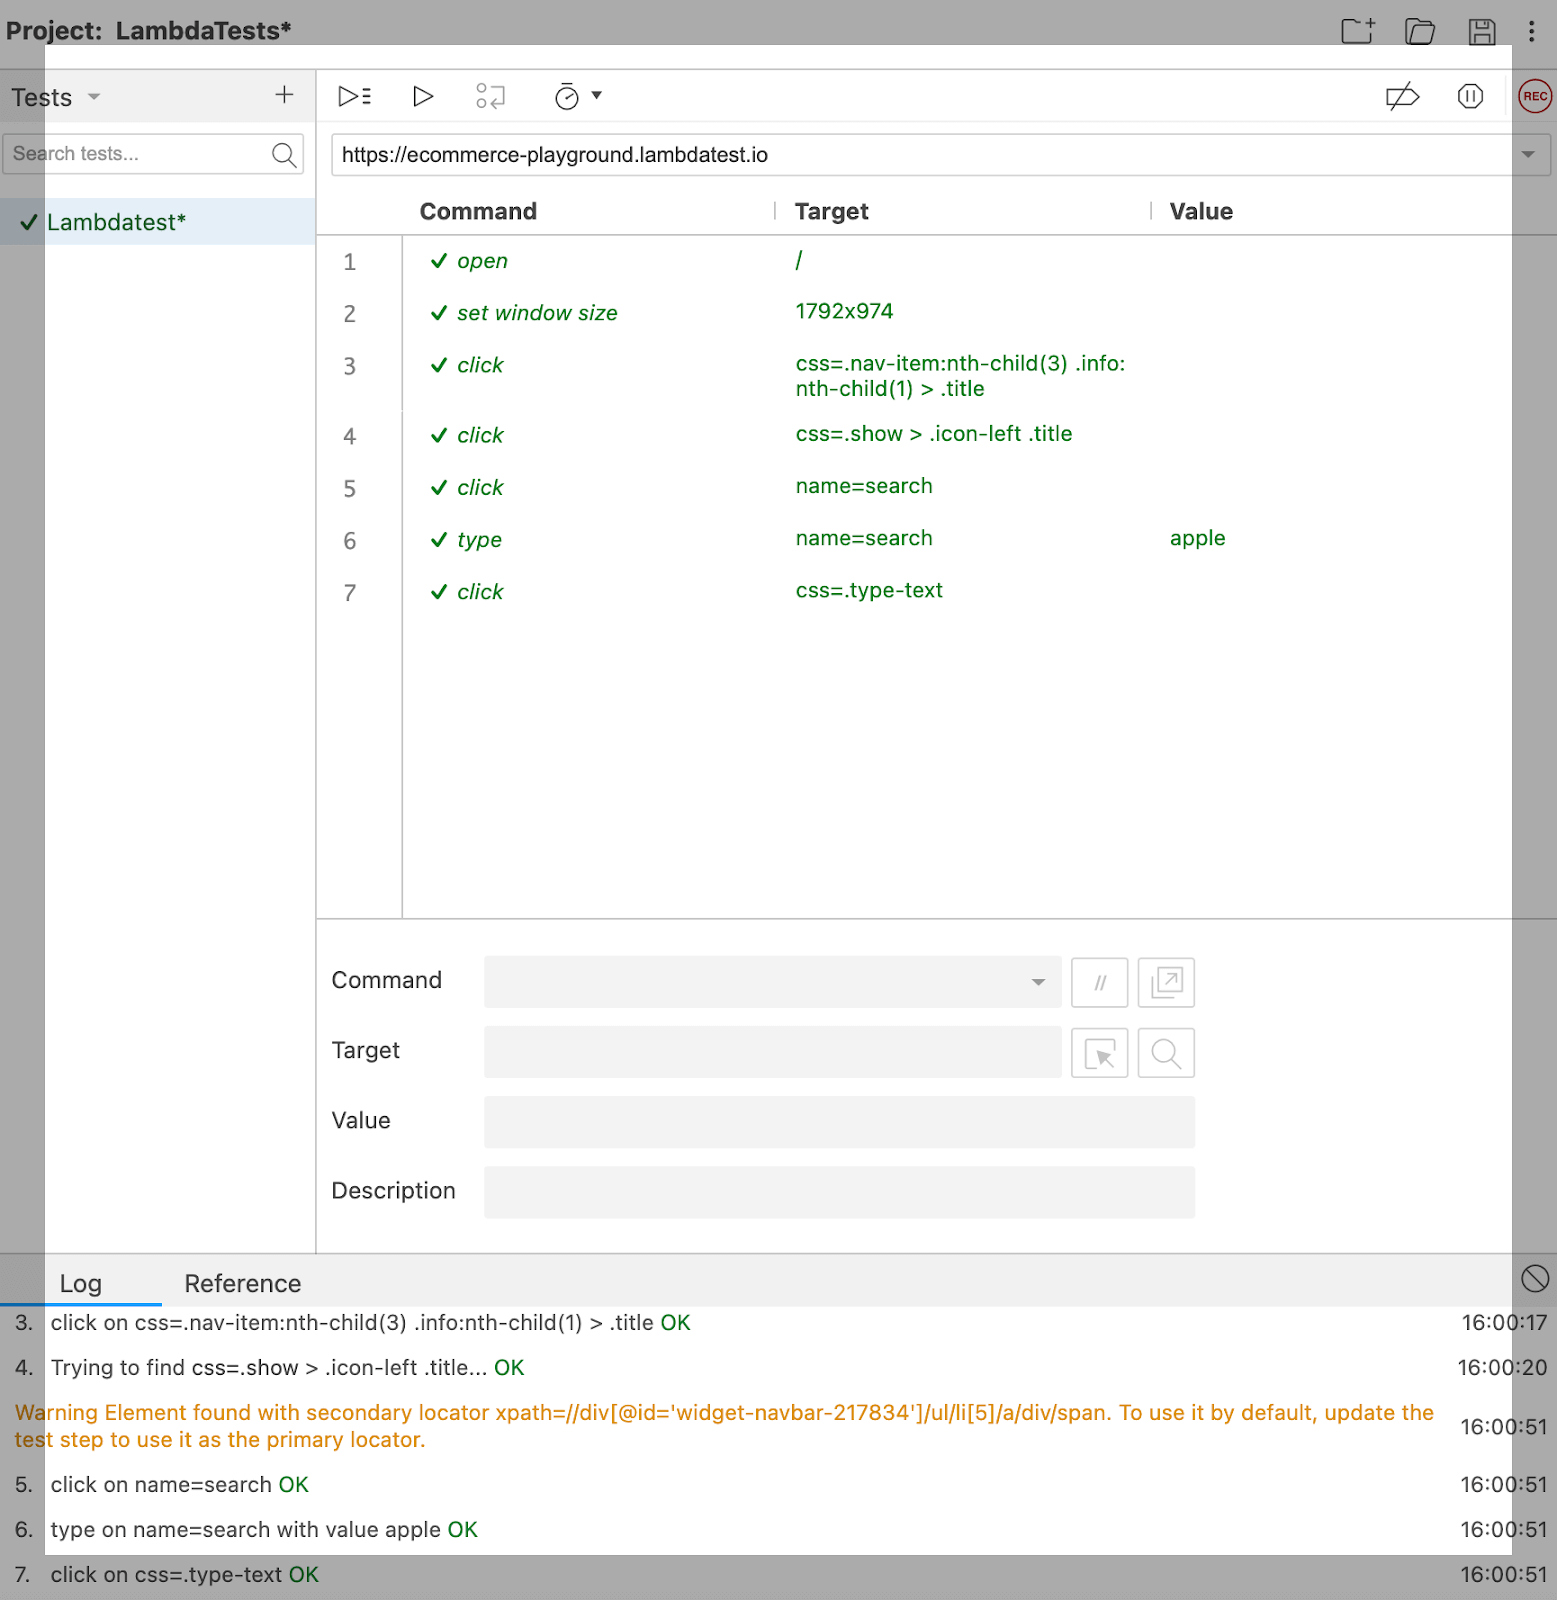
Selenium IDE records multiple locators for every element it touches, retrying each one until a locator succeeds during playback.
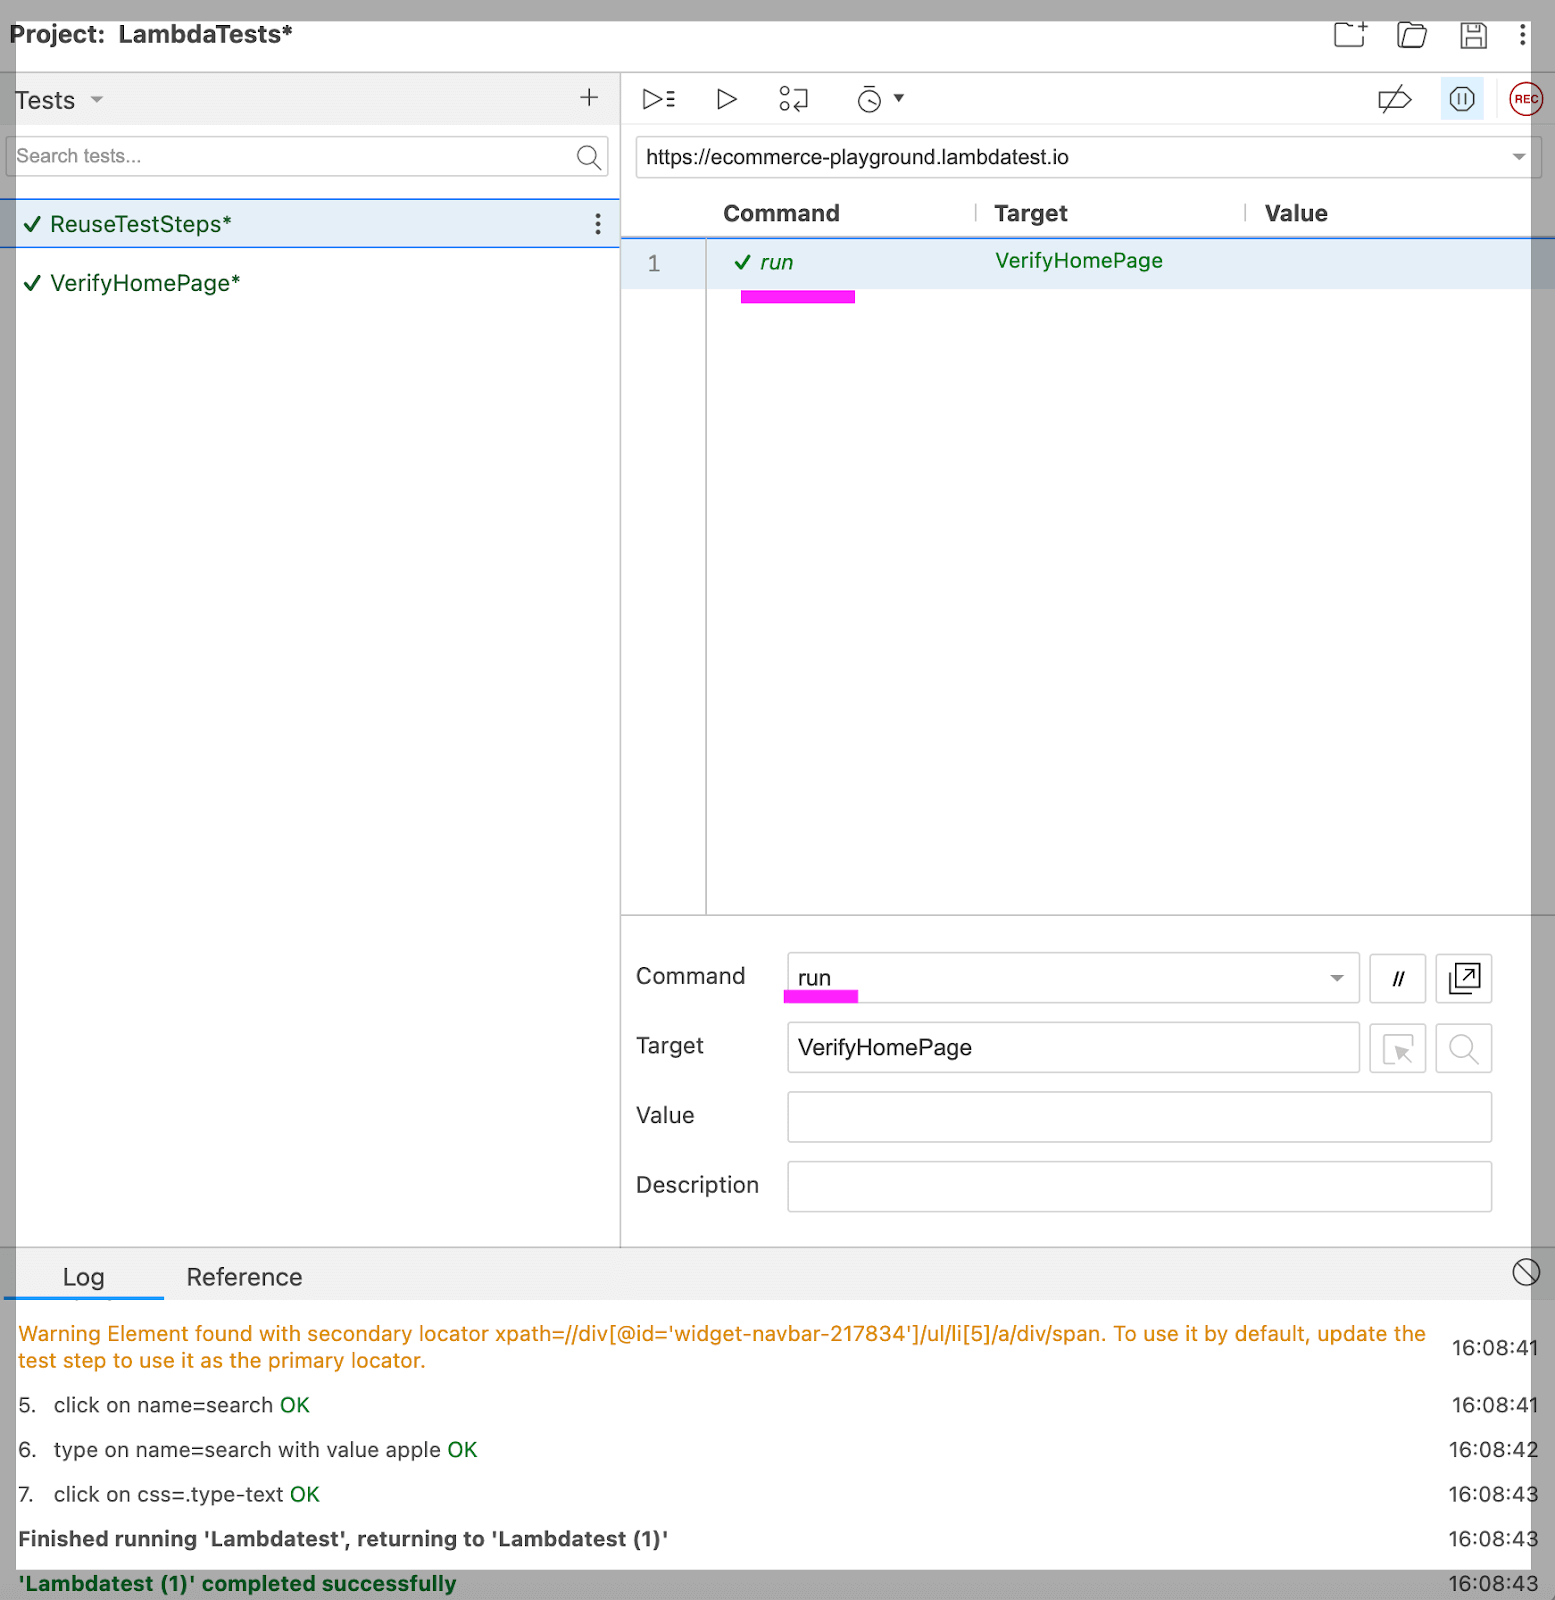
The run command reuses one test case inside another, so login logic can be shared across a suite.
In the screenshot below, VerifyHomePage test steps have been reused in a separate test case.
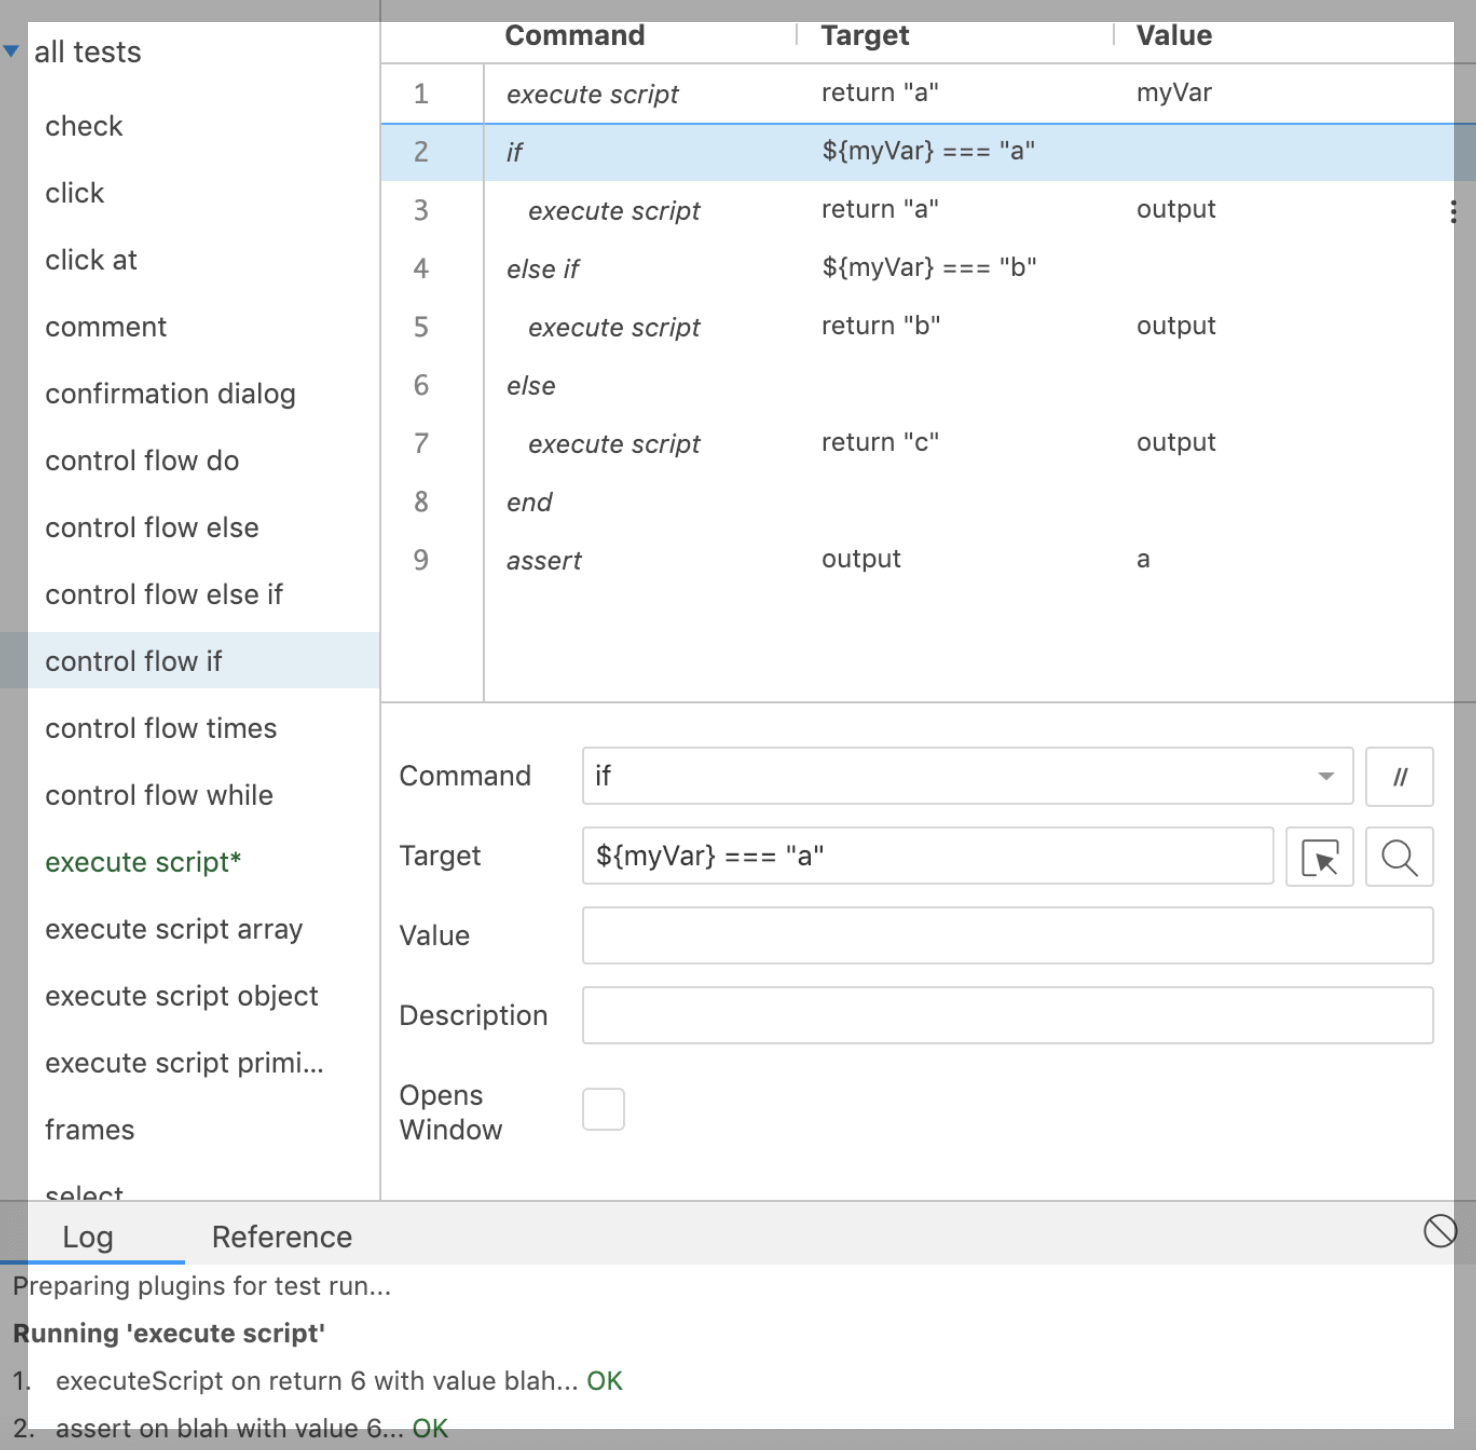
The Selenium IDE comes preloaded with a robust control flow structure that includes available commands like if, while, and times.
Cypress:
We can use Cypress Studio to capture the test case in Cypress. By capturing interactions with the application being tested, Cypress Studio offers a visual approach to developing tests within Cypress.
Cypress Studio builds tests visually by recording interactions against the application under test.
Interacting with the DOM inside Studio produces test code from the .type().click(),.check(),.uncheck(), and .select() Cypress commands.
To enable the Cypress Studio, we have to do the below setting (experimentalStudio: true) in cypress.config.js.
const { defineConfig } = require("cypress");
module.exports = defineConfig({
 e2e: {
   experimentalStudio: true,
 },
});
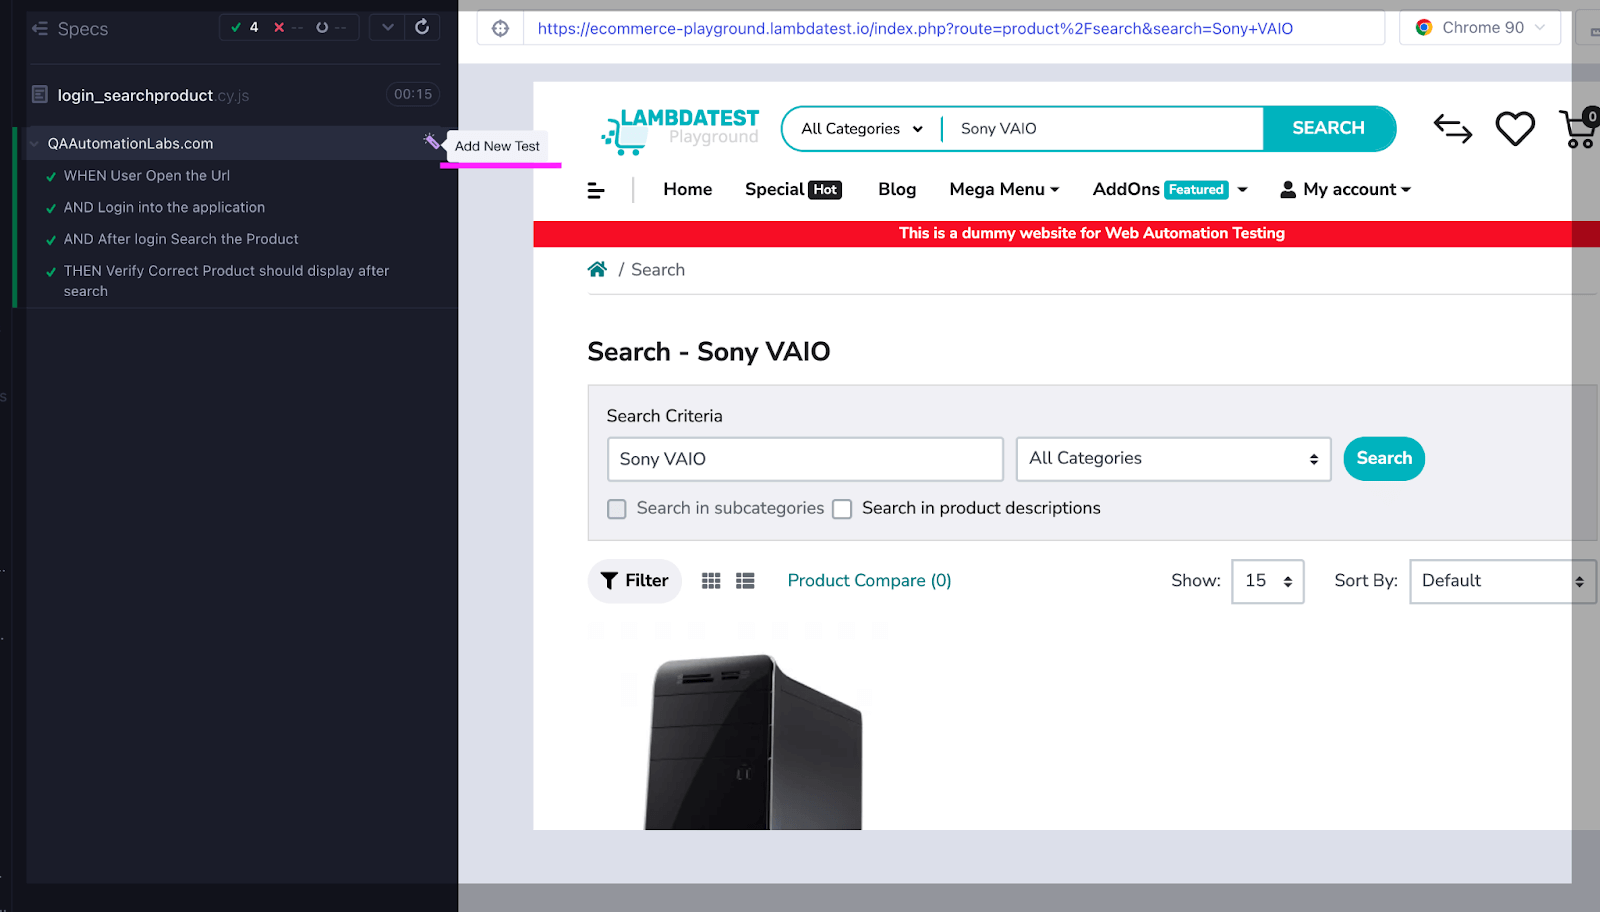
After doing the above setting when we run the test cases. We can see two options to record the test cases:
- Add New Tests.
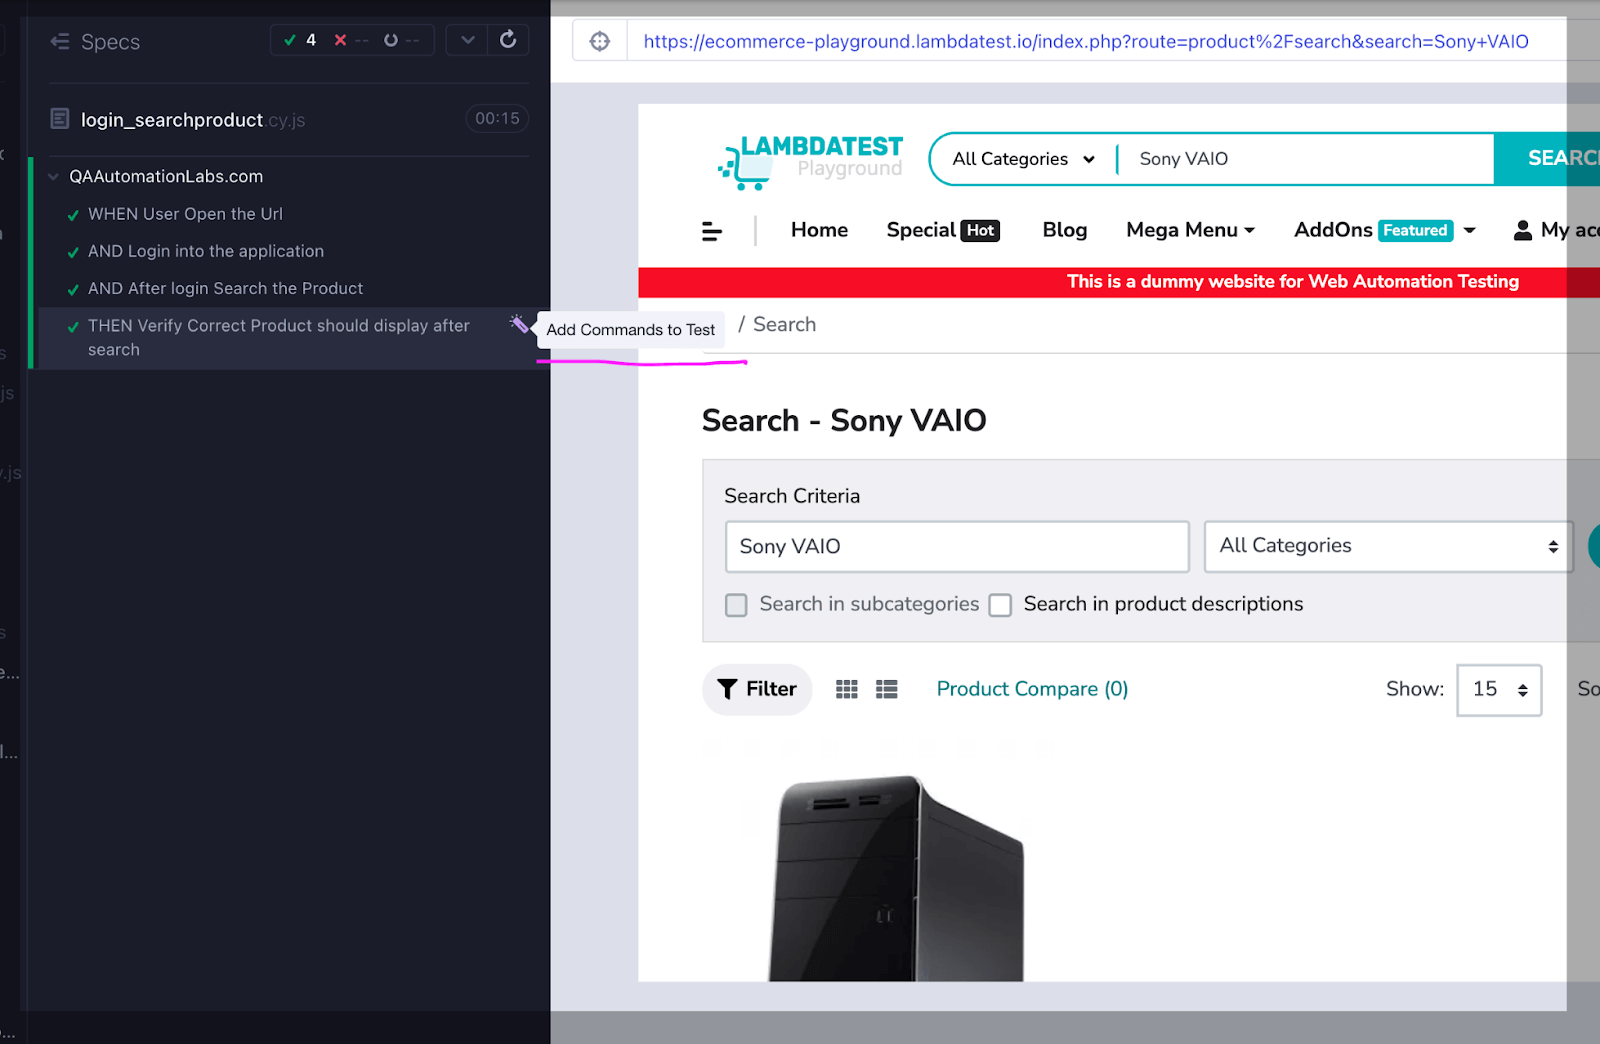
- Add commands to Test.
Add New Tests
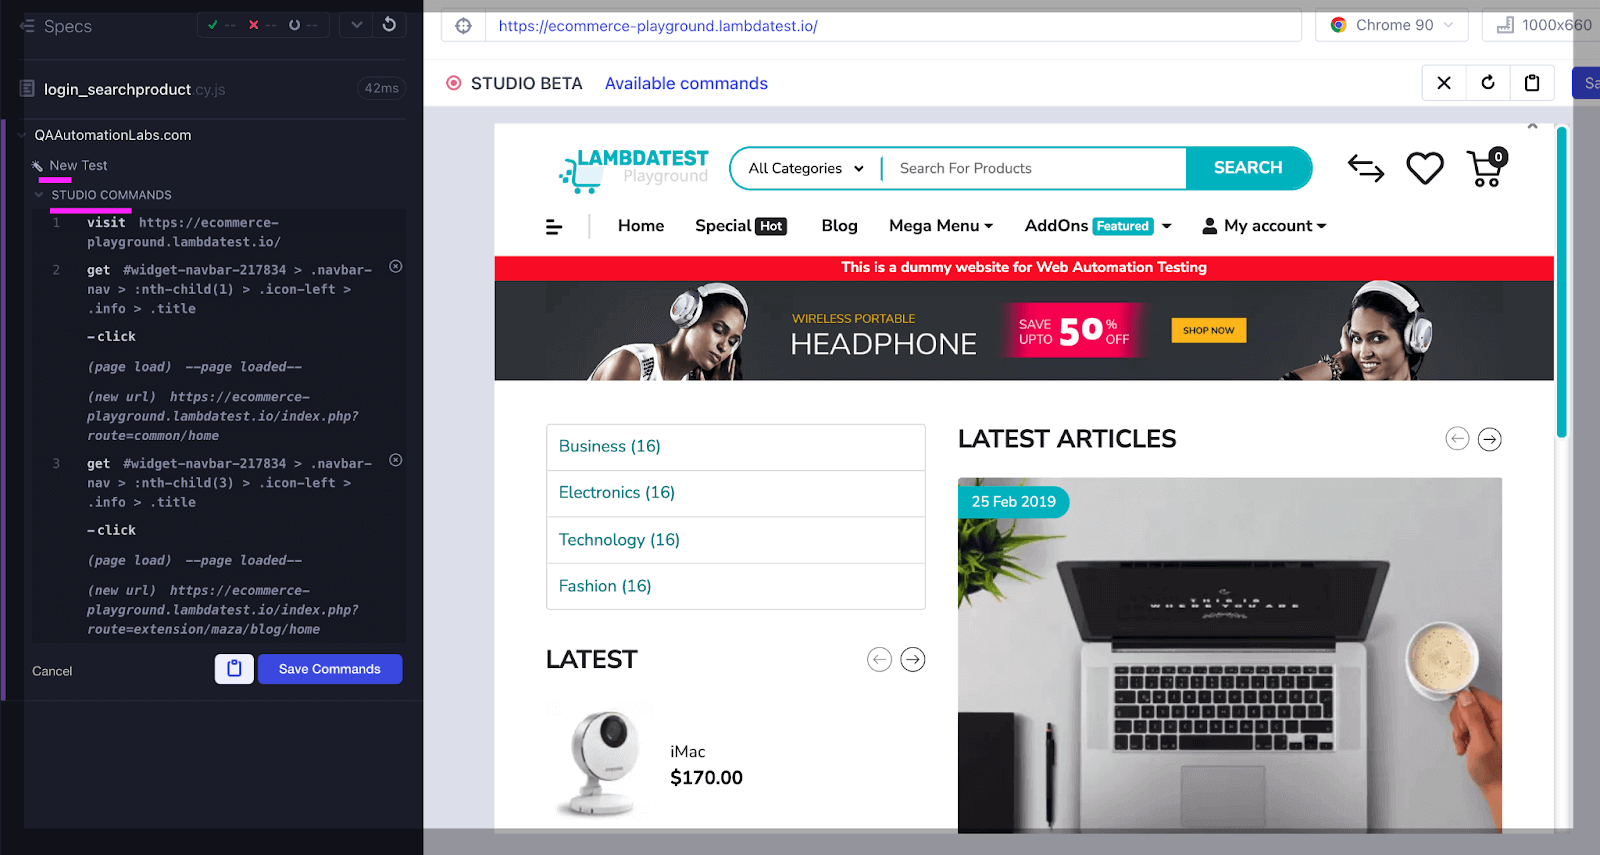
Add New Test creates a test, saves it, and re-runs it.
The screenshot below shows steps recorded by Cypress Studio. Saving the commands writes a new script.
Add commands to Test
Using Add commands to Test, we can add more steps in existing test cases.
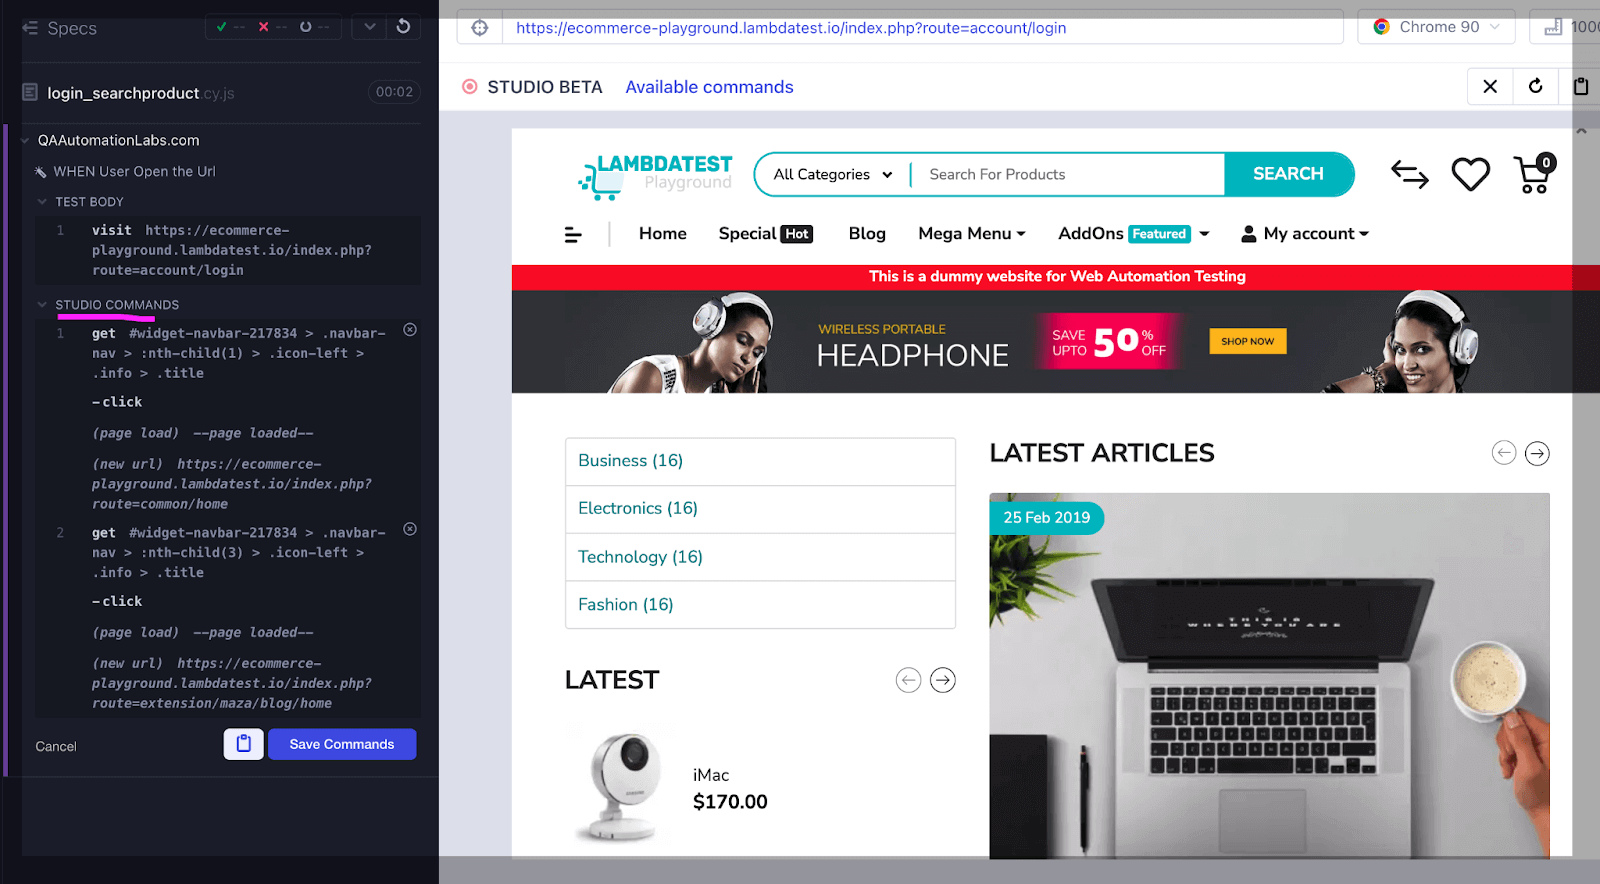
In the screenshot below, you can see whatever steps added in the first test case are recorded on an existing script. This way, we can update our existing script with new additional steps.
/// <reference types="cypress" />
describe("Cypress Studio -- >", { testIsolation: false }, () => {
 it("WHEN User Open the Url", () => {
   cy.visit(
     "https://ecommerce-playground.lambdatest.io/index.php?route=account/login"
   );
   /* ==== Generated with Cypress Studio ==== */
   cy.get('#widget-navbar-217834 > .navbar-nav > :nth-child(1) > .icon-left > .info > .title').click();
   cy.get('#widget-navbar-217834 > .navbar-nav > :nth-child(3) > .icon-left > .info > .title').click();
   /* ==== End Cypress Studio ==== */
 });
 it("AND Login into the application", () => {
   cy.get('[id="input-email"]').type("lambdatest@yopmail.com");
   cy.get('[id="input-password"]').type("lambdatest");
   cy.get('[type="submit"]').eq(0).click();
 });
 it("AND After login Search the Product", () => {
   cy.get('[name="search"]')
     .eq(0)
     .type("Sony VAIO")
     .should("have.value", "Sony VAIO");
   cy.get('[type="submit"]').eq(0).click();
 });
 it("THEN Verify Correct Product should display after search ", () => {
   cy.contains("Sony VAIO");
 });
});
Element Selection
Element selection filters all elements carrying a given tag, then confirms the element you assert on is still attached to the DOM.
Tag types include Id, CSS, Class, Attribute, Tag Name, Link Text, and Name Attribute.
Playwright:
Playwright auto-waits, which keeps both commands and test execution fast.
It runs every relevant actionability check first, and performs the requested action only once those checks pass.
Here is the list of actionability checks performed for each action on the elements.
Yes means Playwright runs that check before the action. A dash means the check does not apply to that action, so it is skipped.
| Action | Attached | Visible | Stable | Receives Events | Enabled | Editable |
|---|---|---|---|---|---|---|
| check | Yes | Yes | Yes | Yes | Yes | - |
| press | Yes | - | - | - | - | - |
| setInputFiles | Yes | - | - | - | - | - |
| selectOption | Yes | Yes | - | - | Yes | - |
| textContent | Yes | - | - | - | - | - |
| type | Yes | - | - | - | - | - |
| click | Yes | Yes | Yes | Yes | Yes | - |
| dblclick | Yes | Yes | Yes | Yes | Yes | - |
| setChecked | Yes | Yes | Yes | Yes | Yes | - |
| tap | Yes | Yes | Yes | Yes | Yes | - |
| uncheck | Yes | Yes | Yes | Yes | Yes | - |
| hover | Yes | Yes | Yes | Yes | - | - |
| scrollIntoViewIfNeeded | Yes | - | Yes | - | - | - |
| screenshot | Yes | Yes | Yes | - | - | - |
| fill | Yes | Yes | - | - | Yes | Yes |
| selectText | Yes | Yes | - | - | - | - |
| dispatchEvent | Yes | - | - | - | - | - |
| focus | Yes | - | - | - | - | - |
| getAttribute | Yes | - | - | - | - | - |
| innerText | Yes | - | - | - | - | - |
| innerHTML | Yes | - | - | - | - | - |
Below are the points that the Playwright will ensure before taking action on any of the elements on the page.
- element is bound to the DOM
- element is visible
- element is enabled
- element receives events, as in not obscured by other elements
Below are a few examples of Playwright. In the case of the Playwright, "waits" is included by default against each action on the element.
await page.goto('https://www.testmuai.com/selenium-playground/')
const element = await page.$('[name="search"]')
await element.click()
await element.type('TestMu AI')
await element.press('Enter')
await page.locator('text=Log in').click();
await page.locator('article:has-text("Playwright")').click();
await page.locator('#nav-bar >> text=Contact Us').click();
Selenium:
WebElements in Selenium interact with DOM elements, and the locator types above connect your code to elements on the page.
The trap is assuming an element has already loaded when you search for it.
In my experience this is one of Selenium's biggest limitations, since the test fails after repeated attempts to find the element.
Loading elements with implicit or explicit waits is what avoids that flakiness.
To avoid failure of the test case, here we check whether the element is available in DOM.
WebElement button = new WebDriverWait(driver, Duration.ofSeconds(30))
    .until(ExpectedConditions.presenceOfElementLocated(By.id("buttonId")));
button.click();
Cypress:
Cypress inverts this, handling element interaction through locators with an in-built wait mechanism.
That mechanism makes execution considerably more stable and cuts flakiness during test runs.
The defaultCommandTimeout option controls this duration, defaulting to 4000 ms.
Cypress therefore waits up to 4 seconds when acting on an element before moving to the next command.
An element that fails to load inside that window returns an error. Raise defaultCommandTimeout in cypress.config.js file when you need longer.
 const { defineConfig } = require('cypress')

module.exports = defineConfig({
 defaultCommandTimeout: 10000
})
Cypress automatically pauses for the network call to complete before moving to the next command. In the below commands of Cypress, for every command, Cypress will wait for 4 seconds.
cy.get('.btn').click() // Click on to the button
cy.focused().click() // Click on element with focus
cy.contains('Welcome').click() // Click on first el containing 'Welcome'
Language/Browser Support
Language/browser support is one of the key differentiators among Playwright vs Selenium vs Cypress.
Playwright:
It supports most languages, including Python, Java, Java Script, and .Net. Playwright has the full support of all modern browsers that include Google Chrome and Microsoft Edge (with Chromium), Safari (with WebKit), and Firefox.
Selenium:
Selenium is a suite of tools for automated testing of web applications, supporting Java, Python, C#, Ruby, and JavaScript.
Any of those languages can write your Selenium test scripts and run them on Chrome, Firefox, Internet Explorer, Edge, and Safari.
Headless browsers are supported too, so tests run without launching a visible browser window.
Using Selenium with a given language and browser means installing the matching language bindings and WebDriver.
Those let you drive the browser: navigating pages, clicking elements, and entering text.
For example, Selenium with Python and Chrome needs the Python bindings plus ChromeDriver.
The bindings then control Chrome and run your tests.
Cypress:
Cypress is a JavaScript-based end-to-end testing tool aimed at applications written in HTML, CSS, and JavaScript.
It supports all modern browsers, including Chrome, Firefox, Edge, and Safari.
Parallel Execution
Parallel execution runs multiple test cases at once, which cuts total execution time.
Playwright, Selenium, and Cypress all support it, though the mechanism differs in each.
The sections below cover how each framework handles parallel execution, which options it exposes, and how much setup it takes.
Playwright:
When it comes to comparing Playwright vs Selenium vs Cypress, Playwright supports parallel execution across multiple machines. Let's take an example to run the test cases in parallel.
Below is the code snippet where we are opening one eCommerce website, then clicking on the Home, Blog link, and verifying the user is redirected to the correct URL.
// @ts-check
const { test, expect } = require("@playwright/test");

test.describe("Test suite", () => {
 test.beforeEach(async ({ page }) => {
   await page.goto("https://ecommerce-playground.lambdatest.io/");
 });
 test("Open the Lambdatest Site Click on Home Link and verify user re-direct to correct url", async ({ page }) => {
   await page.locator('span:has-text("Home")').click();
   await expect(page).toHaveURL(
     "https://ecommerce-playground.lambdatest.io/index.php?route=common/home"
   );
 });
 test("Open the Lambdatest Site Click on Blog Link and verify user re-direct to correct url", async ({ page }) => {
   await page.locator("#widget-navbar-217834 >> text=Blog").click();
   await expect(page).toHaveURL(
     "https://ecommerce-playground.lambdatest.io/index.php?route=extension/maza/blog/home"
   );
 });
});
Running the script with 1 Worker in Playwright:
In below screenshot, we can see we have 2 test cases that are running one by one [1/2].

Here we can see that when we were running test cases in a Single worker, it took 16s.
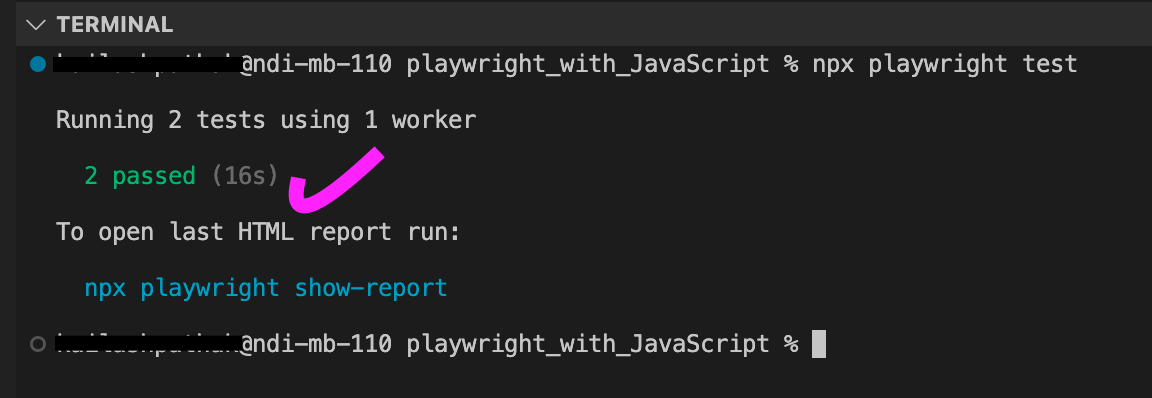
Test cases run in a single worker by default. Running them in parallel across machines means passing a worker count.
Do that on the command line with npx playwright test --workers 4, where "4" is the number of workers to execute on.
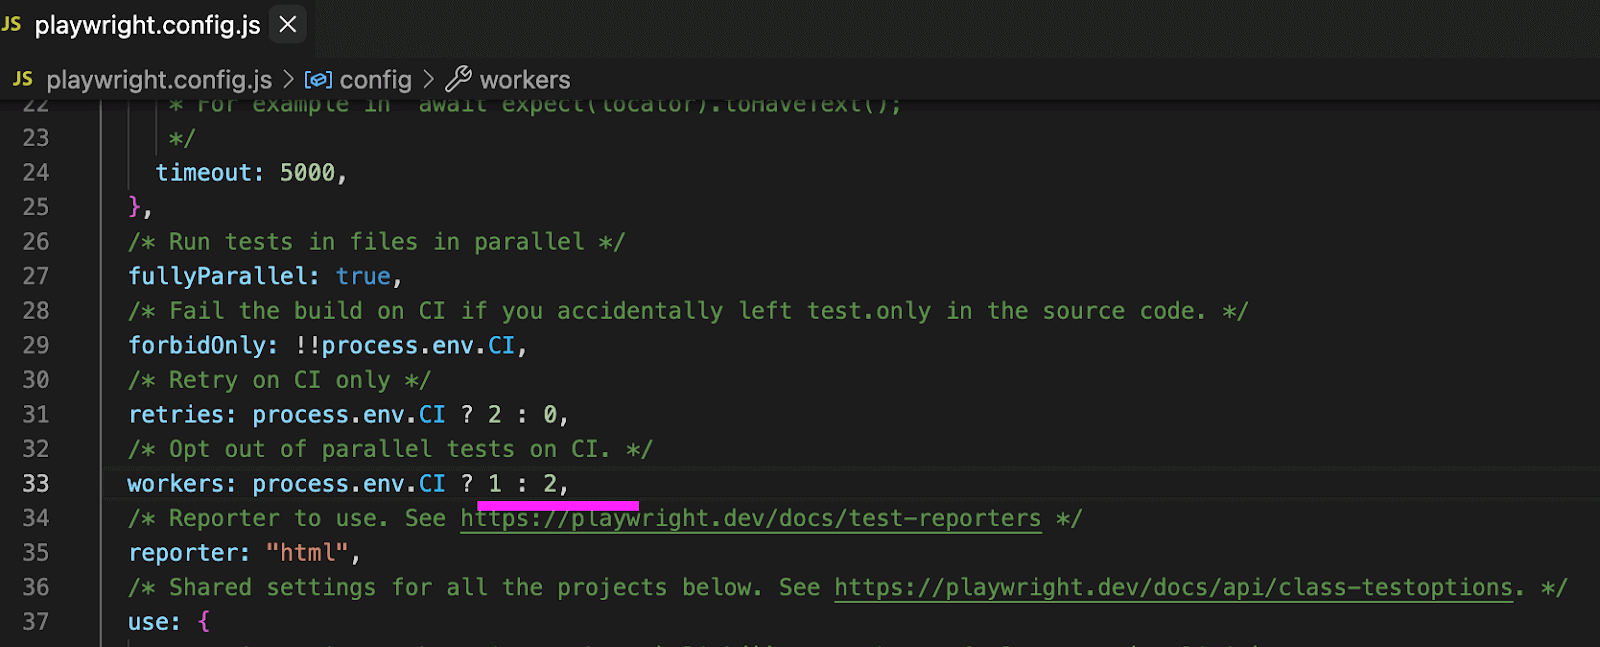
Another way to run the test cases in parallel is by bypassing the worker in playwright.config.js.
Setting to update the Worker
To update the number of workers, we have to update playwright.config.js. In the below screenshot, you can see I have updated the worker to "2" in line number #33.
Running the script with 2 Workers in Playwright:
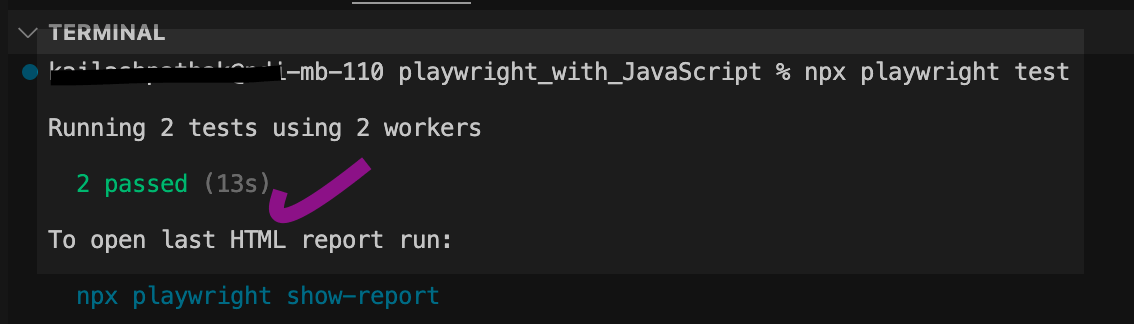
In the below screenshot, we can see both the test cases are executed parallelly [2/2].

When we run the same script with 2 workers taking 13s.
TestMu AI runs parallel testing with Playwright across 3,000+ browser and OS combinations.
You can run one test case across many browsers, or many scenarios in the same browser at different versions.
Subscribe to TestMu AI YouTube Channel and stay updated with detailed tutorials around Playwright testing, Selenium automation on TestMu AI, Cypress testing, and more.
Selenium:
Parallel execution runs test cases from different modules at the same time instead of in series.
Selenium does this through TestNG. The structure below defines the attribute in the TestNG XML file.
<suite name="ParallelTesting" parallel="methods" thread-count="3">
In the above example, in place of "method," we can pass the below values.
Below pointer mentioned here is specific to Java. It might vary for other Selenium-supported languages.
- Methods - All the methods with @Test annotation will run in parallel.
- Instances - Helps execute all methods in the same instance in the same thread.
- Tests - All the test cases inside the
tag of the Testing XML file will run parallel. - Classes - All the test cases inside a Java class will run in parallel.
- Thread Count - No of threads you want to run in parallel.
In the above code snippet, attribute thread count helps in defining the number of threads that we want while executing the test cases in parallel.
Consider how a thread works with three methods and two threads available.
Two methods start on the two threads. When either thread frees up, the third method in the queue begins executing.
Let's Take an example to run the test cases in parallel. Open the Site https://ecommerce-playground.lambdatest.io/, Verify the title, Click on the Home Page, and Verify the user is redirected to the correct URL.
Create three Classes, "ChromeParallelTest," "ForefoxParallelTest," and "SafariParallelTest" to run the test cases in three browsers.
Below is the code snippet for Class "ChromeParallelTest":
package ParallelTestCase;

import org.openqa.selenium.By;
import org.openqa.selenium.WebDriver;
import org.openqa.selenium.WebElement;
import org.openqa.selenium.chrome.ChromeDriver;
import org.testng.Assert;
import org.testng.annotations.AfterClass;
import org.testng.annotations.BeforeTest;
import org.testng.annotations.Test;

public class ChromeParallelTest {

 WebDriver driver;

 @BeforeTest
 public void setUp() {
   // Selenium Manager resolves the driver binary automatically
   driver = new ChromeDriver();
   driver.navigate().to("https://ecommerce-playground.lambdatest.io/");
   driver.manage().window().maximize();
 }

 @Test
 public void VerifyTitle() {
   System.out.println("The thread ID for Running First Test In Chrome Browser is  " + Thread.currentThread().getId());
   Assert.assertEquals(driver.getTitle(), "Your Store");
 }

 @Test
 public void ClickOnHomeLink() {
   System.out.println("The thread ID for Running Second Test In Chrome Browser is  " + Thread.currentThread().getId());
   WebElement homeLink = driver.findElement(By.xpath("//span[contains(text(),'Home')]"));
   homeLink.click();
   String redirectURL = driver.getCurrentUrl();
   Assert.assertEquals(redirectURL, "https://ecommerce-playground.lambdatest.io/index.php?route=common/home");
 }

 @AfterTest
 public void close() {
   driver.quit();
 }
}
Below is the code snippet for the Class "FirefoxParallelTest".
package ParallelTestCase;

import org.openqa.selenium.By;
import org.openqa.selenium.WebDriver;
import org.openqa.selenium.WebElement;
import org.openqa.selenium.firefox.FirefoxDriver;
import org.testng.Assert;
import org.testng.annotations.AfterClass;
import org.testng.annotations.BeforeTest;
import org.testng.annotations.Test;

public class FirefoxParallelTest {

 WebDriver driver;

 @BeforeTest
 public void setUp() {
   // Selenium Manager resolves the driver binary automatically
   driver = new FirefoxDriver();
   driver.navigate().to("https://ecommerce-playground.lambdatest.io/");
   driver.manage().window().maximize();
 }

 @Test
 public void VerifyTitle() {
   System.out.println("The thread ID for Running First Test In Firefox Browser is " + Thread.currentThread().getId());
   Assert.assertEquals(driver.getTitle(), "Your Store");
 }

 @Test
 public void ClickOnHomeLink() {
   System.out.println("The thread ID for Running Second Test In Firefox Browser iss " + Thread.currentThread().getId());
   WebElement homeLink = driver.findElement(By.xpath("//span[contains(text(),'Home')]"));
   homeLink.click();
   String redirectURL = driver.getCurrentUrl();
   Assert.assertEquals(redirectURL, "https://ecommerce-playground.lambdatest.io/index.php?route=common/home");
 }

 @AfterTest
 public void close() {
   driver.quit();
 }
}
Below is the code snippet for Class "SafariParallelTest".
package ParallelTestCase;

import org.openqa.selenium.By;
import org.openqa.selenium.WebDriver;
import org.openqa.selenium.WebElement;
import org.openqa.selenium.firefox.FirefoxDriver;
import org.testng.Assert;
import org.testng.annotations.AfterClass;
import org.testng.annotations.BeforeTest;
import org.testng.annotations.Test;

public class SafariParallelTest {

 WebDriver driver;

 @BeforeTest
 public void setUp() {
   // SafariDriver ships with macOS, enable it via safaridriver --enable
   driver = new SafariDriver();
   driver.navigate().to("https://ecommerce-playground.lambdatest.io/");
   driver.manage().window().maximize();
 }

 @Test
 public void VerifyTitle() {
   System.out.println("The thread ID for Running First Test In Firefox Browser is " + Thread.currentThread().getId());
   Assert.assertEquals(driver.getTitle(), "Your Store");
 }

 @Test
 public void ClickOnHomeLink() {
   System.out.println("The thread ID for Running Second Test In Firefox Browser iss " + Thread.currentThread().getId());
   WebElement homeLink = driver.findElement(By.xpath("//span[contains(text(),'Home')]"));
   homeLink.click();
   String redirectURL = driver.getCurrentUrl();
   Assert.assertEquals(redirectURL, "https://ecommerce-playground.lambdatest.io/index.php?route=common/home");
 }

 @AfterTest
 public void close() {
   driver.quit();
 }
}
To run the test cases in parallel, let's create a testng.xml file with the following config.
<?xml version="1.0" encoding="UTF-8"?>
<!DOCTYPE suite SYSTEM "https://testng.org/testng-1.0.dtd">
<suite name="Suite" parallel="tests" thread-count="2">
<test name="Parallel Test Case Execution In Chrome">
   <classes>
     <class name="ParallelTestCase.ChromeParallelTest"/>
   </classes>
 </test> <!-- Test Case END -->
  <test name="Parallel Test Case Execution In FireFox">
   <classes>
     <class name="ParallelTestCase.FirefoxParallelTest"/>
   </classes>
 </test> <!-- Test Case END -->

 <test name="Parallel Test Case Execution In Safari">
   <classes>
     <class name="ParallelTestCase.SafariParallelTest"/>
   </classes>
 </test> <!-- Test Case END -->
 </suite> <!-- Suite END -->
In the above screenshot, we can see we have given thread-count "2". So the first two test cases are run in two threads. Once the threads are free, the next test case starts executing.
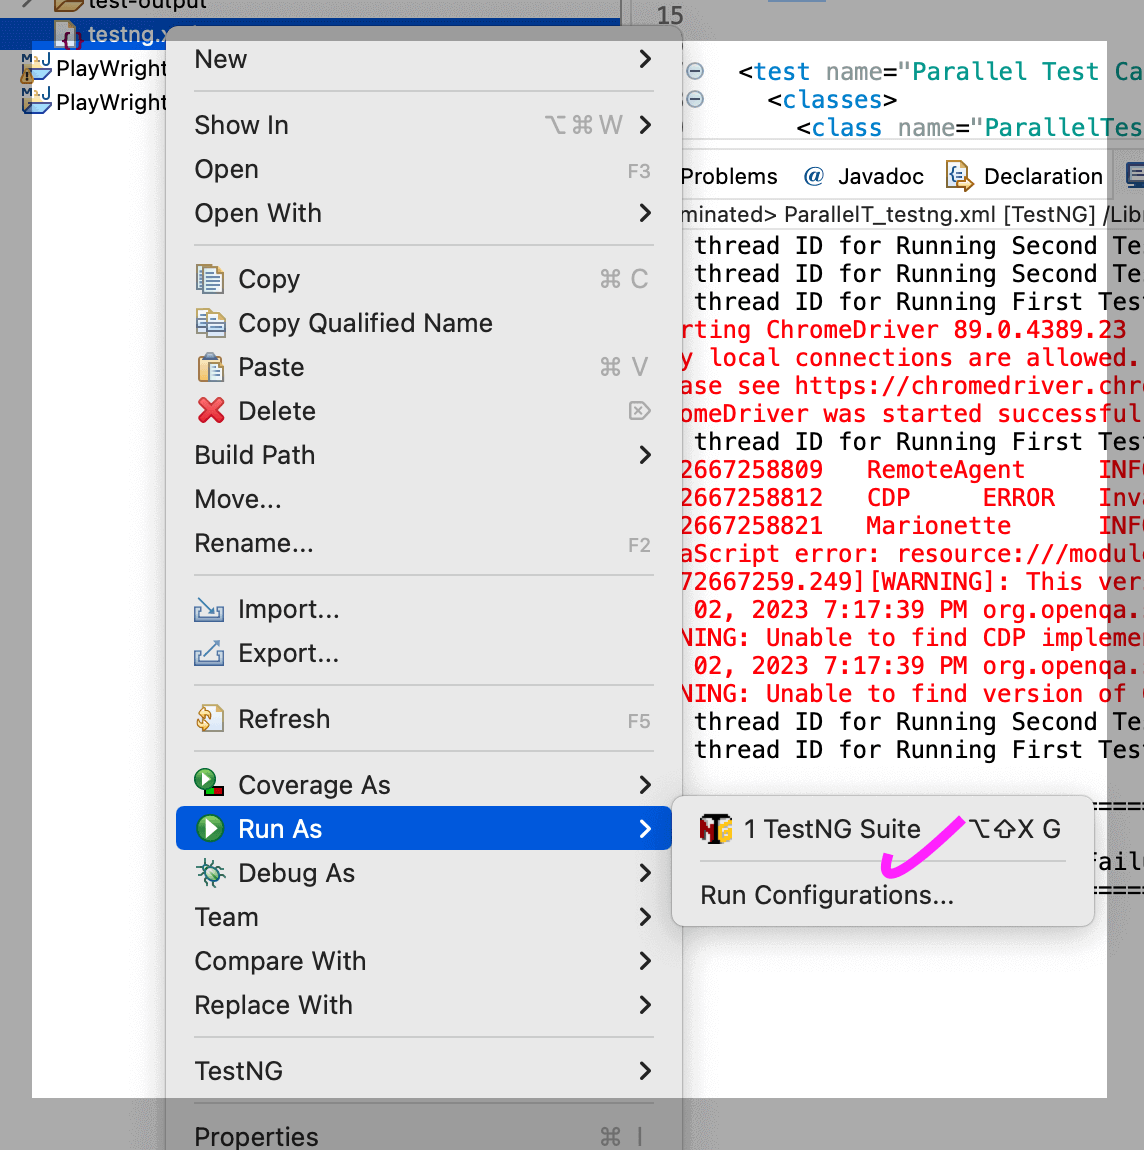
Let's execute the test cases. We have to right-click on testng.xml and then "Run As" -> TestNG Suite.
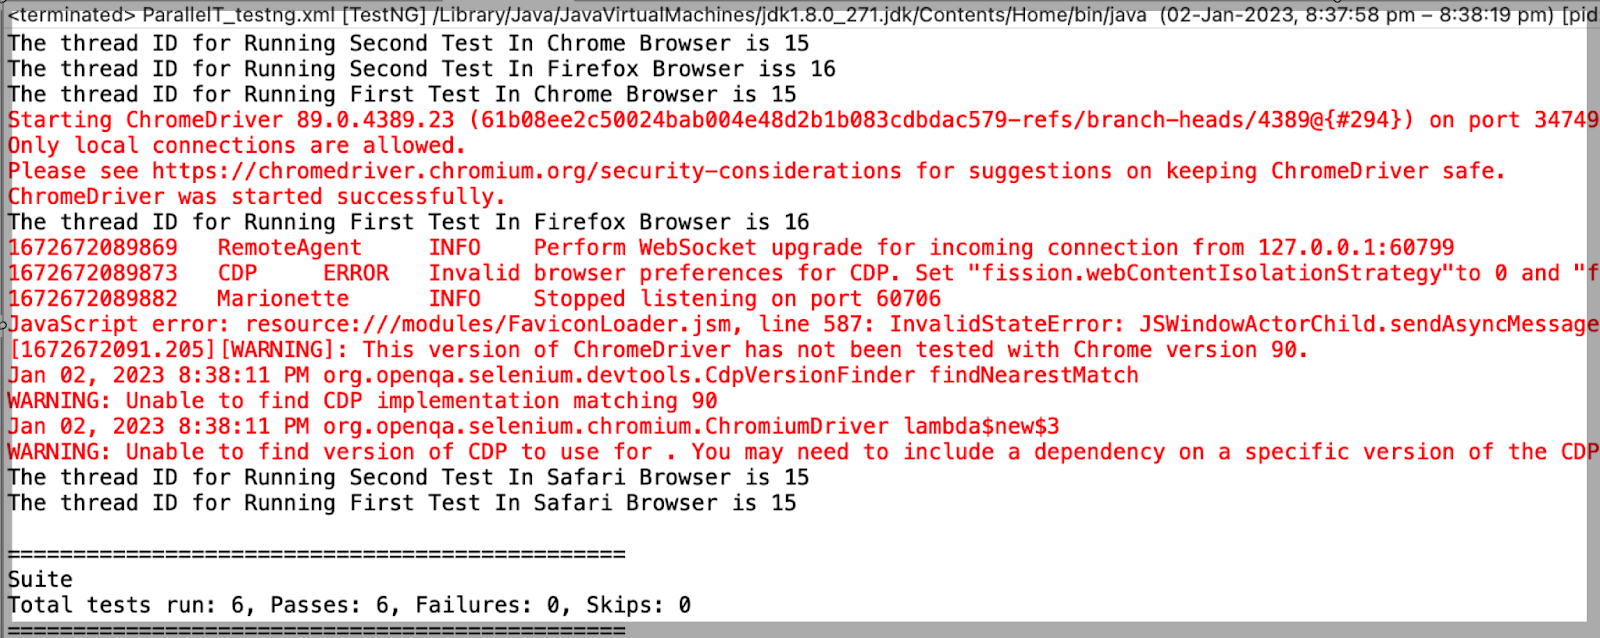
The console logs in the screenshot below show "FirefoxTest" and "ChromeTest" running concurrently on Threads 15 and 16.
"SafariTest" then executed on Thread 15, because that thread was released before 16.
Cypress:
Cypress has supported parallel execution across multiple machines since version 3.1.0.
The cypress run command executes serially by default. Running in parallel saves time and pays off most in Continuous Integration.
To run Cypress test cases locally, we can use the command npx cypress run --record --key xxxxxx-xxx-xxxx0-xx-xxxxx. Record Keys allow you to record test results, screenshots, and videos in Cypress.
Let's run the below Cypress test case in Cypress Cloud for the site https://ecommerce-playground.lambdatest.io/.
describe("Verify title of ecommerce-playground.lambdatest.io", function () {
 it("Should display the correct title", function () {
   cy.visit("https://ecommerce-playground.lambdatest.io/");

   cy.title().should("include", "Your Store");
 });
 it("Should navigate to the Blog page", function () {
   cy.visit("https://ecommerce-playground.lambdatest.io/");

   cy.contains("Blog").click({ force: true });

   cy.url().should("include", "/blog/");
 });
});
When we run the above test case using the command npx cypress run --record --key xxxxxx-xxx-xxxx0-xx-xxxxx. The test case starts running in Cypress cloud.
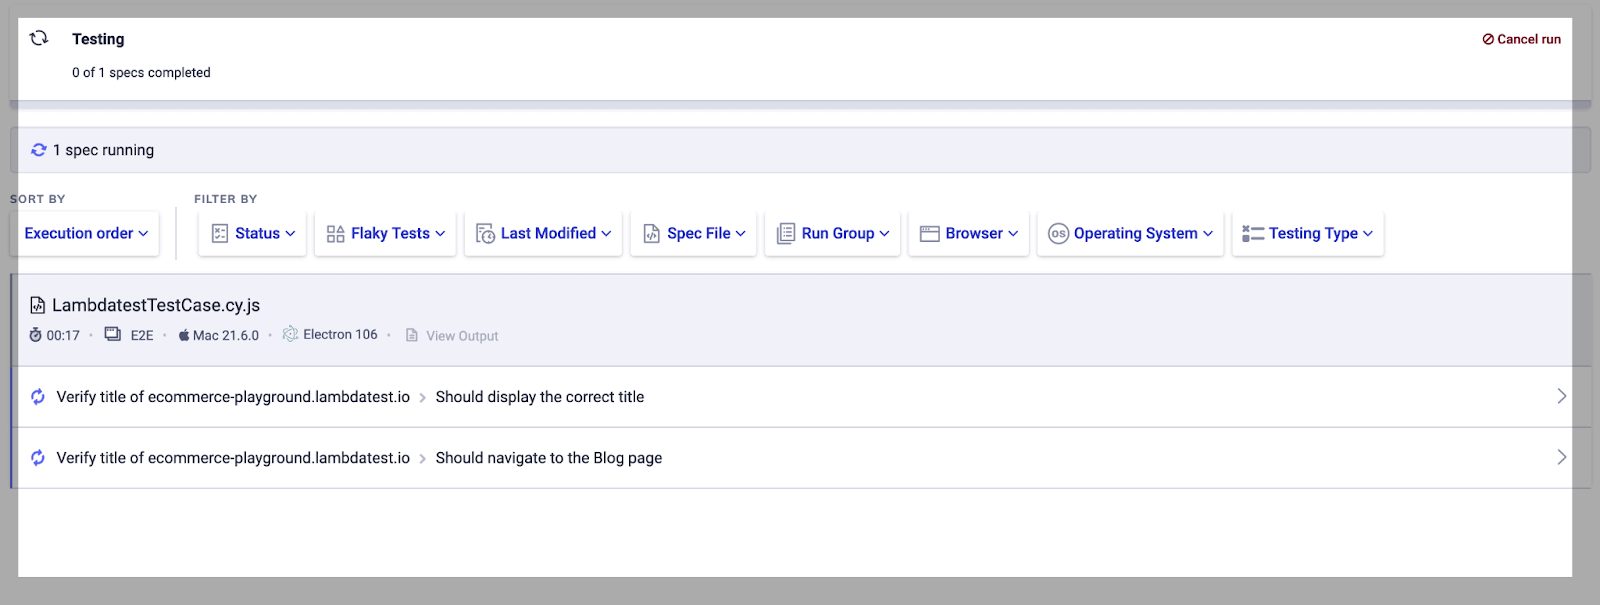
In the below screenshot, we can see the test case running in 1 machine.
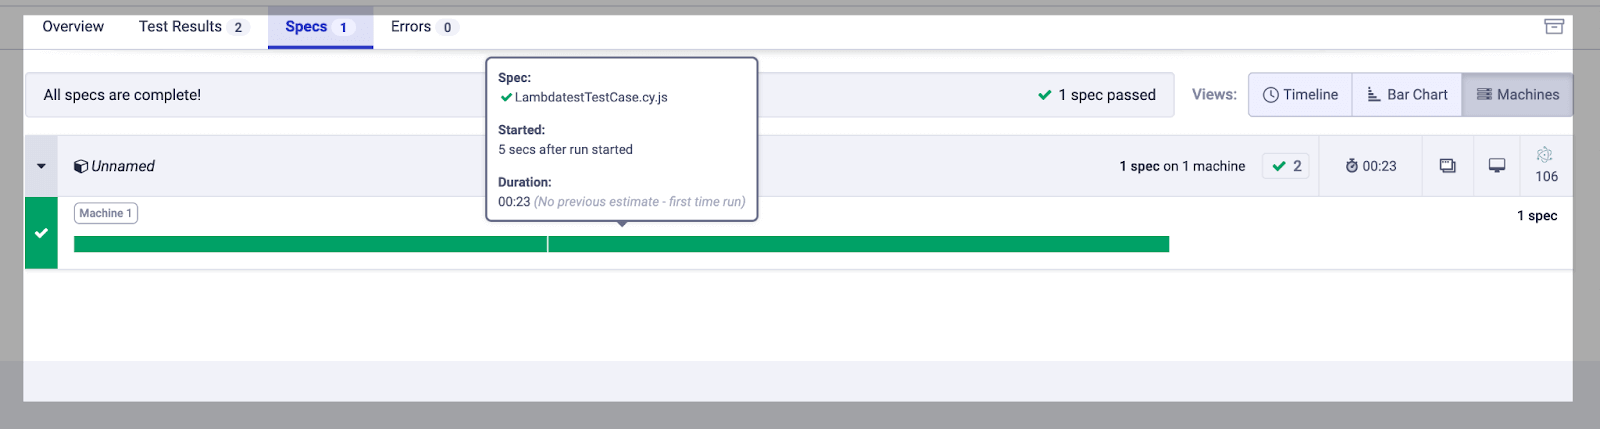
Running Cypress tests in parallel means connecting Cypress cloud to your CI/CD provider.
Cypress supports numerous CI/CD solutions and each connects simply. See how to run Cypress tests with GitHub Actions for a worked example.
Cypress parallelisation depends on a CI provider recording to a dashboard, so the machine count, not the framework, sets your wall-clock time.
Flakiness
A test is considered flaky when it can pass and fail across multiple retry attempts without any code changes.
The Google Testing Blog reports: "Almost 16% of our tests have some level of flakiness associated with them!"
"This is a staggering number; it means that more than 1 in 7 of the tests written by our world-class engineers occasionally fail in a way not caused by changes to the code or tests."
The same post attributes about 84% of observed pass-to-fail transitions to a flaky test rather than a real regression.
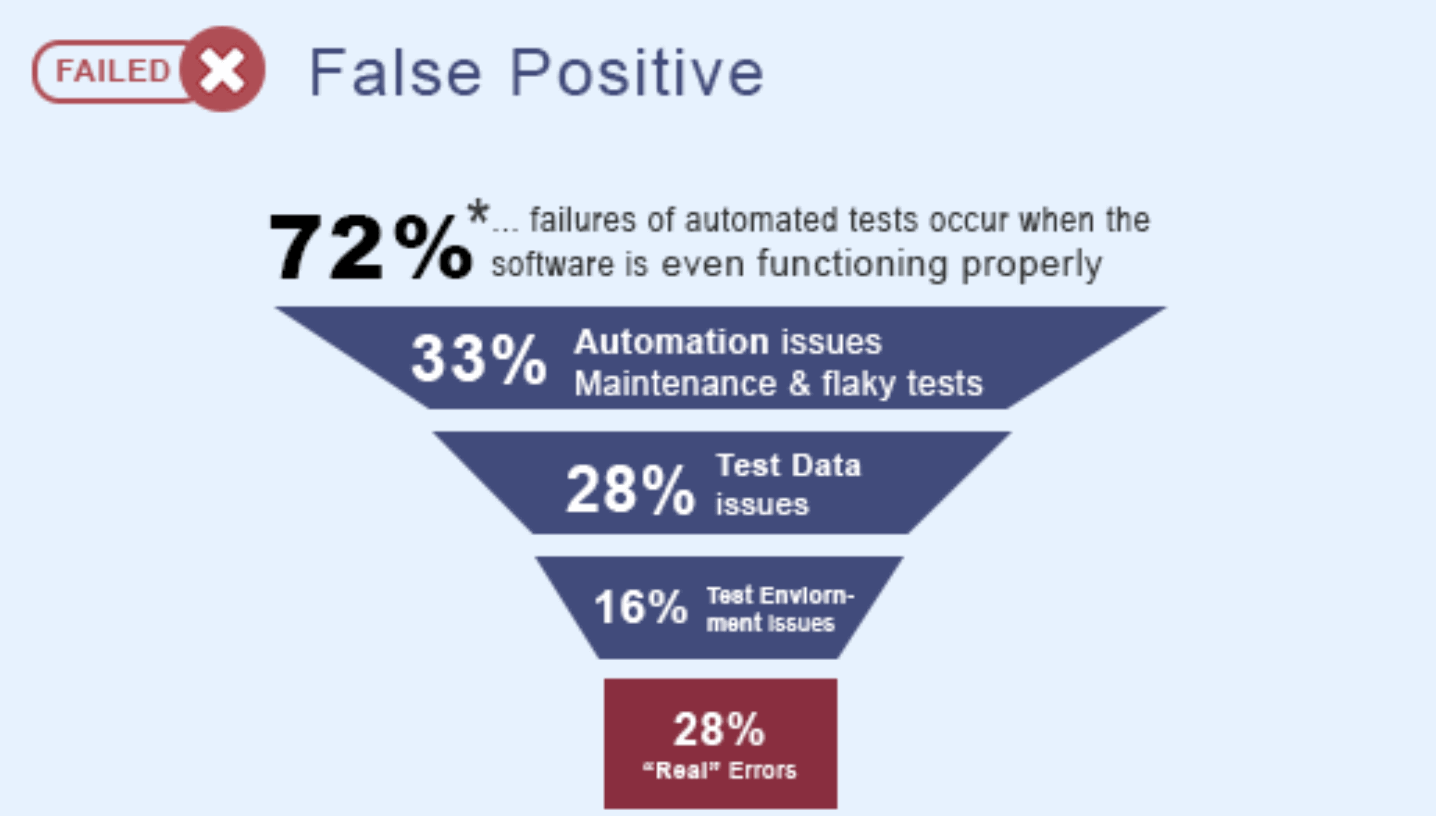
Writing on StickyMinds, Tricentis reports that 72 percent of test failures are actually false positives.
The test failed while the application behaved correctly. On your own suite, that is most post-build triage spent on tests rather than on the product.
Playwright:
There are many ways to handle the flakiness in Playwright. Following are some best ways of handling the flakiness in Playwright.
- Auto-wait feature - In Auto-wait, we make sure when you perform an action, like clicking on the element, selecting a value, and entering the data on the text field, the element should be loaded before the action is performed. Below is a code snippet with the assertion:
test("Verify button enable or not", async ({ page }) => {
  const submit = page.locator("button", { hasText: "Previous" });
  // Explicit check that the button is enabled
  expect(await submit.isEnabled()).toBeTruthy();
  await submit.click();
});
test("Verify button enable or not", async ({ page }) => {
  const submit = page.locator("button", { hasText: "Previous" });
  // Playwright auto-waits for the button to be actionable
  await submit.click();
});
- Method waitForLoadState is used to wait till a specific state of the page has been reached.
- Method waitForNavigation is suggested when Before beginning navigation, clicking an element may cause asynchronous processing to take place.
- Method waitForSelector used to hold off till the selector satisfies the state option (e.g either appear/disappear from the DOM, or become visible/hidden).
await page.waitForLoadState('domcontentloaded', { timeout: 1000 });
await page.waitForLoadState('networkidle', { timeout: 5000 });
await page.waitForLoadState('load', { timeout: 2000 });
await Promise.all([
 page.waitForNavigation({ url: '**/login' }),
 page.click('button'),
]);
await page.waitForSelector('.myDiv')
const config = {
   // Give failing tests 2 retry attempts
   retries: 2,
 }
Selenium:
Selenium tests turn flaky through either the test code or the test infrastructure underneath them.
Infrastructure flakiness is the tractable half, and moving execution to a managed cloud platform removes most of it.
A flaky test passes or fails at random against identical code.
It passes once, fails the next run, then passes again, with no change to the build in between.
There are several ways to avoid flakiness in Selenium tests:
- Use stable selectors - prefer class name or Id over dynamic XPath, which breaks when the HTML structure changes.
- Use explicit waits - they let the page settle before you interact, rather than the blanket delay of an implicit wait.
- Add retry logic - Implement retry logic so failed assertions retry a set number of times, absorbing transient network issues.
- Use a stable testing environment - Make sure your tests run in a stable environment with consistent network and server conditions.
- Debug failing tests - trace each failure to its root cause instead of re-running, which is what surfaces the underlying flakiness.
- Use a test framework - JUnit or TestNG structures tests and handles failures, making broken tests easier to identify.
- Pick a framework that manages execution order and reports failures cleanly, so a broken run is diagnosable.
- Use a reliable CI server - Jenkins or Azure DevOps runs tests automatically and tracks results across runs.
Cypress:
Cypress handles flakiness very well. In Cypress, there are different ways of handling flakiness.
Following are some best ways of handling the flakiness in Cypress.
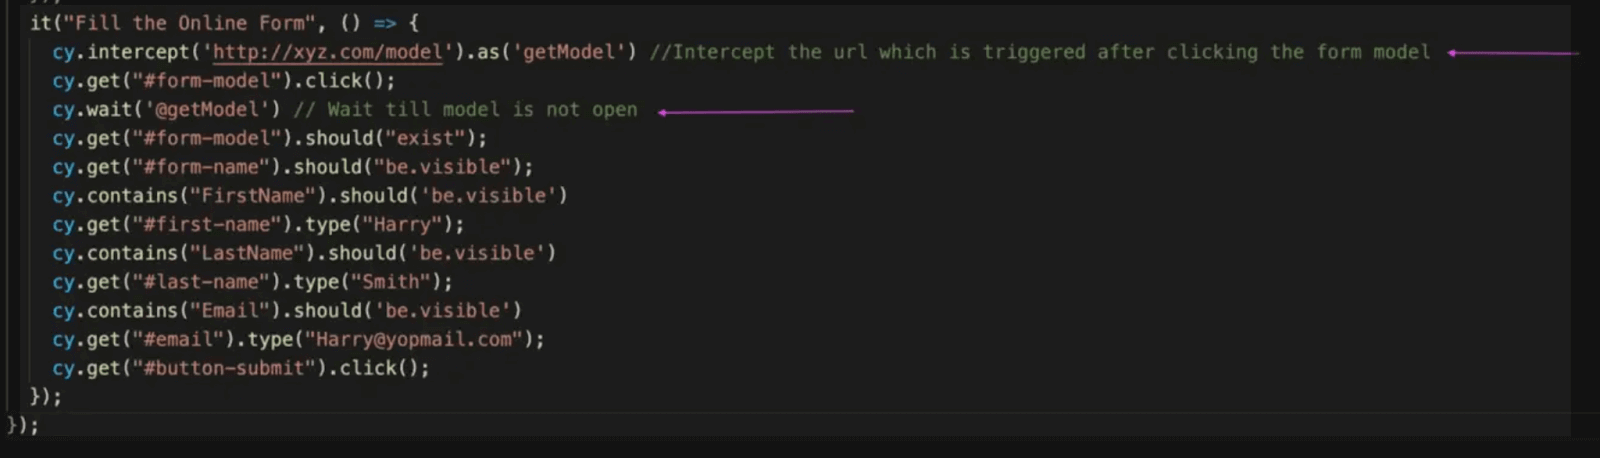
- Adding .contains('element') .should('be.visible'),.should('exist') before clicking on element.
- Test Retires
- Use timeouts instead of waits.
- Use cy.intercept() to wait for the XHR request to finish execution.
- Adding .should('exist'), .should('be.visible'), and .contains('element') before a click reduces the chance of failure.
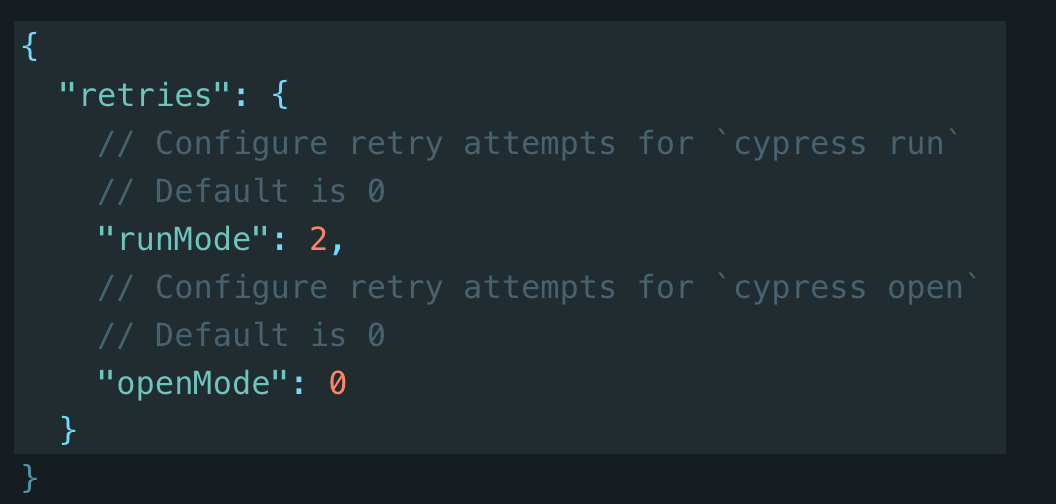
- Test Retries are the second method, configurable at Global Configuration, Individual Test, or Test Suite level.
- Timeouts beat waits when one element needs longer to load. Set a timeout on that element instead of calling cy.wait().
- cy.wait() always burns the full duration you gave it. A timeout releases as soon as the element loads, so it saves time.
cy.get("#first-name", {timeout: 10000}).type("Mike")
Screenshots
Screenshots play a very important role when test cases fail regularly. The screenshot gives an idea about the steps where test cases fail and help you make the test case less flaky.
Playwright:
While comparing Playwright vs Selenium vs Cypress, it is very easy to take screenshots in Playwright. There are three ways to take a screenshot.
- automated screenshot testing
- Capture into buffer
- Element screenshot
Full page screenshots
To take Full page screenshots, we have to write the below code:
await page.screenshot({ path: 'screenshot.png', fullPage: true });
Capture into buffer
Instead of writing into a file, you can get a buffer with the image and post-process it or pass it to a third-party pixel diff facility.
const buffer = await page.screenshot();
console.log(buffer.toString('base64'));
Element screenshot
We can take the screenshot at the element level too, using the below code.
await page.locator('.header').screenshot({ path: 'screenshot.png' });
Selenium:
A screenshot in Selenium WebDriver is helpful for bug investigation. In Selenium, if you want to take the screenshot during execution, you can use the TakesScreenshot method, which informs the WebDriver to grab the screenshot.
Code snippet to take the screenshot of the Page attached below.
import org.apache.commons.io.FileUtils;
import org.openqa.selenium.OutputType;
import org.openqa.selenium.TakesScreenshot;
import org.openqa.selenium.WebDriver;
import org.openqa.selenium.chrome.ChromeDriver;
import java.io.File;
import java.io.IOException;

public class ScreenshotCapture {
   public static void main(String[] args) {
       //set the location of chrome browser
       // Selenium Manager resolves the driver binary automatically
       // Initialize the browser
       WebDriver driver = new ChromeDriver();
       //navigate to the url
       driver.get("https://www.testmuai.com/");
      //Take screenshot
       File screenshot = ((TakesScreenshot) driver).getScreenshotAs(OutputType.FILE);
       //Copy the file to a location
       try {
           FileUtils.copyFile(screenshot, new File("C:\xxx\xxx.png"));
       } catch (IOException e) {
           System.out.println(e.getMessage());
       }
       //closing the webdriver
       driver.close();
   }
}
We can take screenshots of elements in Selenium. Code Snippet to take the screenshot of the element attached below.
import org.apache.commons.io.FileUtils;
import org.openqa.selenium.*;
import org.openqa.selenium.chrome.ChromeDriver;
import java.io.File;
import java.io.IOException;

public class SeleniumelementTakeScreenshot {
 public static void main(String args[]) throws IOException {
   WebDriver driver = new ChromeDriver();
   driver.get("https://www.testmuai.com/");
   WebElement element = driver.findElement(By.cssSelector("h1"));
   File scrFile = element.getScreenshotAs(OutputType.FILE);
   FileUtils.copyFile(scrFile, new File("./image.png"));
   driver.quit();
 }
}
Cypress:
Cypress has an in-built ability to take screenshots. You can run test cases via "cypress open" OR "cypress run". You can use cy.screenshot() if you want to take screenshots manually.
Capturing screenshots when a test fails can be turned off completely by specifying screenshotOnRunFailure to false from within the Cypress configuration or by specifying screenshotOnRunFailure to false in the Cypress.Screenshot.defaults().
Below are different syntaxes to capture the screenshot in Cypress.
cy.screenshot()
cy.screenshot(fileName)
cy.screenshot(options)
cy.screenshot(fileName, options)
In the below Code snippet, you can see the screenshot saved by default under the screenshots folder when test cases are failing.
// cypress/e2e/login.cy.js

describe('Screenshot tests', () => {
   it('takes a screenshot', () => {
     // screenshot will be saved as
     // cypress/screenshots/login.cy.js/Screenshot tests -- takes a screenshot.png
     cy.screenshot()
   })
 })
By default, screenshot capture is true. However, you can disable it by the following setting under the support/index.js file.
Cypress.Screenshot.defaults({
 screenshotOnRunFailure: false,
})
Video
Video makes a failure easy to diagnose, because you can watch the run instead of reconstructing it.
Seeing the steps execute pinpoints exactly where a test broke. The comparison below covers video capture in each framework.
Playwright:
In the Playwright video of test cases handled by the "video" option in the config file. By default videos are off.
// @ts-check
/** @type {import('@playwright/test').PlaywrightTestConfig} */
const config = {
 use: {
   video: 'on-first-retry',
 },
};
module.exports = config;
In option video, we can pass the below parameter
- "off" - Do not record video.
- "on" - Record video for each test.
- "retain-on-failure" - Record video for each test, but remove all videos from successful test runs.
- "on-first-retry" - Record video only when retrying a test for the first time.
Selenium:
Selenium WebDriver has no built-in video recording for executed test cases.
Extensions fill the gap, capturing execution steps so a failed test still shows the reason it broke.
Cypress:
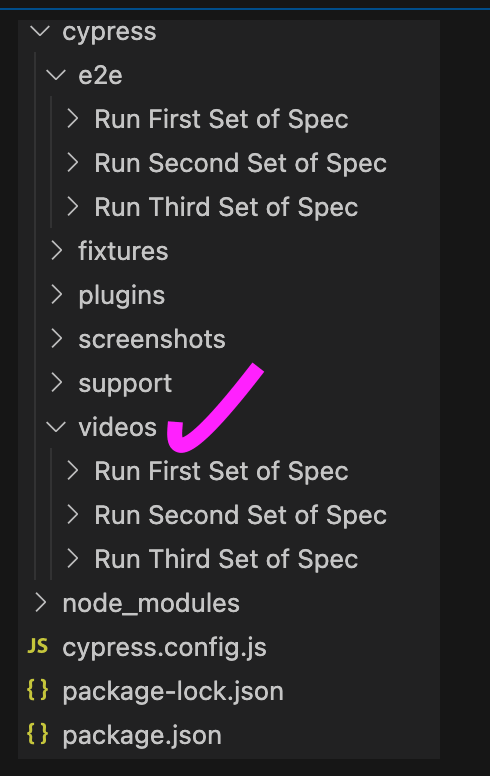
Cypress records video of every .spec file automatically when you run cypress run.
Videos save to the cypress/videos folder. Set the flag video: false in the configuration file to turn recording off.
Note: Run the same Playwright suite in parallel across 3,000+ browser and OS combinations without maintaining a grid. Try TestMu AI Now!
iFrame
An iframe is an HTML element that embeds one document inside another.
iFrames pull content from another site into a page, which is how embedded YouTube videos and external photos appear.
Below is the syntax for iFrame:
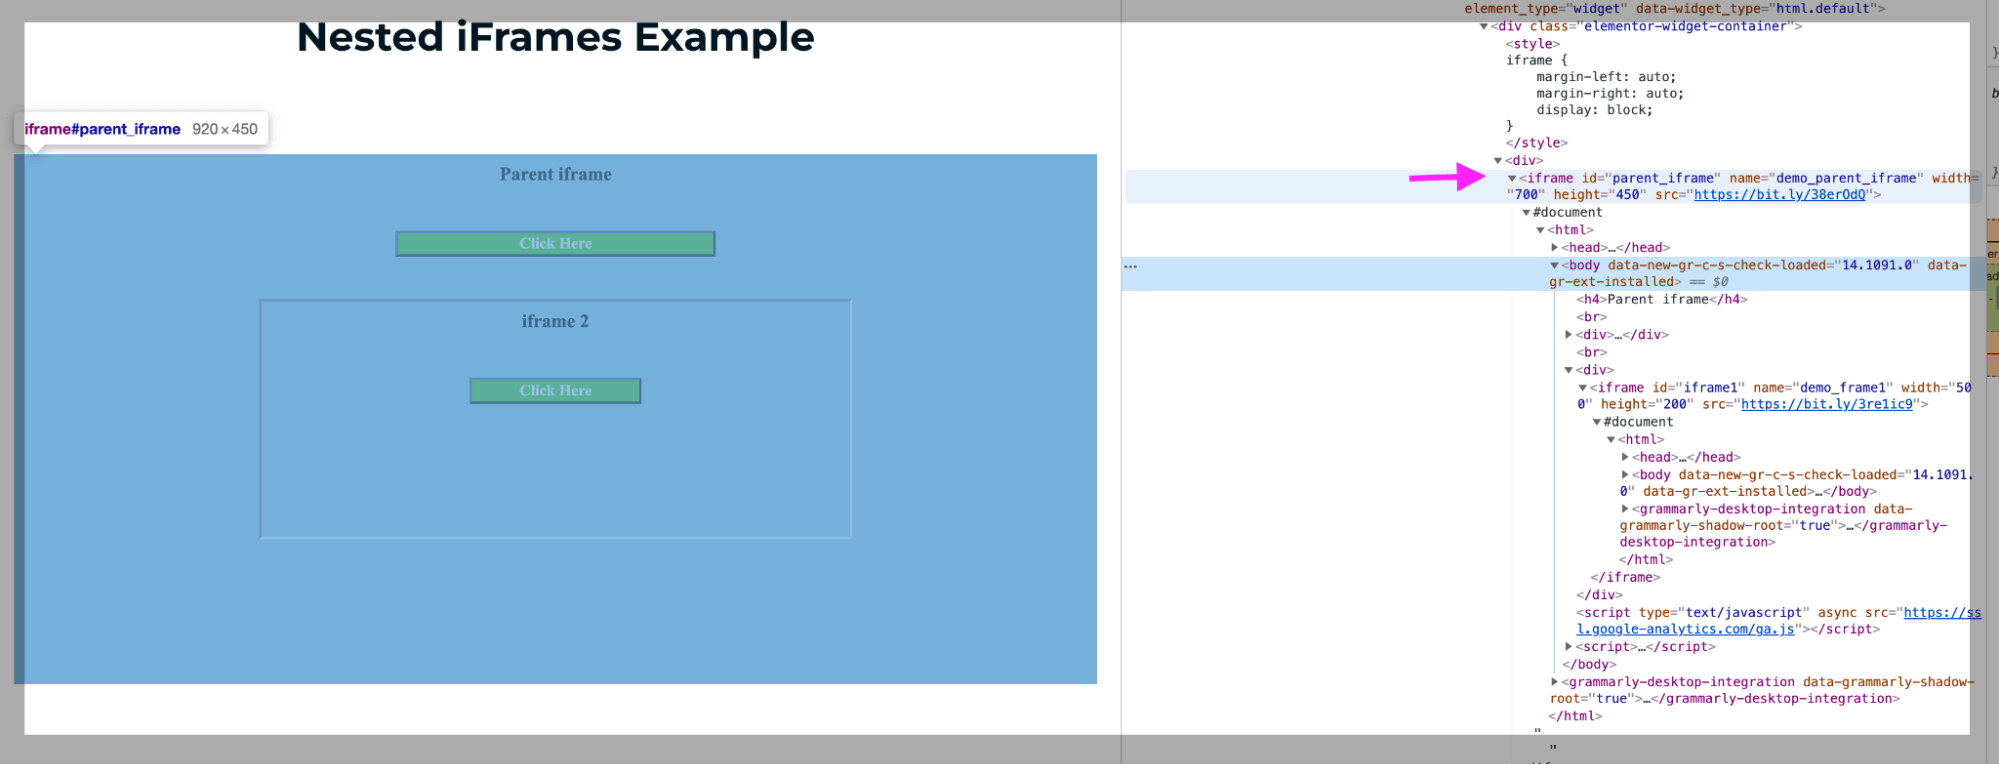
<iframe id="parent_iframe" name="demo_parent_iframe" width="700" height="450" src="https://bit.ly/38erOdQ">
</iframe>
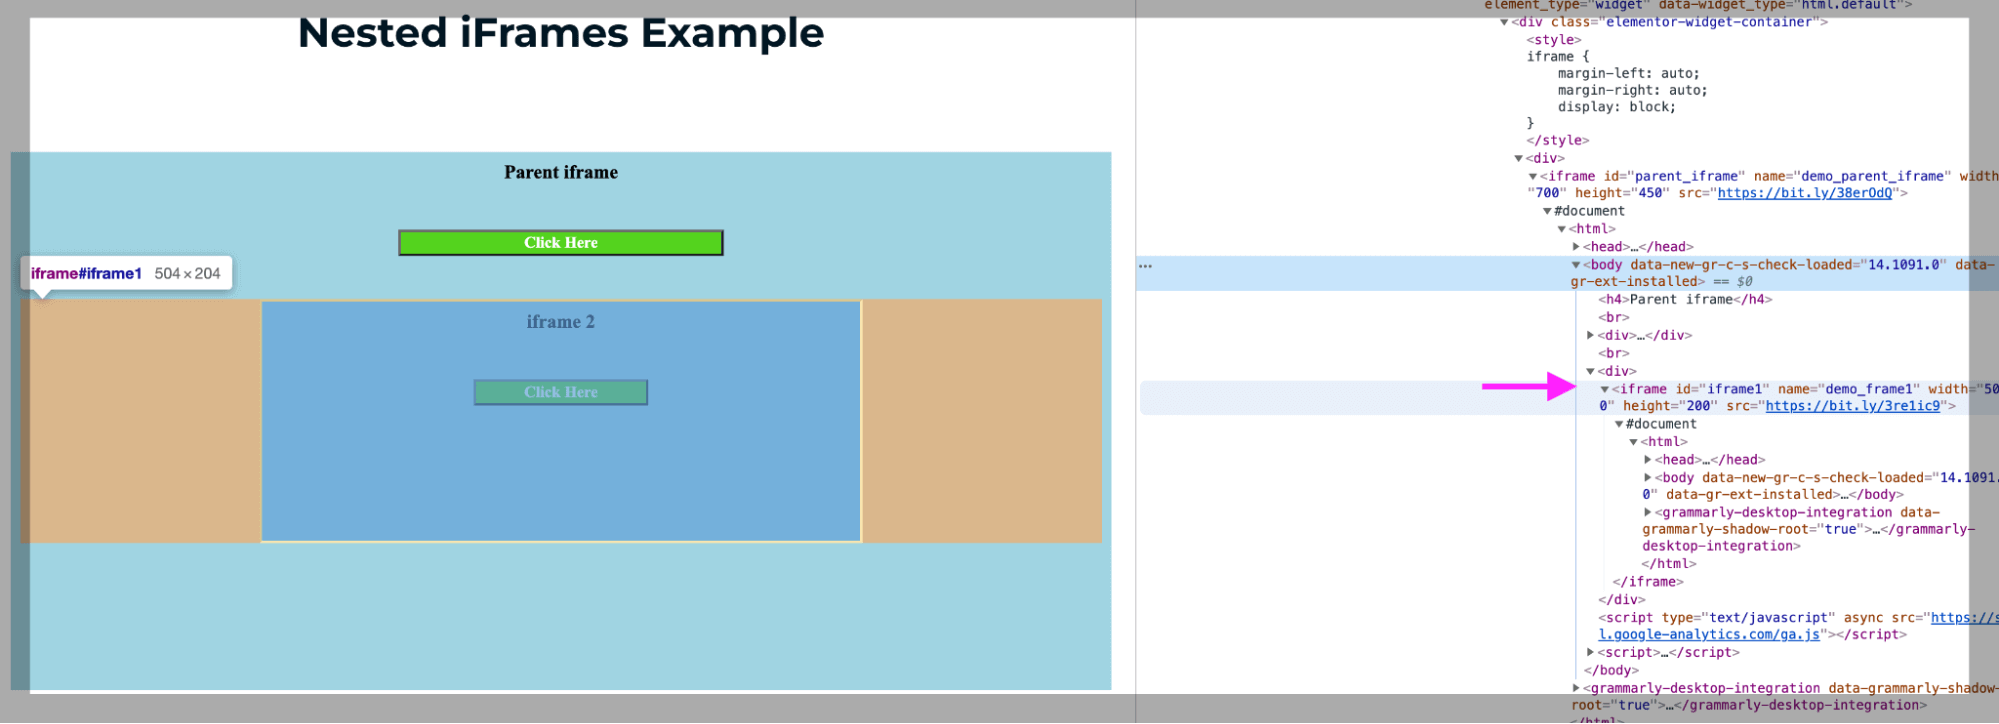
Below screenshot is the example of Nested iFrame where we have Parent and Child both iFrame. The screenshot below shows the "Click Here" button in the Parent and Child iFrame.
Playwright:
Playwright handles iFrames through FrameLocator, which retrieves the iFrame and locates elements inside it.
FrameLocator carries enough logic to resolve the frame and target elements within it in one step.
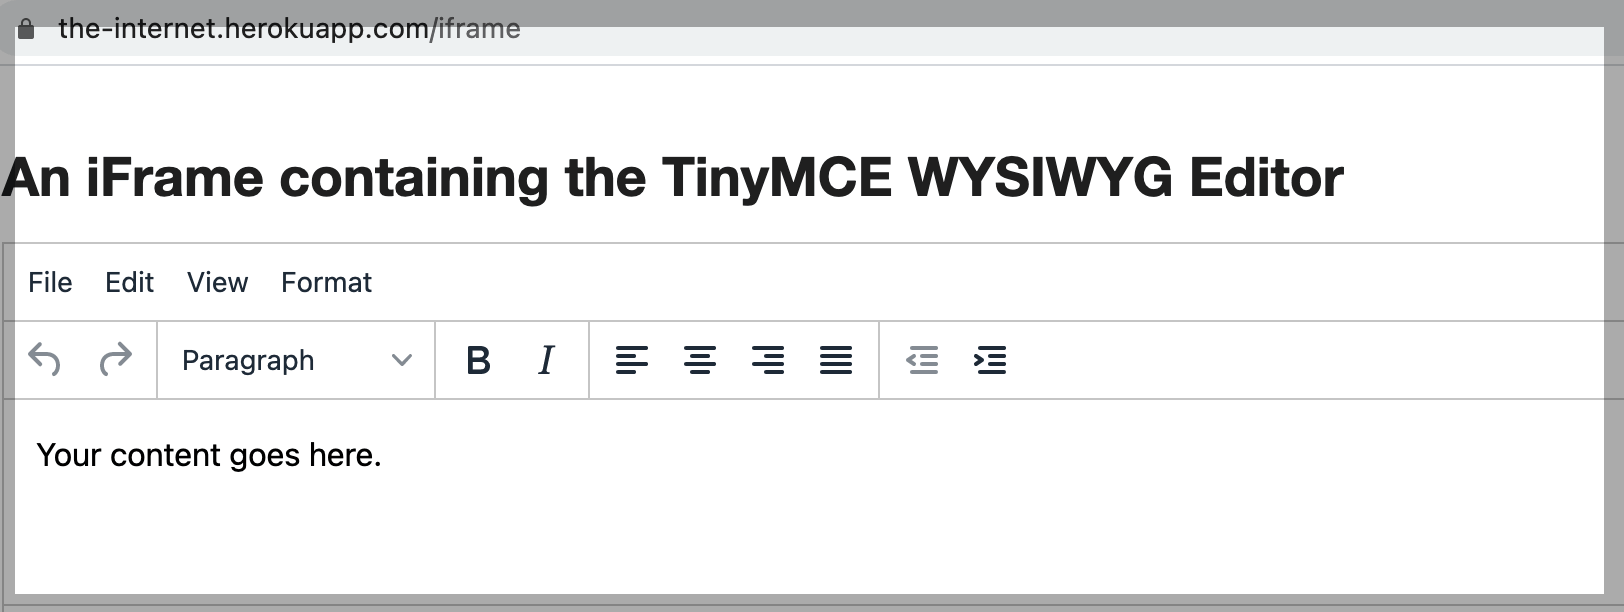
Let's take a simple example: Let us now launch https://the-internet.herokuapp.com/iframe. We have to enter the data in the text area, which is under the iFrame.
Inspect the text area of this frame. Notice below that it is represented by the tag 'iframe' having the 'id' mentioned below.
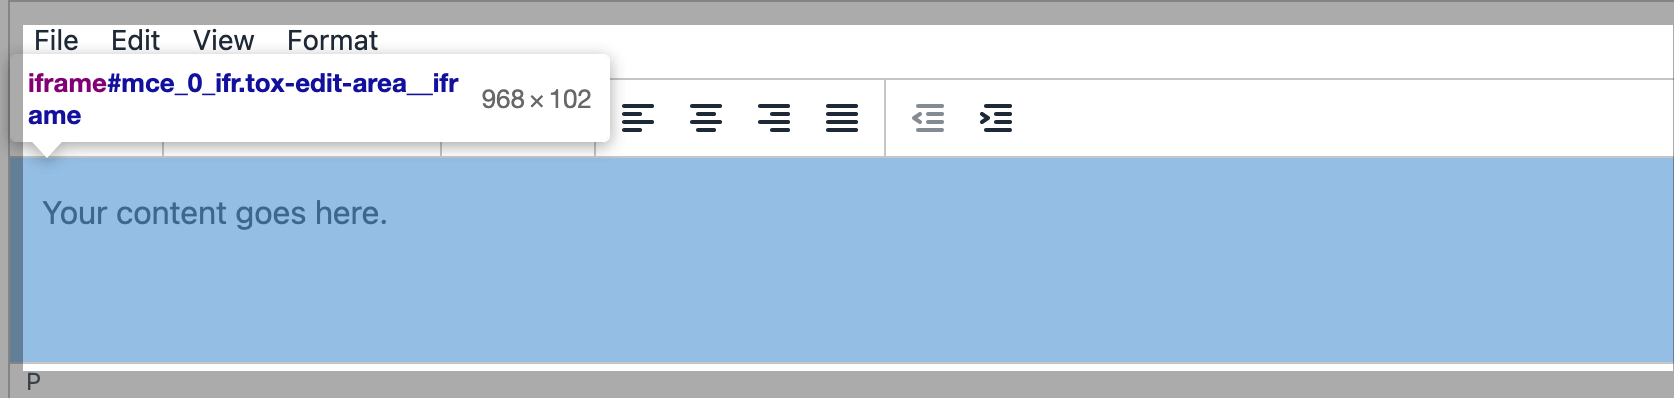
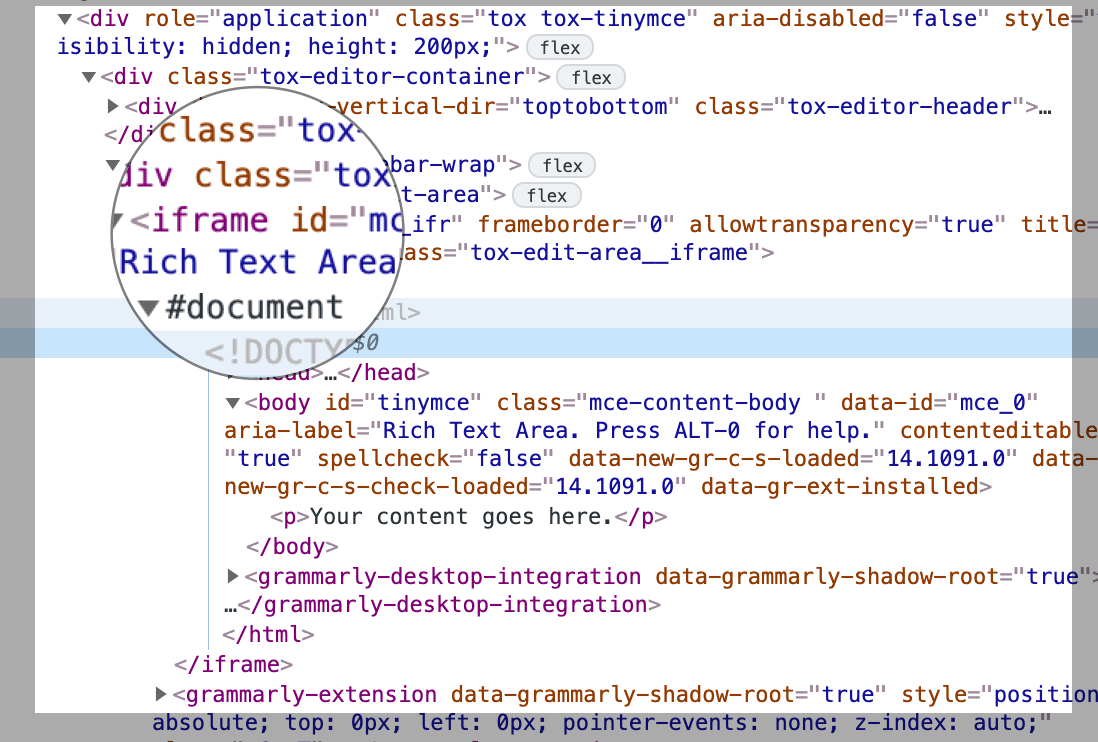
We have a method called "frameLocator" in the Playwright, as seen below. Using this method, we can identify the above frame that we have inspected.
Here we are using the CSS Selector to identify the frame
const frame1 = page.frameLocator('#mce_0_ifr').locator('html')
Once we have located the frame, we have to click it before we start typing into it. Code snippet attached below
import {test,expect} from '@playwright/test'

test("frames", async ({ page }) => {
  await page.goto('https://the-internet.herokuapp.com/iframe')
  const frame1 = page.frameLocator('#mce_0_ifr').locator('html')
   await frame1.click()
  await frame1.type('Welcome to playwright')
   await page.pause()
})
Selenium:
Selenium handles iFrames by switching context. Move the driver to the iFrame window, then perform the actions you need there.
Once those actions finish, switch back to the main page to continue.
By default, Selenium has access to the parent browser driver. The driver focus must change from the main browser window to the frame to access a frame element.
There are various ways to switch to frames.
- switchTo().frame(id) - passes the frame's id or name to switchTo(). Syntax: driver.switchTo().frame("id").
- switchTo().frame(i) - passes the frame index, starting at zero. Syntax: driver.switchTo().frame(0) for the first frame.
- switchTo().frame(webelement n) - passes the frame's webelement. Syntax: driver.switchTo().frame(l).
- switchTo().defaultContent() - Switching focus from the frame to the main page. Syntax - driver.switchTo().defaultContent()
Let's take a simple example:
Launch https://the-internet.herokuapp.com/iframe. We have to copy the text located under the left bottom iFrame.
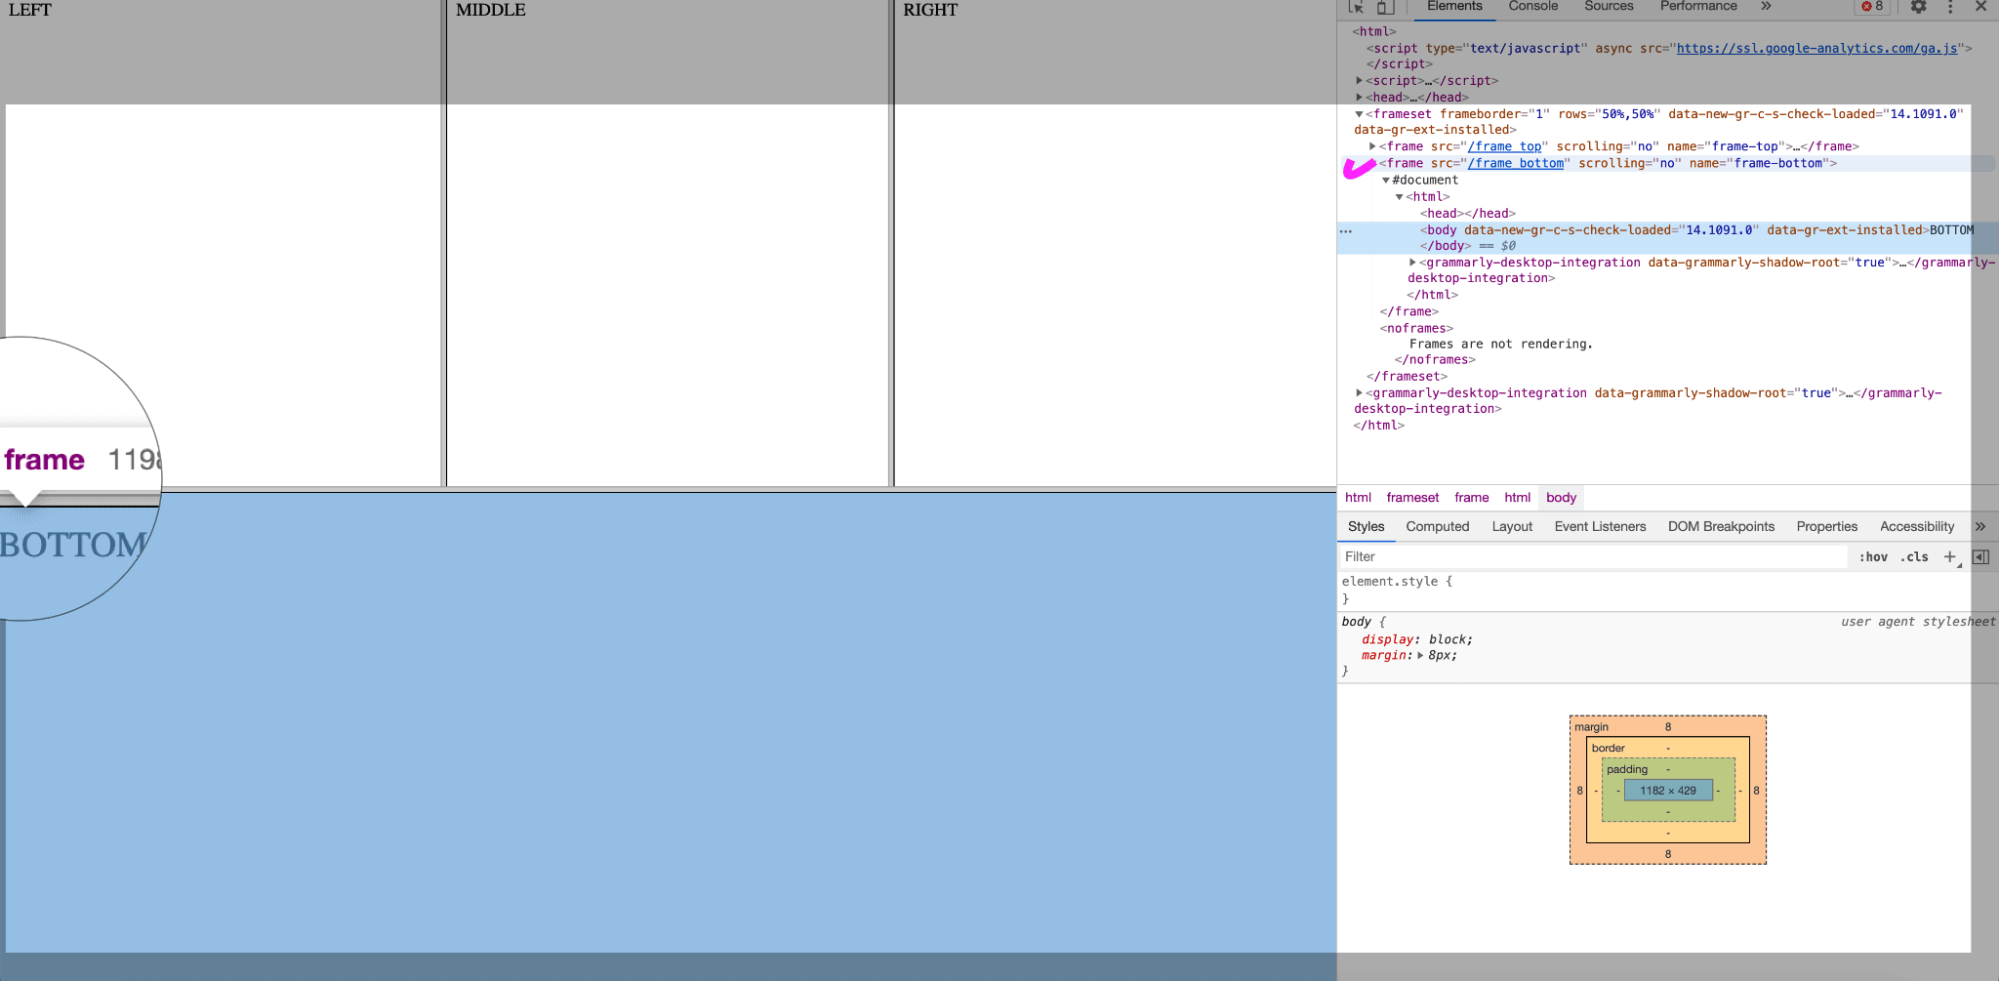
Code snippet is attached below.
import org.openqa.selenium.By;
import org.openqa.selenium.WebDriver;
import org.openqa.selenium.WebElement;
import org.openqa.selenium.chrome.ChromeDriver;
import java.time.Duration;
public class iFrameTest{
  public static void main(String[] args) {
     // Selenium Manager resolves the driver binary automatically
     WebDriver driver = new ChromeDriver();
     driver.get("https://the-internet.herokuapp.com/frames");
     driver.manage().timeouts().implicitlyWait(Duration.ofSeconds(10));
     // Click in Nested link
     driver.findElement(By.partialLinkText("Nested")).click();
     // In below line we are switching to the frame in left bottom side
     driver.switchTo().frame("frame-bottom");
     WebElement text = driver.findElement(By.cssSelector("body"));
     System.out.println("Frame text: " +text.getText());
     driver.close();
  }
}
Cypress:
Cypress does not handle iFrame directly; we need to install the plugin and use the plugin to perform actions on elements inside the iframe. We can install the plugin and then use the custom commands.
npm install -D cypress-iframe
Notice below that it is represented by the tag 'iframe' having the 'class' mentioned below.
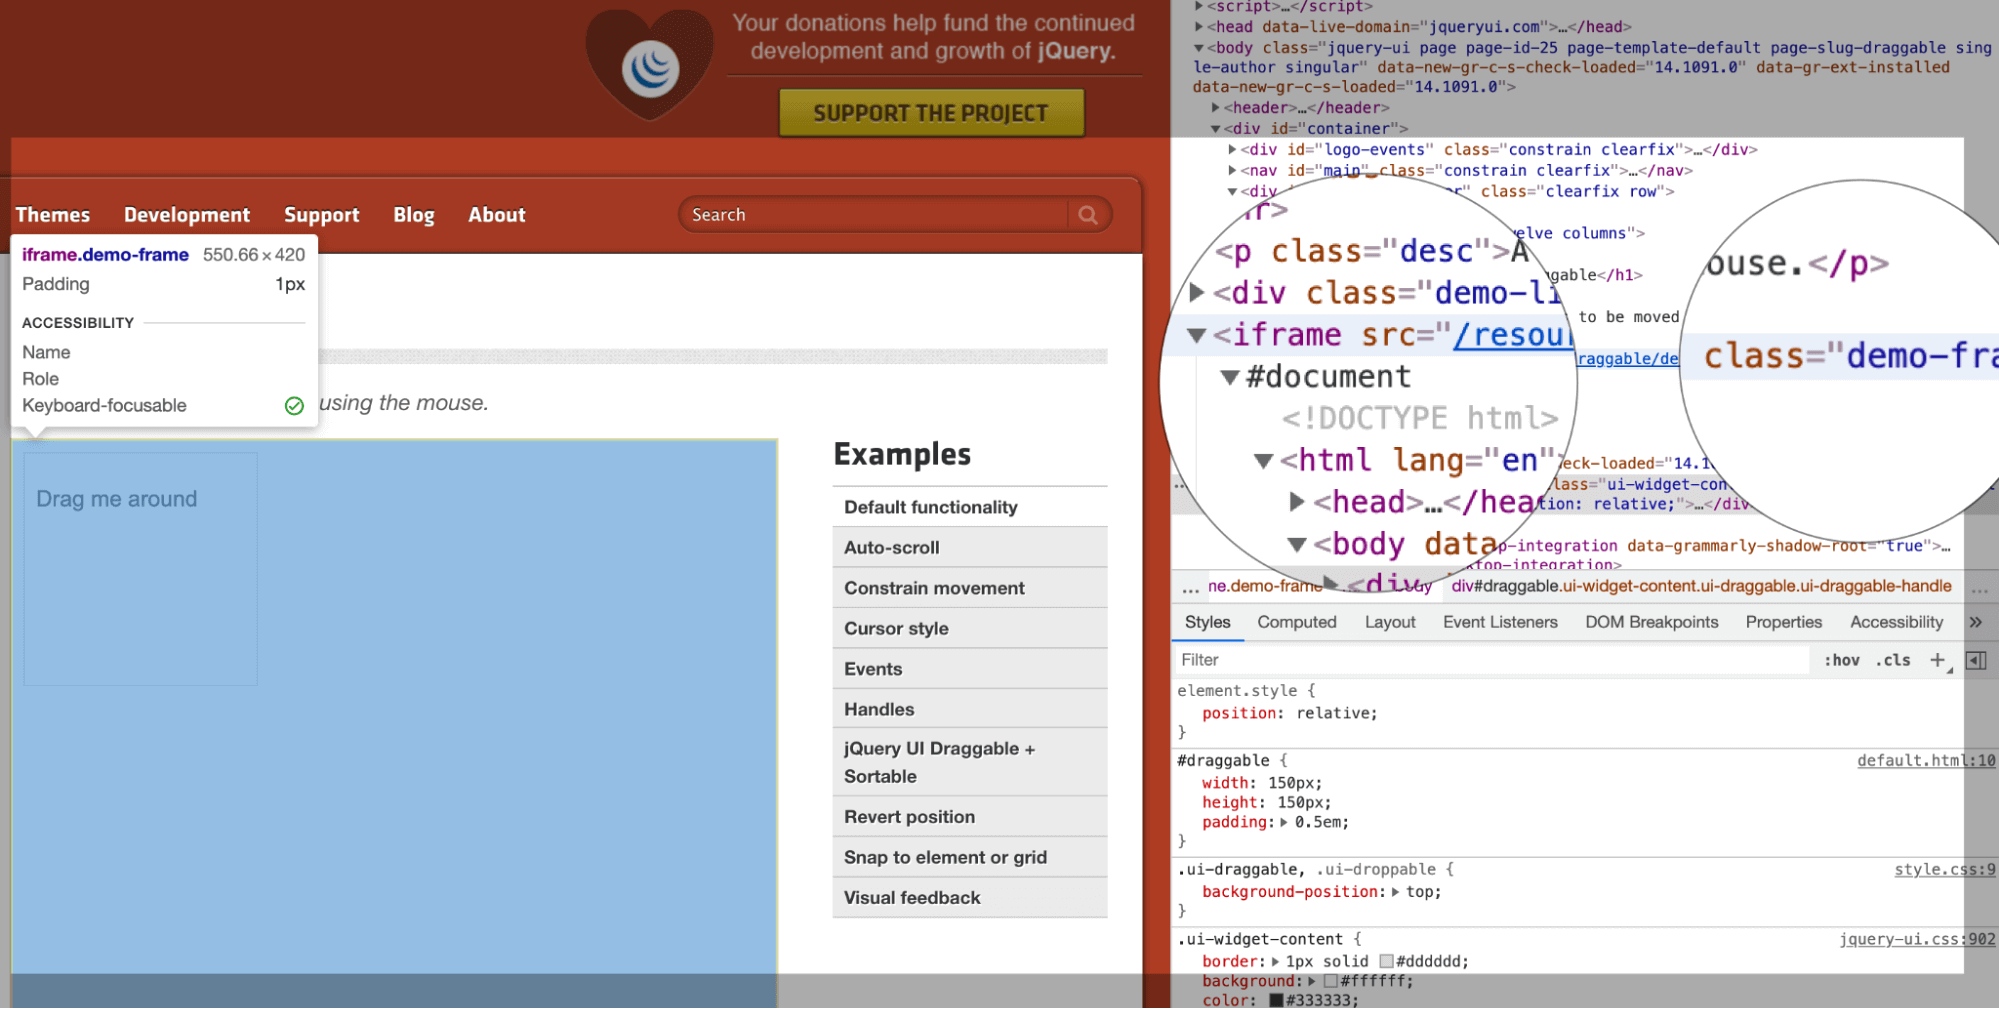
The below code works with elements inside an iFrame.
import 'cypress-iframe'
describe('ifrane example', function () {
  // test case
  it('iframe Test cases', function (){
     // launch the URL
     cy.visit("https://jqueryui.com/draggable/");
     // frame is loading in below line
     cy.frameLoaded('.demo-frame');
     //shifting the focus
     cy.iframe().find("#draggable").then(function(t){
        const frmtxt = t.text()
        //assertion to verify text
        expect(frmtxt).to.contains('Drag me around');
        cy.log(frmtxt);
     })
  });
});
Handling API Requests
Testing doesn't mean to do verification of elements in UI only, but we also have to verify data that is bound with these elements from the API side as well.
An API is the middle layer between the presentation layer and the database, and it carries communication between applications.
That role is why API testing matters. The sections below compare how each framework handles it.
Playwright:
Playwright can be used to get access to the REST API of your application. Below are examples of how we can automate the API request using the methods (GET, POST, PUT, and DELETE)
Playwright also lets UI tests synchronize on backend calls triggered by user actions, through Playwright waitForResponse.
It resolves the moment a matching network response arrives and exposes the full response object for assertions.
For the mocking side of API testing in Playwright, this guide to Playwright mock API testing covers page.route() interception, route.fulfill() with custom status codes, HAR-file mocking, and request blocking.
GET Method
// @ts-check
const { test, expect } = require("@playwright/test");
test.describe("API Testing with Playwright", () => {
 const baseurl = "https://reqres.in/api";

 test("GET API Request with -- Valid 200 Response ", async ({ request }) => {
   const response = await request.get(`${baseurl}/users/2`);
   expect(response.status()).toBe(200);
 });
});
POST Method
// @ts-check
const { test, expect } = require("@playwright/test");
test.describe("API Testing with Playwright", () => {
 const baseurl = "https://reqres.in/api";
 test("POST API Request with -- Valid 201 Response ", async ({ request }) => {
   const response = await request.post(`${baseurl}/users/2`, {
     data: {
       id: 123,
     },
   });
   const responseBody = JSON.parse(await response.text());
   expect(responseBody.id).toBe(123);
   expect(response.status()).toBe(201);
 });
});
PUT Method
// @ts-check
const { test, expect } = require("@playwright/test");
test.describe("API Testing with Playwright", () => {
 const baseurl = "https://reqres.in/api";
 test("PUT API Request with -- Valid 201 Response ", async ({ request }) => {
   const response = await request.put(`${baseurl}/users/2`, {
     data: {
       id: 245,
     },
   });
   const responseBody = JSON.parse(await response.text());
   expect(responseBody.id).toBe(245);
   expect(response.status()).toBe(200);
 });
});
DELETE Method
// @ts-check
const { test, expect } = require("@playwright/test");
test.describe("API Testing with Playwright", () => {
 const baseurl = "https://reqres.in/api";
 test("DELETE API Request with -- Valid 201 Response ", async ({
   request,
 }) => {
   const response = await request.delete(`${baseurl}/users/2`, {});
   expect(response.status()).toBe(204);
 });
});
Selenium:
Selenium is a browser automation tool and is not designed for API testing.
It drives browsers and automates user interactions, but it cannot send HTTP requests or assert on an API response directly.
Pair Selenium with a dedicated HTTP client in the same test project instead. Assert on the API response there, and reserve Selenium for the UI behaviour that depends on it.
Cypress:
Cypress does API automation through the cy.request() command.
GET, POST, PUT, and DELETE are all available, covering the methods most API testing needs.
Below are the example of different methods:
GET Method
To perform a GET operation, we shall make an HTTP request with the cy.request() and pass two parameters in cy.request() Method name and URL.
it("GET API testing Using Cypress", () => {
 cy.request("GET", "https://reqres.in/api/users?page=2").should((response) => {
   expect(response.status).to.eq(200);
 });
});
POST Method
To perform a POST operation, we shall make an HTTP request with the cy.request() and pass three parameters in cy.request() Method name and URL and body.
it("POST API testing Using Cypress", () => {
 cy.request("POST", "https://reqres.in/api/users", {
   name: "morpheus",
   job: "leader",
 }).should((response) => {
   expect(response.status).to.eq(201);
 });
});
PUT Method
To perform a PUT operation, we shall make an HTTP request with the cy.request() and pass three parameters in cy.request() Method name and URL and body.
it("PUT API testing Using Cypress", () => {
 cy.request("PUT", "https://reqres.in/api/users/2", {
   name: "morpheus",
   job: "zion resident",
 }).should((response) => {
   expect(response.status).to.eq(200);
 });
});
DELETE Method
To perform a DELETE operation, we shall make an HTTP request with the cy.request() and pass two parameters in cy.request() Method name and URL.
it("DELETE API testing Using Cypress", () => {
 cy.request("DELETE", "https://reqres.in/api/users/2").should((response) => {
   expect(response.status).to.eq(204);
 });
});
Community support
Selenium is an open-source suite for automated web testing with a large, active community of users and developers.
Support routes differ by framework, and the comparison below covers each.
Playwright:
Playwright is newer, so its community resources are smaller but growing quickly.
The team maintains strong documentation and an active GitHub presence for bug reports and feature requests.
Maintainers respond to community questions and feedback, and outside contributions are accepted. For role preparation, the Playwright interview questions cover what hiring teams ask.
In addition to the official channels, there are a number of community-run forums and resources where users can get help with Playwright. These include Stack Overflow, Reddit, and the Playwright Gitter chat.
Selenium:
There are several ways that community members can get support and help with Selenium:
- Selenium documentation - tutorials, a reference guide, and installation and configuration detail.
- Selenium forums - separate boards per programming language plus a general discussion forum for questions.
- Selenium Slack channel - an active community of users and developers. Request an invite through the form on the Selenium website.
- Stack Overflow - a large body of existing Selenium questions and answers, plus the option to ask your own.
Cypress:
Cypress has a growing Community, and their documentation is excellent. In addition, there are numerous unofficial forums and communities where Cypress users can connect and share their experiences with the tool.
Beyond the forums, Cypress publishes detailed installation and usage documentation, a full API reference, and a library of example projects.
Blog posts, tutorials, and video walkthroughs cover most common testing tasks.
Comparison Table: Cypress vs Playwright vs Selenium
The preceding sections covered each capability in depth. This table collapses all of them into one view for side-by-side scanning.
Playwright leads on built-in tooling and large-scale projects, Selenium on language breadth and community depth, and Cypress on in-browser developer experience.
| Playwright | Selenium | Cypress | |
|---|---|---|---|
| Language Support | JavaScript Java, C#, Python, Ruby | JavaScript Java, C#, Python, Ruby | JavaScript/TypeScript |
| Browser Support | Chrome, Edge, Firefox, Safari | Chrome, Edge, Firefox, Safari | Chrome, Edge, Firefox, Safari |
| Framework Support | Jest/Jasmine, AVA, Mocha, and Vitest | Mocha, Jest/Jasmine,, TestNG, JUnit, Cucumber and NUnit | Supports Mocha, Jest/Jasmine, Cucumber |
| Continuous Integration | Can be easily integrated with continuous integration tools like Jenkins | Can be easily integrated with continuous integration tools like Jenkins | Can be easily integrated with continuous integration tools like Jenkins |
| Ease of use | Playwright has a user-friendly interface and requires minimal setup | Selenium requires more setup and has a steeper learning curve | Cypress has a user-friendly interface and requires minimal setup |
| Test Writing Experience | Intuitive | Moderate | Intuitive |
| DOM manipulation | Easy | Moderate | Easy |
| Community Support | Growing community | Large and active community with good documentation and support resources | Active community with good documentation and support resources |
| Support for headless mode | YES | YES | YES |
| Parallel Execution | Supports parallel execution | Supports parallel execution | Supports parallel execution using CI/CD tool |
| Built-in network traffic control | YES | NO | YES |
| Setup complexity | Easy Setup | Requires some effort to build the framework | Easy Setup |
| Iframe Support | YES | YES | Iframe support through plugin e.g. cypress-iframe |
| Driver | No driver required | Each browser requires its driver | No need of driver bindings |
| Multi Tab Support | YES | NO | YES |
| Drag & Drop Support | YES | YES | YES |
| Test Assertions Libraries | Mocha, Chai | PyUnit, JUnit, TestNG almost any language-specific test framework can be adapted. | Mocha, Chai |
| Inbuilt reports | YES | NO | Default Reporter is Spec, Customizable for other supported reporters |
| Cross-Domain Support | YES | YES | YES |
| Debug features | Playwright has built-in debugging tools and a time-traveling feature for easy debugging | Selenium does not have built-in debugging tools | Cypress has built-in debugging tools and a time-traveling feature for easy debugging |
| Automatic Waiting | YES | NO | YES |
| Dashboard | NO | NO | Provided as Premium/Paid Feature |
| Built-in Screenshot, VIDEO feature | YES | No built-in screenshot feature. Customization is required to add this feature. | YES |
| Pricing | Free for open-source projects, paid for commercial use | Free for all use cases | Free for open-source projects, paid for commercial use |

Certifications in Playwright, Selenium, and Cypress give hiring teams verifiable proof of your test automation skills.
Each one is assessed on TestMu AI cloud infrastructure, so the credential reflects work on a real grid.
Which Should You Choose?
Choose Playwright for a new JavaScript or TypeScript suite, Selenium when you need Java, C#, Ruby, or PHP bindings plus legacy browser reach, and Cypress for the fastest front-end setup.
A Cypress vs Playwright vs Selenium feature table rarely settles the argument, because your existing stack decides more than any single capability. Match your situation to a row below, or widen the field with the guide to best test automation frameworks.
| Your situation | Pick | Why it wins here |
|---|---|---|
| Starting a new suite in JavaScript or TypeScript | Playwright | Auto-waiting, tracing, and parallel workers ship in the box, so a usable suite exists on day one without wiring a toolchain together. |
| Your team writes Java, C#, Ruby, or PHP | Selenium | The only one of the three with official bindings in all four languages. Playwright covers Java and C# but not Ruby or PHP, and Cypress is JavaScript only. |
| Front-end team that wants a passing test today | Cypress | One npm install brings the runner, assertions, automatic waiting, and video capture. The time-travel debugger is the fastest way to see why a step failed. |
| You already run a Selenium grid with trained engineers | Selenium | A rewrite buys speed you can also get by moving the same suite onto parallel cloud infrastructure. Migrate the runner, not the framework. |
| Wall-clock time on a large suite is the problem | Playwright | Spec files spread across parallel workers by default. Cypress needs a CI service to parallelise, and Selenium needs a grid plus TestNG or JUnit configuration. |
| You need component tests and end-to-end tests in one tool | Cypress | Component testing is a first-class mode rather than a separate stack, which keeps React or Vue component specs beside the end-to-end suite. |
| Legacy browser or Internet Explorer coverage is required | Selenium | Neither Playwright nor Cypress targets Internet Explorer. Selenium still drives it through the W3C WebDriver standard. |
Migrate from Selenium to Playwright with Agent Skills.

Two rows point the same way: if the complaint is runtime rather than syntax, changing frameworks is the expensive fix.
A suite that takes hours locally is usually limited by how many browsers one machine can drive, not by the framework's protocol.
That gap is what Automation Cloud fills, running your existing Selenium, Cypress, and Playwright scripts across 3,000+ real browser and OS combinations in parallel.
There is no local grid to patch and no proprietary DSL to rewrite into.
Network logs, console logs, video, screenshots, and command logs are captured on every run, so debugging works the same whichever framework you picked.
Per-framework setup lives in the Playwright testing documentation.
Wrapping up
Start by writing one real test in the framework your decision-matrix row pointed to, against your own application rather than a demo site.
A test that logs in, waits on a slow element, and asserts the result teaches you more than any feature table, because it stresses the waiting and selector behaviour your app actually has.
Once that test passes locally, point it at a cloud grid before you write the next fifty.
Framework choice sets your authoring experience while parallel infrastructure sets your feedback time, and the two are easier to get right separately.
The same script runs across 3,000+ browser and OS combinations on Automation Cloud without changing the test itself.
If none of the three fits, the comparison of Puppeteer vs Selenium covers a fourth option with a narrower browser range but tighter Chrome DevTools control.
And if you would rather widen the shortlist than pick from these three, this guide to the best Selenium alternatives compares nine web automation frameworks on speed, maintenance, language support, and migration cost.
Author

Kailash Pathak
Blogs: 12


Kailash Pathak is a Senior QA Lead Manager at 3Pillar Global with over 18 years of experience in software testing and automation. He has built scalable automation frameworks using Selenium, Cypress, and Playwright, integrating them with CI/CD pipelines and aligning them with business goals. He is the author of Web Automation Testing Using Playwright, which ranked #1 in Amazon’s “API & Operating Environments” category for six consecutive months. He is a Microsoft MVP (Most Valuable Professional) in Quality Assurance, a LinkedIn “Top QA Voice” with 19,500+ followers, and a core member of TestMu AI Spartans, DZone, and Applitools Ambassador programs. Kailash holds certifications including AWS (CFL), PMI-ACP®, ITIL®, PRINCE2 Practitioner®, and ISTQB. He has delivered 25+ QA talks across conferences and webinars and actively mentors engineers while driving quality strategies, shift-left testing, and continuous improvement.
Reviewer

Srinivasan Sekar
Reviewer
Srinivasan Sekar is Director of Engineering at TestMu AI (formerly LambdaTest), where he leads engineering and open-source initiatives behind the Selenium and Appium automation grid and owns TestMu AI's MCP Server. A committer to Appium and a contributor to Selenium, WebdriverIO, Taiko, and AppiumTestDistribution, he brings over 15 years of experience in quality engineering and open-source technologies. He is the author of the Apress book 'The MCP Standard: A Developer's Guide to Building Universal AI Tools with the Model Context Protocol,' a Certified Kubernetes and Cloud Native Associate, and an international conference speaker. Before TestMu AI he spent over eight years at Thoughtworks as a Principal Consultant and Quality Architect. Srinivasan holds a B.Tech in Information Technology from Anna University.


Playwright vs Selenium vs Cypress FAQs
Did you find this page helpful?
More Related Blogs
TestMu AI forEnterprise
Get access to solutions built on Enterprise
grade security, privacy, & compliance
- Advanced access controls
- Advanced data retention rules
- Advanced Local Testing
- Premium Support options
- Early access to beta features
- Private Slack Channel
- Unlimited Manual Accessibility DevTools Tests