World’s largest virtual agentic engineering & quality conference


- TestMu AI (Formerly LambdaTest)
- /
- Blog
- /
- Playwright Agents: Planner, Generator, and Healer [2026]
Playwright Agents: Planner, Generator, and Healer [2026]
Learn what Playwright Agents are, how the Planner, Generator, and Healer work, how to install them, and run a full step-by-step example.

Kailash Pathak
Author
Last Updated on: June 25, 2026
Maintaining a Playwright suite carries two predictable costs. Writing spec files for new features takes sprint time, and every frontend change breaks existing locators that you then have to fix. Playwright agents take on both tasks inside the framework you already use.
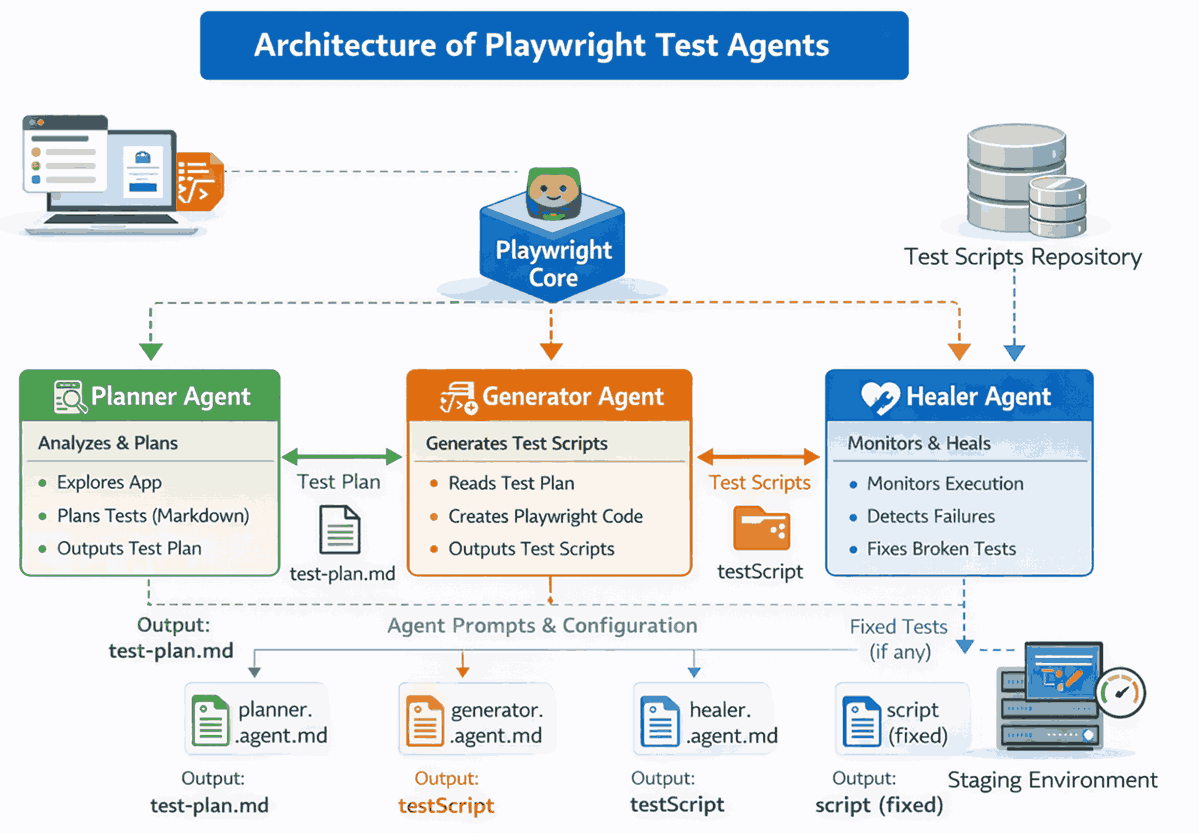
The framework ships three agents that divide the work. The planner opens the live application, explores it, and writes a test plan covering the main scenarios. The generator reads that plan and produces the actual spec files.
The healer runs with your tests and updates broken locators on its own, so a renamed button or a restructured component no longer fails the build.
Overview
What Are Agents in Playwright
Playwright Agents are three AI modules in Playwright v1.56 that automate test planning, code generation, and failure repair inside VS Code using a connected LLM.
How to Use Playwright Test Agents
Run npx playwright init-agents --loop=vscode in your project root to create the agents/ directory with all three agent definition files.
Each agent handles a distinct phase of the test lifecycle. Prompt them in sequence inside VS Code:
- Planner: Explores your live app and writes test-plan.md with numbered scenarios.
- Generator: Reads the plan and produces executable spec files with locators and assertions.
- Healer: Runs after failures, identifies broken locators, and applies fixes automatically.
What Are Playwright Agents
Playwright Agents are three AI modules built into Playwright v1.56 that automate test planning, code generation, and failure repair.
They run inside VS Code through Playwright's MCP and AI agents integration. Each agent reads its own definition file and uses the configured LLM to act on your prompt. Here is what each one does:
Teams that want to build their own agent rather than use the built-in modules can follow this guide to Playwright LangChain, which covers wrapping Playwright actions as LangChain tools, running a ReAct loop for failure triage and test generation, and the security patterns that production browser agents need.
For a deeper look at how these agents communicate with the underlying MCP server, see this guide to AI and Playwright MCP, which covers MCP setup and an end-to-end Jira-ticket-to-tests workflow.
| Agent | Input | Output | Job |
|---|---|---|---|
| Planner | Running app + natural language prompt | test-plan.md | Explore flows, document test scenarios |
| Generator | test-plan.md + scenario reference | Playwright spec files (.spec.ts) | Write executable code with locators and assertions |
| Healer | Failing test output + error logs | Fixed spec files | Diagnose failures and apply targeted fixes |
Which Agents Come Built Into Playwright
Playwright ships three built-in agents: the Planner, the Generator, and the Healer. Each is scoped to one phase of the test lifecycle.
Planner Agent
- Live app required: The Planner cannot navigate without a running local instance.
- Public flows only: Auth-gated flows require a pre-established session before the Planner runs.
- Stable state matters: Slow rendering or inconsistent app state between runs reduces output quality.
Generator Agent
- Use scenario numbers: Reference by number (e.g. 1.1); using names risks picking the wrong scenario from a long plan.
- DOM-based locators: Writes selectors from what it observes in the live DOM at each interaction step.
- CSS fallback: Falls back to CSS selectors when the app lacks ARIA roles or semantic attributes.
Healer Agent
- Narrow the scope: Point it at a single failing spec file for faster, more accurate repairs.
- What it fixes: Strict mode violations, selector ambiguity, and element timing failures.
- What it cannot fix: Tests broken by application-side bugs or inconsistent API responses.
- Stateless repairs: Each pass is independent and re-reads the spec file fresh every run.
Note: Run your Playwright tests with AI across 50+ real browsers and OS combinations. Try TestMu AI Today!
How Do Playwright Test Agents Work
Playwright Test Agents are built on top of the Model Context Protocol (MCP), which lets the agents use a connected LLM to reason about your app and generate or repair test code.
Each agent is defined by a Markdown file in agents/. When you prompt one in VS Code, Playwright passes its definition file, your prompt, and current context (DOM snapshot or failure output) to the LLM. The LLM decides what to do: open a browser, click, write a file, or fix a locator.
The agents operate in a defined handoff sequence:
- Planner receives a prompt describing the app and the flow to test. It opens a browser, navigates the app, captures the interaction steps, and writes test-plan.md with numbered scenarios, steps, and expected outcomes.
- Generator reads test-plan.md and a scenario reference from your prompt. It replays the steps in a browser, captures the DOM state at each interaction point, and writes a Playwright spec file with locators and assertions derived from what it observed.
- Playwright runs the generated tests. The test runner executes each spec file and outputs pass or fail results with full error logs.
- Healer reads the failure output. If any test failed, it analyzes the error, inspects the affected locator or assertion, rewrites the broken code, and triggers another test run to verify the fix.
The --loop=vscode flag chains all three agents and repeats until the suite is stable. You can also run agents individually: trigger only the Healer when a locator breaks, or only the Generator when you add new scenarios without re-running the Planner.
Each agent run is independent. The LLM stores no state between sessions, so prompt clarity and app stability directly determine output quality.
How to Install Playwright Test Agents
Playwright Agents extend an existing Playwright project. Initialize Playwright first, then add the agents.
Prerequisite: VS Code with an LLM Configured
Playwright Test Agents run inside VS Code and require an LLM provider connected through VS Code's agent panel. Without this, the agents initialize but do nothing when prompted.
- Install an LLM extension: GitHub Copilot or any VS Code-compatible LLM extension from the Extensions panel.
- Activate a model: Sign in and confirm a model is active in the VS Code agent panel before running any agent.
- Model quality matters: A more capable model produces better locators and fewer prompt deviations.
- Language support: Agents output TypeScript and JavaScript spec files only. Python and Java Playwright users cannot generate native code in those languages through agents at this time.
Step 1: Initialize a Playwright Project
If you do not have a Playwright project, follow the guide on how to install Playwright first, then return here for the agents setup. The command below installs browsers, generates playwright.config.ts, and scaffolds a tests/ directory.
npm init playwright@latest- Choose TypeScript or JavaScript: The CLI prompts for a language. TypeScript is recommended for agent-generated output.
- Set the test directory: Accept the default tests/ or specify a custom path. Agents write spec files here.
- Add a GitHub Actions workflow: Optional. Select yes to scaffold a CI config alongside the project.
- Install browsers: The CLI runs npx playwright install automatically. Chromium, Firefox, and WebKit are downloaded.
- Verify the output: Confirm playwright.config.ts and the tests/ directory exist at the project root before proceeding.
If you already have a Playwright project with a config file, skip to Step 2.
Step 2: Initialize Playwright Test Agents
Run this from your project root:
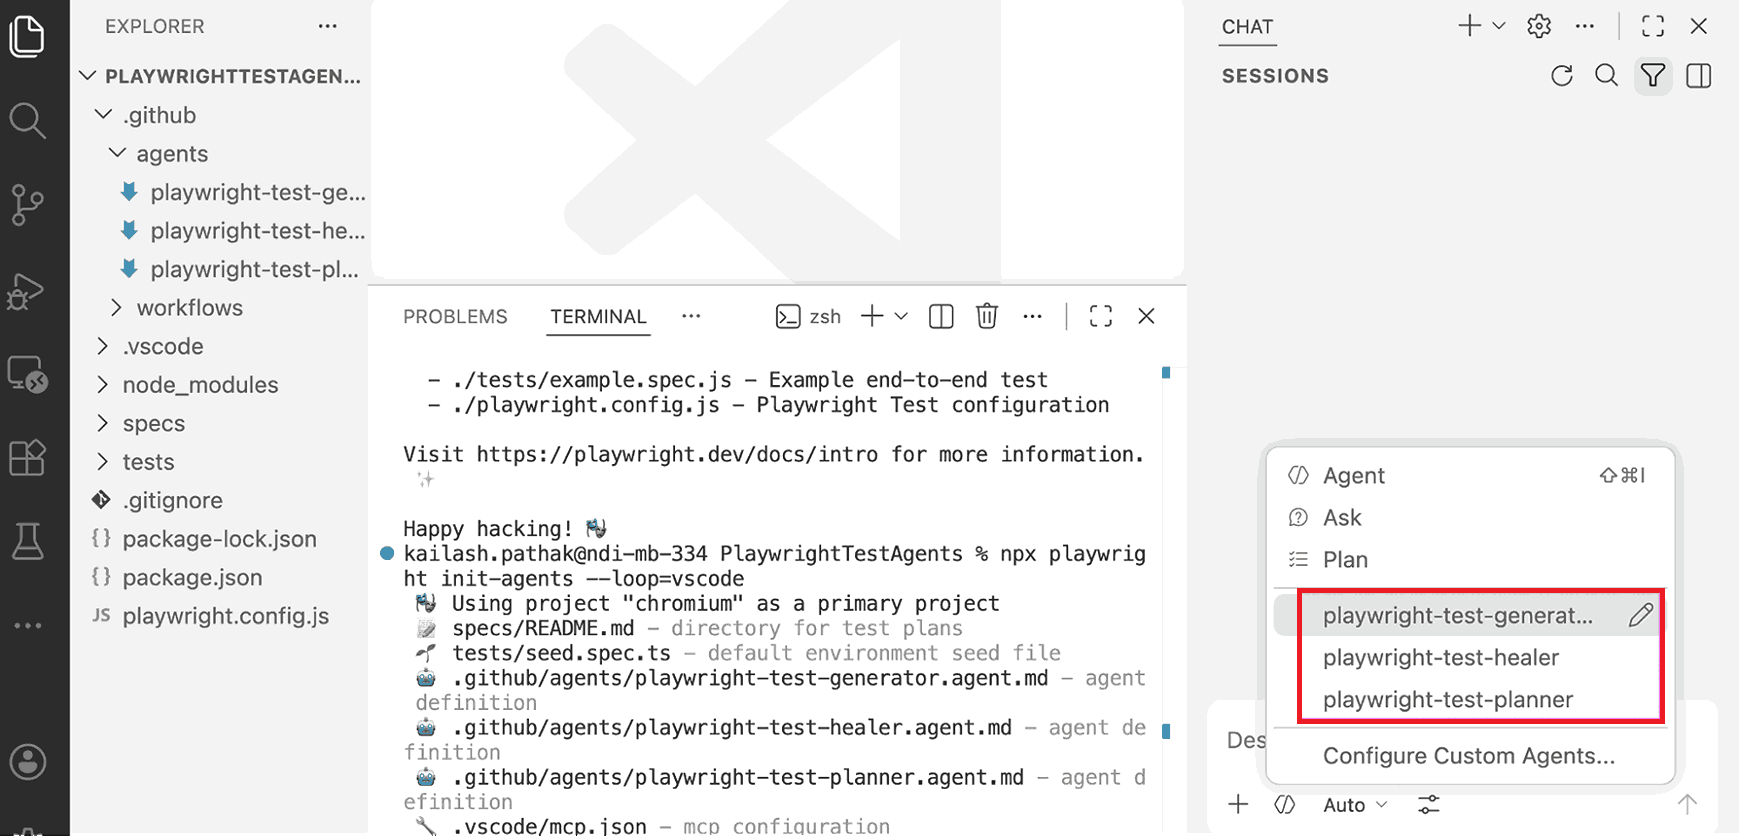
npx playwright init-agents --loop=vscodeThis creates an agents/ directory with three definition files:
agents/
├── playwright-test-planner.agent.md
├── playwright-test-generator.agent.md
└── playwright-test-healer.agent.md
Do not rename or delete these files. The --loop=vscode flag connects the agents to VS Code's agent panel so prompts route to the correct agent.
Step 3: Open Agents in VS Code
Open the project in VS Code. All three agents appear in the agent panel by name. They are ready immediately after initialization with no additional configuration.
Before running any agent, start your web application locally. The Planner and Generator open a real browser and interact with the running app. They cannot plan or generate tests against an app with inconsistent state, slow rendering, or auth-gated flows that have no active session.
How to Use Playwright Test Agents (Step-by-Step Example)
Run the Planner to map your app's flows, pass the output to the Generator to create spec files, then use the Healer to fix any failures.
The example below runs all three agents in sequence on the TestMu AI eCommerce Playground. The flow covers login, adding a product to cart, and completing checkout. Each step shows the exact prompt, what the agent produces, and what to watch for before passing output to the next agent.
1. Create a Test Plan (Planner Agent)
The Planner opens your app in a browser, navigates the specified flow, and writes a structured Markdown test plan. Give it a target URL and the flows you want documented.
Prompt:
Use the Playwright test planner to create a test plan and save it as test-plan.md.
On https://ecommerce-playground.lambdatest.io/: log in with test credentials, search for a laptop, add the first result to cart, proceed to checkout, and complete the order with test billing details.
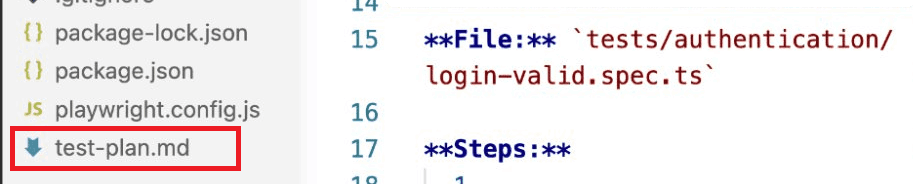
The Planner writes test-plan.md to the project root with numbered scenarios, steps per scenario, and expected outcomes. Edit it before passing it to the Generator: remove out-of-scope flows, add edge cases the Planner missed. Here is what the output looks like:
# Test Plan

## 1. Checkout Flow

### 1.1 Successful Order with Valid Credentials
Steps:
1. Navigate to https://ecommerce-playground.lambdatest.io/
2. Log in with test@example.com / Test1234
3. Search for "laptop" and open the first result
4. Click Add to Cart, then Proceed to Checkout
5. Fill billing details and place the order
Expected: Order confirmation page displays with order ID
Use fixed test data and a stable app state before running the Planner. Inconsistent state between runs produces gaps in the generated plan.
2. Generate the Test Script (Generator Agent)
The Generator reads test-plan.md and converts one scenario into an executable Playwright spec file. Reference scenarios by number to prevent ambiguity.
Prompt:
Create a Playwright script for scenario 1.1 from test-plan.md using the Playwright test generator agent.
The Generator opens a browser, replays each step from the scenario in real time, and writes the spec file under tests/. It defaults to semantic locators like getByRole(), getByLabel(), and getByText(). See Playwright assertions for how these locators are used alongside expect() checks. Here is a representative output:
import { test, expect } from '@playwright/test';

test.describe('1.1 Successful Order with Valid Credentials', () => {
  test('completes checkout and shows order confirmation', async ({ page }) => {
    await page.goto('https://ecommerce-playground.lambdatest.io/');
    await page.getByRole('link', { name: 'My Account' }).click();
    await page.getByLabel('E-Mail Address').fill('test@example.com');
    await page.getByLabel('Password').fill('Test1234');
    await page.getByRole('button', { name: 'Login' }).click();
    await page.getByRole('searchbox').fill('laptop');
    await page.getByRole('button', { name: 'Search' }).click();
    await page.locator('.product-thumb').first().click();
    await page.getByRole('button', { name: 'Add to Cart' }).click();
    await page.getByRole('link', { name: 'Checkout' }).click();
    await expect(page.getByRole('heading', { name: 'Order Confirmed' })).toBeVisible();
  });
});
Run the generated spec locally before treating it as production-ready. Verify every assertion reflects the actual business requirement, not just that the page loaded.
3. Execute the Test
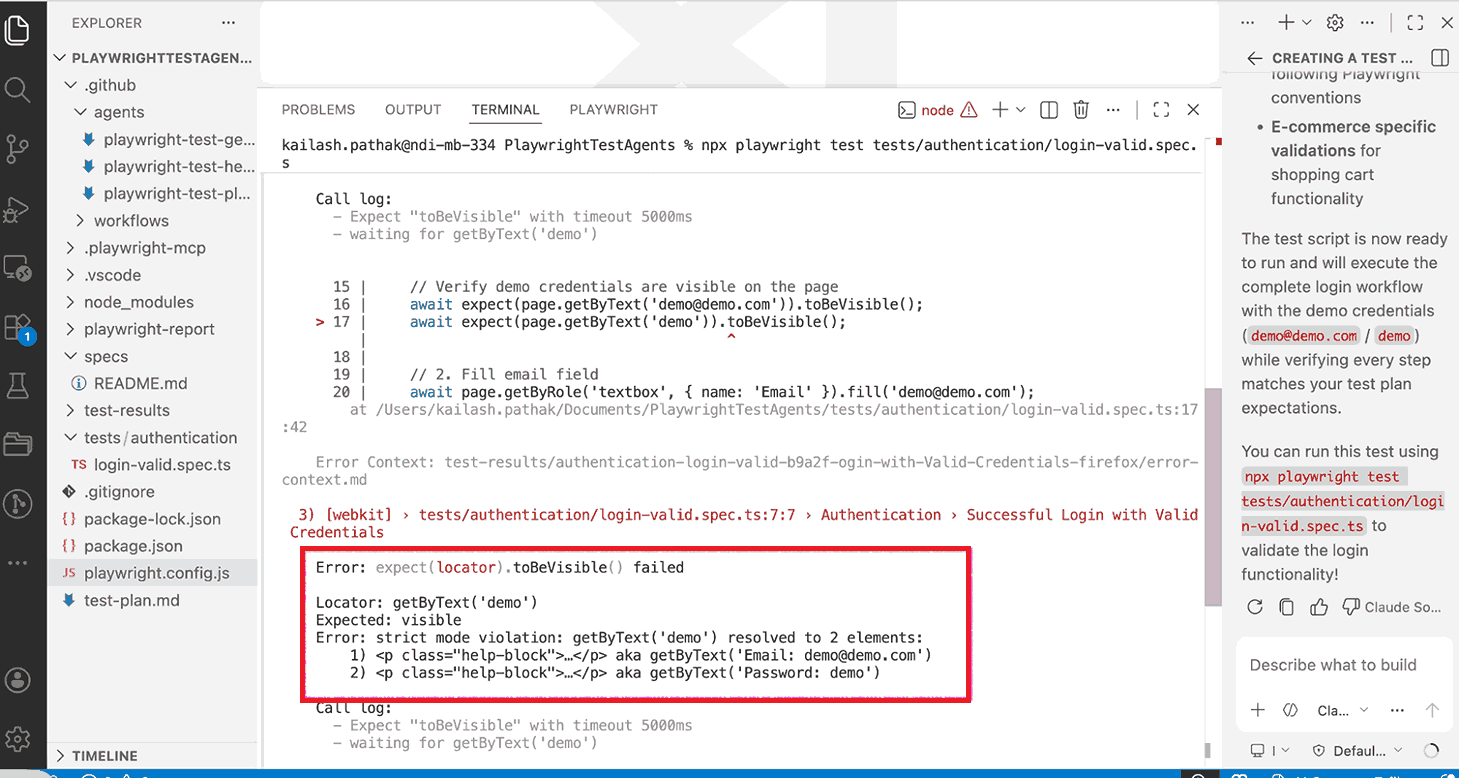
Run the generated spec with the command below. The first run commonly fails because the Generator selected a locator that resolves to more than one element. For additional Playwright run tests options including filters and reporters, see the linked guide.
npx playwright test tests/checkout/checkout-valid.spec.tsA typical strict mode failure looks like this:
Error: strict mode violation: getByText('Login') resolved to 3 elementsPlaywright's strict mode requires every locator to match exactly one element. Do not fix this manually yet. Pass it to the Healer instead.
4. Fix Failures (Healer Agent)
The Healer reads the failure output, identifies the root cause, and rewrites the affected spec. Point it at the failing file.
Prompt:
Identify the reason for the test failure in tests/checkout/checkout-valid.spec.ts and fix it using the Playwright Healer Agent.
The Healer inspects the DOM and rewrites the ambiguous locator. getByText('Login') matching three elements becomes getByRole('button', { name: 'Login' }). This is the same principle behind auto-heal in Playwright: narrow the selector to exactly one element.
The Healer reruns after each fix and continues until all tests pass or it hits its repair limit. Always review changes before committing. A fix can quietly alter what the test was originally verifying.
- Handles: Strict mode violations, selector ambiguity, element timing failures, changed locators after UI updates.
- Cannot fix: Tests broken by application-side bugs, race conditions in the app's JavaScript, or inconsistent API responses.

5. Re-run and Confirm
After the Healer applies fixes, re-run the suite to confirm the repair holds across all scenarios in the plan.
npx playwright testA clean run output looks like:
Running 3 tests using 1 worker

  ✓  tests/checkout/checkout-valid.spec.ts (4.2s)
  ✓  tests/checkout/checkout-guest.spec.ts (3.8s)
  ✓  tests/auth/login-valid.spec.ts (2.1s)

  3 passed (11s)
The spec is now stable for local CI. The next step is running it on a cloud grid against multiple browsers and OS combinations before merging.
Troubleshooting Playwright Agent Issues
Most Playwright Agent failures are not caused by the agents themselves. They come from environment mismatches, config path issues, or unstable app state.
Config File Not Found
This error appears when the agent cannot locate playwright.config.ts. It usually means the agent is running from a different working directory than expected.
- Config location: Place playwright.config.ts at the project root, not inside a subdirectory.
- Working directory: Verify which directory VS Code is running the agent from.
- Absolute paths: Specify the full config path if the agent runs from a nested directory.
- Env vars: Verify environment variables and CLI arguments include the correct config path.
Improper Folder Structure
Agents expect tests to live in standard locations. Non-standard paths cause the Generator to write files the Healer cannot find during repair.
Error: No tests found. Make sure the testDir in playwright.config.ts matches the location of your spec files.- Standard test directory: Keep spec files inside tests/ or e2e/ and do not scatter them across the project.
- Avoid deep nesting: Agents cannot reliably reference files in deeply nested or dynamically generated paths.
- Naming conventions: Use consistent names for test files and folders; agents match by convention, not by search.
Environment Issues
A mismatch between local and CI environments produces failures that look like test bugs but are dependency problems.
browserType.launch: Executable doesn't exist at /path/to/chromium
Run: npx playwright install- Version alignment: Match Node.js and Playwright versions across local, staging, and CI.
- Install dependencies: Run npm install before running agents to ensure all packages are present.
- Install browsers: Run npx playwright install to fetch the browsers for the installed Playwright version.
Permissions and File Access
When running agents in Playwright Docker or other CI environments, agents may lack the permissions needed to read config files or write test output.
- Directory permissions: Verify read and write access on the tests/ and agents/ directories.
- Container restrictions: Check if the CI runner or container blocks filesystem access.
- File packaging: Confirm config files and spec files are not excluded by .dockerignore or .gitignore.
Scale Your Playwright Test Authoring with TestMu's KaneAI
Playwright Agents write tests inside your codebase. TestMu's KaneAI authors them from natural language, then exports directly to Playwright with no manual coding required.
Describe the flow in plain English and KaneAI maps it to a full Playwright spec with locators, assertions, and step structure already in place.
Features:
- Natural language authoring: Write test intentions in plain English, no coding required.
- Playwright export: Generate ready-to-run Playwright spec files directly from KaneAI test cases.
- Self-healing: AI-native element detection updates broken locators when the UI changes.
- Reusable test modules: Convert common flows like login or checkout into reusable blocks across your suite.
- Web and mobile coverage: Author and run tests across desktop browsers, mobile web, and native apps.
To get started, see the KaneAI getting started guide.

Best Practices for Playwright Agents
Playwright Agents produce better output when inputs are unambiguous and the environment is stable and predictable.
- Choose a capable LLM model. Cheaper models skip assertions and ignore locator instructions. Test two models on the same prompt and lock the one that produces semantic locators and complete assertions.
- Write specific prompts. Include the target URL, each step, test data, and expected outcome. Vague prompts produce generic assertions that pass locally but miss real failures in CI.
- State your locator strategy in the prompt. Explicitly request getByRole(), getByLabel(), and getByTestId(). Pair with the Playwright Skill to enforce this automatically.
- Review every generated spec before merging. Agents cannot verify assertions match business logic. A test that only checks the URL changed after a form submit is passing but wrong.
- Run agents against a stable environment. Slow rendering and flaky APIs cause the Planner to miss flows and the Generator to create selectors for elements that render inconsistently. Use fixed test data every time.
- Run the Planner after major feature releases. Point it at newly shipped UI and compare the output against your existing test plan. Coverage gaps show up as new scenarios in the plan that have no matching spec files.
- Version-control your agent definition files. The three .agent.md files define agent behavior. Commit them so the whole team uses the same config. Changes to agent definitions should go through code review.
Conclusion
Playwright Agents take the mechanical work out of test authorship. The Planner maps your flows, the Generator writes the spec files, and the Healer keeps them passing when the UI changes.
Start with one flow. Run npx playwright init-agents --loop=vscode, prompt the Planner on your most-tested path, trim test-plan.md to the scenarios you need, and pass it to the Generator. Review every assertion before merging. Coverage decisions and business logic checks still belong to the engineer. Prefer a hosted, CLI-driven agent instead? Compare a Playwright CLI alternative.
Citations
- Playwright Test Agents: https://playwright.dev/docs/test-agents
- Playwright MCP: https://github.com/microsoft/playwright-mcp
- Playwright v1.56 Release Notes: https://playwright.dev/docs/release-notes
Author
Kailash Pathak
Blogs: 13
Kailash Pathak is a Senior QA Lead Manager at 3Pillar Global with over 18 years of experience in software testing and automation. He has built scalable automation frameworks using Selenium, Cypress, and Playwright, integrating them with CI/CD pipelines and aligning them with business goals. He is the author of Web Automation Testing Using Playwright, which ranked #1 in Amazon’s “API & Operating Environments” category for six consecutive months. He is a Microsoft MVP (Most Valuable Professional) in Quality Assurance, a LinkedIn “Top QA Voice” with 19,500+ followers, and a core member of TestMu AI Spartans, DZone, and Applitools Ambassador programs. Kailash holds certifications including AWS (CFL), PMI-ACP®, ITIL®, PRINCE2 Practitioner®, and ISTQB. He has delivered 25+ QA talks across conferences and webinars and actively mentors engineers while driving quality strategies, shift-left testing, and continuous improvement.


Frequently asked questions
Did you find this page helpful?
More Related Blogs
TestMu AI forEnterprise
Get access to solutions built on Enterprise
grade security, privacy, & compliance
- Advanced access controls
- Advanced data retention rules
- Advanced Local Testing
- Premium Support options
- Early access to beta features
- Private Slack Channel
- Unlimited Manual Accessibility DevTools Tests