

Power Your Software Testing with AI Agents and Cloud
The Native AI-Agentic Cloud Platform to Supercharge Quality Engineering. Test Intelligently and Ship Faster.


- TestMu AI (Formerly LambdaTest)
- /
- Blog
- /
- Playwright Screenshot Comparison: toHaveScreenshot() Guide
Playwright Screenshot Comparison: toHaveScreenshot() Guide
Learn Playwright screenshot comparison with toHaveScreenshot(): baselines, pixel diffs, threshold vs maxDiffPixels, masking, and consistent local and CI runs.
Last Updated on:
A CSS change that pushes the search bar 20 pixels down passes every functional assertion in a Playwright suite, because the search box still exists and still accepts text. Visual testing catches it: Playwright captures the page, compares it with an approved baseline image, and fails the test when more pixels differ than you allow.
This guide builds that check with Playwright's built-in toHaveScreenshot() assertion. The console output blocks come from real runs on the TestMu AI cloud grid with Playwright 1.63.0. They also show why the same test can pass on a laptop and fail in CI, and how to keep one baseline for both.
Every example runs against the eCommerce playground, a demo store that labels itself a dummy website for web automation testing.
How Does Playwright Screenshot Comparison Work?
Playwright screenshot comparison is an assertion: expect(page).toHaveScreenshot() captures the page, retakes it until two consecutive captures match, compares that stable image with a stored baseline, and fails when the images differ by more than the allowed tolerance.
The Playwright visual comparisons documentation states that Playwright Test uses the pixelmatch library for this comparison, and that you can pass options to modify its behavior.
- First run - no baseline exists yet, so the test fails with "A snapshot doesn't exist at ..., writing actual." and saves the capture as the baseline.
- Baseline file - stored next to the spec in a folder named after it, such as
tests/compare.spec.ts-snapshots/. The file name joins the snapshot name, the project name, and the operating system of the machine running the tests. - Later runs - each run compares against the baseline. On a failure, Playwright writes
-actual.png,-expected.png, and-diff.pngfiles totest-results/. - Intentional changes -
npx playwright test --update-snapshotsoverwrites the baselines with fresh captures.
The toHaveScreenshot() API reference defines threshold as an acceptable perceived color difference in the YIQ color space between the same pixel in compared images, from 0 (strict) to 1 (lax), with a default of 0.2.
So threshold decides whether one pixel counts as different; it says nothing about how much of the image may change. That job belongs to maxDiffPixels and maxDiffPixelRatio, which set how many differing pixels a test tolerates. Both are unset by default, and Playwright 1.63's comparator treats an unset budget as zero, so a single changed pixel fails the assertion. When you set both, the stricter one wins.
The pixelmatch README sets yellow as the default diff-output color for anti-aliased pixels and red as the default color for differing pixels, and pixelmatch detects and ignores anti-aliased pixels unless includeAA is enabled.
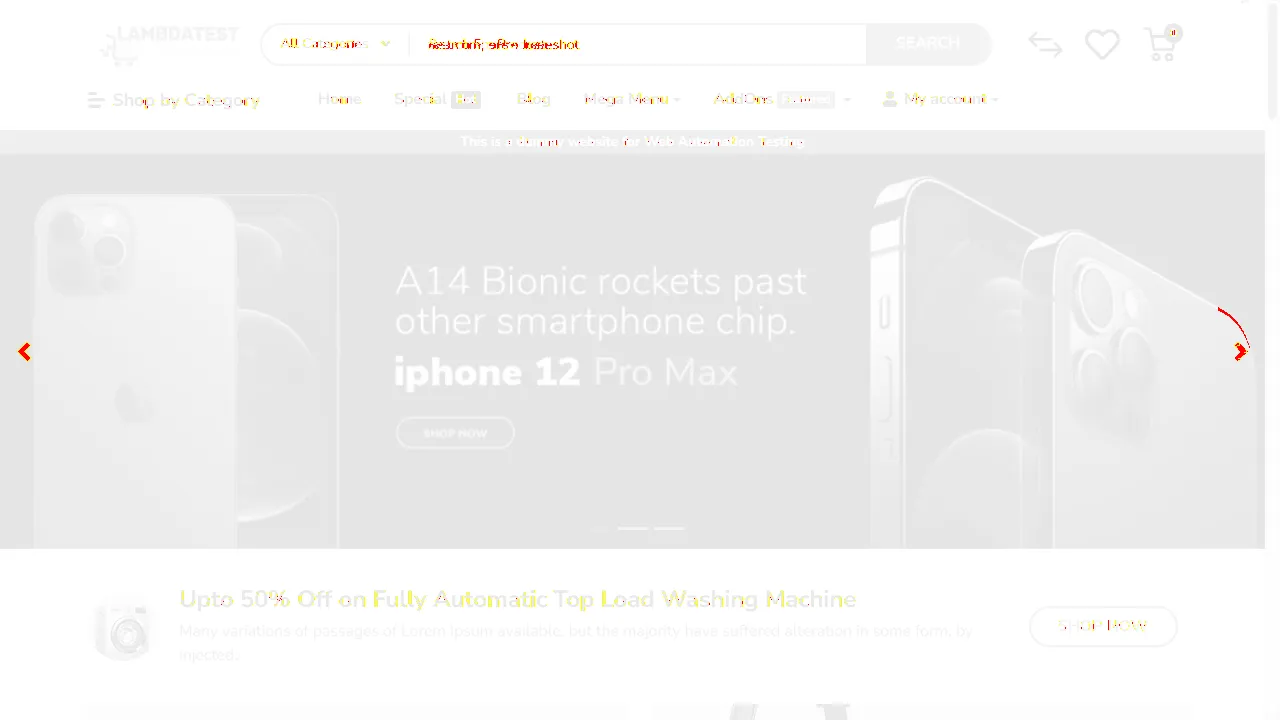
Playwright's diff image follows the same scheme: red pixels are the differences it counts toward the failure, and yellow pixels are anti-aliasing differences left out of the count. A diff that is mostly yellow with one red block usually points to one real change.
How to Set Up Playwright?
Scaffold a project with npm init playwright@latest, which installs @playwright/test, writes a sample playwright.config.ts, and downloads the browsers. The runs in this guide used Playwright 1.63.0 on Node.js 24.
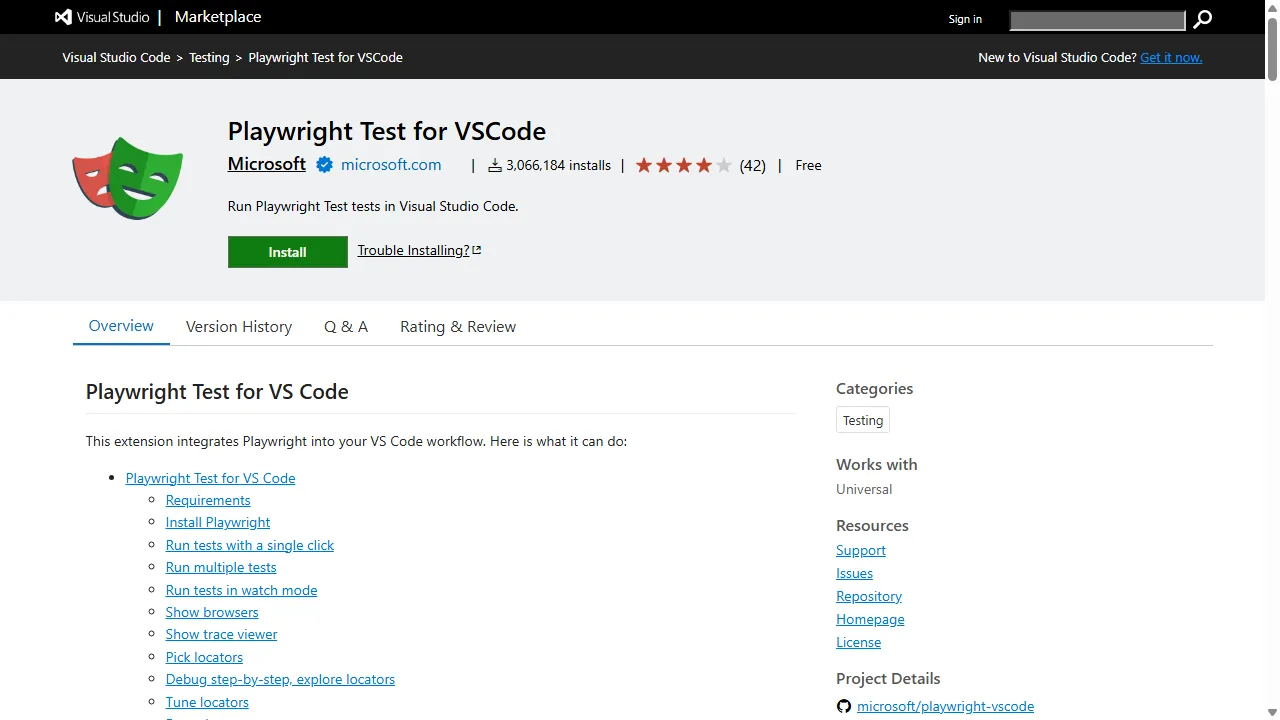
In VS Code, Microsoft's Playwright Test for VSCode extension does the same setup: install it from the Visual Studio Marketplace, then run Install Playwright from the command palette.
The capture and comparison examples in the next two sections, including their console output and screenshots, come from runs of that code with Playwright 1.63.0 on the TestMu AI cloud grid.
How to Capture Screenshots Using Playwright?
page.screenshot() captures an image and returns it as a Buffer; it does not compare anything. Use it to save evidence, feed an external diff tool, or check what a test saw.
The Playwright screenshots guide covers full-page and single-element screenshots, and capturing into a buffer instead of a file so the image can go to a third-party pixel diff tool.
These are the main options and their defaults, as documented in the Playwright 1.63 API reference for page.screenshot():
| Option | Default | What it does |
|---|---|---|
| path | None | File path to save the image. Without it, the image is only returned as a Buffer. |
| type | png | Image format. The quality option applies to lossy formats such as jpeg. |
| fullPage | false | Captures the full scrollable page instead of the current viewport. |
| clip | None | Captures only the region given by x, y, width, and height. |
| mask | None | Covers the listed locators with a box, pink (#FF00FF) unless maskColor sets another color. |
| animations | allow | "disabled" fast-forwards finite CSS animations and transitions and cancels infinite ones. |
| caret | hide | Hides the text cursor so a blinking caret does not change the image. |
| omitBackground | false | Removes the default white background for transparent images. Not applicable to jpeg. |
| scale | device | "css" produces one pixel per CSS pixel, which keeps high-DPI screenshots small. |
| style | None | CSS applied during the capture, for example to hide a clock or an ad slot. |
| timeout | 0 (no timeout) | Maximum wait in milliseconds. The actionTimeout config option changes the default. |
toHaveScreenshot() accepts the same capture options but changes several defaults to make captures repeatable, and adds the comparison and the baseline handling:
| Behavior | page.screenshot() | toHaveScreenshot() |
|---|---|---|
| Compares against a baseline | No | Yes, and fails the test on a mismatch |
| Baseline files | None | Written on the first run, rewritten with --update-snapshots |
| Waits for a stable image | No | Captures until two consecutive screenshots match |
| animations default | allow | disabled |
| scale default | device | css |
| Returns | The image as a Buffer | Nothing; it passes or fails |
Full-Page Screenshot Using Playwright
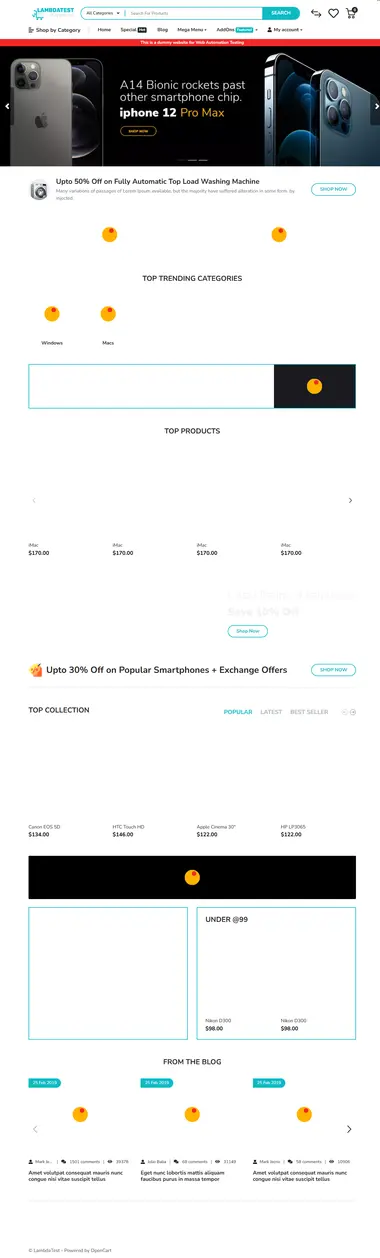
Navigate to the page with page.goto() and pass fullPage: true. The path option sets the file name and location.
import { test } from '@playwright/test';

test('capture full page screenshot', async ({ page }) => {
  await page.goto('https://ecommerce-playground.lambdatest.io/');
  await page.screenshot({ path: 'homepage.png', fullPage: true });
});
The saved file covers the whole scrollable homepage, including everything below the fold. Product images further down still show lazy-load placeholders because nothing scrolled them into view before the capture, so scroll through the page first if those sections matter.
Element Screenshot Using Playwright
When only one component changes between releases, capture that component instead of the whole page, which keeps unrelated content out of the image. Find the element with Playwright locators and call screenshot() on the locator. On the playground, getByRole('textbox', { name: 'Search For Products' }) finds the search input by its accessible name.
On the grid run, that locator resolved to the header search input, outlined in red here for the screenshot:

import { test } from '@playwright/test';

test('capture element screenshot', async ({ page }) => {
  await page.goto('https://ecommerce-playground.lambdatest.io/');
  await page.getByRole('textbox', { name: 'Search For Products' }).screenshot({ path: 'search-box.png' });
});
The image type follows the file extension, and a relative path resolves against the current working directory. This is the search-box.png the grid run saved, cropped to the input's 457 x 26 pixel bounding box:

Capture Screenshot Into Buffer Using Playwright
Leave out path and screenshot() returns the image as a Buffer without writing a file. That is the entry point for third-party image comparison or post-processing, such as sending the capture to a visual testing service.
import { test } from '@playwright/test';

test('capture screenshot to buffer', async ({ page }) => {
  await page.goto('https://ecommerce-playground.lambdatest.io/');
  const buffer = await page.getByRole('textbox', { name: 'Search For Products' }).screenshot();
  console.log(buffer.toString('base64'));
});
The grid run printed the PNG as base64. Every PNG starts with iVBORw0KGgo, the base64 form of the PNG file signature:
iVBORw0KGgoAAAANSUhEUgAAAckAAAAaCAIAAABTgDATAAAG2ElEQVR4nOzcT0gbWRgA8LdlBmZgZ2ECDnRgDRjoHBIw0BziYsAcckhADzkYMLBzsGCgOSg0SxXWUgvrQgvmkIKCwuZgQQ9ZsGBgc0jBLPUwCxHMIQsKcSGFEQzLBCYwA+6bidGosa5maG35fqfM5P0N...

Austin Siewert
Co-Founder, Steadfast Systems
Discovered @TestMu AI yesterday. Best browser testing tool I've found for my use case. Great pricing model for the limited testing I do 👏
2M+ Devs and QAs rely on TestMu AI
Deliver immersive digital experiences with Next-Generation Mobile Apps and Cross Browser Testing Cloud

How to Compare Screenshots With toHaveScreenshot()?
This demo compares the playground homepage before and after typing into the search box, so the only intended difference is the typed text.
Test scenario:
- Capture a baseline screenshot of the homepage.
- Type "test compare screenshot" into the search field and capture again.
- Expect the comparison to report the typed text as the difference.
Step 1: Generate the baseline
import { test, expect } from '@playwright/test';

test('compare screenshot', async ({ page }) => {
  await page.goto('https://ecommerce-playground.lambdatest.io/');
  await expect(page).toHaveScreenshot();
});
Run it with npx playwright test -g "compare screenshot". The first run fails by design and writes the baseline. This is the output from running the same test on the TestMu AI cloud grid (project chrome:latest:Windows 11@lambdatest, set up in the cloud section below), with the local path prefix shortened:
Running 1 test using 1 worker

  x  1 [chrome:latest:Windows 11@lambdatest] › tests\compare.spec.ts:3:5 › compare screenshot (25.1s)

  1) [chrome:latest:Windows 11@lambdatest] › tests\compare.spec.ts:3:5 › compare screenshot

    Error: A snapshot doesn't exist at ...\tests\compare.spec.ts-snapshots\compare-screenshot-1-chrome-latest-Windows-11-lambdatest-win32.png, writing actual.

    Expected: tests\compare.spec.ts-snapshots\compare-screenshot-1-chrome-latest-Windows-11-lambdatest-win32.png
    Received: test-results\compare-compare-screenshot-chrome-latest-Windows-11-lambdatest\compare-screenshot-1-actual.png

  1 failed
The baseline name shows how Playwright keys baselines: the snapshot name, the project name, and win32, the operating system of the machine running the test runner. The browser itself ran on Windows 11 in the cloud; the suffix names the local machine, which matters once baselines move between machines (see the local vs CI section).
Running the unchanged test again passed in 23.0s, so the homepage matched its own baseline on a second run. A baseline that fails its own rerun points to dynamic content that needs a mask before any real comparison is possible.
Step 2: Introduce a difference
import { test, expect } from '@playwright/test';

test('compare screenshot', async ({ page }) => {
  await page.goto('https://ecommerce-playground.lambdatest.io/');
  await page.getByRole('textbox', { name: 'Search For Products' }).fill('test compare screenshot');
  await expect(page).toHaveScreenshot();
});
fill() types into the search field, then toHaveScreenshot() compares the page with the baseline. The run fails, and the call log shows the stability loop at work (repeated capture steps shortened to "..."):
Error: expect(page).toHaveScreenshot(expected) failed

  990 pixels (ratio 0.01 of all image pixels) are different.

Call log:
  - Expect "toHaveScreenshot" with timeout 5000ms
    - verifying given screenshot expectation
  - taking page screenshot
    - disabled all CSS animations
  - waiting for fonts to load...
  - fonts loaded
  - 1752 pixels (ratio 0.01 of all image pixels) are different.
  - waiting 100ms before taking screenshot
  ...
  - 762 pixels (ratio 0.01 of all image pixels) are different.
  - waiting 250ms before taking screenshot
  ...
  - captured a stable screenshot
  - 990 pixels (ratio 0.01 of all image pixels) are different.

Expected: tests\compare.spec.ts-snapshots\compare-screenshot-1-chrome-latest-Windows-11-lambdatest-win32.png
Received: test-results\compare-compare-screenshot-chrome-latest-Windows-11-lambdatest\compare-screenshot-1-actual.png
Diff:     test-results\compare-compare-screenshot-chrome-latest-Windows-11-lambdatest\compare-screenshot-1-diff.png
- Stability loop - only the first capture is compared with the baseline (1752 pixels). After that, Playwright compares each capture with the previous one (the 762-pixel line is the second capture against the first) until two consecutive captures match, then compares that stable capture with the baseline: 990 pixels.
- Rounded ratio - Playwright rounds the printed ratio up to two decimals. 990 pixels in a 1280 x 720 viewport is about 0.001 of the image, not 0.01, so do not copy the printed ratio into
maxDiffPixelRatio. - Output files - the failure wrote the actual, expected, and diff images to
test-results/.
The test-results folder after the failed run:
test-results/
  .last-run.json
  compare-compare-screenshot-chrome-latest-Windows-11-lambdatest/
    compare-screenshot-1-actual.png
    compare-screenshot-1-diff.png
    compare-screenshot-1-expected.png
    error-context.md
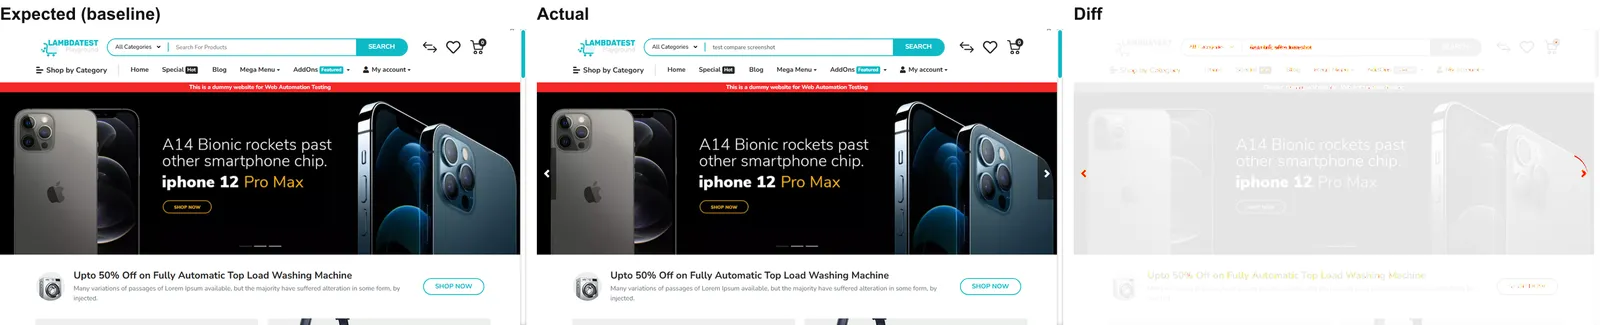
This diff comes from a rerun on the grid that measured the same 990 pixels. The typed text and the hero slider's previous and next arrows are red. Most of the header and banner text is outlined in yellow: anti-aliasing differences that pixelmatch detected and excluded from the count.
Side by side, the captures show where the extra red came from: the slider arrows are visible in the actual capture but not in the baseline, a side effect of typing into the page that the masking section below deals with.
How to Allow an Acceptable Pixel Difference?
A zero-pixel budget suits static pages. For pages with small, known rendering noise, allow a budget with maxDiffPixels (an absolute count) or maxDiffPixelRatio (a fraction of all pixels, between 0 and 1). Set a default for every test in playwright.config.ts:
import { defineConfig } from '@playwright/test';

export default defineConfig({
  expect: {
    toHaveScreenshot: { maxDiffPixels: 100 },
  },
});
Or override it for one assertion. The typed-text difference measured 990 pixels, so a budget of 1000 lets this test pass:
test('compare screenshot', async ({ page }) => {
  await page.goto('https://ecommerce-playground.lambdatest.io/');
  await page.getByRole('textbox', { name: 'Search For Products' }).fill('test compare screenshot');
  await expect(page).toHaveScreenshot({ maxDiffPixels: 1000 });
});
On the cloud grid, this version passed in 20.5s against the same baseline. A later rerun of the unbudgeted test measured 713 pixels instead of 990, so the difference after typing is not fixed from run to run. Measure a few runs before you pick a number. In a real suite, the budget should only absorb rendering noise: a budget large enough to hide the typed text would also hide a missing button of the same size.
How to Mask Dynamic Content Before Comparing?
A pixel budget tolerates noise anywhere on the page. A mask tolerates it only where you expect it: every locator passed to mask is covered by a solid box in both the baseline and the new capture, so changes inside it never count. The first attempt masked only the search box, and the run still failed with 616 differing pixels.
The new diff showed why: typing into the field also changed how the hero slider's previous and next arrows rendered. Masking the arrows as well cut the difference to 339 pixels, all on text edges across the header and banner. Those disappeared once the test moved focus out of the input with blur() before the capture:
test('compare screenshot with mask', async ({ page }) => {
  await page.goto('https://ecommerce-playground.lambdatest.io/');
  const search = page.getByRole('textbox', { name: 'Search For Products' });
  const sliderArrows = page.locator('.carousel-control-prev, .carousel-control-next');
  await search.fill('test compare screenshot');
  await search.blur();
  await expect(page).toHaveScreenshot({ mask: [search, sliderArrows] });
});
A mask changes the baseline image too, so the baseline was regenerated first with npx playwright test --update-snapshots, and Playwright reported that the file "is re-generated, writing actual". With the mask and the blur in place, the test passed on two consecutive cloud runs with no pixel budget at all.
A page.screenshot() capture with the same mask shows what the comparison sees: the search box and both slider arrows are covered by the default pink boxes.

For regions that are easier to hide with CSS, such as a live clock, the stylePath option applies a stylesheet during the capture. The Playwright visual regression testing guide covers more ways to exclude parts of a page.
Let Claude Code write Playwright tests that actually pass.

Why Do Playwright Screenshots Differ Between Local And CI?
A comparison that passes on a laptop can fail in CI with no code change. The Playwright visual comparisons documentation says browser rendering varies with the host OS, version, settings, hardware, power source, and headless mode, so a baseline captured on one machine rarely matches a capture from another.
- Font rendering - each OS anti-aliases text differently, so text edges differ even when the layout is identical.
- Headless versus headed mode - Chromium can render slightly differently depending on whether it runs headless or headed.
- Hardware and GPU drivers - a local machine and a CI runner often take different GPU or software rendering paths.
- Baseline file names - the default name ends with the runner's OS (win32, darwin, or linux), so a Linux CI job looks for a file that a Mac never wrote and fails with "A snapshot doesn't exist".
The fix is to render baselines and comparisons in one environment. Running Playwright inside a Docker image is one way; the Playwright Docker tutorial walks through the setup, and the Playwright CI/CD guide covers the pipeline side.
A cloud grid is the other way: every run uses the same remote browser, whichever machine starts it. The OS suffix still comes from the local runner, as the win32 in the baseline name above shows, so a cloud project needs a path template without it. Projects accept their own snapshotPathTemplate, which lets you drop the suffix for cloud projects only:
projects: [
  {
    name: 'chrome:latest:Windows 11@lambdatest',
    snapshotPathTemplate: '{testDir}/__screenshots__/{testFilePath}/{arg}{-projectName}{ext}',
    use: { viewport: { width: 1280, height: 720 } },
  },
],
On the next cloud run, Playwright wrote the baseline to tests/__screenshots__/compare.spec.ts/compare-screenshot-1-chrome-latest-Windows-11-lambdatest.png, with no OS suffix, so a Mac, a Windows laptop, and a Linux CI job all compare against the same file. Keep the default template for local projects, where the OS really does change the rendering.
How to Run Playwright Screenshot Comparison on the Cloud?
Playwright's comparator keeps baselines as files in your repository, and a diff either passes or fails; there is no review step. SmartUI visual AI testing from TestMu AI moves that workflow to a dashboard: the first run against a new SmartUI project becomes the baseline automatically, each detected change waits for an approve or reject decision, and approved screenshots become the new baseline. Its Smart Ignore mode filters out dynamic content and pixel noise before a change reaches the review queue.
With the hooks approach below, SmartUI captures run inside Playwright sessions on the TestMu AI cloud grid, so the browser and OS matrix comes from the grid rather than from browsers installed on each machine. The steps below follow the SmartUI with Playwright documentation: create a SmartUI project in the dashboard, then pass its name in the test capabilities.

Configure the Cloud Grid
Store the username and access key from your TestMu AI profile in a .env file, along with the SmartUI project name:
LT_USERNAME=<LT_USERNAME>
LT_ACCESS_KEY=<LT_ACCESS_KEY>
SMARTUI_PROJECT=<your SmartUI project name>
Next, add a cloud project to playwright.config.ts. The project name encodes the browser, version, and OS the grid should start; this run used Chrome (latest) on Windows 11:
import { defineConfig, devices } from '@playwright/test';

export default defineConfig({
  testDir: './tests',
  fullyParallel: true,
  forbidOnly: !!process.env.CI,
  retries: process.env.CI ? 2 : 0,
  reporter: 'html',
  projects: [
    {
      name: 'chrome:latest:Windows 11@lambdatest',
      snapshotPathTemplate: '{testDir}/__screenshots__/{testFilePath}/{arg}{-projectName}{ext}',
      use: { viewport: { width: 1280, height: 720 } },
    },
    // Uncomment to run locally instead of on the cloud grid
    // { name: 'chromium', use: { ...devices['Desktop Chrome'] } },
  ],
});
The fixture in lambdatest-setup.ts connects any project whose name contains @lambdatest to the grid and runs every other project locally. It follows the cloud pattern in TestMu AI's Playwright agent skill:
import { test as base, chromium } from '@playwright/test';
import { execSync } from 'child_process';
import dotenv from 'dotenv';
dotenv.config();

const pwVersion = execSync('npx playwright --version').toString().trim().split(' ')[1];

export const test = base.extend({
  page: async ({}, use, testInfo) => {
    const projectName = testInfo.project.name;

    if (!projectName.includes('@lambdatest')) {
      // Local run: launch the browser configured for this project
      const browser = await chromium.launch();
      const context = await browser.newContext(testInfo.project.use);
      await use(await context.newPage());
      await browser.close();
      return;
    }

    // Project name format: browserName:version:platform@lambdatest
    const [browserName, browserVersion, platform] = projectName.split('@lambdatest')[0].split(':');
    const capabilities = {
      browserName: browserName || 'Chrome',
      browserVersion: browserVersion || 'latest',
      'LT:Options': {
        platform: platform || 'Windows 11',
        build: 'Playwright Screenshot Comparison',
        name: testInfo.title,
        user: process.env.LT_USERNAME,
        accessKey: process.env.LT_ACCESS_KEY,
        network: true,
        video: true,
        console: true,
        playwrightClientVersion: pwVersion,
        // Route smartui.takeScreenshot captures to this SmartUI project
        ...(process.env.SMARTUI_PROJECT ? { smartUIProjectName: process.env.SMARTUI_PROJECT } : {}),
      },
    };

    const browser = await chromium.connect({
      wsEndpoint: `wss://cdp.lambdatest.com/playwright?capabilities=${encodeURIComponent(
        JSON.stringify(capabilities)
      )}`,
    });
    const context = await browser.newContext(testInfo.project.use);
    const ltPage = await context.newPage();

    await use(ltPage);

    // Report the result to the TestMu AI dashboard
    const status = testInfo.status === 'passed' ? 'passed' : 'failed';
    const remark = testInfo.error?.message?.slice(0, 250) || 'OK';
    await ltPage.evaluate(
      (_) => {},
      `lambdatest_action: ${JSON.stringify({ action: 'setTestStatus', arguments: { status, remark } })}`
    );
    await context.close();
    await browser.close();
  },
});

export { expect } from '@playwright/test';
- No built-in fixtures requested - the fixture takes an empty object instead of the built-in
page. Requestingpagemakes Playwright launch a local browser first; an earlier version of this fixture did that, and its first cloud run failed with "Executable doesn't exist" on a machine without local browsers. - Project name parsing -
chrome:latest:Windows 11@lambdatestbecomes the browserName, browserVersion, and platform capabilities, so adding a browser only takes a new project entry. - playwrightClientVersion - tells the grid which Playwright version the client runs, read from
npx playwright --version. - chromium.connect() - opens a WebSocket session to the grid's Playwright endpoint. Baseline files are still read and written in your local
testsfolder. - setTestStatus - after the test body finishes, the fixture reports pass or fail to the TestMu AI dashboard, so a visual failure shows up as a failed session.
Every toHaveScreenshot() run in this guide used this fixture with SMARTUI_PROJECT unset. Import test and expect from ../lambdatest-setup instead of @playwright/test, and the tests from the previous sections run on the grid unchanged.
SmartUI Test Implementation
With SMARTUI_PROJECT set, a SmartUI capture is one lambdatest_action call. The screenshotName identifies the screenshot inside the SmartUI project, and fullPage captures the whole scrollable page:
import { test } from '../lambdatest-setup';

test('capture full page screenshot using SmartUI', async ({ page }) => {
  await page.goto('https://ecommerce-playground.lambdatest.io/');
  await page.evaluate(
    (_) => {},
    `lambdatest_action: ${JSON.stringify({
      action: 'smartui.takeScreenshot',
      arguments: { fullPage: true, screenshotName: 'homepage' },
    })}`
  );
});
Run it once to create the baseline. Then add a step that changes the page and keep the same screenshotName, so SmartUI compares the new capture with that baseline:
test('capture full page screenshot using SmartUI', async ({ page }) => {
  await page.goto('https://ecommerce-playground.lambdatest.io/');
  await page.getByRole('textbox', { name: 'Search For Products' }).fill('apple');
  await page.evaluate(
    (_) => {},
    `lambdatest_action: ${JSON.stringify({
      action: 'smartui.takeScreenshot',
      arguments: { fullPage: true, screenshotName: 'homepage' },
    })}`
  );
});
To compare one component instead of the full page, scope the capture to a single element with SmartUI hooks.
Reviewing Changes in SmartUI
SmartUI turns the comparison into a review step. For each screenshot with detected changes, the reviewer can approve the change, which makes the new screenshot the baseline, reject it as a bug, which keeps the existing baseline, or ignore it for that run. A global change, such as a font update, can be bulk-approved across every affected screen.
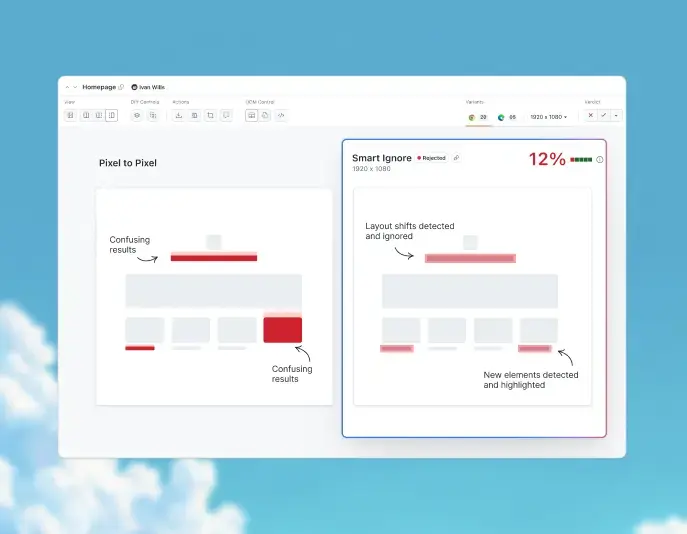
This illustration from the SmartUI product page shows what Smart Ignore changes: the pixel-to-pixel view flags shifted elements as confusing results, while Smart Ignore marks layout shifts as detected and ignored and highlights only the new elements.
- Comparison mode - strict mode flags every changed pixel, while Smart Ignore, the default mode, filters rendering noise before results reach the reviewer.
- Ignore regions - bounding boxes exclude known dynamic areas such as timestamps, ads, and rotating banners, the same job the mask option does in Playwright.
- Approval gates - in CI, the build status waits until every detected change is approved or rejected, and a rejected change blocks the build.

Note: Run your toHaveScreenshot() suite on the TestMu AI cloud grid and review every visual change in SmartUI before it ships. Start testing for free
Conclusion
Start with one toHaveScreenshot() assertion on the page your users see most, commit its baseline, and rerun it unchanged to prove it is stable before you trust a failure. Mask the dynamic regions, keep any pixel budget just above the noise you measured, and generate baselines where the comparisons run.
When the suite needs more browsers than your machines have, run the same tests on the TestMu AI automation cloud by adding one project per browser and OS, and follow the Playwright testing docs to connect your first project.
Author

Jaydeep Karale
Blogs: 6


Jaydeep is a software engineer with 10 years of experience, most recently developing and supporting applications written in Python. He has extensive with shell scripting and is also an AI/ML enthusiast. He is also a tech educator, creating content on Twitter, YouTube, Instagram, and LinkedIn.
Reviewer

Parth Mistry
Reviewer
Parth Mistry is a Member of Technical Staff at TestMu AI (formerly LambdaTest), building SmartUI, the visual regression testing product. He developed and owns the SmartUI CLI, a modular TypeScript tool built on Playwright for multi-browser automation, and built the Storybook CLI for visual regression of UI components. He maintains cross-language SDKs in Python, Java, Ruby, C#, and Node.js, and engineered a Node-based visual rendering service on Kafka, Redis, MySQL, and S3. His migration of that service to an event-driven, KEDA-autoscaled architecture improved execution speed by 60% and cut annual infrastructure cost by $9,600. He also built the end-to-end SmartUI integration with KaneAI. Parth is a Google Summer of Code 2024 contributor and an alumnus of IIT Jodhpur.


Playwright Screenshot Comparison FAQs
Did you find this page helpful?
More Related Blogs
TestMu AI forEnterprise
Get access to solutions built on Enterprise
grade security, privacy, & compliance
- Advanced access controls
- Advanced data retention rules
- Advanced Local Testing
- Premium Support options
- Early access to beta features
- Private Slack Channel
- Unlimited Manual Accessibility DevTools Tests