

Power Your Software Testing with AI Agents and Cloud
The Native AI-Agentic Cloud Platform to Supercharge Quality Engineering. Test Intelligently and Ship Faster.


- TestMu AI (Formerly LambdaTest)
- /
- Learning Hub
- /
- How to Effectively Use Following-Sibling XPath in Selenium Tests
How to Effectively Use Following-Sibling XPath in Selenium Tests
Learn how to use following-sibling XPath in Selenium to locate dynamic web elements, handle forms, tables, and pagination for reliable automation tests.
Last Updated on:
When working with complex or dynamic web applications, locating elements that share the same parent can be challenging. The following-sibling XPath in Selenium is a powerful axis that helps you identify elements that appear immediately after a specific element in the DOM hierarchy.
It’s especially useful when elements don’t have unique attributes but maintain a consistent structural relationship, such as form fields, lists, or pagination links. Using the following-sibling XPath ensures your locators stay reliable even when element positions or IDs change slightly.
TL;DR
- The XPath following-sibling axis selects elements that share a parent with a known reference element and appear after it.
- The expression following-sibling::li[1]/a targets the next pagination link without hardcoding a path that breaks as page numbers change.
- Anchoring to a preceding label locates a form input when the field itself has no stable ID or class.
- Inside a table row, following-sibling fetches a specific column value relative to a reference cell.
- Wrapping text comparisons in normalize-space() stops an XPath match from failing on stray whitespace.
- Prefer an ID or CSS selector over following-sibling when the DOM changes often, because sibling positions shift.
What Are XPath Axes?
XPath axes are a core feature of XPath that allow us to navigate through the DOM structure relative to a specific element.
They allow us to traverse in different directions, referring to the element itself (self), moving up (parent), down (child), or sideways (sibling), to define relationships between elements.
This makes it possible to find elements dynamically based on their position or relation to other elements, which is especially useful in complex or changing UIs where static locators may break. In test automation, XPath is often used when other Selenium locators, like tags or CSS class names, are not enough to select all elements in the DOM.
The common XPath axes are:
- self: Selects the current node itself.
- parent: Selects the parent of the current node.
- ancestor: Selects all ancestors (parent, grandparent, etc.) of the current node.
- ancestor-or-self: Selects the current node and all its ancestors.
- preceding: Selects all nodes that come before the current node in the document, excluding ancestors.
- preceding-sibling: Selects all siblings before the current node.
- following: Selects all nodes that come after the current node in the document, excluding descendants.
- following-sibling: Selects all siblings after the current node.
- child: Selects all direct children of the current node.
- descendant: Selects all descendants (children, grandchildren, etc.) of the current node.
- descendant-or-self: Selects the current node and all its descendants.
What Is Following-Sibling XPath in Selenium?
The following-sibling XPath is used to locate all the elements that share the same parent and appear after the current node in the DOM hierarchy. In simpler terms, it allows you to move sideways to the next sibling elements under the same parent.
Syntax: The syntax for the following-sibling in Selenium is:
current_node/following-sibling::tagname- current_node: The reference element (context node) from which the search starts.
- following-sibling: Specifies the XPath axis to traverse.
- tagname: Filters sibling elements by their HTML tag.
Optional Indexing
- [n]: If multiple siblings match, select a specific one using [n].
Note: XPath indexing is 1-based, so [1] refers to the first matching sibling.
Just to understand the working of the following-sibling XPath in Selenium, let’s take an example.
Example: Selecting an Input Field in a Form
<div class="form-group">
   <label for="username">Username:</label>
   <input type="text" id="username" />

   <label for="password">Password:</label>
   <input type="password" id="password" />

   <button type="submit">Login</button>
</div>
To select the password <input> using its <label> as a reference:
//label[@for='password']/following-sibling::input[@id='password']The following-sibling axis selects all the sibling elements that match the criteria. So, if multiple siblings of the same type exist, you can further refine the selection by using an index.
//label[@for='password']/following-sibling::input[1]Here, [1] ensures that only the first matching sibling <input> is selected.

Note: Run your automation test script at scale across 3,000+ browser and OS combinations. Try TestMu AI Now!
Where to Apply Following-Sibling XPath in Automation?
You can apply the following-sibling XPath in Selenium automation testing when you need to locate elements that appear after a specific node within the same parent. It’s especially useful for handling structured layouts like form fields, table rows, or labels linked to input fields, where element positions remain consistent.
Let’s discuss some real-time examples in web automation where the following-sibling XPath can be useful for precise element selection.
Selecting the Next Immediate Sibling
When you need to interact with the element that directly follows a specific element on a web page, you can use the following-sibling XPath to locate it precisely.
Test Scenario:
- Pagination: Navigate to the page link that comes right after the current page.
- Multi-step Form: Progress to the next step.
Example:
Consider a pagination component.
<div class="pagination">
 <a class="page" href="?page=1">1</a>
 <a class="page" href="?page=2">2</a>
 <a class="page" href="?page=3">3</a>
</div>
To select and click the immediate next page after “1”, use the following-sibling XPath as shown below:
//a[text()='1']/following-sibling::a[1]This would select:
<a class="page" href="?page=2">2</a>Selecting All Following Siblings
When you need to interact with all the sibling elements following a specific element on a web page, you can use the following-sibling XPath to select them efficiently.
Test Scenario:
- Navigation menus: Verify that all menu items after a given item are present.
- Dropdowns: Retrieve all dropdown options that appear after a known value.
- Dynamic lists: Retrieve all options that appear after a reference option when lists update dynamically.
Example:
Consider a navigation menu.
<ul class="nav">
 <li>Home</li>
 <li>Products</li>
 <li>Services</li>
 <li>Contact</li>
</ul>
To select all menu items that come after “Products,” use the following-sibling XPath as shown below:
//li[text()='Products']/following-sibling::liThis would select:
<li>Services</li>
<li>Contact</li>
Locating Input Fields Dynamically in Forms
When form fields lack unique IDs or classes, but their labels can be used as anchors, you can use the following-sibling XPath to locate the corresponding input fields dynamically.
Test Scenario:
- Forms: Locate the input field that follows a label.
- Dynamic validation fields: Target input fields that appear after certain labels in dynamically generated forms, where new fields are revealed based on user interaction.
Example:
Consider a login form.
<label>Username</label>
<input type="text" name="username">
<label>Password</label>
<input type="password" name="password">
To select the input field that comes right after the “Username” label, use the following-sibling XPath as shown below:
//label[text()='Username']/following-sibling::inputThis would select:
<input type="text" name="username">Handling Dynamic Content and Error Messages
When elements appear conditionally on a web page, you can use the following-sibling in XPath to locate them reliably.
Test Scenario:
- Validation messages: Capture error or success messages that appear after a form is submitted.
- Conditional content: Select elements that are revealed only after a user interaction, like accordions, alerts, pop-up messages, etc.
Example:
Consider a login form.
<form id="login">
 <label>Username</label>
 <input type="text" name="username">

 <label>Password</label>
 <input type="password" name="password">
</form>
<div class="error">Invalid credentials</div>
To select the error message that appears after an invalid form submission using the following-sibling XPath as shown below:
//form[@id='login']/following-sibling::div[@class='error']This would select:
<div class="error">Invalid credentials</div>Extracting Data from Tables
When you need to fetch specific values from table rows or columns based on a reference cell, you can use the following-sibling XPath for precise selection.
Test Scenario:
- Row-based data retrieval: Get values from other columns in the same table row.
- Dynamic tables: Handle tables where rows may be reordered or new rows are added, but the relative structure remains consistent.
- Content verification: Validate that table data matches expected values.
Example:
Consider a product table.
<table>
 <tr>
   <td>Product A</td>
   <td>$50</td>
   <td>In Stock</td>
 </tr>
 <tr>
   <td>Product B</td>
   <td>$75</td>
   <td>Out of Stock</td>
 </tr>
</table>
To select the price of “Product B”, use the following-sibling XPath as shown below:
//td[text()='Product B']/following-sibling::td[1]This would select:
<td>$75</td>Navigating Through Nested Sections
When a page contains repeated or nested structures, you can use following-sibling in XPath to select elements that appear directly after a known reference node.
Test Scenario:
- Nested content validation: Interact with sections that are sequentially organized under the same parent, such as accordion panels or FAQ items.
- Image galleries/slideshows: Select the next image, caption, or slide after a reference element.
- Comment threads/discussions: Grab replies or subsequent comments that follow a specific comment.
Example:
Consider an accordion section.
<div class="accordion">
 <h3>Section 1</h3>
 <div class="panel">Content 1</div>

 <h3>Section 2</h3>
 <div class="panel">Content 2</div>
</div>
To select the panel immediately following “Section 1”, use the following-sibling XPath as shown below:
//h3[text()='Section 1']/following-sibling::div[@class='panel'][1]This would select:
<div class="panel">Content 1</div>How to Use Following-Sibling XPath in a Real Test Case?
Using the following-sibling in XPath in a real test case helps you navigate dynamic web elements, like pagination links or sequential form fields, without hardcoding element positions. It ensures your automation scripts remain robust even when the page structure changes slightly.
Let us create an automation test using the following-sibling in XPath for a simple pagination scenario.
Test Scenario:
- Go to TestMu AI Playground E-Commerce Store.
- Navigate to the product listing page (e.g., Laptops).
- Identify the current active page number.
- Click the next page using the following-sibling XPath axis.
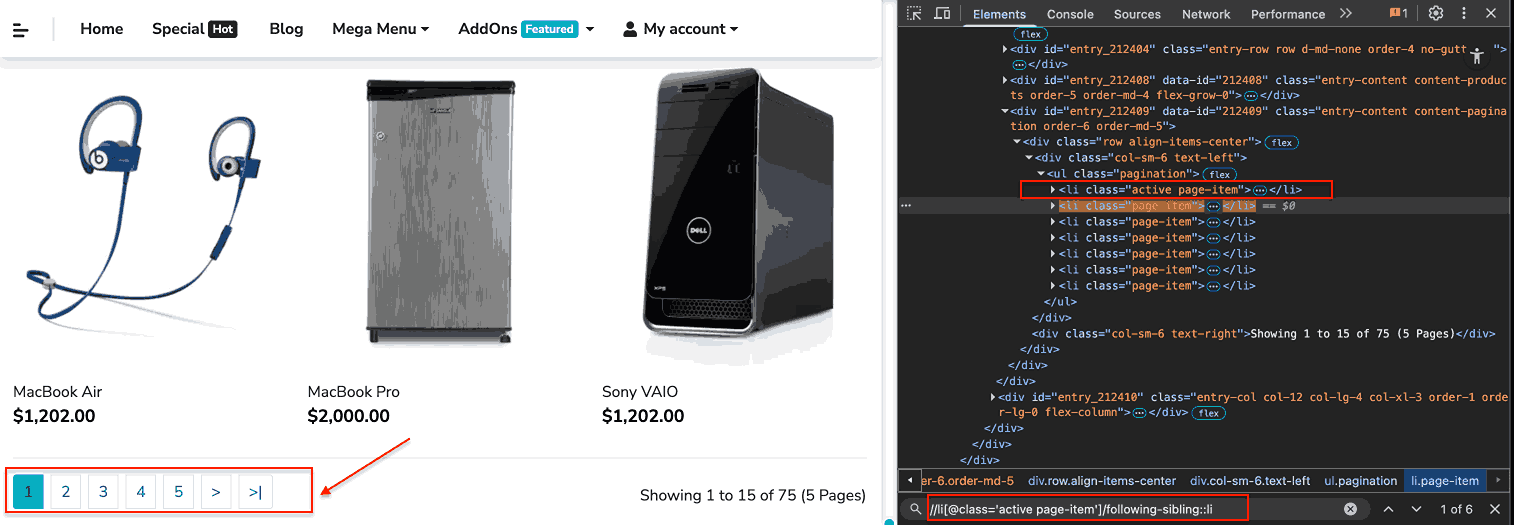
Before implementing the pagination test using the following-sibling XPath, make sure you have the following setup:
Prerequisites:
Make sure you have the following libraries and tools already installed.
- Node.js & npm: Install the latest Node.js version to manage packages and run your WebdriverIO scripts, and to verify your installation, run the command below:
node -v
npm -vnpm install @wdio/cli @wdio/globals --save-devnpm install mocha --save-devnpm install chai --save-devnpm install chromedriver --save-devYou can implement this automation test for the scenario using the WebdriverIO framework, but before you jump to the entire code, you need to get the XPath for the next page.
Get the XPath for the Next Page:
Here, the XPath for the next page would be:
//li[@class='active page-item']/following-sibling::li[1]/aThe index [1] selects the first sibling <li>after the active page (context node), which corresponds to the next page link.
Code Implementation:
import { browser, $ } from "@wdio/globals";


describe("TestMu AI Playground Pagination Test", () => {
 before(async () => {
   // Visit the TestMu AI Playground E-Commerce Store
   await browser.url("https://ecommerce-playground.lambdatest.io/");
 });


 it("Navigate to Laptop product listing and click next page", async () => {
   // Go to the laptop product listing page
   const laptopCategory = await $("//h4[normalize-space()='Laptops']");
   await laptopCategory.click();


   // Wait for the product listing page to load
   const productListUrl = await browser.getUrl();
   expect(productListUrl).toContain("route=product/category&path=18");


   // Identify the current active page number
   const activePageEl = await $("//li[@class='active page-item']");
   const currentPageText = await activePageEl.getText();
   const currentPage = parseInt(currentPageText.trim());


   console.log("Current active page is:", currentPage);


   // Click the next page using following-sibling
   const nextPage = await $(
     "//li[@class='active page-item']/following-sibling::li[1]/a"
   );
   await nextPage.click();


   // Verify that page has navigated to next page
   const newProductListUrl = await browser.getUrl();
   expect(newProductListUrl).toContain(`page=${currentPage + 1}`);
 });
});

Test Execution:
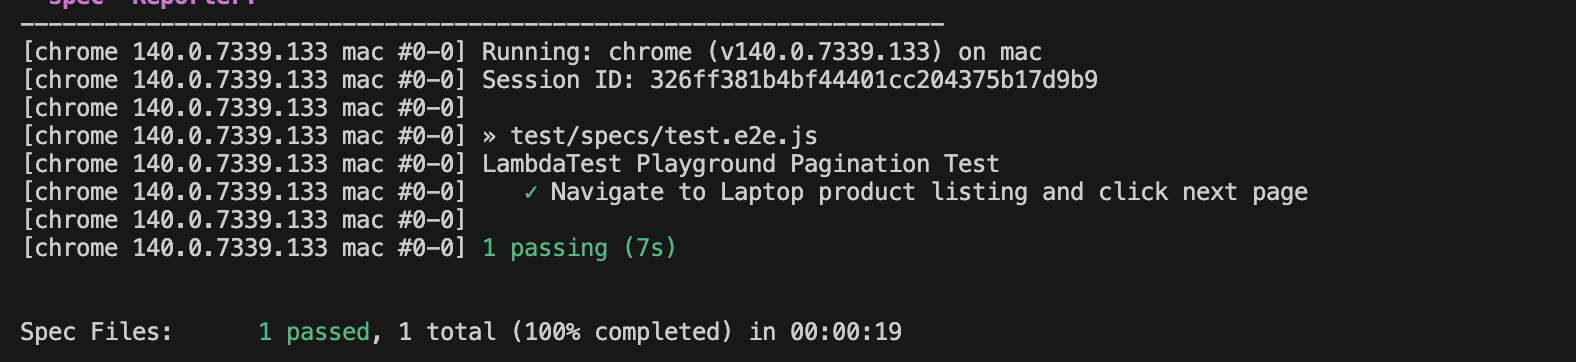
To further enhance test execution speed and scalability, you can move your automation tests to a cloud platform. Local execution works fine but is limited by available infrastructure, browser instances, and system resources. Running tests in the cloud allows parallel execution across multiple browsers and devices, reducing overall test time significantly.
By leveraging cloud-based platforms like TestMu AI, you can perform both manual and Selenium testing at scale across 3,000+ browser and OS combinations and 10,000+ real devices, all with minimal configuration changes.
To get started with TestMu AI, follow the steps given below:
- Install wdio-lambdatest-service: Add the TestMu AI service to your WebdriverIO setup using
npm i wdio-lambdatest-service --save-dev// wdio.conf.js
exports.config = {
// ...
user: process.env.LT_USERNAME,
key: process.env.LT_ACCESS_KEY,
logFile : './logDir/api.log',
product : 'appAutomation',
services: [
['lambdatest', {
tunnel: true
}]
],
// ...
};
capabilities: [
   {
     browserName: "Chrome",
     browserVersion: "dev",
     "LT:Options": {
       username: process.env.LT_USERNAME,
       accessKey: process.env.LT_ACCESS_KEY,
       platformName: "Windows 10",
       project: "Following Sibling XPath Axis Demo",
       build: "Build 1",
       name: "Pagination Test",
       w3c: true,
       plugin: "node_js-webdriverio",
     },
   },
 ],
Your final configuration file must look like this:
export const config = {
 runner: "local",
 specs: ["./test/specs/**/*.js"],
 exclude: [],
 maxInstances: 10,
 user: process.env.LT_USERNAME,
 key: process.env.LT_ACCESS_KEY,
 logFile: "./logDir/api.log",
 product: "appAutomation",
 services: [
   [
     "lambdatest",
     {
       tunnel: true,
     },
   ],
 ],
 capabilities: [
   {
     browserName: "Chrome",
     browserVersion: "dev",
     "LT:Options": {
       username: process.env.LT_USERNAME,
       accessKey: process.env.LT_ACCESS_KEY,
       platformName: "Windows 10",
       project: "Following Sibling XPath Axis Demo",
       build: "Build 1",
       name: "Pagination Test",
       w3c: true,
       plugin: "node_js-webdriverio",
     },
   },
 ],
 logLevel: "info",
 bail: 0,
 waitforTimeout: 10000,
 connectionRetryTimeout: 120000,
 connectionRetryCount: 3,
 framework: "mocha",
 reporters: ["spec"],
 mochaOpts: {
   ui: "bdd",
   timeout: 60000,
 },
};
Test Execution:
Run the following command given below:
npm run wdioThe test has been executed successfully in the TestMu AI Cloud Grid. You can verify the result in your TestMu AI Automation Dashboard.
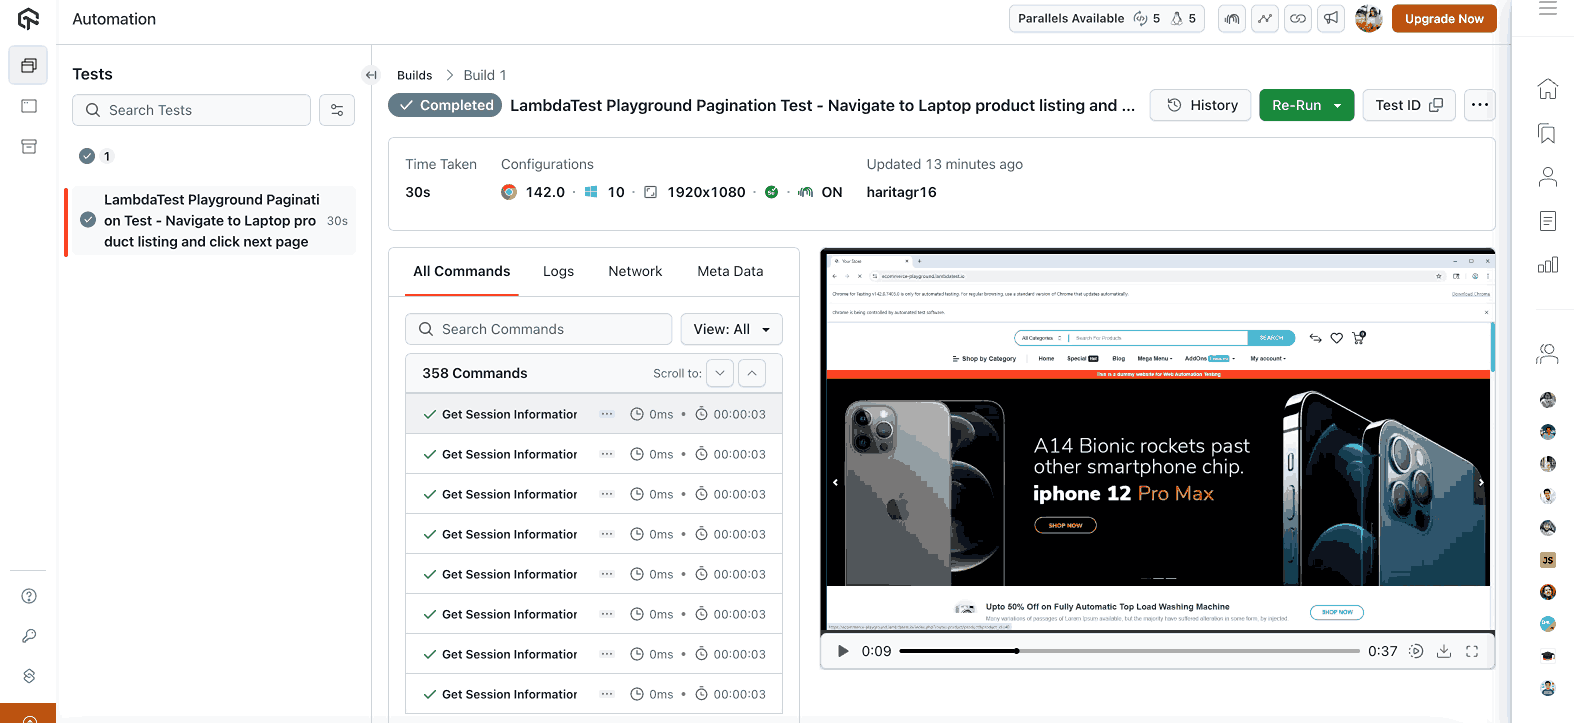
This test shows how you can effectively use following-sibling XPath to navigate pagination dynamically, without hardcoding the next page number.
To get started, check out this guide on Selenium testing with TestMu AI.
Common Pitfalls to Avoid with Following-Sibling XPath in Selenium
While the following-sibling axis is powerful, if used carelessly, you may encounter issues. Below are some common pitfalls faced by testers, along with ways to avoid them.
Multiple Matching Elements
If multiple elements match the same XPath expression, following-sibling::tagname may return multiple matches, resulting in unintended element selections.
Solution:
- Use Indexing (with caution) to select a specific occurrence
- Use attribute conditions like @class, or @id
- Use text-based matching like text()
Solution:
//label[text()='Username']/following-sibling::input
//form[@id='login']/following-sibling::div[@class='error']
Dynamic Text or Attribute Changes
If an element’s text or attributes change dynamically, relying on exact matches may cause failures.
Code Example of Exact Match:
<h2>Messages Today: 7</h2>
<p>Unread messages summary</p>
Here, the number of messages “7” is a dynamic value and may change. Using an exact text match is likely to cause the test to fail.
//h2[text()='Messages Today: 7']/following-sibling::pSolution:
Instead of exact matching, use partial matching with contains().
//h2[contains(text(),'Messages Today')]/following-sibling::pInvisible or Delayed Elements
Elements may not be rendered or visible immediately due to the way the browser’s rendering engine processes the page. To handle this, you can use Selenium waits, which allow your test to pause until elements are present, visible, and ready for interaction.
Common Causes Include:
- Lazy loading, animations, or transitions.
- Asynchronous content loading.
- Hidden elements via CSS (display: none; or visibility: hidden;).
Solution:
- Explicit Waits: Use Selenium WebDriverWait to wait until elements are present, visible, and enabled.
WebElement element = new WebDriverWait(driver, Duration.ofSeconds(10))
   .until(d -> {
       WebElement el = d.findElement(By.id("elementId"));
       return (el.isDisplayed() && el.isEnabled()) ? el : null;
   });
element.click();WebElement element = wait.until(ExpectedConditions.visibilityOfElementLocated(By.id("elementId")));
element.sendKeys("test");wait.until(ExpectedConditions.invisibilityOfElementLocated(By.id("loadingSpinner")));Whitespaces and Hidden Text
Extra spaces, line breaks, or hidden text nodes may cause mismatches and test failures.
Code Example of Whitespaces:
<div>
  Welcome
  User
</div>
If you try a direct text match as below, it will fail.
//div[text()='Welcome User']Solution:
Use normalize-space() in your XPath to trim unnecessary whitespace.
//div[normalize-space(.)='Welcome User']Unstable DOM Structure
The following-sibling axis in Xpath is highly dependent on the DOM layout. Changes like adding, removing, or reordering elements may break your XPath.
Solution:
- Avoid relying only on sibling positions.
- Combine with other axes like ancestor, descendant, or child.
- Prefer direct locators like By.id, By.className, or By.cssSelector where possible.
Performance Issues
Overly broad XPath queries can slow down test execution.
Code Example of Performance Issues:
//*[following-sibling::div]This searches for all elements in the DOM that have a following-sibling <div>, which is inefficient in large applications and can cause test lag.
- Avoid wildcards (*) wherever possible; target specific elements instead.
- Combine with attributes like text(), @class, or @id for precision.
- Use indexing as needed.
- Prefer faster locators such as By.id, By.className, or By.cssSelector, as they are usually more efficient than XPath.
Though Selenium offers many locator strategies, there’s often debate on when to use XPath vs CSS selectors, as each has its own advantages and trade-offs in terms of readability, flexibility, and performance.
Best Practices for Using Following-Sibling XPath in Selenium
Using the following-sibling axis can make your automation scripts powerful. By implementing the following strategies, you can ensure that your tests are efficient, maintainable, and robust.
Be as Concise and Specific as Possible
Keep the XPath expression as simple and straightforward as possible. This is crucial for maintaining the readability and maintainability of tests and ensuring there are no errors as the application evolves. When writing XPath in Selenium, always combine the following-sibling with conditions like text(), @class, or @id to avoid selecting unintended siblings.
Example:
//label[text()='Username']/following-sibling::input//form[@id='login']/following-sibling::div[@class='error']Use Indexing When Targeting a Specific Sibling
Numeric indexing allows precise targeting within a set of matched siblings. Use [n] to select the exact sibling when multiple matches exist.
Example:
//h3[text()='Section 1']/following-sibling::div[1]Combine With Other Axes for Complex Structures
The following-sibling can be combined with other XPath axes, like descendant or child, to navigate nested or dynamic content efficiently.
Example:
<div class="section">
 <h2>Introduction</h2>
 <div class="content">
   <button>Read More</button>
 </div>
</div>
To select the Read More button from the Introduction heading, the XPath can be:
//h2[text()='Introduction']/following-sibling::div/child::buttonor using shorthand:
//h2[text()='Introduction']/following-sibling::div/buttonConclusion
The following-sibling XPath axis provides a precise way to select elements that appear after a reference node within the same parent. Its strength and versatility make it invaluable for navigating complex web structures, including dynamic content, interactive menus, and intricate forms.
However, over-reliance on following-sibling without combining it with other XPath axes, conditions, or functions can lead to brittle or suboptimal locators. But by using it thoughtfully alongside other XPath techniques, testers can create robust, maintainable, and reliable automation scripts.
Citations
- XPath Axes: https://jrebecchi.github.io/xpath-helper/xpath-axes.html
- wdio-lambdatest-service: https://www.npmjs.com/package/wdio-lambdatest-service
- Infer XPath:https://www.researchgate.net/publication/345652983_Infer_XPath
Author

Harita Ravindranath
Blogs: 18


Harita Ravindranath is a Full Stack Developer and Project Manager at Tokhimo Inc., with 7 years of experience in the tech industry. She has completed her graduation in B-tech in Electronics and Communication Engineering. She has 5+ years of hands on expertise in JavaScript based technologies like React.js, Next.js, TypeScript, Node.js, and Express.js, and has led 4 full stack projects from scratch. Harita also brings over 2 years of experience in Quality Engineering, including manual and automation testing using Selenium and Cypress, test strategy creation, and Agile/Scrum based development. With 4+ years in project leadership, she is skilled in managing CI/CD pipelines, cloud platforms, and ensuring high quality releases. Harita has authored 30+ technical blogs on web development and automation testing, and has worked on end to end testing for a major banking application covering UI, API, mobile, visual, and cross browser testing. She believes in building clean, efficient, and maintainable solutions by avoiding over engineering.
Reviewer

Akshay Verma
Reviewer
Akshay Verma is a Senior Product Manager at TestMu AI (formerly LambdaTest), where he drives adoption and product-led growth across the testing platform, focusing on onboarding, time-to-value, and unlocking new markets. Earlier in the company he drove the execution of product features that contributed to a 2x revenue-growth trajectory within a year. Before TestMu AI he helped build the Revenue Intelligence product from scratch at Next Quarter, which went on to drive 43% of that company's revenue. Akshay holds a B.Tech in Computer Science from Delhi Technological University.
On This Page
- What Are XPath Axes?
- What Is Following-Sibling XPath in Selenium?
- Where to Apply Following-Sibling XPath in Automation?
- How to Use Following-Sibling XPath in a Real Test Case?
- Common Pitfalls to Avoid with Following-Sibling XPath in Selenium
- Best Practices for Using Following-Sibling XPath in Selenium
- Conclusion
- Citations
Frequently asked questions
Did you find this page helpful?
More Related Learning Hubs
TestMu AI forEnterprise
Get access to solutions built on Enterprise
grade security, privacy, & compliance
- Advanced access controls
- Advanced data retention rules
- Advanced Local Testing
- Premium Support options
- Early access to beta features
- Private Slack Channel
- Unlimited Manual Accessibility DevTools Tests