

Power Your Software Testing with AI Agents and Cloud
The Native AI-Agentic Cloud Platform to Supercharge Quality Engineering. Test Intelligently and Ship Faster.


- TestMu AI (Formerly LambdaTest)
- /
- Blog
- /
- AI Agent to Generate Selenium Java Tests [2026 Guide]
AI Agent to Generate Selenium Java Tests [2026 Guide]
Use an AI agent to generate Selenium Java tests from plain English scenarios. Step-by-step guide using OpenAI and Ollama to automate test script creation fast.
Last Updated on:
Artificial Intelligence is transforming software testing by enabling faster test creation, smarter execution, and more efficient quality assurance processes. According to the Gartner Market Guide for AI-Augmented Software-Testing Tools, 80% of enterprises are expected to integrate AI testing tools into their engineering toolchains by 2027, up from 15% in early 2023.
AI agents can generate test cases, automate script creation, execute tests, and produce detailed reports with minimal manual effort.
An AI Agent to generate Selenium Java tests takes this a step further by converting plain English use cases into executable Selenium automation scripts. The agent reads a .txt file containing testing scenarios, processes the content using AI models such as OpenAI or Ollama, and automatically generates Selenium test scripts in Java, reducing manual scripting effort and accelerating automation development.
Overview
To generate Selenium Java tests automatically, build a custom Python-based AI agent using OpenAI for cloud-based generation, or use KaneAI for an AI-native, codeless natural-language testing experience. These solutions convert plain-English test scenarios into structured Selenium WebDriver code using TestNG and the Page Object Model.
Building an AI Agent for Test Automation
- Best for local LLM execution: Ollama - This local provider allows a Python-based AI agent to generate Selenium Java test scripts directly on a local machine using a configured offline model.
- Best for cloud-based AI generation: OpenAI - This provider connects a Python script to GPT models to securely generate structured Selenium WebDriver Java code based on plain-English test scenarios.
- Best for scenario ingestion: Plain-text files - The custom AI agent reads test scenarios directly from a .txt file to establish a single, well-defined source of truth for the language model.
- Best for provider routing: Configured Python scripts - The main Python script dynamically routes the test scenario to either OpenAI or Ollama based on the provider selected in the configuration file.
- Best for structured script generation: Page Object Model - The AI agent outputs clean Selenium WebDriver Java code split into Page Object classes, a Test class, testng.xml, and a Readme file.
AI-Native Selenium Test Automation
- Best for codeless test management: KaneAI - This GenAI-native agent, built into the TestMu AI ecosystem, allows teams to plan, author, run, and evolve Selenium tests entirely through natural-language prompts without manual scripting.
Understanding the Selenium AI Test Generation Workflow
Before you deep dive into building the AI agent, here is a high-level overview of how this AI Agent works for generating Selenium Java test automation scripts.
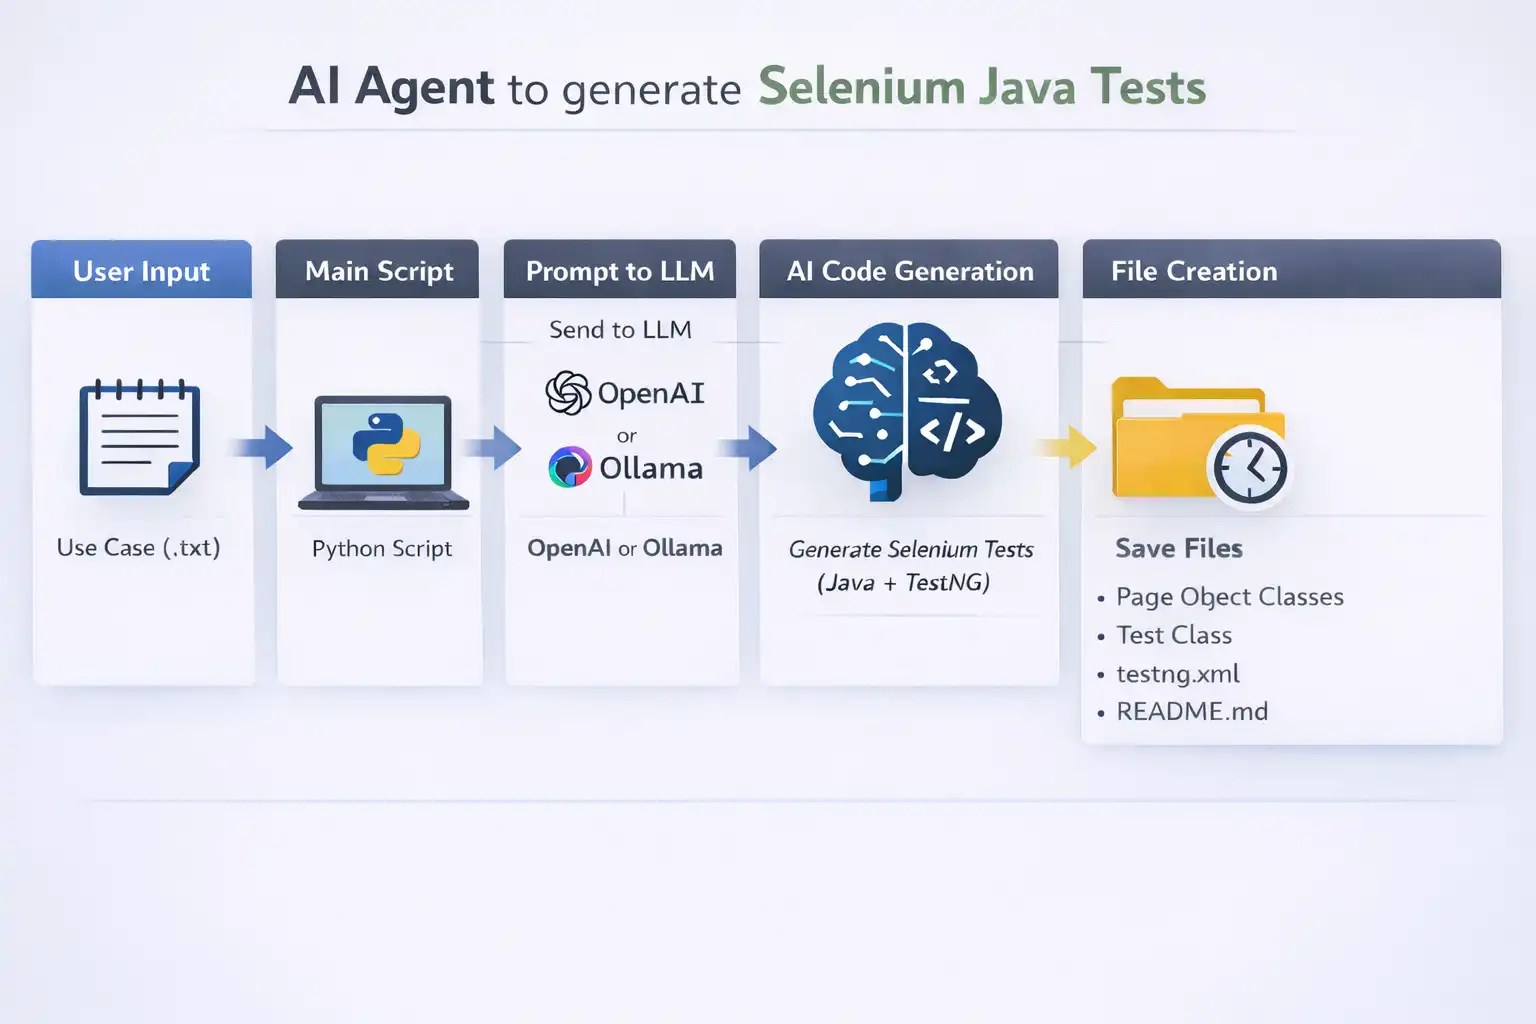
The process is explained step by step below:
- User Input: You provide a plain English test scenario in a .txt file
- Processing Layer: The Python main script reads your test scenario file and forwards it to the LLM model (OpenAI or Ollama), depending on your configuration.
- AI Engine: Before sending requests to the LLM, the AI agent converts your test scenario from plain English to a structured prompt and adds clear instructions like:
- Generate Selenium WebDriver code in Java
- Use the TestNG framework
- Follow Page Object Model
- Generate Multiple Page object classes (if needed)
- Rules for generating the code
- Output format for files
- File Generation: The AI agent creates a new timestamp-based folder and stores the generated code in separate files, bifurcating the page object classes, test class, testng.xml, and Readme.md
Project Structure
.
├── config.py
├── tools.py
├── main.py
├── requirements.txt
├── .env
├── test_cases/
│   ├── input/
│   │   └── sample_test_case.txt
│   └── output/
How Do You Build an AI Agent for Test Automation?
You will be building an AI Agent for test automation that performs the following tasks:
- Reads a test scenario from a .txt file
- Sends the scenario with the right prompt to OpenAI/Ollama, based on the provider selected in the config file
- Generates the Selenium WebDriver Java test automation scripts bifurcated into:
- Page Object Classes
- Test Class
- Testng.xml
- Readme.md with notes and steps to run the test
Prerequisites
Before you start building the AI agent for test automation, make sure you have the following in place:
- Python 3.14 and above
- Code Editor (VS Code is preferred)
- Basic understanding of Python and Terminal
- LLM Setup:
- OpenAI API Key
- Ollama setup on the local machine
- Test Scenario written in Plain English text
Building the AI Agent Step-by-Step
Let's start building the AI agent using the following step-by-step guide:
- Creating and Activating a Python Virtual Environment: Run the following command in the terminal to create a Python virtual environment:
python -m venv venvNext, run the following command to activate the virtual environment:
On MacOS/Linux:
source venv/bin/activateOn Windows:
venv\Scripts\activate#requirements.txt
openai==2.28.0
requests==2.32.5
python-dotenv==1.2.2Run the following command from the terminal to install the dependencies:
pip install -r requirements.txtfrom dataclasses import dataclass, field
from pathlib import Path
@dataclass
class OpenAIConfig:
model_name: str = "gpt-5.4-mini"
max_tokens: int = 1200
temperature: float = 0.3
@dataclass
class OllamaConfig:
model: str = "llama3"
prompt: str = "You are a Selenium WebDriver test automation expert. Generate Selenium WebDriver Java test scripts. STRICTLY follow the format. Any deviation is not acceptable."
stream: bool = False
temperature: float = 0.3
ollama_endpoint: str = "http://localhost:11434/api/generate"
@dataclass
class FileConfig:
input_file: Path = Path("test_cases/input/sample_test_case.txt")
output_file_path: Path = Path("test_cases/output/")
@dataclass
class AppConfig:
provider:str = "ollama" #openai or ollama
openai: OpenAIConfig = field(default_factory=OpenAIConfig)
ollama: OllamaConfig = field(default_factory=OllamaConfig)
files: FileConfig = field(default_factory=FileConfig)
config = AppConfig()
The configuration file acts as a centralized config system for switching between different LLM providers and file settings.
Let's break it down to understand it further:
- Dataclasses: The
@dataclassautomatically generates the__init__()method, making it easier to create and manage objects without writing boilerplate code. - Separate Configs: Separate config classes are defined for OpenAI, Ollama, and input/output file handling, each with default values. Your input file name is currently configured as "sample_test_case.txt".
- AppConfig: The
AppConfigclass acts as a central wrapper, allowing you to switch between providers (OpenAI or Ollama) using a single flag. field(default_factory=...): It ensures each config gets its own instance, avoiding shared state issues.
tools.py and implement the following utility functions within it:load_test_case_from_file()build_prompt()generate_with_openai()generate_with_ollama()generate_selenium_test_script()create_timestamped_output_dir()split_and_save_files()
Here is what each of these utility functions does:
load_test_case_from_file() function:
The load_test_case_from_file() function takes your test case file path as a parameter, reads its contents, and returns them as a string. It safely handles errors by raising a clear message if the file is not found and wraps any other unexpected issues in a RuntimeError.
def load_test_case_from_file(file_path: str | Path) -> str:
    try:
        with open(file_path, "r", encoding="utf-8") as file:
            return file.read()
    except FileNotFoundError:
        raise FileNotFoundError(f"Test case file not found: {file_path}")
    except Exception as e:
        raise RuntimeError(f"Error reading test case file: {e}")
build_prompt() function:
The build_prompt() function is a core part of the application; it constructs the prompt that gets sent to the LLM to generate your Selenium Java test automation code. It takes your use case text as input and embeds it into a detailed instruction template, guiding the model to generate Java-based Selenium tests using best practices such as POM and TestNG framework.
def build_prompt(use_case_text: str) -> str:
    return f"""
You are a test automation expert specializing in Selenium WebDriver with Java.

Generate Selenium automation test script using the following requirements:
- Use latest Selenium WebDriver with Java
- Follow Page Object Model (POM)
- Use latest version of TestNG framework
- Apply best coding practices
- Add comments explaining each step

IMPORTANT: You MUST follow the exact output format below.

Rules:
- ALWAYS start each file with ===FILE: filename===
- Use class names based on the web page(e.g. HomPage.java, LoginPage.java, etc.)
- Do not add "Page" to the test class name
- Do NOT add explanations outside file blocks
- DO NOT skip this format
- If you do not follow this format, the output will be rejected
- DO NOT use markdown (no **, no ``` blocks)
- DO NOT add file names outside ===FILE: markers
- ONLY use ===FILE: filename=== format
- OUTPUT FORMAT FOR FILES(STRICT):
    ===FILE: filename===
    file content

- The following files MUST only be generated in the same order(STRICT). No deviation is acceptable:
  - Multiple Page Object classes(if needed)
  - Test class
  - testng.xml
  - README.md

Use Case:
{use_case_text}
"""
The prompt also enforces file formatting rules like (===FILE: filename===) to ensure the output is structured, consistent, and directly usable for file generation without manual cleanup. It also enforces rules to generate the POM, test class, testng.xml, and ReadMe in strict order to maintain consistency in the generated output.
Using Effective Prompts
Using effective prompts is essential if you want to generate clean, reliable Selenium test scripts from AI. By clearly defining your requirements, you can guide the model to use best coding practices, create clean test scripts, and use the Page Object Model to produce well-structured code.
- Prompt Design for Better Selenium AI Test Generation: Clear and detailed prompts help Selenium AI generate accurate and maintainable Selenium Java test scripts. Specifying requirements such as Java-based Selenium automation, the latest Selenium and TestNG versions, and coding best practices enables the AI to produce cleaner and more scalable test automation code.
- Customizing Prompts for Page Object Model (POM): You can use the following prompts to train the AI to perfectly generate the page object files you need:
- Use best practices to generate the Page Object classes
- Generate Multiple Page Object classes (if needed)
- Do not instantiate the WebDriver in the Page Object class
- Do not create duplicate Page Object classes
generate_with_openai() function:
The generate_with_openai() function sends a prompt to the OpenAI API to generate Selenium WebDriver test scripts in Java. The OpenAI client is initialized using the API key from an environment variable, allowing the code to securely connect and interact with OpenAI services.
def generate_with_openai(prompt: str) -> Optional[str]:
    client = OpenAI(api_key=os.getenv("OPENAI_API_KEY"))
    response = client.chat.completions.create(
        model=config.openai.model_name,
        temperature=config.openai.temperature,
        max_tokens=config.openai.max_tokens,
        messages=[
            {"role": "system", "content": "You are a Selenium WebDriver test automation expert. Generate Selenium WebDriver Java test scripts. STRICTLY follow the format. Any deviation is not acceptable."},
            {"role": "user", "content": prompt},
        ],
    )
    return response.choices[0].message.content
It uses the model, temperature, and token limits from the configuration. The API returns multiple choices, and the function extracts the generated content from the first response. Finally, it returns the generated test script as a string.
generate_with_ollama() function:
The generate_with_ollama() function sends a prompt to an Ollama model using an HTTP POST request to generate a response. It combines a predefined base prompt with the user input and passes model configuration, such as model name and streaming option, in the request body.
def generate_with_ollama(prompt: str) -> str:
    response = requests.post(
        config.ollama.ollama_endpoint,
        json={
            "model": config.ollama.model,
            "prompt": config.ollama.prompt + "\n" + prompt,
            "stream": config.ollama.stream,
        },
    )
    response.raise_for_status()
    data = response.json()
    return data.get("response", "")
After sending the request, it checks for HTTP errors using raise_for_status() and parses the JSON response. Finally, it extracts and returns the generated text from the response field, defaulting to an empty string if it is missing.
generate_selenium_test_script() function:
The generate_selenium_test_script() function acts as a wrapper to generate a Selenium WebDriver test script based on the input test case. It first builds a prompt using the build_prompt(test_case_text) function, which prepares the input for the LLM.
def generate_selenium_test_script(test_case_text: str) -> Optional[str]:
    prompt = build_prompt(test_case_text)
    provider = config.provider.lower()
    if provider == "openai":
        return generate_with_openai(prompt)
    elif provider == "ollama":
        return generate_with_ollama(prompt)
    else:
        raise ValueError(f"Unsupported provider: {provider}")
Next, based on the configured provider, i.e., OpenAI or Ollama, it dynamically calls the respective function to generate the script. If an unsupported provider is specified, it raises a ValueError to prevent unexpected behavior.
create_timestamped_output_dir() function:
The create_timestamped_output_dir() function creates a new folder with the current date and time as its name, so every run gets its own unique output directory. It ensures the folder exists (creates it if needed) and then returns its path for saving files.
def create_timestamped_output_dir(base_output_path: Path) -> Path:
    timestamp = datetime.now().strftime("%Y-%m-%d_%H-%M-%S")
    output_dir = base_output_path / timestamp
    output_dir.mkdir(parents=True, exist_ok=True)
    return output_dir
split_and_save_files() function:
The split_and_save_files() function takes the AI-generated response and splits it into multiple files based on a marker (===FILE:). It extracts each filename and its content, then saves them into the appropriate folders.
def split_and_save_files(generated_text: str, base_output_path: Path) -> None:
        sections = generated_text.split("===FILE:")
        if len(sections)<=1:
            raise ValueError ("No Structured files found in AI response!")

        pageobject_dir = base_output_path/"pageobjects"
        pageobject_dir.mkdir(parents=True, exist_ok=True)

        for section in sections[1:]:
            section = section.strip()
            parts = section.split("\n",1)
            raw_filename = parts[0].strip()
            filename =  raw_filename.replace("===", "").strip().split()[0]
            content = parts[1].strip() if len(parts)>1 else ""
            content = content.split("===FILE:")[0].strip()

            if filename.endswith("Page.java"):
                file_path = pageobject_dir / filename
            else:
                file_path = base_output_path / filename

            with open(file_path, "w", encoding="utf-8") as f:
                f.write(content)

            print(f"✅ Created: {file_path}")
The Page Object files go into a pageobjects directory, while the test class, testng.xml, and README.md files go into the main output/<timestamped> folder. If the expected structure is missing, it throws an error to avoid saving incorrect output.
main.py file to orchestrate the complete workflow of generating Selenium test scripts using AI:from tools import load_test_case_from_file, generate_selenium_test_script, split_and_save_files, create_timestamped_output_dir
from config import config
from pathlib import Path
def main() -> None:
try:
input_file = config.files.input_file
output_file_path = config.files.output_file_path
run_output_dir = create_timestamped_output_dir(output_file_path)
use_case_text = load_test_case_from_file(input_file)
if not use_case_text:
raise ValueError("Test case file is empty.")
generated_output = generate_selenium_test_script(use_case_text)
if not generated_output:
raise RuntimeError("Failed to generate Selenium WebDriver Java test automation scripts.")
split_and_save_files(generated_output, run_output_dir)
print(f"✅ Selenium WebDriver Java test automation scripts generated successfully at: {run_output_dir}")
except Exception as e:
print(f"❌ Error occurred: {e}")
if __name__ == "__main__":
main()The main.py file is where your program starts and manages the whole process of generating Selenium test scripts from start to finish. It reads your input test case file and sends the test case to the AI to generate automation scripts, and generates the timestamped output folder.
Once the scripts are generated, it splits them into multiple files and saves them in the appropriate directories. In case of any exception, it catches the error and prints the message "Error occurred" with the exception details.
Generating First Test Scripts
One of the practical applications of agentic AI testing is generating Selenium test scripts from simple text-based test scenarios. In this example, you will use the AI agent you built to automatically generate Java Selenium test scripts from a predefined login test case.
Create a new text file, "sample_test_case.txt", and place it in the input/ folder with the following test scenario to generate the Selenium test scripts using the AI agent you just built:
| Title: Application Login scenario Precondition: User is registered in the application. Steps: 1. Open Chrome browser 2. Navigate to https://ecommerce-playground.lambdatest.io/index.php?route=account/login 3. Enter "Johndoe881@email.com" in the E-Mail Address field 4. Enter "Password@321" in the Password field 5. Click on the Login Button 6. Add an assert statement to check that "My Account" page is displayed. |
In the config.py file, within the AppConfig, ensure that you update the provider value to "openai". Next, create a .env file and add your OpenAI API key to it. This file should always remain on your local machine and should not be committed to the remote repository.
OPENAI_API_KEY=<Your OpenAI API Key>Running the AI Agent
Open the terminal, and run the following command to generate the test scripts:
python main.py
Your test scripts should be generated in a new timestamped (YYYY-MM-DD_hh-mm-ss) folder inside the output/ folder.
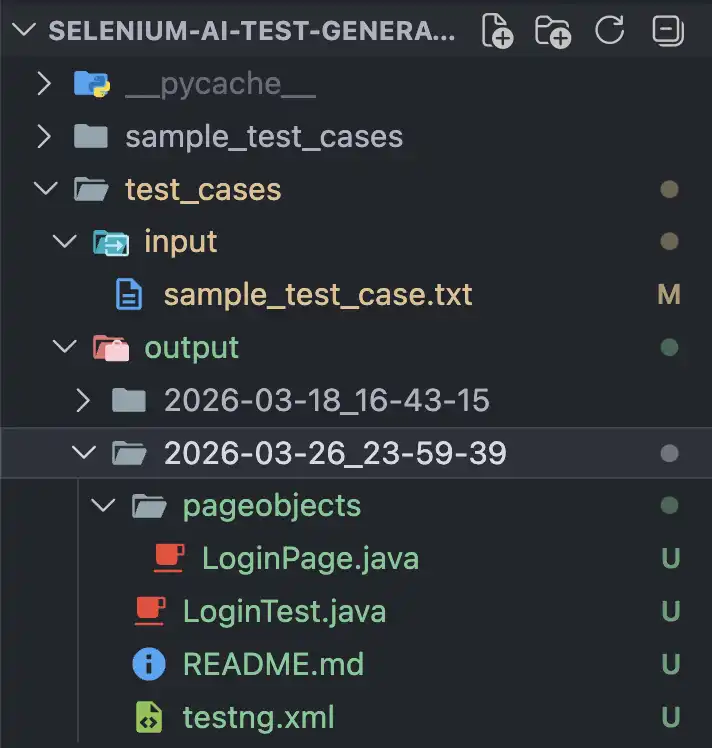
Reviewing the Generated Java Selenium Code
Check each file generated in the output/ folder and review the code to verify if it fits the test scenario you defined and follows the expected structure and best practices.
The following page object classes are generated:
LoginPage.java
public class LoginPage {
    private WebDriver driver;

    public LoginPage(WebDriver driver) {
        this.driver = driver;
    }

    public void navigateToLoginPage() {
        driver.get("https://ecommerce-playground.lambdatest.io/index.php?route=account/login");
    }

    public void enterEmail(String email) {
        driver.findElement(By.name("email")).sendKeys(email);
    }

    public void enterPassword(String password) {
        driver.findElement(By.name("password")).sendKeys(password);
    }

    public void clickLoginButton() {
        driver.findElement(By.xpath("//button[@type='submit']")).click();
    }
}
The page object file is generated correctly using the name and XPath locator strategies, and appropriate methods are created to interact with the respective WebElements on the page. However, the import statements are missing; you will need to add them to avoid errors. Additionally, you should check the locators and consider adding explicit waits in this class while locating elements to reduce flakiness during test execution.
The following test class is generated:
LoginTest.java
import org.openqa.selenium.By;
import org.openqa.selenium.WebDriver;
import org.openqa.selenium.WebElement;
import org.openqa.selenium.chrome.ChromeDriver;
import org.testng.Assert;
import org.testng.annotations.BeforeMethod;
import org.testng.annotations.Test;

public class LoginTest {
    private WebDriver driver;

    @BeforeMethod
    public void setup() {
        System.setProperty("webdriver.chrome.driver", "path_to_chrome_driver");
        driver = new ChromeDriver();
    }

    @AfterMethod
    public void teardown() {
        driver.quit();
    }

    @Test
    public void testLoginScenario() {
        LoginPage loginPage = new LoginPage(driver);
        loginPage.navigateToLoginPage();
        loginPage.enterEmail("Johndoe881@email.com");
        loginPage.enterPassword("Password@321");
        loginPage.clickLoginButton();

        WebElement myAccountPageTitle = driver.findElement(By.xpath("//h1[@class='page-title']"));
        Assert.assertTrue(myAccountPageTitle.isDisplayed(), "My Account page is not displayed");
    }
}
The test class is generated per the provided prompt and includes the @BeforeMethod and @AfterMethod annotations for setup and teardown. However, it includes the System.setProperty() statement, which can be removed as it is no longer required in the latest versions of Selenium to set the ChromeDriver path. The import statement for the @AfterMethod annotation is also missing and should be added.
Additionally, the myAccountPageTitle WebElement can be moved to a separate MyAccount Page Object class for better design alignment. Its XPath in Selenium should also be verified to ensure it correctly identifies the intended element on the page.
Testng.xml
<?xml version="1.0" encoding="UTF-8"?>
<!DOCTYPE suite SYSTEM "http://testng.org/testng-1.0.dtd">
<suite name="LoginTestSuite">
    <test name="LoginTest">
        <classes>
            <class name="LoginTest"/>
        </classes>
    </test>
</suite>
You will need to update the qualified class name once you move the code to your project.
README.md
**How to run the test**

1. Install TestNG framework and Selenium WebDriver.
2. Place the Selenium ChromeDriver executable in a directory, update the path_to_chrome_driver variable in LoginTest.java with this directory.
3. Run the test using the testng.xml file by executing the command: java -cp .;test-classes org.testng.TestNG testng.xml

Note: Update the path_to_chrome_driver variable with your actual ChromeDriver executable path.
The steps for the ChromeDriver executable and the command to run testng.xml can be removed, as they are not accurate. Instead, you can update this section with the steps to run the testng.xml by right-clicking on it.
Overall, the AI agent generated the test code quickly, saving you manual effort and providing a good starting point. However, it is important that you review the code, validate and refine it, before using it in a project.
After reviewing the generated Selenium Java code, you will notice that the process still involves several manual tasks, including configuring environment files, managing dependencies, validating locators, refining page objects, fixing missing imports, and improving test stability with explicit waits.
While AI-generated code provides a useful starting point, maintaining and scaling this workflow can become time-consuming for fast-moving QA teams. To reduce this complexity, many teams are adopting cloud-based AI testing platforms that simplify the selenium automation lifecycle.
One such platform is KaneAI by TestMu AI (formerly LambdaTest). It helps streamline test creation, maintenance, execution, and analysis within a unified environment, reducing the need for extensive manual setup and framework management. By leveraging AI-driven workflows and natural language-based test creation, it enables teams to accelerate Selenium test automation more efficiently.
How Does TestMu AI's KaneAI Help With Selenium Test Automation?
KaneAI is a GenAI-native testing agent that enables teams to plan, author, and evolve Selenium test cases using natural language prompts. It is designed for modern high-speed quality engineering teams and integrates seamlessly with the broader TestMu AI ecosystem for test management, execution, orchestration, and reporting.
Here is how you can use the same test scenario with KaneAI that you previously provided as input to generate the Selenium Java test scripts.
The following steps should be undertaken to start testing with KaneAI:
- Create an account on TestMu AI and log in.
- Navigate to KaneAI > Agent on the TestMu AI website
Type the following test scenario in the text box
|
KaneAI will generate the test steps after analyzing the test scenario provided and will prompt us to approve.
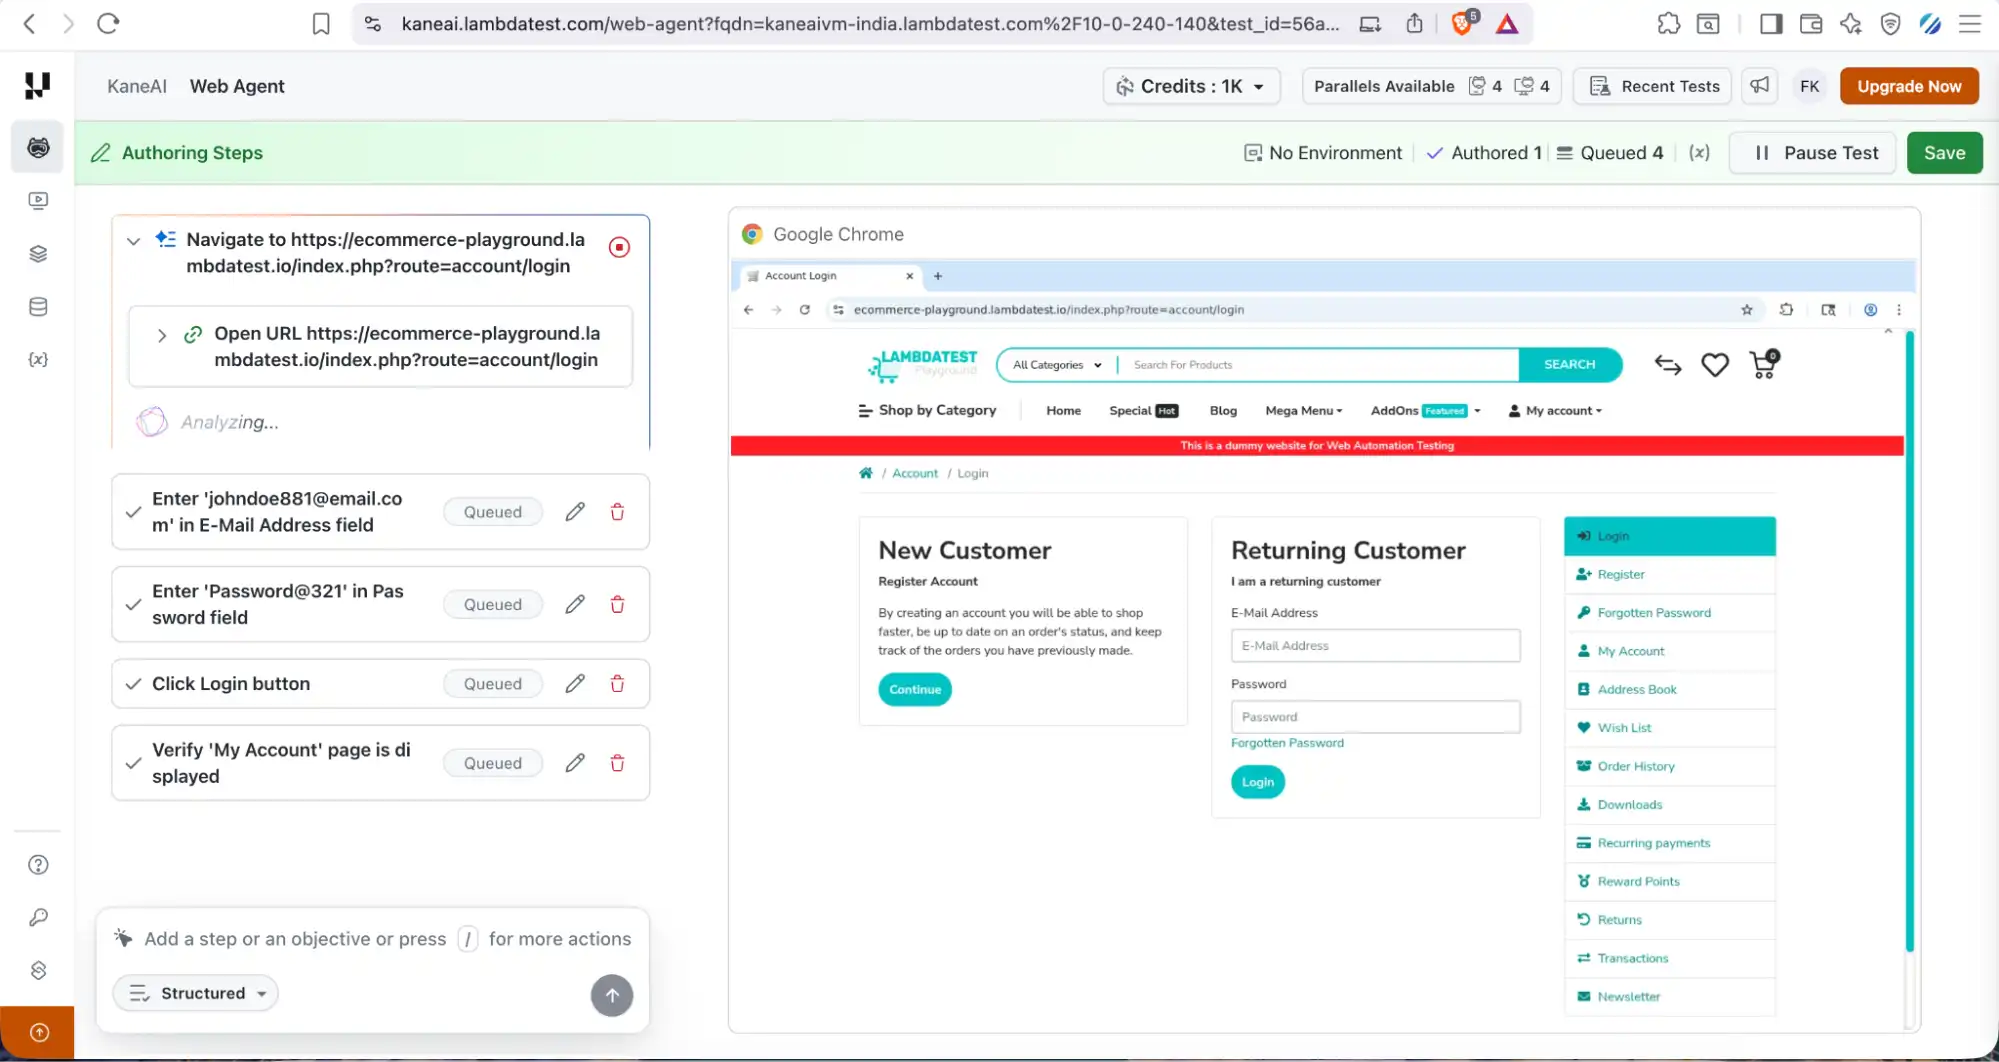
After the test steps are approved, the test execution will start automatically, and the test summary can be viewed in the Test Manager screen as shown in the screenshot below:
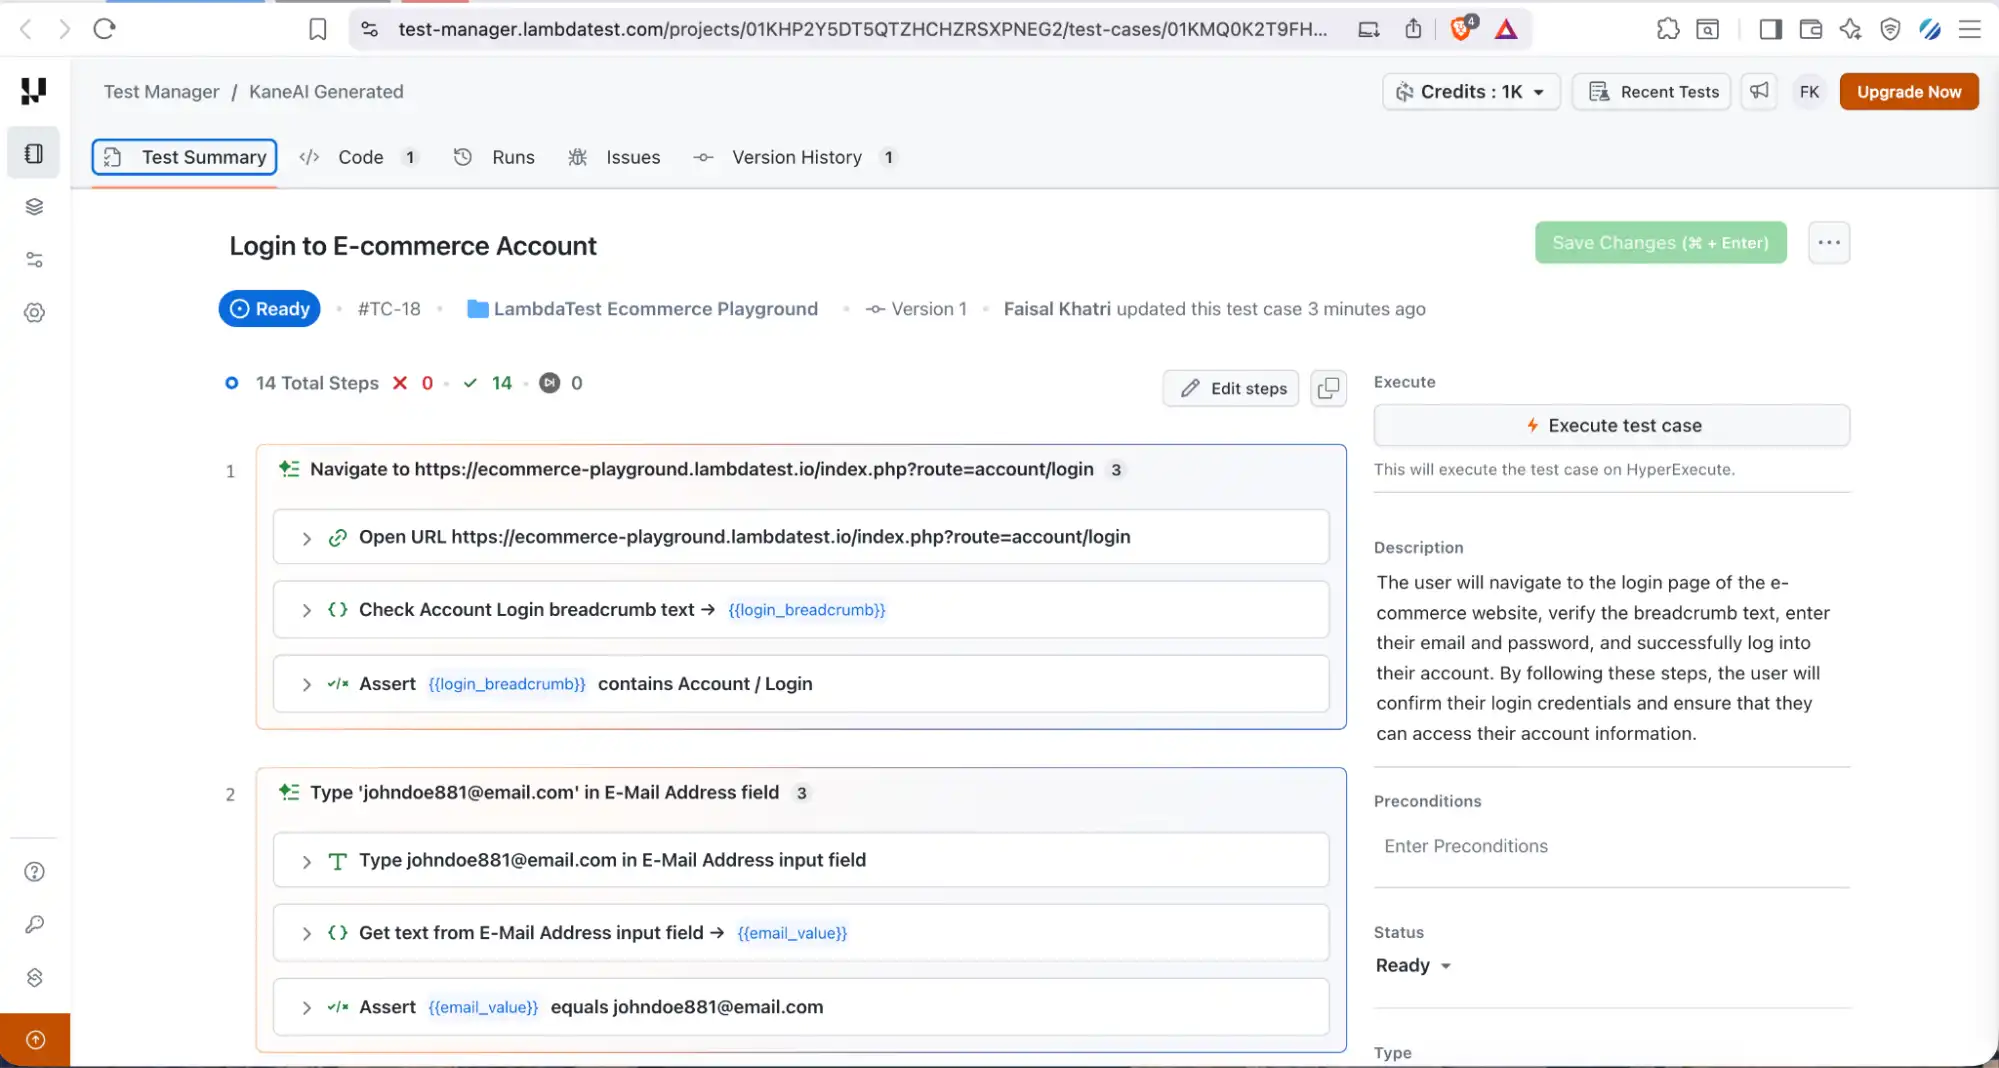
KaneAI also generates the code for the test scenario, which can be downloaded from the Code tab as displayed below:
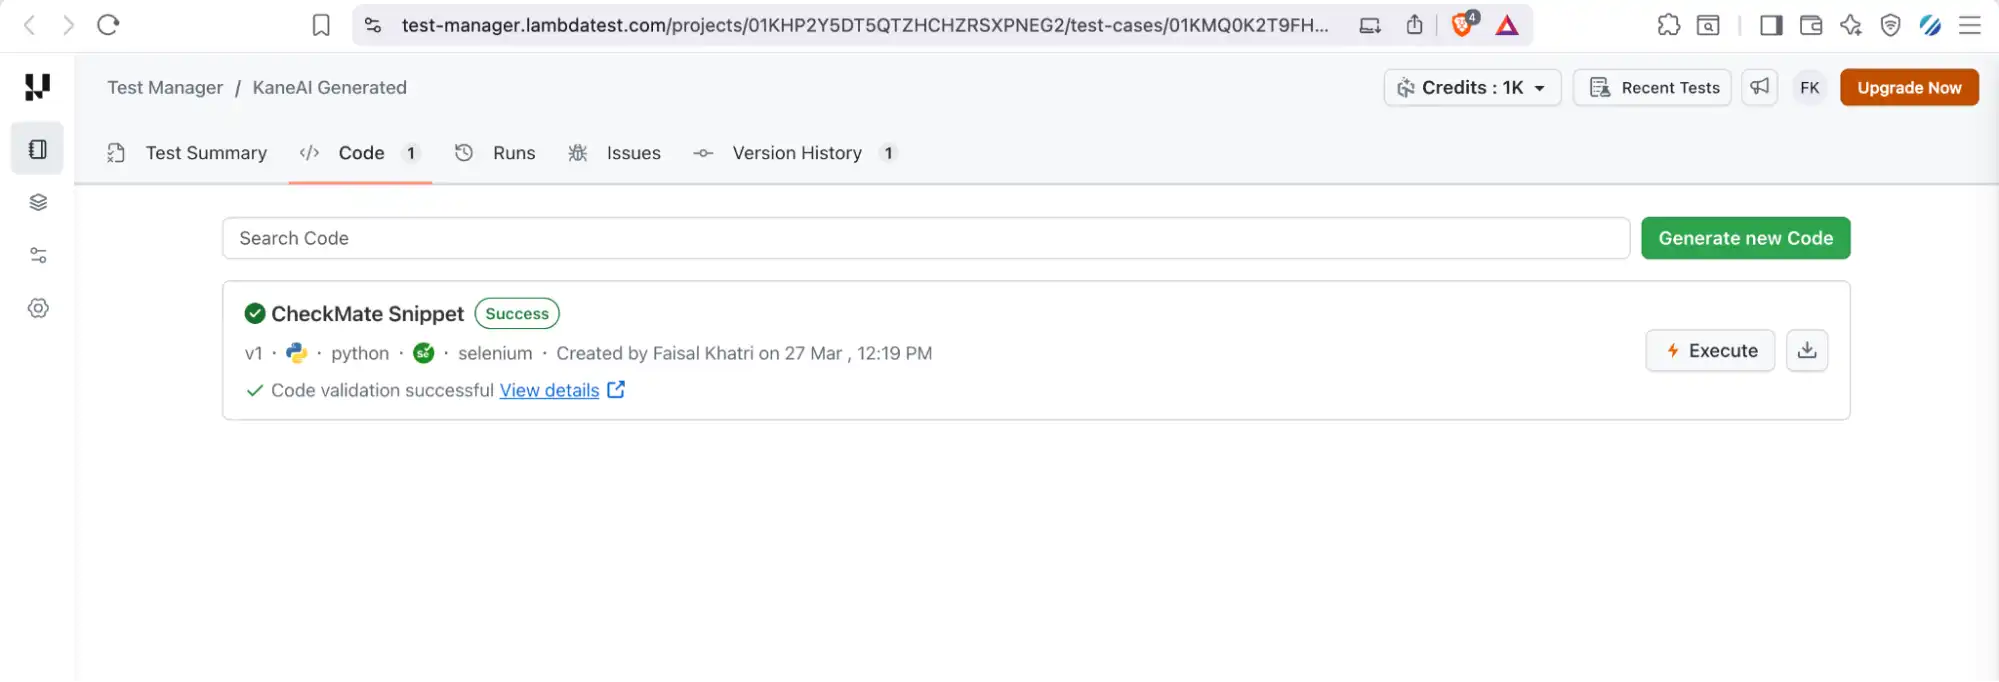
KaneAI helps in running tests automatically using plain English, making the entire process hassle-free without requiring coding knowledge or complex setup. It allows test automation engineers to quickly create and execute tests just by describing scenarios in natural language.
This significantly speeds up test creation while making automation more accessible to both technical and non-technical users.
To get started with KaneAI Agent, follow this support documentation on authoring your first desktop browser test and get the most out of KaneAI's natural language automation.
Selenium Automation Using TestMu AI Agent Skills Framework
While building AI test automation agents gives teams flexibility and control, TestMu AI also provides a more structured and reusable approach through its Agent Skills framework.
One of the key components in this ecosystem is the selenium-skill, available through the TestMu AI agent-skills. This skill is designed as a modular AI capability that focuses specifically on Selenium automation use cases, enabling teams to generate production-ready Selenium WebDriver test scripts with minimal setup.
The Selenium Skill acts as a purpose-built automation assistant that understands requests related to Selenium testing, browser automation, and cross-browser execution across modern AI browsers and web environments. Based on natural language inputs, it can generate reliable, scalable, and structured test scripts that align with real-world automation requirements.
Unlike custom-built AI agents that require continuous prompt tuning and maintenance, the Selenium Skill provides a reusable and standardized approach for teams looking to adopt AI test generation quickly. It supports both local execution and cloud-based workflows within the TestMu AI ecosystem, making it suitable for teams at different stages of automation maturity.
By leveraging the TestMu AI agent-skills framework, teams can extend Selenium automation capabilities without rebuilding core AI logic from scratch, while still maintaining flexibility for customization and scaling.
If you are getting started with Selenium and want to generate production-ready test automation with Selenium Skill, please refer to this guide on Run Selenium Tests Using Agent Skills.
Limitations and Challenges
The following limitations and challenges in Selenium can be faced while working with AI agents for test script generation.
- When AI-Generated Scripts May Fail: AI-generated test scripts can be treated as a starting point, as they may fail when the input prompt is unclear or missing important details. They can also break due to dynamic elements, incorrect assumptions about the UI, or environment-specific issues.
- Manual Cleanup / Selector Accuracy: AI may generate locators that are not always reliable or optimal. The Selenium locators used in the AI-generated scripts should always be reviewed and refined, preferring stable options like IDs or CSS selectors over complex XPaths.
- Test Maintenance and Flakiness Considerations: AI-generated tests may be flaky if they don't handle Selenium waits, dynamic content, or synchronization properly. Adding proper Selenium waits and improving test design can reduce flakiness. Regular maintenance is required to keep tests stable as the application evolves.
- Reviewing Hallucinations: AI can sometimes generate incorrect or non-existent methods, elements, or logic. It's important to carefully review the code to catch such hallucinations before execution. Validating against actual application behavior ensures the tests are accurate and usable.
- Agent Testing is Still Evolving: Current AI agents for Selenium test generation operate in isolation, handling only script creation. Agent Testing, where one agent generates tests while another independently validates, executes, and reports results, is still an emerging concept. Teams looking to build fully autonomous testing pipelines will need to wait for more mature multi-agent frameworks before this becomes production-ready.
If you want to better understand what AI agents are, how they work, and where they fit into modern automation workflows, follow this detailed AI agents testing tutorial.
The agent you built in this guide also illustrates a deeper problem: it prints a success message once the files are written, but the missing imports and inaccurate Readme steps only surface when someone reads the generated code. Agent Assurance from TestMu AI targets exactly this class of agent, the kind that acts by writing files. Point it at your agent's codebase and it derives the test suite itself, including adversarial scenarios such as prompt injection and instruction override, then invokes the agent for real and grades each criterion against observed evidence, meaning the files actually produced on disk rather than the agent's own summary. Every criterion resolves to Pass, Fail, or Unable to Verify, and whatever could not be verified is reported as a number beside the pass rate.

Note: Your test-generation agent says it worked. Agent Assurance is built to prove it. Early access is opening in batches. Join the Agent Assurance waitlist
Using Best Practices
The following are some of the best practices that should be considered while using AI agents to generate automation code:
- Improving prompt quality for reliable tests: Clear and detailed prompts help the AI generate stable test scripts. Mentioning requirements like framework names, naming conventions, and coding standards ensures better structure and avoids errors in Selenium best practices for test automation.
- Adding assertions and validations: Always ensure the generated tests include proper assertions to validate expected outcomes. This helps confirm that the application behaves correctly instead of just performing actions.
- Reviewing and refactoring generated code before execution: AI-generated code should always be reviewed before running it. Refactoring helps remove redundancies, improve readability, and align the code with Selenium best practices and project standards.
- Handling Invalid/Empty Inputs: It's important to validate inputs like test case files before processing them. Ensure proper checks are added for empty or invalid data to prevent unexpected failures during execution.
- Integrating OpenAI API Error Handling: Proper error handling for API calls helps manage issues like timeouts, rate limits, or failed responses. Using try-catch blocks and logging error messages improves debugging and aligns with reliable automation practices.
- Logging and Debugging Tips: Adding logs at key steps helps track execution flow and quickly identify issues. Clear logging messages make debugging easier, especially when working with AI-generated outputs, API calls, and while testing AI applications built on automation workflows.
Conclusion
For designing AI QA agents that generate test scripts, creating a comprehensive prompt with clear rules, a structured output format, and strict guidelines is essential to ensure consistent results. It's also important to validate and refine the generated code, as well as handle edge cases and failures gracefully.
In my experience, if we need to set up test automation quickly, as speed is the need of the hour to deliver a bug-free product to the clients, using ready-to-use tools like KaneAI is a good choice. However, it all depends on the team's decision, since AI is evolving, designing an AI agent that generates test automation scripts can also be a viable and flexible approach, especially when customization and control are important.
Citations
- OpenAI API Platform Documentation
- Selenium
- Introduction - Ollama
- ollama/docs/api.md at main
- TestNG Documentation
- Author Your First Desktop Browser Test | TestMu AI (Formerly LambdaTest)
- Run Selenium Tests Using Agent Skills | TestMu AI (Formerly LambdaTest)
- AI agent skills for TestMu AI (Formerly LambdaTest) · GitHub
- Market Guide for AI-Augmented Software-Testing Tools
Author

Faisal Khatri
Blogs: 40


Mohammad Faisal Khatri is a Software Testing Professional with 17+ years of experience in manual exploratory and automation testing. He currently works as a Senior Testing Specialist at Kafaat Business Solutions and has previously worked with Thoughtworks, HCL Technologies, and CrossAsyst Infotech. He is skilled in tools like Selenium WebDriver, Rest Assured, SuperTest, Playwright, WebDriverIO, Appium, Postman, Docker, Jenkins, GitHub Actions, TestNG, and MySQL. Faisal has led QA teams of 5+ members, managing delivery across onshore and offshore models. He holds a B.Com degree and is ISTQB Foundation Level certified. A passionate content creator, he has authored 100+ blogs on Medium, 40+ on TestMu AI, and built a community of 25K+ followers on LinkedIn. His GitHub repository “Awesome Learning” has earned 1K+ stars.


Frequently asked questions
Did you find this page helpful?
More Related Blogs
TestMu AI forEnterprise
Get access to solutions built on Enterprise
grade security, privacy, & compliance
- Advanced access controls
- Advanced data retention rules
- Advanced Local Testing
- Premium Support options
- Early access to beta features
- Private Slack Channel
- Unlimited Manual Accessibility DevTools Tests