

Power Your Software Testing with AI Agents and Cloud
The Native AI-Agentic Cloud Platform to Supercharge Quality Engineering. Test Intelligently and Ship Faster.


- TestMu AI (Formerly LambdaTest)
- /
- Learning Hub
- /
- CSS Selectors in Selenium: Complete Guide With Examples
CSS Selectors in Selenium: Complete Guide With Examples
Learn how to use CSS Selectors in Selenium to locate web elements efficiently with syntax, examples, and best practices for reliable test automation.
Last Updated on:
On This Page
- What Are CSS Selectors?
- Why Use CSS Selectors?
- How to Copy CSS Selectors using Developer Tools?
- How to Locate Web Elements Using CSS Selectors in Selenium?
- CSS Selectors in Python, C#, JS
- What Are the Common Types of CSS Selectors in Selenium?
- CSS Combinators in Selenium
- Advance Selectors in Selenium
- CSS Selectors vs XPath
- Best Practices for Using CSS Selectors in Selenium
- Conclusion
Locating web elements is the foundation of every automation script; without accurate locators, even the most advanced test logic can fail. Automation frameworks like Selenium support multiple locator strategies; however, CSS Selectors in Selenium provide one of the fastest and most reliable ways to identify elements across a webpage.
CSS Selectors in Selenium are processed directly by the browser’s rendering engine, making them faster and more reliable. They work consistently across browsers without compatibility concerns, and because they often rely on stable attributes like IDs, classes, or data tags, your automation scripts become more maintainable and less likely to break with UI changes.
Overview
To build fast, reliable, and maintainable cross-browser automation scripts in Selenium, use CSS Selectors to locate web elements by their tags, classes, IDs, or attributes. CSS Selectors execute faster than XPath because browsers interpret them natively, making them highly consistent across major browsers.
Common Types of CSS Selectors
- ID Selector: The ID selector targets an element using its unique id attribute, providing one of the fastest and most reliable ways to identify elements in Selenium.
- Class Selector: The class selector targets elements sharing a specific class name, which is useful for identifying groups of similar elements like buttons or links.
- Tag Selector: The tag selector identifies web elements using their HTML tag name, making it ideal for selecting broad groups of elements like inputs or divs.
- Attribute Selector: The attribute selector targets elements by matching a specific attribute and its value, allowing precise identification when IDs or classes are not available.
- Descendant Selector: The descendant selector uses a space to select any target element nested anywhere inside a specified parent element, regardless of depth.
- Child Selector: The child selector uses the greater-than symbol to target only the direct, first-level children of a parent element, preventing over-matching deeper nested elements.
- Adjacent Sibling Selector: The adjacent sibling selector uses the plus symbol to target the single element that immediately follows another specified element at the same hierarchical level.
- General Sibling Selector: The general sibling selector uses the tilde symbol to select all sibling elements that appear after a specified reference element at the same level.
Handling Dynamic Elements
- CSS pseudo-classes: CSS pseudo-classes like :nth-child() help locate dynamic or state-changing elements that change visibility, though text-based matching requires switching to XPath.
- Text-based matching: Text-based matching in Selenium requires avoiding the invalid :contains() pseudo-class, using XPath's text() function or filtering document.querySelectorAll() results in JavaScript instead.
What Are CSS Selectors?
CSS Selectors in Selenium offer a seamless way to locate elements without the complexity of long XPath expressions. Since they align closely with how browsers interpret styles, they deliver faster execution and greater stability.
Their straightforward syntax helps create cleaner, more maintainable automation scripts that adapt easily to UI updates. In Selenium WebDriver, elements can be located using the By.cssSelector() method. This method takes a CSS Selector string as its argument and allows interaction with elements that match the defined selection criteria.
CSS Selectors are one of several locator techniques available in Selenium. For a broader overview, refer to this guide on different types of locators in Selenium WebDriver with examples of all supported types.

Note: Run Selenium automated tests across 3,000+ browser and OS combinations. Try TestMu AI Now!
Why Use CSS Selectors?
Using CSS Selectors gives you more control and flexibility when locating elements in Selenium.
Here’s why they’re preferred:
- Speed: CSS Selectors in Selenium execute faster because browsers natively understand CSS, unlike XPath, which needs additional parsing.
- Clarity: Their syntax is shorter, cleaner, and easier to read, making test scripts more maintainable and developer-friendly.
- Consistency: They behave consistently across all major browsers, minimizing cross-browser compatibility issues during automation testing.
- Familiarity: Since most developers already use CSS, writing and understanding selectors in Selenium feels intuitive and straightforward.
- Precision: CSS Selectors allow flexible element targeting through attributes, IDs, and classes, even with dynamic or nested structures.
- Maintainability: Tests using CSS Selectors are less likely to break when UI layouts or DOM structures slightly change.
How to Copy CSS Selectors using Developer Tools?
Finding CSS Selectors manually can be time-consuming, especially on complex web pages. Fortunately, modern browsers like Chrome, Firefox, and Microsoft Edge make it easy to generate them directly using Developer Tools.
Follow these simple steps to copy a CSS Selector efficiently:
- Open the Target Page: Open the Chrome browser and navigate to the TestMu AI Selenium Playground.
- Launch Developer Tools: Click on the three dots in the top-right corner of the browser > go to More Tools > Developer Tools. Alternatively, you can use the shortcut key F12.
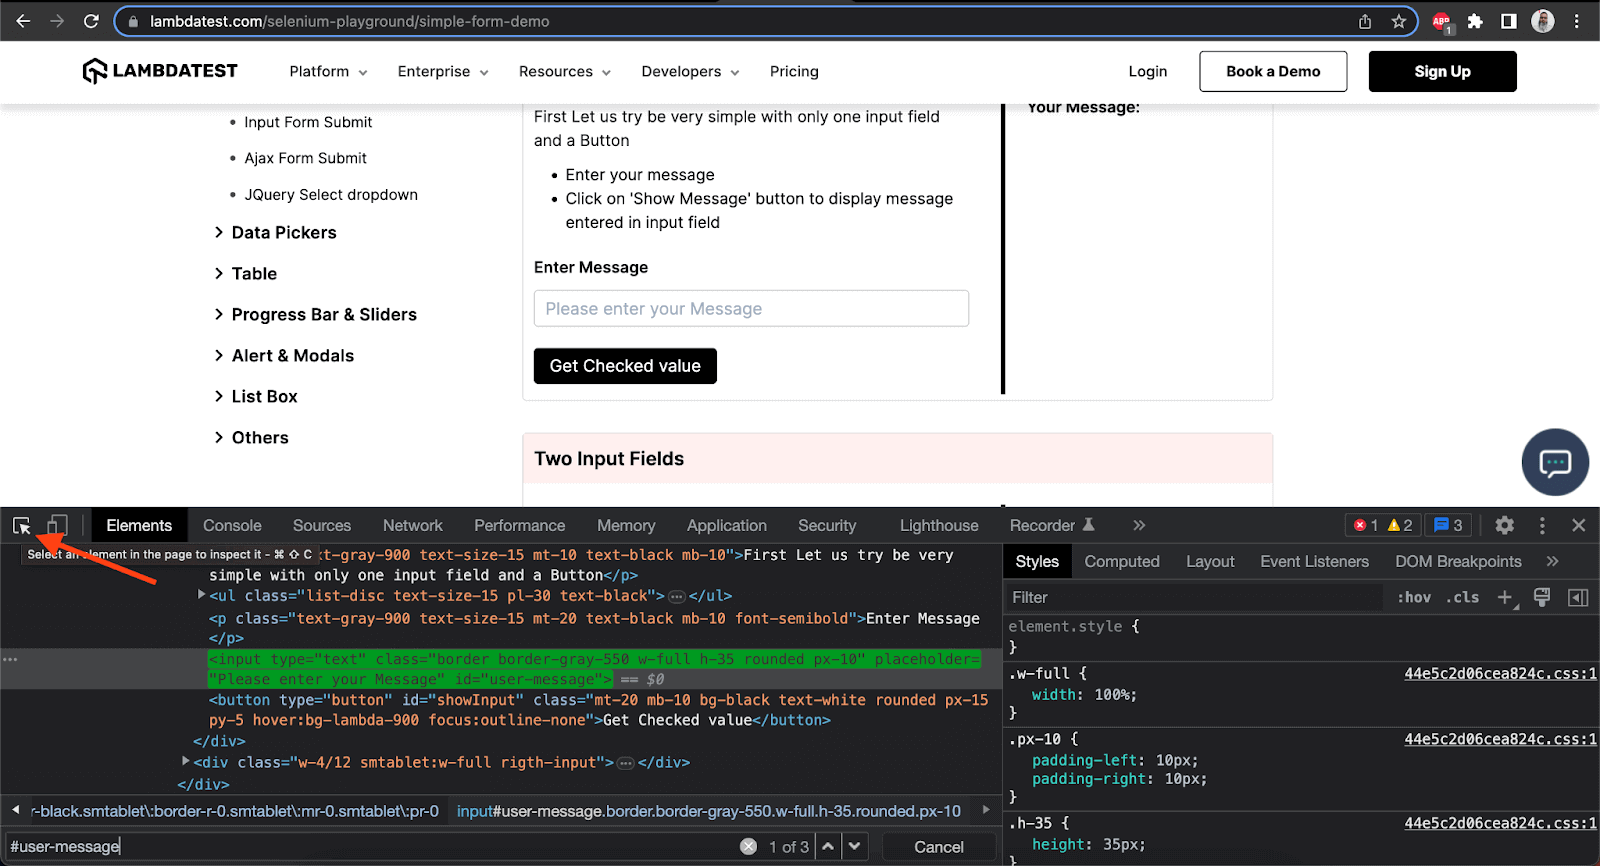
- Select the Target Element: Click the Select Element icon in the top-left corner of the Developer Tools window. Then, click on the web element you want to inspect, for example, the “Enter Message” field in the Simple Form Demo.
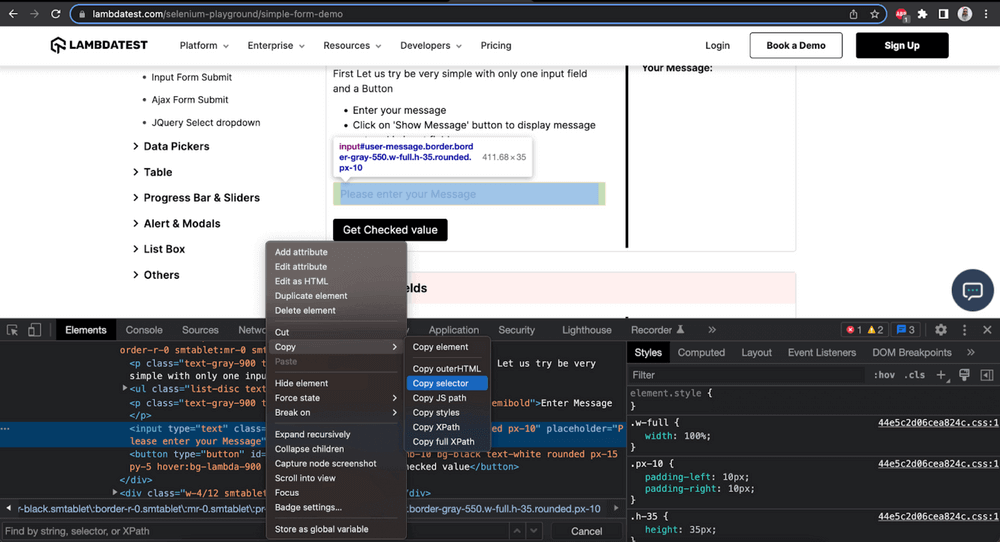
- Copy the CSS Selector: Right-click on the highlighted HTML element in the DOM and select: Copy > Copy selector.
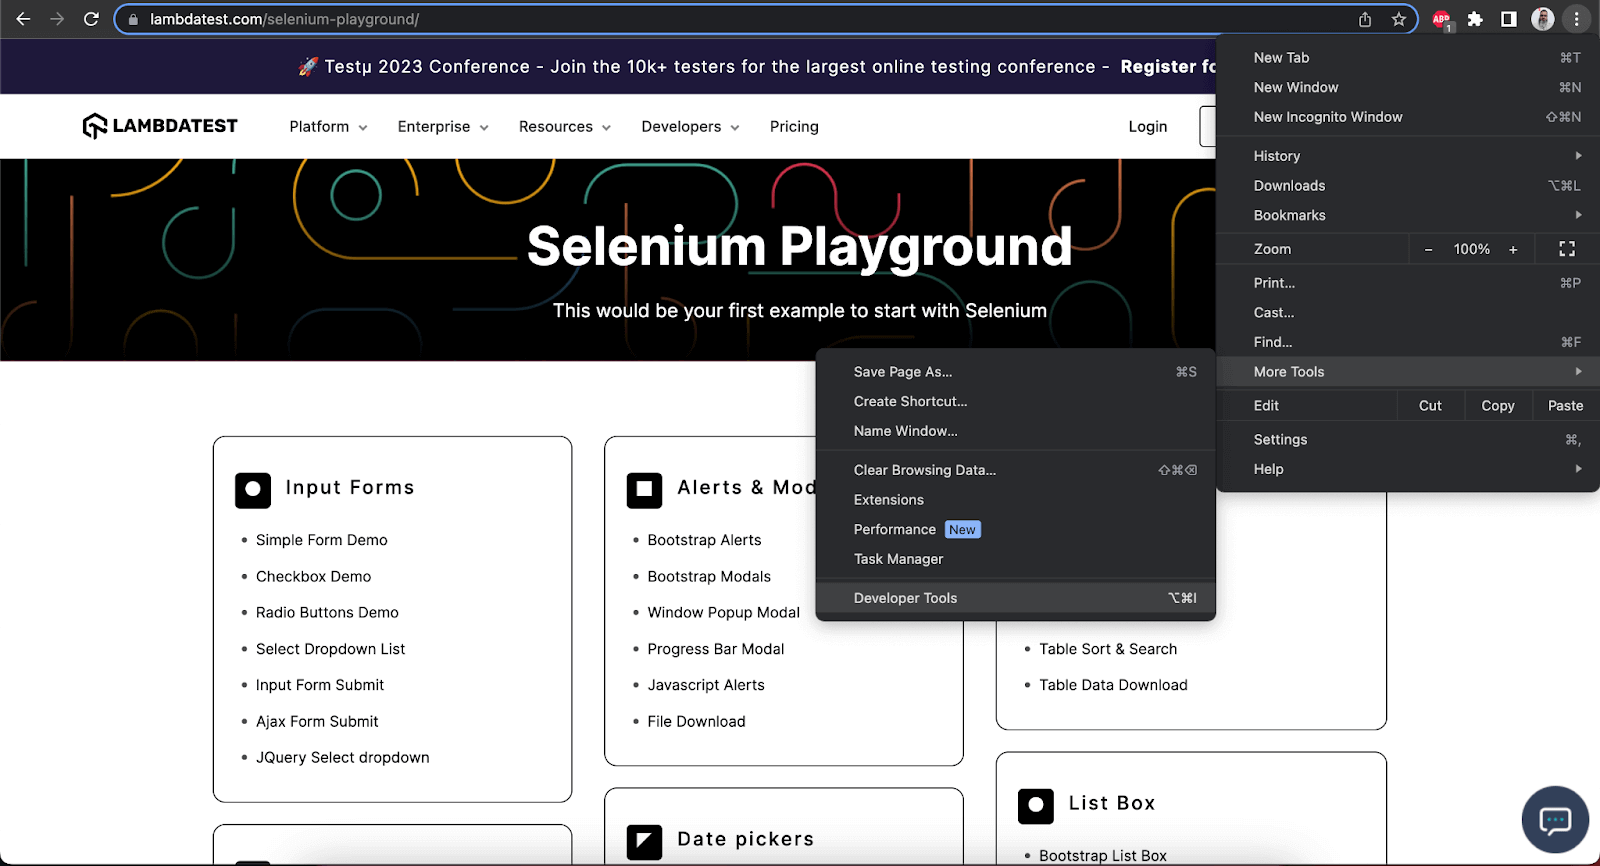
Once opened, the Developer Tools window should appear on your screen, showing the HTML structure under the Elements tab.
Now, press Ctrl/Cmd + F inside the Developer Tools search bar and paste (Ctrl/Cmd + V) the copied selector.
Tip: You can also verify a selector from the Console tab before pasting it into code. Run $$('#user-message'), the DevTools shorthand for document.querySelectorAll(), and the console returns every matching element instantly. If it returns an empty array, the selector is wrong; if it returns more than one element, it is not specific enough for a reliable locator.
You’ll see something like:
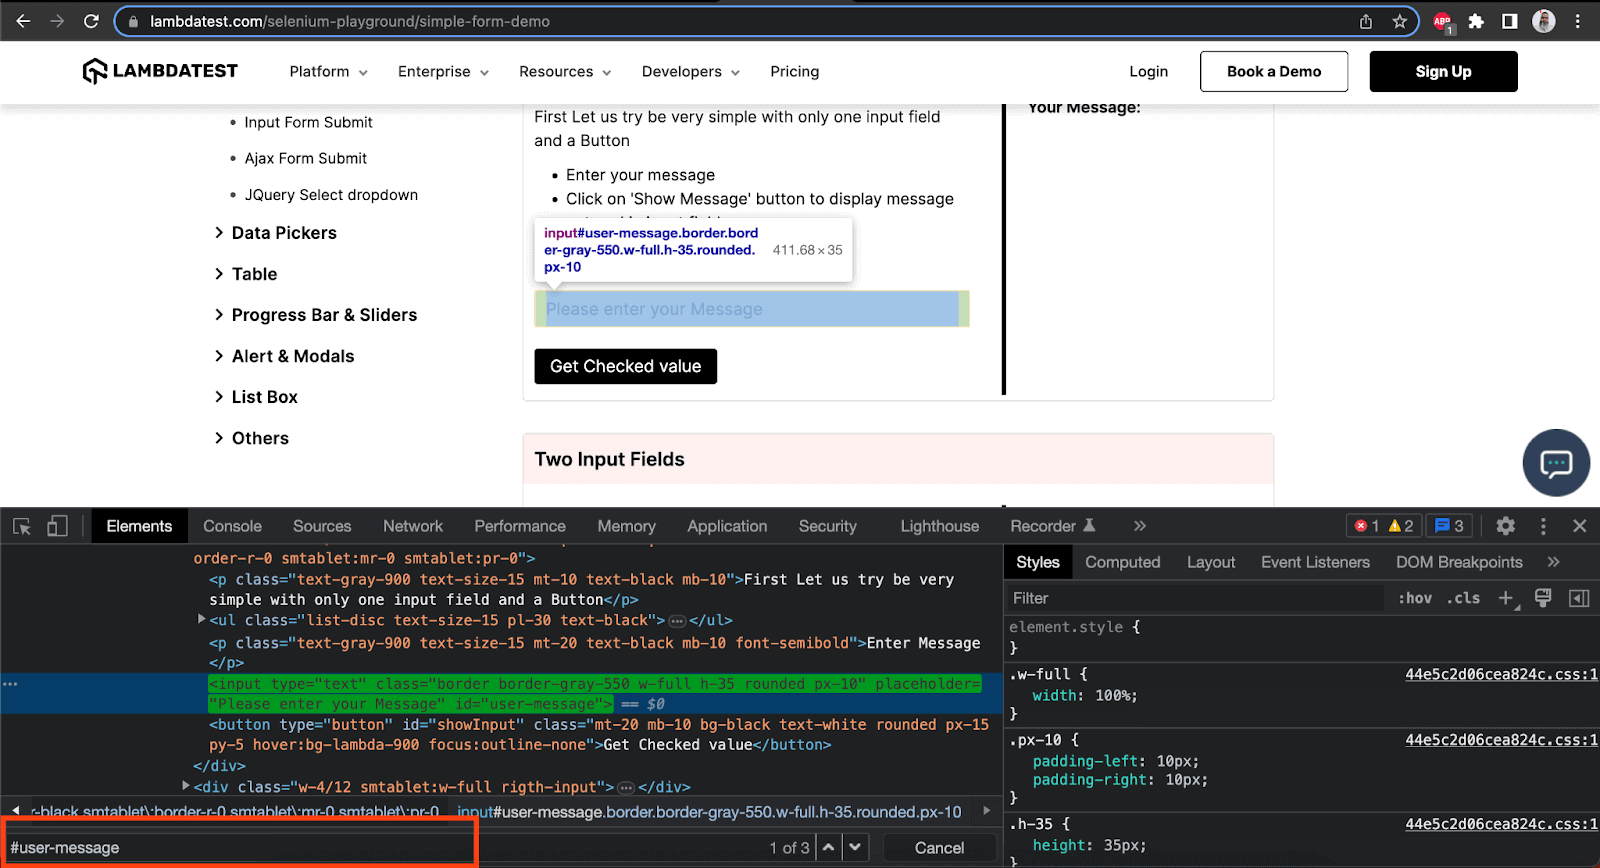
#user-messageThis indicates the unique ID of the “Enter Message” field.
Example Use Case:
Suppose you’re testing a Login Form on a web page.
You right-click the “Email” input field > choose Inspect > right-click the highlighted HTML > select Copy > Copy selector.
You might get a selector like:
#login-form > div > input[type=email]You can now use it directly in Selenium:
WebElement emailField = driver.findElement(By.cssSelector("#login-form > div > input[type=email]"));
emailField.sendKeys("qauser@example.com");
This approach helps you quickly fetch precise and reliable locators for testing real-time UI workflows, saving you valuable time during test script creation.
How to Locate Web Elements Using CSS Selectors in Selenium?
Below is a practical demonstration of how you can locate web elements using CSS Selectors in a Selenium automation script.
Let’s take a simple test scenario to understand how CSS Selectors work in Selenium automation using the Simple Form Demo page on TestMu AI’s Selenium Playground.
Test Scenario:
- Enter a custom message in the text field.
- Click the “Show Message” button.
- Verify that the displayed message matches the entered input.
Code Implementation:
import org.openqa.selenium.By;
import org.openqa.selenium.WebDriver;
import org.openqa.selenium.WebElement;
import org.openqa.selenium.chrome.ChromeDriver;

public class CSSSelectorDemo {
    public static void main(String[] args) {
        // Set up the ChromeDriver
        WebDriver driver = new ChromeDriver();
        driver.manage().window().maximize();

        // Navigate to the Selenium Playground
        driver.get("https://www.testmuai.com/selenium-playground/simple-form-demo/");

        // Locate the "Enter Message" field using CSS Selector (ID Selector)
        WebElement messageInput = driver.findElement(By.cssSelector("#user-message"));
        messageInput.sendKeys("Hello TestMu AI!");

        // Locate the "Show Message" button using CSS Selector (ID Selector)
        WebElement showMessageBtn = driver.findElement(By.cssSelector("#showInput"));

        showMessageBtn.click();
        // Locate the displayed message using CSS Selector (ID Selector)
        WebElement displayMessage = driver.findElement(By.cssSelector("#message"));
        String output = displayMessage.getText();

        // Print the result
        System.out.println("Displayed Message: " + output);

        // Close the browser
        driver.quit();
    }
}
Code Walkthrough:
- WebDriver Setup: Initializes the Chrome browser using Selenium WebDriver.
- Maximize: By using the manage().window().maximize() method, you can ensure that the browser opens in full-screen mode for better visibility.
- Navigating to the Test Page: By calling the driver.get() method, you direct the browser to TestMu AI’s Selenium Playground, where the form is located.
- Entering a Message (ID Selector): Using the findElement(By.cssSelector()) method with the selector #user-message, you locate the input field and type a custom message with the sendKeys() method.
- Clicking the “Show Message” Button (ID Selector): The button is located using the #showInput selector, its stable ID on the playground page, and the click() method simulates a user clicking it.
- Verifying the Output Message (ID Selector): The displayed message is located using the #message selector, and the getText() method retrieves its content for validation.
- Printing and Closing: The System.out.println() method prints the output to the console, and driver.quit() cleanly ends the browser session.
Test Execution:
On Test Terminal:
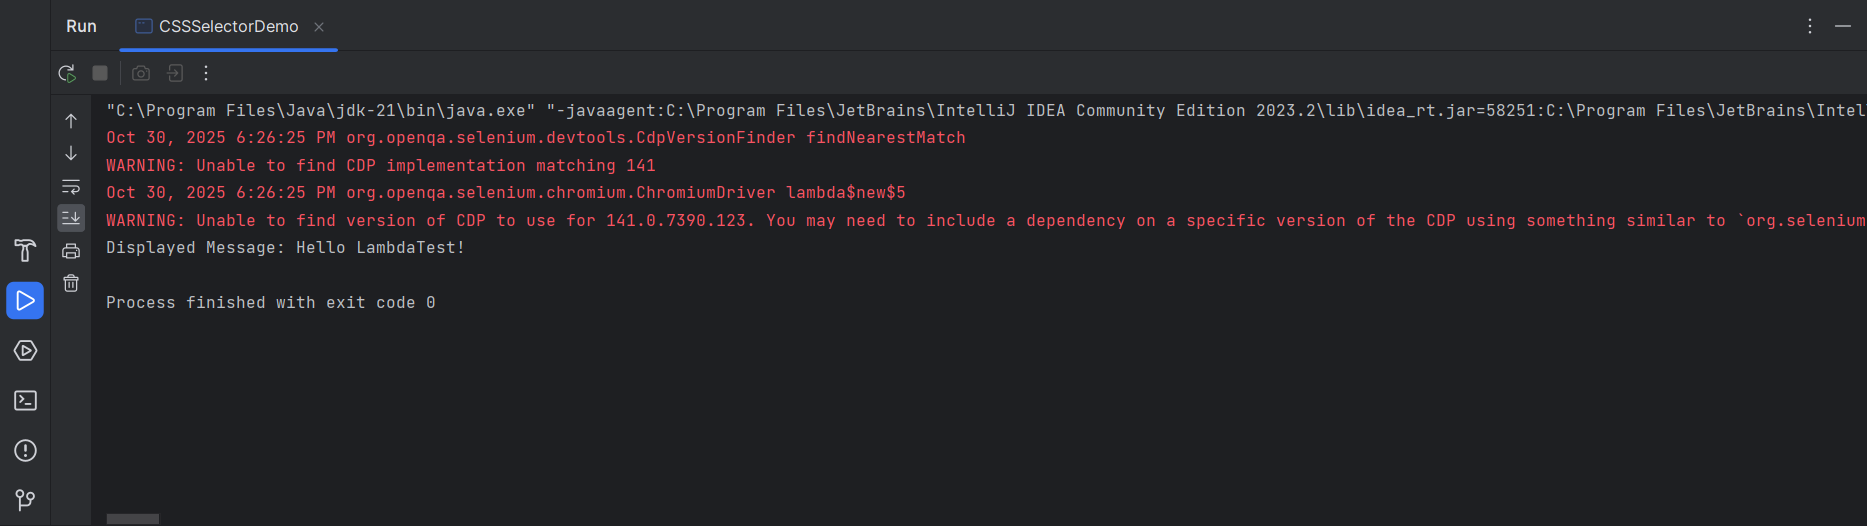
On Test Browser:
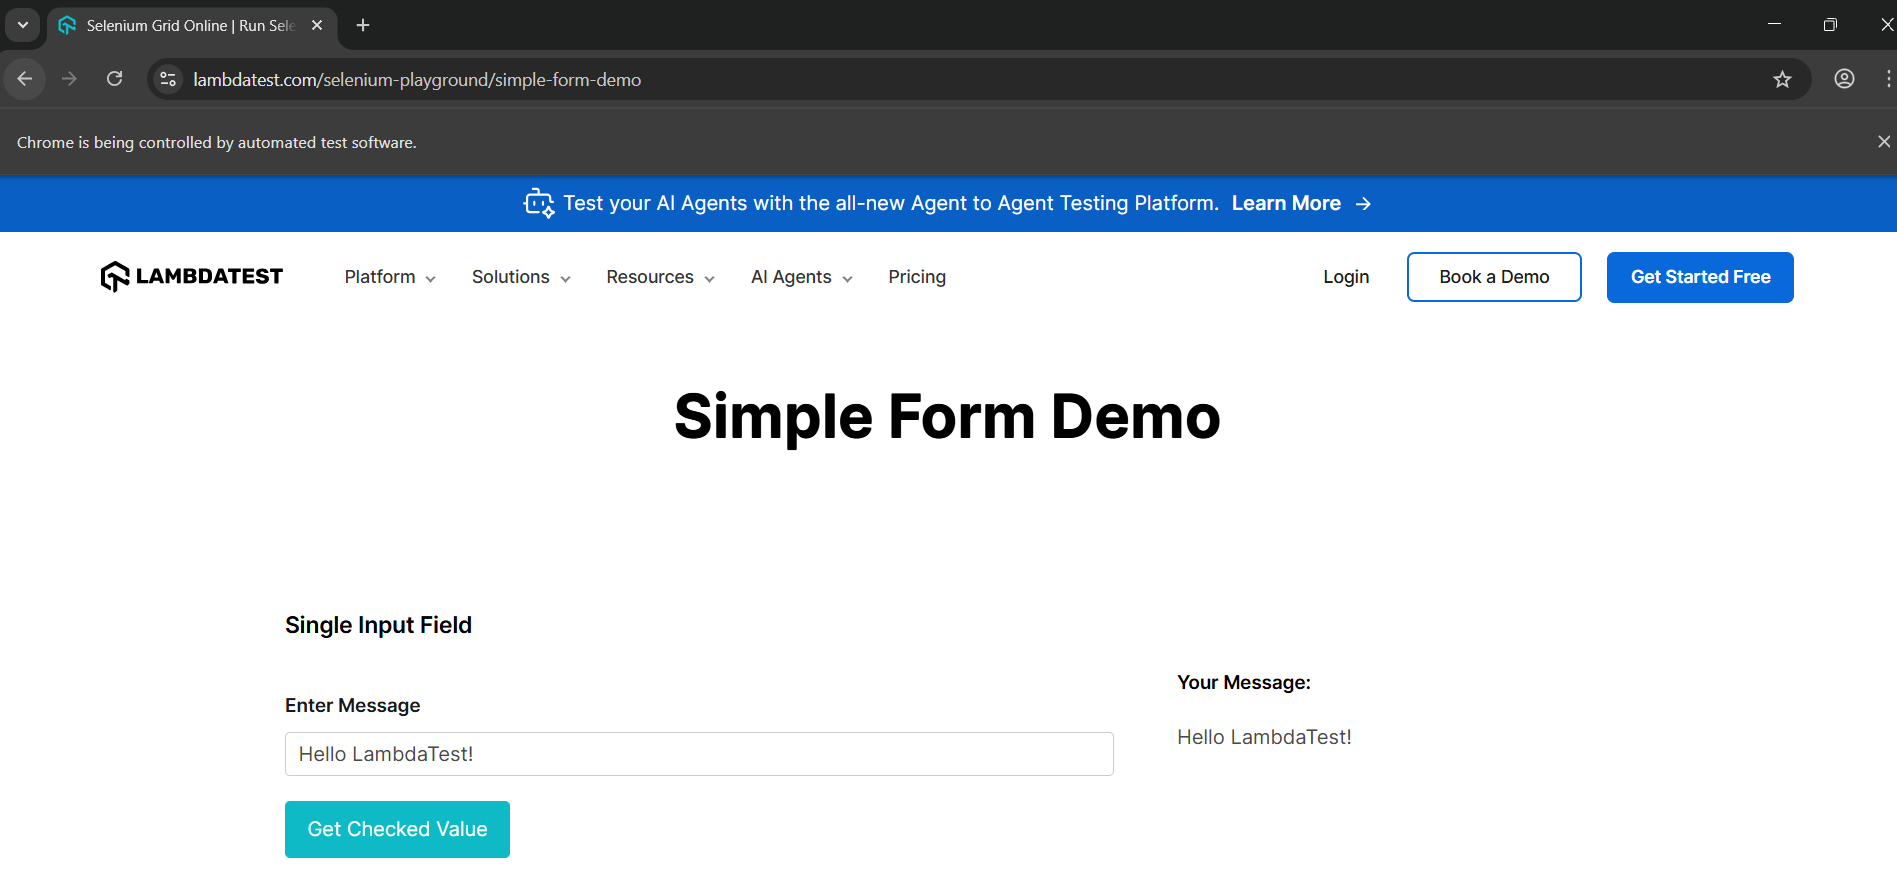
While local execution helps validate your scripts quickly, it comes with certain challenges: limited device/browser coverage, slower execution on constrained hardware, dependency conflicts, and inconsistent network or environment setups. These issues often slow down feedback cycles and block continuous testing at scale.
To overcome these limitations, you can execute your tests scripts over the cloud. Cloud testing offers faster test execution, seamless scalability, centralized test management, and access to thousands of browser - OS combinations without maintaining local infrastructure.
One such platform is TestMu AI, a GenAI-native test execution platform that enables Selenium testing at scale across 3,000+ browser and operating system combinations.
Here’s how you can set it up:
- Create a .env File: Securely store your TestMu AI credentials by creating a .env file in the root of your project and adding the following values:
LT_USERNAME="<your_username>"
LT_ACCESS_KEY="<your_access_key>"String gridURL = "https://" + System.getenv("LT_USERNAME") + ":" + System.getenv("LT_ACCESS_KEY") + "@hub.lambdatest.com/wd/hub";ChromeOptions browserOptions = new ChromeOptions();
browserOptions.setPlatformName("Windows 10");
browserOptions.setBrowserVersion("121.0");
HashMap<String, Object> ltOptions = new HashMap<String, Object>();
ltOptions.put("username", "YOUR_LT_USERNAME");
ltOptions.put("accessKey", "YOUR_LT_ACCESS_KEY");
ltOptions.put("project", "CSSSelectorDemo");
ltOptions.put("w3c", true);
ltOptions.put("plugin", "java-testNG");
browserOptions.setCapability("LT:Options", ltOptions);
You can easily generate these Selenium Java capabilities using the TestMu AI Automation Capabilities Generator.
Test Execution:
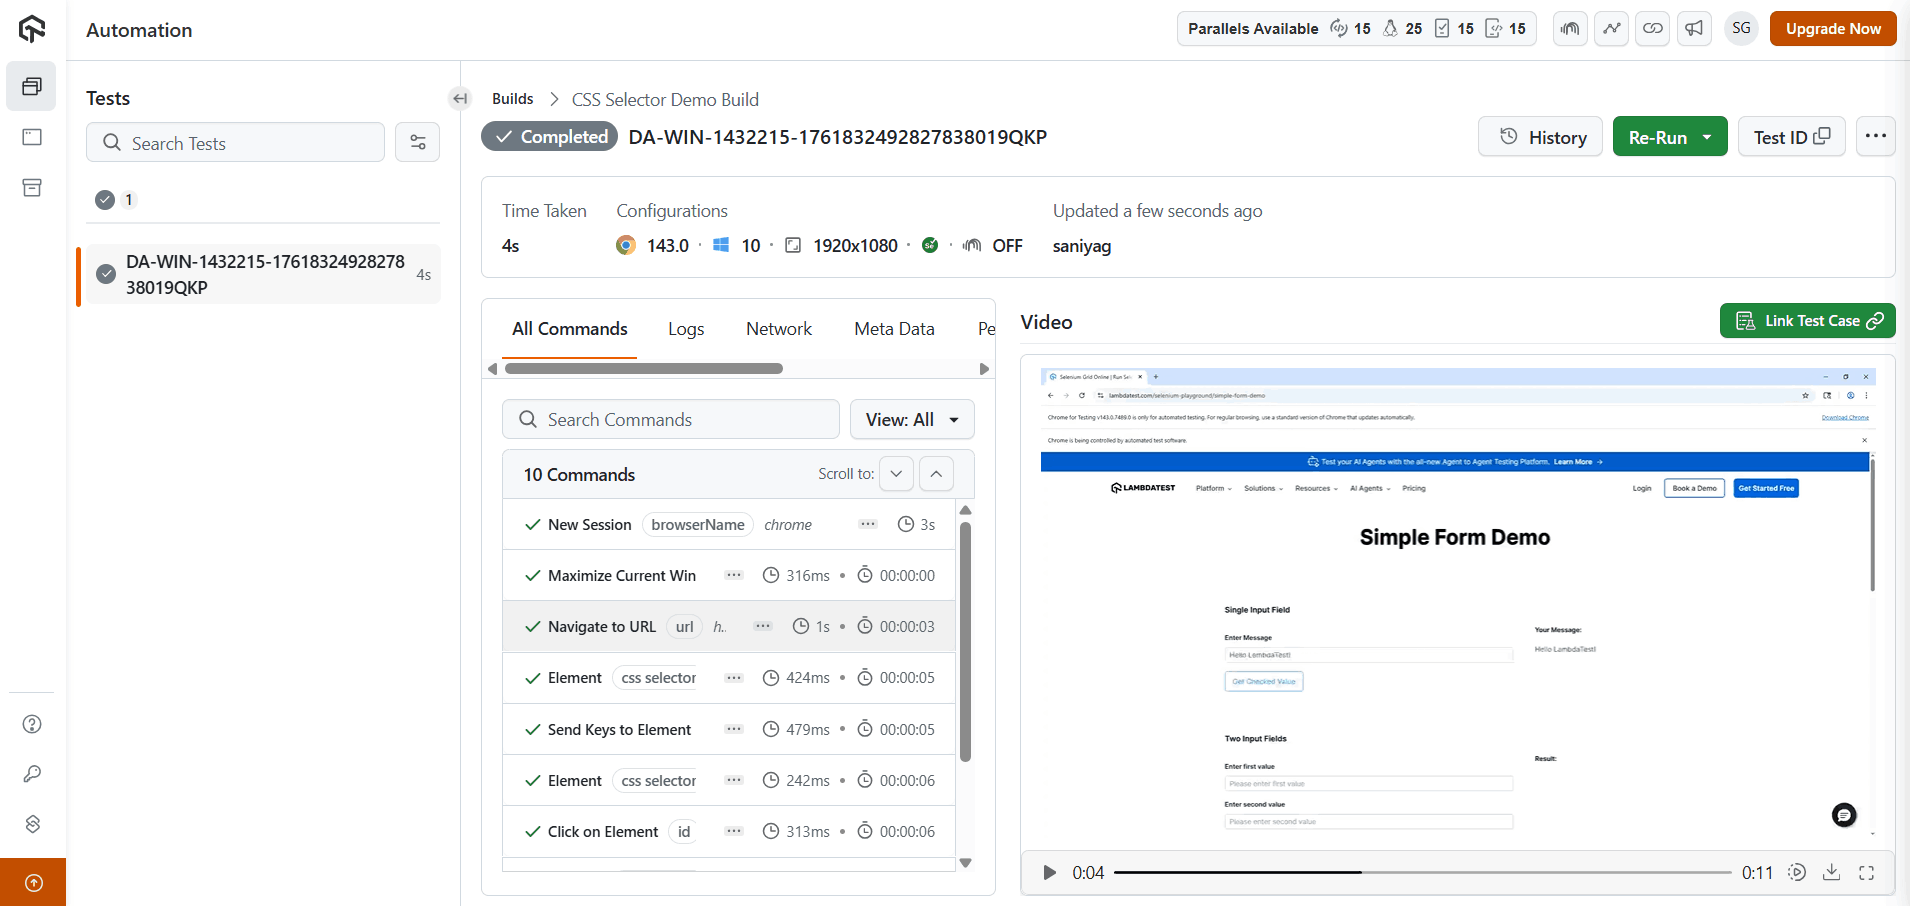 To get started, refer to the documentation on Selenium Java testing with TestMu AI.
How to Use CSS Selectors in Python, C#, and JavaScript?
The selector string itself never changes across languages; only the binding syntax around it does. The same #user-message locator from the Java example above works in every Selenium language binding.
Python uses the By.CSS_SELECTOR constant with find_element():
from selenium import webdriver
from selenium.webdriver.common.by import By

driver = webdriver.Chrome()
driver.get("https://www.testmuai.com/selenium-playground/simple-form-demo/")

message_input = driver.find_element(By.CSS_SELECTOR, "#user-message")
message_input.send_keys("Hello TestMu AI!")
driver.find_element(By.CSS_SELECTOR, "#showInput").click()
C# uses the By.CssSelector() method with FindElement():
using OpenQA.Selenium;
using OpenQA.Selenium.Chrome;

IWebDriver driver = new ChromeDriver();
driver.Navigate().GoToUrl("https://www.testmuai.com/selenium-playground/simple-form-demo/");

IWebElement messageInput = driver.FindElement(By.CssSelector("#user-message"));
messageInput.SendKeys("Hello TestMu AI!");
driver.FindElement(By.CssSelector("#showInput")).Click();
JavaScript (the selenium-webdriver Node.js package) uses By.css():
const { Builder, By } = require("selenium-webdriver");

const driver = await new Builder().forBrowser("chrome").build();
await driver.get("https://www.testmuai.com/selenium-playground/simple-form-demo/");

await driver.findElement(By.css("#user-message")).sendKeys("Hello TestMu AI!");
await driver.findElement(By.css("#showInput")).click();
Outside Selenium, the same selectors drive document.querySelectorAll("#user-message") in plain browser JavaScript, which is exactly what the DevTools $$() shorthand calls under the hood. Learning the selector syntax once pays off across every stack.
What Are the Common Types of CSS Selectors in Selenium?
CSS Selectors in Selenium come in different types, allowing you to identify elements based on their attributes or relationships. Below are the most commonly used types, along with their definitions, syntax, and examples.
ID Selector
You can use an element’s unique id attribute to locate it directly. Since IDs are unique within a page, this is one of the fastest and most reliable locator strategies. .
Syntax:
#idSample Usage:
WebElement usernameField = driver.findElement(By.cssSelector("#username"));
usernameField.sendKeys("test_user");
Here, the element with the ID username is located, and text is entered into it.
ID with TagName
You can combine the HTML tag name with the element’s id to make the selector more specific and readable.
Syntax:
tagname#idSample Usage:
WebElement inputField = driver.findElement(By.cssSelector("input#username"));
inputField.clear();
inputField.sendKeys("admin_user");
This locates the <input> tag that has the ID username and inputs the value admin_user.
Class Name Selector
This targets elements using their class attribute. It’s useful when multiple elements share the same class name, such as buttons or links.
Syntax:
.classnameSample Usage:
WebElement loginButton = driver.findElement(By.cssSelector(".login-button"));
loginButton.click();
The code clicks on a button with the class name login-button, commonly used in login forms.
Name Selector
The name attribute is often used for input fields. You can target these elements easily using the attribute selector.
Syntax:
[name='value']Sample Usage:
WebElement emailInput = driver.findElement(By.cssSelector("[name='email']"));
emailInput.sendKeys("user@example.com");
This example locates an element with the name attribute equal to email and enters a user’s email address.
Combination of ID and Type Attributes
You can combine multiple attributes to narrow down your search when a single attribute isn’t unique.
Syntax:
tagname[id='value'][type='value']Sample Usage:
WebElement userInput = driver.findElement(By.cssSelector("input[id='username'][type='text']"));
userInput.sendKeys("qa_admin");
This selector finds an <input> element that has both an id of username and a type of text.
Combination of HTML TagName and ClassName
This allows you to locate elements by combining the tag name and the class name, which is common for buttons, links, or divs.
Syntax:
tagname.classnameSample Usage:
WebElement submitBtn = driver.findElement(By.cssSelector("button.submit-btn"));
submitBtn.click();
This example clicks on a <button> element with the class submit-btn.
Mastering CSS Combinators in Selenium
Combinators express relationships between elements, which is how you reach elements that have no unique attributes of their own. All four examples below work against this HTML structure:
<div id="login-form">
  <h2>Sign In</h2>
  <p id="hint">Use your work email</p>
  <p>Terms apply</p>
  <ul>
    <li><a href="/forgot">Forgot password</a></li>
    <li><a href="/signup">Create account</a></li>
  </ul>
</div>
Descendant Combinator (space)
Matches elements nested anywhere inside another element, at any depth.
// Matches BOTH <a> links: they are descendants of #login-form at any depth
List<WebElement> links = driver.findElements(By.cssSelector("#login-form a"));
Child Combinator (>)
Matches only direct children, one level deep. This is the combinator to reach elements the descendant selector over-matches.
// Matches the <h2> and both <p> tags, but NOT the <a> links (they are two levels deep)
WebElement heading = driver.findElement(By.cssSelector("#login-form > h2"));
Adjacent Sibling Combinator (+)
Matches the single element that immediately follows another at the same level. Useful for labels, hints, and validation messages rendered right after a field.
// Matches ONLY <p id="hint">: it directly follows the <h2>
WebElement hint = driver.findElement(By.cssSelector("h2 + p"));
General Sibling Combinator (~)
Matches every sibling that appears after the reference element, not just the first one.
// Matches BOTH <p> tags: each is a later sibling of the <h2>
List<WebElement> paragraphs = driver.findElements(By.cssSelector("h2 ~ p"));
The practical rule: prefer > over the space when you know the exact structure, because tighter scoping fails loudly when the DOM changes instead of silently matching the wrong element. Use + and ~ when the target has no attributes of its own but its neighbor does.
Advance Selectors in Selenium
When working with dynamic web elements whose attributes change slightly with each page load, substring matching makes it easier to locate elements using only part of an attribute’s value.
Below are some of the other advance types of CSS Selectors in Selenium that you will learn and understand with its simple examples:
Matching a Prefix (Starts With)
Finds elements where the attribute value starts with a specific substring.
Syntax:
[attribute^='value']Sample Usage:
WebElement userInput = driver.findElement(By.cssSelector("input[id^='user']"));
userInput.sendKeys("tester01");
This will match any <input> element whose ID begins with “user,” such as user_id, user_name, or user_input.
Matching a Suffix (Ends With)
Finds elements where the attribute value ends with a specific substring.
Syntax:
[attribute$='value']Sample Usage:
WebElement nameInput = driver.findElement(By.cssSelector("input[id$='name']"));
nameInput.sendKeys("Saniya");
This will match any element with an ID ending in “name,” such as first_name or last_name.
Matching a Substring (Contains)
Locates elements where the attribute value contains a specific substring.
Syntax:
[attribute*='value']Sample Usage:
WebElement userElement = driver.findElement(By.cssSelector("input[id*='user']"));
userElement.sendKeys("automation_user");
This matches any <input> field whose ID contains the word “user,” such as user_input or app_user_name.
Matching a Word (Contains Whole Word)
Matches elements that contain a specific word in an attribute’s value (separated by spaces).
Syntax:
[attribute~='word']Sample Usage:
WebElement activeButton = driver.findElement(By.cssSelector("[class~='active']"));
activeButton.click();
This targets elements with the class active, even when multiple class names are applied (e.g., btn primary active).
The above selectors are especially useful when dealing with substring matching, as they allow you to locate elements based on partial attribute values. This is particularly helpful for dynamic web elements whose attributes (like IDs or class names) change slightly between sessions or page loads.
Next, you’ll explore another advanced type of CSS Selector in Selenium called pseudo-class selectors. These selectors let you locate elements based on their position or state within the DOM hierarchy. They’re helpful when multiple elements share similar attributes.
TagName with “:first-of-type”
Selects the first element of its type within a parent container.
Syntax:
tagname:first-of-typeSample Usage:
WebElement firstParagraph = driver.findElement(By.cssSelector("p:first-of-type"));
System.out.println(firstParagraph.getText());
This prints the text of the first <p> tag inside its parent element.
TagName with “:last-of-type”
Selects the last element of its type within a parent container.
Syntax:
tagname:last-of-typeSample Usage:
WebElement lastParagraph = driver.findElement(By.cssSelector("p:last-of-type"));
System.out.println(lastParagraph.getText());
Useful for validating or extracting the content of the last <p> tag or any element of the same type within its parent container.
TagName with “:nth-of-type(n)”
Selects the nth element among siblings of the same type within a parent container.
Syntax:
tagname:nth-of-type(n)Sample Usage:
WebElement secondListItem = driver.findElement(By.cssSelector("li:nth-of-type(2)"));
System.out.println(secondListItem.getText());
This locates the second <li> element in a list, making it useful for accessing or validating specific items in structured HTML lists or tables.
TagName with “:nth-child(n)”
Selects the nth child of a parent element, regardless of the tag type. This is useful when you want to target a specific element based on its position within the parent container.
Syntax:
tagname:nth-child(n)Sample Usage:
WebElement thirdDiv = driver.findElement(By.cssSelector("div:nth-child(3)"));
System.out.println(thirdDiv.getText());
This targets the third <div> child element within its parent container, useful when elements share similar attributes, and their position helps uniquely identify them.
TagName with “:first-child”
Selects the first child element of a parent, regardless of its tag type. This is useful when you want to identify or verify the very first element within a container.
Syntax:
tagname:first-childSample Usage:
WebElement firstChild = driver.findElement(By.cssSelector("div:first-child"));
System.out.println(firstChild.getAttribute("class"));
This retrieves the first <div> child element inside its parent container and prints its class attribute, ideal for validating structural or style-based DOM relationships.
TagName with “:last-child”
Selects the last child element of a parent container, regardless of its tag type. It’s commonly used when verifying the final element in a list or structure.
Syntax:
tagname:last-childSample Usage:
WebElement lastChild = driver.findElement(By.cssSelector("div:last-child"));
System.out.println(lastChild.getText());
This locates the last <div> child element within its parent container and prints its text content, useful for validating the closing element in a structured section.
CSS Selectors vs XPath in Selenium: Which Is Better?
Neither wins everywhere. CSS Selectors are the better default; XPath does two things CSS structurally cannot. Here is the honest comparison:
| Criteria | CSS Selectors | XPath |
|---|---|---|
| Speed | Generally faster; resolved by the browser's native CSS engine | Slightly slower; needs a separate XPath evaluator, most visibly in older browsers |
| Readability | Short and familiar: input#username | Verbose: //input[@id='username'] |
| Browser support | Consistent across all modern browsers | Supported everywhere, but with more engine-to-engine quirks in legacy browsers |
| Upward traversal | Cannot walk up to a parent or ancestor element | Can: parent:: and ancestor:: axes traverse up the DOM |
| Match by visible text | Not possible; :contains() is not valid CSS | Built in: //button[text()='Show Message'] or contains(text(),...) |
| Direction of search | Forward only (top-down) | Bidirectional: forward and backward through the DOM |
Decision framework: default to CSS Selectors for speed and readability. Switch to XPath only when you must (a) select an element by its visible text, or (b) locate an element and then traverse up to its parent or ancestor. If you find yourself writing long XPath chains for anything else, the fix is usually a better attribute, such as data-testid, not a longer expression.
Converting between the two: you cannot embed a CSS selector inside an XPath expression, but every CSS selector has an XPath equivalent, and utilities named css2xpath (available as npm and Python packages) automate the translation. The mapping is mechanical: #username becomes //*[@id='username'], .login-button becomes //*[contains(concat(' ',@class,' '),' login-button ')], and ul > li becomes //ul/li. Converting in the other direction is not always possible, since XPath text and axis expressions have no CSS equivalent. For the full XPath side of this comparison, see this guide on using XPath in Selenium.

Best Practices for Using CSS Selectors in Selenium
Following Selenium best practices while writing CSS Selectors ensures your locators remain stable, efficient, and easy to maintain across UI changes.
- Keep Selectors Concise: Short and specific CSS Selectors make your Selenium scripts easier to read and debug. Avoid unnecessary tag nesting or long hierarchies that may break with small UI changes.
- Avoid Dynamic IDs: Many modern web apps generate dynamic IDs during each session. As a Selenium best practice, avoid using these IDs since they can cause test failures when values change.
- Use Attribute-Based Locators: Attribute-based CSS Selectors such as [name='email'] or [type='submit'] offer stability and clarity, especially when IDs or classes are inconsistent.
- Leverage Class Names or Custom Attributes: Class names or custom attributes like data-testid are reliable options for locating elements that don’t change frequently.
- Validate in Browser DevTools: Before adding a CSS Selector in your Selenium test, always verify it in the browser’s DevTools to ensure it correctly identifies the intended element without ambiguity.
- Use Hierarchical Selectors Wisely: When working with parent-child relationships, keep the selector chain short. Overly complex hierarchies make Selenium locators breakable and harder to maintain.
- Prefer CSS over XPath for Speed: In Selenium, CSS Selectors are generally faster and more readable than XPath expressions. Use CSS wherever possible to improve test speed and maintainability.
- Combine Attributes for Uniqueness: If a single attribute isn’t unique, combine multiple attributes like [name='username'][type='text'] to pinpoint the element precisely.
- Handle Dynamic Elements Gracefully: For dynamic elements, use CSS pseudo-classes like :nth-child() to target elements by position. Remember that :contains() is not part of the CSS standard; when you must match visible text, use an XPath text() expression instead.
- Debug InvalidSelectorException Systematically: Selenium throws InvalidSelectorException when a selector string is syntactically invalid, common causes are unbalanced quotes or brackets, XPath syntax passed to By.cssSelector(), and unsupported pseudo-classes like :contains(). Reproduce the selector in the browser console with $$('your-selector') first: if the console rejects it, Selenium will too.
- Organize Locators in a Central Repository: Store all your CSS Selectors in a separate constants file or Page Object Model to improve reusability and simplify updates when the UI changes.
- Add Comments for Complex Selectors: When a selector uses multiple attributes or nested elements, document its purpose clearly in comments. This helps future maintainers understand its intent.
Conclusion
Mastering CSS Selectors in Selenium gives you precise control over how you identify and interact with web elements. They not only make your test scripts cleaner and faster but also reduce dependency on brittle locators like XPath or dynamic IDs.
By following Selenium best practices, such as using attribute-based selectors, validating them in DevTools, and organizing them within a Page Object Model, you ensure your automation scripts remain robust and easy to maintain as the application evolves.
Whether you’re testing simple forms or complex UIs, CSS Selectors provide the flexibility and accuracy every QA engineer needs for efficient web automation.
Citations
- CSS Selectors: https://www.researchgate.net/publication/345320707_CSS_Selectors
- Generator Based on CSS Selectors for Efficient Extraction from HTML Pages: https://www.researchgate.net/publication/346659775
- CSS Mastery Advanced Web Standards Solutions: https://www.academia.edu/30674145/
Author

Andreea


Andreea D. is an experienced QA Automation Engineer with over 10 years in software testing, specializing in UI and API automation using tools like Ranorex, SpecFlow, Selenium, and Postman. She has worked across diverse industries, mentoring peers, training aspiring testers, and contributing to Agile teams. Beyond her engineering expertise, Andreea is a technical blogger with multiple published articles, including guides on bug reporting, OOP principles in test automation, Appium reporting, and penetration testing. She also coordinates programs supporting senior citizens in Romania, blending technical leadership with community impact.
Reviewer

Rahul Mishra
Reviewer
Rahul Mishra is a Lead Member of Technical Staff at TestMu AI (formerly LambdaTest), leading frontend engineering and accessibility testing across the quality engineering platform. He mentors frontend engineers, runs code reviews and sprint planning, optimizes React.js rendering performance, and makes product features accessible to users with disabilities through WCAG and ADA-compliant accessibility audits. He brings 10+ years of experience across React.js, VueJS, TypeScript, Swift, Objective-C, and AWS, with earlier work as a Technical Lead at VectoScalar Technologies. Rahul holds a B.E. in Information Technology.


Frequently asked questions on CSS Selectors
Did you find this page helpful?
More Related Learning Hubs
TestMu AI forEnterprise
Get access to solutions built on Enterprise
grade security, privacy, & compliance
- Advanced access controls
- Advanced data retention rules
- Advanced Local Testing
- Premium Support options
- Early access to beta features
- Private Slack Channel
- Unlimited Manual Accessibility DevTools Tests