

Power Your Software Testing with AI Agents and Cloud
The Native AI-Agentic Cloud Platform to Supercharge Quality Engineering. Test Intelligently and Ship Faster.


- TestMu AI (Formerly LambdaTest)
- /
- Blog
- /
- How To Automate iOS App Using Appium
Appium iOS Automation: Step-by-Step Guide for 2026
Automate iOS apps with Appium using XCUITest driver. This guide covers simulator setup, real device testing, and running tests on cloud devices.
Last Updated on:
Appium iOS automation lets you test native, hybrid, and web apps on iPhones and iPads using a single codebase. With the XCUITest driver, Appium communicates directly with iOS devices without requiring app recompilation.
This tutorial covers everything from initial setup to running tests on real devices. You will learn how to configure Appium for iOS simulators and real devices, write your first test script, and troubleshoot common issues.
Key Takeaways
- Appium is an open-source test automation framework for iOS app automation that tests native, web, and hybrid apps and reuses test code across iOS, Android, and Windows through a single API.
- The Appium XCUITest driver is based on Apple's XCTest framework and WebDriverAgent, so Appium automates an iOS app file directly without recompiling the app or opening the project in Xcode.
- In Appium 2.x, the XCUITest driver is no longer bundled with Appium and is installed with appium driver install xcuitest, and capabilities use the appium: prefix, such as appium:automationName.
- iOS simulators run Appium tests faster than real devices and need no provisioning profiles but lack push notifications and camera support, so teams run regression on simulators and smoke or sanity suites on real iOS devices.
- Appium automation on a real iOS device needs the udid, bundleId, xcodeOrgId, xcodeSigningId, and updatedWDABundleId capabilities, plus a provisioning profile that signs the WebDriverAgentRunner app.
- Appium iOS tests should prefer accessibility id, class name, or predicate locators over XPath, which can be up to 100 times slower in special cases because Apple's XCTest framework does not natively support XPath.
- Local Appium iOS automation requires a Mac, a USB connection to each device, and a separate Mac host per device for parallel runs, and jailbroken devices are not officially supported.
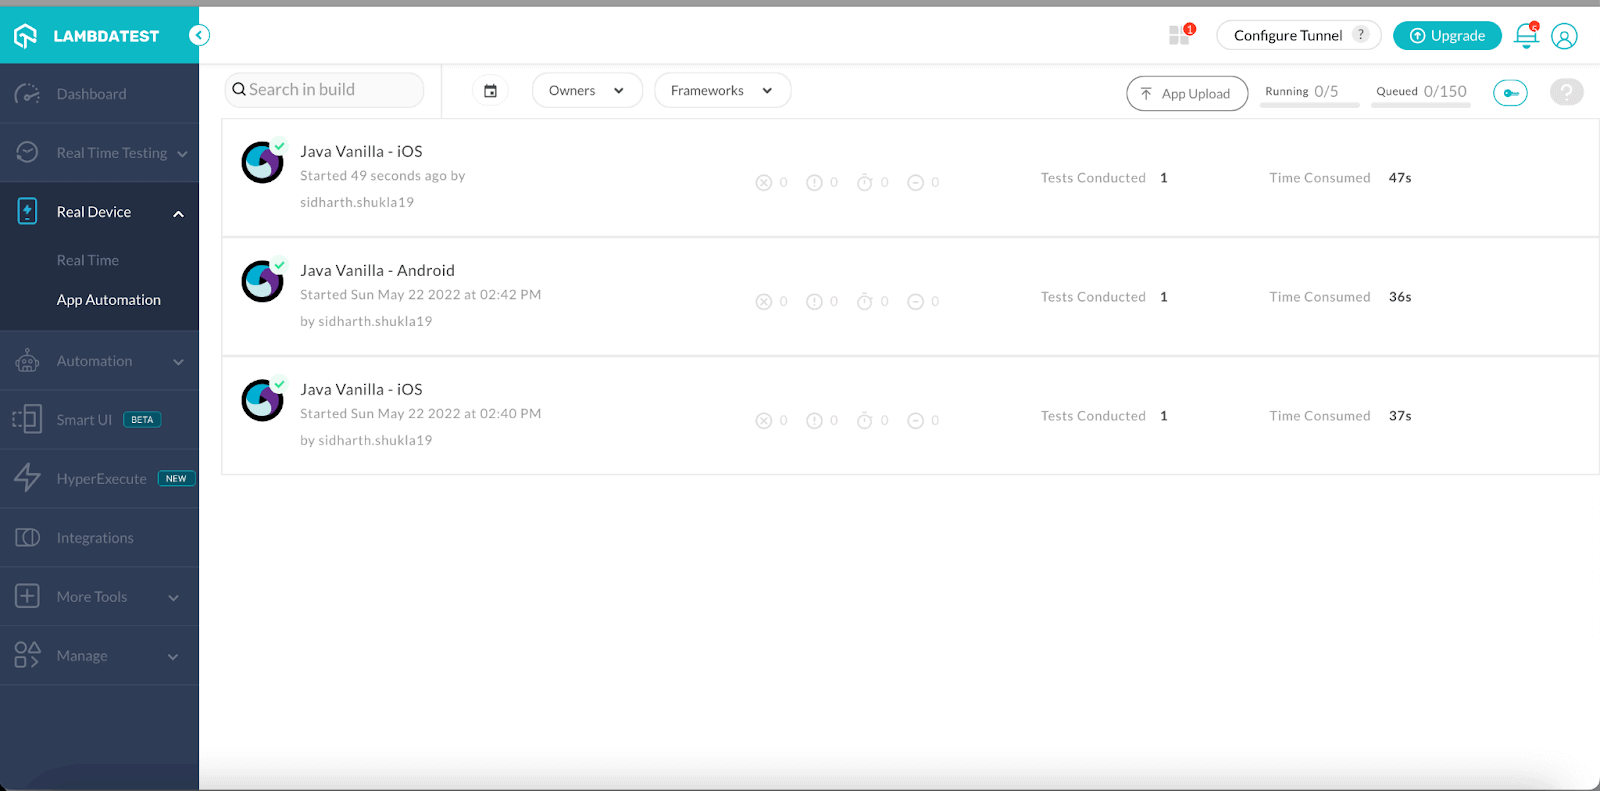
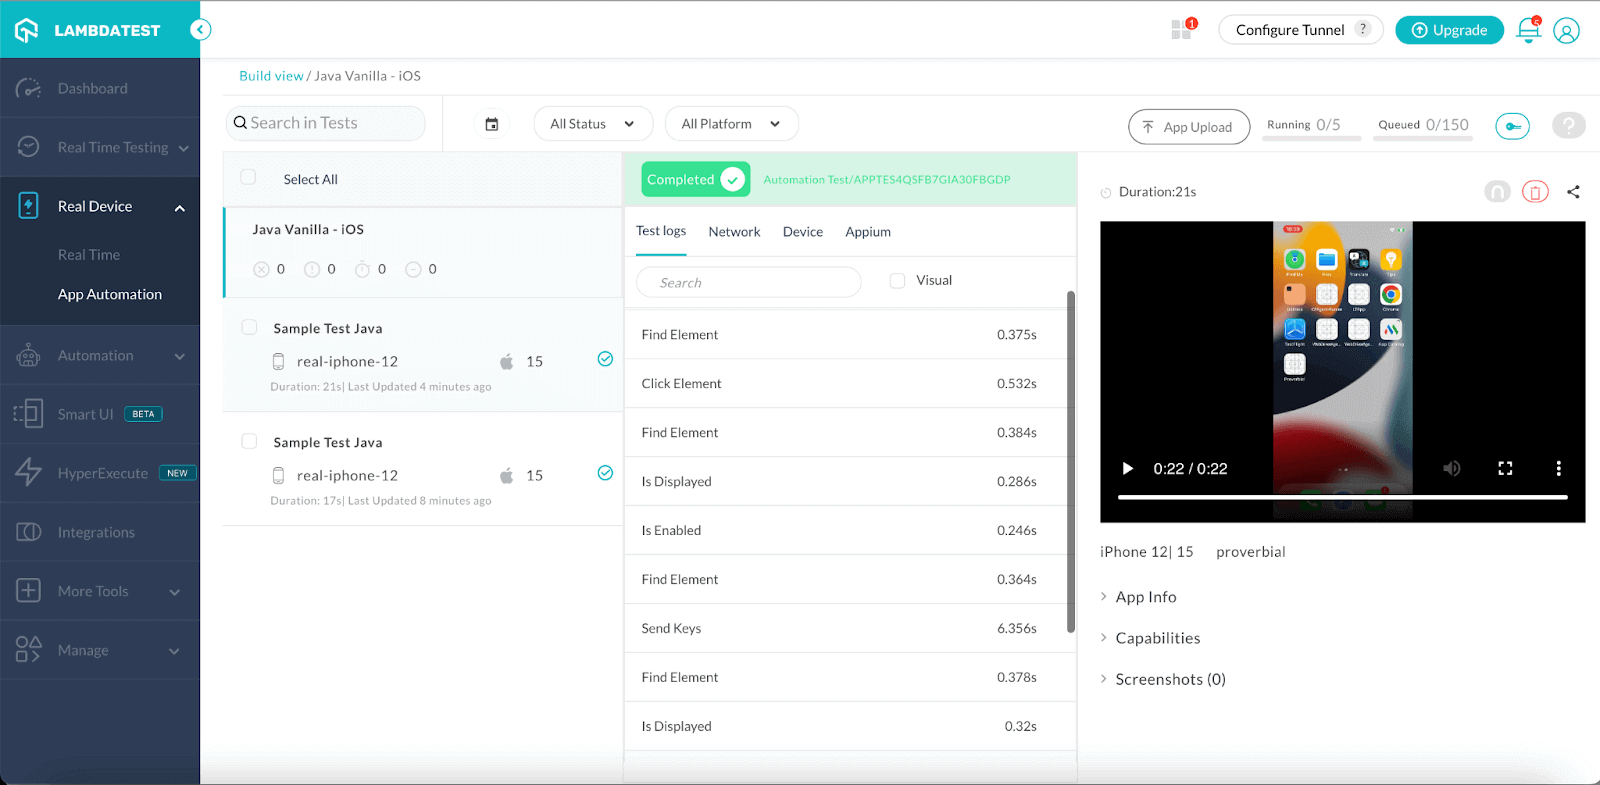
- TestMu AI runs Appium iOS tests on real cloud iPhones without local prerequisite setup, and the TestMu AI Real Device App Automation section shows each build with video, test logs, and network details.

Types of iOS application testing
There are specifically two types of iOS application testing, either you can test it using the simulator or by using the real device. In most real-time projects, the team prefers to perform regression testing in the iOS simulator, but simulator testing alone is insufficient for QA sign-off. This is why test (or QA) teams prefer to execute one round of Smoke or Sanity on the real devices.
When teams perform iOS testing, they like to run Functional Testing, Performance Testing, Security Testing, and Hardware Testing. It is important to note that Performance, Security, and Hardware Testing are non-functional testing types.
In this Appium testing tutorial, we will perform functional testing on iOS using a real device cloud.
Many mobile app testing frameworks facilitate automated device testing on iOS. However, my personal choice has always been "Appium." You will know about the USPs of Appium once you read through this blog on how to automate iOS app using Appium.

Austin Siewert
Co-Founder, Steadfast Systems
Discovered @TestMu AI yesterday. Best browser testing tool I've found for my use case. Great pricing model for the limited testing I do 👏
2M+ Devs and QAs rely on TestMu AI
Deliver immersive digital experiences with Next-Generation Mobile Apps and Cross Browser Testing Cloud

What is Appium?
Appium is an open source test automation framework , empowers testing for native, web, and hybrid apps across iOS, Android, and Windows platforms. Notably, it offers cross-platform capability, enabling unified testing with a single API across iOS, Android, and Windows devices.
In simple words, it processes the request from the client and forwards it to the simulator and emulator or real devices. The test scripts are automated, and the result is communicated to the client via the server. This emulator vs simulator vs real device testing blog will help you learn more about it.
This enables code reuse between iOS, Android, and Windows test suites. The best part is using programming languages such as JavaScript, Java, Ruby, Python, PHP, and C# for Appium test script design.
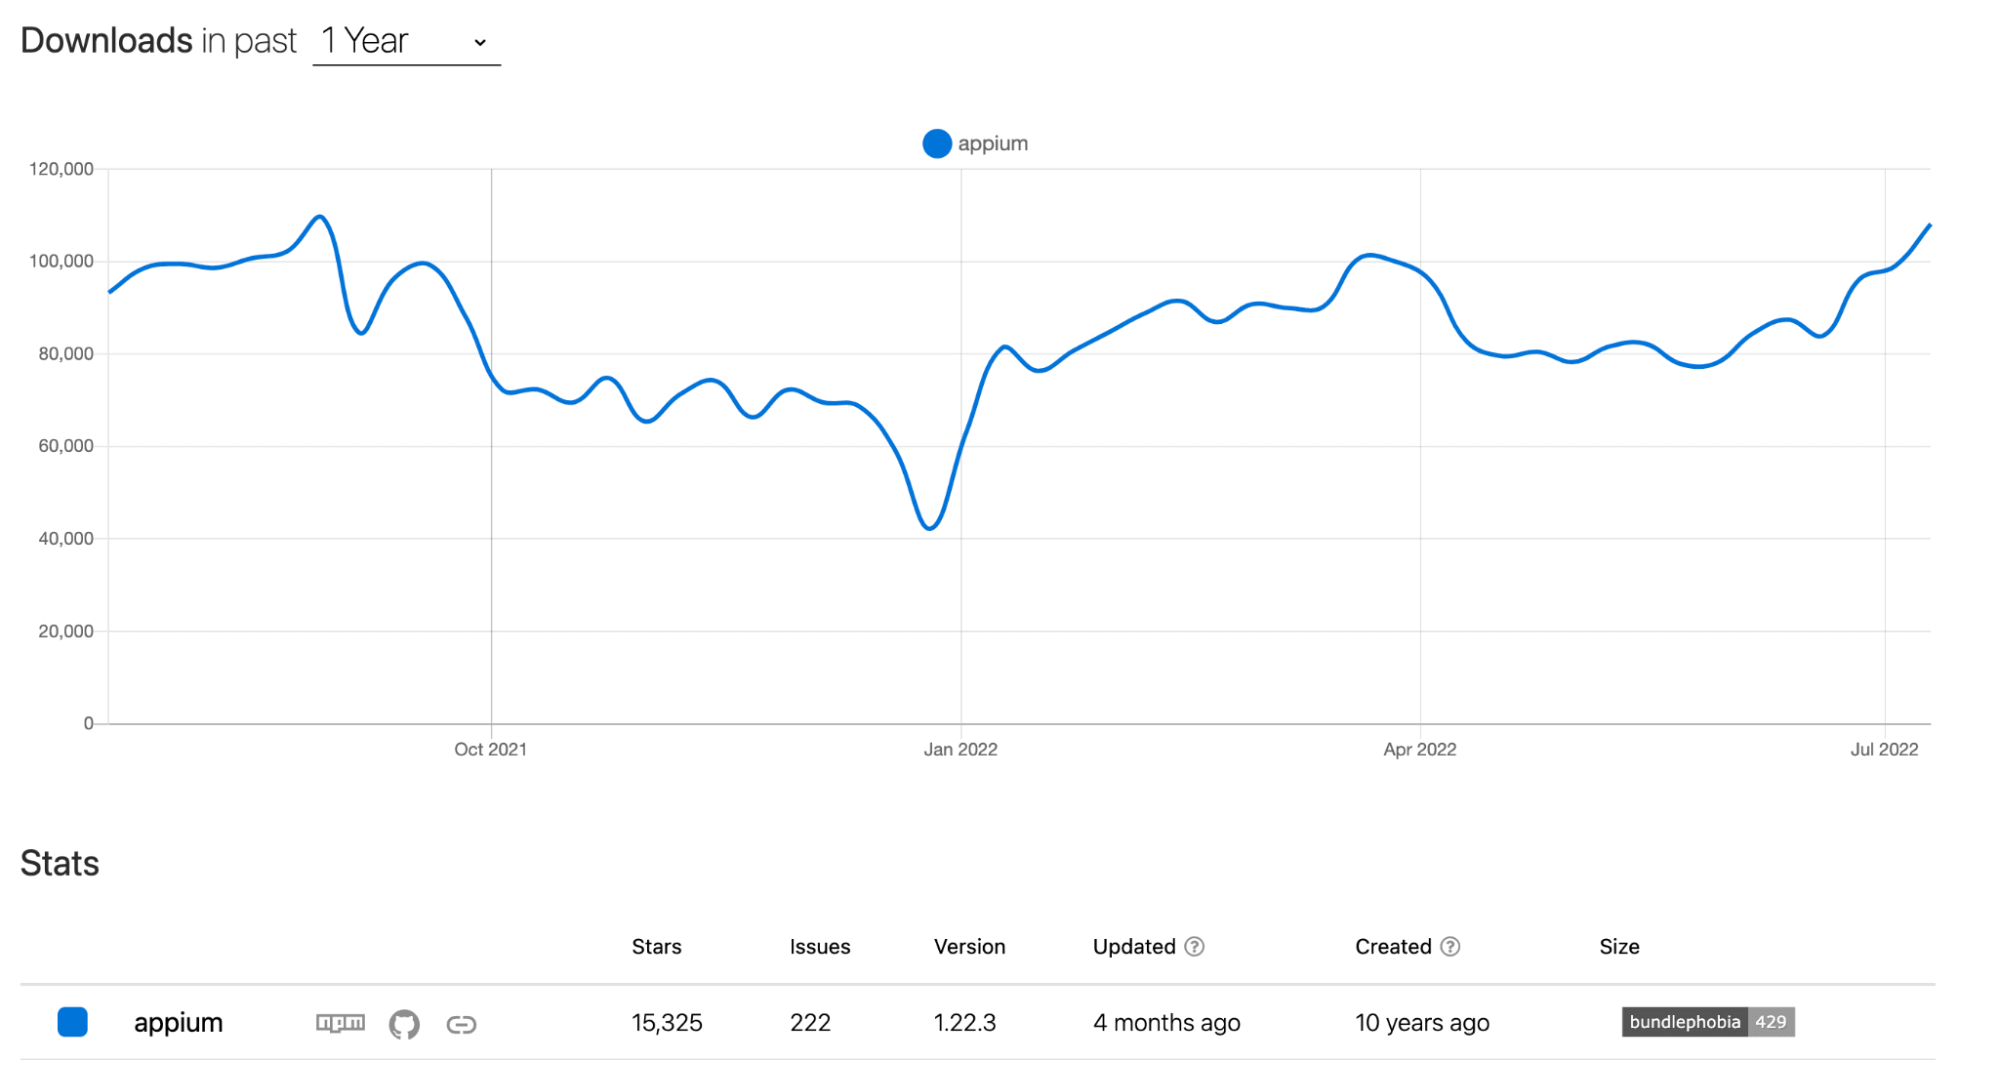
As per the official website of Appium, per month, around 416k downloads are done by the users. It has a massive number of users along with community support.
Watch this video to learn about Appium, one of the most popular open-source test automation frameworks for mobile app testing.
Benefits of automating iOS app testing using Appium
As discussed earlier in this blog on how to automate iOS app using Appium, you must have had a little idea about iOS and Appium by now, but the million-dollar question is why Appium?
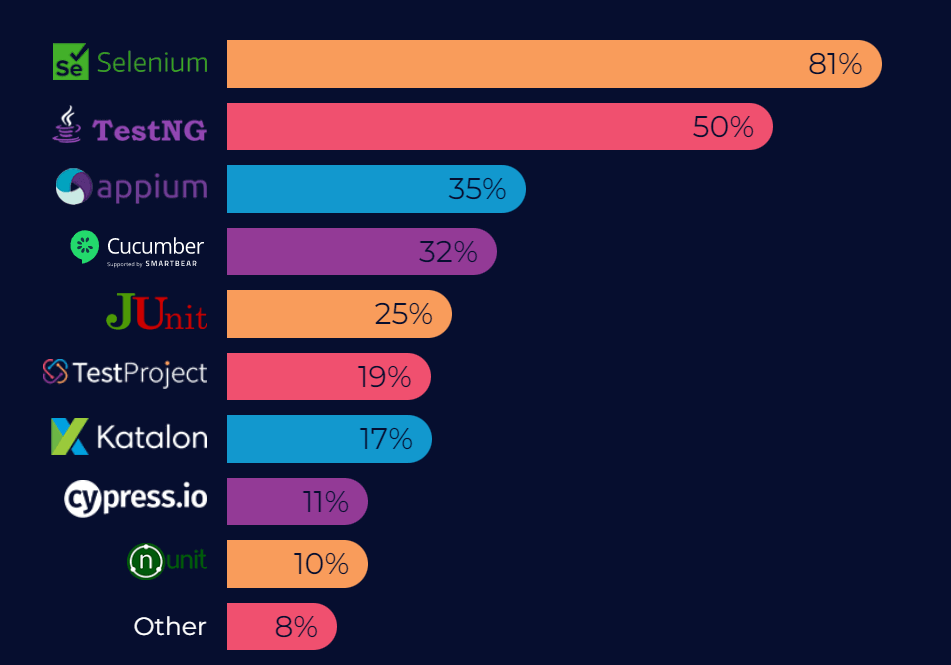
Appium has shown significant progress and is quickly becoming a preferred automation testing tool for mobile applications, with 35% of the organizations choosing it over other free/open source functional testing tools.
So, let's point out some of the significant benefits of iOS Appium automation testing. We have alternatives for iOS automation, but Appium is easy to use and has extensive community support.
- Cross platform
- Avoid installing extra dependencies
- Support for major iOS versions
- Avoid recompilation of app
- Hassle-free execution
In case you are a beginner to Appium you can learn to perform mobile app testing easily through this tutorial.
As stated on the official website of Appium, the Appium team does not test the XCUITest driver against jailbroken devices, so it cannot be guaranteed that it will work as seen on non-jailbroken devices.

Note: Automate your iOS apps on the Appium cloud of 10,000+ real devices. Try TestMu AI Now!
Prerequisites for Automating iOS Apps with Appium
Before starting the pre-setup, as per my past experiences, I must tell you that it is quite tedious to do the entire setup, so please stay with us and follow all the steps carefully. Remember that all the steps mentioned below are mainly specific to OS, so follow steps respective to your operating system (i.e., macOS, Windows).
- First, you must have the Java setup done along with an IDE. We can use any IDE, but I recommend using Eclipse or IntelliJ IDE. I would recommend using Eclipse for the first try or practice.
- To set up JDK in the machine, please refer to the official Oracle website. If you already have JDK in your machine, skip this step. Never forget to check your java version in your machine post installation. You can also check the Java version as below once the installation is completed:
- Once your JDK installation along with environment setup is done, the next step is supposed to install Eclipse. For your help, please refer to these blogs on how to install Eclipse and how to install IntelliJ.

Step 1: Install Homebrew
It is a package management software, and to install, follow the instructions on this page: https://brew.sh/.
To check the installed details along with the version, we can type brew -v as shown below:

Step 2: Install Carthage
The WebDriverAgent requires it. To install it, just type below command:
brew install carthage
If it is already installed in your machine, then you will get a message as below:
"carthage 0.38.0 is already installed and up-to-date."
Step 3: Install Node & Npm
This step is required because Appium is a node application. To install it, run the below command on the terminal.
brew install node
To verify the installed versions of npm and node, we can use npm -v & node -v as shown below:

Step 4: Install authorize-ios
authorize-ios is a little utility that pre-authorizes Instruments to run UIAutomation scripts against iOS devices. It is required to run tests on real devices.
In the terminal, enter the below command to install authorize-ios:
npm install -g authorize-ios
Step 5: Install ios-deploy
Install ios-deploy via Homebrew by running the below command on the terminal:
brew install ios-deploy
To verify the installation, we can use the ios-deploy --version command in the terminal as below:
 Step 6: Install ideviceinstaller
This is the tool for managing apps on iOS device
brew install ideviceinstaller
To check whether the installation is completed or not, the ideviceinstaller --version command can be used as shown below:

Step-7: Install Xcode
Xcode is a complete developer toolset for creating apps for Mac, iPhone, iPad, Apple Watch, and Apple TV. Xcode brings user interface design, coding, testing, debugging, and submitting to the App Store into a unified workflow.
For step-by-step guidance on using Xcode to build, test, and submit apps to the App Store, look at XCode documentation. To verify the Xcode installation, we can use the /usr/bin/xcodebuild -version command as shown below:

Step 8: Install XCUITest driver
Appium XCUITest driver is a combined solution, which allows automated black-box testing of iOS and tvOS native applications and WebKit web views. The native testing is based on Apple's XCTest framework and the fork of Facebook's WebDriverAgent server. Web views communication is done via Webkit remote debugger protocol.
The appium-ios-device library ensures real device communication. To install the XCUITest driver, please use the official website. Its documentation also covers common errors or issues faced during the installation.
Step 9: Install Appium and Appium Doctor
To install Appium, please type the below command and use the version of Appium after @ in the below command:
npm install -g appium@version
You can check the version of Appium installed by using the command appium --version on the terminal, refer to the below screenshot for reference:

Appium doctor is a mini software that checks all (well, almost all) of the preconditions for appium to run successfully. In the terminal, enter the following:
npm install -g appium-doctor
We can use the command appium-doctor --version to check the installed version:

Step 10: Install Maven
As we all know, Maven is the dependency management tool, type below command in your terminal:
brew install maven
Don't forget to set up the Maven path before checking the version. You can do that by using the below command:
export PATH=/opt/apache-maven-3.8.6/bin:$PATH
Once installation complete do cross-check by typing below command:
mvn --version
Output will look as below:

Step 11: Install TestNG
TestNG is a testing framework that we'll be using to manage our automated test suite. Launch Eclipse, select "Help" > "Eclipse Marketplace" > search for TestNG. Learn more about TestNG through this Selenium TestNG tutorial.
We should be able to see the TestNG for Eclipse option with a button labeled "Install." Click on the button and complete the installation. For more help, please go through this Appium with TestNG tutorial.
Step 12: Install Appium Desktop
We need to install Appium Desktop so we can use the Appium Inspector to identify the elements on the iOS app for designing test scripts. You can install the Appium Desktop from the official website.
Appium iOS Simulator Setup
Running Appium tests on iOS Simulator is faster than real devices and requires no provisioning profiles. Here is how to configure it:
Step 1: Launch iOS Simulator
Open Xcode and navigate to Window > Devices and Simulators. Select a simulator (e.g., iPhone 15 Pro) and boot it.
Step 2: Set Desired Capabilities
DesiredCapabilities caps = new DesiredCapabilities();
caps.setCapability("platformName", "iOS");
caps.setCapability("platformVersion", "17.0");
caps.setCapability("deviceName", "iPhone 15 Pro");
caps.setCapability("automationName", "XCUITest");
caps.setCapability("app", "/path/to/your.app");
Step 3: Run the Test
Start the Appium server and execute your test. The simulator will launch automatically if not already running.
Note: Simulators do not support push notifications, camera, or certain hardware features. Use real devices for complete testing coverage.
Appium 2.x XCUITest Driver Setup
Appium 2.x changed how drivers are installed. The XCUITest driver is no longer bundled with Appium.
Install XCUITest Driver
appium driver install xcuitest
Verify Installation
appium driver list --installed
Key Changes in Appium 2.x
- Drivers are installed separately
- New capability format:
appium:automationNameinstead ofautomationName - Improved W3C WebDriver compliance
- WebDriverAgent updates are automatic
Updated Capabilities for Appium 2.x
DesiredCapabilities caps = new DesiredCapabilities();
caps.setCapability("appium:platformName", "iOS");
caps.setCapability("appium:platformVersion", "17.0");
caps.setCapability("appium:deviceName", "iPhone 15");
caps.setCapability("appium:automationName", "XCUITest");
caps.setCapability("appium:app", "/path/to/app.ipa");
caps.setCapability("appium:udid", "auto");
Clone Appium Skill and run your test with one command.

Capabilities setup for real iOS device
This is the most vital step to perform. Below are the mentioned capabilities we require to run our tests.
DesiredCapabilities capabilities = new DesiredCapabilities();
    capabilities.setCapability("platformName", "iOS");
    capabilities.setCapability(MobileCapabilityType.NO_RESET, true);
    capabilities.setCapability("useNewWDA", false);
    capabilities.setCapability("platformVersion", "12.0.1");
    capabilities.setCapability("deviceName", "iPhone 8");
    capabilities.setCapability("udid", "auto");
    capabilities.setCapability("bundleId", "<your bundle id>");
    capabilities.setCapability("xcodeOrgId", "<your org id>");
    capabilities.setCapability("xcodeSigningId", "iPhone Developer");
    capabilities.setCapability("updatedWDABundleId", "<bundle id in scope of provisioning profile>");
    capabilities.setCapability(MobileCapabilityType.APP, "[PATH_TO_YOUR_IPA_FILE]");
Now the question is how to get the details that have been mentioned in the above code. Let's go through them one by one:
- platformVersion: is the version of iOS our app is running,
12.0.1in my case. - deviceName: is not required, as we have plugged in a real device and will select that device using the
udiddesired capability. Appium still requires us to supply a value fordeviceName, so we useiPhone 8. To know the device name, on the iPhone, we can navigate to "Settings > General > About > Name." - udid: is the unique ID of the device we want to run our test on. Now connect your iPhone to your computer by USB and load up iTunes. We could find our device udid by running the command
instruments -sdevicesin the terminal. Still, since we only have a single device plugged in, we can put in auto, and Appium will automatically find the udid of the device for us and use it. If "auto" doesn't work, then do provide your udid. - xcodeOrgId & xcodeSigningId: join the Apple Developer Program and locate your apple developer team id; xcodeorgid is the ID of the developer team that signed the certificate used to create the app.
xcodeSigningIdis the first part of the "Common Name" associated with the developer certificate.Since XCode set this up for us, it is almost always
iPhone Developer, but it could be something different for you if you are automating a different iOS device. - bundleID: it is the special iOS-internal name of our app. The easiest way to get the bundleID is by using iTunesConnect. The steps are as below:
- Log into iTunes Connect.
- Click My Apps.
- Click on an app to find the bundle ID.
- The default app page will open, displaying the App ID and bundle ID.
- App: many websites provide sample APKs that can be used for testing. If you do not have any .apk or .ipa files, you can run your sample tests on TestMu AI using our sample iOS app.
- noReset: do not forget to use this capability. This approximately saves 2.9 seconds per test by avoiding app installation before every test run.
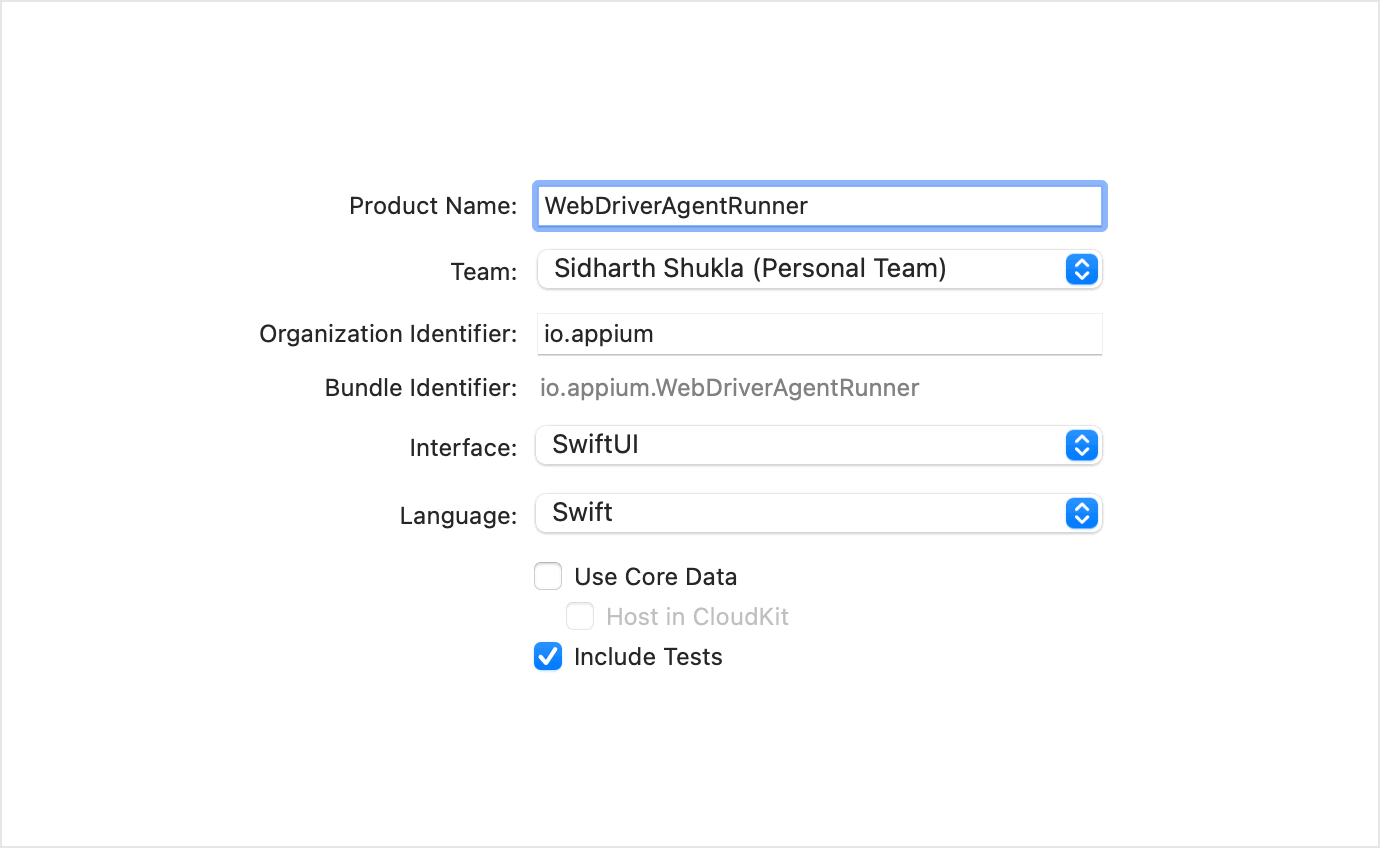
- updatedWDABundleId: we need to create a provisioning profile for signing the WebDriverAgentRunner. Launch the Xcode and create a new project, select the team and enter the project name as follows:
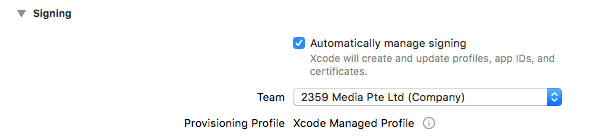
Take a look at the "Project" tab of your project settings to confirm that "Automatically manage signing" is selected, and an Xcode Managed Profile is created.
Suppose you manually try to run the WebDriverAgentRunner app on the device. In that case, you will see a popup message:
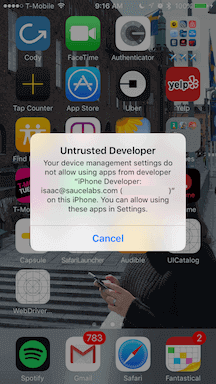
You can go to Settings => General => Device Management on the device to trust the developer and allow the WebDriverAgentRunner app to be run.
Copy your bundleId and add the following capability to your Appium Capabilities setup:
capabilities.setCapability("updatedWDABundleId", "<bundle id in scope of provisioning profile>");
If you are unable to do the above steps, then the manual configuration can also be done. To go through the steps, please refer to this document. It has all the steps along with the screenshots.
Identifying the iOS elements
In this section of this blog on how to automate iOS app using Appium, we will learn how to identify the iOS elements. To identify elements in iOS devices, we need to download and install the Appium Desktop application and use the Appium Desktop Inspector functionality.
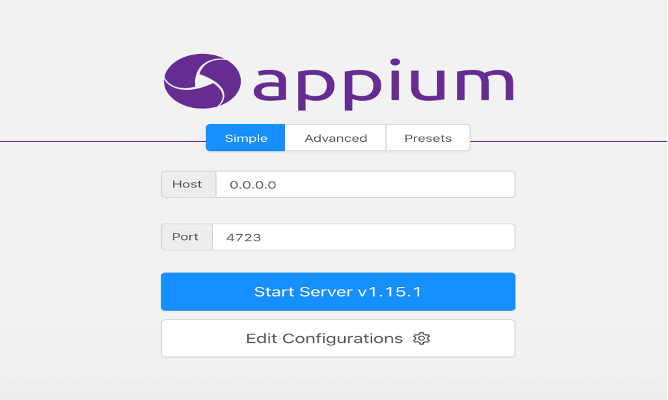
- If you have installed Appium Desktop, then we can start by clicking on the Start Server button inside of Appium Desktop as shown below.
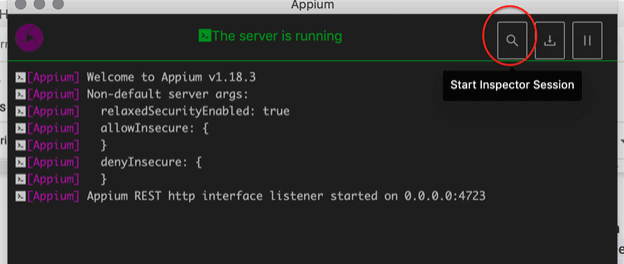
- Click the search icon from the right-up corner.
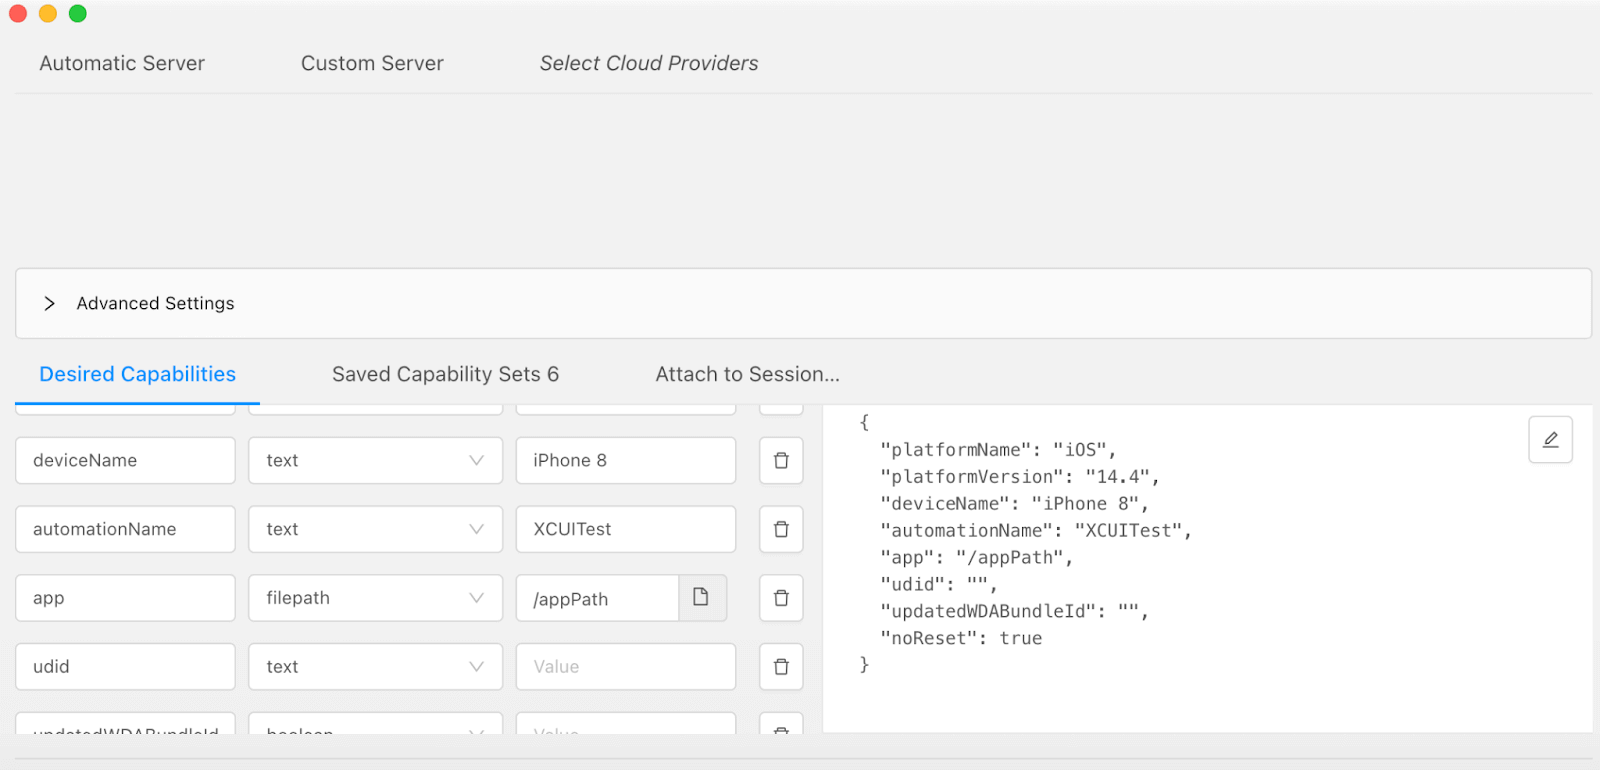
- Add correct desired capabilities per your device/emulator and application. Then click on the Start Session button.
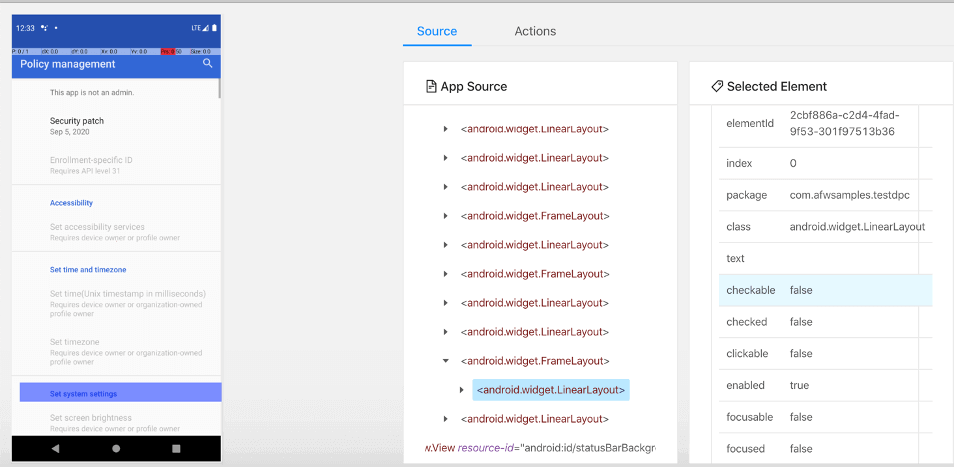
- It will open the App screen, App Source (the hierarchy of elements), and Selected Element Pane (The attributes and associated values of the element). You can use this to create locators which will uniquely identify the element.
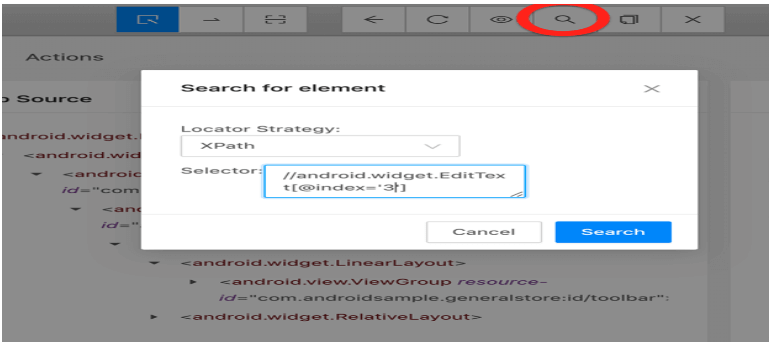
- You can provide a .ipa file in desired capabilities inside Appium Inspector, which will install and launch the app. If you need to build or inspect that IPA file first, the packaging and signing steps are covered separately. Refer to the screenshots below, which we have used to test .ipa and passed in the value against "app." Use all the fields of desired capabilities discussed in this blog on how to automate iOS app using Appium. The best thing about the Appium Inspector is that you can verify your written locator on screen. Check the below screenshots.
- If your locator is correct, it will highlight the associated element, which is the same for Android and iOS.
Some of the most used locator strategies are mentioned below.
| STRATEGY | DESCRIPTION |
|---|---|
| Accessibility ID | Reads a unique identifier for a UI element. For XCUITest, it is the element's accessibility-id attribute. For Android, it is the element's content-desc attribute. |
| Class name | For iOS, it is the full name of the XCUI element and begins with XCUIElementType. For Android, it is the full name of the UIAutomator2 class (e.g., android.widget.TextView) |
| ID | Native element identifier. resource-id for Android; name for iOS. |
| Name | Name of element. |
| XPath | Searches the app XML source using xpath (not recommended, has performance issues). |
| Image | Locates an element by matching it with a base 64 encoded image file. |
| iOS UIAutomation | When automating an iOS application, Apple's Instruments framework can be used to find elements. |
In most real time projects, one public webelement is created, and element identification for Android and iOS is mentioned, as shown below. The nameOfMobileElement mentioned below is just an example. You can replace the same with the name of the locator used to identify the webelement of the targeted mobile app. We have identified the iOS element using iOSNsPredicate.
@iOSXCUITFindBy(iOSNsPredicate = "name=='<nameOfMobileElement>'")
    @AndroidFindBy(uiAutomator = "text("<textOf TheMobileElement>")")
    public MobileElement elementName;
@iOSXCUITFindBy(iOSNsPredicate = "name=='<nameOfMobileElement>'")
@AndroidFindBy(uiAutomator = "text("<textOf TheMobileElement>")")
public MobileElement elementName;
We can also use XPath as mentioned below for identification in iOS, in-fact all type of axes methods in XPath can be used to identify the element uniquely:
@iOSXCUITFindBy(xpath = "//*[@name='<nameOfMobileElement>']/following-sibling::XCUIElementTypeStaticText")
Though in my past experiences the most used identification I have used is accessibility as below, "GO TO APP" is just an example, it should be replaced with the accessibility for the app used for testing:
@iOSXCUITFindBy(accessibility = "GO TO APP")
While identifying iOS elements, we need to remember that the element should always be unique and try the locators first and give XPath identification the least priority. I would suggest not using XPath locators unless there is no other alternative.
In general, XPath locators might be much slower than other locators like accessibility id, class name, and predicate (up to 100 times slower in some special cases). They are so slow because Apple's XCTest framework does not natively support the XPath location.
Demo Code for automating iOS app using Appium
Before running the tests, we need to perform below two steps:
Step 1: Make sure the device which will be used for testing is unlocked, and if it asks you to "Trust the Computer", tap the button to trust our Mac. You'll need to do this the first time, and it won't ask for it.
Step 2: Start the Appium server.
import io.appium.java_client.MobileBy;
import io.appium.java_client.MobileElement;
import io.appium.java_client.ios.IOSDriver;
import java.net.MalformedURLException;
import java.net.URL;

import io.appium.java_client.remote.MobileCapabilityType;
import org.junit.Before;
import org.junit.Test;
import org.openqa.selenium.remote.DesiredCapabilities;
import org.openqa.selenium.support.ui.ExpectedConditions;
import org.openqa.selenium.support.ui.WebDriverWait;

public class iOS_Test {
    private IOSDriver driver;

    @Before
    public void setUp() throws MalformedURLException {
        DesiredCapabilities capabilities = new DesiredCapabilities();
        capabilities.setCapability("platformName", "iOS");
        capabilities.setCapability("platformVersion", "15.5");
        capabilities.setCapability("deviceName", "Sidiphone");
        capabilities.setCapability("udid", "auto");
        capabilities.setCapability("bundleId", "<your bundle id>");
        capabilities.setCapability("xcodeOrgId", "<your org id>");
        capabilities.setCapability("xcodeSigningId", "iPhone Developer");
        capabilities.setCapability("updatedWDABundleId", "<bundle id in scope of provisioning profile>");
        capabilities.setCapability(MobileCapabilityType.APP, "[PATH_TO_YOUR_.IPA_FILE_COMPILED]");
        driver = new IOSDriver<>(new URL("http://localhost:4723/wd/hub"), capabilities);
    }

    @Test
    public void testClickAnElement() throws InterruptedException {
        //Opens the browser
        MobileElement browser = (MobileElement) driver.findElementByAccessibilityId("Browser");
        browser.click();
        Thread.sleep(3000);

        WebDriverWait el7 =  new WebDriverWait(driver, 30);
        el7.until(ExpectedConditions.elementToBeClickable(MobileBy.id("url")));
        driver.findElementById("url").sendKeys("https://www.testmuai.com/");

        //Clicks on the text box
        WebDriverWait el = new WebDriverWait(driver,90);
        MobileElement el4 = (MobileElement) driver.findElementByAccessibilityId("find");
        el.until(ExpectedConditions.elementToBeClickable(el4));
        el4.click();
        el4.sendKeys("LambdaTest");

        //((JavascriptExecutor) driver).executeScript("lambda-status=passed");
        driver.quit();

    }
}
In the above code, the Test method we have used is testClickAnElement(), and the element we are trying to click is from the iOS app shared in this post on how to automate iOS app using Appium.

Appium iOS Troubleshooting
Pre-Run Checklist
Before running tests, verify:
- UDID is correct (check in Xcode Organizer or run idevice_id -l)
- Settings -> Developer -> Enable UI Automation is ON
- Settings -> Safari -> Advanced -> Web Inspector and Remote Automation are ON
- Provisioning profile includes an iOS Distribution certificate
- Keyboard is set to Apple's default English keyboard
Common Errors
| Error | Fix |
|---|---|
| Unable to install WebDriverAgent | Open WebDriverAgent.xcodeproj in Xcode, sign with your team, build manually once, then trust certificate on device |
| Could not determine bundle ID | Check Info.plist in your .ipa for valid CFBundleIdentifier |
| Valid provisioning profile not found | Add device UDID to Apple Developer Portal, regenerate profile |
| Timed out waiting for application | Add capability: caps.setCapability("appium:wdaLaunchTimeout", 120000); |
| Permission popup blocks test | Add capability: caps.setCapability("appium:autoAcceptAlerts", true); |
Limitations
- Only one device per Mac host for parallel execution
- USB connection required (no wireless automation)
- Slower response time compared to native XCUITest
- Jailbroken devices not officially supported
The wireless limitation is exactly what Swastik Baranwal and Navin Chandra tackle in the TestMu Conf 2026 workshop Engineering RemoteXPC: Building Wireless iOS Automation with Appium, which walks through running iOS automation over the network instead of over a USB cable.
How to automate iOS app using Appium on a real device cloud?
In this blog on how to automate iOS app using Appium, you must have realized that testing on real devices is not a cakewalk, especially iOS real device testing is tedious. The important thing is that real iOS device testing can only take place on a Mac, so we can't even perform real iOS device testing without a Mac.
As a result, most organizations prefer to use Real Device Cloud. You can try TestMu AI cloud devices, which are quite easy to use, and we can avoid setting up all the prerequisites on local machines.
TestMu AI provides a cloud-based solution for mobile automation testing. It lets you automate native and hybrid mobile apps on an online device farm of 3000+ real iOS. It is a scalable, secure, and high-performing Appium testing platform that empowers development and testing teams to accelerate their release cycles.
Below we have executed the test suite using TestMu AI real cloud devices. Just use the below code along with your username and password. We used the iPhone 12 for our test run. You can use the model as per the requirement.
For a complete reference of iOS app-specific settings and capabilities supported on the TestMu AI platform, refer to the Appium iOS app settings documentation.
import io.appium.java_client.AppiumDriver;
import io.appium.java_client.MobileBy;
import io.appium.java_client.MobileElement;
import io.appium.java_client.ios.IOSDriver;

import org.openqa.selenium.remote.DesiredCapabilities;
import org.openqa.selenium.support.ui.ExpectedConditions;
import org.openqa.selenium.support.ui.WebDriverWait;

import java.net.URL;

public class vanilla_ios {

    public static String userName = System.getenv("LT_USERNAME") == null ? "sidharth****"  //Add username here
            : System.getenv("LT_USERNAME");
    public static String accessKey = System.getenv("LT_ACCESS_KEY") == null ? "********" //Add accessKey here
            : System.getenv("LT_ACCESS_KEY");

    public static final String URL = "https://" + userName + ":" + accessKey + "@beta-hub.lambdatest.com/wd/hub";
    public static IOSDriver driver = null;

    public static void main(String[] args) throws Exception {

       try {
            DesiredCapabilities caps = new DesiredCapabilities();
            caps.setCapability("platformVersion", "15");
            caps.setCapability("deviceName", "iPhone 12");
            caps.setCapability("isRealMobile", true);
            caps.setCapability("app", "******"); //Enter your app url
            caps.setCapability("platformName", "iOS");
            caps.setCapability("build", "Java Vanilla - iOS");
            caps.setCapability("name", "Sample Test Java");
            caps.setCapability("devicelog", true);
            caps.setCapability("network", true);


        driver = new IOSDriver(new URL("https://" + userName + ":" + accessKey + "@beta-hub.lambdatest.com/wd/hub"), caps);


            Thread.sleep(2000);

            //Opens the browser
            MobileElement browser = (MobileElement) driver.findElementByAccessibilityId("Browser");
            browser.click();
            Thread.sleep(3000);

           WebDriverWait el7 =  new WebDriverWait(driver, 30);
           el7.until(ExpectedConditions.elementToBeClickable(MobileBy.id("url")));
           driver.findElementById("url").sendKeys("https://www.testmuai.com/");

            //Clicks on the text box
            WebDriverWait el = new WebDriverWait(driver,90);
            MobileElement el4 = (MobileElement) driver.findElementByAccessibilityId("find");
            el.until(ExpectedConditions.elementToBeClickable(el4));
            el4.click();
            el4.sendKeys("Lambdatest");

            //((JavascriptExecutor) driver).executeScript("lambda-status=passed");
            driver.quit();

        } catch (Exception t) {
           System.out.println(t);
           driver.quit();

       }
    }
}
In the above script, we have first done the capabilities setup and then automated the iOS app with two steps:
The first one is to open the browser and the second one is to click on the text box and then enter text "TestMu AI" on the text box. For ease of execution, we have used thread.sleep in this blog on how to automate iOS app using Appium. You can ignore the same while executing in your setup.
- To execute the same, you need to use the below two commands on your terminal:
mvn clean install
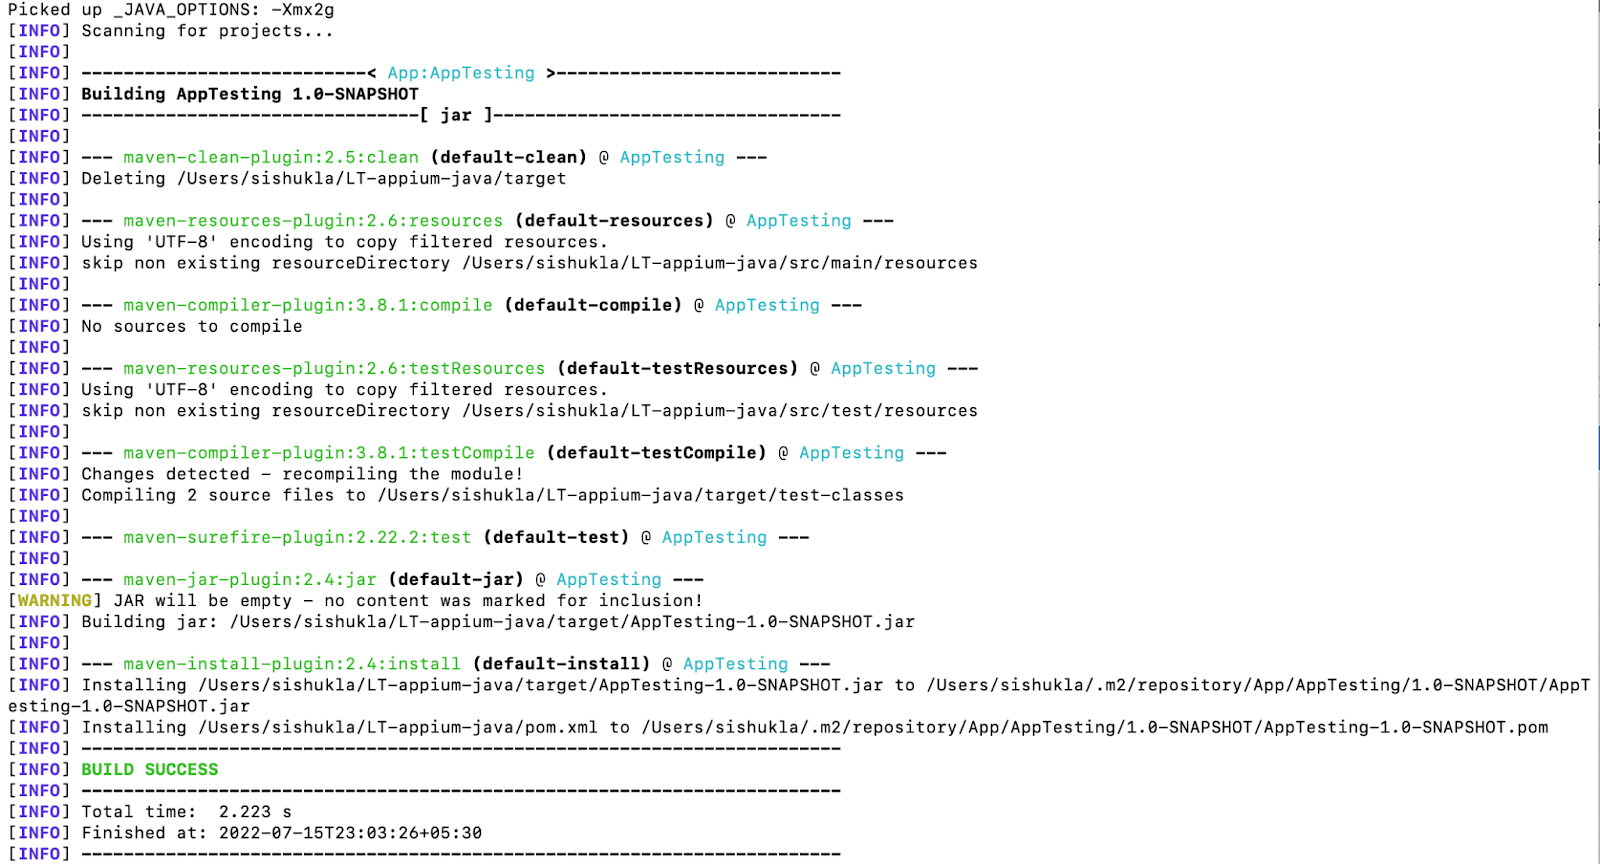
mvn test -P ios
Austin Siewert
Co-Founder, Steadfast Systems
Discovered @TestMu AI yesterday. Best browser testing tool I've found for my use case. Great pricing model for the limited testing I do 👏
2M+ Devs and QAs rely on TestMu AI
Deliver immersive digital experiences with Next-Generation Mobile Apps and Cross Browser Testing Cloud
Note: Boost your Testing efficiency by ultimate guide of Appium Commands Cheat Sheet for Developers.
Conclusion
With this, we have concluded this tutorial on how to automate iOS app using Appium. As per my suggestion, we should only consider real iOS devices for Sanity or Smoke suite execution. For regression, it is always advised to use either simulators or cloud devices.
Though we have simulators, we should never release a product without being tested on real devices, so better to prepare an automation suite and run the real devices on the cloud, saving time and ensuring quality.
We can address most app-related issues by ensuring that the app works on a real device. iOS testing with Appium will help provide that confidence in the product and confirm the app's success when it is released to users.
Happy testing, and do share what should be the next topic you want to learn.
For a first-hand account, see RemoteXPC: Wireless iOS Testing With Appium from Testμ 2026.

Author

Sai Krishna
Blogs: 24

Sai Krishna is Director of Engineering at TestMu AI (formerly LambdaTest), where he leads agentic AI for quality engineering, building AI agents that autonomously drive mobile and conversational test automation. His current focus is Agent Testing and Model Context Protocol (MCP) support for mobile. He is a core contributor and member of the Appium open-source project and the creator of AppiumTestDistribution and appium-device-farm. With over 14 years of experience including more than 9 years at Thoughtworks as a Principal Consultant, he holds a BSc in Electronics and speaks regularly at TestMu and Appium Conf on Appium, mobile automation, and agentic AI in testing.
Reviewer

Siddhant Sinha
Reviewer
Siddhant Sinha is a Lead Member of Technical Staff at TestMu AI architecting Kane CLI, the command-line tool for browser automation from the terminal, where natural-language flows run in a real Chrome browser and return pass or fail with shareable proof. He has spent over three years at TestMu AI (formerly LambdaTest) building scalable platforms that run tests at scale on real Android and iOS devices. His expertise covers platform architecture, large-scale distributed systems, and CLI design, shaped by earlier cloud-native engineering at Semut.io, including building Elasticsearch as a service.
On This Page
- Types of iOS application testing
- What is Appium?
- Benefits of automating iOS app testing using Appium
- Prerequisites for Automating iOS Apps with Appium
- Capabilities setup for real iOS device
- Identifying the iOS elements
- Demo Code for automating iOS app using Appium
- How to automate iOS app using Appium on a real device cloud?
Automating iOS Apps with Appium FAQs
Did you find this page helpful?
More Related Blogs
TestMu AI forEnterprise
Get access to solutions built on Enterprise
grade security, privacy, & compliance
- Advanced access controls
- Advanced data retention rules
- Advanced Local Testing
- Premium Support options
- Early access to beta features
- Private Slack Channel
- Unlimited Manual Accessibility DevTools Tests