

Power Your Software Testing with AI Agents and Cloud
The Native AI-Agentic Cloud Platform to Supercharge Quality Engineering. Test Intelligently and Ship Faster.


- TestMu AI (Formerly LambdaTest)
- /
- Learning Hub
- /
- What Is an IPA File? How to Open, Create, and Install It
What Is an IPA File? How to Open, Create, and Install It
What an .ipa file contains, how to open one by renaming it to .zip, how to create it in Xcode, and how to install it on an iPhone or iPad with AltStore.
Last Updated on:
On This Page
- What Is an IPA File?
- When to Create an IPA File?
- How to Create an IPA File?
- How to Open an IPA File?
- What Does an IPA File Contain?
- IPA vs APP vs PKG vs APK
- How to Install an IPA File?
- Install Without a Computer
- Can You Install Unsigned IPAs?
- Easily Test IPA Files with TestMu AI Real Device Cloud
- Conclusion
- Citations
IPA files are an important part of the iOS app development process. They package iOS apps so developers, testers, or enterprise teams can install them directly on Apple devices, as long as the build is properly signed. iOS apps from the App Store are signed for public distribution, which means they can't be installed outside Apple's channels for internal testing, beta releases, or enterprise use. IPA files take on this role before an app is released, letting teams install the app, debug it, and make sure it works as expected.
Overview
An IPA file is a compressed ZIP archive containing an iOS application bundle used to install apps on Apple devices. You can create IPA files using Xcode for testing or App Store submission, extract their contents by renaming them to .zip, and install them on iOS devices using AltStore.
What Are the Components of an IPA File?
- Payload Folder: This primary directory inside the IPA file contains the compiled .app bundle, which includes the executable code, assets, and resources needed to run the application.
- Application.app File: Located inside the Payload folder, this critical file contains the executable binary, configuration settings, and resources required for the iOS app to function.
- iTunesArtwork File: This PNG image represents the application's icon and is included in many IPA packages for legacy compatibility with older iTunes syncing.
- iTunesMetadata.plist: This structured property list contains essential app metadata, such as the app name, version, bundle identifier, and developer details, used during distribution.
- WatchKitSupport Folder: This optional folder contains the binaries and assets required to install and run the watchOS companion version of the app on Apple Watch.
- META-INF Folder: This directory stores digital signatures, certificates, and packaging metadata to verify the authenticity and integrity of the IPA file during installation.
How to Add and Install an IPA File?
- Xcode: Apple's official IDE is used to build, archive, and export signed IPA files for development, ad-hoc testing, enterprise distribution, or App Store submission.
- AltServer: This desktop application installs on a PC or Mac to enable secure communication with an iOS device for sideloading and managing IPA files.
- AltStore: This sideloading platform runs on iOS devices to install, re-sign, and update IPA files directly without using the official App Store.
- Apple Configurator 2: This modern macOS tool allows developers to manually install and manage IPA files on connected iOS devices, replacing deprecated iTunes workflows.
- ipatool: This open-source command-line tool authenticates with an Apple ID to search for and download IPA files directly from the App Store.
- TestMu AI: This single app test automation cloud allows cross-platform teams to validate both iOS IPA and Android APK builds without maintaining physical device labs.
What Is an IPA File?
An IPA file is the packaged file format used to distribute iOS applications. IPA stands for iOS App Store Package and functions similarly to an Android APK file. It contains everything needed for an iPhone, iPad, or iPod touch to install and run an app.
When you download an app from the App Store, you are indirectly downloading an IPA file, though it is managed by Apple's ecosystem and rarely seen directly by users. Under the hood, an IPA is a compressed archive in ZIP format. If you change the file extension from .ipa to .zip, you can extract it to see its contents.
Inside, it typically contains the app's binary executable, resource files such as images, audio, and video, and a Payload folder which houses the .app bundle. There are also metadata files like Info.plist, which defines configuration details including app identifiers, permissions, supported devices, and iOS version requirements.
Developers create IPA files using Xcode and sign them with Apple-provided certificates so they can be installed on iOS devices. If you are new to Xcode? Check out this Xcode tutorial.
When to Create an IPA File?
When developing iOS apps, creating an IPA file is essential for testing on real devices, sharing beta versions with testers, submitting to the App Store, distributing apps internally, archiving releases, or installing builds manually for targeted evaluation.
Here are some of the use cases where building an IPA file is necessary:
- During Development and Testing: Before releasing an app, testers need to perform iOS app testing on real devices to check stability, performance, and functionality. Creating an IPA allows the app to be installed directly on an iPhone or iPad, helping identify issues that might not appear in the simulator.
- Preparing for Beta Testing: IPA files are used to share pre-release versions of an app with beta testers. Testers provide feedback on usability, performance, and bugs, which helps improve the app before the official release.
- App Store Submission: To submit an app to the App Store, it must be packaged as an IPA and uploaded via App Store Connect. Apple reviews the IPA to ensure it meets App Store guidelines, security standards, and performance requirements.
- Enterprise Distribution: Organizations creating internal apps for business use rely on IPA files for enterprise distribution. These apps are not published on the App Store but are distributed directly to employees using an Apple Developer Enterprise Program (ADEP) certificate or Mobile Device Management (MDM) platforms.
- Archiving and Backup: Developers also create IPA files to archive versions of an app. This allows them to preserve iterations for future releases or provide fallback options if a newer version causes problems. Having IPA backups ensures a reliable rollback strategy in the app development workflow.
- Manual Installation and Testing: Sometimes, testers need to install an app manually on a device without using the App Store. This can be done through Apple Configurator, iTunes, or other sideloading tools. Manual installation is common for testing private builds or distributing apps for very specific use cases outside standard deployment channels.

Note: Test your IPA files on 10,000+ real iOS and Android devices. Try TestMu AI Now!
How to Create an IPA File?
Creating an IPA file in Xcode starts by opening your project and selecting a target device. After archiving the build, you export it using the appropriate distribution method such as Development, Ad Hoc, Enterprise, or App Store, ensuring proper code signing. The resulting IPA is ready for mobile app testing, internal deployment, or submission.
Here are the steps to create an IPA file:
1. Open Xcode: Launch Xcode and open your iOS project.
2. Select a Scheme: In the scheme selector at the top, choose your app's scheme and set the target device to Generic iOS Device or a connected physical device.
3. Archive the Project: Go to Product > Clean (optional but recommended), then select Product > Archive. This builds and archives the project, opening it in the Organizer window.
4. Export the Archive: In the Organizer, select your archived build and click Distribute App to start the export process.
5. Choose Export Method: Pick the distribution method:
- Development for internal testing.
- Ad Hoc for limited external testing.
- Enterprise for organization-wide use.
- App Store for official submission.
6. Sign the App: Use a valid provisioning profile and certificate for code signing. Xcode can handle this automatically or let you configure it manually.
7. Generate the IPA: Complete the prompts to generate the IPA. The final .ipa file will be exported to your specified location, ready for installation or submission.
How to Open an IPA File?
IPA files cannot be opened directly. To open them, you can use unzip tools or iTunes (deprecated now). By renaming them to .zip and extracting, you can inspect the Payload folder, app bundle, metadata, icons, and WatchKit resources.
However, for development, to test on iPhone, or for analysis purposes, it is possible to access and inspect their contents.
Using Unzip Tools
One common method is to manually extract the IPA file's contents using unzip utilities. This method is particularly useful for developers who want to inspect the app package before deployment.
- Change the File Extension: Rename the .ipa file to .zip.
- Use Extraction Software: Open the renamed file using a tool like 7-Zip, WinZip, or The Unarchiver (for macOS).
- Explore the Contents: Once unzipped, you'll see the internal structure, typically including:
- Payload: A folder containing the actual .app package.
- iTunesArtwork: The app's icon image.
- iTunesMetadata.plist: Metadata describing the app (name, developer, version, etc.).
- Application.app: The main executable file for the app.
- META-INF: Metadata and digital signature information.
- WatchKitSupport/WK: Additional resources if the app supports Apple Watch.
Using iTunes
In older versions of iTunes (12.7 and earlier), IPA files were automatically downloaded and stored locally during app syncing. If you're using an older iTunes version, you can locate IPA files in these default directories:
- macOS: ~/Music/iTunes/iTunes Media/Mobile Applications
- Windows: C:\Users\[Your Username]\Music\iTunes\iTunes Media\Mobile Applications
Note: This access method is deprecated. Apple removed app management from iTunes after version 12.7, so on modern systems you manage and install IPAs with Apple Configurator 2 or Xcode instead, not iTunes.
Using ipatool (Command Line)
For a scriptable option, ipatool is an open-source command-line tool that authenticates with your Apple ID and searches or downloads IPAs directly from the App Store. It is useful in CI pipelines or when you need to fetch a build without opening a GUI:
# Authenticate, then search and download an app's IPA
ipatool auth login -e your@appleid.com
ipatool search "app name"
ipatool download -b com.example.app
What Does an IPA File Contain?
An IPA file packages an iOS app in a standardized structure. It contains the Payload folder with the .app executable, optional iTunesArtwork icon, iTunesMetadata.plist for app details, optional WatchKit resources, and META-INF for digital signatures and integrity verification.
When unpacked, an IPA typically includes several essential components that ensure the app works correctly on iOS devices.
- Payload Folder: This is the main directory inside every IPA file. It contains the compiled .app bundle, which includes the app's executable code, assets, and resources. This folder is what gets installed on an iOS device.
- Application.app File: Located within the Payload folder, this file holds the executable code, resources, and settings required for the app to run. Without it, the app cannot function.
- iTunesArtwork / iTunesArtwork File: Usually a PNG image representing the app's icon. It was primarily used for display in older versions of iTunes during app syncing. Although optional today, many IPA files still include it.
- iTunesMetadata.plist: A property list file containing metadata about the app, such as its name, version, bundle identifier, developer information, and copyright. This file is often used during syncing or distribution to provide descriptive information about the app.
- WatchKitSupport / WK Folder: Included only in apps that support Apple Watch. It contains the resources needed to install and run the watchOS version of the app. This folder is optional and appears only if WatchKit features are used.
- META-INF Folder: Stores digital signatures and packaging metadata. This helps verify the source and integrity of the IPA file, ensuring security during installation.
IPA vs APP vs PKG vs APK: Format Differences
The .ipa extension is easy to confuse with three neighboring formats. The short version: .APP is the app itself, .IPA wraps it for distribution, .PKG installs software on macOS, and .APK is the Android equivalent of an IPA.
.IPA vs .APP vs .PKG
| Format | What it is | Platform |
|---|---|---|
| .APP | The uncompressed application bundle itself. On iOS it lives inside the IPA's Payload folder; it is a directory of the executable, assets, and Info.plist. | iOS and macOS |
| .IPA | A ZIP archive that packages the .app bundle (plus metadata and signatures) for iOS distribution and installation. | iOS / iPadOS |
| .PKG | A macOS installer package that runs an install workflow to place software on a Mac. It is not an iOS app container. | macOS |
So an IPA contains a .APP, while a PKG is a different thing entirely: an installer for desktop macOS software, not a phone app. On Apple Silicon Macs (M1, M2 and later), iOS apps can also run directly, but they are still distributed as IPAs, not PKGs.
Are IPA and APK the Same?
No. They serve the same role, an installable app package, but for different operating systems and they are not interchangeable. You cannot install an IPA on Android or an APK on iOS.
| Aspect | IPA (iOS) | APK (Android) |
|---|---|---|
| Platform | iPhone and iPad (iOS / iPadOS) | Android phones and tablets |
| Structure | ZIP with a Payload folder holding the .app bundle | ZIP with DEX bytecode, resources, and a manifest |
| Signing | Apple certificate and provisioning profile | Developer keystore signature |
| Install outside the store | Sideloading tools, TestFlight, MDM, enterprise | Enable Unknown Sources, then open the APK |
| Official store | Apple App Store | Google Play |
Because the platforms and signing models differ, a cross-platform team validates both the IPA and the APK build of an app, which is where a single app test automation cloud covering both iOS and Android saves maintaining two device labs.
How to Install an IPA File?
Installing IPA files gives you flexibility for testing beta apps, distributing internally, or using apps outside the App Store. The most practical and reliable method today is using a sideloading tool like AltStore. It's easy to reinstall or update IPA files and re-sign apps before certificates expire.
Shown below are the steps to install an IPA file:
1. Download AltServer: Install AltServer on your PC or Mac.
2. Connect Your Device: Plug in your iPhone or iPad via USB, or set up Wi-Fi sync.
3. Install AltStore: Use AltServer to install AltStore on your device.
4. Add Your IPA File: Open AltStore, go to My Apps, tap the "+" icon, and select your IPA file from the Files app.
5. Trust the Developer: If you see an "Untrusted Developer" warning, go to Settings > General > Device Management, locate the developer profile, and trust it.
In addition, you can also check this guide that explains how to install an IPA on iPhone.
Testing IPA files is essential to ensure your iOS app runs smoothly and is bug-free before App Store release. Traditional methods like Xcode simulators or physical devices are limited: simulators can be slow and unrealistic, testing on specific devices is time-consuming, and hardware constraints may cause you to miss issues on other models or iOS versions.
How to Install IPA Files Without a Computer (On-Device Sideloading)
Sideloading no longer requires a Mac or PC. Several on-device methods install IPAs directly on the iPhone, though each comes with trade-offs around signing and stability.
- On-device sideloading apps - tools such as Scarlet, Esign, and similar signer apps let you import an IPA and install it straight from the device using a certificate. They are convenient but depend on certificates that can be revoked.
- TrollStore - on the iOS versions it supports, TrollStore uses a CoreTrust bug to permanently sign apps on-device, so installs do not expire the way certificate-based ones do. It only works on specific vulnerable iOS versions.
- OTA (Over-The-Air) web services - some services host a signed IPA and an install manifest so the app installs from a Safari link, no cable and no desktop app required.
The 7-day certificate limit. When you sideload with a free Apple developer account, the signing certificate is valid for only 7 days, after which the app stops launching until it is re-signed. A paid Apple Developer Program account extends this to one year. Certificate-based tools like AltStore can refresh the signature automatically in the background before it expires, so the app keeps working; methods that permanently sign the app, such as TrollStore, avoid the 7-day cycle entirely.
Can You Install Unsigned IPA Files on iOS?
Not through normal means. iOS enforces code signing: every app must carry a valid Apple digital signature and provisioning profile, so an unsigned IPA is rejected at install time. This is a core part of the platform's security model, not a bug.
There are three legitimate or technical ways around it:
- Sign it yourself for testing - developers install an unsigned build on their own registered devices through Xcode or Apple Configurator 2, which signs the app with their development certificate during deployment. This is the supported path for local testing.
- Enterprise or MDM distribution - organizations sign internal apps with an enterprise certificate and push them through Mobile Device Management, so employees install without the App Store.
- Jailbreak or CoreTrust exploits - a jailbroken device, or a tool like TrollStore that abuses a CoreTrust signature-validation bug, can run apps the system would normally refuse. These bypass Apple's protections and carry real security risk.
For legitimate QA, signing through Xcode or Apple Configurator 2 and testing on real devices is the safe route; the exploit-based methods are for research and niche cases, not production testing.
Easily Test IPA Files with TestMu AI Real Device Cloud
To test your IPA files, a more reliable and scalable option includes a real device cloud offered by platforms like TestMu AI. It provides access to a wide range of iPhones and iPads with different iOS versions, allowing you to quickly detect bugs, UI issues, or performance problems without being limited by local hardware.
With TestMu AI, you can upload or select your IPA file, choose the device models and iOS versions.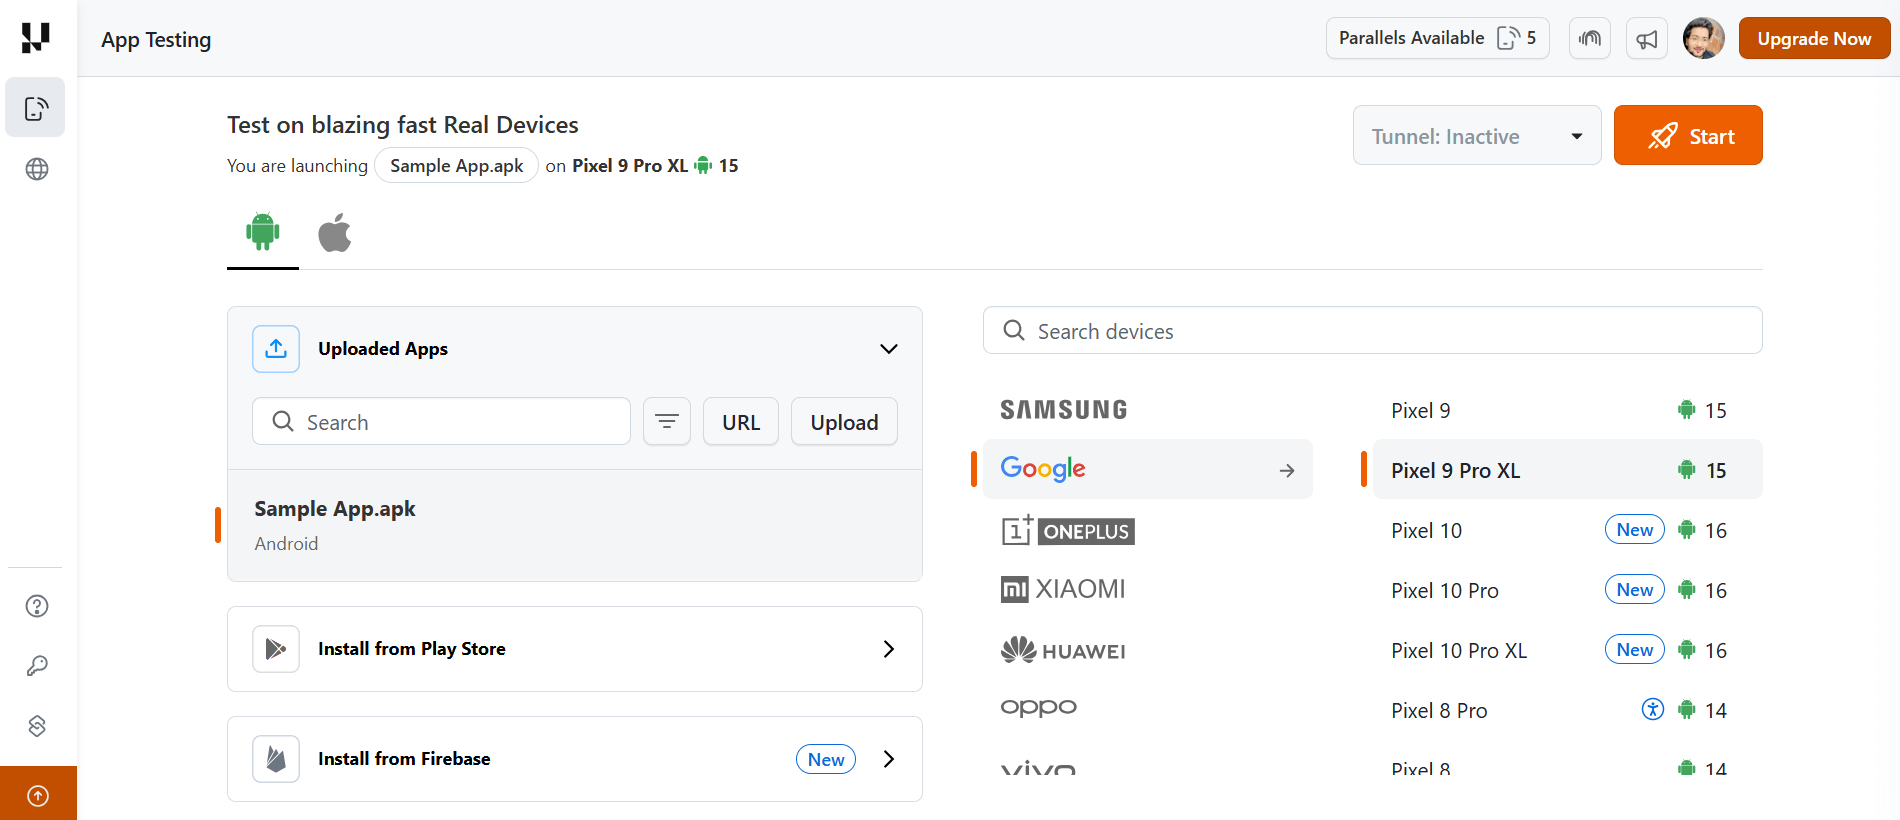
After that, you can launch and test your IPA file on real devices in the cloud. This approach provides faster feedback, allows testing across a broad range of devices, and helps identify bugs, UI issues, and performance issues that may not appear on iOS simulators.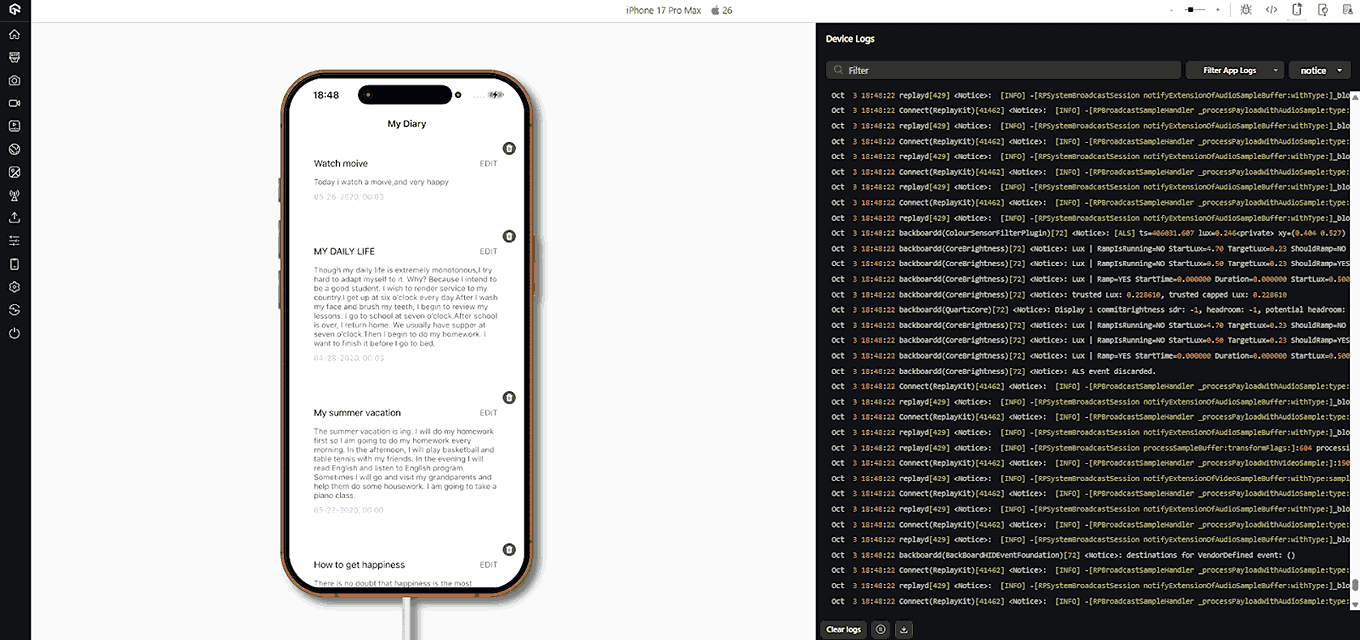
With TestMu AI, you can perform iOS device testing on the cloud that also scales with your needs, making it easier to verify your app's stability and compatibility before release.
To get started, refer to this guide on real device app testing.

Conclusion
If you want to test apps on iPhones or iPads, understanding IPA files gives you greater control over how you install, manage, and test iOS apps. IPA files allow apps to be installed outside the App Store through sideloading with tools like AltStore.
Installation is only one part of the workflow. Thorough testing is essential before any app reaches production. Platforms like TestMu AI simplify this process by letting you upload your IPA and run tests on real iOS devices directly from your browser. This approach helps you catch bugs early, ensure consistent performance across devices, and deliver a better experience to users.
Regardless of the method you choose, it's important to conduct all necessary tests, maintain proper certificates, and remain fully compliant with Apple's guidelines for app distribution.
Citations
- .ipa Wikipedia: https://en.wikipedia.org/wiki/.ipa
Author

Salman Khan
Blogs: 138


Salman is a Test Automation Evangelist and Community Contributor at TestMu AI, with over 6 years of hands-on experience in software testing and automation. He has completed his Master of Technology in Computer Science and Engineering, demonstrating strong technical expertise in software development, testing, AI agents and LLMs. He is certified in KaneAI, Automation Testing, Selenium, Cypress, Playwright, and Appium, with deep experience in CI/CD pipelines, cross-browser testing, AI in testing, and mobile automation. Salman works closely with engineering teams to convert complex testing concepts into actionable, developer-first content. Salman has authored 120+ technical tutorials, guides, and documentation on test automation, web development, and related domains, making him a strong voice in the QA and testing community.
Reviewer

Srinivasan Sekar
Reviewer
Srinivasan Sekar is Director of Engineering at TestMu AI (formerly LambdaTest), where he leads engineering and open-source initiatives behind the Selenium and Appium automation grid and owns TestMu AI's MCP Server. A committer to Appium and a contributor to Selenium, WebdriverIO, Taiko, and AppiumTestDistribution, he brings over 15 years of experience in quality engineering and open-source technologies. He is the author of the Apress book 'The MCP Standard: A Developer's Guide to Building Universal AI Tools with the Model Context Protocol,' a Certified Kubernetes and Cloud Native Associate, and an international conference speaker. Before TestMu AI he spent over eight years at Thoughtworks as a Principal Consultant and Quality Architect. Srinivasan holds a B.Tech in Information Technology from Anna University.


IPA File FAQs
Did you find this page helpful?
More Related Learning Hubs
TestMu AI forEnterprise
Get access to solutions built on Enterprise
grade security, privacy, & compliance
- Advanced access controls
- Advanced data retention rules
- Advanced Local Testing
- Premium Support options
- Early access to beta features
- Private Slack Channel
- Unlimited Manual Accessibility DevTools Tests