

Power Your Software Testing with AI Agents and Cloud
The Native AI-Agentic Cloud Platform to Supercharge Quality Engineering. Test Intelligently and Ship Faster.


- TestMu AI (Formerly LambdaTest)
- /
- Learning Hub
- /
- Appium Commands Cheat Sheet For Developers
Appium Commands Cheat Sheet For Developers
This Appium commands cheat sheet provides an overview of different Appium commands used while performing mobile app automation.
Last Updated on:
Nowadays, mobile applications are an integral part of our daily life. Due to this growing demand, mobile applications must be of good quality. This is why the need for automation for the application is also really important. The testing tool should be very efficient and reliable to automate any application.
If we see all the tools available for automation, the only tool that stands out is Appium. It is a popular open-source mobile app testing tool because it supports cross-platform device executions. It also helps write tests with many different languages like Java, C#, Python, Ruby, etc., making it accessible to many testers with varying language preferences. This helps ensure high-quality automation, resulting in high-quality applications.
This Appium commands cheat sheet provides an overview of different Appium commands used while performing mobile app automation.
Key Takeaways
- For Java developers, day-to-day Appium automation relies on two command sets: Appium CLI commands that install and manage Appium, drivers, plugins, and the server, and Appium Java client methods that automate mobile apps.
- Appium 2.0 installs with npm install -g appium@next and no longer bundles drivers, so each driver, such as uiautomator2, is installed separately with appium driver install.
- Appium Doctor, installed with npm install -g @appium/doctor, checks whether all mandatory and optional libraries for Android or iOS automation are installed and explains how to add missing ones.
- The Appium Java client v8.x.x sets desired capabilities through options classes, such as UiAutomator2Options for Android, EspressoOptions for Espresso, and XCUITestOptions for iOS devices.
- XPath is the slowest Appium locator strategy because each lookup scans the complete XML hierarchy of the screen, while iOS class chain locators are more stable than XPath.
- Swipes and other gestures in Appium 2.0 should use W3C actions, because the TouchActions class is deprecated and will be removed in future Appium releases.

What is Appium?
Appium is an open-source testing tool for automating mobile, desktop, smart TV, and smartwatch applications. Appium involves a Node JS-based server, which exposes many different APIs with the help of different drivers. The different language bindings of Appium use these APIs internally, connect to the devices via the server, and execute different commands on the device.
The Appium server was on v1.x.x for a long time, but it upgraded to 2.0 beta a few years ago. This is now considered very stable, and it’s almost around the corner when Appium will come out with the final version 2.0 shortly. Appium has also stopped the support for v1.x.x, and it is now advisable to start using v2.x.x.
With this new upgrade, there were many breaking changes to its command line tool and its different language bindings, but in this Appium commands cheat sheet, we will focus on the Java binding library. To give an example of the breaking changes, Appium has decoupled its drivers from the initial Appium installation.
There are new commands you can use to install specific drivers and plugins. Also, in the Java client, the `MobileElement` class is now removed, and you must use `WebElement` instead. Android and iOS driver classes, which were generic, are now converted back to non-generic classes.
Now coming back to this Appium commands cheat sheet, the aim is to collate all the useful commands which the Appium server and its Java client expose for us and provide you with a neat cheat sheet that you can refer to see all these useful Appium commands all in one Appium commands cheat sheet.
Agentic AI tooling changes how those steps get written: with KaneAI, the GenAI-native testing agent from TestMu AI, you describe the intent of a test in plain English and the agent plans, authors, and executes the steps for you, exporting them to Appium when you want the code. Teams that live in the command line can run Kane CLI, an agentic quality verifier that works from the terminal and inside CI pipelines.
💡Appium Commands Cheat Sheet
| Cheat Sheet for Appium | ||
|---|---|---|
| Installing Appium | ||
Install Appium 2.0 | > npm install -g appium@next | |
| Appium Doctor | ||
Install Appium Doctor | > npm install -g @appium/doctor | |
Check Android Setup | > appium-doctor --android | |
Check iOS Setup | > appium-doctor --ios | |
| Appium Drivers | ||
List Appium Drivers | > appium driver list | |
Install Driver | > appium driver install uiautomator2 | |
Upgrade Driver | > appium driver update uiautomator2 | |
Uninstall Driver | > appium driver uninstall uiautomator2 | |
| Appium Plugins | ||
List Appium Plugins | > appium plugin list | |
Install Plugin | > appium plugin install relaxed-caps | |
Upgrade Plugin | > appium plugin update appium-dashboard | |
Uninstall Plugin | > appium plugin uninstall relaxed-caps | |
| Appium Server | ||
Start Appium Server | > appium server [list-of-options] | |
Appium Server Parameters (Optional) | --address: IP address where you want to run your tests on. --port: Port number where the Appium server will start. --base-path: Base path to be used in server URL, ideally this should be /wd/hub. --use-drivers: Mention comma-delimited list of drivers to be activated. --use-plugins: Mention comma-delimited list of plugins to be activated. --log: File path where you want to save Appium server logs. --log-filters: Add log filters to get only the required logs. --log-level: Specify log levels that should be logged. --log-timestamp: Add this if you want to have timestamps in the logs. --local-timezone: Add the timezone for which you want to see the time in. --debug-log-spacing: To add extra spacing in logs for debugging. --allow-insecure: Mention all the insecure features which you want to be enabled by separating them with a comma. --default-capabilities: Specify the default capabilities which you know will not change for your tests. You can override them by passing in the driver instance when creating the session. --session-override: Add this if you want to override the existing session. --webhook: ention the webhook URL where you want Appium logs to be redirected. --strict-caps: Mention this when you want a strict check of passed capabilities. --driver-xcuitest-webdriveragent-port: Mention WebDriverAgent port number. --config: Specify the Appium config file path which Appium can use to configure. --nodeconfig: Specify the Selenium Grid configuration file to connect to a grid. --allow-cors: Use this when you want to allow Web to connect to your Appium server instance. --relaxed-security: Use this to relax security check. | |
Start and Stop Appium Server | > appium server --address localhost --port 4723 | |
| App Management | ||
Get App package name | | |
Get the current Activity name | | |
Activate application | | |
Terminate application | | |
Install application | | |
Uninstall application | | |
Check if the application is installed | | |
| Appium Java Client |
|---|
Start Appium Server: |
Stop Appium Server: |
Setting Desired Capabilities: |
Start Driver Session: |
Stop Driver Session: |
Update Driver Settings: |
Update Driver Setting Via Capabilities: |
| Supported Locator Strategies | ||
|---|---|---|
Accessibility ID: | ||
ID: | ||
Class Name: | ||
XPath: | ||
Android Ui Selector: | ||
Android Data Matcher: | ||
Android View Matcher: | ||
iOS Predicate String: | ||
iOS Class Chain: |
| Device Actions | ||
|---|---|---|
Take a Screenshot: | ||
Get screen size: | ||
Check if running on Device Browser: | ||
Open a Deeplink: | ||
Get Session ID: | ||
Handle Alerts: | ||
Switch context to WebView: | ||
Get all the available contexts: | ||
Get Battery percent level: | ||
Get Battery state: | ||
Check if the keyboard is visible: | ||
Hide keyboard: | ||
Android specific actions: Open Notifications panel To open the notification panel on your device, use the following command: Toggle Location services To toggle location services ON / OFF on the device, use the following command: Toggle Mobile Data To toggle mobile data ON / OFF on the device, use the following command: Toggle WiFi To toggle WiFi ON / OFF on the device, use the following command: Toggle Airplane Mode To toggle Airplane mode ON / OFF on the device, use the following command: Toggle Airplane Mode To toggle Airplane mode ON / OFF on the device, use the following command: | ||
Lock device: | ||
Check if device is locked: | ||
Unlock device: | ||
Get Clipboard Text: | ||
Video recording: | ||
Video stream real-time: | ||
Pull device file to local: | ||
Push local file to the device: | ||
Swipe up on screen: |
| Android Emulator Device Actions | ||
|---|---|---|
Modify Network speed: | ||
Use Fingerprint: | ||
Update Geolocation: | ||
Get Geolocation: |
| App Management | ||
|---|---|---|
Get App package name: | ||
Get the current Activity name: | ||
Activate application: | ||
Terminate application: | ||
Install application: | ||
Uninstall application: | ||
Check if the application is installed: |
Clone Appium Skill and run your test with one command.

Installing Appium
The command to install Appium 2.0 command line tool is:
> npm install -g appium@nextThis command will install the Appium server command line tool on your machine. This will not install the drivers, which would also get installed with Appium v1.x.x.
This is the big change introduced in v2.x.x, where drivers are decoupled from the command line, and the control is given to the user, who can install only those required drivers.
Subscribe to our TestMu AI YouTube Channel to get the latest updates on tutorials around Selenium testing, Playwright, CI/CD, and more.
Appium Doctor
Appium Doctor is a package created by the Appium team that helps check the machine setup for Android and iOS.
Install Appium Doctor
To install the Appium doctor package, run the following command:
> npm install -g @appium/doctorCheck Android Setup
To check machine setup for Android automation, run the following command:
> appium-doctor --androidThis command will give the following output:
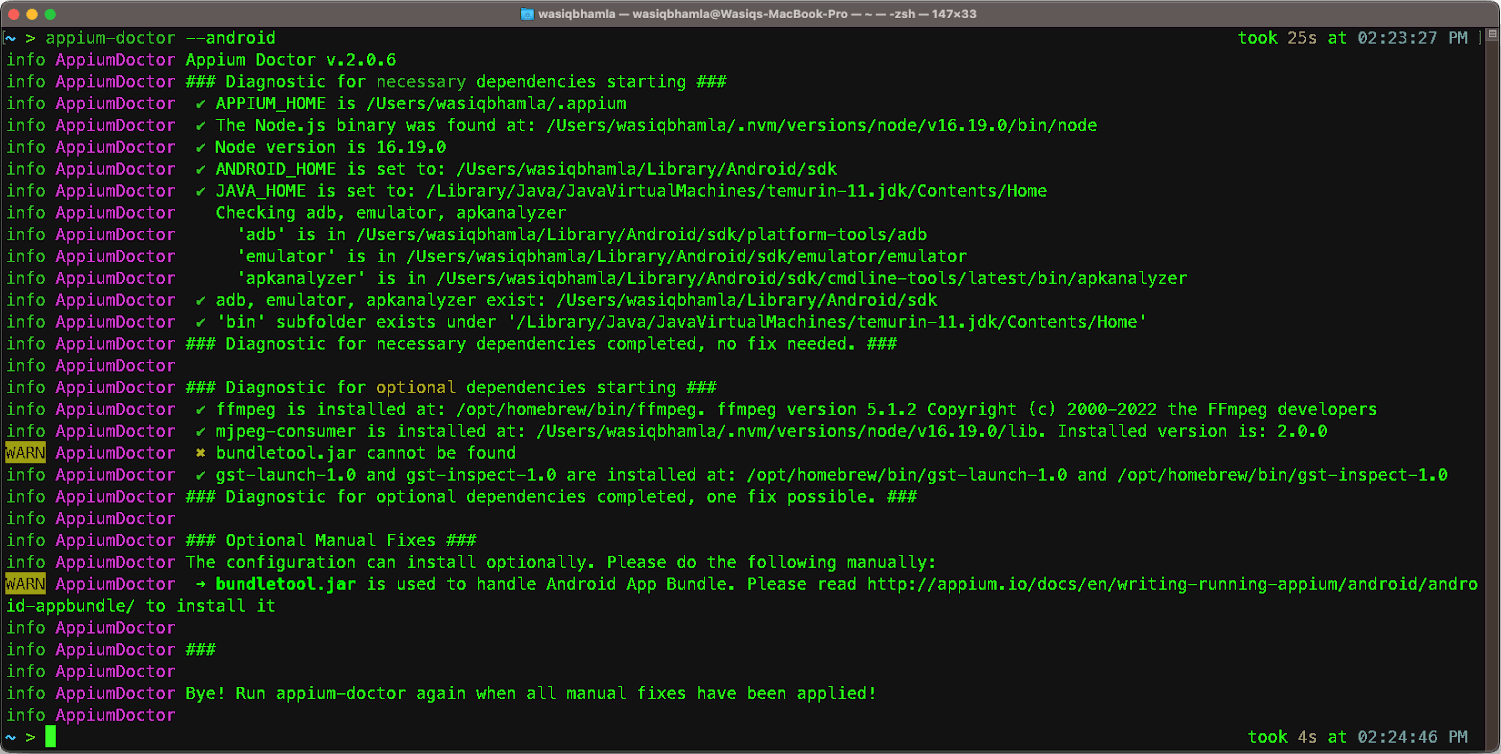
Here, Appium Doctor will check whether all the mandatory and optional libraries are installed on your machine. If the same is not installed, it will guide you on how to install that library.
Check iOS Setup
To check machine setup for iOS automation testing, run the following command:
> appium-doctor --iosThis will check your machine for all the mandatory and optional libraries if they are installed or not. And if they are not installed, the output will point out the same and guide you on how to install it.
Appium Drivers
In Appium, a driver is a component that bridges the test script and the device or emulator. It provides a way for the test script to interact with the device and automate the testing process.
List Appium Drivers
The Appium command line can tell you what drivers are supported so you can pick the driver you want and install the same separately. To see the list of drivers available in Appium, run the following command:
> appium driver listThis will display the list of supported drivers as shown below:
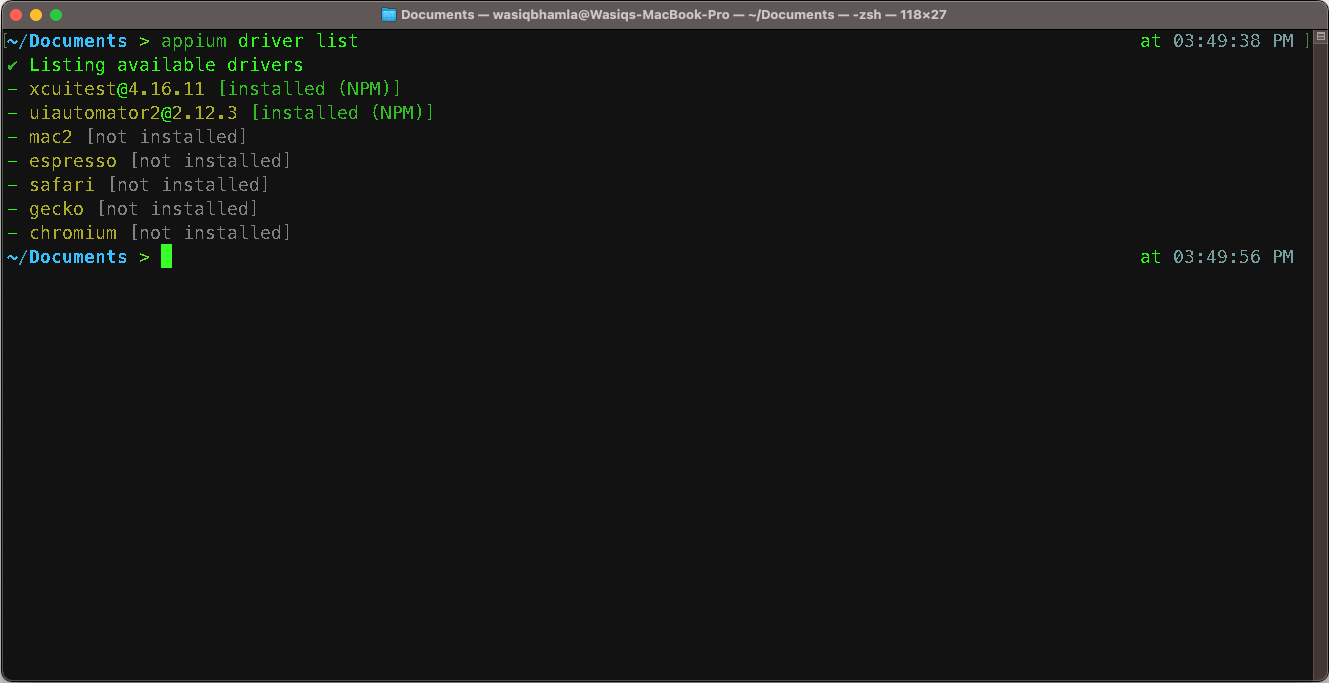
If you have installed any drivers, this will be highlighted as installed in the output shown above in this Appium commands cheat sheet.
Install Driver
To install any driver, you must copy the name of the driver provided from the list command we saw earlier in this Appium commands cheat sheet and run the following command to install that driver:
> appium driver install uiautomator2You must install one driver at a time. The driver's name should be from the list of supported drivers.
Upgrade Driver
There might be times when you want to upgrade the installed drivers to their latest versions. For that, upgrading the Appium command line is not required. You can upgrade the driver using the Appium command line like you installed the driver. This is the command you must use to upgrade the driver:
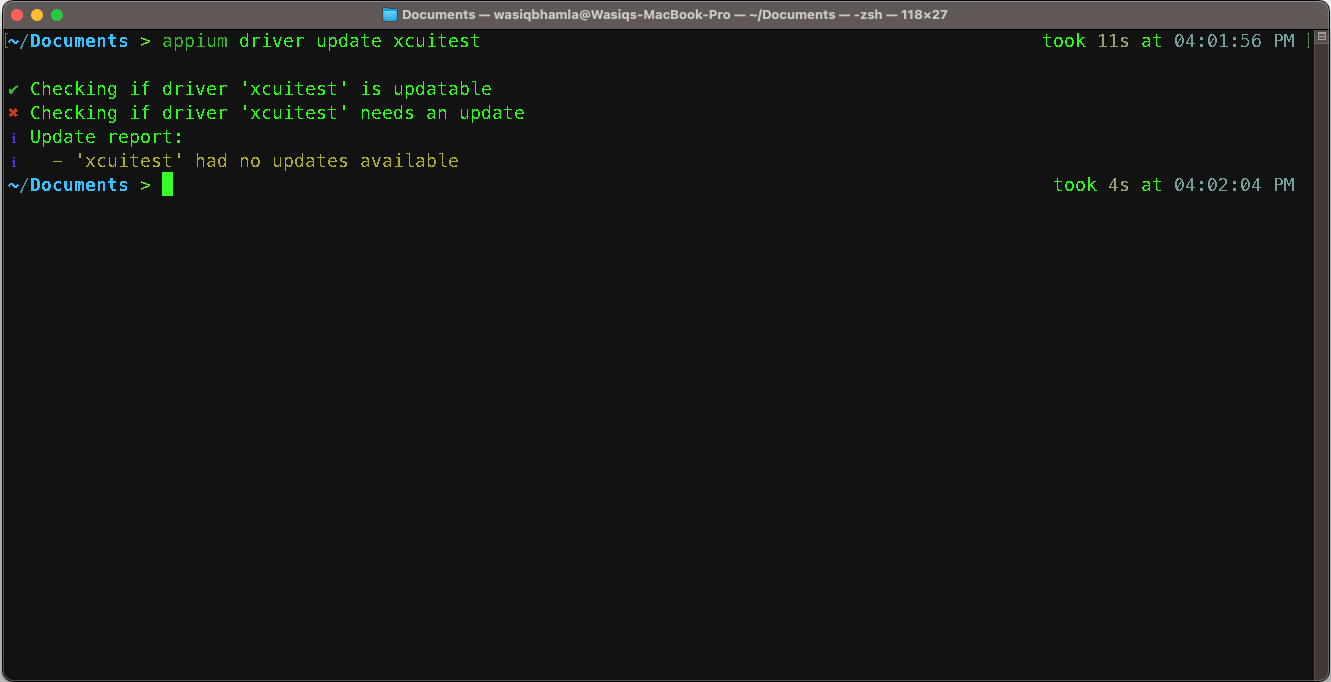
> appium driver update uiautomator2If there is an update available, you will see the output as follows:
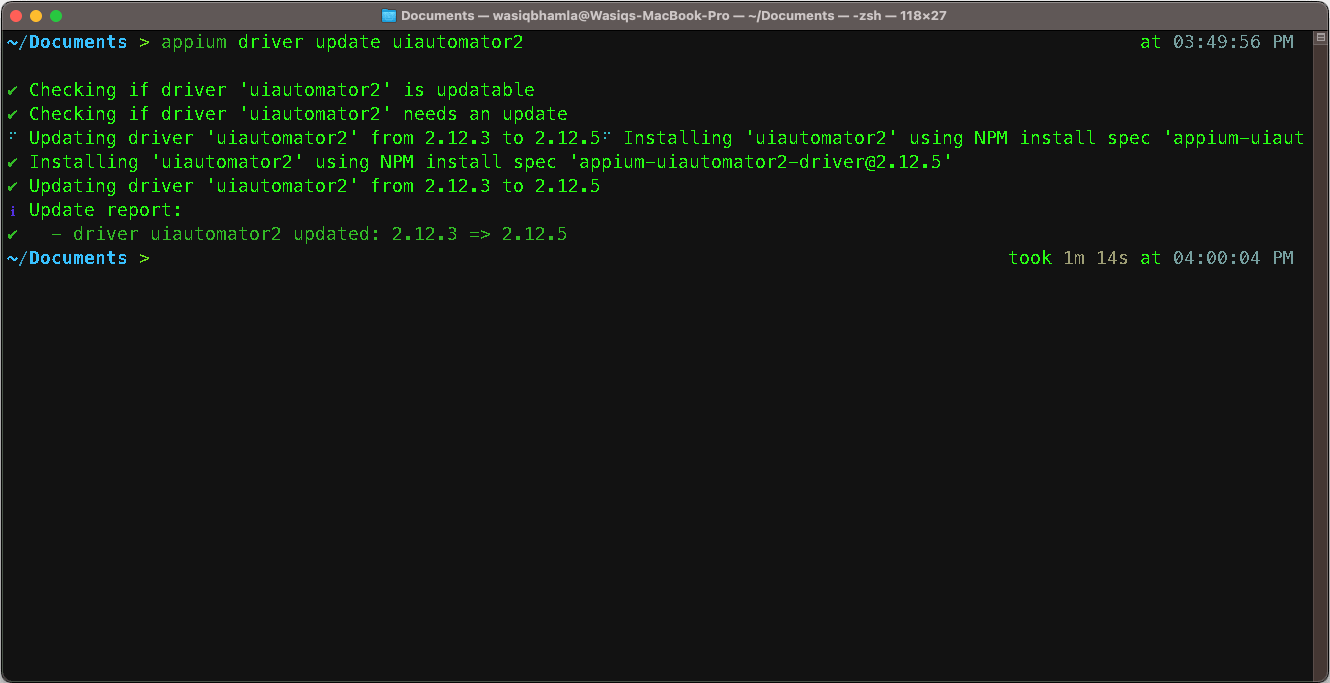
If there is no update available, you will see the following Error message:

Uninstall Driver
You can uninstall the driver which you don’t want by running the following command:
> appium driver uninstall uiautomator2This is the output for the command:
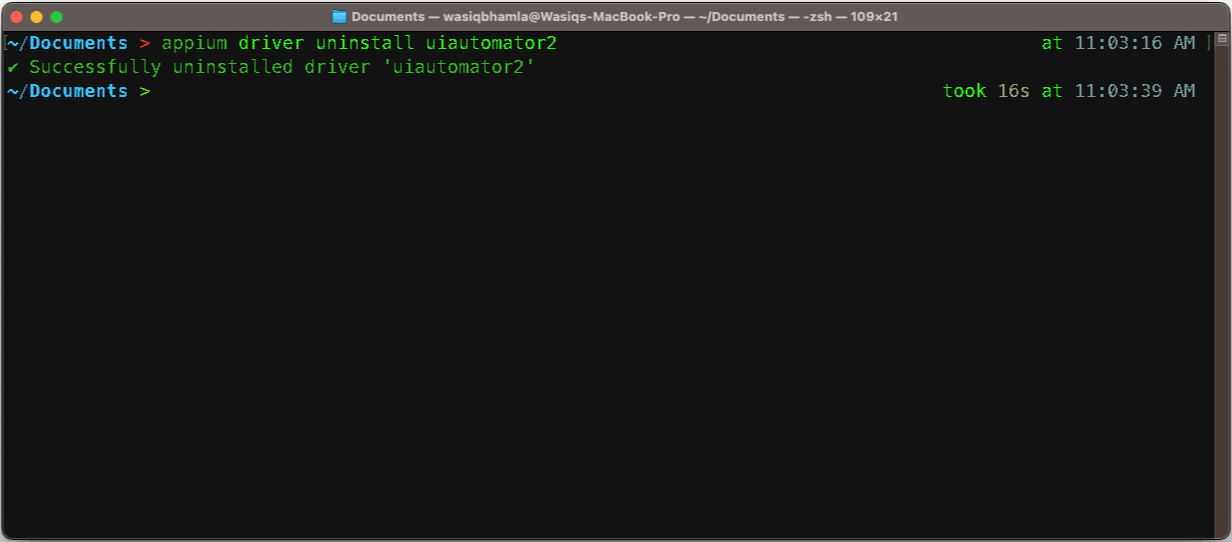
This command will remove all the files related to the driver from your machine.
Appium Plugins
Plugins are a way to modify the Appium behavior, extend Appium functionality, or Add new behavior to Appium.
List Appium Plugins
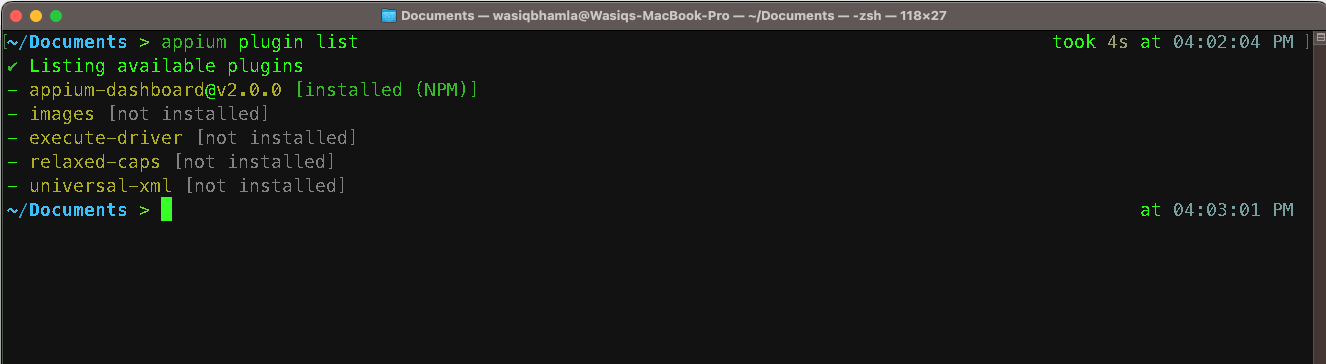
To see all the Plugins which are developed and maintained by Appium teams, run the following command:
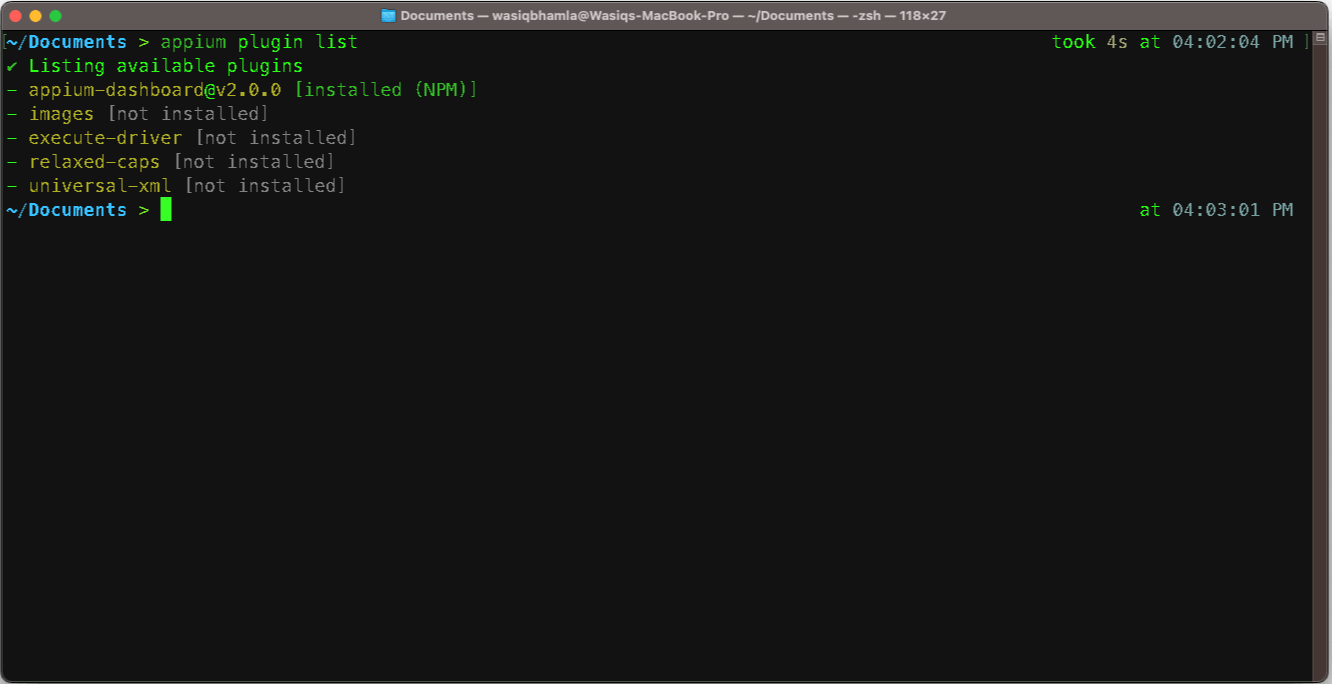
> appium plugin listAnd the following is the output of the command:
Install Plugin
To install any Appium-developed plugin, run the following command:
> appium plugin install relaxed-caps
Once the plugin is installed, you will see the following output:
If the plugin is developed by another contributor (not by the Appium team), you won’t be able to install the plugin using the command mentioned above. You must use the following command to install:
> appium plugin install --source=npm appium-dashboardNotice the --source flag? This is required to install external plugins, which are published on NPM.
Upgrade Plugin
If there is a new version released for the installed plugin, you can upgrade your plugin by running the following command:
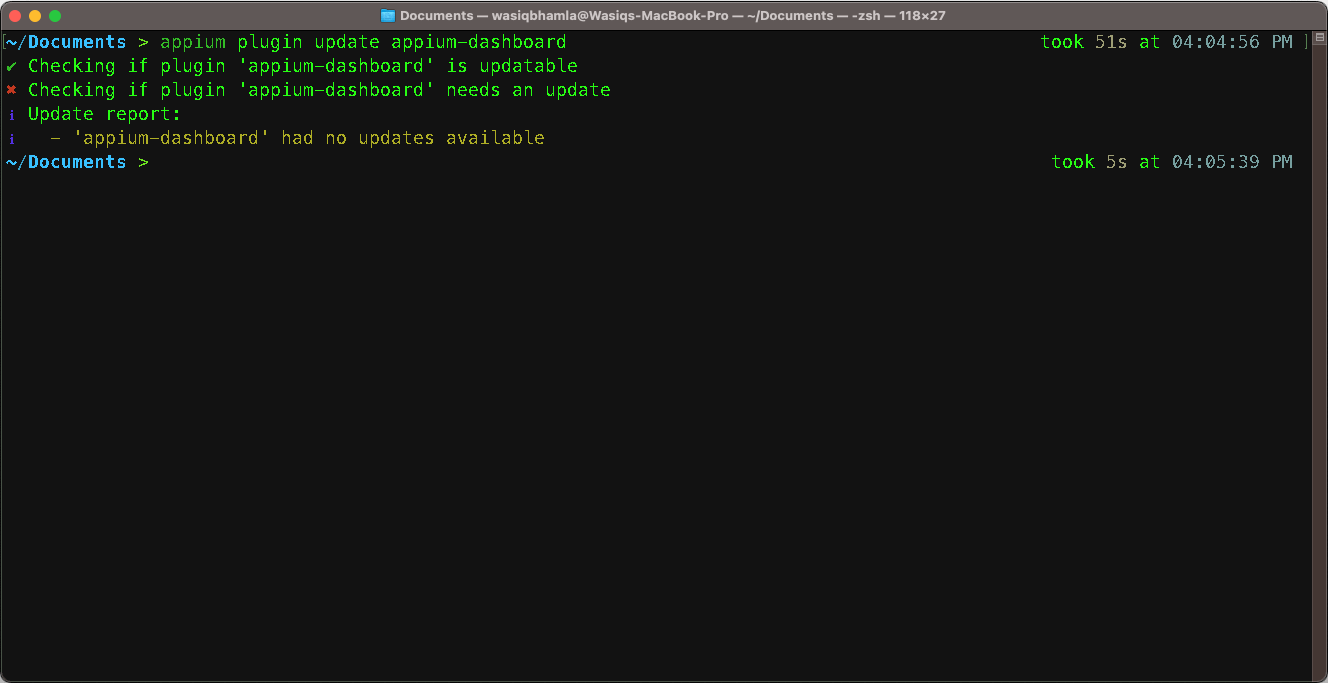
> appium plugin update appium-dashboard
This will install the latest version of the plugin if it is available, else you will see the following output:
Uninstall Plugin
To uninstall any plugin, run the following command:
> appium plugin uninstall relaxed-capsThis will remove all the files related to the plugin from your machine.
Appium Server
Appium server command is used to start an Appium session which you can use to make connections from your test. Once the connection is successful, the Appium server will install the application under test on the device mentioned in the capabilities you provided while starting the session on the Appium server.
Following is the command syntax you can use to start the Appium server:
> appium server [list-of-options]The behavior of the Appium server will vary based on the options passed when starting the server.
Appium server options
In this section of this Appium commands cheat sheet, let’s check out all the available options which you can use based on your requirements:
- --address: IP address where you want to run your tests on.
- --port: Port number where the Appium server will start.
- --base-path: Base path to be used in server URL, ideally this should be /wd/hub.
- --use-drivers: Mention comma-delimited list of drivers to be activated.
- --use-plugins: Mention comma-delimited list of plugins to be activated.
- --log: File path where you want to save Appium server logs.
- --log-filters: Add log filters to get only the required logs.
- --log-level: Specify log levels that should be logged.
- --log-timestamp: Add this if you want to have timestamps in the logs.
- --local-timezone: Add the timezone for which you want to see the time in.
- --debug-log-spacing: To add extra spacing in logs for debugging.
- --allow-insecure: Mention all the insecure features which you want to be enabled by separating them with a comma.
- --default-capabilities: Specify the default capabilities which you know will not change for your tests. You can override them by passing in the driver instance when creating the session.
- --session-override: Add this if you want to override the existing session.
- --webhook: Mention the webhook URL where you want Appium logs to be redirected.
- --strict-caps: Mention this when you want a strict check of passed capabilities.
- --driver-xcuitest-webdriveragent-port: Mention WebDriverAgent port number.
- --config: Specify the Appium config file path which Appium can use to configure.
- --nodeconfig: Specify the Selenium Grid configuration file to connect to a grid.
- --allow-cors: Use this when you want to allow Web to connect to your Appium server instance.
- --relaxed-security: Use this to relax security check.
Start and stop Appium Server
To start the Appium server from the command line using basic options, run the following command:
> appium server --address localhost --port 4723 --use-drivers uiautomator2 --base-path /wd/hub --use-plugins appium-dashboardThis command will use the uiautomator2 driver along with the appium-dashboard plugin, will start the server on localhost and port 4723 using the base path as /wd/hub. So when you pass the server URL in your driver instance, you will give the URL as http://localhost:4723/wd/hub.
To stop the server, simply press Ctrl + C on your terminal.
Appium Java Client
Appium provides different language bindings which can be used depending on the users' interests and project requirements. In this Appium commands cheat sheet, we’ll check out the Appium Java client and how you can use its different classes to automate mobile applications.
Start Appium server
To start the Appium server programmatically, you must build the Appium service as shown in the code below:
private AppiumDriverLocalService buildAppiumService () {
                                  final var logFile = Path.of (getProperty ("user.dir"), "logs", "appium.log")
                                      .toFile ();
                                  final var builder = new AppiumServiceBuilder ();
                                  return builder.withIPAddress (System.getProperty ("host", "127.0.0.1"))
                                      .usingPort (Integer.parseInt (System.getProperty ("port", "4723")))
                                      .withLogFile (logFile)
                                      .withArgument (GeneralServerFlag.BASEPATH, "/wd/hub")
                                      .withArgument (GeneralServerFlag.USE_DRIVERS, "uiautomator2")
                                      .withArgument (GeneralServerFlag.USE_PLUGINS, "appium-dashboard")
                                      .withArgument (GeneralServerFlag.SESSION_OVERRIDE)
                                      .withArgument (GeneralServerFlag.ALLOW_INSECURE, "chromedriver_autodownload")
                                      .build ();
                               }
Here, we are building the Appium service by setting different options using the utility methods exposed by the builder class. These options are the same as we saw earlier with the Appium server command.
To start the Appium server using this builder class, you can call the start method as shown below:
this.service = buildAppiumService ();
this.service.start ();Stop Appium Server
To stop the Appium server, call the stop method as shown below:
if (this.service.isRunning ()) {
                                  this.service.stop ();
                               }
In this example, we first check if the Appium server is already running. If it’s true, then stop the server.
Setting desired capabilities
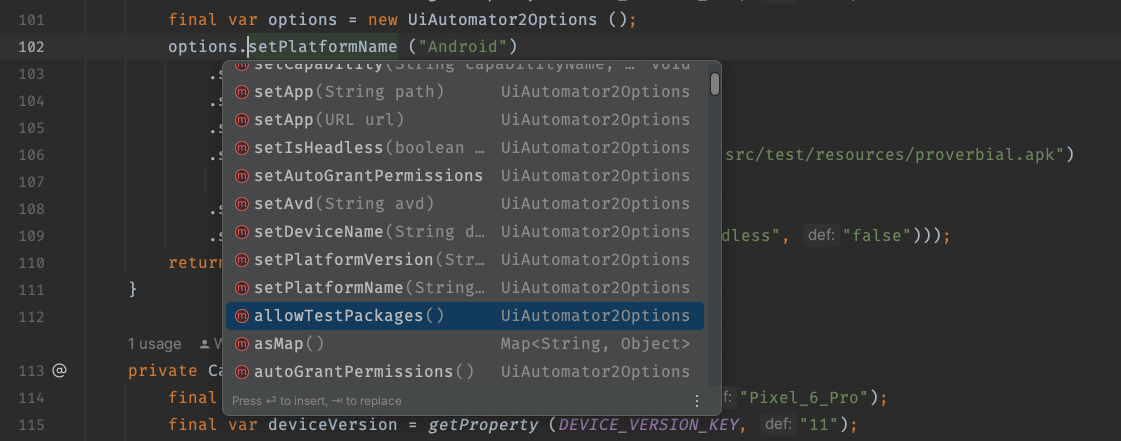
For setting desired capabilities, the Appium Java client has introduced an options class in Appium Java client v8.x.x. This class is UiAutomator2Options for Android when using the UiAutomator2 Automation name. Similarly, there are EspressoOptions when you want to use the Espresso Automation name.
In the following screenshot example, you can see how this options class has exposed different methods which you can use to set different capabilities:
Let’s see how you can use this options class to set the desired capabilities in the code example below:
private Capabilities buildCapabilities () {
                                  final var deviceName = getProperty (DEVICE_NAME_KEY, "Pixel_6_Pro");
                                  final var deviceVersion = getProperty (DEVICE_VERSION_KEY, "11");
                                  final var options = new UiAutomator2Options ();
                                  options.setPlatformName ("Android")
                                      .setPlatformVersion (deviceVersion)
                                      .setDeviceName (deviceName)
                                      .setAvd (deviceName)
                                      .setApp (Path.of (getProperty ("user.dir"), "src/test/resources/proverbial.apk")
                                          .toString ())
                                      .setAutoGrantPermissions (true)
                                      .setIsHeadless (parseBoolean (getProperty ("headless", "false")));
                                  return options;
                               }
As you can see that this options class has exposed different methods based on the capabilities, which are supported by this Automation name. Similarly, you can explore EspressoOptions class to see all the supported capabilities for that Automation name.
Similarly, for iOS, there is XCUITestOptions class, which you can use for setting desired capabilities for iOS devices.
Tip: All these options classes are subclasses of the Capabilities interface of Selenium WebDriver.
Start driver session
Now, you can use the options instance member to initialize the driver for your desired platform. In this Appium commands cheat sheet, we will look at how to start an Android driver session on the server we have started in our test script. The following code example demonstrates the same:
var capabilities = buildCapabilities ();
                               this.service = buildAppiumService ();
                               this.service.start ();
                               . . .
                               var serverUrl = this.service.getUrl ();
this.driver = new AndroidDriver (serverUrl, capabilities);In this snippet, we are saving the capabilities using the buildCapabilities method, which we had created earlier, and we are getting the server URL from the service field and initializing the Android driver by passing the same along with capabilities for the Android device.
Stop driver session
To stop the driver session, you will call the quit method. Following is an example for the same:
this.driver.quit ();Update Driver settings
There are some settings you can update after the driver has been initialized. These settings can be for Android or iOS, or both. To update these settings, you can call the setSetting method as shown below:
this.driver.setSetting (Setting.KEYBOARD_AUTOCORRECTION, false);You can explore the Setting enum used here to see what all settings are supported by Appium and which you can update at runtime.
Update Driver Setting Via Capabilities
There is a special capability that you can use to update the driver settings while initializing the driver instead of the earlier approach, which we did after driver initialization. This special capability is written in the following way:
options.setCapability ("appium:settings[setting-name]", "value");Here, the setting-name is the name of the setting supported by Appium, and the value can be any value of any type. You won't add double quotes if the value is boolean or int.
Supported Locator Strategies
In the Appium Java client, the following are the supported locator strategies in Appium:
Accessibility ID
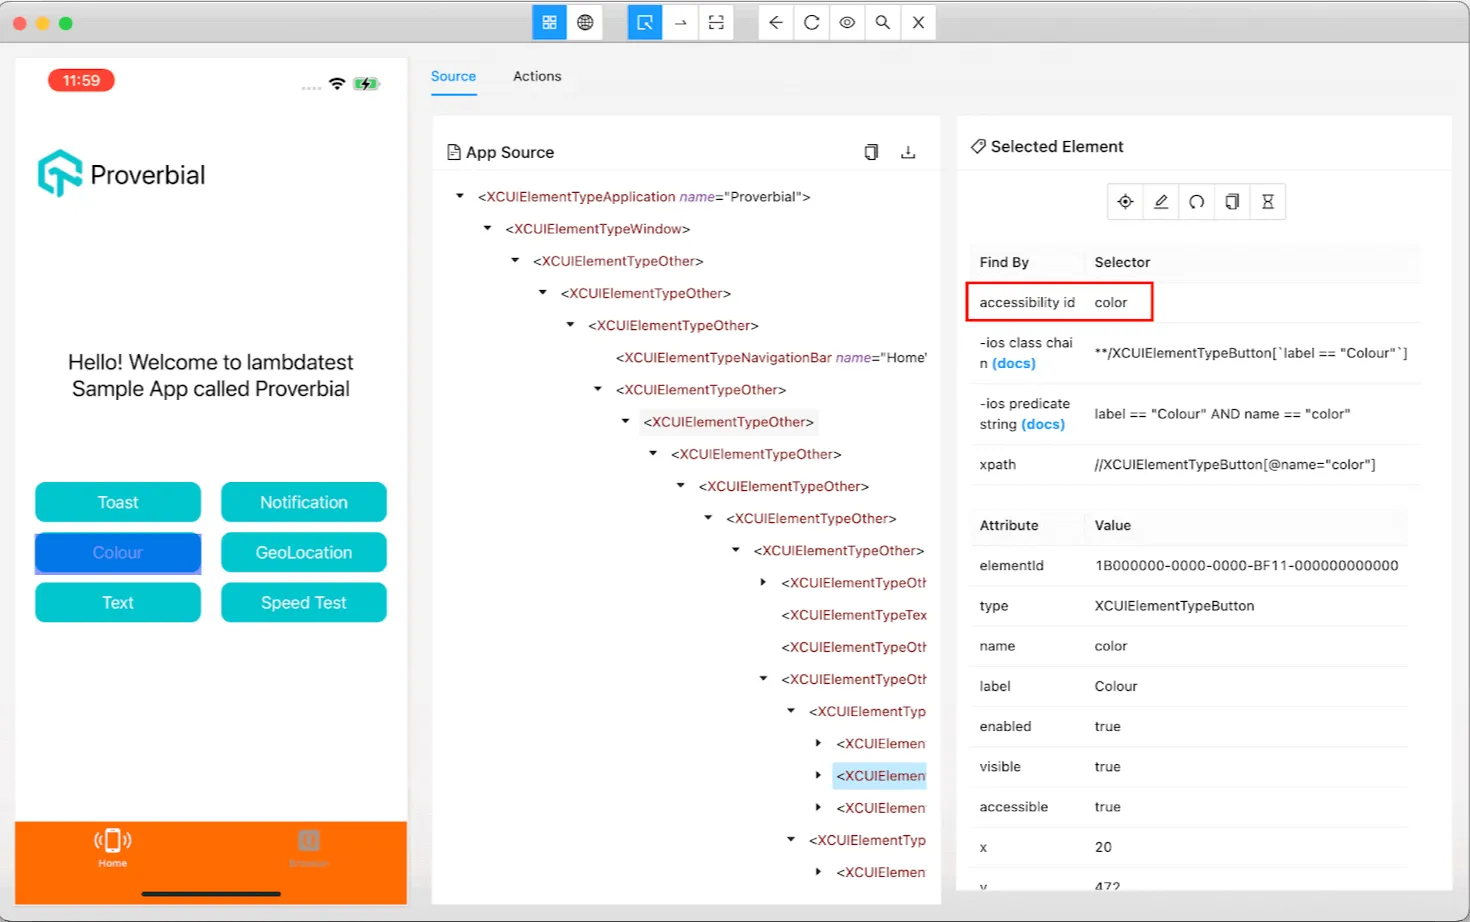
This allows finding the elements using the element Accessibility labels. Example usage for this is as follows:
var element = this.driver.findElement(AppiumBy.accessibilityId ("accessibility-id"));Here’s where you can find the accessibility ID in the Appium inspector:
ID
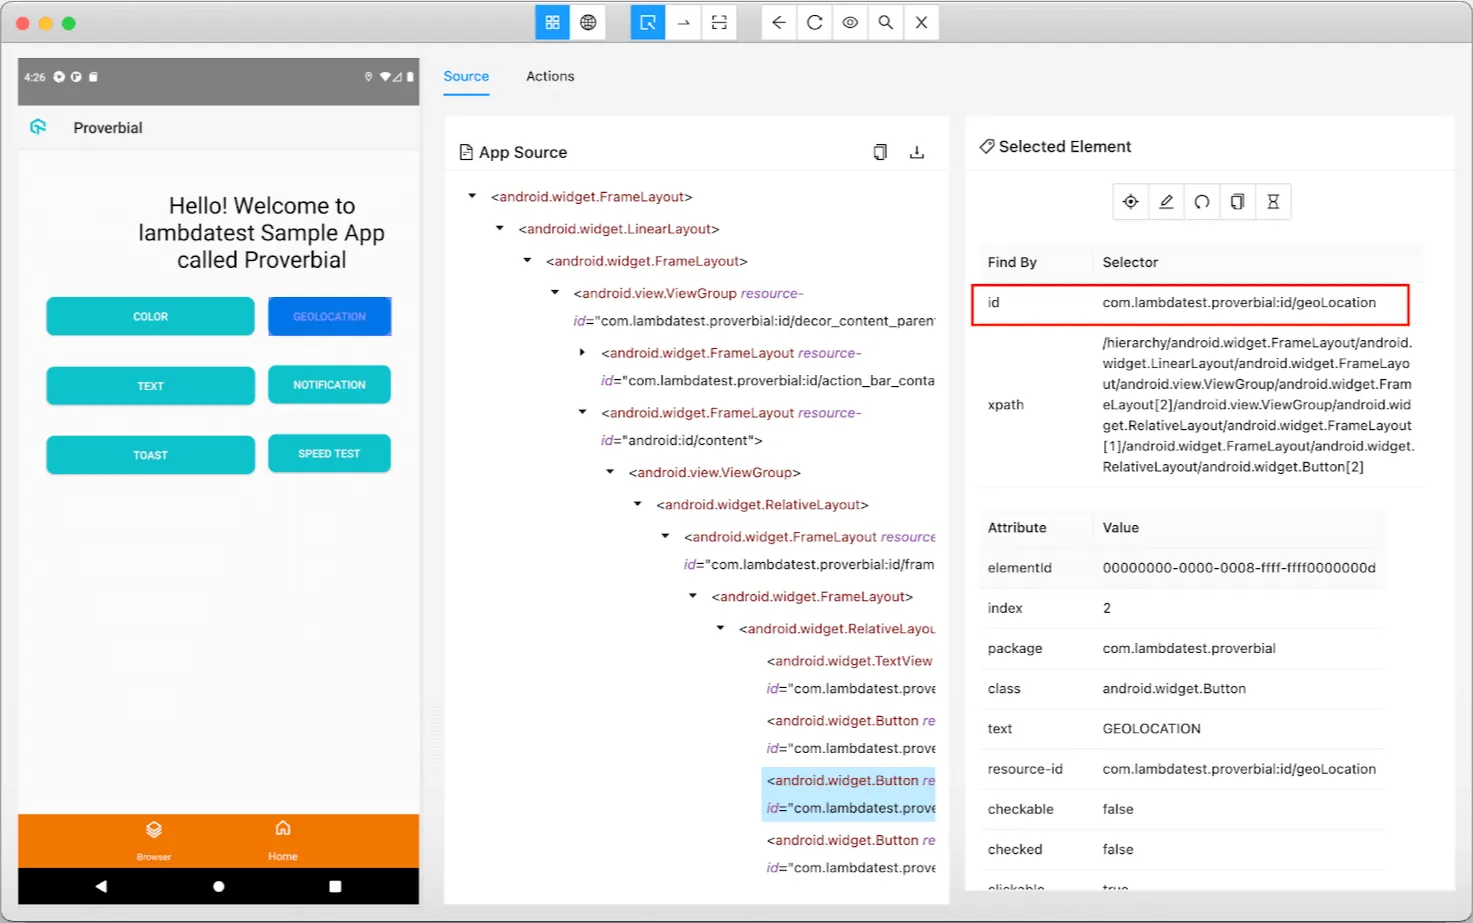
This allows finding the elements using the element unique ID. Example usage for this is as follows:
var element = this.driver.findElement(AppiumBy.id ("element-id"));In the Appium inspector, here’s where you will find the ID locator:
Class Name
This will use the element class name to locate it. Following is the example for the same:
var element = AppiumBy.className ("some.class");You can find the class name attribute in the Appium inspector as shown below:
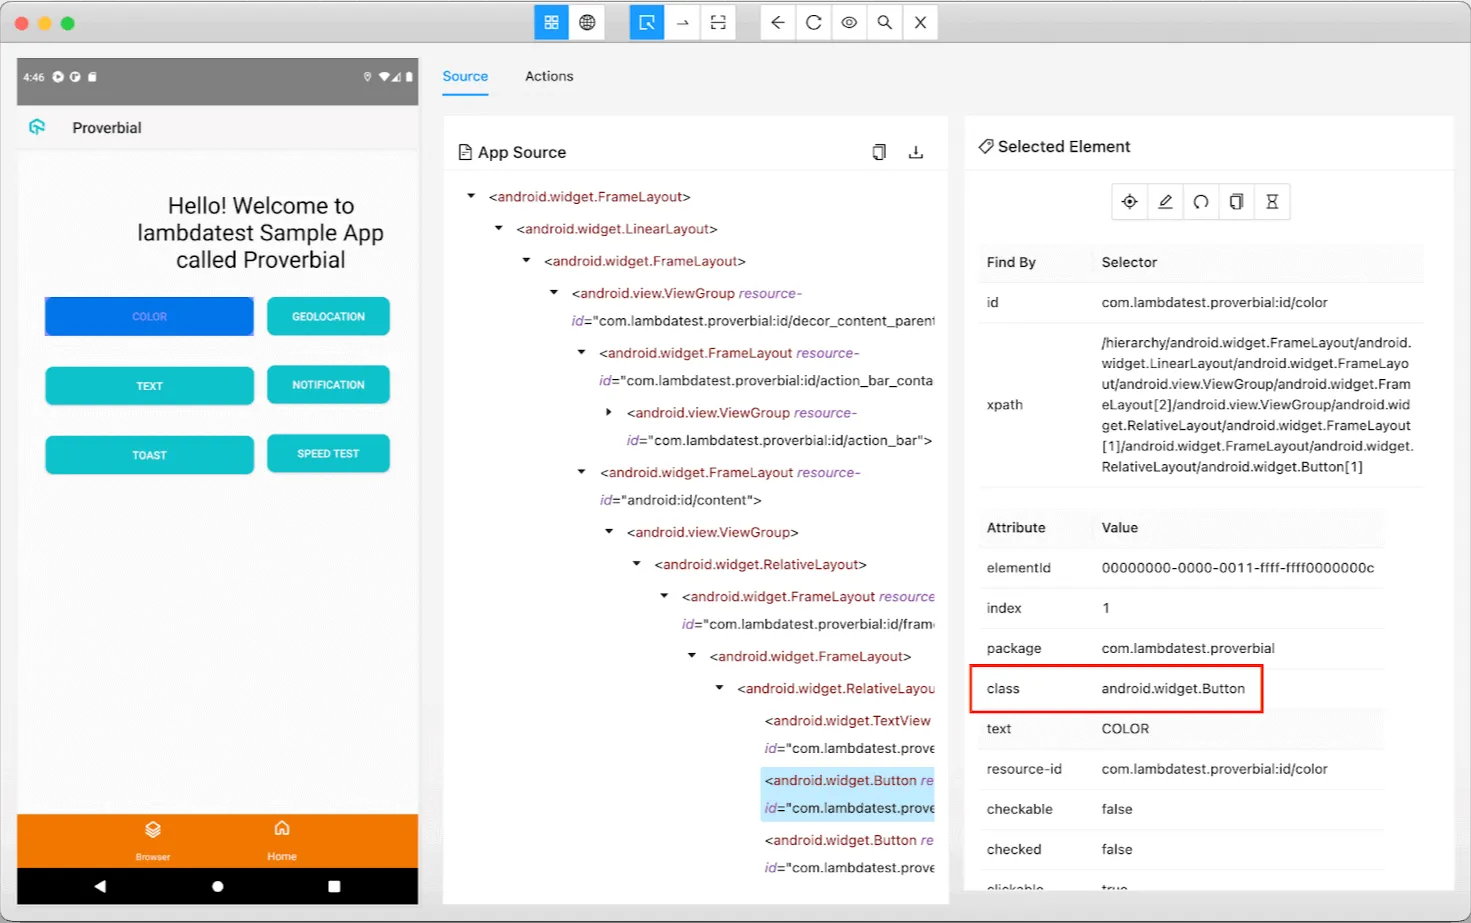
XPath
XPath locator strategy will scan the complete XML hierarchy tree of the application screen for the locator you will try to find the element. Hence this is the slowest-performing locator strategy. Following is an example of using XPath:
var element = AppiumBy.xpath (".//android.widget.Button[@text='COLOR']");Appium Inspector also provides you with pre-built XPath for any element as shown below:
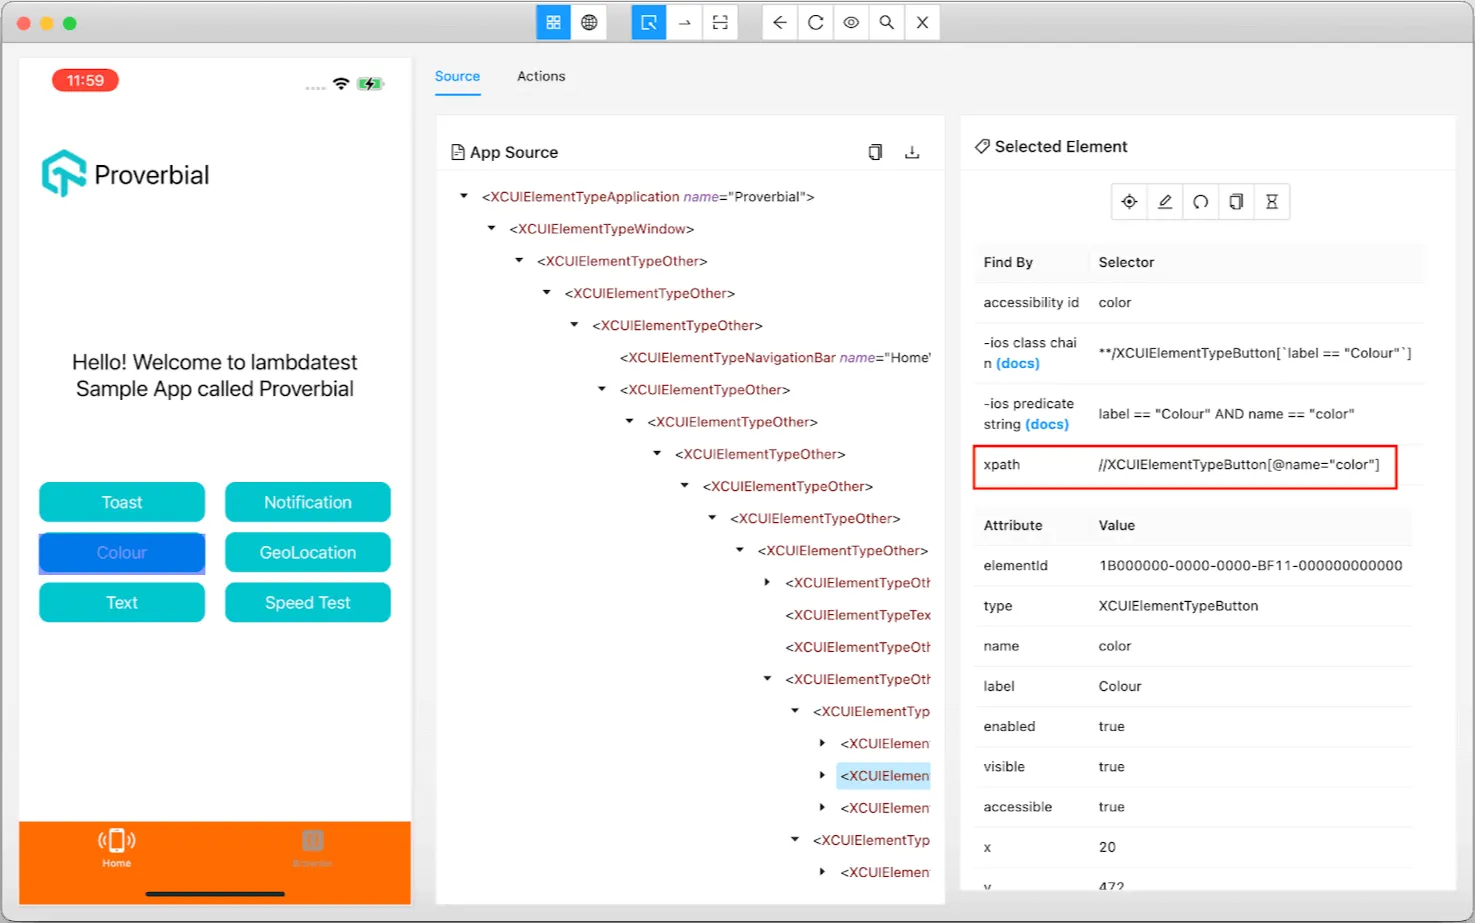
Android Ui Selector
This allows finding the elements using different attributes of the element using UiSelector class methods by using the androidUIAutomator method as shown below:
var element = AppiumBy.androidUIAutomator ("new UiSelector().text("some-text")");This locator is specific for the UiAutomator2 Automation name.
In Appium inspector, you can check if your locator string is valid when you evaluate it in the search window in the inspector, as shown below:
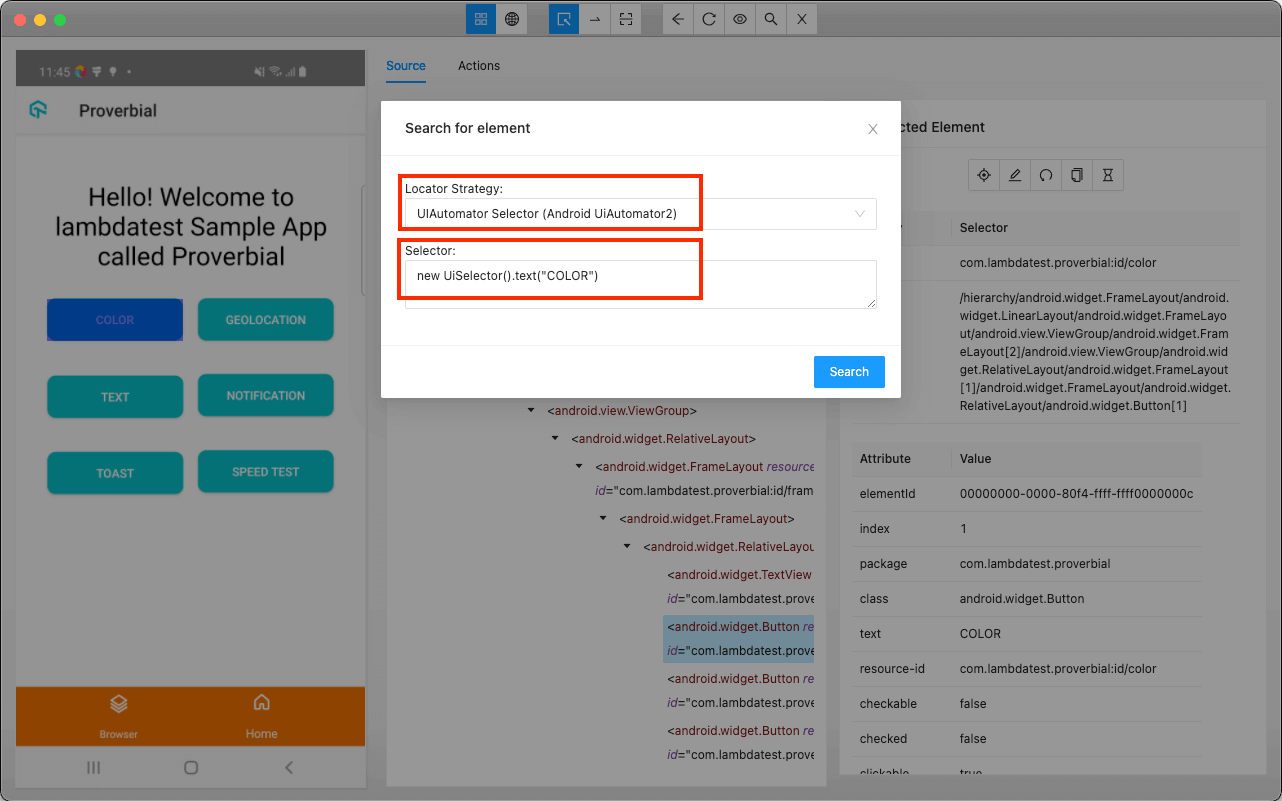
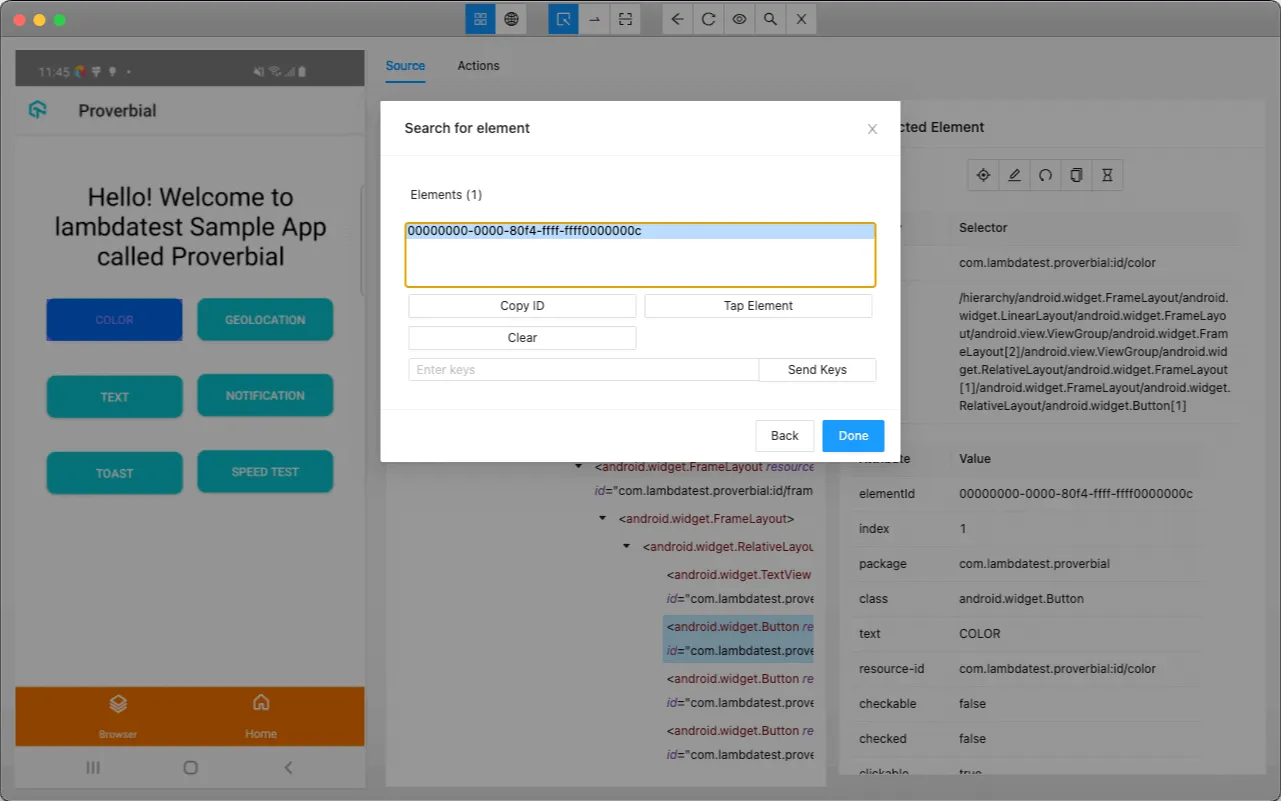
When you click on the Search button, you will get the following window which will list all the elements found using the locator you provided it:
Android Data Matcher
This locator strategy is specific to the Espresso Automation name. This will work only when the element is part of a view component in Android. Following is the example of how to use this locator:
var element = AppiumBy.androidDataMatcher (new Json ().toJson (ImmutableMap.of (
                                "name", "hasEntry",
                                "args", ImmutableList.of ("title", "App")
                               )));
Android View Matcher
This locator strategy is specific to the Espresso Automation name. It is similar to data matcher; however, the only difference is that you won’t be using Hamcrest methods here. Instead, the class will be used. Following is the example of how to use this locator:
var element = AppiumBy.androidViewMatcher (new Json ().toJson (ImmutableMap.of (
                                "name", "withText",
                                "args", "Animation",
                                "class", "androidx.test.espresso.matcher.ViewMatchers"
                               )));
iOS Predicate String
Predicate strings are very similar to SQL query which you can use to query the iOS driver to find the elements using the element's attributes. Following is an example of how you can write a predicate string locator strategy:
var element = AppiumBy.iOSNsPredicateString ("label == "Colour" AND name == "color"");iOS Class Chain
This locator is similar to XPath, but it is more stable as compared to XPath. This stability is because class chains can call class chain queries directly in XCUITest. In contrast, XPath is not native to XCUITest, so it requires recursively building an entire UI hierarchy to find the elements.
With the iOS class chain, you can use indexes and combine the Predicate string strategy and class chaining. Following is an example of how you can write a class chain locator strategy:
var element = AppiumBy.iOSClassChain ("**/XCUIElementTypeButton['label == "Colour"']");Device Actions
Let’s take a look at all the common actions which you can do on both Android and iOS devices.
Take a screenshot
For taking the screenshot of the visible page, you can use the following command:
final var file = ((TakesScreenshot) this.driver).getScreenshotAs (FILE);
                                 try {
                                    FileUtils.copyFile (file, new File (fileName));
                                 } catch (final IOException e) {
                                    e.printStackTrace ();
                                 }
Here, we are saving the screenshot in a temporary file and later save it in the desired location.
Get screen size
To get the device's viewport size, use the following command:
driver.manage ().window ().getSize ();Check if running on Device Browser
To check if you are testing a web application on a mobile browser, run the following command:
var isWebApp = driver.isBrowser ();
Open a Deeplink
Deep Links are a shortcut to the application screen which you can use to reduce the execution time by directly going to the screen under test instead of going through different screens just to reach the desired screen. To open the deeplink, use the following command:
driver.get ("someapp://deeplink/to/screen");Get Session ID
To get the currently running session ID, run the following command:
var sessionId = driver.getSessionId ();Handle Alerts
You can handle native alerts using the following command:
var message = this.driver.switchTo ()
                                 .alert ()
.accept ();You can either accept or dismiss alerts depending on the requirements. Both of these methods will return the message of the Alert.
Following are the common device actions, which can be used on real as well as on Emulator or Simulator devices of Android and iOS:
Switch context to WebView
In a hybrid application, when you are on the screen which has an in-built web view component, you can switch the driver context to that web view and automate that component as well. To switch the context, use the following command:
driver.context ("WebView-name");Get all the available contexts
You can also get the names of all the available contexts by using the following command:
var handles = driver.getContextHandles ();Get Battery percent level
You can get the battery percent level for your real device by using the following command:
var batteryPercent = driver.getBatteryInfo ().getLevel ();This will return a double value where 1.0 equals 100% charged.
Get Battery state
You can get the current battery state for your real device by using the following command:
var batteryState = driver.getBatteryInfo ().getState ();Here, the battery state can be any of the following:
- UNKNOWN: This is the unknown state of the battery.
- CHARGING: This is when the device is charging.
- DISCHARGING: This is when the device battery charge level is discharging.
- NOT_CHARGING: This is when the device is not charging.
- FULL: This is when the device charging is full.
Check if the keyboard is visible
You can check if the device keyboard is visible or not by using the following command:
var isKeyboardVisible = driver.isKeyboardShown ();This method will return true if the keyboard is visible, else false.
Hide keyboard
If the keyboard is visible, you can hide it using the following command:
driver.hideKeyboard ();Tip: This command is only for Android
Hide Keyboard on iOS
If the keyboard is visible, you can hide it by using the following command in iOS:
driver.hideKeyboard ("return");Pro Tip: In iOS devices, you won’t be able to hide the numeric keyboard by using the above command because there is no key on the keyboard that you can use to hide the keyboard.
The only way to hide that keyboard successfully is a small HACK or a walkaround where you pass the new line char in the text box in which you are setting the value, for example, if you are setting 1200 as the string to the numeric text box, then pass \n at the end of the numeric string and the keyboard will hide automatically.
Android specific actions
- Open Notifications panel
To open the notification panel on your device, use the following command:
driver.openNotifications ();To toggle location services ON / OFF on the device, use the following command:
driver.toggleLocationServices ();To toggle mobile data ON / OFF on the device, use the following command:
driver.toggleData ();To toggle WiFi ON / OFF on the device, use the following command:
driver.toggleWifi ();To toggle Airplane mode ON / OFF on the device, use the following command:
driver.toggleAirplaneMode ();Lock device
You can lock the device by using the following command:
driver.lockDevice ();Check if device is locked
You can also check if the device is already locked by using the following command:
var isLocked = driver.isDeviceLocked ();Unlock device
To unlock the locked device, you can use the following command:
driver.unlockDevice ();Get Clipboard Text
To get clipboard text from the device, use the following commands:
var text = driver.getClipboardText ();
// OR
var text = driver.getClipboard (ClipboardContentType.PLAINTEXT);
Video recording
You can video record your test session by using the following command to start the recording right after starting the driver session or whenever you want to start the recording:
// For Android
var option = AndroidStartScreenRecordingOptions.startScreenRecordingOptions ()
                                 .withTimeLimit (Duration.ofMinutes (5));
// For iOS
final var option = IOSStartScreenRecordingOptions.startScreenRecordingOptions ()
                                  .withTimeLimit (Duration.ofMinutes (5));
this.driver.startRecordingScreen (option);And when you want to stop the recording and create the video, use the following command:
// For Android
var option = AndroidStopScreenRecordingOptions.stopScreenRecordingOptions ();
// For iOS
var option = IOSStopScreenRecordingOptions.stopScreenRecordingOptions ();
final var videoContent = this.driver.stopRecordingScreen (option);
saveRecording (videoContent);
. . .
private void saveRecording (final String content) {
final var decode = Base64.getDecoder ()
.decode (content);
try {
final var date = new SimpleDateFormat ("yyyyMMdd-HHmmss");
final var timeStamp = date.format (Calendar.getInstance ()
.getTime ());
final var fileName = format ("{0}/videos/VID-{1}.mp4", System.getProperty ("user.dir"), timeStamp);
FileUtils.writeByteArrayToFile (new File (fileName), decode);
} catch (final IOException e) {
// Do some error handling
}
}
Pro Tip: For iOS devices, this command of startRecordingScreen will also start live streaming your device on http://localhost:9100 which you can view on any browser.
Tip: commons-io library is used in the above code snippet for saving the file in mp4 format.
To understand the above code snippet, we will get the video content in Base64 encoding when we stop the recording. We decode it from Base64 string to byte[], and later we save it to an mp4 file under the videos folder in the project's root folder
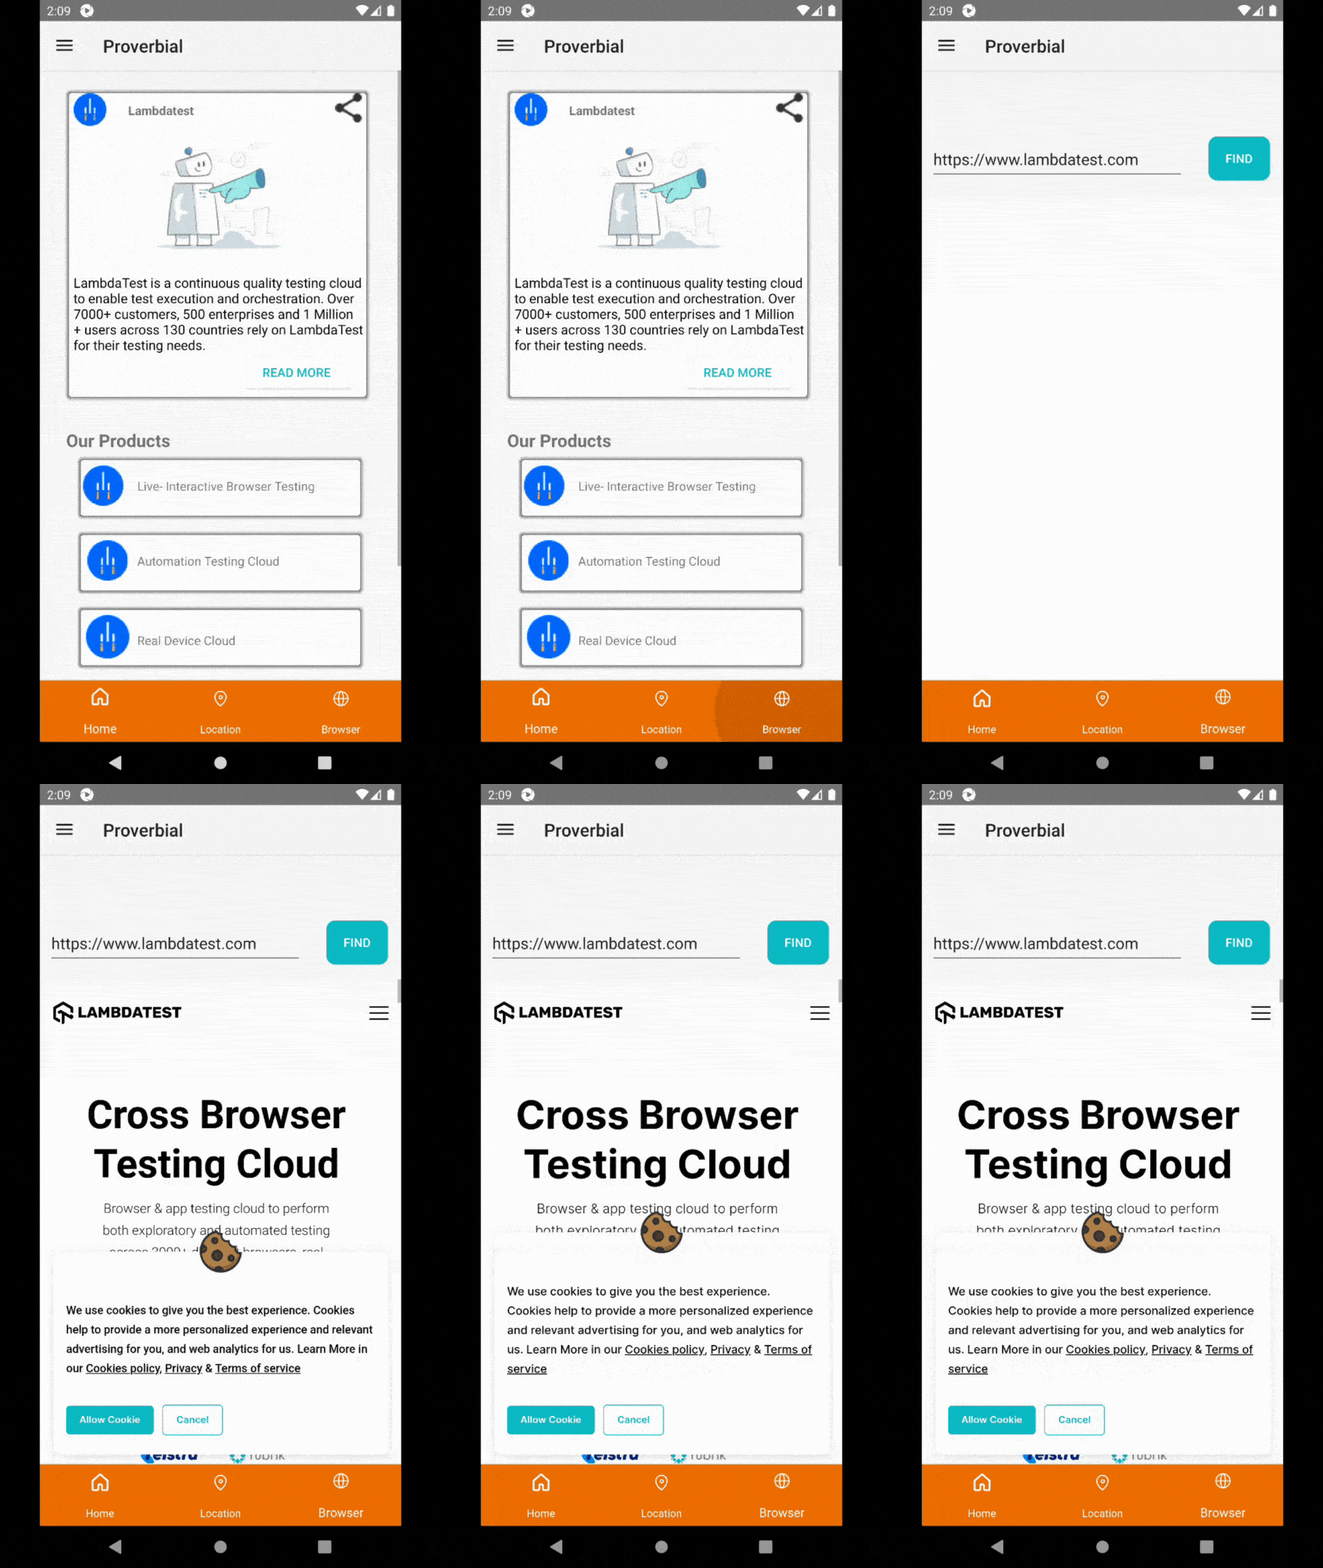
The following video is a sample that was generated using the above code snippets:
Video stream real-time
You can live stream the test execution on your device by using the following command to start the streaming:
private void startStreaming () {
                                   final var args = new HashMap<String, Object> ();
                                   args.put ("host", "127.0.0.1");
                                   args.put ("port", 8093);
                                   args.put ("quality", 75);
                                   args.put ("bitRate", 20000000);
                                   this.driver.executeScript ("mobile: startScreenStreaming", args);
                                }
Tip: This option is only for Android devices.
Pre-requisites:
- Insecure setting: When starting the Appium server, you must mention the allow_insecure flag with the value adb_screen_streaming to enable video streaming
- MJPEG: To install this package, run the command npm i -g mjpeg-consumer.
- GStreamer: This package you can install from their download page if you are on a Windows or Linux machine. However, for Mac OS users, you can install these packages on your machine using the following Homebrew command:.
> brew install gstreamer gst-plugins-base gst-plugins-good gst-plugins-bad gst-plugins-ugly gst-libav
You can call this startStreaming method whenever you want to start streaming. Once this method gets executed, you can open the browser and navigate to http://127.0.0.1:8093 where you can see your device live streaming
- width: The width of the stream measured in pixels, e.g., 768
- package.jsonheight: The height of the stream measured in pixels, e.g., 1024
- bitRate: Video bit rate for the stream measured in bits per second, default is 4 Mbps (4000000)
- host: This is the IP address where you want to start the MJPEG server
- port: This the port number where you want to start the MJPEG server
- quality: This the video quality of the stream which will range between 1 to 100 where 100 is the best quality
- considerRotation: If your application will constantly be switching between Portrait and Landscape view, it is recommended to set this option as true.
To stop streaming, use the following command and call the method whenever you want to stop the stream:
private void stopStreaming () {
this.driver.executeScript ("mobile: stopScreenStreaming");
}
. . .
stopStreaming ();
Pull device file to local
You can download the file from your device to your local machine by using the following command:
byte [] fileContent = driver.pullFile ("/device/path/to/file");The pullFile method will return file content in Base64 format.
Pull the device folder to local
You can download the file from your device to your local machine using the following command:
byte [] folderContent = driver.pullFolder ("/device/path/to/folder");
The pullFile method will return file content in Base64 format.
Push local file to the device
You can also push your local file to your device file system by using the following command:
try {
                                  this.driver.pushFile ("/device/path/to/folder", new File ("/local/file/path"));
                               } catch (IOException e) {
// Do some error handling
}
Swipe up on screen
With Appium 2.0, it is always recommended to use W3C actions instead of TouchActions class as we used to do earlier because those classes are now deprecated and will be removed in future Appium releases. For a comprehensive walkthrough on performing tap, swipe, scroll, and other touch interactions, refer to this guide on Appium gestures.
Let’s see how to Swipe UP on the screen using the W3C action sequence using the following command:
private void swipe () {
                                  final var size = this.driver.manage ()
                                      .window ()
                                      .getSize ();
                                  final var start = new Point (size.getWidth () / 2, size.getHeight () / 2);
                                  final var end = new Point (start.getX (), start.getY () - (start.getY () / 2));


                                  final var finger = new PointerInput (PointerInput.Kind.TOUCH, "Finger 1");
                                  final var sequence = new Sequence (finger, 0);
                                  sequence.addAction (
                                      finger.createPointerMove (Duration.ZERO, PointerInput.Origin.viewport (), start.getX (), start.getY ()));
                                  sequence.addAction (finger.createPointerDown (PointerInput.MouseButton.LEFT.asArg ()));
                                  sequence.addAction (
                                      finger.createPointerMove (ofMillis (600), PointerInput.Origin.viewport (), end.getX (), end.getY ()));
                                  sequence.addAction (finger.createPointerUp (PointerInput.MouseButton.LEFT.asArg ()));
                                  this.driver.perform (singletonList (sequence));
                               }
In this code snippet, we are starting on the center of the screen and moving my finger upwards by 50% of the actual screen height. Similarly, you can come up with different logic to swipe down, left, and right accordingly
Android Emulator Device Actions
Following actions are specific to the Android virtual device:
Modify Network speed
You can modify the network speed by using the following command:
driver.setNetworkSpeed (NetworkSpeed.FULL);The allowed values of the parameter for the setNetworkSpeed method are as follows:
| Network Type | Speed (upload / download) KBPS |
|---|---|
| GSM | 14.4 / 14.4 |
| SCSD | 14.4 / 57.6 |
| GPRS | 28.8 / 57.6 |
| EDGE | 473.6 / 473.6 |
| UMTS | 384.0 / 384.0 |
| HSDPA | 5760.0 / 13,900.0 |
| LTE | 58,000 / 173,000 |
| EVDO | 75,000 / 280,000 |
| FULL | No limit |
Use Fingerprint
You can emulate fingerprint scan by using the following command and passing the fingerprint ID:
driver.fingerPrint (1);
Update Geolocation
You can emulate different Geo Locations on the Emulator by using the following command:
driver.setLocation (new AndroidGeoLocation (<lat>, <lon>));
Get Geolocation
You can get the current Geo Locations on the Emulator by using the following command:
var location = driver.location ();
App Management
Following are the commands for managing the application under test:
Get App package name
To get the application package name, use the following command:
var packageName = driver.getCurrentPackage ();Tip: This command is only for Android
Get the current Activity name
To get the current page activity name, use the following command:
var activityName = this.driver.currentActivity ();
Tip: This command is only for Android
Activate application
To activate the application on the device if the application is installed but not running or is running in the background, use the following command:
driver.activateApp ("com.domain.app.package");Tip: For the iOS platform, use the application bundle ID instead of the package name
Terminate application
To terminate the running application, use the following command:
driver.terminateApp ("com.domain.app.package");Install application
To install the application, use the following command:
this.driver.installApp ("<app-path>");Uninstall application
To install an application from the device, use the following command:
this.driver.removeApp ("<app-package>");Check if the application is installed
To check if the application has been installed on the device, use the following command:
var isInstalled = this.driver.isAppInstalled ("<app-package>");Due to the ever-increasing demand for quick and easy mobile automation, Appium testing has become important. Testing apps with the Appium framework is feasible and cost-effective, enabling both development and testing teams to deliver amazing mobile experiences.
Continuous testing cloud like TestMu AI provides a scalable mobile automation testing platform to test your mobile apps on a real device cloud using the Appium framework. It also provides a virtual testing platform to perform Appium testing of your mobile web applications on Android emulator online and iOS Simulators.
Additionally, TestMu AI comes with support for different mobile app testing frameworks like Appium, Espresso, and XCUITest to test your mobile apps in real-world environments.

Conclusion
To conclude and recap on this Appium commands cheat sheet, we have covered almost all the top Appium commands with respect to Appium CLI and Appium Java client, which you can use in your day-to-day mobile automation like a pro. Feel free to play around with these commands and see how many things you can do with Appium 2.0.
If you liked this Appium command cheat sheet, don’t forget to share it with your network, who may also benefit from it and help them learn about Appium.
Author

Navin Chandra
Blogs: 5

Navin Chandra is a Member of Technical Staff at TestMu AI (formerly LambdaTest), building the open-source automation that powers its Selenium and Appium cloud grid. A committer to both Selenium and Appium, he implemented WebDriver BiDi support in Selenium for real-time browser events and bidirectional control and is developing Apple's iOS RemoteXPC protocol in Appium to enable low-level wireless communication with iOS system services. He contributes to Selenium across multiple language bindings as a member of the Selenium GitHub organization. He has served as a Google Summer of Code mentee and mentor at openSUSE and an LFX mentee at CNCF's KubeArmor, and is a SUSE Certified Deployment Specialist. Navin holds a B.Tech in Computer Science.
Reviewer

Siddhant Sinha
Reviewer
Siddhant Sinha is a Lead Member of Technical Staff at TestMu AI architecting Kane CLI, the command-line tool for browser automation from the terminal, where natural-language flows run in a real Chrome browser and return pass or fail with shareable proof. He has spent over three years at TestMu AI (formerly LambdaTest) building scalable platforms that run tests at scale on real Android and iOS devices. His expertise covers platform architecture, large-scale distributed systems, and CLI design, shaped by earlier cloud-native engineering at Semut.io, including building Elasticsearch as a service.
Appium Commands Cheat Sheet FAQs
Did you find this page helpful?
More Related Learning Hubs
TestMu AI forEnterprise
Get access to solutions built on Enterprise
grade security, privacy, & compliance
- Advanced access controls
- Advanced data retention rules
- Advanced Local Testing
- Premium Support options
- Early access to beta features
- Private Slack Channel
- Unlimited Manual Accessibility DevTools Tests