

Power Your Software Testing with AI Agents and Cloud
The Native AI-Agentic Cloud Platform to Supercharge Quality Engineering. Test Intelligently and Ship Faster.


- TestMu AI (Formerly LambdaTest)
- /
- Blog
- /
- How to Build an MCP Server: A Step-by-Step Guide
How to Build an MCP Server: A Step-by-Step Guide
Model Context Protocol replaces one-off LLM integrations with a single open standard. This guide covers MCP architecture, the STDIO and Streamable HTTP transports, the Python and TypeScript SDK trade-off, and the environment setup for both.
Last Updated on:
Software teams have spent years stitching AI models to external tools through fragile, one-off integrations: custom wrappers, hardcoded endpoints, and brittle middleware that breaks the moment an API version changes. Every new tool meant starting that process over from scratch. The engineering debt quietly piled up, and the promise of truly intelligent, connected AI systems stayed just out of reach.
Model Context Protocol changes that equation entirely. Rather than building a separate bridge for every service your AI needs to talk to, MCP provides a single standardized, open protocol that works across tools, platforms, and models. Write the integration once, and any MCP-compatible AI system can use it today and as your stack evolves tomorrow.
TL;DR
- To build an MCP server: install Node.js v18+ or Python 3.10+, pick an SDK (Python FastMCP for speed, TypeScript for strict contracts), define your Tools, Resources, and Prompts, choose STDIO or Streamable HTTP as the transport, then test in isolation with the MCP Inspector before connecting a host.
- Model Context Protocol is an open standard that replaces per-tool integration code with one interface. Write the MCP server once and any MCP-compatible AI system can call it, instead of rebuilding a custom bridge for every database, API, or function. Vendor-specific: no, it is an open protocol.
- An MCP server is a runtime process exposing Tools, Resources, and Prompts. It runs independently and does not know which LLM is calling it, which is exactly why one server works across Cursor, Claude Desktop, VS Code, and any other compliant host.
- MCP Tools are model-controlled. The model decides when to invoke them, they can change the state of the world, and every call passes schema validation first. Highest risk surface of the three MCP primitives: yes, because tools trigger real side effects.
- MCP Resources are application-controlled and behave like GET endpoints, exposing raw data such as logs, files, and API responses. Invoked by the model directly: no, the host or client decides when to read them. Supports subscriptions for live data: yes.
- MCP Prompts are user-controlled, parameterized message templates the server registers with the host. Chosen by the model: no, the user or application decides when a prompt is invoked. They are structured building blocks for starting a workflow, not chat messages.
- For local integrations such as IDE plugins and CLI tools, use the STDIO transport. Zero infrastructure, near-zero latency over kernel pipes, and OS permissions for access control. Network port exposed: no. Serves multiple clients at once: no, one per process.
- For remote and cloud deployments, use the Streamable HTTP transport. One URL in both directions, session IDs, Last-Event-ID replay after a dropped connection, and horizontal scaling behind a load balancer. Authentication included: no, you implement API keys, bearer tokens, or OAuth yourself.
- The legacy MCP HTTP+SSE transport is deprecated because of its complexity. Safe to use in a new MCP server: no, Streamable HTTP is the current standard, though older servers may still run the old split-endpoint design.
- Every MCP session runs handshake, then discovery, then operation, in that order. Requests sent before the initialized notification are rejected, and a protocol version mismatch drops the connection immediately.
- For rapid prototyping, data analysis, and local STDIO servers, use the Python SDK with FastMCP, which registers tools through decorators. For production remote servers, strict contracts, and VS Code extensions, use the TypeScript SDK. More boilerplate in TypeScript: yes.
- MCP server prerequisites are Node.js v18 or later for TypeScript, Python 3.10 or later for FastMCP, and the MCP Inspector CLI. Needed before connecting a host: yes, the Inspector tests the server in isolation first.
- The MCP SDK is ESM-only. CommonJS require supported: no, omitting "type": "module" from package.json produces ERR_REQUIRE_ESM, making it the single most important field in a TypeScript MCP project.
Why Does MCP Matter Right Now?
The current state of LLM integration is a complete mess. The rush to create AI-powered features has resulted in an abundance of unique, one-time "glue code."
Consider this: you must create custom integration code each time you want an LLM to communicate with a new database, access a new API, or perform a new function. This strategy is:
- Unscalable: Each new integration is a fresh engineering project.
- Brittle: Changes to either the LLM's prompt or the target system can easily break the connection.
- Insecure: Hardcoding logic into prompts or ad hoc scripts creates security risks.
The solution to this chaos is MCP. By offering a single, open-protocol standard for all LLM interactions, it tackles these crucial scaling, maintenance, and security issues. Having a reliable, standard interface to connect all the LLM models to your systems is not only handy but also vital in a world where new models are released every other week.
What is MCP (Model Context Protocol)?
MCP is fundamentally an open-source protocol intended to provide a standardized, simplified interface for integrating AI models with external systems. Consider it as a set of guidelines and a common language that your external systems and the LLM agree to use.
Consider the MCP as an AI application's USB-C port. MCP offers an established approach for connecting AI applications to external systems, much like USB-C offers a standardized way to connect electronic devices. If you want the wider context on where the protocol sits alongside agent frameworks, TestMu AI covers that ground in MCP and AI agents.
MCP vs. Traditional API Integration Side-by-Side
| Feature | Traditional API Integration | MCP Integration |
|---|---|---|
| Prompt Complexity | Very High: Requires embedding extensive, raw API documentation, endpoints, and authentication workflows directly into a system prompt. It forces the LLM to learn how to construct valid HTTP requests and handle custom error parsing per endpoint through natural language instructions. | Low: The model only ingests semantic tool names and descriptions. It leverages an automated schema discovery handshake via JSON-RPC 2.0 (tools/list), which programmatically communicates input parameters and type requirements, drastically reducing system prompt token overhead. |
| Model Brittle | Extremely High: Any minor structural modification to a downstream REST API payload or parameter name breaks the LLM reasoning loop. This results in silent execution failures that require manual prompt updates and complete regression re-evaluations. | Low: Upstream drift is isolated within the specific MCP server wrapper logic. The interface exposed to the LLM remains immutable. QA only needs to verify the updated server handler code, while the host-side orchestration prompt contract stays stable. |
| Parameter Validation & Safety | Ad-hoc / Non-existent: Relies entirely on loose prompt constraints or post-processing regular expression blocks to intercept outputs. There are no rigid safety rails to prevent the model from fabricating or hallucinating invalid parameter fields. | Rigid / Deterministic: Utilizes type-safe runtime interception via validation engines like Zod (TypeScript) or Pydantic (Python). Malformed payloads are blocked and rejected programmatically at the communication boundary before code runs, ensuring exact parameter conformity. |
| Scalability & Interoperability | Low: Creates custom, hardwired bridge solutions. A prompt-engineered connector built for one specific LLM framework or orchestration agent cannot easily adapt to another without a total rewrite of its prompt logic. | High: Operates as a reusable, open standard. By decoupling the AI client from tool execution via standard transport layers (STDIO or SSE), a verified server is instantly plug-and-play across any compliant host platform (e.g., Cursor, Claude Desktop, VS Code). |
| Developer & QA DX | Poor: Engineers spend excessive test and debug cycles troubleshooting flaky, non-deterministic edge cases caused by the model formatting string arguments incorrectly or confusing input fields. | Excellent: QA can deterministically intercept, log, and audit the raw JSON-RPC traffic. This abstraction allows developers to focus on standard software engineering principles (strict type definitions, semantic docstrings) while simplifying bug isolation between model reasoning and code execution. |
What You Will Build in This Guide
Talking about a protocol is good; building one is better. This guide is a technical tutorial designed to get you from zero to a working MCP server. We will not be building a theoretical "hello world" scenario. We're going to create a functional, real-world integration: A Weather MCP Server.
We'll focus on the entire developer lifecycle: from initial project setup and defining the core MCP logic to testing and deploying the server. This is your first step toward building truly connected, robust AI systems. Let's get started.
Deep Dive: Understanding MCP Architecture
The architecture behind MCP is made to be flexible, scalable and adaptive to various LLM environments and applications. Fundamentally, MCP uses a client-server architecture that enables large language models to safely access external tools and context without hardwired integrations. MCP is centered around three primary components at a higher level.
MCP Architecture at a Glance: Hosts, Clients, and Servers
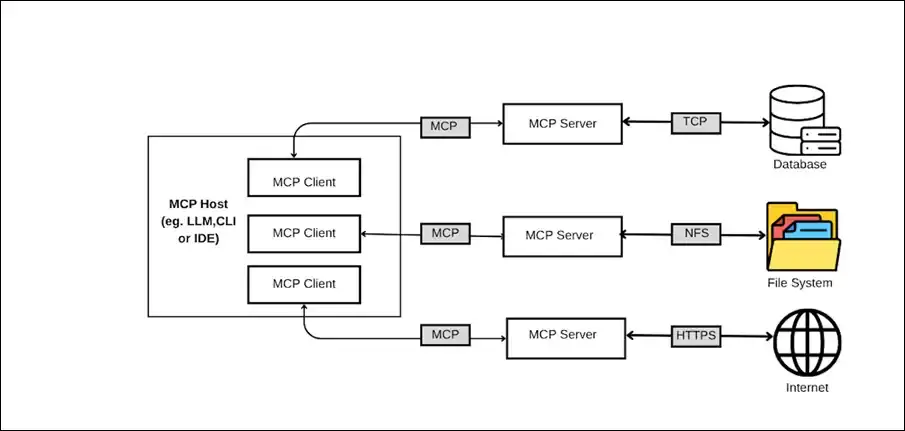
Figure 1: MCP Architecture
1. MCP Host
The top-level runtime: a desktop app, IDE plugin, or agent framework where the AI lives. The Host owns the user session, manages connection lifecycles, and controls which servers are reachable. It is the authorization gatekeeper and your first point of integration testing.
2. Client
A scoped, one-to-one connection to a single MCP Server living inside the Host. Clients handle protocol mechanics: handshakes, capability negotiation, request/response pairing, and transport-level error handling.
3. Server
A runtime process that exposes Tools, Resources, and Prompts via the MCP interface. The server operates independently and does not inherently know which specific LLM model is invoking it. While MCP was originally designed as a stateful protocol requiring an initialization handshake, its state behaviour depends entirely on how it is deployed:
- Local (STDIO) Deployments: Servers are stateless by default, handling requests as isolated, independent operations.
- Remote (Streamable HTTP/SSE) Deployments: Servers can maintain session state across persistent network connections by utilizing unique Session IDs.
For an in-depth breakdown of how the protocol balances stateful sessions with cloud scaling architectures, see the Model Context Protocol blog post Exploring the Future of MCP Transports.
The Three MCP Primitives: Tools, Resources, and Prompts
The most crucial idea in MCP is the MCP primitives. They specify what the clients and servers can offer each other. These primitives define the range of actions that can be implemented and the types of contextual information that can be shared with AI applications.
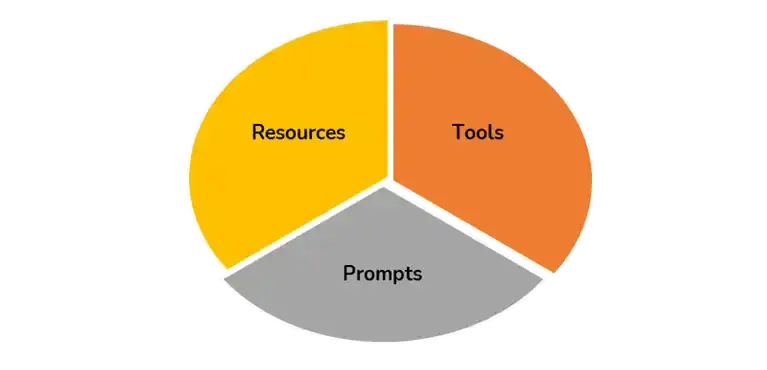
Figure 2: The MCP Primitives
- Tools: These are the actions that the LLM can take. Unlike resources, tools are model-controlled, meaning the model decides when to invoke them based on the context of the conversation. They are dynamic and can change the state of the world (e.g., creating a Jira ticket, sending a Slack message, or executing a database query). Every tool call passes through explicit schema validation before execution, and because tools can trigger real-world side effects, they carry the highest risk surface of all three primitives. This makes input validation and execution boundaries a critical architectural concern.
- Resources: These are the data sets of MCP, functioning similarly to GET endpoints. They allow a server to expose raw data such as logs, files, and API responses. Importantly, resources are application-controlled, meaning the host or client decides when to read them rather than the model invoking them directly. Resources can also support subscriptions for real-time updates, making them suitable for live data feeds and event-driven architectures. This distinction separates them architecturally from tools, which are model-driven.
- Prompts: These are reusable, parameterized message templates that a server registers and makes available to the host. A host can surface them to the user or inject them into the model's context at the right moment. Prompts are user-controlled, meaning it is the user or the application that decides when a prompt is invoked, not the model itself. They are not conversational chat messages. They are structured building blocks designed to standardise how specific tasks or workflows are initiated, ensuring consistency across interactions without relying on ad hoc instruction.
For the complete core implementation details on executable actions and template contexts, see the Model Context Protocol documentation on Understanding MCP servers.
If you want to see how those primitives get used once a server is running, TestMu AI has a companion piece on MCP servers for test automation.
Transport Types: STDIO vs HTTP/SSE, Which One to Use and When
One of the most consequential decisions when building an MCP server is choosing how it communicates. Before any tool is called or any resource is fetched, the client and server need a shared channel to exchange JSON-RPC messages. The Model Context Protocol formalizes this through its transport layer, a pluggable mechanism that handles connection setup, message serialization, and lifecycle management without touching your application logic.
MCP currently defines two production-ready transport mechanisms: Standard Input/Output (STDIO) and Streamable HTTP (which incorporates Server-Sent Events as an optional streaming layer). There is also a legacy HTTP+SSE design that has since been deprecated but may still appear in older server implementations. Knowing what each transport does, where it performs best, and what it costs operationally is what separates a well-architected MCP deployment from one that causes friction at scale.
The Role of the Transport Layer
The transport layer in MCP has a narrowly defined job: convert outgoing MCP objects into the JSON-RPC 2.0 wire format, move them across the connection, and convert incoming bytes back into typed messages. It does not interpret those messages; that is the server's responsibility. The transport ensures just the delivery.
Every MCP message belongs to one of three categories, regardless of which transport carries it:
- Requests: A method name, an optional parameter object, and a unique ID so the response can be matched back to the original call.
- Responses: The matching ID from the request, plus either a result object or a structured error.
- Notifications: One-way messages that carry no ID and expect no reply, used for events like progress signals or capability-change announcements.
This separation of concerns is what makes transports interchangeable. You can write your MCP server logic once and expose it over STDIO, Streamable HTTP, or both, and the application code does not change.
STDIO: Built for Local Integrations
STDIO is the simplest transport in the MCP ecosystem and currently the most widely deployed.
How It Works
When a host application wants to talk to an MCP server over STDIO, it spawns the server as a child process. From that point, the two processes communicate entirely through standard streams: the client writes JSON-RPC messages to the server's stdin, and the server writes responses back to stdout.
Key Features of STDIO
- Zero infrastructure: There is no server to run, no port to open, no certificate to provision. The operating system's process model is the entire deployment mechanism.
- Minimal latency: Communication happens through kernel-managed pipe buffers rather than a network stack. There is no TCP handshake, no HTTP framing, and no TLS negotiation, adding round-trip time.
- Security by default: STDIO exposes no network surface. Access control falls back entirely to OS-level user permissions. No tokens, no API keys, no firewall rules required.
- Automatic Lifecycle Management: The server process is tied to the client that launched it. When the host application exits, the child process terminates automatically. There is no orphaned server to clean up, no stale connection to time out.
Limitations to Know
- One-Client-Per-Process: STDIO is inherently a one-client-per-process model. A single server instance cannot serve multiple clients simultaneously. If you need concurrency, you need multiple processes.
- Distribution: Getting non-technical users to download and run a program on their machine is much harder than just giving them a link to a website. Because local executables lack native code signing certificates like Windows Authenticode or macOS notarization, users have no automated way to verify that the server is safe. Simply put, since the executable is not cryptographically signed, users must entirely trust whoever gave them the file.
For more information on how code verification and deployment signing work for local systems, see Microsoft's documentation on ClickOnce and Authenticode.
When to Choose STDIO
- You are building a developer tool: an IDE plugin, a CLI integration, a code-editor extension.
- The server and client will always run on the same machine.
- Your users are technically capable of installing and launching local processes and reviewing the source code if they want to audit it.
- You want the fastest possible local iteration cycle with no infrastructure dependencies.
- You are in early development and want to test MCP behaviour before committing to a deployment model.
HTTP/SSE: Built for Remote Deployments
When your MCP server needs to run on the internet rather than on a developer's local machine, HTTP/SSE is the transport you reach for. MCP's HTTP transport has gone through two versions. The original design (HTTP+SSE) is now deprecated due to its complexity. Its replacement, Streamable HTTP, is the current standard and what all new implementations should use.
How It Works
Streamable HTTP uses a single URL that handles all communication in both directions. The client sends requests via HTTP POST. The server replies with either a plain JSON response for quick, simple results or opens an SSE stream for long-running tasks that produce multiple messages.
The client can also establish a persistent SSE channel via HTTP GET, over which the server pushes real-time notifications and updates without being explicitly polled. If a connection drops mid-task, the client reconnects and sends the last event ID it received. The server replays anything missed, so the task picks up where it left off rather than restarting from scratch.
Key Features
- Single endpoint: One URL handles everything, no split between a "send" endpoint and a "receive" endpoint like the old HTTP+SSE design had.
- Flexible responses: The server decides whether to reply with plain JSON or open a streaming SSE channel based on what the operation actually needs.
- Session support: The server can issue a session ID during setup, letting it remember context across multiple independent requests, which tools are active, where a long task left off, and so on. Sessions can be explicitly closed with an HTTP DELETE.
- Resumable connections: Built-in event IDs on SSE messages mean dropped connections don't mean lost progress. The client picks up exactly where it left off.
- Scales horizontally: A single server instance handles many clients at once. Add more replicas behind a load balancer as demand grows.
Limitations
- Auth is your responsibility: Unlike STDIO, which relies on OS-level permissions, Streamable HTTP exposes a real network port. You have to implement authentication yourself, API keys, bearer tokens, or OAuth.
- HTTPS is mandatory in production: All traffic must be encrypted. This adds a small operational step.
- More moving parts: Compared to STDIO's zero-infrastructure model, running a Streamable HTTP server means managing a runtime environment, certificates, authentication, and network configuration.
- Latency is network-bound: Responses travel over HTTP rather than in-process pipes, so there is an inherent network round-trip that STDIO does not have.
When to Use It
- Your server needs to be accessible over the internet or from a remote machine
- Multiple users or clients need to connect to the same server at the same time
- You are deploying to a cloud environment or a container platform
- Your users should get an HTTPS link, no local installs, no binaries to run.
- You need long-running tasks that should survive a dropped connection
- You want compatibility with standard HTTP infrastructure like load balancers, API gateways, and monitoring tools.

Note:
STDIO vs HTTP/SSE Side-by-Side Comparison
| Dimension | STDIO | Streamable HTTP |
|---|---|---|
| Server location | Same machine as client | Anywhere, local or remote |
| Concurrent clients | One per process | Many, simultaneously |
| Network required | No | Yes |
| TLS / HTTPS | Not applicable | Required in production |
| Authentication | OS user permissions | Must be implemented explicitly |
| Latency | Near-zero (in-process pipes) | Network round-trip + HTTP overhead |
| Session state | Tied to process lifetime | Explicit session IDs across requests |
| Resumability | Not applicable | Last-Event-ID replay |
| Infrastructure needed | None | Server runtime, certs, auth, networking |
| Best suited for | Developer tools, CLIs, IDEs | Cloud services, SaaS, shared servers |
Making the Decision
Transport selection in MCP is less about technical capability and more about where your server lives and who connects to it. STDIO is the right default for local developer tooling: zero infrastructure, zero configuration, zero network exposure. Streamable HTTP is the right foundation for anything that runs as a persistent, network-accessible service: scalable, resumable, and compatible with every piece of HTTP infrastructure your organisation already operates.
How MCP Communication Works: The Request Lifecycle
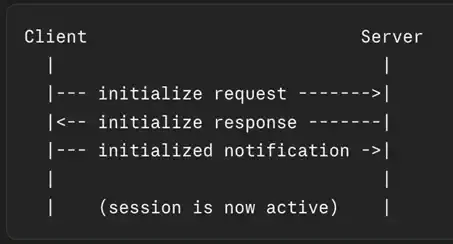
Understanding what happens between the moment a user asks an AI a question and the moment a result comes back requires looking at how MCP actually moves messages. Every interaction, whether the model is calling a tool, reading a file, or fetching data from an API, follows a structured sequence. Every MCP session moves through three distinct phases: handshake, discovery, and operation. These happen in order and cannot be skipped.
Phase 1: Handshake (Initialization)
Before any tool gets called or any data gets read, the client and server must introduce themselves. The client sends an initialize request carrying its protocol version and a list of capabilities it supports. The server responds with the protocol version it will use for the session and its own set of capabilities, which tools it exposes, whether it supports resource subscriptions, and so on. If the two sides cannot agree on a compatible protocol version, the connection is dropped immediately.
Once the server responds, the client sends an initialized notification to confirm that it is ready. Only after this exchange is complete can either side send anything else. Requests sent before initialization is confirmed are rejected.
Phase 2: Discovery
With the session open, the client asks the server what it can do. This typically means sending a tools/list request to get a catalogue of available tools, a resources/list request to see what data is accessible, and a prompts/list request to find reusable templates. The server responds to each with a structured list. The AI model uses this information to decide which tools are relevant to the user's request.
Phase 3: Operation (Tool Calls and Responses)
Once the model knows what tools are available, it can invoke them. A tool call is a tools/call request that names the tool and passes the required arguments. The server executes the operation and returns the result. This is the core loop: the model calls tools, gets results, reasons about them, and calls more tools as needed.
The server's response echoes the same id so the client can match it back to the original request, important in asynchronous environments where multiple calls may be in flight at once.
Notifications: One-Way Updates
Not every message requires a reply. Notifications are one-way messages, they carry no id field and expect no response. Servers use them to push updates to the client without being asked: a progress update on a long-running task, an alert that the tool list has changed, or a log message. The client can also send notifications to the server, such as signalling that it is cancelling an in-progress request.
Shutdown
When the session is done, the connection is closed cleanly. For STDIO, the client closes the server's input stream and waits for the process to exit. For HTTP-based transports, closing the connection is sufficient, no special protocol message is needed.
Choosing Your SDK: Python vs. TypeScript
Selecting an SDK for your Model Context Protocol (MCP) server involves evaluating the ecosystem, performance profile, and long-term maintenance overhead of the integration. While the protocol is transport-agnostic, the implementation path usually splits between Python and TypeScript based on the specific architectural needs of the project.
The Python SDK for MCP is a high-level framework designed for rapid development of Model Context Protocol servers. With the introduction of FastMCP, the SDK has moved toward a "convention-over-configuration" approach, allowing developers to convert Python functions into MCP tools with minimal boilerplate.
Key Strengths
- Rapid Prototyping: Uses decorators (like @mcp.tool()) to automatically register functions, reducing the time from concept to execution.
- AI/ML Synergy: Provides native access to the extensive Python data science ecosystem, including libraries like Pandas, NumPy and PyTorch.
- System Integration: Exceptional for local automation and interacting with operating system APIs, making it a natural fit for STDIO-based local servers.
Limitations
- Dynamic Typing Risks: Being a dynamically typed language, it relies heavily on external validation tools like Pydantic to ensure the LLM sends the correct data types.
- Concurrency: For CPU-bound workloads, Python's Global Interpreter Lock (GIL) limits true parallelism compared to Node.js worker threads. However, for I/O-bound MCP servers, which represent the majority of real-world deployments, asyncio performance is generally comparable to Node.js. The distinction matters most at the architectural level when choosing between the two SDKs for high-throughput, CPU-intensive operations specifically.
When to Use
- When your server needs to perform data analysis or utilize machine learning models.
- When you are building local productivity tools or IDE extensions that require quick iteration.
- When you want to leverage "FastMCP" to build a functional server in just a few lines of code.
TypeScript SDK
The TypeScript SDK is a robust, type-safe implementation of the Model Context Protocol built for the Node.js environment. It is designed to handle enterprise-level integrations where architecture, scale, and contract-rigidity are the primary concerns.
Key Strengths
- Strict Type Safety: The TypeScript compiler catches "contract violations" (mismatches between what the LLM expects and what the server provides) during development.
- High Concurrency: Built on the Node.js event loop, it is optimized for remote servers handling numerous simultaneous asynchronous requests via HTTP/SSE.
- Ecosystem Alignment: Ideal for developers already working within web-native or cloud-native stacks, allowing for easy integration with existing Node.js backends.
Limitations
- Higher Boilerplate: Requires more initial setup compared to FastMCP, including defining explicit interfaces and schemas for every tool and resource.
- Context Switching: If the primary project involves heavy data science, moving to TypeScript for the MCP layer can create friction for the engineering team.
When to Use
- When building production-grade, remote MCP servers that live in the cloud.
- When the integration is part of a larger JavaScript/TypeScript project, such as a VS Code extension or a web application.
- When the priority is long-term maintainability and preventing runtime "Undefined" errors through a strict type system.
The same trade-off shows up when you decide whether an AI agent should reach your tooling through a protocol server or a command line at all, which TestMu AI compares in MCP vs CLI.
Prerequisites and Environment Setup
Before writing any MCP server code, your environment needs to be correctly set up. This section covers what to install, how to initialise your project, and how to configure your project files for both Python and TypeScript.
System Requirements
To begin building, ensure your local environment meets these baseline specifications:
- Node.js (v18+): Essential for TypeScript development, as modern MCP features leverage newer asynchronous patterns.
- Python (3.10+): Required for Python-based servers to ensure compatibility with the FastMCP framework.
- MCP Inspector: A critical CLI tool for testing and debugging servers in isolation before they are connected to a host.
- Testing Environment: The primary testing environment for local MCP integrations. TestMu AI walks through wiring one up end to end in the MCP automation testing setup guide.
Part A: Configuring an MCP Server with TypeScript
1. TypeScript MCP Project Structure
Create a clean and testable structure from the beginning.
weather-mcp-ts/
|-- package.json
|-- tsconfig.json
|-- src/
    |-- index.ts
2. Project Initialization
- Create Directory: mkdir weather-mcp-ts && cd weather-mcp-ts
- Initialize npm: npm init -y
- Install SDK: npm install @modelcontextprotocol/sdk zod@3
- Dev Dependencies: npm install -D typescript @types/node
3. Configuring package.json
This file acts as the single source of truth for your server's metadata and execution commands. The single most important setting is "type": "module". The MCP SDK is ESM-only, omitting this causes ERR_REQUIRE_ESM errors.
Example: package.json
{
  "name": "weather-mcp-ts",
  "version": "1.0.0",
  "description": "A simple MCP server built with TypeScript",
  "type": "module",
  "bin": {
    "weather-mcp-ts": "./build/index.js"
  },
  "scripts": {
    "build": "tsc && chmod 755 build/index.js",
    "start": "node build/index.js",
    "dev": "tsc --watch"
  },
  "files": [
    "build"
  ],
  "dependencies": {
    "@modelcontextprotocol/sdk": "^1.0.0",
    "zod": "^3.0.0"
  },
  "devDependencies": {
    "@types/node": "^20.0.0",
    "typescript": "^5.0.0"
  }
}
Important package.json fields: type: module enables ESM imports; bin allows the package to be executed as a command; build compiles TypeScript to JavaScript; files controls what gets packaged if published.
Note on cross-platform compatibility: The chmod 755 command in the build script is Unix/macOS only and will fail on Windows with an error. There are two ways to handle this, depending on the use case:
Option 1: Use the shx package for cross-platform compatibility. Install it with npm install -D shx and update the build script to:
"build": "tsc && shx chmod 755 build/index.js"Option 2: Skip chmod entirely if you are not publishing this server as a CLI binary on Unix systems. The permission flag is only necessary when the built file needs to be executed directly as a standalone command from the terminal. If you are running it via node build/index.js, it is not required.
4. Configure tsconfig.json
This configuration compiles source files from src into build, uses modern JavaScript output, and enables strict type checking.
Example: tsconfig.json
{
  "compilerOptions": {
    "target": "ES2022",
    "module": "Node16",
    "moduleResolution": "Node16",
    "outDir": "./build",
    "rootDir": "./src",
    "strict": true,
    "esModuleInterop": true,
    "skipLibCheck": true,
    "forceConsistentCasingInFileNames": true
  },
  "include": ["src/**/*"],
  "exclude": ["node_modules"]
}
Part B: Configuring an MCP Server with Python
1. Python MCP Project Structure
weather-mcp-python/
|-- pyproject.toml
|-- uv.lock
|-- .venv/
|-- weather.py
2. Configuring a Virtual Environment for Python
When building an MCP server in Python, it is best practice to isolate project dependencies inside a virtual environment. A virtual environment keeps the MCP SDK, HTTP clients, and other packages separate from your global Python installation.
- It avoids dependency version conflicts.
- It prevents accidentally using globally installed packages.
- It makes project setup easier to reproduce across machines.
Option 1: Using uv Virtual Environment
Create the project:
uv init weather-mcp-python
cd weather-mcp-python
Create the virtual environment:
uv venvThis creates a local .venv directory containing the isolated Python interpreter and installed packages for this project.
Activate the virtual environment:
# macOS or Linux
source .venv/bin/activate

# Windows PowerShell
.venv\Scripts\Activate.ps1

# Windows Command Prompt
.venv\Scripts\activate.bat
Install MCP dependencies:
uv add "mcp[cli]" httpxThis installs the Python MCP SDK with CLI helpers and httpx for HTTP requests. uv also updates pyproject.toml and the lock file.
Example: pyproject.toml
[project]
name = "weather-mcp-python"
version = "0.1.0"
description = "A simple MCP server built with Python"
readme = "README.md"
requires-python = ">=3.10"
dependencies = [
    "mcp[cli]>=1.2.0",
    "httpx>=0.27.0"
]

[project.scripts]
weather-mcp-python = "weather:main"

[build-system]
requires = ["hatchling"]
build-backend = "hatchling.build"
Option 2: Using Python's Built-in venv
mkdir weather-mcp-python
cd weather-mcp-python

# macOS or Linux
python3 -m venv .venv
source .venv/bin/activate

# Windows
python -m venv .venv
.venv\Scripts\Activate.ps1

python -m pip install --upgrade pip
pip install "mcp[cli]" httpx
If you use plain venv and pip instead of uv, you can store dependencies in requirements.txt.
pip freeze > requirements.txt
# Later, another developer can install dependencies with:
pip install -r requirements.txt
Note on dependency management: pip freeze captures all installed packages, including transitive dependencies with pinned versions, which produces a bloated requirements.txt that is difficult to maintain. There are cleaner approaches depending on your workflow:
Option 1: Maintain a lean requirements.txt manually by listing only your direct dependencies without pinned versions unless stability demands it:
mcp[cli]>=1.2.0
httpx>=0.27.0
Option 2: Use pip-compile from the pip-tools package for reproducible lockfiles. It separates direct dependencies from resolved transitive ones, giving you both clarity and reproducibility:
pip install pip-tools
pip-compile requirements.in
Option 3: Use uv, which is the modern best practice for Python dependency management. It generates a clean lockfile automatically while keeping your direct dependencies readable and separate.
For developers inheriting this project, a requirements.txt produced by pip freeze with hundreds of pinned transitive entries is a maintenance burden. List what you need, let the tooling resolve the rest.
Conclusion
You now have the four decisions that shape every MCP server, made before a single tool is written. Which primitives you expose determines who controls invocation. Which transport you pick determines where the server can live and how many clients it serves. Which SDK you choose determines how much boilerplate stands between a function and a registered tool. And a correctly configured project is what keeps ERR_REQUIRE_ESM and a Windows-only chmod out of your first run.
From here, the build itself is the short part. Register a tool, run the MCP Inspector against the server in isolation, and only then connect it to a host. Debugging a schema mismatch inside a chat client is far harder than catching it in the Inspector, which is why the tool belongs in your prerequisites rather than your troubleshooting steps.
A working reference beats a specification when you are checking your own implementation. The TestMu AI MCP Server is a production Streamable HTTP server with OAuth that you can connect to your own IDE and inspect, covering HyperExecute, automation test triage and debug, SmartUI visual diff analysis, and accessibility. Read the TestMu AI MCP Server documentation for the tool list and per-client configuration, or sign up for free and point your client at it to watch a real JSON-RPC session run end to end.
Author

Piyusha Podutwar
Blogs: 4


Piyusha Podutwar is a Senior Software Engineer at DPS with over 12 years of experience in mainframe application and system programming. She has authored 20+ technical tutorials for TestMu AI on API testing, Agile, DevOps automation, software testing, automation testing, and digital transformation. She is skilled in Assembler, COBOL, DB2, and JCL, and has led large-scale modernization and migration projects across banking, finance, retail, and insurance domains. A Certified Scrum Master, Piyusha previously worked with IBM, TCS, BMC Software, and T-Systems.
Reviewer

Anubhav Singhmaar
Reviewer
Anubhav Singhmaar is an AI Product Manager at TestMu AI driving Kane CLI, the command-line tool that brings browser automation to the terminal, turning natural-language flows into runs in a real Chrome browser that return pass or fail with shareable proof. He owns the roadmap and prioritization and works with engineering to ship developer-facing features. Before TestMu AI, he spent over four years at Sprinklr owning enterprise voice AI across APAC and EMEA. A mechanical engineer turned product manager, he grounds guidance in real QA workflows.


MCP Server FAQs
Did you find this page helpful?
More Related Blogs
TestMu AI forEnterprise
Get access to solutions built on Enterprise
grade security, privacy, & compliance
- Advanced access controls
- Advanced data retention rules
- Advanced Local Testing
- Premium Support options
- Early access to beta features
- Private Slack Channel
- Unlimited Manual Accessibility DevTools Tests