

Power Your Software Testing with AI Agents and Cloud
The Native AI-Agentic Cloud Platform to Supercharge Quality Engineering. Test Intelligently and Ship Faster.


- TestMu AI (Formerly LambdaTest)
- /
- Blog
- /
- How To Avoid Anti-Patterns In Cypress
How To Avoid Anti-Patterns In Cypress
Learn how to avoid anti-patterns in Cypress: fragile locators, overcomplicated chains, hard waits, and duplicated code, with fixes and BDD examples.
Last Updated on:
Avoid anti-patterns in Cypress by selecting elements with test-specific data attributes, replacing fixed cy.wait() calls with per-command timeouts, and reusing custom commands instead of duplicating test code.
Cypress retries every query and assertion until its default command timeout of 4000 milliseconds expires, so a hard-coded wait adds flakiness without adding certainty.
This guide covers fragile locators, overcomplicated command chains, inefficient waits, custom commands and DRY, behavior driven development with Cucumber, Gherkin functions, and running regression on a Cypress cloud grid.
Overview
Avoid Cypress anti-patterns by using test-specific attributes instead of fragile CSS selectors, replacing inefficient hard waits with command timeouts, and keeping test code simple. For scalable execution, run Cypress automation scripts in parallel across multiple operating systems using TestMu AI to perform automated cross-browser testing.
- Test-specific attributes: Cypress tests avoid fragile locators by using test-specific attributes like data-test or test-cy instead of dynamic CSS or XPath selectors, ensuring tests remain unaffected by UI design or style updates.
- Behavior-Driven Development: Cucumber integrates with Cypress as a preprocessor to write readable, plain-English scenarios using Gherkin syntax, which aligns automated test cases with real user behavior and improves project transparency.
- Parallel test execution: TestMu AI scales Cypress test suites by running automation scripts in parallel across 40+ different browsers and operating systems, expanding test coverage and reducing execution time.
Get the best out of your Cypress tests with TestMu AI’s online Cypress automation tool. Check out how you can test your Cypress testing scripts using TestMu AI’s online cloud.
Fragile Locators
Have you experienced fragile locators in your test scripts? Any slight change on the UI would fail the tests, and it will require some maintenance work to update the specific locator.
Imagine a dynamic CSS, XPath, Id, Class, Tag selectors; it could be tough to target elements changing every time the web page loads.
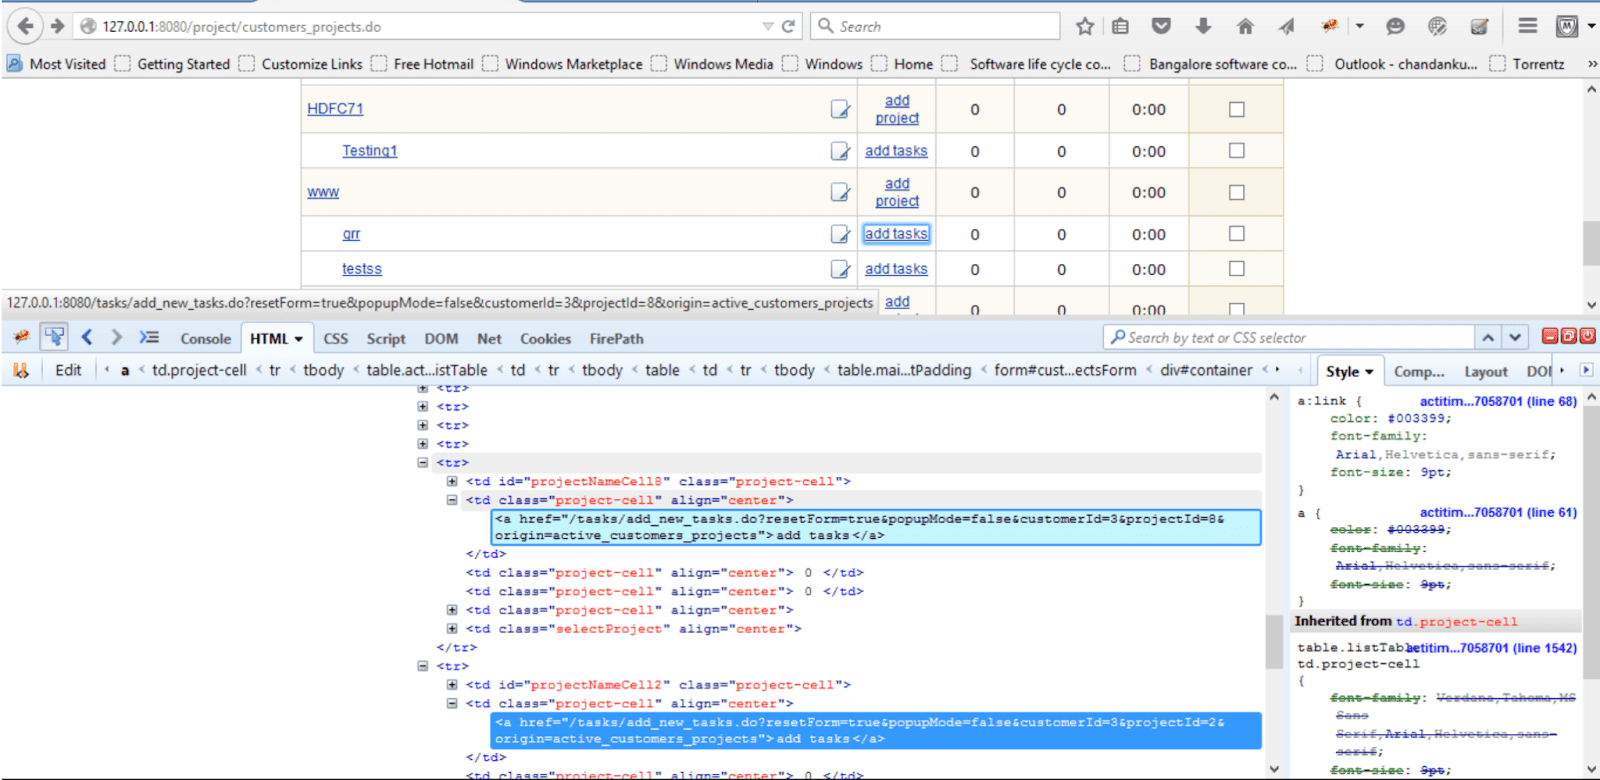
Let’s imagine an input field
<input class="gLFyf gsfi" jsaction="paste:puy29d;" maxlength="2048" name="q" type="text" aria-autocomplete="both" aria-haspopup="false" autocapitalize="off" autocomplete="off" autocorrect="off" autofocus="" role="combobox" spellcheck="false" title="Search" value="" aria-label="Search" data-ved="0ahUKEwjj1t2JiY32AhVQkmoFHTMfD48Q39UDCAQ">
The easiest way to approach could be using:
cy.get('.a4bIc')
But, that wouldn’t be the best approach as this is a fragile selector; instead, we should add test attributes to our elements, and the example above it should be like the following:
<input class="gLFyf gsfi" jsaction="paste:puy29d;" maxlength="2048" name="q" type="text" aria-autocomplete="both" aria-haspopup="false" autocapitalize="off" autocomplete="off" autocorrect="off" autofocus="" role="combobox" spellcheck="false" title="Search" value="" aria-label="Search" data-ved="0ahUKEwjj1t2JiY32AhVQkmoFHTMfD48Q39UDCAQ" data-test="submit">
Now, we can use our locator in a better way:
cy.get('[data-test=submit]')
The test-cy attribute will not change from CSS style or JS behavioral changes; additionally, it clarifies to everyone that this element is used directly by the test code.
Also read – How to Find HTML Elements Using Cypress Locators
Key Takeaway: Selecting Cypress elements through a dedicated test attribute such as data-test keeps a test passing when CSS classes and JavaScript behavior change.
Overcomplexity, chains in Cypress
We always want to use elegant solutions and apply a better approach in our test automation code, but always remember the KISS principle; if you are not aware, KISS is an acronym for Keep It Simple, Stupid. This principle says about making your code simple. It will help if you avoid unnecessary complexity. A simple code is easier to maintain and easier to understand.
cy.get(nice.selector-unique').type('This is a great blog post.')
Chaining the .type() onto the cy.get(), telling it to type into the subject yielded from the cy.get() command, which will be a DOM element.
it('Another example of Command chains', () => {
  cy.visit('https://www.awesomesite.com')

cy
  // Find the element with id any-link'
  .get('#any-link')
  .as('myElement') // sets the alias
  .click()

cy.get('@myElement') // re-queries the DOM as before (only if necessary)
  .click()

})
Using Aliases, let us reuse our DOM queries for faster tests when the element is still in the DOM. Furthermore, it automatically handles re-querying the DOM when it is not immediately found in the DOM. It is beneficial when dealing with front-end frameworks that do a lot of re-rendering.
Another cool thing about Cypress is the built-in retry function available in too many commands; there is a default timeout set to 4000 milliseconds, which you can modify in your cypress.config.js file. If you come from Selenium, you probably know it as a fluent wait. In this case, nothing extra needs to be added to our tests to make them wait fluently.
Also read – Cypress Vs Selenium: Which is Better?
Key Takeaway: A Cypress alias created with .as() lets a test reuse a DOM query, and the built-in 4000 millisecond command timeout removes the need for a manually written fluent wait.

Inefficient waits, avoiding waits in Cypress
Perhaps, you want to debug your tests, or you need to halt your tests for a couple of seconds to see the desired state. But, in Cypress, when you use .wait() and do nothing for a couple of seconds, how long do we need to wait? We understand sometimes our test scripts are going so fast that we need to consider hard waits and tell Cypress to reduce speed. But remember using waits in our code is regarded as an anti-pattern in Cypress.
cy.get('#any-link')
    .wait(5000)
    .click()
Instead, we can use timeout per command; the timeouts can be modified per command, which will affect all default assertions and any assertions chained after that command.
cy.get('#any-link', {timeout: 5000})
    .should('be.visible')
    .click()
Also, you can wait for basically anything by passing a callback function into the .should() command. It will use the built-in retry logic and wait for the procedure to pass. As a recap in our example above, Cypress will wait 5 seconds for the element to exist in the DOM and wait another 5 seconds for the same element to be visible.
Key Takeaway: Replacing a fixed cy.wait() with a per-command timeout on cy.get() lets Cypress retry until the element is ready instead of pausing for a guessed duration.
Optimizing DRY, custom commands in Cypress
If you are not aware of custom commands in Cypress, it is an excellent time to avoid reinventing the wheel and reuse those available custom commands. Cypress comes with its API for creating custom commands and overwriting existing commands, for example, cypress-downloadfile:
You can install the module:
npm install cypress-downloadfile
Then, add the following line to cypress/support/commands.js:
require('cypress-downloadfile/lib/downloadFileCommand')
Add the following lines to cypress/plugins/index.js
const {downloadFile} = require('cypress-downloadfile/lib/addPlugin')
module.exports = (on, config) => {
  on('task', {downloadFile})
}
After we can start using the custom command the following way:
cy.downloadFile('https://my_blog.pdf', 'downloads', 'blogpost.pdf')
As mentioned before, we can reuse most of the custom commands, but Cypress allows us to modify the behavior of these custom commands; this is really useful to optimize our code and use the DRY principle.
Cypress.Commands.overwrite('download', (url, directory) => {})
Let’s try not to overcomplicate things and reuse custom commands in our tests.
In the below Cypress testing tutorial video, you’ll understand how to create custom commands in Cypress.

You can also Subscribe to the TestMu AI YouTube Channel and stay updated with the latest tutorials around automated browser testing, Selenium testing, CI/CD, and more.
Key Takeaway: Cypress custom commands, including community packages such as cypress-downloadfile, remove duplicated steps, and Cypress.Commands.overwrite() changes an existing command without copying its code.
How Do AI Coding Assistants Reintroduce Cypress Anti-Patterns?
AI coding assistants reintroduce Cypress anti-patterns because they generate specs from older public code. Fixed cy.wait() calls, class-based selectors, and long action chains are the three that show up most often in generated tests.
A generated spec usually passes on the machine that produced it and then fails in CI, which becomes a flaky test someone has to debug. Lint generated specs before review. The eslint-plugin-cypress package, maintained by the Cypress team, ships rules that catch each anti-pattern in this guide:
- cypress/no-unnecessary-waiting: fails any cy.wait() given a fixed number of milliseconds instead of an alias or a route.
- cypress/require-data-selectors: forces cy.get() to target a data-* test attribute rather than a CSS class copied out of the DOM.
- cypress/unsafe-to-chain-command: stops action commands such as .click() and .type() from being chained onto each other.
- cypress/no-xpath: blocks XPath locators, which break on the smallest markup change.
- cypress/no-force: flags { force: true }, which hides a real visibility or overlay failure instead of reporting it.
Treat an assistant as a first-draft writer. It produces scaffolding quickly, but a reviewer still decides the selector strategy, the assertion, and the test data. That same review step applies to every other use of AI in software testing, and a linter is what makes the step repeatable across a team.
Also read - Cypress best practices and the Cypress tutorial.
Key Takeaway: Running eslint-plugin-cypress over AI-generated Cypress specs catches fixed waits, class-based selectors, XPath locators, and forced clicks before those anti-patterns reach the test suite.
Behavior Driven Development in Cypress
Behavior-driven development is a software engineering practice developed to deliver high-quality products by focusing on the business value or behavior of the system. The main difference is BDD focuses on the behavior/ business value. In contrast, TDD focuses on tests which sometimes leads developers to become too detail-focused compared to the business focus/value. However, it’s important to understand the TDD vs BDD difference before choosing a suitable framework.
Cucumber is a tool that supports BDD; anyone can write specifications in plain English using Gherkin. It is as simple as adding a test from the business value point of view, as I like to call business-centric test automation.
Let’s start adding the cucumber plugin using npm to our current Cypress project. Please follow the below video for Cypress installation:

Please install the plugin.
npm install --save-dev cypress-cucumber-preprocessor
The following dependency will be added to your package.json of the project.
devDependencies": { "cypress-cucumber-preprocessor": "^4.1.4" }
To make it work, we would need to add it to cypress plugins as part of Cypress Configuration under cypress/plugins/index.js
const cucumber = required('cypress-cucumber-preprocessor').default

module.exports = (on, config) => {
  on('file:preprocessor', cucumber())

}
Next, we need to add cosmiconfig configuration to the package.json. Cosmiconfig searches and loads the required configuration of the project. In this case, we are defining to locate the step definitions by setting up the below property.
"cypress-cucumber-preprocessor": {
    "nonGlobalStepDefinitions": true
  }
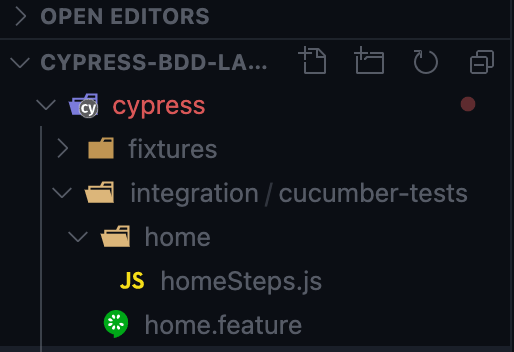
Let’s create a new folder under Cypress -> Integration directory as ‘cucumber-test’ and then create a new feature, “Home.feature.”
Feature: Home / Landing Page

Scenario: Navigating to E-commerce Store
         		Given I open home page
         		Then I should see Homepage
For step definition location, let’s create a folder named “home.”
Let’s create a step definition file ‘homeSteps.js.”
import { Given } from "cypress-cucumber-preprocessor/steps";

Given('I open home page', () => {
    cy.visit('https://ecommerce-playground.lambdatest.io/')
})

Then('I should see Homepage', () => {
    cy.get('#search').should('be.visible')
})
The folder structure should be as the following:
Now, let’s run using the following command in the terminal or command console to execute the test:
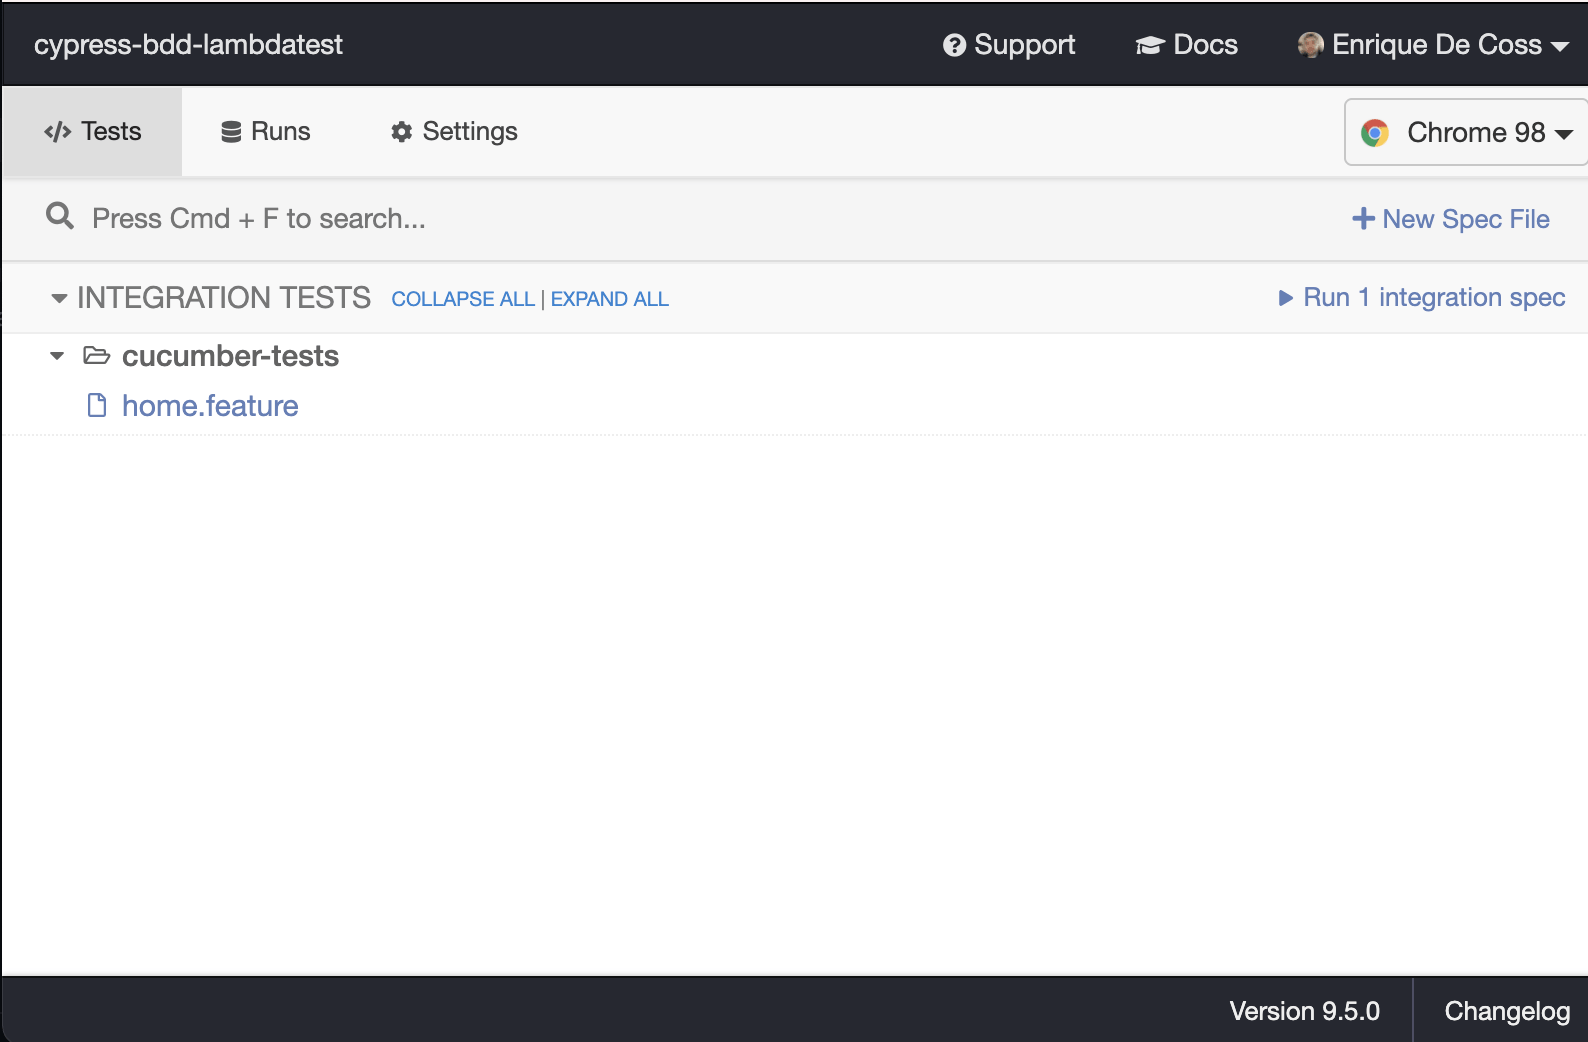
npx cypress open
On Cypress Test Runner, select ‘home.feature’
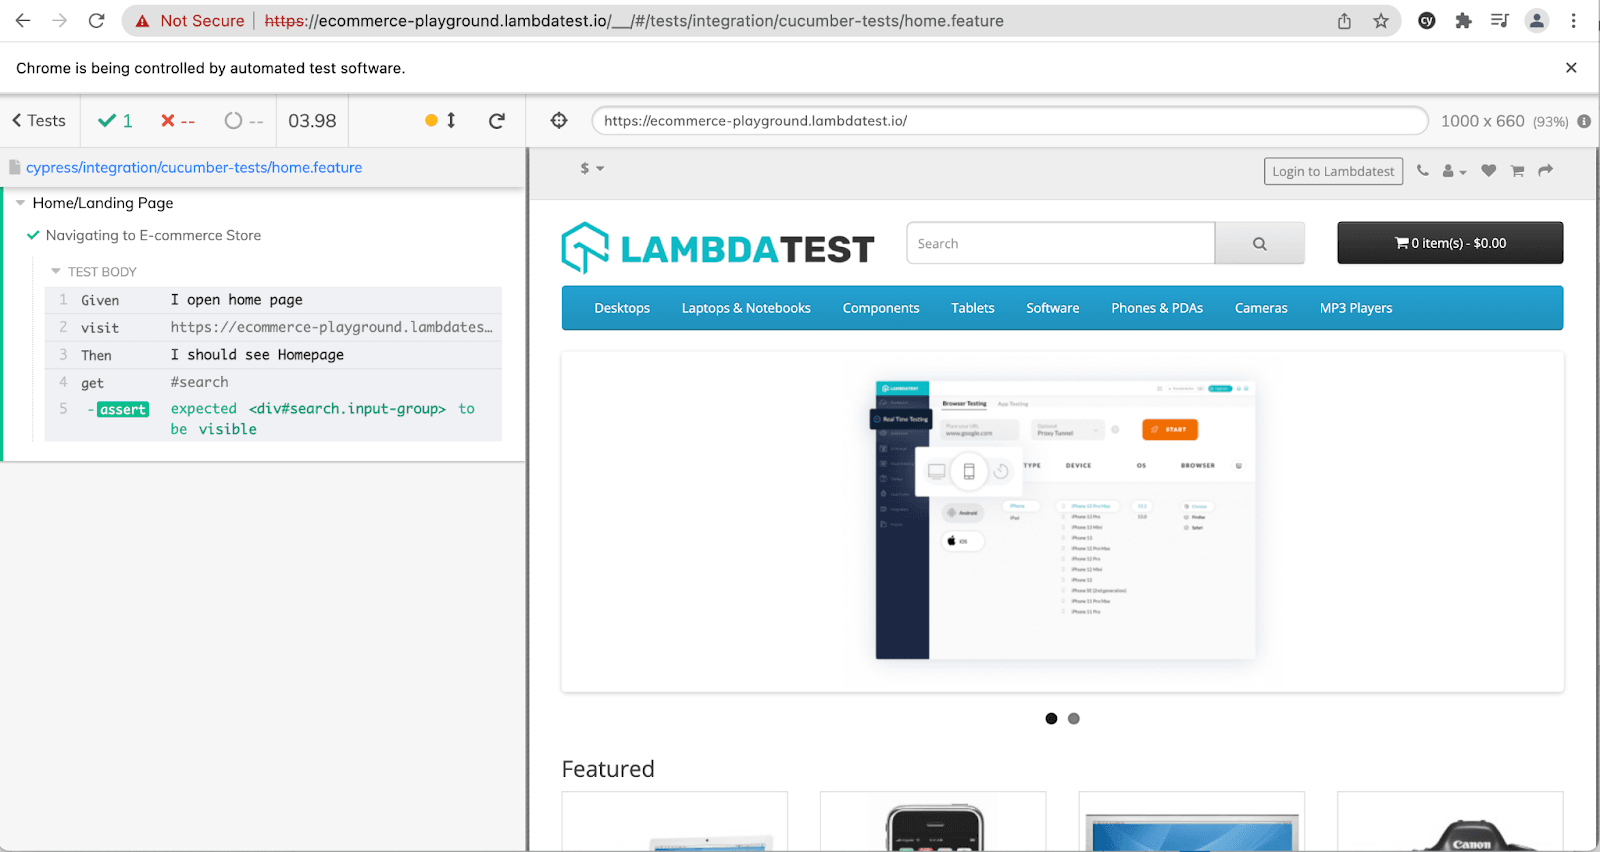
And you should see the results correctly:
Also read – Now Run Your Cypress Tests on TestMu AI
Key Takeaway: Adding the Cucumber preprocessor to a Cypress project and registering it in the Cypress plugin configuration lets a team write scenarios in plain English Gherkin instead of raw JavaScript assertions.

Cucumber Expressions
In the “.feature” file, cypress-cucumber-pre-processor uses the same expression as the cucumber expressions to link Gherkin to step definition. This can be achieved either by Cucumber expressions or regular expressions. The advantage of these is that they are more humanly readable than regular expressions. The following is how a Gherkin Step is translated in Step Definition.
Gherkin Step
Given I open home page
Step Definition translation
Given('I open home page', () => {
cy.visit(url)
})
Gherkin Keywords
Keywords are used to give structure & meaning to the executable specifications. For example, every specification or a feature file starts one of the keywords as:
- FEATURE
- SCENARIO
- SCENARIO OUTLINE
- BACKGROUND
Examples:
Feature: Background Example

Background: Given greeting has been set

Scenario: example #1
 	When name is "John"
	Then greetings equals "Hello John"

Scenario: example #2
	When name is "Mary"
	Then greetings equals "Hello Mary"
Step definition will look like the following:
let myName, greeting, finalString;

Given("greeting has been set", () => {
greeting = 'Hello '
})

When("name is {string}", setName => {
myName = setName
finalString = greeting.concat(myName)
})

Then("greetings equals {string}", expectedValue => {    expect(finalString).to.equal(expectedValue)
})

Take this certification to showcase your expertise with end-to-end testing using Cypress automation framework and stay one step ahead.
Here’s a short glimpse of the Cypress 101 certification from TestMu AI:

Key Takeaway: Cucumber expressions link a Gherkin step to its step definition in a more readable form than regular expressions, and the keywords Feature, Scenario, Scenario Outline, and Background give a feature file its structure.
Gherkin Functions
Gherkin uses functions to execute the specifications/ features files. These functions are used to translate the specification to executable tasks with the help of expressions or regular expressions.
- GIVEN represents pre-conditions in the executable specification. It is a pre-step to the specification or test.
- WHEN represents the condition in the executable specification. It is a condition to the specification or test.
- THEN represents post-condition in the executable specification. It is the post-condition to the specification or test. There could be single or multiple steps as part of Then (post-condition).
- AND step is to extend pre-step, conditions, and post-condition (s). It can be used with all the functions (Given, When & Then).
- BUT is helpful to define the negative step in the scenario. Same like AND step, BUT also supports the Given/When/Then step.
How do you write a feature statement?
Follow the following principles to build greatness in features.
- Keep it short and to the point.
- Make your benefits measurable.
- Emphasize the advantages.
The principles are not mandatory like Gherkin Keywords or Function, but they communicate the vision or goal of the feature.
Feature and Steps Definition
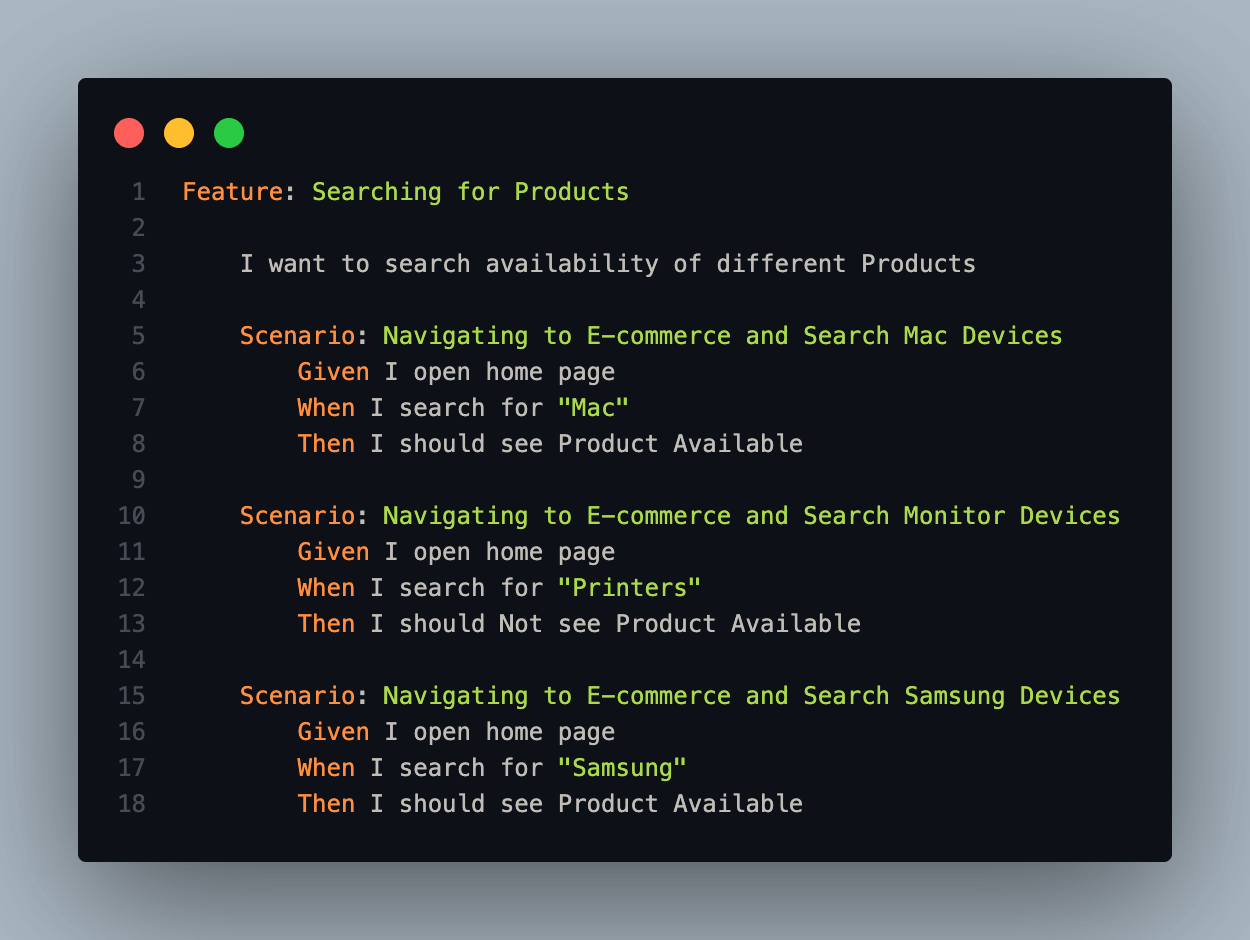
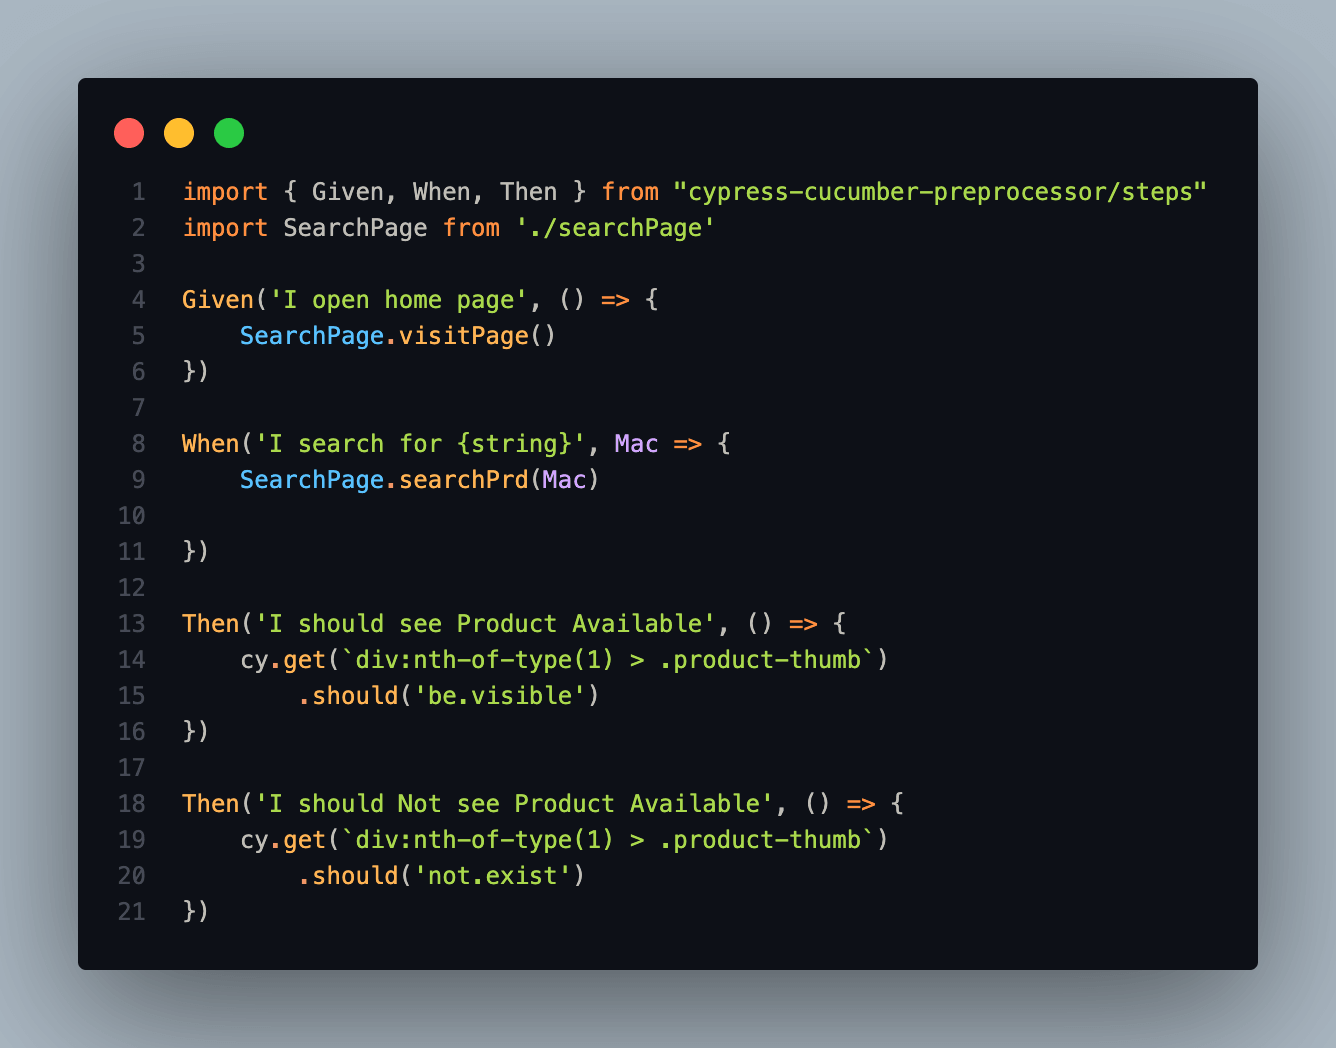
Here, we can find our Feature File and our Step Definition file.
File: search.feature
File: searchSteps.js
Code Walkthrough
Let’s start defining our Page file, here we can include our locators and URLs:
searchPage.js
const URL = "https://ecommerce-playground.lambdatest.io/"
const search = "#search"

class SearchPage{
    static visitPage(){
        cy.visit(URL)
    }

    static searchPrd(name){
        cy.get(search)
        .type(name+'{enter}')
    }

}

export default SearchPage
We defined the URL, in this case, TestMu AI Playground, and our search locator, as we can see in the following two methods:
class SearchPage{
    static visitPage(){
        cy.visit(URL)
    }

    static searchPrd(name){
        cy.get(search)
        .type(name+'{enter}')
    }
Now, let’s take a look into our Step Definition file searchSteps.js.
import { Given, When, Then } from "cypress-cucumber-preprocessor/steps"
import SearchPage from './searchPage'
First, we need to import our Cucumber plugin previously installed and our SearchPage file; this file includes our selectors and methods.
Now we need to define our Given, When, and Then steps; let’s start with the “Given” one:
Given('I open home page', () => {
    SearchPage.visitPage()
})
As we can notice, we are calling our SearchPage method to perform a “cy.visit”.
Related to our “When” definition, we take advantage of dynamic parameters coming from our feature file. Therefore, it is helpful to get the actual search value from the feature file.
Scenario: Navigating to E-commerce and Search Mac Devices
        Given I open home page
        When I search for "Mac"
        Then I should see Product Available
When('I search for {string}', Mac => {
    SearchPage.searchPrd(Mac)

})
As we notice, we are distinguishing from a search returning any Product vs. a search returning no Products; it is helpful as our feature can include negative scenarios.
Then('I should see Product Available', () => {
    cy.get(`div:nth-of-type(1) > .product-thumb`)
        .should('be.visible')
})

Then('I should Not see Product Available', () => {
    cy.get(`div:nth-of-type(1) > .product-thumb`)
        .should('not.exist')
})
Scenario: Navigating to E-commerce and Search Mac Devices
        Given I open home page
        When I search for "Mac"
        Then I should see Product Available

    Scenario: Navigating to E-commerce and Search Monitor Devices
        Given I open home page
        When I search for "Printers"
        Then I should Not see Product Available

    Scenario: Navigating to E-commerce and Search Samsung Devices
        Given I open home page
        When I search for "Samsung"
        Then I should see Product Available
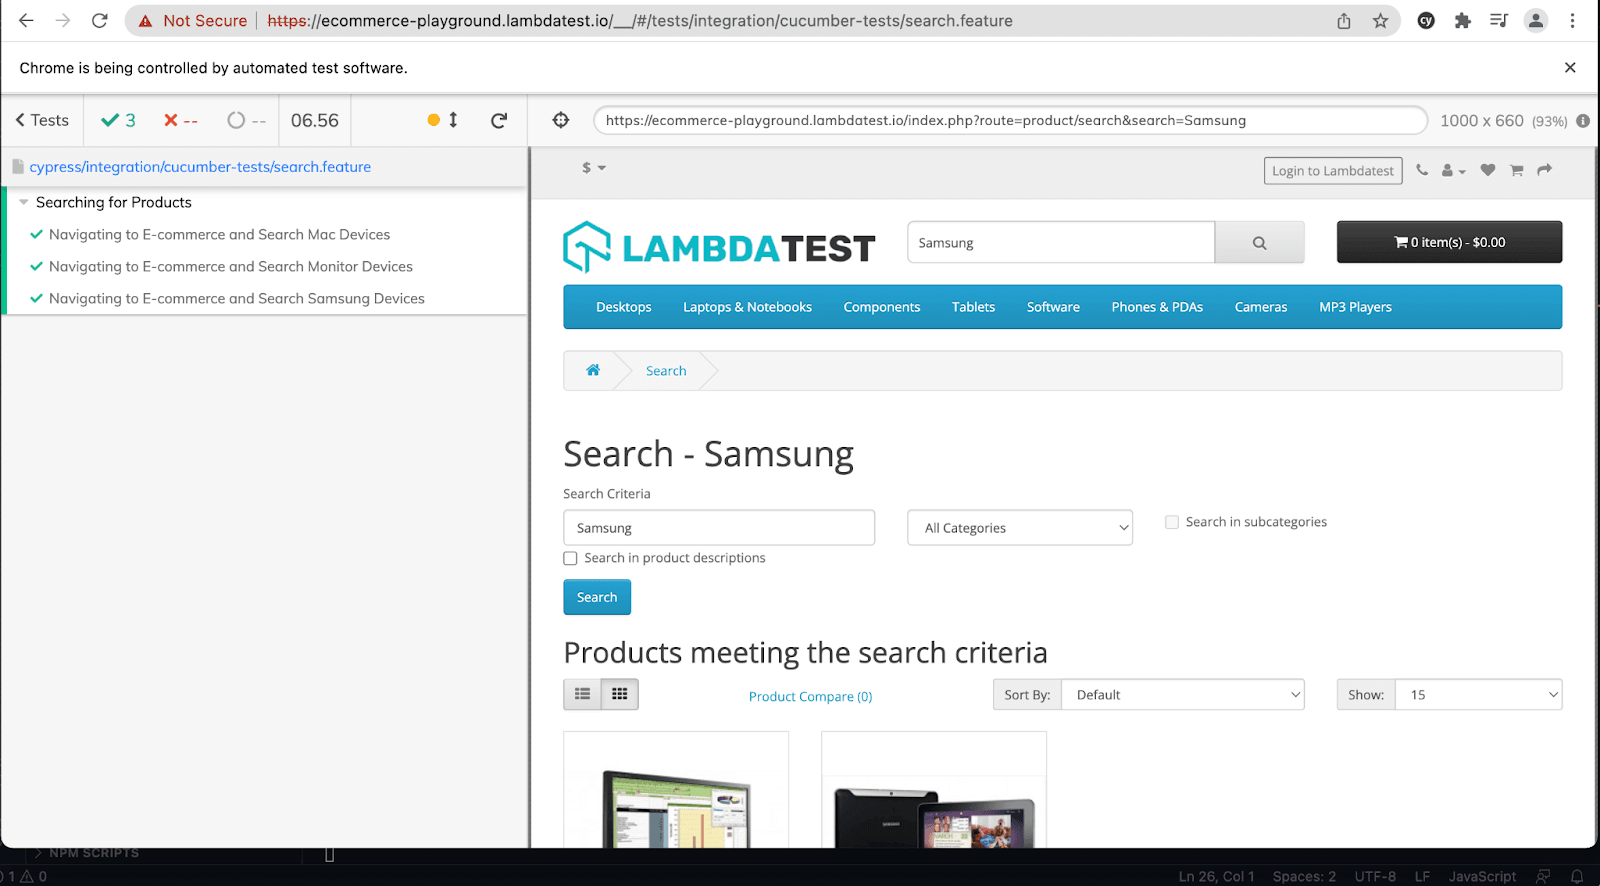
And here is the test execution, which indicates that our BDD approach is working:
Key Takeaway: The Gherkin functions Given, When, Then, And, and But turn a written specification into executable Cypress steps, with Given as the precondition, When as the action, and Then as the assertion.
How to run Regression on Cypress Cloud Grid
We can use a Cloud Cypress Grid like TestMu AI, which provides automated cross browser testing on 40+ browsers and operating systems, and Cypress parallel testing to expedite the test execution in a scalable way. In addition, it will help improve our overall test coverage by resulting in better product quality as we can cover different combinations using the same test scripts.
To get started with Cypress testing, you have to install TestMu AI Cypress CLI on your machine. Trigger the following command to install the same:
npm install -g lambdatest-cypress-cli
After installation is completed, set up the configuration using the below command:
lambdatest-cypress init
Once the command is completed, lambdatest-config.json is created in the project folder. Next, enter the TestMu AI credentials from the TestMu AI Profile Section.
"lambdatest_auth": {
      "username": "<Your LambdaTest username>",
      "access_key": "<Your LambdaTest access key>"
Here is how you can configure the required browser & OS combinations in lambdatest-config.json:
{
  "lambdatest_auth": {
     "username": "",
     "access_key": ""
  },
  "browsers": [
     {
        "browser": "MicrosoftEdge",
        "platform": "Windows 10",
        "versions": [
           "latest"
        ]
     },
     {
        "browser": "Chrome",
        "platform": "Windows 10",
        "versions": [
           "latest"
        ]
     },
     {
        "browser": "Firefox",
        "platform": "macOS Big Sur",
        "versions": [
           "latest"
        ]
     },
     {
        "browser": "Firefox",
        "platform": "Windows 10",
        "versions": [
           "latest"
        ]
     }
  ],
The run_settings section in the JSON file contains the desired Cypress test suite capabilities, including Cypress_version, build_name, number of parallel sessions, etc.
"run_settings": {
      "Cypress_config_file": "Cypress.json",
      "build_name": "build-cucumber-testing",
      "parallels": 5,
      "specs": "./Cypress/integration/cucumber-tests/*.feature",
      "ignore_files": "",
      "feature_file_suppport": false
   },
Tunnel_settings in the JSON file lets you connect your local system with TestMu AI servers via an SSH-based integration tunnel. Once this tunnel is established, you can test locally hosted pages on all the browsers currently supported by Cypress on TestMu AI.
"tunnel_settings": {
    "tunnel": false,
    "tunnelName": null
}
Now that the setup is ready, it’s time to run the tests; remember that our run_settings file displays the parallels field as five once we trigger our execution in parallel without any extra parameter.
lambdatest-cypress run
Shown below is the test execution status from the TestMu AI Automation Dashboard.
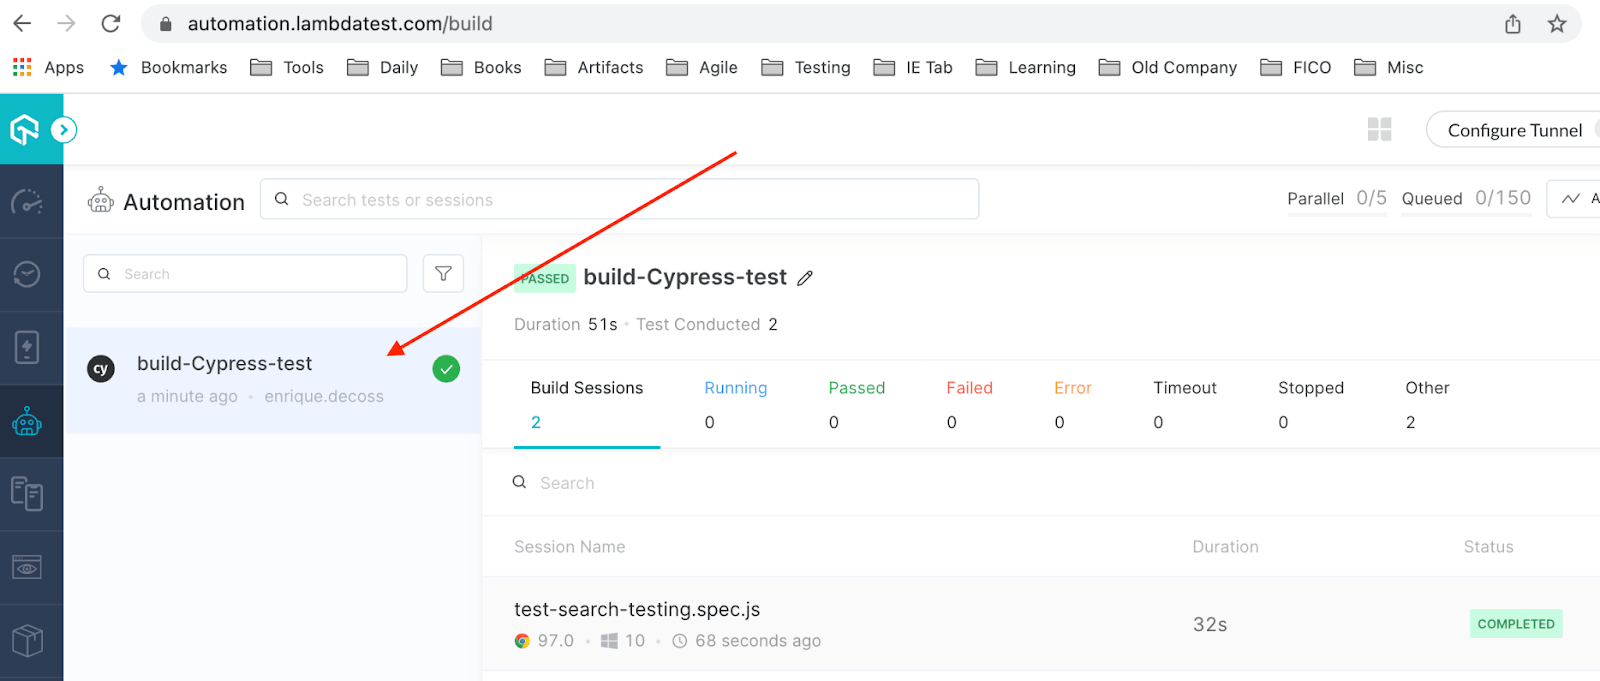
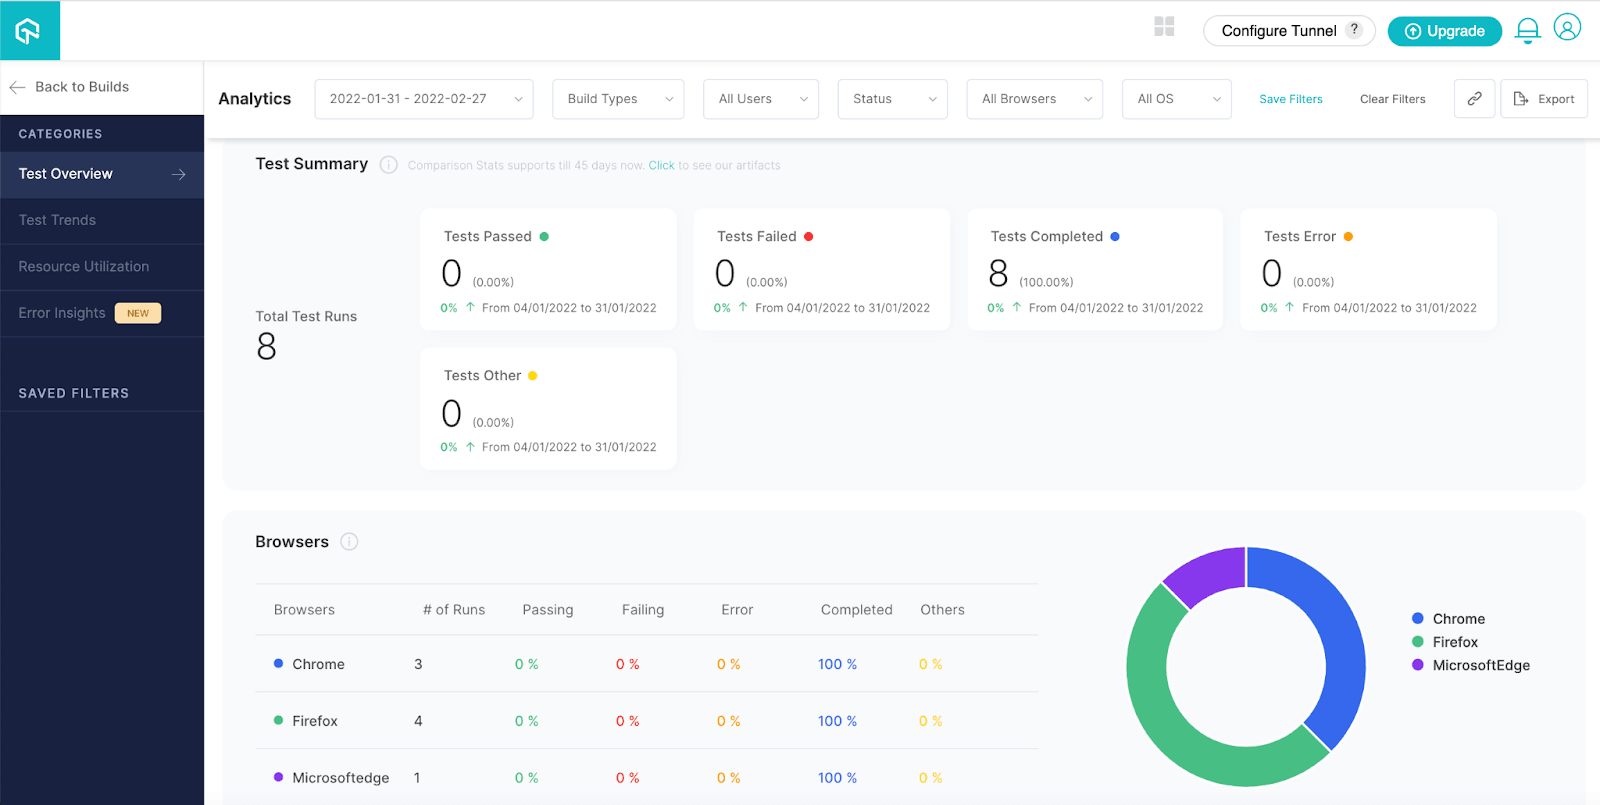
To view test performance metrics, navigate to the TestMu AI Analytics Dashboard. The Test Overview will provide a snapshot of tests consistent with stable behavior. Meanwhile, the Test Summary will display the total number of tests passed or failed, as well as any completed tests and pending tests.
Also read – How to Perform Cypress Testing at Scale with TestMu AI

Key Takeaway: Running a Cypress regression suite on a cloud grid executes the same specs in parallel across many browser and operating system combinations, which widens coverage without rewriting a single test.

Final Thoughts
The presented list was not supposed to be exhaustive since there are good resources and smells/patterns in Parts II and III of xUnit Test Patterns. In this Cypress e2e testing tutorial on avoiding anti-patterns in Cypress, I focused on the BDD approach as our Test Automation must be customer-centric and easy to follow from our non-technical stakeholders.
Happy Bug Hunting with Cypress!
Author

Enrique
Blogs: 11


Enrique DeCoss, Senior Quality Assurance Manager at FICO is an industry leader in quality strategy with 16+ of experience implementing automation tools. Enrique has a strong background in Testing Tools, API testing strategies, performance testing, Linux OS and testing techniques. Enrique loves to share his in-depth knowledge in competencies including, Selenium, JavaScript, Python, ML testing tools, cloud computing, agile methodologies, and people Management.
Cypress Anti-Patterns FAQs
Did you find this page helpful?
More Related Blogs
TestMu AI forEnterprise
Get access to solutions built on Enterprise
grade security, privacy, & compliance
- Advanced access controls
- Advanced data retention rules
- Advanced Local Testing
- Premium Support options
- Early access to beta features
- Private Slack Channel
- Unlimited Manual Accessibility DevTools Tests