

Power Your Software Testing with AI Agents and Cloud
The Native AI-Agentic Cloud Platform to Supercharge Quality Engineering. Test Intelligently and Ship Faster.


- TestMu AI (Formerly LambdaTest)
- /
- Blog
- /
- Cypress Component Testing: A Complete Tutorial
Cypress Component Testing: A Complete Tutorial
Test your UI components in isolation with Cypress component testing. Debug faster, catch issues early, and ensure reliable, scalable front-end code.
Last Updated on:
Cypress component testing mounts a single UI component in a real browser and asserts its rendering, props, and interactions without starting the full application. The cy.mount() command renders the component directly, so a React form or button is testable through Vite or Webpack without a server, a router, or seeded data. This guide covers what component testing with Cypress is, how to set it up, how to run tests on the cloud, best practices, how AI agents help, and troubleshooting fixes.
Key Takeaways
- Cypress component testing mounts one UI component in a real browser with cy.mount() and asserts its rendering, props, and interactions without starting the full application.
- Component testing and end-to-end testing differ in scope, since component tests exercise a single UI element in isolation while end-to-end tests cover a complete application workflow.
- Setting up component testing means installing Cypress as a dev dependency, running npx cypress open, choosing Component Testing, and selecting React as the framework with Vite as the bundler.
- Stable test selectors come from data-cy or data-testid attributes rather than class names or tag selectors, which are generic and change during code refactoring.
- A spec file such as Form.cy.jsx mounts the component in a beforeEach hook, so each test starts from a fresh render with no state carried over from the previous test.
- HyperExecute from TestMu AI runs Cypress component tests in the cloud from a matrix.yml file that sets the browser, spec files, and parallelism, with results shown in the HyperExecute dashboard.
- Cypress made Cloud MCP generally available on 20 May 2026, which lets an AI assistant query run history and name the component specs that fail most often.
- A component that does not render usually points to a missing cy.mount() call, a missing required prop, or a runtime error, while broken styling usually means the style file was never imported into the spec.
What Is Component Testing With Cypress?
Component testing in Cypress is a technique to verify if an individual part of a user interface, like a button or form, works on its own. With Cypress, you can run these tests right in the browser to see exactly how your component behaves in different conditions without the need to start the whole web application.
The main difference between Cypress component testing and Cypress end-to-end testing is their scope. Component testing focuses mainly on a single UI element in isolation whereas E2E testing covers the entire application workflow.
Getting Started With Cypress Component Testing
Let’s dive into Cypress component testing using a real-world example. I cloned a section on the Write for Us page from the TestMu AI website with React and SASS.
You can either use this project to follow along, or you can use any existing React project. You’ll still get the same result. All you have to do is follow the steps accordingly.
If you want to use the project, clone this Cypress Component Testing GitHub repository.
Prerequisites
To follow along with this Cypress component testing tutorial, make sure to:
- Install Node.js.
- Have npm or yarn as your package manager.

Note: Run Cypress component tests across 50+ browser versions. Try TestMu AI Today!
Set Up React Project for Component Testing
Before configuring Cypress for component testing, you need a project to work with.
Note: If you already have a React project, you can skip to the next section.
1. Create a React App
Use Vite for a rapid, modern development experience. Open your terminal and run:
npm create vite@latest <project-directory-name>This command will launch an interactive setup where you:
- Enter a name for your project
- Select a framework (choose React)
- Pick a language (select JavaScript, unless you prefer TypeScript)
2. Move Into Your Work Directory and Install Dependencies
Run the below command to move into your work directory and install the dependencies:
cd <project-directory-name>
npm install
3. Add SASS for Styling (Optional)
Run the below command to install SASS:
npm install sass4. Folder structure
This is how a folder structure looks like:
cypress-component-testing/
├── node_modules/
├── public/
├── src/
│   ├── assets/
│   ├── components/
│   │   └── Form.jsx
│   │   └── Navbar.jsx
│   │   └── SubmitBlog.jsx
│   │   └── SubmitBlogContent.jsx
│   ├── App.jsx
│   ├── App.scss
│   └── main.jsx
├── package.json
├── vite.config.js
└── README.md
Yours might look different, maybe due to folder name, file name, or how you created your app, but in the end, you’ll still achieve the same result if you follow up.
Our main focus in this Cypress tutorial will be on the <Form /> component. We’ll use Cypress to test the input fields, checking their placeholders and ensuring they accept user input.
5. Add your React component
Here’s what App.jsx file looks like:
import Navbar from './components/Navbar/Navbar';
import SubmitBlog from './components/SubmitBlog/SubmitBlog';

function App() {
  return (
    <>
      <Navbar />
      <SubmitBlog />
    </>
  )
}

export default App
This is not our main focus, but it’s good that you see the code in each file down to the very one we’re testing, especially if you want to practice with this same code example.
In the App.tsx component, we have <Navbar /> and <SubmitBlog />. However, we’re more concerned with the <SubmitBlog /> component, which contains a form we’ll be working with.
import Navbar from './components/Navbar/Navbar';
import SubmitBlog from './components/SubmitBlog/SubmitBlog';

function App() {
  return (
    <>
      <Navbar />
      <SubmitBlog />
    </>
  )
}

export default App
The SubmitBlog component contains SubmitBlogContent and Form. The SubmitBlogContent component is an image and title for the section. Finally, here’s the Form.jsx code we want to test:
export default function Form() {
    return (
        <form className={styles.submitBlogForm} onSubmit={(e) => {e.preventDefault();}}>
            <div className={styles.nameFields}>
                <input type="text" placeholder="First Name*" required />
                <input type="text" placeholder="Last Name*" required />
            </div>

            <input type="email" placeholder="Email*" required />
            <input type="text" placeholder="Designation*" required />

            <div className={styles.contactFields}>
                <select name="" id="" className={styles.countrySelect} required>
                    <option value="">Nigeria (+234)</option>
                    <option value="">USA (+1)</option>
                    <option value="">UK (+44)</option>
                    <option value="">Algeria (+213)</option>
                </select>
                <input type="number" placeholder="Phone Number*" required />
            </div>

            <input type="text" placeholder="Social Media Profile (LinkedIn/Twitter)*" required />

            <textarea placeholder="Provide Work Samples"></textarea>

            <button>Submit</button>
        </form>
    )
}
Here’s the styling:
.submitBlogForm {
    display: flex;
    flex-direction: column;
    gap: 10px;
    background-color: #fff;
    border-radius: 8px;
    padding: 20px;

    input {
        padding: 15px 10px;
        font-size: 16px;
        width: 100%;
        border: none;
        background-color: transparent;
        border-bottom: 1px solid #ccc;

        &:focus {
            outline: none;
        }

        &::placeholder {
            font-size: 14px;
        }
    }

    textarea {
        padding: 15px 10px;
        font-size: 14px;
        width: 100%;
        height: 100px;
        background-color: transparent;
        border: 1px solid #ccc;

        &:focus {
            outline: none;
        }

        &::placeholder {
            font-size: 14px;
        }
    }

    .nameFields {
        display: flex;
        gap: 20px;

        input {
            flex: 1;
            border-bottom: 1px solid #ccc;
        }
    }

    .contactFields {
        display: flex;
        gap: 20px;

        input {
            flex: 1;
            border-bottom: 1px solid #ccc;
        }

        .countrySelect {
            width: 30%;
            padding: 15px 10px;
            font-size: 14px;
            border: none;
            background-color: transparent;
            border-bottom: 1px solid #ccc;

            &:focus {
                outline: none;
            }
        }
    }

    button {
        padding: 15px;
        background-color: transparent;
        border: 1px solid black;
        border-radius: 5px;
        cursor: pointer;
        width: 150px;
        color: #333;
        margin: 0 auto;
        margin-top: 20px;
    }
}
Configure Cypress for Component Testing
Now that we have a working React project, the next step is to set up Cypress for component testing. Cypress allows you to test individual components of your application, which makes it easier to identify UI bugs early in development.
1. Install Cypress
First, install Cypress as a development dependency:
npm install cypress --save-dev2. Open Cypress
Once installed, launch Cypress using:
npx cypress openThis command opens the Cypress App (Test Runner). You’ll be prompted to choose the type of testing:
- End-to-End (E2E) Testing
- Component Testing
For this tutorial, select Component Testing.
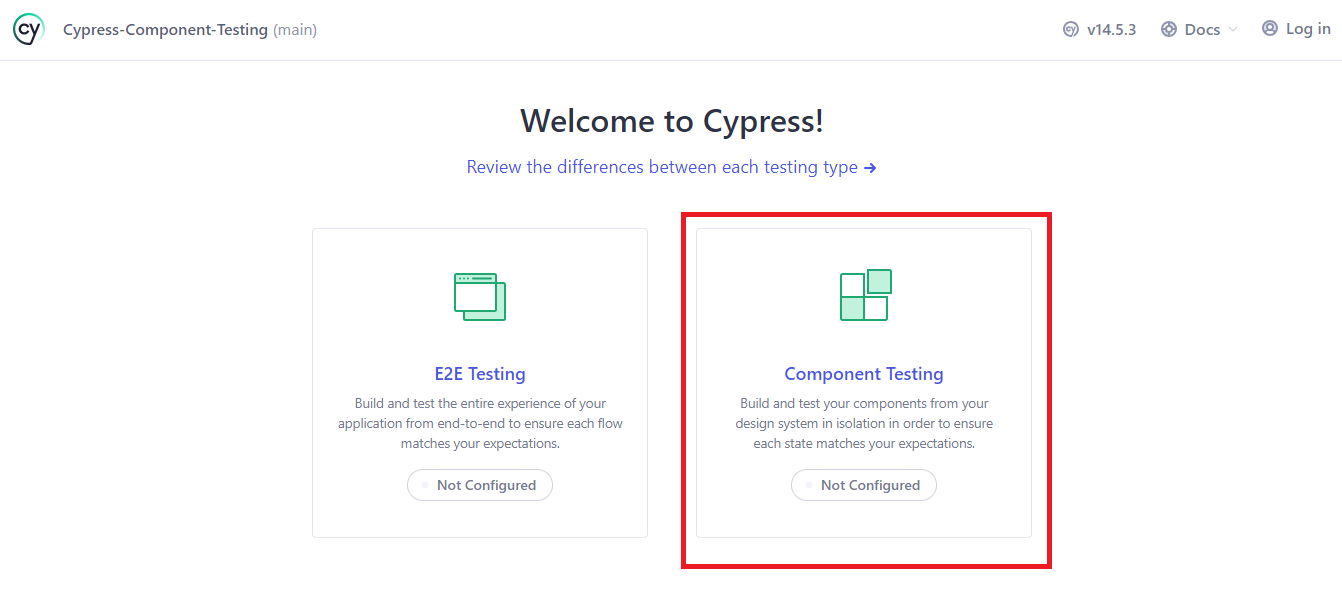
3. Configure Framework and Bundler
After selecting component testing, Cypress will ask you to configure your setup:
- Framework: React
- Bundler: Vite
This ensures Vite is available as a dev dependency for Cypress to use internally.
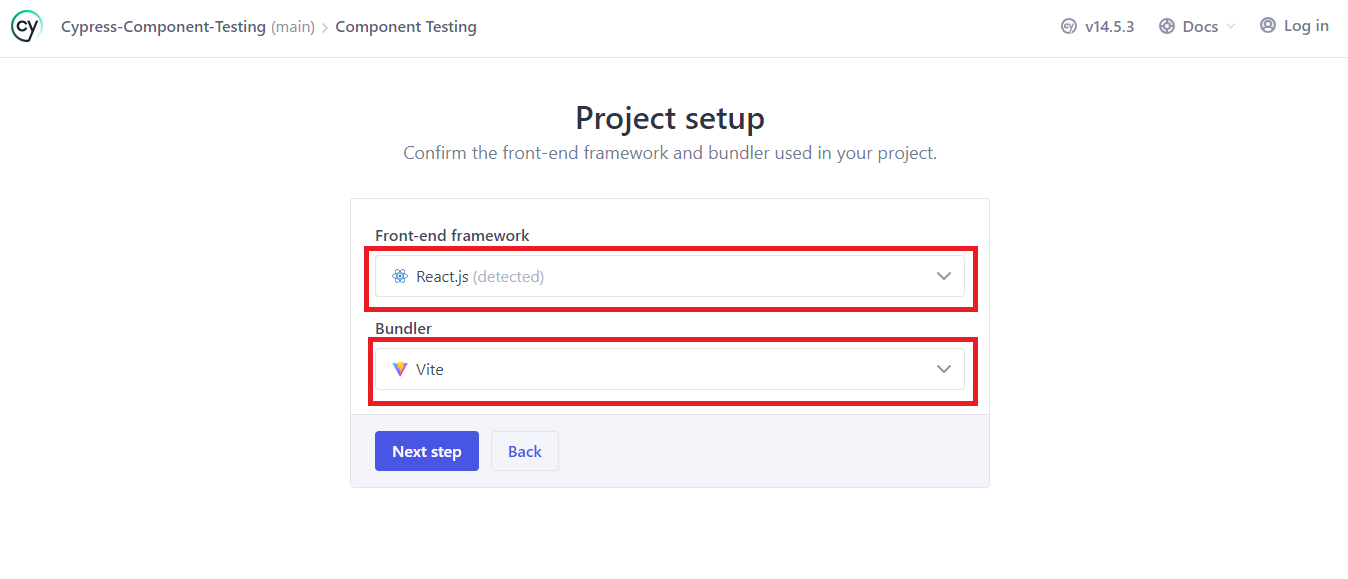
4. Verify Vite Installation
Check your package.json file in the devDependencies section. If Vite is missing, install it:
npm install -D vite5. Finalize Setup in Cypress
Click “Continue” in the Cypress app.
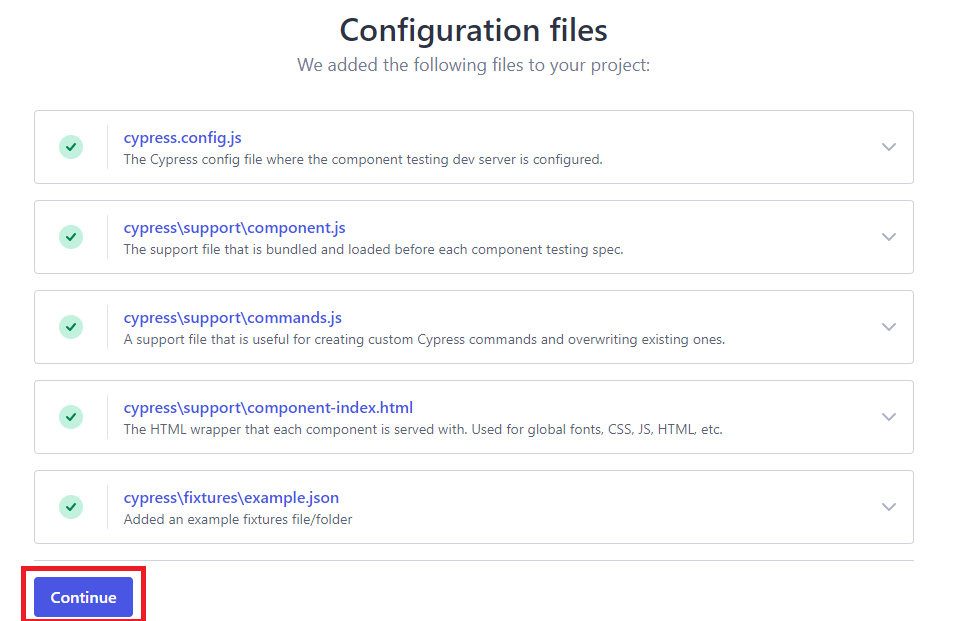
Select your preferred browser (I am using Electron), and then click “Start Component Testing in Electron”.
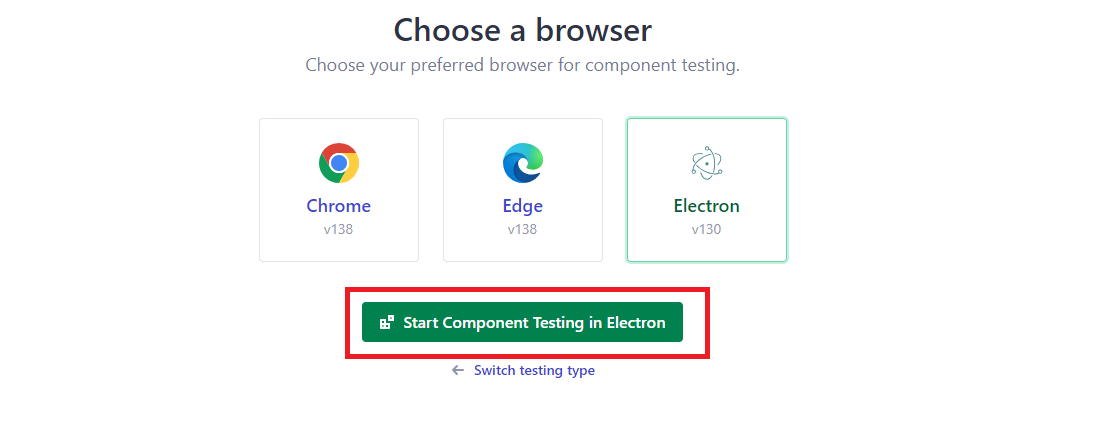
Write Component Tests
We’ll write a Cypress component test to check:
- The form renders correctly.
- All input fields exist.
- You can type into the input fields and submit the form.
First, add data-cy attributes to the form elements in the Form.jsx file:
<input type="text" placeholder="First Name*" required data-cy="first-name" />
<input type="text" placeholder="Last Name*" required data-cy="last-name" />
1. Create the Test File
Inside the cypress folder:
cypress/
└── component/
    └── Form.cy.jsx
2. Write the test
import React from 'react';
import Form from '../../src/components/Form/Form';
import '../../src/components/Form/Form.module.scss';

describe('Form component', () => {
  beforeEach(() => {
    cy.mount(<Form />);
  });

  it('renders all required fields', () => {
    cy.get('[data-cy="first-name"]').should('exist');
    cy.get('[data-cy="last-name"]').should('exist');
    cy.get('[data-cy="email"]').should('exist');
    cy.get('[data-cy="designation"]').should('exist');
    cy.get('[data-cy="country"]').should('exist');
    cy.get('[data-cy="phone"]').should('exist');
    cy.get('[data-cy="social"]').should('exist');
    cy.get('[data-cy="samples"]').should('exist');
  });


  it('Fills and submit form', () => {
    cy.get('[data-cy="first-name"]').type('Chosen');
    cy.get('[data-cy="last-name"]').type('Vincent');
    cy.get('[data-cy="email"]').type('chosen@example.com');
    cy.get('[data-cy="designation"]').type('Software Engineer');
    cy.get('[data-cy="country"]').select('nigeria');
    cy.get('[data-cy="phone"]').type('1234567890');
    cy.get('[data-cy="social"]').type('https://www.linkedin.com/in/chosenvincent1/');
    cy.get('[data-cy="samples"]').type('https://www.testmuai.com/blog/smooth-scroll-in-css/');

    cy.get('[data-cy="submit"]').should('exist').click();
  });
});
Key Notes:
- Use describe to group tests and it to define test cases.
- Import React and the component explicitly.
- Use cy.mount() to render the component in the Cypress Test Runner.
Run Cypress Component Tests
Start Cypress in component testing mode:
npx cypress open --componentOr use:
npx cypress openThen click the Form.cy.jsx file to run the test. Cypress will render the form and execute all assertions in real-time.
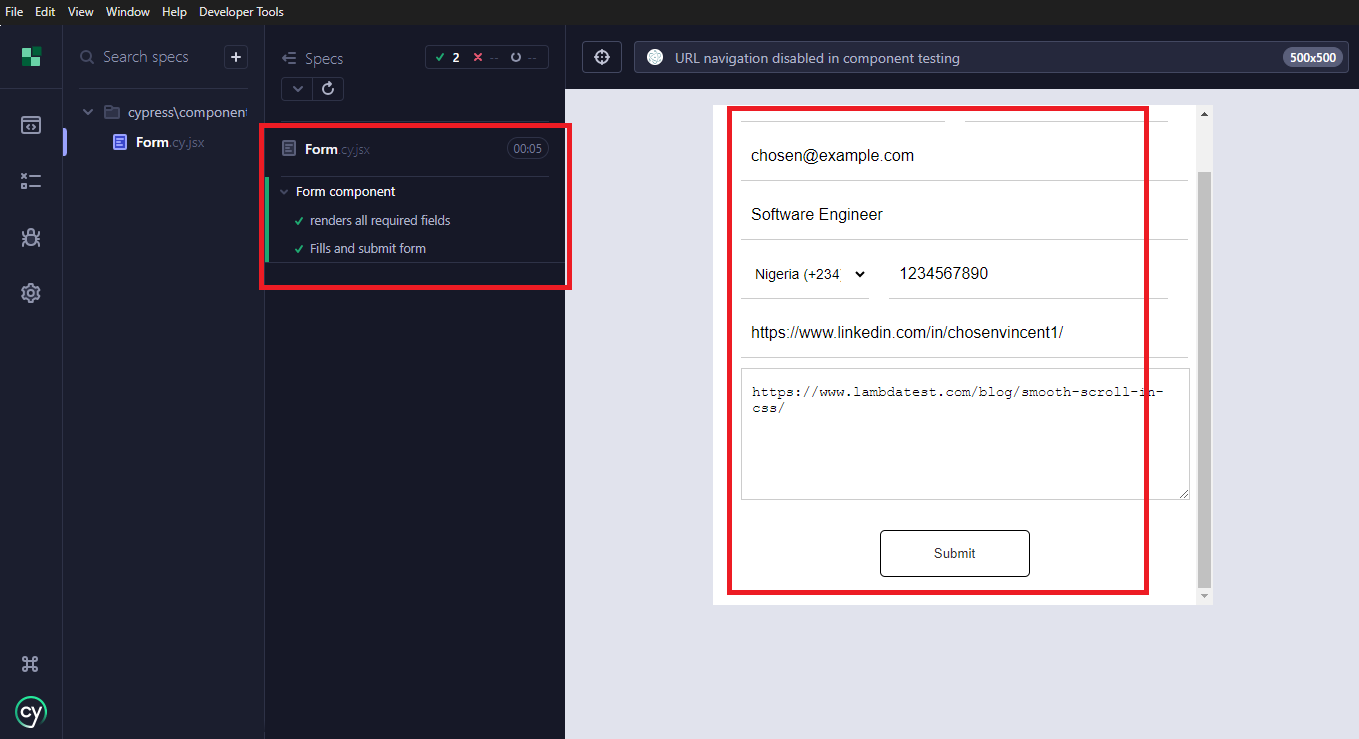
Key Takeaway: Getting a React component under Cypress test takes a Vite project, Cypress installed as a dev dependency, and the Component Testing option with React as the framework and Vite as the bundler. Elements under test get data-cy attributes, and the spec file Form.cy.jsx mounts the component with cy.mount() inside a beforeEach hook before asserting that every field exists and accepts input. Running npx cypress open --component renders the form in the browser and executes those assertions.
How to Run Cypress Component Tests on Cloud?
Running Cypress component tests locally works well, but for larger test suites, team collaboration, or CI integration, running tests on the cloud is better. We’ll use HyperExecute, an end-to-end test orchestration platform from TestMu AI.

Clone React Project
We’ll use a simple React project from the Cypress GitHub Repository, specifically the “react-webpack5-js” example.
- Clone the repository to your local machine.
- Navigate to the react-webpack5-js folder.
Running Test on HyperExecute
HyperExecute provides a pre-configured environment for faster testing. It supports Cypress, Selenium, Playwright, Appium, and multiple languages like Python, Java, C#, PHP, and Go.
1. Create a folder and YAML file
Create a folder in your project root, and inside it, create matrix.yml with the following configuration:
---
version: 0.1
runson: ${matrix.os}

cypress: true
cypressOps:
  Build: "[Matrix] Cypress Component Testing"
  Tags: ["HYP-Cypress", "macOS", "Matrix", "Accessibility"]
  BuildTags: ["HYP-Cypress-v10"]

pre:
  - npm install
  - npm install cypress --save-dev
  - npm i lambdatest-cypress-cli

matrix:
  os: [linux]
  browser: ["chrome"]
  files: ["Welcome.cy.js", "LoginForm.cy.js", "InputField.cy.js", "Button.cy.js"]

parallelism: 5

testSuites:
  - npx cypress run --component --spec ./src/components/$files --browser=$browser --headed --config video=true

jobLabel: [cypress-v10, mac, matrix]
2. Download and Add HyperExecute CLI
Download the HyperExecute CLI for your OS and place it in your project root. It reads the YAML configuration and uses your TestMu AI credentials.
3. Upload and Run Your Tests
Run this command in your terminal to upload and run your tests on HyperExecute:
./hyperexecute --config yaml/matrix.yml --force-clean-artifacts --download-artifacts --user <user_name> --key <access_key>Replace <user_name> and <access_key> with your TestMu AI credentials.
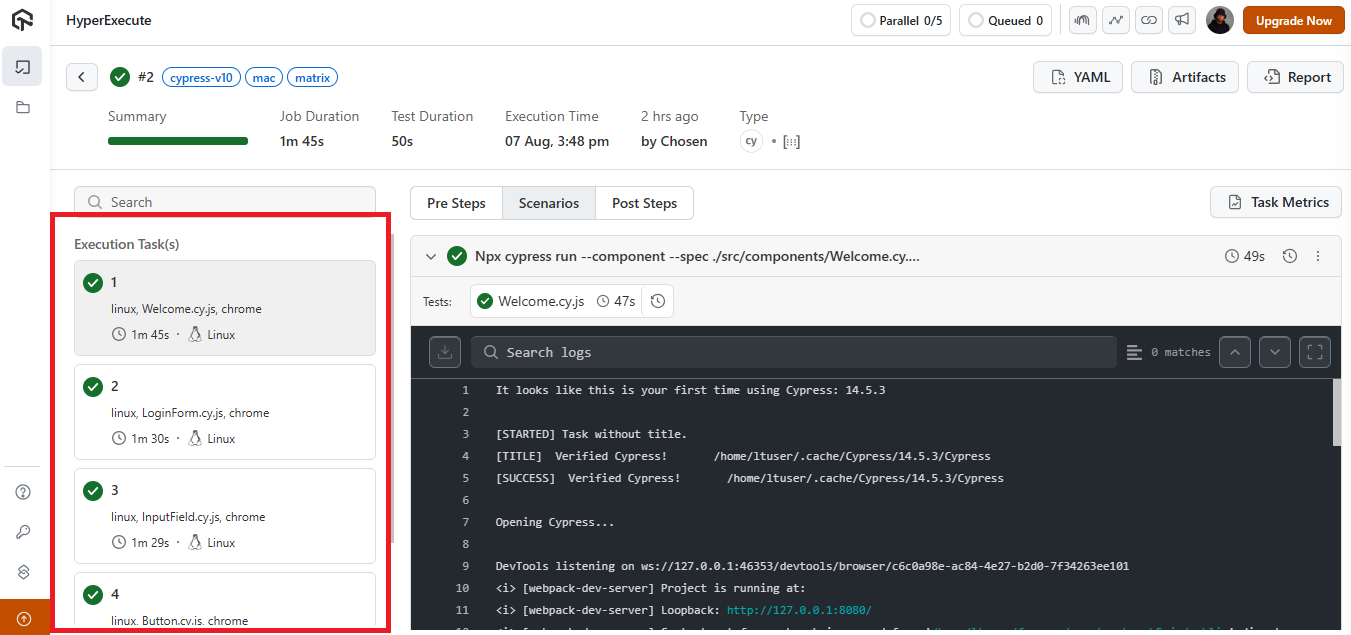
4. View Your Tests on HyperExecute Dashboard
Navigate to HyperExecute, and click your test to view execution tasks and logs.
Best Practices for Cypress Component Testing
To effectively carry out component testing with Cypress, you need to follow some best practices. They will make your tests reliable, readable, and easy to maintain:
- Use data- Attributes for Targeting Elements: Avoid using class names or tag selectors like input, .btn, or .form-control in your tests.
- Keep Tests Focused and Isolated: Test one component at a time. Each test should focus on a particular feature or behavior.
They are too generic and are more likely to change during code refactoring. Instead, use custom attributes like data-cy or data-testid. They are more stable and specifically meant for testing.
Avoid testing too many things in a single test block. Isolating your test makes it easier to identify where something is going wrong.
// Good
it('shows validation error for empty email', () => { ... });

// Bad
it('renders, fills form, validates fields, submits, and checks success message', () => { ... });
beforeEach(() => {
cy.mount(<Form />);
});
// Good
it('displays an error when email is empty');

// Bad
it('checks if email input works');
How Do AI Agents Help With Cypress Component Testing?
AI agents help with Cypress component testing in two ways. They draft the mount spec from a component's props, and they read past run data before suggesting a fix. Cypress supports both paths directly.
- Cloud MCP: Cypress made Cloud MCP generally available on 20 May 2026, so an AI assistant can query your run history and name the component specs that fail most often.
- Prompt-driven generation: Cypress AI features use a large language model to read the rendered DOM and return test code for a component that already mounts in the runner.
- Editor-side spec drafting: An assistant such as GitHub Copilot or Claude Code reads the component file and writes the cy.mount() call with the props that component requires.
- Selector drift: Generated specs often target class names. Keep data-cy attributes on the elements under test so the agent has a stable hook to pick.
- Assertion review: An agent cannot know what a component is supposed to do. Check every generated assertion against the design before the spec joins your suite.
- Failure triage: Give the agent the Cypress error, the spec, and the component source together. A mount failure usually traces to a missing prop or an unconfigured bundler.
Agents also work one level above the mounted component. KaneAI, the GenAI-native testing agent from TestMu AI, turns plain English instructions, PRDs, tickets, or screen recordings into end-to-end tests, and its smart element detection re-anchors steps when the UI changes instead of failing on a stale selector. Generated tests export to Cypress, so the flows that surround a component sit in the same repository as the component specs and run on the TestMu AI grid.
Troubleshooting Tips for Cypress Component Tests
One way or the other, issues will come up when writing or running Cypress component tests. Here are some common issues and how to troubleshoot them.
- Component Doesn’t Render in the Test Runner: Sometimes you might want to run your test, but nothing shows up. This can be because the component is missing or the test fails immediately.
- You forgot to call cy.mount()
- You’re missing a required prop
- The component has runtime errors
Possible causes include:
Make sure the component is mounted correctly, and if it requires props, pass them.
cy.mount(<UserCard user={prop} />);
Also, check the browser console in the Cypress Test Runner for any React errors.
Always import styles manually in your test file.
import '../../src/components/Form/Form.module.scss';
If you’re using CSS modules or SCSS, make sure your build tool (like Vite or Webpack) is configured to handle them in Cypress.
beforeEach(() => {
  cy.mount(<Form />);
});
Also, avoid using .only and .skip except when you’re debugging.
Make sure you’re passing all required props in cy.mount().
To fix this, use the .cy.jsx extension.
Form.cy.jsx
And import React in your test file:
import React from 'react';
Conclusion
Cypress component testing bridges the gap between isolated unit tests and full end-to-end scenarios, giving developers confidence that their UI behaves as expected. By setting up the environment properly, following best practices, and organizing tests effectively, you ensure faster feedback and fewer regressions. Leveraging cloud platforms further enhances Cypress testing with scalability, and parallel execution, making the workflow efficient for modern teams.
Citations
- Cypress Component Testing: https://docs.cypress.io/app/component-testing/get-started
- Cypress Cloud MCP: https://www.cypress.io/blog/cloud-mcp-give-your-ai-assistant-access-to-your-test-runs
- AI features in Cypress: https://docs.cypress.io/cloud/features/cypress-ai-features
Author

Harshit Paul
Blogs: 93


Harshit Paul is Director of Product Marketing at TestMu AI (formerly LambdaTest), with over 8 years of experience in product and growth marketing for developer and QA tools, leading the Agentic AI in Quality Engineering space. He has authored 80+ technical articles for TestMu AI on software testing and automation, and hosted webinars on Selenium, automation testing, browser compatibility, DevOps, and continuous testing. He has led go-to-market and technical marketing initiatives across software testing products, contributing to SEO, content strategy, and developer marketing. He began his career as a certified Salesforce developer at Wipro Technologies, where he worked for 2 years before moving into marketing. Harshit holds a degree in computer programming from Vivekananda Institute of Professional Studies.
Reviewer

Sri Harsha
Reviewer
Sri Harsha is Engineering Manager of the Open Source Program Office at TestMu AI (formerly LambdaTest), where he leads open-source engineering behind the Selenium and Appium automation grid and builds agentic AI systems for quality engineering. He is a member of the Selenium Technical Leadership Committee and a committer to WebdriverIO and Appium, and was recognized with the LambdaTest Delta Award 2023 for Best Contributor in open-source testing. He brings over 10 years of experience in software testing and automation, with earlier roles at EPAM Systems and ZenQ. Sri Harsha holds a B.Tech in Computer Science from Jawaharlal Nehru Technological University.
Cypress Component Testing FAQs
Did you find this page helpful?
More Related Blogs
TestMu AI forEnterprise
Get access to solutions built on Enterprise
grade security, privacy, & compliance
- Advanced access controls
- Advanced data retention rules
- Advanced Local Testing
- Premium Support options
- Early access to beta features
- Private Slack Channel
- Unlimited Manual Accessibility DevTools Tests