

Power Your Software Testing with AI Agents and Cloud
The Native AI-Agentic Cloud Platform to Supercharge Quality Engineering. Test Intelligently and Ship Faster.


- TestMu AI (Formerly LambdaTest)
- /
- Blog
- /
- How To Install TestNG In Eclipse: Step-By-Step Guide
How To Install TestNG In Eclipse: Step-By-Step Guide
How to install TestNG in Eclipse from the Marketplace or the update site, verify the plugin, convert an existing Java project, and run your first TestNG test.
Last Updated on:
Test automation guarantees software competence without repetitive human intervention. TestNG, or Test Next Generation, is one of Java's most frequently used automation testing frameworks.
Inspired by JUnit and NUnit, TestNG is a Java Test Automation Framework that allows users to perform different types of testing, such as Unit Testing, Integration Testing, Functional Testing, etc.
In this article, you will learn how to install TestNG in Eclipse and set it up in your system to start writing test scripts for your test project. If you are preparing for an interview you can learn more through TestNG interview questions.
This chapter is part of the TestNG tutorial. It follows the framework overview and comes before creating your first TestNG project.
TL;DR
To install TestNG in Eclipse, use the Eclipse Marketplace for a quick setup, or use the "Install New Software" option as an alternative if the plugin is not visible in the marketplace. Both methods integrate the Java testing framework directly into your IDE after a quick restart.
What Is TestNG Framework?
TestNG is a Java testing framework that simplifies writing and running automated tests, supporting unit, functional, integration, and end-to-end testing with annotations, parallel execution, and detailed reports.
How to Install TestNG in Eclipse IDE?
- Eclipse Marketplace: Install TestNG by searching for "TestNG" in the Eclipse Marketplace under the Help menu, confirming the checkboxes, accepting the license, and restarting the Eclipse IDE to complete the integration.
- Install New Software: Install TestNG by navigating to "Install New Software" under the Help menu, entering the update site URL (https://testng.org/testng-eclipse-update-site/), selecting the plugin, and restarting Eclipse after installation.
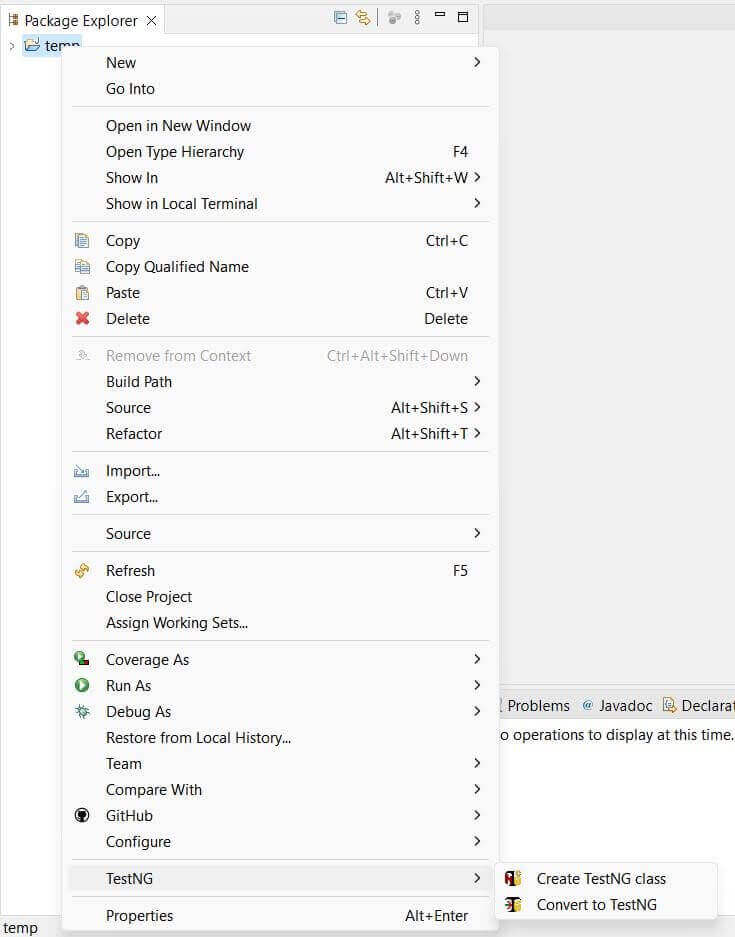
- Installation verification: Confirm TestNG is successfully installed by right-clicking any Java project in Eclipse and checking for TestNG options in the menu after restarting the IDE.
- Java project conversion: Integrate TestNG into an existing Java project by right-clicking the project, selecting "Convert to TestNG", and reviewing the generated testng.xml configuration file.
- Test execution: Run your automated tests by selecting "Run As TestNG Test" to execute test classes, generate detailed reports, and integrate your test suites with CI/CD pipelines.
How To Install TestNG In Eclipse
First, check your Java version. According to testng.org, TestNG up to 7.5 runs on JDK 8, while TestNG 7.6.0 and later need JDK 11 or higher, so any current release, such as 7.12.0 on Maven Central in September 2026, needs JDK 11+. Then install the Eclipse IDE from the official website if you have not already, and use either method below.
Installing TestNG from Eclipse Marketplace
Step 1: Open Eclipse IDE. Once it is launched, navigate to Help > Eclipse Marketplace.
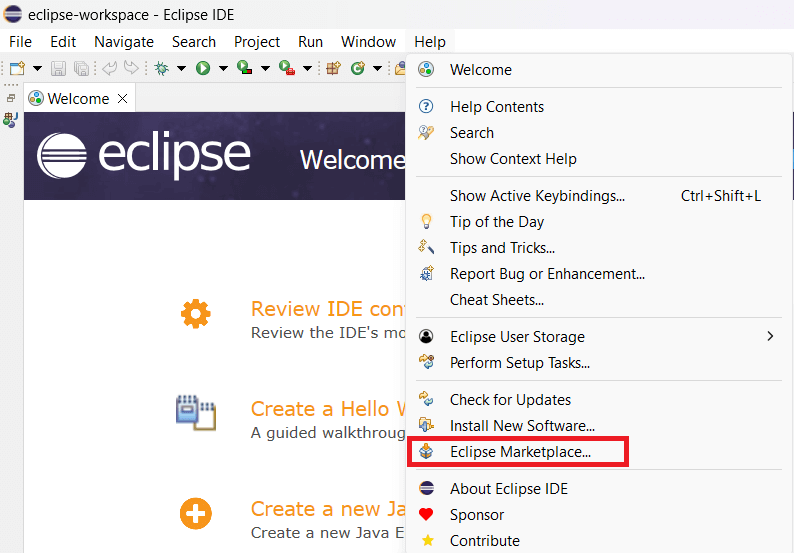
Step 2: Search for TestNG in the search bar and click on install for the first result.
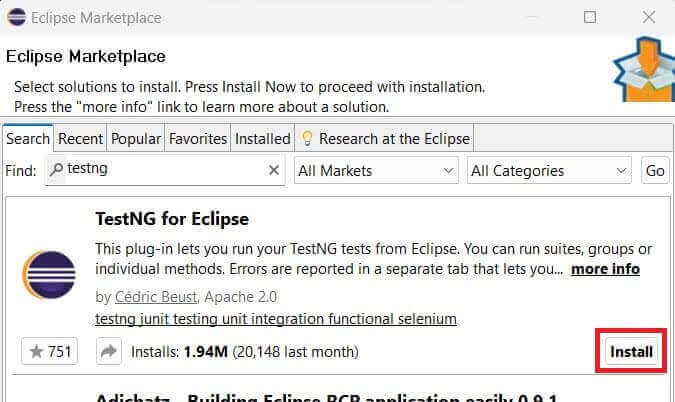
Step 3: Make sure that all the checkboxes for TestNG are checked, and then click on the Confirm button.
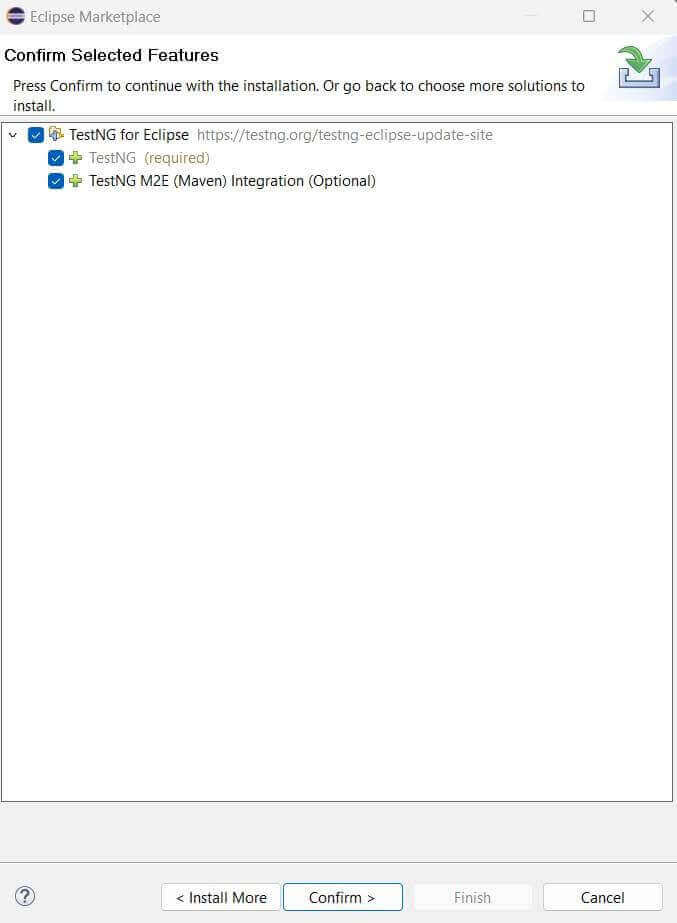
Step 4: Accept the license and click on Finish.
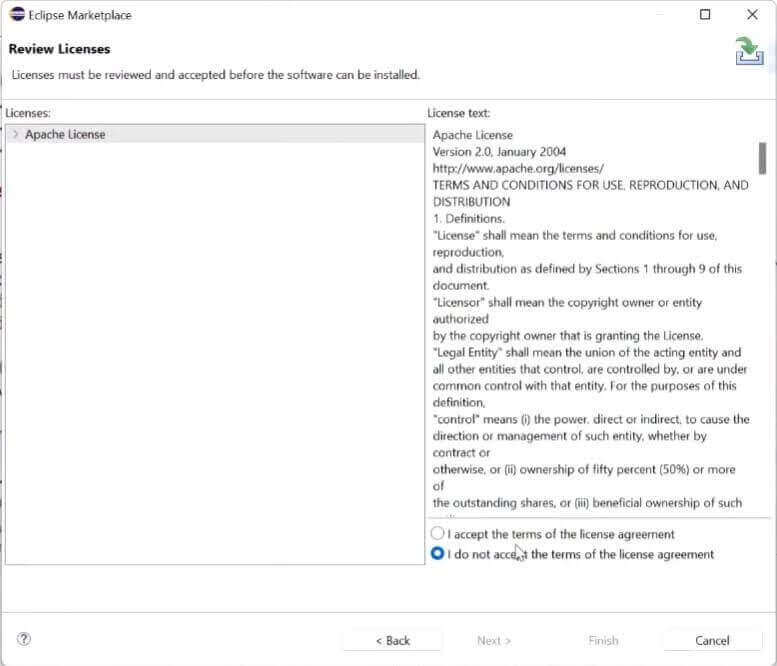
Note: For the TestNG plugin to work, Eclipse must be restarted. When you right-click on a project, you can find TestNG in the menu options if installed.

You can watch the Complete TestNG Framework Tutorial to understand the basics and get started with TestNG. With the help of this video, you can start writing unit tests for your project on Eclipse using TestNG.
You can also subscribe to the TestMu AI YouTube Channel and stay updated with the latest tutorials and updates on Selenium automation testing, Playwright automation testing, and more.
Install TestNG Using Install New Software
In some versions of Eclipse, you might not find the TestNG plugin in the Eclipse marketplace. We can install TestNG in Eclipse from the TestNG plugin site in such cases.
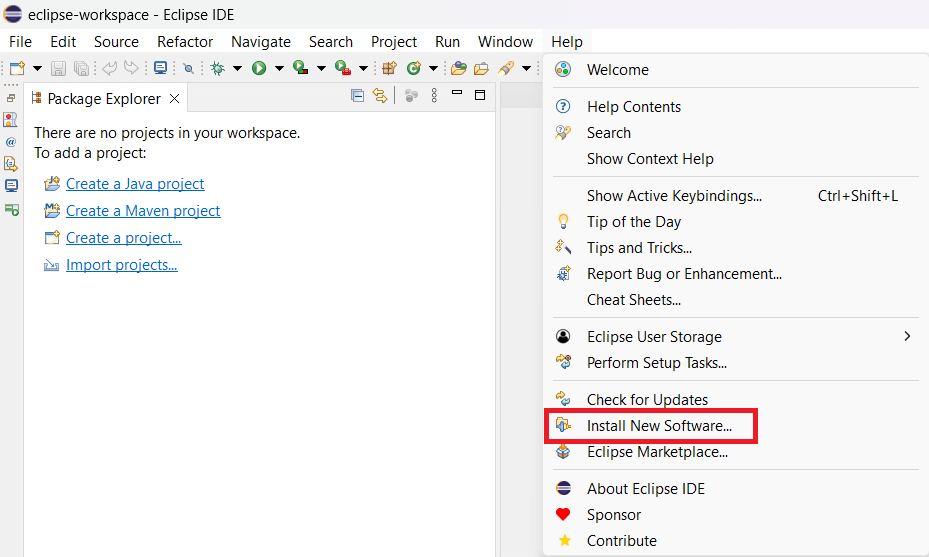
Step 1: Go to Eclipse help and click on the "Install New Software" button.
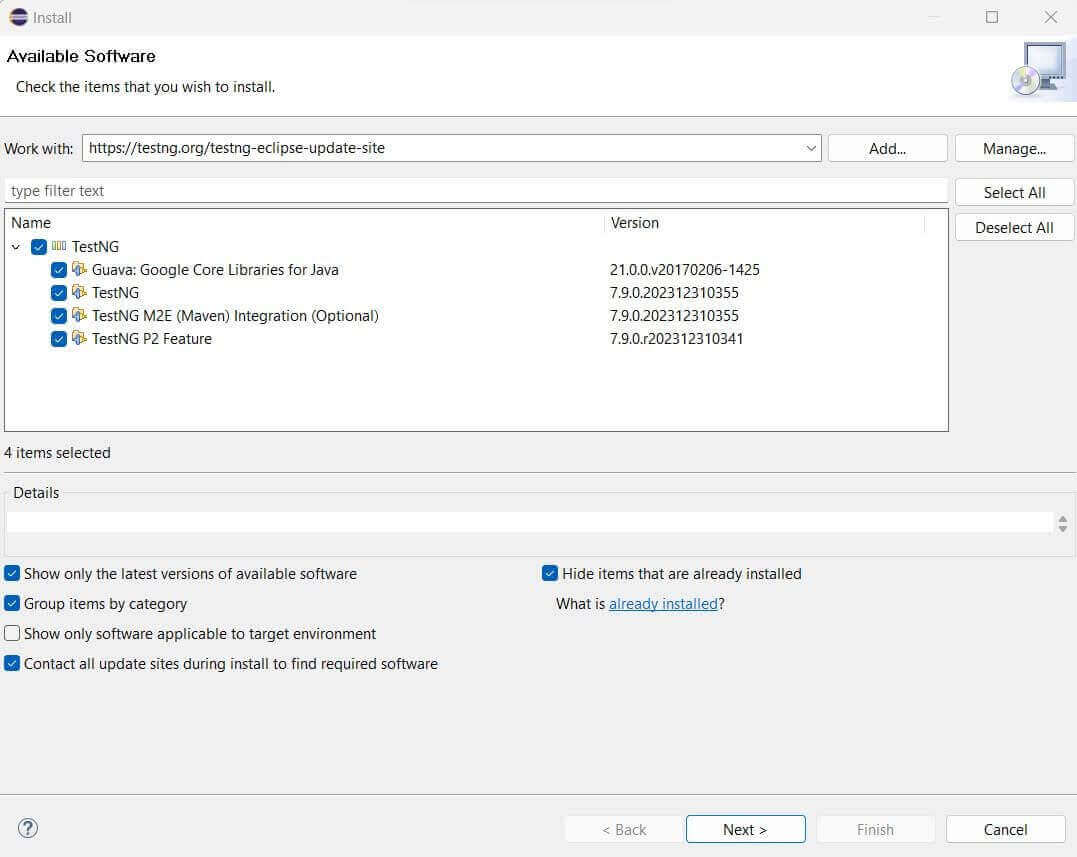
Step 2: Enter the TestNG plugin link "https://testng.org/testng-eclipse-update-site/" in the search bar. It will fetch the required plugin. Ensure the check bar is selected, and click the next button to start the installation. When I checked the update site on September 30, 2026, it listed plugin builds up to 7.11.0, and Eclipse installs the newest one by default.
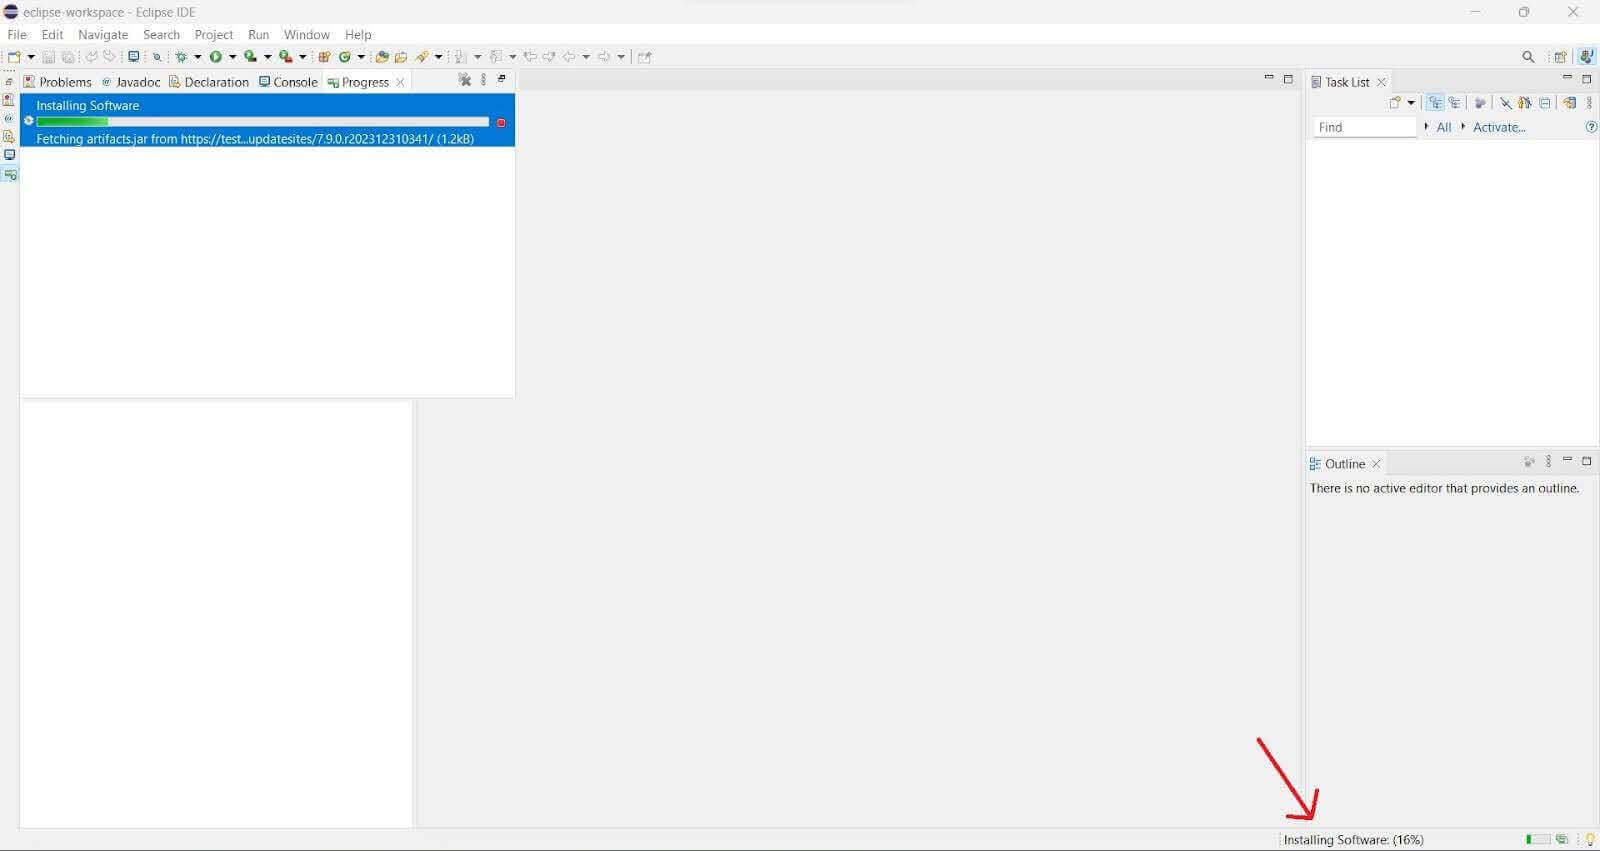
Step 3: Accept the license agreement and hit the Finish button. The installation status is visible in the bottom right corner. Provide permission wherever required. Once installation is complete, restart the IDE to notice changes.
Setting Up TestNG Eclipse Tests From Your Existing Java Projects
Once we have successfully installed TestNG on Eclipse, we can integrate it with existing Java projects to create tests by doing the following:
Step 1: Writing a test with TestNG on Eclipse is very simple. First, find the project you need from the explorer on the left and right-click on it.
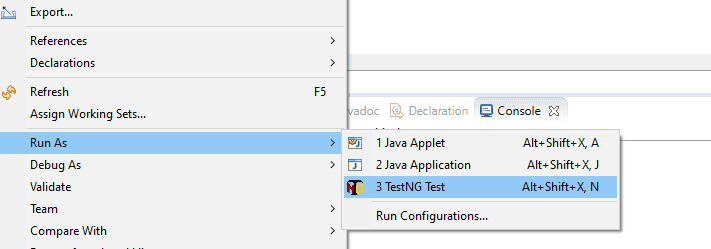
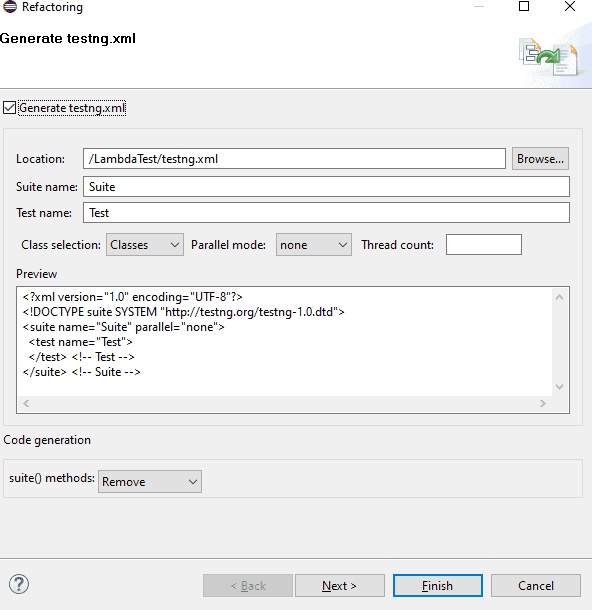
Step 2: Select and click on Convert to TestNG. You will see a refactoring window popping up with the testng.xml details. Testng.xml is the configuration file that allows us to control the execution of tests, handle multiple test classes, define test suites, etc. Click on Finish. We can see the XML file created in the directory.
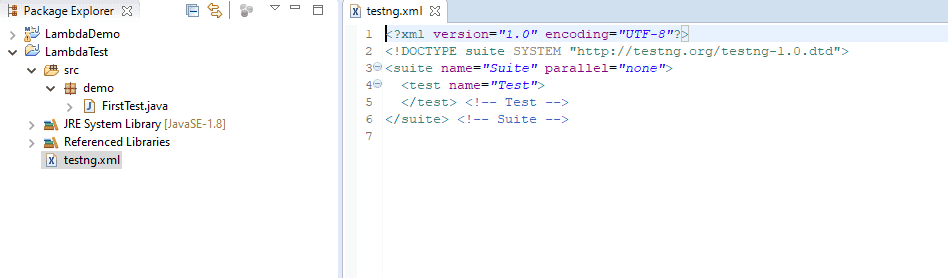
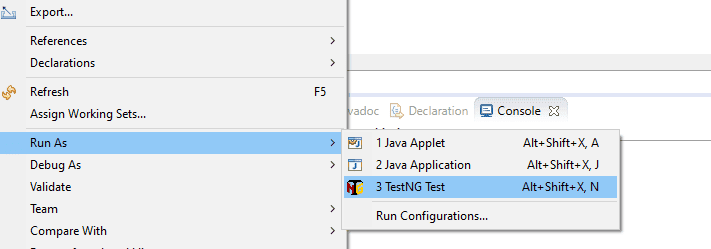
You can create a new test class from the dropdown and add annotations to define actions. Under the project, you can run the tests from the Run As option.
The free TestNG Certification from TestMu AI is a way to validate your TestNG skills with a recognized credential.

Austin Siewert
Co-Founder, Steadfast Systems
Discovered @TestMu AI yesterday. Best browser testing tool I've found for my use case. Great pricing model for the limited testing I do 👏
2M+ Devs and QAs rely on TestMu AI
Deliver immersive digital experiences with Next-Generation Mobile Apps and Cross Browser Testing Cloud

How Do AI Coding Assistants Change TestNG Test Writing In Eclipse?
GitHub Copilot's Eclipse plugin can draft a TestNG test method with assertions right inside the editor, but you still choose the annotations and register the class in testng.xml yourself.
- Copilot for Eclipse: Microsoft publishes an official GitHub Copilot plugin on the Eclipse Marketplace. It reads the open class and its comments, then suggests test methods and assertions in the editor or through its chat panel.
- Agent Mode: Copilot's Agent Mode works across more than one file in a project, so it can read a class together with its existing TestNG suite before it drafts a new test method.
- Playwright's test agents: For UI-heavy TestNG suites, Playwright's Planner, Generator, and Healer agents connect through the Model Context Protocol and read the page's accessibility tree instead of a screenshot, so the locators they generate target a role and a name rather than a CSS class.
- What still needs review: None of these tools add a class to testng.xml, choose its group or priority, or confirm that an assertion matches the real business rule. Run the suite in Eclipse and read every generated assertion before you trust it.
Conclusion
Install TestNG from the Eclipse Marketplace or the update site, confirm the TestNG option appears when you right-click a project, and make sure the project runs on JDK 11 or later for current TestNG releases. Next, create your first TestNG automation script. When the suite grows, TestMu AI Automation Cloud runs TestNG and Selenium tests in parallel across 3,000+ browser and OS combinations, and the TestNG with Selenium documentation covers the setup.
Author

Kritika Murari
Blogs: 31


Kritika Murari is a Community Contributor with experience in creating technical content around software testing, automation, and emerging technologies. A former Content Manager at TestMu AI, she has authored blogs, guides, and resources that simplify complex testing concepts for developers and QA professionals. Kritika actively contributes to the testing community through insightful content and knowledge-sharing.
Reviewer

Srinivasan Sekar
Reviewer
Srinivasan Sekar is Director of Engineering at TestMu AI (formerly LambdaTest), where he leads engineering and open-source initiatives behind the Selenium and Appium automation grid and owns TestMu AI's MCP Server. A committer to Appium and a contributor to Selenium, WebdriverIO, Taiko, and AppiumTestDistribution, he brings over 15 years of experience in quality engineering and open-source technologies. He is the author of the Apress book 'The MCP Standard: A Developer's Guide to Building Universal AI Tools with the Model Context Protocol,' a Certified Kubernetes and Cloud Native Associate, and an international conference speaker. Before TestMu AI he spent over eight years at Thoughtworks as a Principal Consultant and Quality Architect. Srinivasan holds a B.Tech in Information Technology from Anna University.
TestNG in Eclipse FAQs
Did you find this page helpful?
More Related Blogs
TestMu AI forEnterprise
Get access to solutions built on Enterprise
grade security, privacy, & compliance
- Advanced access controls
- Advanced data retention rules
- Advanced Local Testing
- Premium Support options
- Early access to beta features
- Private Slack Channel
- Unlimited Manual Accessibility DevTools Tests