

Power Your Software Testing with AI Agents and Cloud
The Native AI-Agentic Cloud Platform to Supercharge Quality Engineering. Test Intelligently and Ship Faster.


- TestMu AI (Formerly LambdaTest)
- /
- Blog
- /
- Your First TestNG Test: Write and Run a TestNG Script
Your First TestNG Test: Write and Run a TestNG Script
TestNG is a Java framework that drives Selenium WebDriver. Learn to set up Eclipse, write your first TestNG automation script, and run it across browsers.
Last Updated on:
A TestNG automation script is a Java class whose annotated methods drive a browser through Selenium WebDriver and assert the result.
This chapter is part of the TestNG tutorial, which covers setup, annotations, testng.xml, data-driven tests, and parallel execution.
TestNG supplies the @BeforeTest, @Test and @AfterTest annotations that fix run order, and a testng.xml suite file that controls grouping and parallel execution. If you are preparing for an interview you can also work through these TestNG interview questions.
This guide covers setting up the environment, writing the code, how AI agents help you write TestNG scripts, executing cross browser testing with Remote WebDriver, running a single remote instance, and running parallel tests.
Overview
To build your first automation script, write Java test suites using the TestNG framework for structured execution and integrate them with Selenium WebDriver to automate browser actions. This setup allows you to run tests locally or scale them efficiently using cloud-based parallel execution.
Why TestNG Matters in Automation
- Test structure: TestNG uses annotations like @Test, @BeforeTest, and @AfterTest to make Java test flows easier to understand and maintain.
- Execution control: The testng.xml configuration file enables grouping, sequencing, and parallel execution across multiple tests to control the overall test execution flow.
- Result visibility: TestNG HTML and XML reports are automatically generated during execution to provide detailed visibility into test results for better tracking.
- Browser automation: Selenium WebDriver integrates with the TestNG framework to drive automated actions on real web browsers during test execution.
How to Get Started
- Development environment: Eclipse IDE supports writing Java scripts and integrates with the TestNG plugin to run tests directly within the environment.
- Script execution: The Run as TestNG Test command in Eclipse executes your test method and outputs the results directly to the console.
Running Tests on the Cloud
- Cross-browser scaling: TestMu AI is a cloud-based grid that executes TestNG tests across 3,000+ browser/OS combinations without requiring local browser installations.
- Test speed: Parallel execution runs multiple tests simultaneously on the cloud to speed up test cycles and improve overall efficiency.
- Debugging: TestMu AI logs and media provide detailed logs, screenshots, and video recordings to help developers debug test failures quickly.
Watch this video to learn how to set up and use TestNG with Selenium to automate your testing process. We will also introduce the TestNG Priority method, which allows you to write easy-to-read and maintainable tests.
Setting Up The Environment
The setup takes six steps and about fifteen minutes. It uses the current versions of everything: Java 17 or newer, TestNG 7.12.0, and Selenium 4.49.0, which downloads its own browser driver, so there are no jar files or driver executables to fetch by hand.
Step 1: Install Java 17 or newer
TestNG 7.x and Selenium 4 both need Java 11 or newer, so install a current long-term-support release, Java 17 or Java 21. Download a JDK from Adoptium and run the installer.
Then set the JAVA_HOME environment variable to the JDK folder and add its bin folder to PATH. On Windows this is Start → Edit the system environment variables → Environment Variables. Verify the install from a new terminal:
java -version
javac -version
Both commands should print the version you installed. If the terminal cannot find java, the PATH entry is wrong.
Step 2: Install Eclipse IDE for Java Developers
Download the installer from eclipse.org/downloads, choose Eclipse IDE for Java Developers, and finish the wizard. On the first start, pick a workspace folder; the project in this chapter lives there.
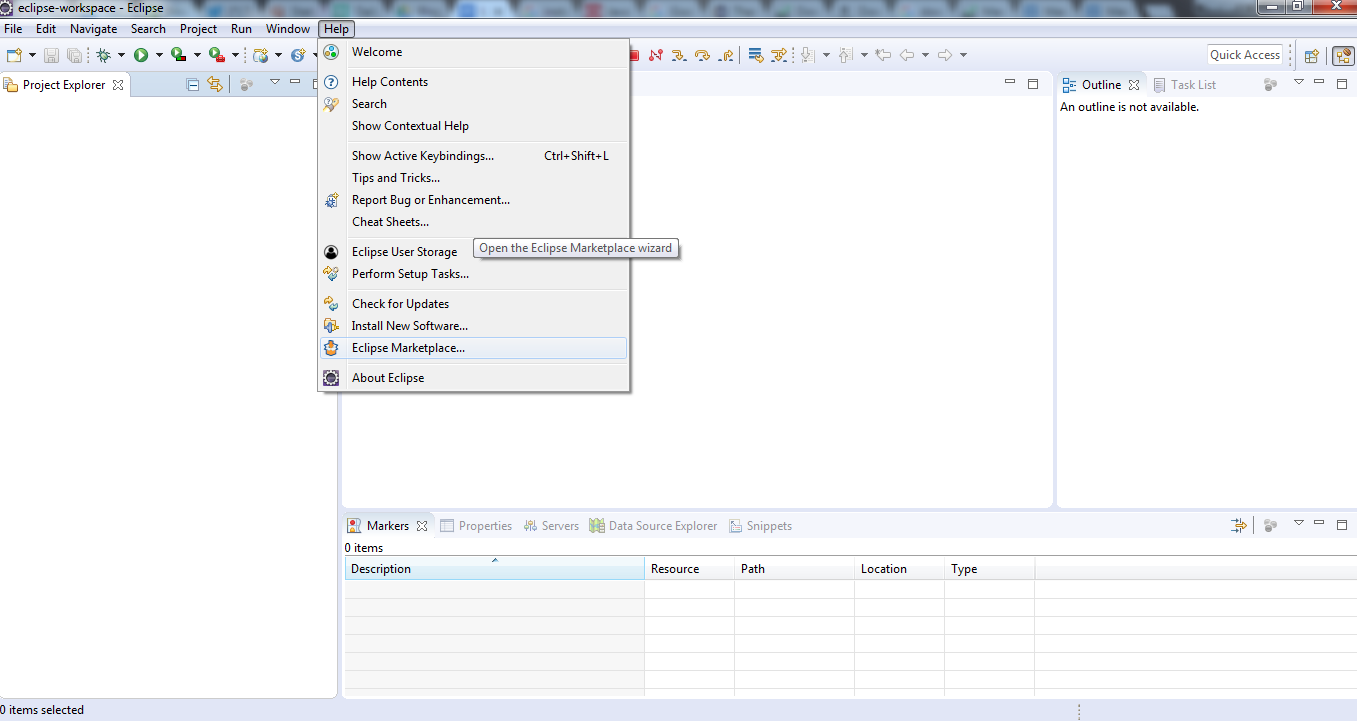
Step 3: Install TestNG from Eclipse Marketplace
For this, Go to Help→ Eclipse Marketplace
Click ‘install’ on TestNG for Eclipse.
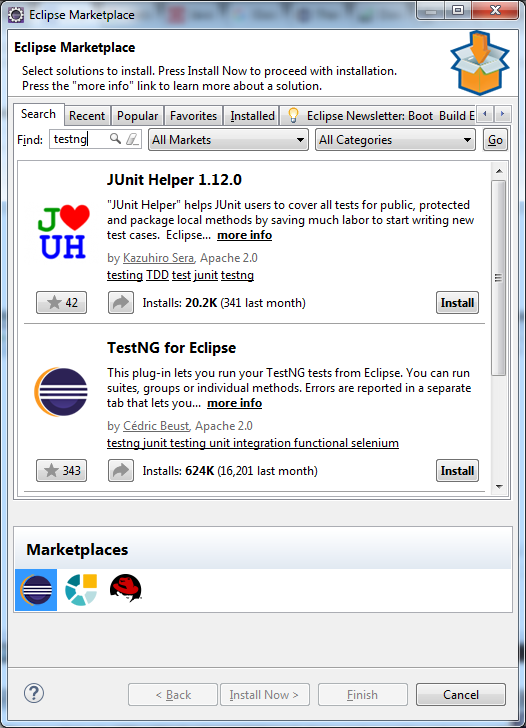
And finish the process.
Step 4: Create a Maven project
Go to File → New → Maven Project, tick Create a simple project (skip archetype selection), and click Next. Enter a Group Id such as com.example and an Artifact Id such as first-testng-project, then click Finish. Do not put spaces in the Artifact Id.
Maven downloads the libraries the project declares, so there is nothing to import into the build path. The pom.xml file at the project root is where the next step adds TestNG and Selenium.
Step 5: Add TestNG and Selenium to pom.xml
Open pom.xml and add the two dependencies and the Surefire plugin, which is what runs TestNG tests from Maven:
<dependencies>
    <dependency>
        <groupId>org.testng</groupId>
        <artifactId>testng</artifactId>
        <version>7.12.0</version>
        <scope>test</scope>
    </dependency>
    <dependency>
        <groupId>org.seleniumhq.selenium</groupId>
        <artifactId>selenium-java</artifactId>
        <version>4.49.0</version>
    </dependency>
</dependencies>

<build>
    <plugins>
        <plugin>
            <groupId>org.apache.maven.plugins</groupId>
            <artifactId>maven-surefire-plugin</artifactId>
            <version>3.6.0</version>
        </plugin>
    </plugins>
</build>
Save the file. Eclipse resolves the dependencies on save; if it does not, right-click the project and choose Maven → Update Project. Selenium 4 ships Selenium Manager, which downloads a matching ChromeDriver on the first run, so the System.setProperty driver line from older tutorials is gone. The TestNG Maven dependency chapter covers the Gradle equivalent and version pinning.
Step 6: Create a new TestNG class
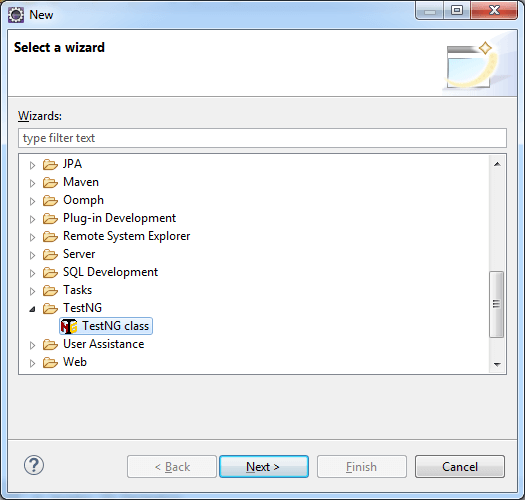
Create a package named newpack under src/test/java, then create a new TestNG class inside it. Right click newpack–> New –> Other
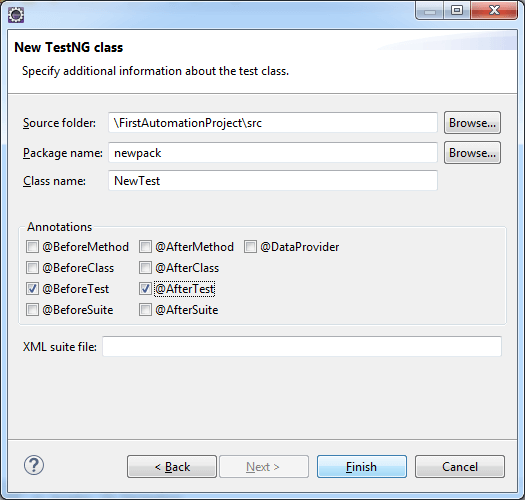
Check @BeforeTest and @AfterTest. Once you click on Finish, you’re all set to write your automation script.
A template TestNG code will open up like this.
Key Takeaway: A working TestNG environment today is a JDK 17 or newer, Eclipse with the TestNG plugin, and a Maven project whose pom.xml declares testng 7.12.0 and selenium-java 4.49.0. There are no jar downloads and no driver executables.
Writing The Code
On the eclipse window that you’re seeing now, write the following code. We are writing a code in order to verify the title of webpage.
CODE(self explanatory):
package newpack;

import org.openqa.selenium.WebDriver;
import org.openqa.selenium.chrome.ChromeDriver;
import org.testng.Assert;
import org.testng.annotations.Test;

public class NewTest {

    @Test
    public void firstTest() {
        // Selenium Manager downloads a matching ChromeDriver on the first run,
        // so there is no System.setProperty line and no driver path.
        WebDriver driver = new ChromeDriver();

        driver.get("https://www.testmuai.com/");

        // the assertion decides pass or fail; TestNG reports it
        String actualTitle = driver.getTitle();
        Assert.assertTrue(actualTitle.contains("TestMu"), "Unexpected title: " + actualTitle);

        driver.quit();
    }
}
After writing the code, save it and right click on ‘New Test.java’ → Run as→ TestNG Test.
Once you click on it, you’ll see a chrome browser window opening the website that you’ve entered in your code to test. And it will automatically close as soon as the test is completed and in the output section below, you’ll see ‘Test Passed’ as the status of your test on the console below.
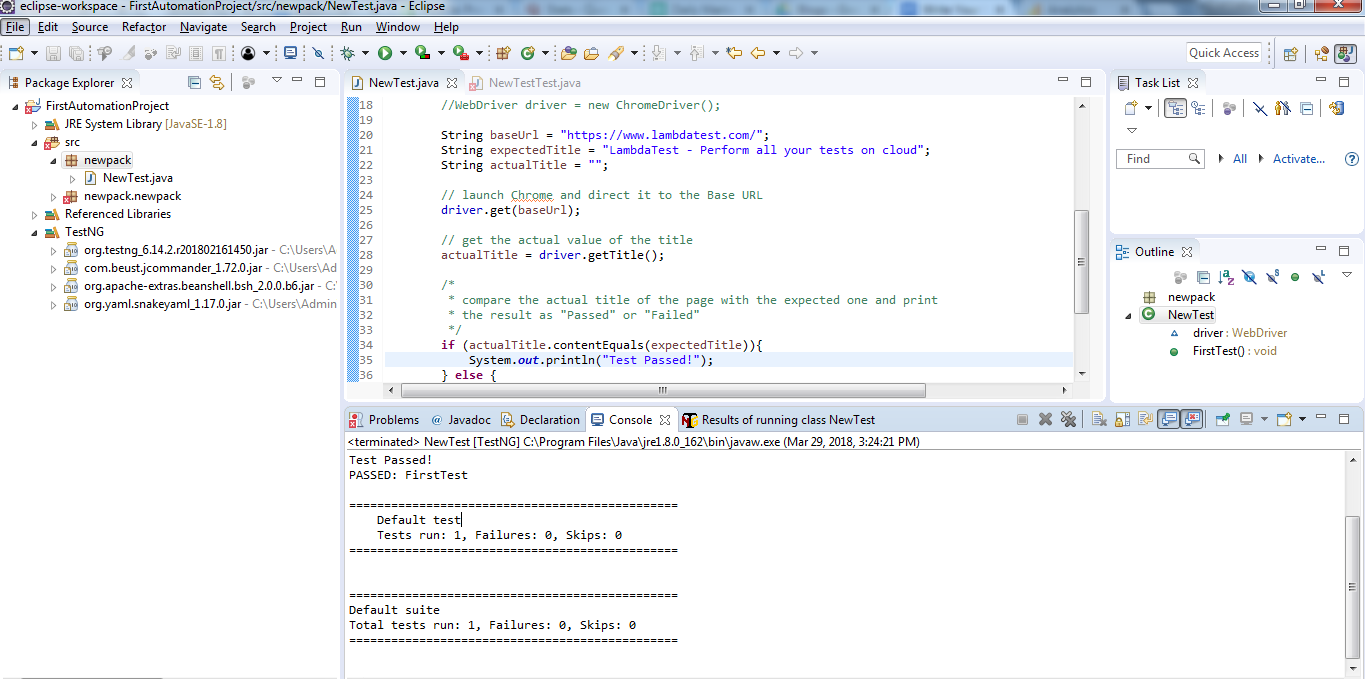
With this, you have run your first automation test in TestNG using a local webdriver.
To verify the title of a given webpage matches the one already specified.

Austin Siewert
Co-Founder, Steadfast Systems
Discovered @TestMu AI yesterday. Best browser testing tool I've found for my use case. Great pricing model for the limited testing I do 👏
2M+ Devs and QAs rely on TestMu AI
Deliver immersive digital experiences with Next-Generation Mobile Apps and Cross Browser Testing Cloud

With TestNG certification, you can challenge your skills in performing automated testing with TestNG and take your career to the next level.
Here’s a short glimpse of the TestNG certification from TestMu AI:
Key Takeaway: A first TestNG script is one Java class that opens a browser in a @BeforeTest method, asserts a page title inside a @Test method, and quits the driver in @AfterTest.
How Do AI Agents Help You Write TestNG Scripts?
AI coding agents write the repetitive parts of a TestNG script: the class skeleton, the @BeforeTest driver setup, the @Test method and the assertion. You still supply the locators and review the output.
Three uses are worth knowing when you start writing TestNG code:
- Editor agents: GitHub Copilot and Cursor read an open Page Object class and generate the matching @Test method, including a @DataProvider signature, from a plain comment describing the scenario.
- Browser-connected agents: an agent wired to a browser through a Model Context Protocol server, such as Playwright MCP, opens the page, reads the live DOM, and returns real CSS or XPath locators instead of guessed ones.
- Failure triage: an agent parses the testng-results.xml file in the test-output folder, groups failing methods by stack trace, and reports which failures share one root cause.
The limits are specific. An agent that has never seen the live DOM invents locators that compile and then throw NoSuchElementException at runtime. Generated waits often default to Thread.sleep instead of WebDriverWait, which is the standard source of flaky Selenium tests.
Treat generated TestNG code as a first draft. Run it once, replace every invented locator with one read from the real page, then commit. The same review rule applies to a full AI agent to generate Selenium Java tests, and the broader shift is covered in our guide to AI in test automation.
Key Takeaway: AI agents generate TestNG class skeletons and annotations reliably, but locators produced without reading the live DOM fail at runtime and must be verified against the real page.
Running the Script on a Cloud Selenium Grid
A couple changes in your code is all that you would need for running your Selenium test script on TestMu AI Selenium grid. Here we will take a look at a different example to help you demonstrate the TestMu AI Selenium grid.
We will be running a script of a simple To Do list app. In this list, our code will be marking 2 items as done, add a list item and will display the total count of pending items. You can find the below code on our GitHub repository as well.
import org.openqa.selenium.By;
import org.openqa.selenium.Platform;
import org.openqa.selenium.WebDriver;
import org.openqa.selenium.remote.DesiredCapabilities;
import org.openqa.selenium.remote.RemoteWebDriver;
import org.testng.Assert;
import org.testng.annotations.AfterClass;
import org.testng.annotations.BeforeClass;
import org.testng.annotations.Test;
import java.net.MalformedURLException;
import java.net.URL;

public class TestNGTodo{
     public String username = "YOUR_USERNAME";
    public String authkey = "YOUR_ACCESS_KEY";
    public static RemoteWebDriver driver = null;
    public String gridURL = "@hub.lambdatest.com/wd/hub";
    boolean status = false;

    @BeforeClass
    public void setUp() throws Exception {
       DesiredCapabilities capabilities = new DesiredCapabilities();
        capabilities.setCapability("browserName", "chrome");
        capabilities.setCapability("version", "70.0");
        capabilities.setCapability("platform", "win10"); // If this cap isn't specified, it will just get the any available one
        capabilities.setCapability("build", "LambdaTestSampleApp");
        capabilities.setCapability("name", "LambdaTestJavaSample");
        capabilities.setCapability("network", true); // To enable network logs
        capabilities.setCapability("visual", true); // To enable step by step screenshot
        capabilities.setCapability("video", true); // To enable video recording
        capabilities.setCapability("console", true); // To capture console logs
        try {
            driver = new RemoteWebDriver(new URL("https://" + username + ":" + authkey + gridURL), capabilities);
        } catch (MalformedURLException e) {
            System.out.println("Invalid grid URL");
        } catch (Exception e) {
            System.out.println(e.getMessage());
        }
    }

    @Test
    public void testSimple() throws Exception {
       try {
              //Change it to production page
            driver.get("https://4dvanceboy.github.io/lambdatest/lambdasampleapp.html");

              //Let's mark done first two items in the list.
              driver.findElement(By.name("li1")).click();
            driver.findElement(By.name("li2")).click();

             // Let's add an item in the list.
              driver.findElement(By.id("sampletodotext")).sendKeys("Yey, Let's add it to list");
            driver.findElement(By.id("addbutton")).click();

              // Let's check that the item we added is added in the list.
            String enteredText = driver.findElementByXPath("/html/body/div/div/div/ul/li[6]/span").getText();
            if (enteredText.equals("Yey, Let's add it to list")) {
                status = true;
            }
        } catch (Exception e) {
            System.out.println(e.getMessage());
        }
    }

    @AfterClass
    public void tearDown() throws Exception {
       if (driver != null) {
            ((JavascriptExecutor) driver).executeScript("lambda-status=" + status);
            driver.quit();
        }
    }
}
If you look at the configurations selected for running the test. They are our desired capabilities and the code provided for those capabilities is fetched from TestMu AI Capabilities Generator.
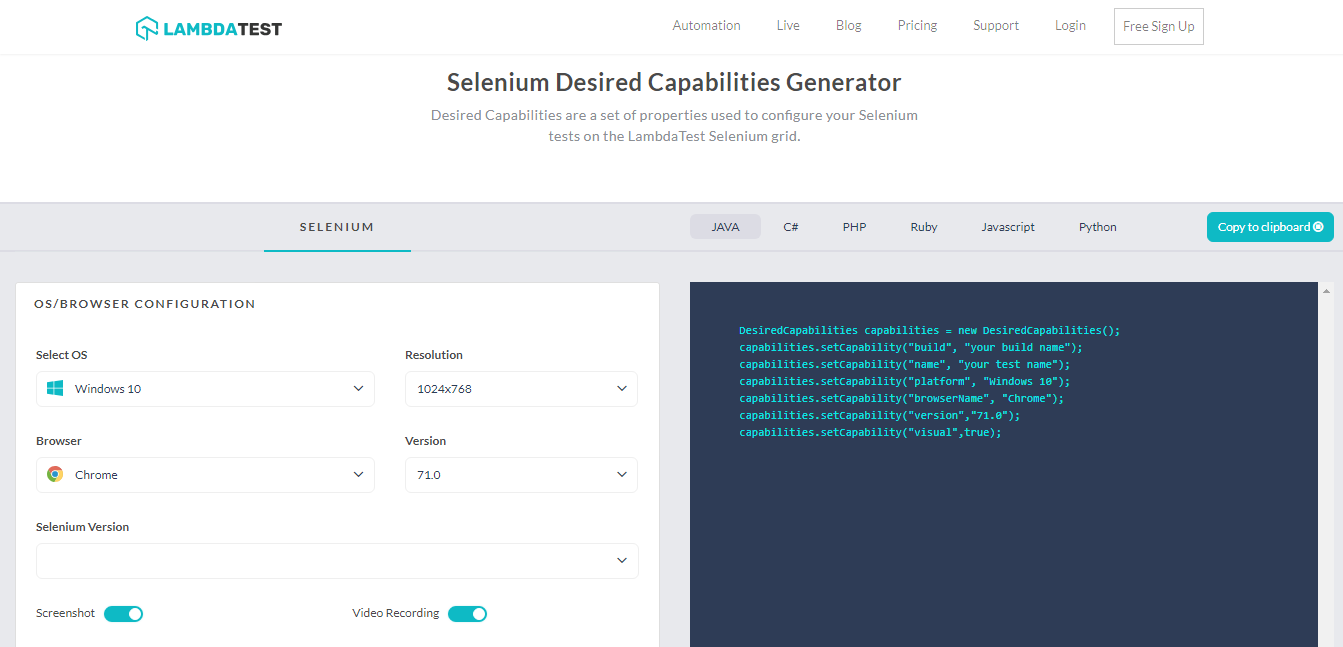
The button which says Copy to clipboard will help you to copy all the code based on your selections in just a single click.
That’s all you need for running your first automation test script using Selenium with TestNG at TestMu AI.

Key Takeaway: A single remote TestNG run needs one DesiredCapabilities object holding the browser name, browser version and platform, passed to RemoteWebDriver with the grid hub URL.
To run the same script on several browsers at once, add parallel and thread-count to testng.xml and keep one driver per thread. The parallel execution in TestNG chapter shows that setup.
A Minimal TestNG Test with Selenium 4
The class below is the shortest useful TestNG test for a browser today. It opens a page in Chrome, checks the title, and closes the browser, using three annotations: @BeforeTest for setup, @Test for the check, and @AfterTest for teardown. Selenium 4 downloads a matching ChromeDriver on its own, so there is no driver setup code and no WebDriverManager dependency.
Add Selenium next to TestNG in pom.xml (org.seleniumhq.selenium:selenium-java:4.49.0 and org.testng:testng:7.12.0), then create this class under src/test/java:
package demoTestNG;

import org.openqa.selenium.WebDriver;
import org.openqa.selenium.chrome.ChromeDriver;
import org.testng.Assert;
import org.testng.annotations.AfterTest;
import org.testng.annotations.BeforeTest;
import org.testng.annotations.Test;

public class FirstTestNGScript {
    private WebDriver driver;

    @BeforeTest
    public void setUp() {
        driver = new ChromeDriver();
        driver.manage().window().maximize();
    }

    @Test
    public void homePageTitleContainsBrand() {
        driver.get("https://www.testmuai.com/");
        String title = driver.getTitle();
        Assert.assertTrue(title.contains("TestMu"), "Unexpected title: " + title);
    }

    @AfterTest
    public void tearDown() {
        if (driver != null) {
            driver.quit();
        }
    }
}
To run it through a suite file instead of the IDE, add testng.xml at the project root and run mvn test -Dsurefire.suiteXmlFiles=testng.xml:
<?xml version="1.0" encoding="UTF-8"?>
<!DOCTYPE suite SYSTEM "https://testng.org/testng-1.0.dtd">
<suite name="FirstTestNGSuite">
    <test name="HomePageTest">
        <classes>
            <class name="demoTestNG.FirstTestNGScript" />
        </classes>
    </test>
</suite>
@BeforeTest runs once before the test methods inside the <test> tag and @AfterTest once after them; use @BeforeMethod instead when every test needs a fresh browser. The console prints a summary line with total, passed, failed, and skipped counts, and test-output/index.html holds the HTML report.
Author

Deeksha Agarwal
Blogs: 34


Deeksha is a Senior Product Manager at The Economic Times and a Community Evangelist with 8+ years of experience. She is followed by 6,000+ QA professionals, software testers, tech leaders, and enthusiasts across global communities. Deeksha has authored 40+ expert bios for TestMu AI, focusing on cross-browser testing, mobile app testing, regression testing, usability testing, and automation. Previously at TestMu AI, she drove product growth in native app testing and responsive browser features, combining product leadership with deep QA expertise.
TestNG Automation Script FAQs
Did you find this page helpful?
More Related Blogs
TestMu AI forEnterprise
Get access to solutions built on Enterprise
grade security, privacy, & compliance
- Advanced access controls
- Advanced data retention rules
- Advanced Local Testing
- Premium Support options
- Early access to beta features
- Private Slack Channel
- Unlimited Manual Accessibility DevTools Tests