

Power Your Software Testing with AI Agents and Cloud
The Native AI-Agentic Cloud Platform to Supercharge Quality Engineering. Test Intelligently and Ship Faster.


- TestMu AI (Formerly LambdaTest)
- /
- Blog
- /
- Create TestNG Project In Eclipse & Run Selenium Test Script
Create TestNG Project In Eclipse & Run Selenium Test Script
Learn how to create your first TestNG project in Eclipse with this step-by-step guide for Selenium WebDriver and run your first Selenium TestNG Script.
Last Updated on:
Creating a TestNG project in Eclipse and running Selenium test scripts helps you efficiently organize and execute automated web tests, making your testing process faster, structured, and easier to manage. TestNG’s features like annotations, parallel execution, and detailed reports ensure your automation framework is reliable and scalable.
This chapter is part of the TestNG tutorial, which covers setup, annotations, testng.xml, data-driven tests, and parallel execution.
Overview
To run automated tests, set up a Java project in Eclipse IDE to manage your workspace, and use the TestNG framework to simplify test execution, grouping, and reporting. You can then add Selenium JAR files to automate web browser actions and execute your test scripts directly.
TestNG at a Glance
- Java testing: TestNG - This framework simplifies test execution, grouping, and reporting with annotations and parallel execution in automation projects.
How to Setup a TestNG Project in Eclipse?
- Integrated development: Eclipse IDE - This environment for Java Developers must be installed to start creating and managing Java projects effectively.
- Eclipse integration: TestNG Plugin - This plugin is installed via the Eclipse Marketplace to enable TestNG functionality within the IDE.
- Project organization: Java Project - This project is created by navigating to File New Java Project in Eclipse to organize your code.
- Dependency management: TestNG Library - This library is added via Build Path to include necessary testing dependencies in your project.
- Browser automation: Selenium JAR files - These external bindings must be added to the project properties to enable browser automation capabilities.
- Test definition: Test Class - This class is created in the src folder with methods annotated with @Test for execution.
- Execution method: Run Tests - This action is performed by right-clicking the test class and selecting Run As TestNG Test to view results.
- Scalable execution: TestMu AI - This cloud Selenium Grid allows you to run parallel tests across 3000+ real browsers and operating systems.
In the last article, we installed TestNG in Eclipse and did some environment set up for the same. Subsequently, we saw how we could convert our existing Java projects into TestNG projects in Eclipse. In this article, we will create a TestNG project from scratch and write our very first test script using TestNG. We will begin by setting up a TestNG project first and then move on to writing the scripts.
Before getting started, we will quickly list down the prerequisites for getting started with a TestNG project, so that you can continue without any hiccups. If you’re looking to deepen your TestNG knowledge, don’t miss our comprehensive TestNG interview questions and answers guide to enhance your TestNG skills further.
Here’s what you need to have installed in your system-
- Eclipse IDE
- Download Selenium WebDriver and Client for Java. – Visit the official website and hit the download button for Java file.
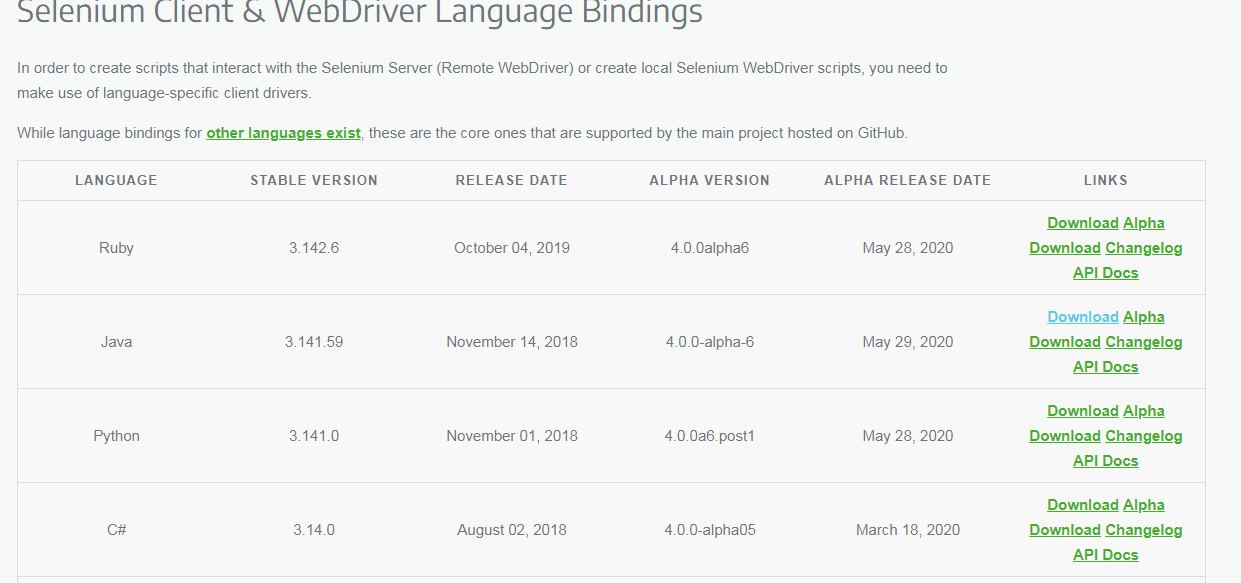
Download and extract these Selenium bindings. We will be using these to add External JAR files later in this Selenium TestNG tutorial.
Watch this video to learn how to set up and use TestNG with Selenium to automate your testing process. We will also introduce the TestNG Priority method, which allows you to write easy-to-read and maintainable tests.
Step 1: Create TestNG Project In Eclipse
First of all, you will need to launch Eclipse and then follow the steps below to create a new TestNG project.
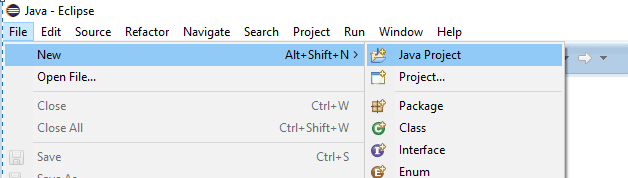
Navigate to File > New > Java Project.
Give your project a name for example, ‘TestMuNG’ and click on Next.

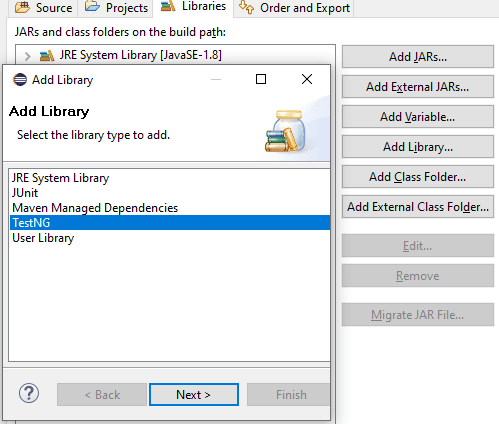
On the next screen, you will see the Java settings for your new project. To make it a TestNG project just navigate to the Libraries tab and click on the Add Library button.
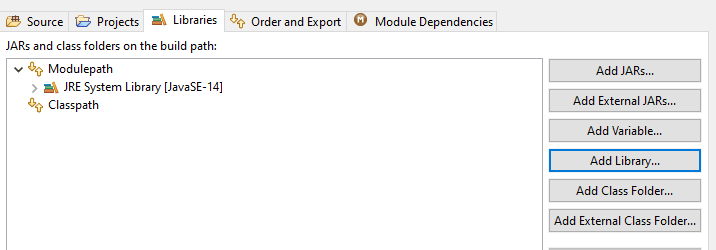
Choose TestNG from the list of libraries and click Next.
Now, you will see TestNG added to your project libraries. Click on Finish and you are all set with your testNG project.
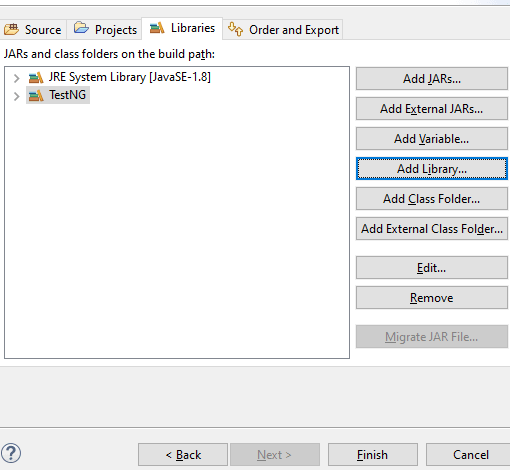
Your Java project has been created successfully and you will be able to see it by clicking on the Package Explorer button on the left panel.

Step 2: Adding Selenium JAR files To Selenium TestNG Project
Next, you need to add the Selenium API JAR files to your TestNG project “TestMuNG”. Right-click on the Project and then hit the Properties.

Now, you need to perform JAR selection from the Selenium Java language bindings which you downloaded in your systems. Navigate or choose the path where you have downloaded the Selenium Java language bindings. Add all the JAR files (even the ones inside the libs folder).
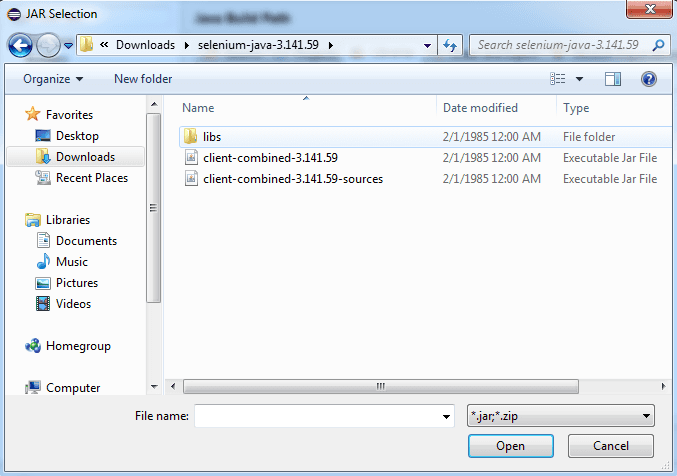
After adding all JAR files, hit the button to Apply and Close.

Awesome, now you will notice a folder for Referenced Libraries in the project TestMuNG.


With these steps, your java project is now all set to execute TestNG, the only thing you will have to do is import the Selenium libraries and browser driver(make sure to use the driver compatible with your system browser version) to run Selenium code.
Step 3: Creating a TestNG class in Eclipse
Creating a TestNG class is as easy as creating a Java class. All you need to do is follow the steps mentioned below and have your first testNG class ready.
Navigate to src from the project folder and right-click the same. You will see TestNG as an option in the dropdown towards the bottom. Click on it and you will now see two sub-options to either create a TestNG class or convert the class to TestNG. As we are creating a new TestNG class, you need to select the first option.

Generally, the source folder name is auto-filled but if it is not, you can simply browse through the same. Next, you can give any name to your class, for example, ‘TestNGTestOne’ and its package. For now, we will keep the basic annotations selected @BeforeMethod and @AfterMethod. However, Annotations can be configured at a later stage as well depending upon your test scenario. If you wish to configure them now, you can refer to the TestNG annotations.

You will now see a class(TestNGTestOne.java) in your project directory with default methods, viz f(), as well as beforeMethod() and afterMethod() that you can see were checked in the screenshot above.

You are now all set to write code in your first TestNG class, but before doing so let me quickly brief you about the TestNG annotations that we can see in the class we just created.
- @Test annotation implies that the method is a test method and any code written under it constitutes to be a test case.
- @BeforeMethod implies that the method beneath should be running before the test method.
- @AfterMethod, just as the name suggests implies that the method should run after the test method.
Watch this video to learn about the TestNG Annotations and how they help provide better structure and readability to the code.

Step 4: Writing Our First Test Case Using Selenium and TestNG
Test Scenario: We will write a simple test script wherein we will just open up a browser, navigate to Google, verify the title, and then quit the browser session. You will see the utility of the @BeforeMethod and @AfterMethod annotations as well.
Here is the java test file “TestNGTestOne.java”.
package testNG;
import org.testng.annotations.Test;
import org.testng.annotations.BeforeMethod;
import org.openqa.selenium.WebDriver;
import org.openqa.selenium.chrome.ChromeDriver;
import org.testng.Assert;
import org.testng.annotations.AfterMethod;

public class TestNGTestOne {

  	WebDriver driver;

  @Test
  public void f() {
  	//Setting up the chrome driver exe, the second argument is the location where you have kept the driver in your system
  	  System.setProperty("webdriver.chrome.driver", "E:\Softwares\chromedriver.exe");

  	//Setting the driver to chrome driver
  	  driver = new ChromeDriver();
  	  String url = "https://www.google.com";
  	  driver.get(url);
  	  //Capturing the title and validating if expected is equal to actual
  	  String expectedTitle = "Google";
  	  String actualTitle = driver.getTitle();
  	  Assert.assertEquals(actualTitle, expectedTitle);
    }
  @BeforeMethod
  public void beforeMethod() {
  	  System.out.println("Starting the browser session");
  }

  @AfterMethod
  public void afterMethod() {
  	  System.out.println("Closing the browser session");
  	  driver.quit();
  }
}
Step 5: Running Selenium TestNG Script
Right-click on the test script and navigate to Run As >> TestNG Test.

After running the test script, as shown above, you can verify the results of the test. This can be seen either on the TestNG reports or the console itself.
Now we will write our first script using Selenium and TestNG.

Austin Siewert
Co-Founder, Steadfast Systems
Discovered @TestMu AI yesterday. Best browser testing tool I've found for my use case. Great pricing model for the limited testing I do 👏
2M+ Devs and QAs rely on TestMu AI
Deliver immersive digital experiences with Next-Generation Mobile Apps and Cross Browser Testing Cloud

With TestNG certification, you can challenge your skills in performing automated testing with TestNG and take your career to the next level.
Here’s a short glimpse of the TestNG certification from TestMu AI:
TestNG Reports and Results
After Run As TestNG Test, the Console shows the pass, fail, and skip counts, and Eclipse writes index.html and emailable-report.html into the project's test-output folder. The TestNG reports chapter explains those files and how to publish them from Jenkins.
Can AI Coding Assistants Debug A Failing TestNG Script?
AI coding assistants like GitHub Copilot, Cursor, and Claude Code can read a failing TestNG stack trace and suggest a fix in the same editor where you wrote the test class.
These tools match the exception in the console or the XML report under test-output back to the exact line in your Test Class, then propose a change such as replacing a fixed Thread.sleep with an explicit WebDriverWait. They can also flag a missing @Test annotation on a method before you even run the suite, since Eclipse still compiles a plain method with no annotation. Some setups go further and let an agent open the TestNG-generated HTML report through a Model Context Protocol server and read it directly, instead of you pasting the trace into a chat window.
The limitation is that a single failed run does not tell the assistant whether the locator was wrong or the page was just slow to load that one time. It cannot see the browser session that already closed, so a suggested wait value or selector change is a guess until you rerun the TestNG suite and confirm the same test passes on a second run. Treat every AI-suggested fix to a Selenium TestNG test as unverified until the suite reruns clean.
Bonus Pointer: Use A Cloud Selenium Grid For Parallel Testing
Kudos on creating the TestNG project in Eclipse and running the Selenium TestNG script. Right now you have triggered the Selenium TestNG script using a Selenium WebDriver in your own machine but that isn’t a scalable approach. It’s okay if you’re a novice at Selenium testing. However, after some time your test suites are bound to get bigger as you may have to run automated browser testing over dozens or maybe hundreds of browsers + OS combinations.
Doing so with Selenium WebDriver can consume a lot of time and effort because the tests will be queued and executed one after another.
This is where you can leverage a Selenium Grid which can allow you to run these test cases in parallel. So read this Selenium Grid tutorial and fasttrack your Selenium testing experience like a pro!
If you’re already familiar with Selenium Grid and have it set up in your system, even then there are going to be scale issues. You will need to expand the Selenium Grid with new devices and browsers that would be launched in the market. And that would require a lot of investment in hardware and maintenance of your local Selenium Grid. Which is why it is recommended to use a cloud Selenium Grid like TestMu AI.
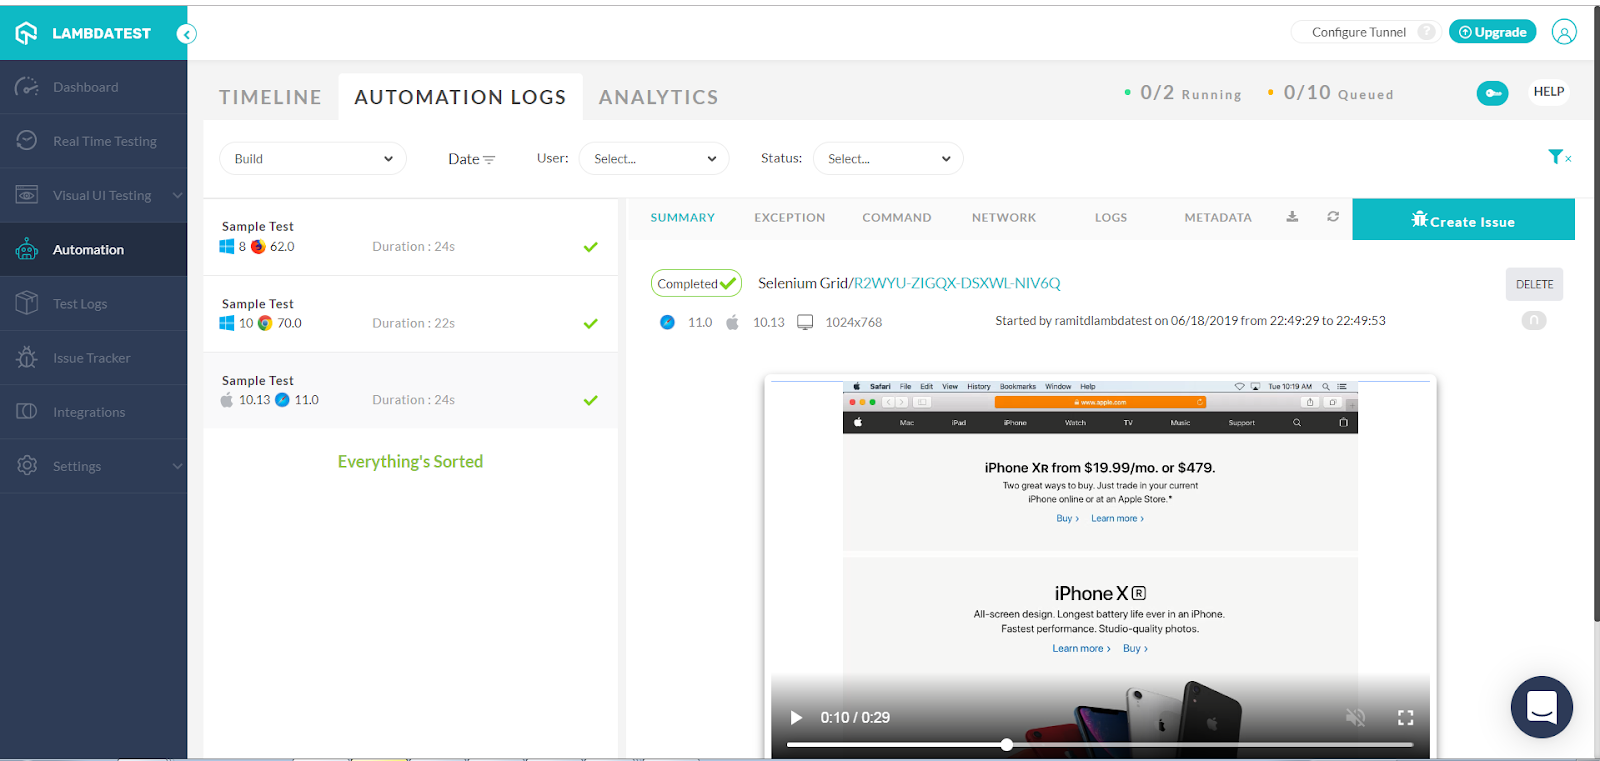
TestMu AI will help you trigger your Selenium tests with TestNG over 3000+ real browsers and operating systems. That way, you won’t even have to worry about which browsers are new in the market or maintaining your in-house Selenium infrastructure so you could focus on writing better Selenium testing scripts.
In order to run your same script on TestMu AI Selenium Grid, you will need to sign up with TestMu AI(Its FREE) and do a couple of changes to your project setup. Run your TestNG scripts on Selenium Grid Cloud. Happy Testing!

Author

Praveen Mishra
Blogs: 23


Praveen Mishra is a community contributor with 7 years of experience in B2B SaaS, specializing in testing automation and data-driven testing strategies. He holds a Bachelor's degree in Computer Applications (Computer Science) and has written 25+ technical articles on automation testing, CI/CD, cross-browser testing, and related topics. Praveen is followed by over 10,000 professionals from the QA community, including QA engineers, tech leaders, AI enthusiasts, and DevOps professionals, on LinkedIn.
Frequently asked questions
Did you find this page helpful?
More Related Blogs
TestMu AI forEnterprise
Get access to solutions built on Enterprise
grade security, privacy, & compliance
- Advanced access controls
- Advanced data retention rules
- Advanced Local Testing
- Premium Support options
- Early access to beta features
- Private Slack Channel
- Unlimited Manual Accessibility DevTools Tests