

Power Your Software Testing with AI Agents and Cloud
The Native AI-Agentic Cloud Platform to Supercharge Quality Engineering. Test Intelligently and Ship Faster.


- TestMu AI (Formerly LambdaTest)
- /
- Blog
- /
- How to Create TestNG.xml File in Eclipse
How to Create TestNG.xml File in Eclipse
This TestNG guide will help you in creating a TestNG.xml file and then executing multiple test cases in parallel on a Selenium Grid.
Last Updated on:
Creating a TestNG.xml file in Eclipse gives you one suite file that decides which test classes run, in what order, and how many run at the same time. The parallel attribute on the suite or test tag, paired with thread-count, turns a sequential run into a concurrent one, and each thread needs its own WebDriver instance.
This chapter is part of the TestNG tutorial, which covers setup, annotations, testng.xml, data-driven tests, and parallel execution.
This guide explains what the TestNG.xml file is, why teams use it, its main tags, how to set up a TestNG project in Eclipse, and a demo that creates and runs the file.
Overview
To create a TestNG.xml file in Eclipse, right-click your project, select TestNG, and click Convert to TestNG, or manually create a new file named testng.xml. This configuration file allows you to organize, prioritize, and run Java automation tests in parallel.
Why Use TestNG?
- Java test configuration: TestNG is a testing framework that offers flexible test configuration, parallel execution, and comprehensive reporting for automated test suites.
- Test execution environment: Eclipse is an integrated development environment used to set up TestNG projects, create test classes, and generate the testng.xml configuration file.
TestNG Results Plugin
- Jenkins test visualization: The TestNG Results Plugin parses TestNG XML files to present summaries, trends, and detailed failure data directly on the Jenkins dashboard.
- CI/CD automation: Jenkins is a continuous integration tool that automates TestNG test execution, archives XML results, and facilitates report sharing across teams.
How to Generate, Install, and Share Reports in Jenkins
- Report generation: To generate TestNG reports in Jenkins, configure your Jenkins job to run TestNG tests, archive the generated XML result files, and link them to the TestNG Results plugin.
- Plugin installation: To install the TestNG Results plugin, navigate to Manage Plugins in Jenkins, search for the plugin under the Available tab, and complete the installation to enable automatic report visualization.
- Report sharing: To share TestNG reports, users can access them directly via Jenkins dashboard URLs, export them as HTML files for offline sharing, or configure automated email notifications to stakeholders.
Advanced Testing Tools
- Cloud-based parallel testing: TestMu AI is an AI-powered test execution platform that runs Selenium automation tests with TestNG across 3,000+ browser/OS combinations.
- AI-assisted test authoring: KaneAI is a GenAI native test assistant by TestMu AI designed for natural language test creation, management, and debugging.
What Is the TestNG.xml File?
TestNG.xml is a configuration file that allows for organizing and executing the automated tests. It helps customize the test execution, including test suites, methods, parameters, and groups.
TestNG allows you to create multiple test cases simultaneously, and that is where the TestNG.xml file eases this task of writing various test cases all within single or multiple classes using TestNG Annotations.

Why Use TestNG.xml File?
The TestNG.xml file allows running tests in parallel, which could help the software teams save time and get faster feedback on the builds.
Here are the reasons to use the TestNG.xml file:
Prioritizes the test methods
TestNG.xml can be used to prioritize the test methods inside the test block. The TestNG.xml file allows for the specification of the tests in the order in which they need to be executed. This helps organize and efficiently run the test in the required order.
Allows parameterization in the tests
XML file allows parameterization, using which values used in the tests using the @Parameters annotation can be provided using the <parameter> tag in the TestNG.xml file.
A classic example for this case would be cross browser testing, where the browser placeholder is updated in the tests using @Parameters annotation, and multiple test blocks can be created in the TestNG.xml file.
To learn more about it, you can go through this blog on TestNG parameterization.
Provides parallel test execution
Another advantage of the TestNG.xml file is parallel testing. Using the parallel tag, test blocks under the test suite can be executed in parallel. Threads help only until one machine runs out of CPU and browsers; past that point, TestMu AI's HyperExecute can distribute the same suite across multiple virtual machines from a single YAML file, without changes to the test code.
<suite name="LambdaTest ECommerce Tests" parallel="tests">
It can also help in parallel execution of the test methods provided inside each test block.
<test name="ECommerce Website Login tests" parallel="methods">
Provides TestNG listeners
The TestNG listeners can be added to the TestNG.xml file, thus helping to get the minute details about the test execution. This can help automation test engineers easily debug failed tests.
Offers group test execution
The TestNG.xml file allows group execution of the test cases. It will enable the executing the test method in a specific order as updated in the file. Therefore, while performing TestNG testing, the TestNG.xml file allows testers to control the test execution flow.

Note: Run Your Selenium Tests With TestNG on Cloud. Try TestMu AI Today!
TestNG Test Suite Structure: Tags in a TestNG.xml File
A TestNG test suite is whatever one TestNG.xml file describes: a suite block that holds one or more test blocks, each pointing at classes and methods. Following is an example of the TestNG.xml file with multiple tests within a test suite and a single test with various tags inside it:
<suite name="LambdaTest ECommerce Tests" parallel="tests">
   <test name="ECommerce Website Login tests" parallel="methods">
       <parameter name="browser" value="chrome"/>
       <classes>
           <class name="io.github.mfaisalkhatri.LambdaTestECommerceTests">
               <methods>
                   <exclude name="testLogin"/>
                   <include name="testRegisterUser"/>
                   <include name="testAddProductToCart"/>
               </methods>
           </class>
       </classes>
   </test>
   <test name="ECommerce Website Login tests on LambdaTest Cloud Grid on Chrome" enabled="false">
       <parameter name="browser" value="chrome_cloud"/>
       <classes>
           <class name="io.github.mfaisalkhatri.LambdaTestECommerceTests">
               <methods>
                   <include name="testLogin"/>
               </methods>
           </class>
       </classes>
   </test>
</suite>
Let’s discuss the different tags used in the above TestNG.xml file:
<suite>
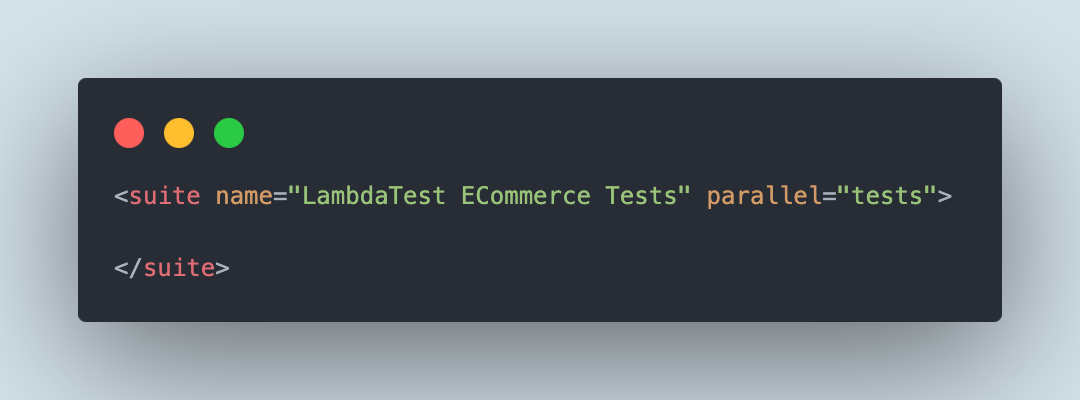
A TestNG.xml file has a single suite block. It is represented using the <suite> tag in the file. A suite can contain multiple test blocks within it.
<test>
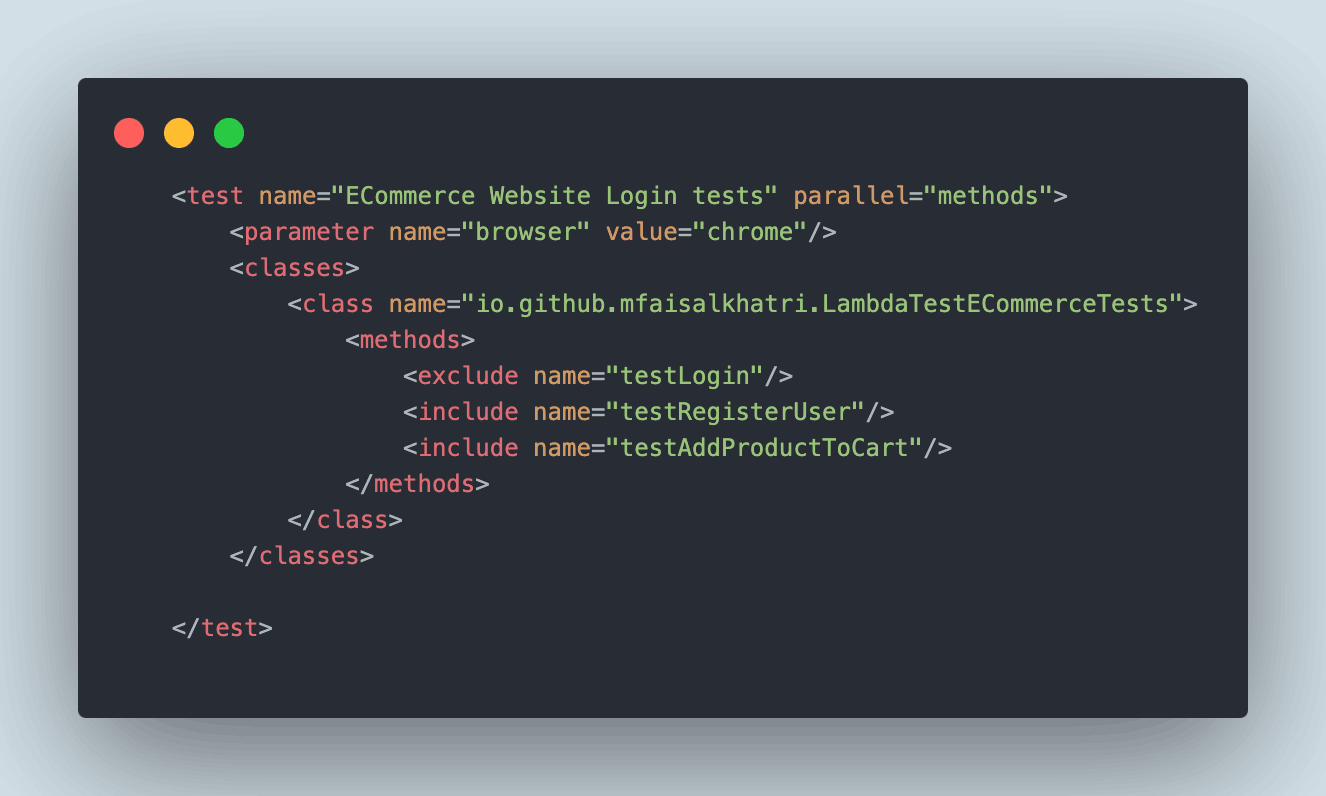
There can be multiple test blocks inside the TestNG.xml file. It is represented by the <test> tag and can contain one or multiple <classes> tags inside it.
<classes>
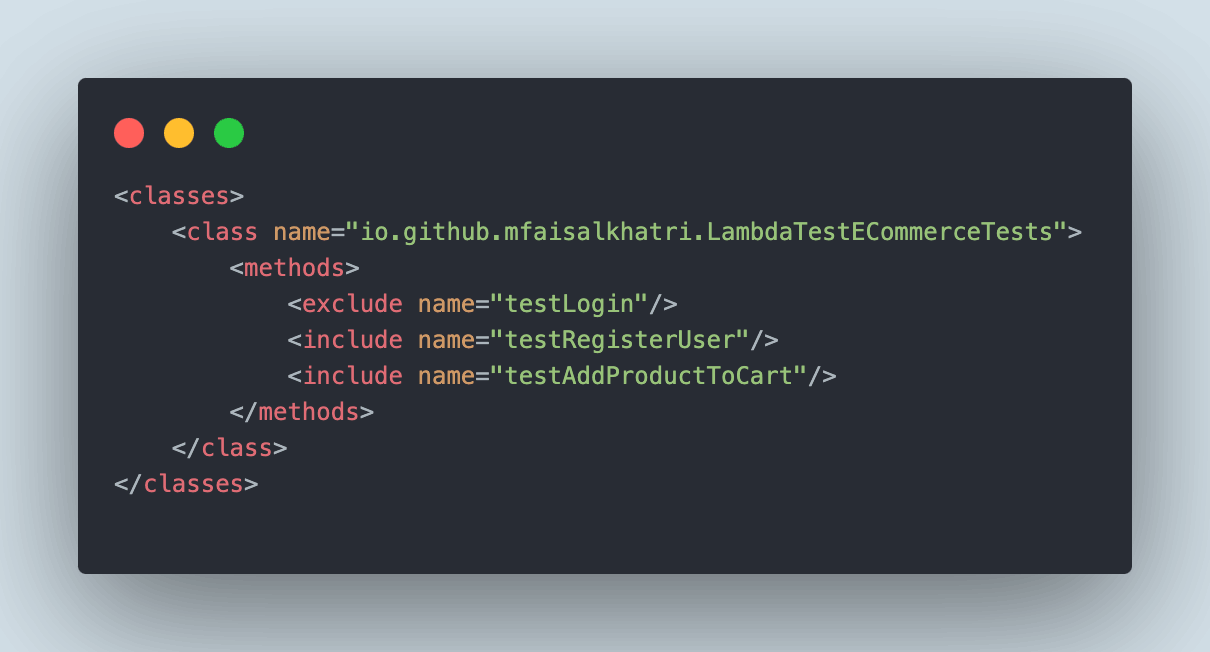
The <classes> tag has the name of the Java class that has the test methods written inside it. It can contain single or multiple test classes inside the <classes> tag block.
<methods>
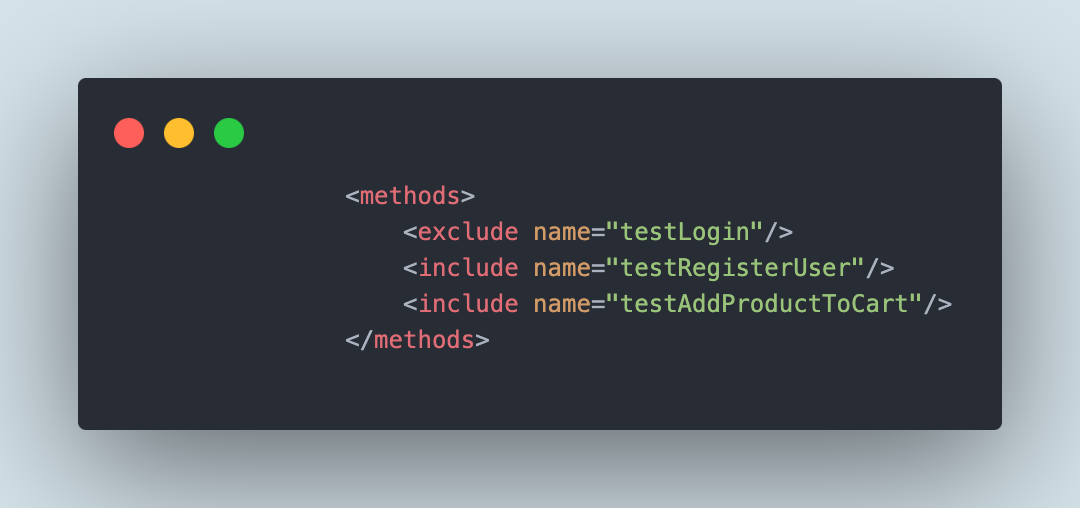
The <methods> tag can contain single or multiple test methods. These are the names of the actual test methods which will be executed for testing. The name of the test methods can be included using the <include> tag or excluded using the <exclude> tag. The <include> tag will queue up the test method for execution, while the < exclude > tag will skip the test, and the test will not be executed.
You can also enhance your Selenium test execution process by using AI-augmented testing agents such as KaneAI.
KaneAI by TestMu AI is a GenAI native test assistant, featuring industry-first AI capabilities for test authoring, management, and debugging, tailored specifically for high-speed quality engineering teams. With KaneAI, users can effortlessly create and refine complex test cases using natural language, drastically cutting down the time and expertise needed to dive into test automation.

The Test Class Used in This Demo
The demo needs a TestNG project with one test class. If you do not have one yet, the TestNG project in Eclipse chapter walks through the Eclipse wizard, and the TestNG Maven dependency chapter covers the pom.xml route. The class below is what the testng.xml file will point at.
Write a Test
A new test class will be added as per the details provided in Step 2. You may notice the red marks in the test class. Hover the mouse over the error line, for example, on @Test annotation. Once the annotation is added, the errors will disappear.
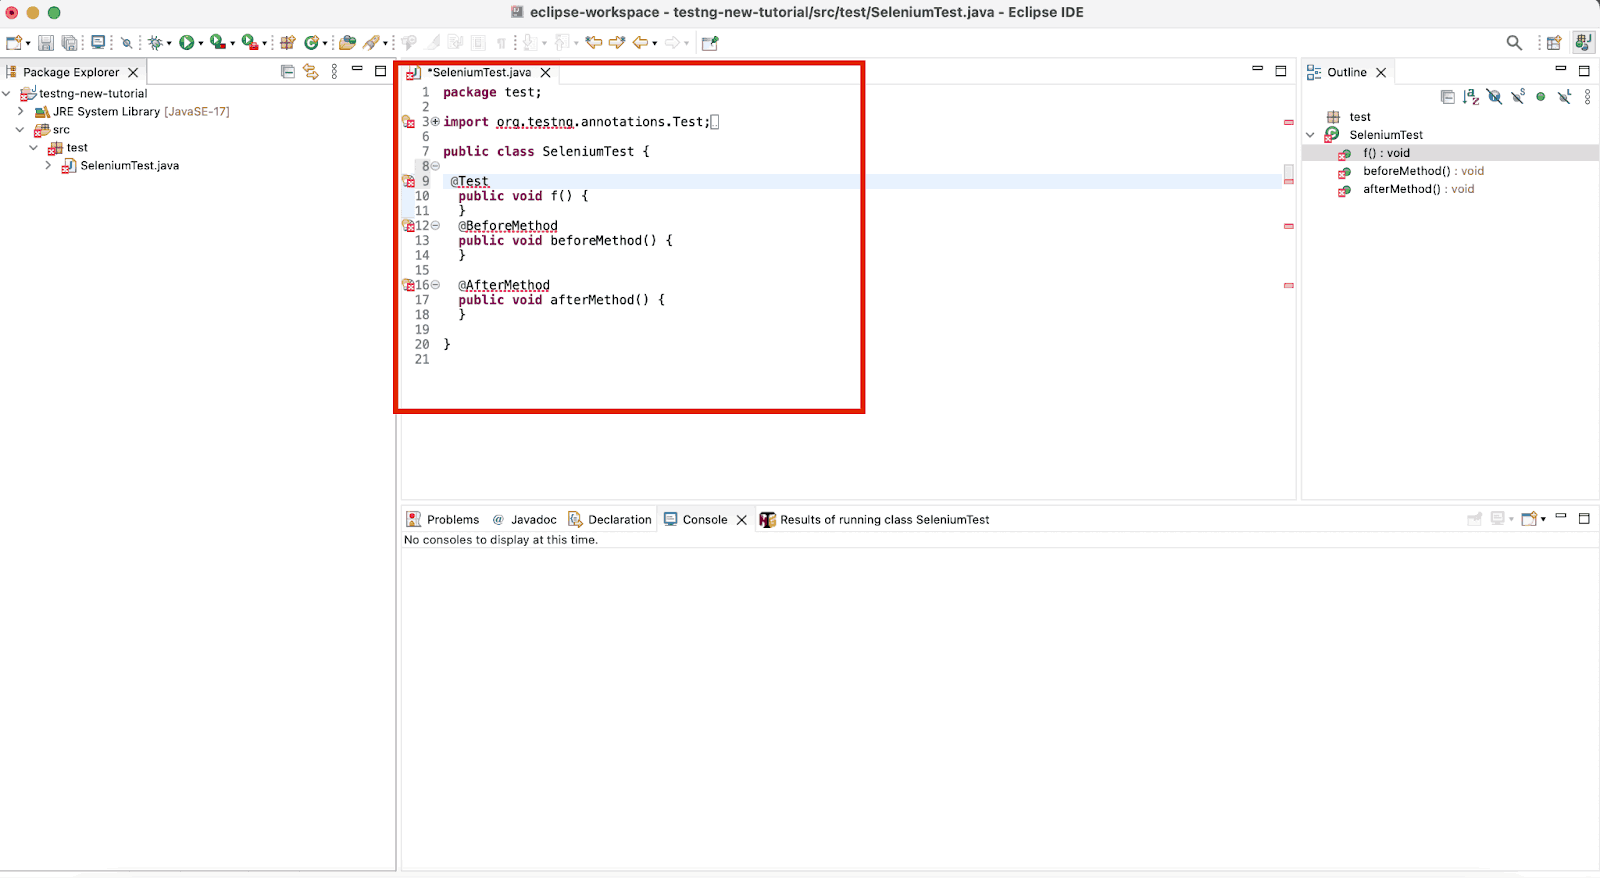
- Make the necessary changes in the class, like updating the test method name and writing the code in the respective @Test, @Before, and @After annotations.
- To run the tests, right-click on the class name > Run As > TestNG Test.
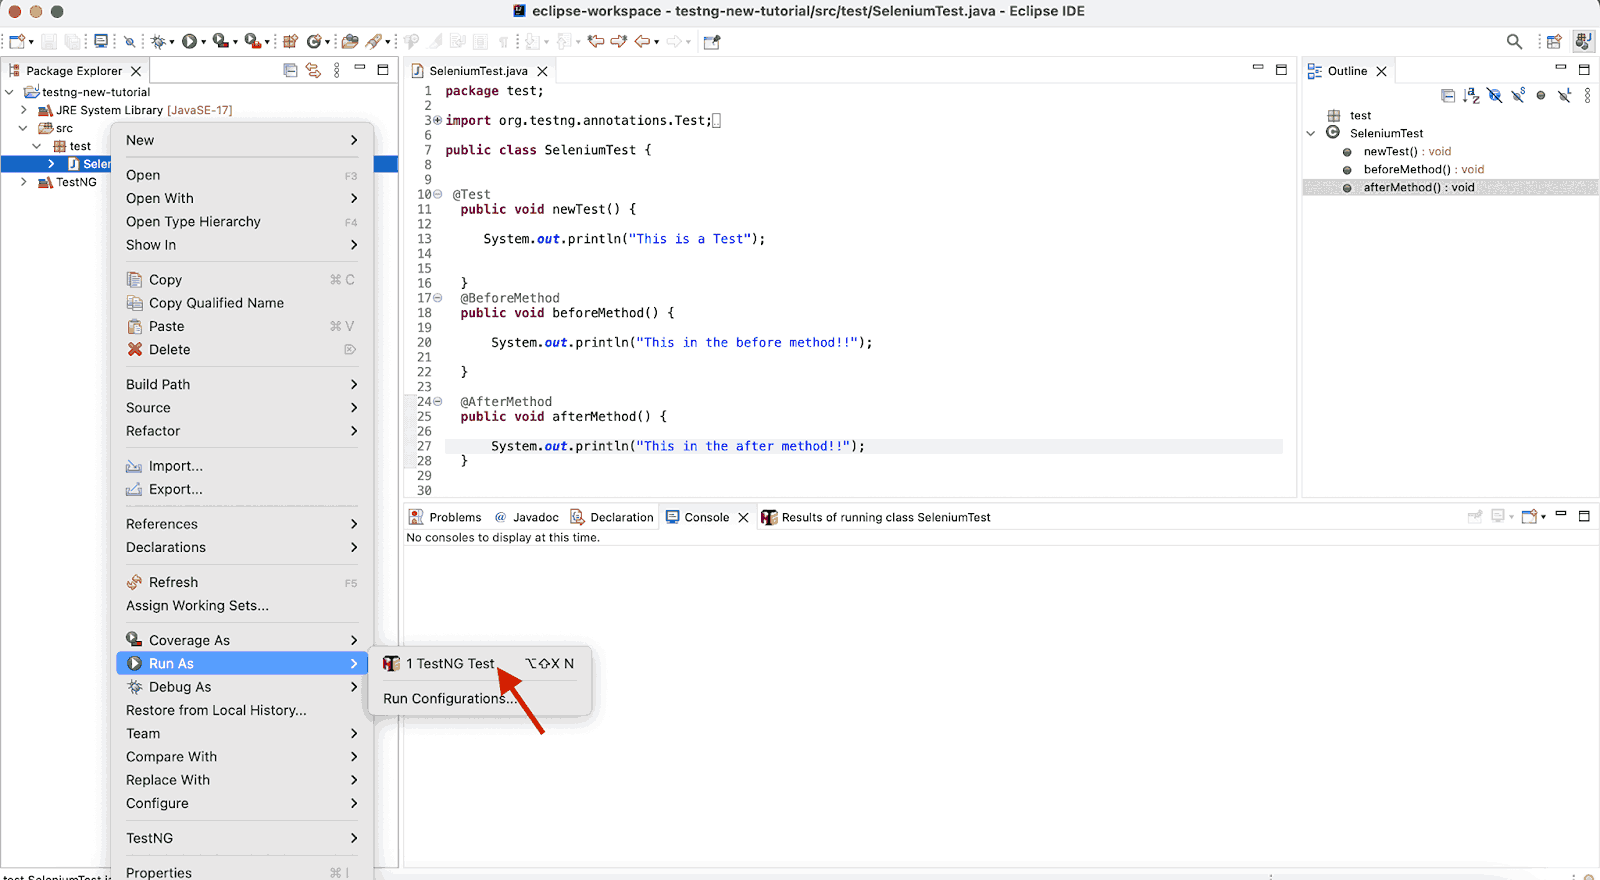
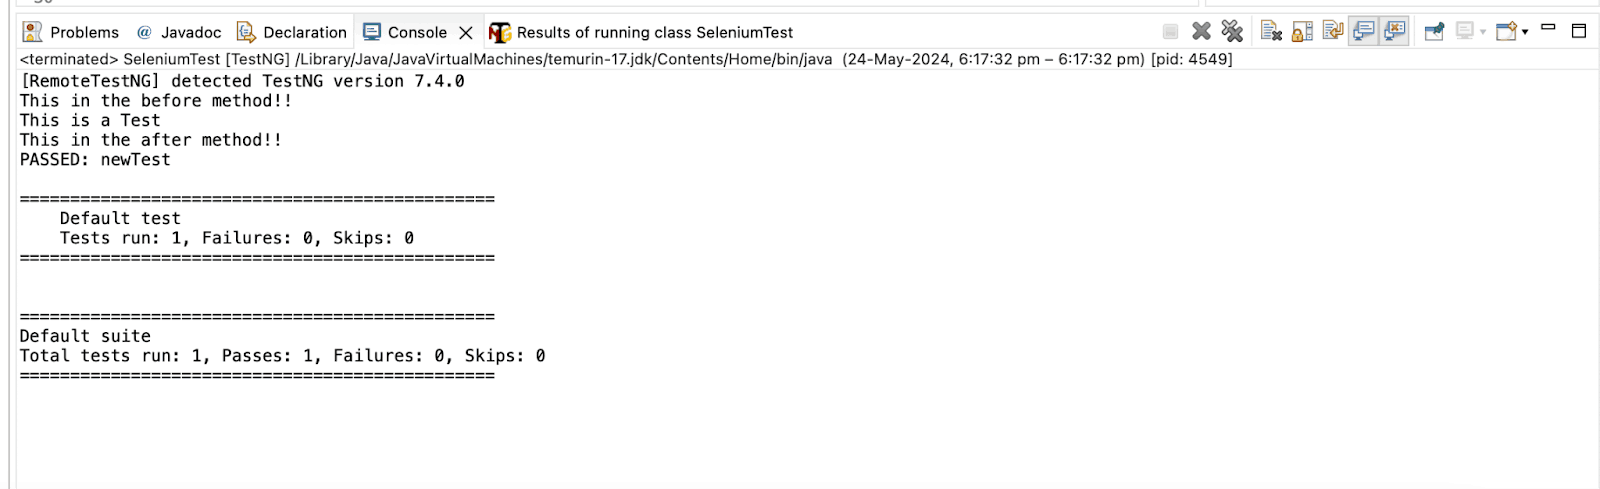
The tests will be executed using TestNG, and the results will be shown in the console window at the bottom.
Subscribe to the TestMu AI YouTube Channel and stay updated with the latest video tutorials on Selenium Java.
Demo: How to Create a TestNG.xml File in Eclipse?
In the above section, we set up a TestNG.xml file and executed tests using TestNG. Now, let’s look at how to create a TestNG.xml file in Eclipse.
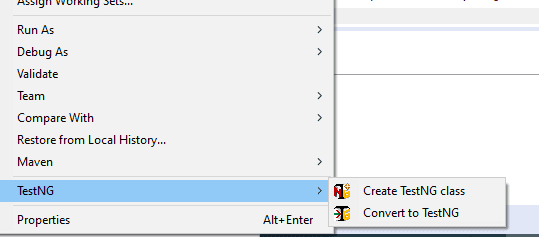
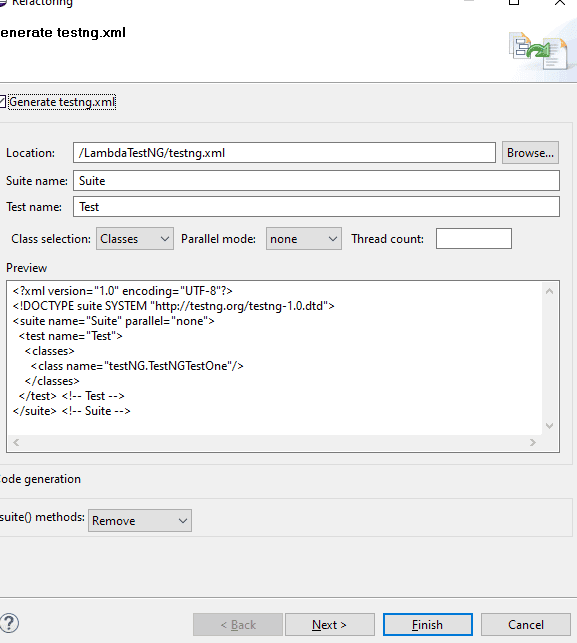
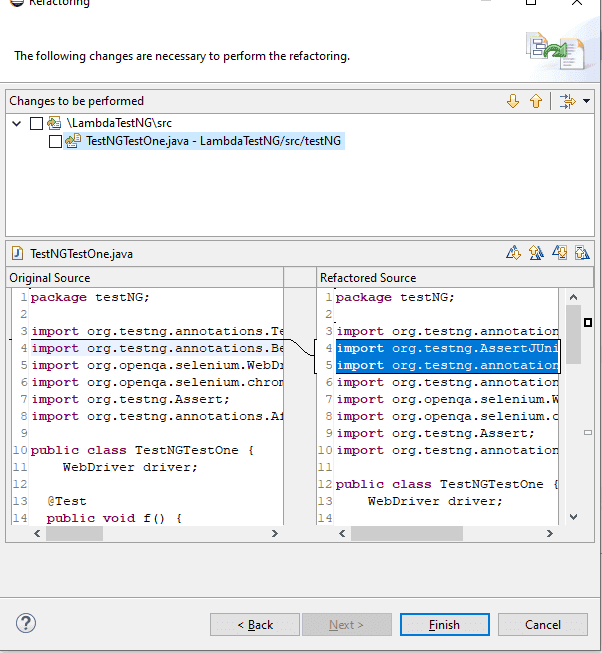
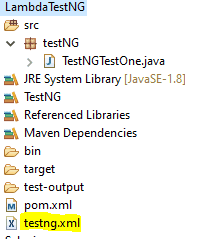
There are two methods to create a TestNG.xml file:
Method 1:
- Right-click on the project folder, and towards the bottom of the list, select TestNG and then Convert to TestNG.
- A screen like the one below would appear. Click on Next.
- The next window that pops up will have the refactored source code after you click Finish.
- A new addition to your project directory will be displayed, named as testng.xml.
- Double-click on testng.xml to open the XML file, which looks like the one below.
Method 2:
- Right-click on New, and select File.
- Enter the following file name testng.xml, and then click on Finish.
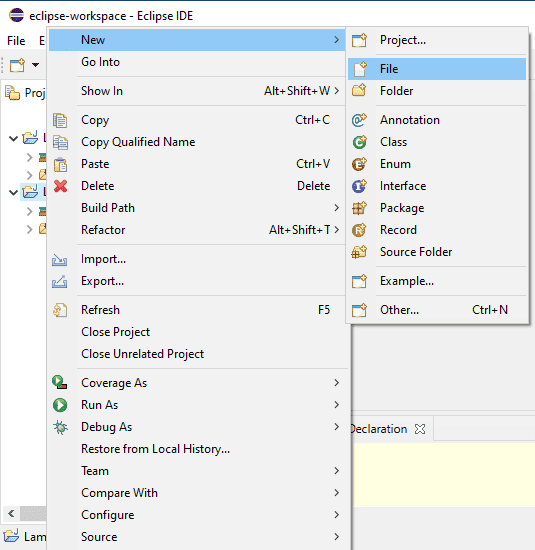
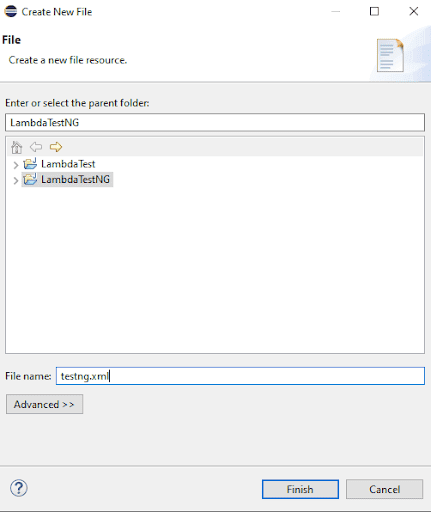
This is what a basic TestNG.xml file looks like.
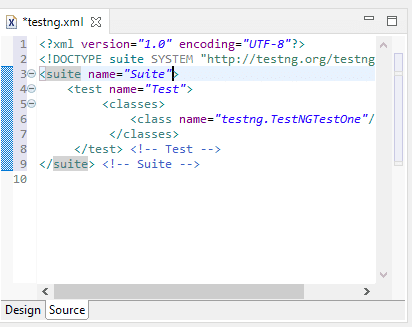
You have your very first TestNG.xml file ready. Now you know how to create a TestNG.xml file in Eclipse. Let’s leverage this TestNG.xml file to run automated tests using automation testing tools like Selenium. If you want to dig further and explore the true capabilities of Selenium, check out this guide on what is Selenium.
Running a TestNG.xml File
The hierarchy of an XML file goes like this- first <suite> tag, second <test> tag, and lastly, <classes> tag. You can give any name to the <suite> and <test> tags, but you have to be careful while naming classes since it combines the package and test name.
Since the suite is the topmost hierarchy, this is where multiple test classes can be placed. Let’s understand with the help of an example. For the test scenarios below, we have created two Java classes wherein both tests will run on the TestMu AI eCommerce Playground website.
Test Scenario 1:
- Check the title of the TestMu AI eCommerce Playground website.
Test Scenario 2:
- Start by searching for the product iphone from the home page.
- Verify that the search results page correctly displays the title Search – iphone to ensure you are on the right page.
Implementation:
The following code will help implement test scenarios 1 and 2. The EcommercePlayGroundTests class has both test methods to implement the test scenarios.
There are two additional methods in the class. The first one is the setup() method, which will run before any test runs and help set up the WebDriver and start the Chrome browser. The second tearDown() method will gracefully close the WebDriver session.
In case you want to know more about WebDriver, you can go through this tutorial on what is Selenium WebDriver.
public class EcommercePlaygroundTests {
   private WebDriver driver;

   @BeforeTest
   public void setup() {
       driver = new ChromeDriver();
       driver.manage().window().maximize();
       driver.manage().timeouts().implicitlyWait(Duration.ofSeconds(20));
   }


   @Test
   public void testCheckTitle() {
       driver.get("https://ecommerce-playground.lambdatest.io/");
       final String title = driver.getTitle();
       assertEquals(title, "Your Store");
   }

   @Test
   public void testSearchForProduct() {
       driver.get("https://ecommerce-playground.lambdatest.io/");
       WebElement searchBox = driver.findElement(By.name("search"));
       searchBox.sendKeys("iphone");

       WebElement searchBtn = driver.findElement(By.cssSelector("button.type-text"));
       searchBtn.click();

       String pageTitle = driver.findElement(By.cssSelector("#product-search h1")).getText();
       assertEquals(pageTitle, "Search - iphone");
   }

   @AfterTest
   public void tearDown() {
       driver.quit();
   }

}

The testCheckTitle() method will implement the Test Scenario 1, whereas the testSearchForProduct() method will implement the Test Scenario 2.
Test Execution:
Let’s create the TestNG.xml file with the name testng-demo.xml and update both test method names to execute the tests.
<?xml version="1.0" encoding="UTF-8"?>
<!DOCTYPE suite SYSTEM "http://testng.org/testng-1.0.dtd">
<suite name="Testng.xml demo">
   <test name="LambdaTest e-commerce playground tests" parallel =”methods”>
       <classes>
           <class name="io.github.mfaisalkhatri.testngxmldemo.EcommercePlaygroundTests">
               <methods>
                   <include name="testCheckTitle"/>
                   <include name="testSearchForProduct"/>
               </methods>
           </class>
       </classes>
   </test>
</suite>
In the TestNG.xml file above, there are 2 test methods that have the <include> tag and belong to the EcommercePlaygroundTests class. When this file is executed, both tests will run in parallel in the order in which they are updated.
First, the testCheckTitle() method will run, next the testSearchForProduct() method will be run. To run the tests methods in parallel, we need to update the parallel = “methods” tag in the <test> tagline.
To run the project using the XML file, right-click on the testng.xml file and select Run As > TestNG Suite.
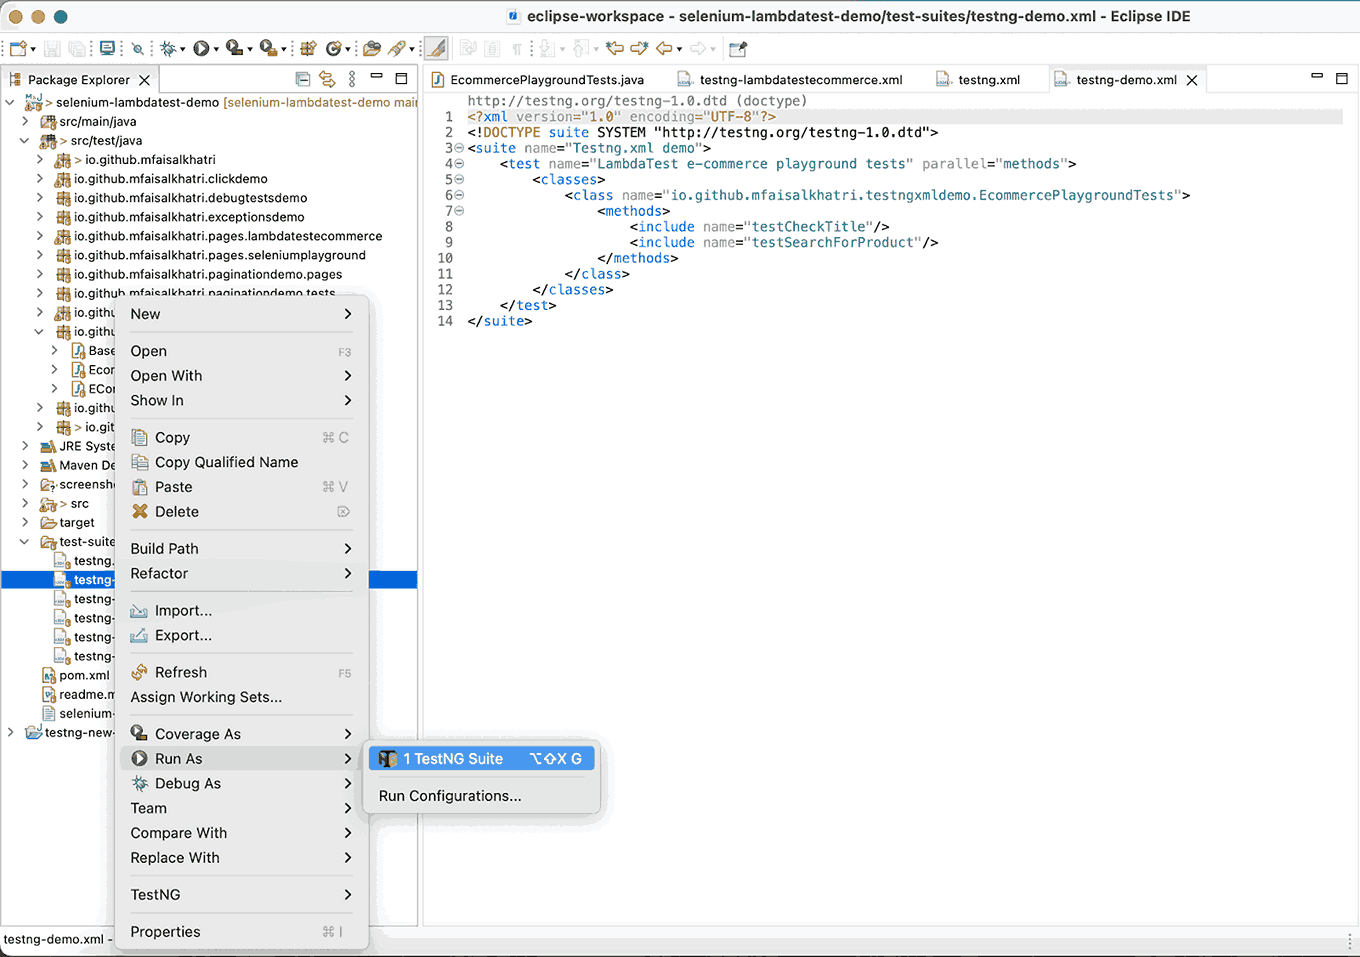
This will execute and run both of the tests using testng.xml with a simple click. Following is the test execution result displayed in the console.
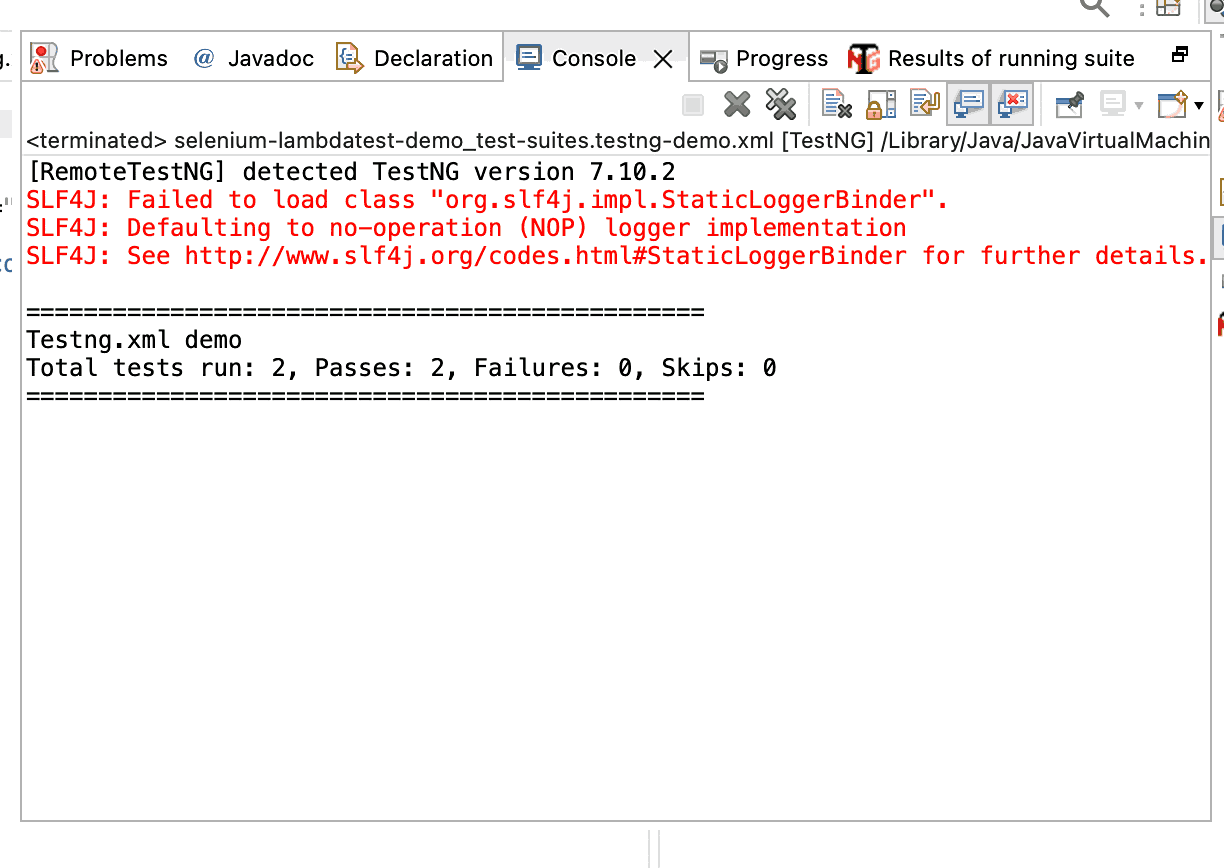
Parallel Testing Using TestNG.xml File
Now that you have executed your TestNG.xml file successfully. As mentioned earlier, this file helps running tests in parallel. So, it is important to note the changes you need to make in the TestNG.xml to perform automation testing. However, configuring hundreds of browsers and operating systems in your nodes doesn’t look feasible enough.
Instead, you can leverage a cloud grid offered by TestMu AI. It is an AI-powered test orchestration and execution platform that lets developers and testers perform Selenium automation testing with TestNG on over 3000+ real browsers and operating systems online. That way, you only need to focus on writing better Selenium automation scripts without worrying about test infrastructure needs.

Austin Siewert
Co-Founder, Steadfast Systems
Discovered @TestMu AI yesterday. Best browser testing tool I've found for my use case. Great pricing model for the limited testing I do 👏
2M+ Devs and QAs rely on TestMu AI
Deliver immersive digital experiences with Next-Generation Mobile Apps and Cross Browser Testing Cloud

Let’s use the same test scenario we implemented in the earlier section of the blog, where we searched for a product on the TestMu AI eCommerce Playground website. Earlier, we ran the tests on the local Chrome browser.
Test Scenario:
- Start by searching for the product iphone from the home page.
- Verify that the search results page correctly displays the title Search – iphone to ensure you are on the right page.
Implementation:
A new test class, Base.java, has been created to take care of all the configurations related to running tests on the TestMu AI cloud grid. It will also take care of starting and closing the browsers.
The values for the browser name, version, and platform name will be provided on runtime using the testng.xml file.
The setup() method will update the browser, its version, and platform name as the values are set using the @Parameters annotation in TestNG.
public class Base {

   RemoteWebDriver driver;
   String status = "failed";

   @BeforeTest
   @Parameters({"browser", "browserVersion", "platform"})
   public void setup(String browser, String browserVersion, String platform) {
       final String userName = System.getenv("LT_USERNAME") == null ? "LT_USERNAME" : System.getenv("LT_USERNAME");
       final String accessKey = System.getenv("LT_ACCESS_KEY") == null ? "LT_ACCESS_KEY" : System.getenv("LT_ACCESS_KEY");
       final String gridUrl = "@hub.lambdatest.com/wd/hub";

       if (browser.equalsIgnoreCase("chrome")) {
           try {
               this.driver = new RemoteWebDriver(new URL("http://" + userName + ":" + accessKey + gridUrl), getChromOptions(browser, browserVersion, platform));

           } catch (final MalformedURLException e) {
               System.out.println("Could not start the chrome browser on LambdaTest cloud grid");
           }
       } else if (browser.equalsIgnoreCase("firefox")) {
           try {
               this.driver = new RemoteWebDriver(new URL("http://" + userName + ":" + accessKey + gridUrl), getFirefoxOptions(browser, browserVersion, platform));

           } catch (final MalformedURLException e) {
               System.out.println("Could not start the firefox browser on LambdaTest cloud grid");
           }
       }

       this.driver.manage().timeouts().implicitlyWait(Duration.ofSeconds(20));
   }

   private ChromeOptions getChromOptions(String browser, String browserVersion, String platform) {
       var browserOptions = new ChromeOptions();
       browserOptions.setPlatformName(platform);
       browserOptions.setBrowserVersion(browserVersion);
       browserOptions.setCapability("LT:Options", getLtOptions());

       return browserOptions;
   }

   private FirefoxOptions getFirefoxOptions(String browser, String browserVersion, String platform) {
       var browserOptions = new FirefoxOptions();
       browserOptions.setPlatformName(platform);
       browserOptions.setBrowserVersion(browserVersion);
       browserOptions.setCapability("LT:Options", getLtOptions());

       return browserOptions;
   }

   private HashMap<String, Object> getLtOptions() {
       final var ltOptions = new HashMap<String, Object>();
       ltOptions.put("project", "Selenium ECommerce playground website");
       ltOptions.put("build", "LambdaTest Ecommerce Website tests");
       ltOptions.put("name", "Search for a product test");
       ltOptions.put("w3c", true);
       ltOptions.put("visual", true);
       ltOptions.put("w3c", true);
       ltOptions.put("plugin", "java-testNG");
       return ltOptions;
   }

   @AfterTest
   public void tearDown() {
       this.driver.executeScript("lambda-status=" + this.status);
       this.driver.quit();
   }

}
The capabilities required for configuration can be set using the TestMu AI Automation Capabilities Generator.
Code Walkthrough:
The getLtOptions() method will set the required capabilities in the test scripts.
Next, a new test class ECommercePlaygroundTestsOnCloud, has been created to implement the test scenario and extend the Base class.
public class ECommercePlaygroundTestsOnCloud extends Base{

   @Test
   public void testSearchForProduct() {
       driver.get("https://ecommerce-playground.lambdatest.io/");
       WebElement searchBox = driver.findElement(By.name("search"));
       searchBox.sendKeys("iphone");

       WebElement searchBtn = driver.findElement(By.cssSelector("button.type-text"));
       searchBtn.click();

       String pageTitle = driver.findElement(By.cssSelector("#product-search h1")).getText();
       assertEquals(pageTitle, "Search - iphone");

       status = "passed";
   }
}
The testSearchForProduct() method will search for the product iphone from the website’s home page. After loading the search page, it will check that the page title equals Search- iphone.
If everything works fine, the status variable will be updated to passed.
Test Execution:
Let’s create a new TestNG.xml file and name it as testng-parallel.xml. That will help to perform Selenium testing on two different browsers and platforms in parallel.
<?xml version="1.0" encoding="UTF-8"?>
<!DOCTYPE suite SYSTEM "http://testng.org/testng-1.0.dtd">
<suite name="Testng.xml demo" parallel="tests">
   <test name="LambdaTest e-commerce playground tests on Windows 10 - Chrome">
       <parameter name="browser" value="chrome"/>
       <parameter name="browserVersion" value="125"/>
       <parameter name="platform" value="Windows 10"/>
       <classes>
           <class name="io.github.mfaisalkhatri.testngxmldemo.ECommercePlaygroundTestsOnCloud">
               <methods>
                   <include name="testSearchForProduct"/>
               </methods>
           </class>
       </classes>
   </test>
   <test name="LambdaTest e-commerce playground tests on macOS Sonoma - Firefox">
       <parameter name="browser" value="firefox"/>
       <parameter name="browserVersion" value="126"/>
       <parameter name="platform" value="macOS Sonoma"/>
       <classes>
           <class name="io.github.mfaisalkhatri.testngxmldemo.ECommercePlaygroundTestsOnCloud">
               <methods>
                   <include name="testSearchForProduct"/>
               </methods>
           </class>
       </classes>
   </test>
</suite>
The parallel = “tests” will execute both tests in parallel.
The details of the test execution can be found on the TestMu AI Web Automation Dashboard.
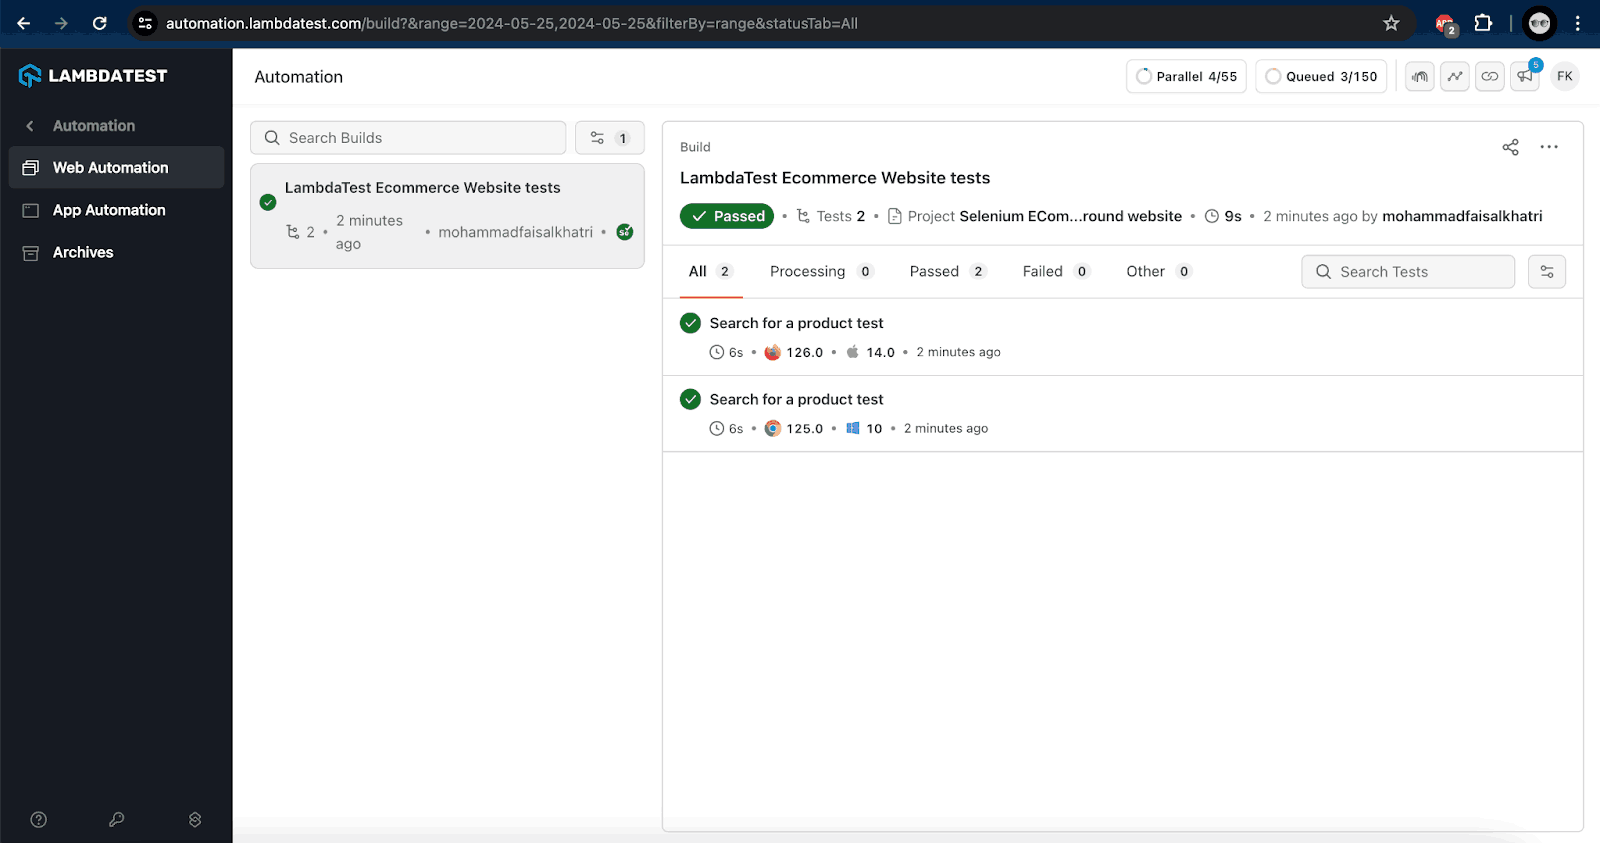
How to Run a TestNG.xml File From the Command Line
The Eclipse demo above runs testng.xml through the TestNG plugin. On a CI server or a teammate's machine the same file runs from the command line, in one of three ways.
With Maven, point the Surefire plugin at the suite file in pom.xml, then run the normal test goal. The suiteXmlFiles setting replaces Surefire's own class scanning, so only what testng.xml lists is executed:
<plugin>
    <groupId>org.apache.maven.plugins</groupId>
    <artifactId>maven-surefire-plugin</artifactId>
    <version>3.6.0</version>
    <configuration>
        <suiteXmlFiles>
            <suiteXmlFile>testng.xml</suiteXmlFile>
        </suiteXmlFiles>
    </configuration>
</plugin>
# uses the suite file configured in pom.xml
mvn test

# or pick a different suite file for this run without editing pom.xml
mvn test -Dsurefire.suiteXmlFiles=smoke.xml
With plain Java, put the compiled classes and every dependency jar on the classpath and start the org.testng.TestNG main class with the suite file as its argument. Use a semicolon instead of a colon as the separator on Windows. Reports land in the test-output folder:
java -cp "target/test-classes:target/classes:lib/*" org.testng.TestNG testng.xml
With Gradle, name the suite file inside the test task, and gradle test runs it:
test {
    useTestNG {
        suites 'src/test/resources/testng.xml'
    }
}
A fourth option is to run the suite from Java code, which is how custom launchers and some CI wrappers do it: create a TestNG instance, call setTestSuites with the file path, and call run. Whichever way you start it, the same testng.xml decides what runs, in what order, and on how many threads.
How Do AI Agents Help You Write a TestNG.xml File?
AI coding agents read the test classes in your project and generate the matching TestNG.xml suite, test and class entries, so the file is scaffolded from real code instead of typed by hand.
Here is where an agent genuinely helps, and where it still needs a human check:
- Suite scaffolding: GitHub Copilot, Cursor and Claude Code can read every method annotated with @Test in a package and emit the matching <class> and <include> blocks, which removes the most common source of typos in a hand-written testng.xml.
- Thread-safety review: an agent will set parallel="methods" on a class that holds one shared WebDriver field, and the run then fails on the second thread. Check the driver scope yourself before trusting the generated config.
- thread-count ceiling: ask the agent to match thread-count to the concurrency your grid actually allows. Setting it higher does not speed the suite up, because the extra tests simply queue.
- testng-results.xml triage: an MCP server that exposes your build tool lets an agent run the suite, parse testng-results.xml, and name the failing method instead of you scrolling the console output.
- Parameter wiring: agents are reliable at keeping <parameter> names in the XML aligned with the @Parameters annotation in Java, which is where browser and platform values usually drift out of sync.
Treat the generated file as a draft. An agent can see the code, but it cannot see whether your WebDriver instances are isolated per thread, and that is the one thing parallel execution depends on.
Conclusion
In this blog on how to create a TestNG.xml file in Eclipse, we discussed the importance of using the TestNG.xml file.
With the TestNG.xml file, testers can organize the tests, customize and run the tests in parallel, and group the tests. It also helps in the parameterization of the tests and provides more visibility towards the test execution.
Author

Faisal Khatri
Blogs: 40


Mohammad Faisal Khatri is a Software Testing Professional with 17+ years of experience in manual exploratory and automation testing. He currently works as a Senior Testing Specialist at Kafaat Business Solutions and has previously worked with Thoughtworks, HCL Technologies, and CrossAsyst Infotech. He is skilled in tools like Selenium WebDriver, Rest Assured, SuperTest, Playwright, WebDriverIO, Appium, Postman, Docker, Jenkins, GitHub Actions, TestNG, and MySQL. Faisal has led QA teams of 5+ members, managing delivery across onshore and offshore models. He holds a B.Com degree and is ISTQB Foundation Level certified. A passionate content creator, he has authored 100+ blogs on Medium, 40+ on TestMu AI, and built a community of 25K+ followers on LinkedIn. His GitHub repository “Awesome Learning” has earned 1K+ stars.
TestNG.xml FAQs
Did you find this page helpful?
More Related Blogs
TestMu AI forEnterprise
Get access to solutions built on Enterprise
grade security, privacy, & compliance
- Advanced access controls
- Advanced data retention rules
- Advanced Local Testing
- Premium Support options
- Early access to beta features
- Private Slack Channel
- Unlimited Manual Accessibility DevTools Tests