World’s largest virtual agentic engineering & quality conference
Write your first JUnit 5 test in minutes. Covers setup, annotations, assertions, parameterized tests, Mockito mocking, and Selenium runs with copy-paste code.

Saniya Gazala
Author
Srinivasan Sekar
Reviewer
Last Updated on: August 5, 2026
On This Page
JUnit is the standard open-source unit testing framework for Java. You mark plain methods with @Test, assert the result, and JUnit discovers and runs them from your IDE, Maven, or Gradle.
JUnit 5 (Jupiter) is the version most teams write today. JUnit 6 arrived on September 30, 2025 and keeps the same Jupiter API you will learn here, raising the runtime baseline to Java 17.
This JUnit tutorial takes you from a first passing test through annotations, assertions, parameterized tests, and Mockito mocking, to parallel Selenium runs across real browsers, with copy-paste code at every step.
JUnit and Selenium work independently, but pairing them gives your browser tests lifecycle control, structured assertions, and reporting, which is why the combination is so common in cross-browser testing.
Overview
Which JUnit version should you use?
JUnit 6 if your project runs Java 17 or higher, since it is the current generation. Stay on JUnit 5 for Java 8 or 11.
What does a JUnit test suite need to run?
Four moving parts turn a plain Java class into a suite your build can execute.
JUnit is the standard open-source Java testing framework. You mark methods with @Test, assert the expected result, and JUnit discovers and runs them from your IDE, Maven, or Gradle.
JUnit is one of the best Java testing frameworks, simplifying the creation of reliable and efficient automated tests. It excels in testing Java applications through features like support for diverse test cases, strong assertions, and comprehensive reporting.
Rooted in the xUnit family of frameworks, JUnit supports various test types, including unit, functional, and integration tests. While primarily used for unit testing, its flexibility allows it to handle broader testing scenarios, such as functional tests that evaluate overall system behavior and integration tests that assess component interactions.

With its flexibility and rich feature set, JUnit remains a go-to framework for ensuring the reliability of Java applications across various testing needs.
This section walks through downloading, installing, and setting up JUnit. If you are new to JUnit, the first prerequisite is installing the Java Development Kit (JDK) on your system.
The Java Development Kit (JDK) lets you develop and execute Java programs. Multiple JDK versions can coexist on one machine, but use the latest. Installing Java on Windows comes first.
Step 1: Go to the Java SE (Standard Edition) page and click on JDK Download.

Step 2: Double-click the .exe file to install Java on the system.

Step 3: Upon installation of Java, add the installation location to the environment variables PATH and CLASSPATH.

Step 4: Add the location of /bin to the environment variable PATH. To do so, click on New.

Step 5: Add the Variable name as JAVA_HOME and the Variable value as the location of your /bin file and click OK.

Step 6: To verify the installation of Java on the machine. Run the command java -version to verify the same.

With this, the installation of Java environment setup is complete.
To set up the JUnit environment you need to follow the steps mentioned below
Step 1: Visit the JUnit official site and click on "Download and install".

Step 2: Navigate to junit.jar to access the Maven Central repository, where you can download the JUnit jar file.

Step 3: Click on the latest version of JUnit from the list of versions available.

Step 4: The JUnit Jar file gets downloaded to your local machine.

That is all; you have Java and JUnit in your local system. Now, it's time to set up the environment variables for JUnit and CLASSPATH variables for JUnit.
For the variables themselves, follow this JUnit tutorial on how to set up the JUnit environment . It also covers installing Eclipse and IntelliJ.
To get more information on how to use Eclipse or IntelliJ IDEA, follow this complete video tutorial on how to install and set up JUnit with IntelliJ IDEA.
To get started, add the JUnit dependencies via Maven or Gradle. JUnit 5 is built for Java 8 and above; if your project is already on Java 17 or higher, use the JUnit 6 line instead.
If using Maven, include the following dependency in your pom.xml file. The junit-jupiter aggregate artifact pulls in the API, the engine, and the params module together, so it is the only entry most projects need:
<dependency>
<groupId>org.junit.jupiter</groupId>
<artifactId>junit-jupiter</artifactId>
<version>5.14.4</version> <!-- JUnit 6: use 6.1.2 (requires Java 17+) -->
<scope>test</scope>
</dependency>This gives your project the Jupiter API, the test engine that runs it, and the parameterized-test support used later in this tutorial. Versions shown are the latest on Maven Central at the time of writing: 5.14.4 for the JUnit 5 line and 6.1.2 for JUnit 6.
For Gradle, the equivalent is a single line in your build file:
dependencies {
testImplementation 'org.junit.jupiter:junit-jupiter:5.14.4'
}
test {
useJUnitPlatform()
}The useJUnitPlatform() call is the step people most often miss. Without it, Gradle falls back to the JUnit 4 runner and silently skips every Jupiter test.
JUnit scans your compiled classes for annotated methods, builds a test plan, runs each method in isolation, and reports pass or fail through its built-in reporter or your build tool.
JUnit allows tests to be written in Java and executed on the Java platform. It comes with a built-in reporter that displays the test results.
JUnit serves three main purposes in automation testing:
JUnit supports unit tests (individual methods or classes), integration tests (component interactions), and system tests (end-to-end behaviour like web servers). Tests can run simultaneously for efficiency, either from the command line or within IDEs like Eclipse and IntelliJ.
The framework simplifies testing through assertions that verify expected behaviour, test runners that execute and present results, Test suites that group related tests for batch execution, and a built-in reporter that keeps outcomes readable.
The next section breaks down the JUnit 5 architecture and shows how its three modules fit together.
Note: Run web app testing using the JUnit framework. Try TestMu AI Now!
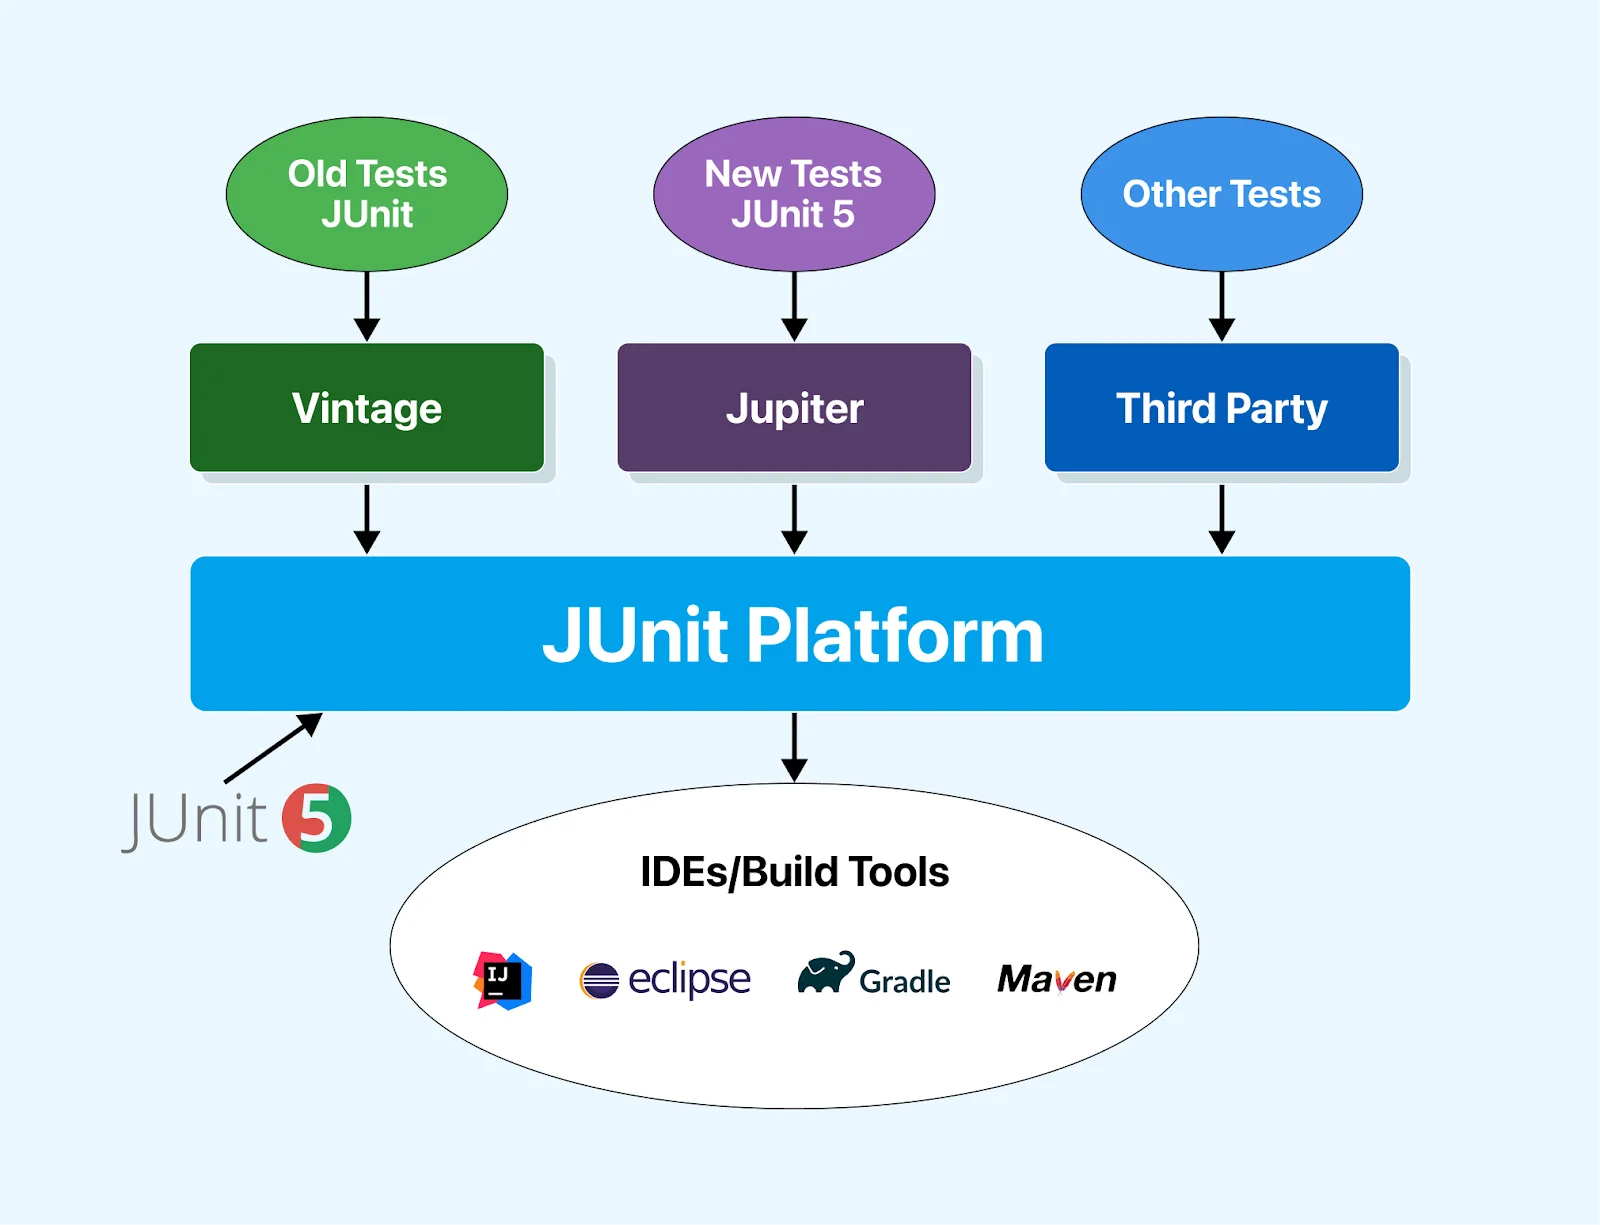
Let's learn the JUnit 5 architecture. JUnit 5 is structured around several modules distributed across three distinct sub-projects, each serving a specific purpose.

The JUnit Platform is the backbone for initiating testing frameworks on the Java Virtual Machine (JVM). It establishes the interface between JUnit and its users, including various build tools. That interface is what lets build tools discover and execute tests without knowing how each engine works.
The platform introduces the TestEngine API, a critical component for developing testing frameworks compatible with the JUnit Platform. Developers can implement custom TestEngines, directly incorporating third-party testing libraries into the JUnit ecosystem.
The Jupiter module introduces innovative programming and extension models tailored for writing tests in JUnit 5. It brings new annotations that enhance test definition capabilities compared to JUnit 4. Notable annotations include:
JUnit Vintage provides compatibility support for running tests built on JUnit 3 and JUnit 4 within the JUnit 5 platform. This ensures smooth migration for projects that rely on earlier JUnit versions.

Together, Platform, Jupiter, and Vintage give JUnit 5 its flexibility, its backward compatibility, and the extended feature set covered next.
JUnit 5 splits into three modules: the Platform that launches tests, Jupiter that provides the API you write against, and Vintage that runs legacy JUnit 3 and 4 suites.
JUnit offers a range of advantages, the main one being that it supports the development of testable code. Additional reasons to consider integrating JUnit into your software development workflow are discussed below.
Incorporating JUnit promotes code reliability and contributes to code clarity, error resolution, software quality enhancement, and overall process efficiency in software development.
JUnit provides a framework to create, execute, and validate test cases. Through annotations, assertions, and automated test runs, it supports code reliability and quicker debugging. The features below cover each in detail.
To explore additional CI/CD tools beyond Jenkins and TeamCity, refer to this guide on the best CI/CD tools. Choose from the list based on your specific requirements and preferences.
Below are the JUnit 5 enhanced functions that extended what JUnit can do, providing developers with advanced features for effective testing and streamlined workflows in this comprehensive JUnit tutorial.
The capabilities above exist in every JUnit version. The ones below arrived with JUnit 5 and are the reason most teams moved off JUnit 4.
Each carries a code example, since these are the APIs you will actually write against day to day.
JUnit 5 addresses a significant concern from JUnit 4 related to precise exception and timeout handling, providing developers with more control and clarity in their tests. The assertThrows() method stands out for its ability to pinpoint the exact location in code where an exception is expected.
In practical terms, if you have a substantial test with an extensive setup (class instantiation, mock preparation, etc.), you can now specifically test for an exception at a precise point within the code. The assertThrows() method takes advantage of lambda functions, enabling you to isolate the code snippet that should throw the specified exception.
Here is an illustration below for better understanding.
@Test
void shouldThrowException() {
// ...
// Verify that parser.parse() throws an IllegalArgumentException
assertThrows(IllegalArgumentException.class, () -> {
parser.parse();
});
}
This approach improves the precision of exception testing, allowing developers to ensure exceptions are thrown exactly where intended.
Additionally, JUnit 5 introduces the capability to test whether a portion of code executes within a specified time frame using the assertTimeout() method. This is valuable when ascertaining that a particular operation is completed within a defined timeout.
Cha@Test
void testTimeout() {
// ...
// Ensure that underTest.longRunningOperation() runs in less than 500 milliseconds
assertTimeout(Duration.ofMillis(500), () -> {
underTest.longRunningOperation();
});
}
ngeThis valuable feature enhances the readability and friendliness of test names through the use of the @DisplayName annotation. This feature allows developers to assign more expressive and human-readable names to their tests. In the example provided, the DisplayNameDemo class showcases the use of @DisplayName at both the class and method levels.
import org.junit.jupiter.api.DisplayName;
import org.junit.jupiter.api.DisplayNameGeneration;
import org.junit.jupiter.api.Test;
import org.junit.jupiter.params.ParameterizedTest;
import org.junit.jupiter.params.provider.ValueSource;
import static org.junit.jupiter.api.Assertions.assertTrue;
@DisplayName("Display name Class Level")
@DisplayNameGeneration(ReplaceCamelCase.class)
class DisplayNameDemo {
@Test
void anotherTestCamelCase() {
// Test logic here
}
@DisplayName("Test parameters with nice names")
@ParameterizedTest(name = "Use the value {0} for test")
@ValueSource(ints = { -1, -4 })
void isValidYear(int number) {
assertTrue(number < 0);
}
@Test
@DisplayName("Test name with Spaces")
void testNameCanContainSpaces() {
// Test logic here
}
}
Descriptive display names make results readable in an IDE, presenting test cases clearly. They also act as documentation, so a failing test explains itself without opening the source.
Group assertions prove particularly beneficial when testing multiple properties of a component in Adobe Experience Manager (AEM). This feature streamlines the testing process by consolidating multiple assertions into a single collective check, providing a clearer and more informative overview in case of failures.
Consider the following example:
@Test
void testNodeProperties() {
// Obtain the properties of the component
ValueMap valueMap = getValueMapOfResource();
// Group assertions for component properties
assertAll("Component Properties Check",
() -> assertEquals("value1", valueMap.get("prop1", "not_set")),
() -> assertEquals("value2", valueMap.get("prop2", "not_set")),
() -> assertEquals("value3", valueMap.get("prop3", "not_set"))
);
}
In the above scenario of this JUnit tutorial, the assertAll() method allows developers to bundle multiple assertions into a single logical unit, named Component Properties Check in this case. If any individual assertions fail, the test will report one collective failure, providing a consolidated view of all the failed assertions.
This approach simplifies the testing of various component properties, offering a more efficient way to ensure that all aspects are correctly set. With group assertions, you can achieve a more organized and insightful testing process, reducing the effort needed to identify and address issues when testing multiple properties within an AEM component.
This feature is a valuable addition, @ExtendWith, which prioritizes extension points over features. This enhancement expands the functionality available in your tests, offering a more versatile and extensible testing framework.
In practical terms, extension points act as gateways to additional functionalities in your tests. These extension points include SlingContextExtension and MockitoExtension, which provide specific capabilities for scenarios like testing with the Apache Sling framework or employing the Mockito mocking framework.
Below is the overview of how the @ExtendWith feature can be applied.
import org.junit.jupiter.api.extension.ExtendWith;
import org.mockito.junit.jupiter.MockitoExtension;
@ExtendWith(SlingContextExtension.class)
@ExtendWith(MockitoExtension.class)
class MyJUnit5Test {
// Test methods go here
}
In the example above, the @ExtendWith annotation allows developers to incorporate multiple extensions into their test class. These extensions can contribute various functionalities, enabling a more tailored testing environment.
Through the @ExtendWith feature, JUnit 5 enhances dependency injection capabilities, providing a flexible and extensible foundation for incorporating diverse testing functionalities into your test suites. This contributes to a more modular and adaptable testing approach, aligning with the diverse needs of testing scenarios encountered in real-world application development.
Some scenarios often arise where a component contains multiple child components that require individual testing. Traditionally, developers may use repetitive tests or loops to validate each child component. However, JUnit 5 introduces an efficient solution to this challenge through the innovative @RepeatedTest feature.
These JUnit 5 features let developers execute the same test multiple times, eliminating the need for manual duplication or intricate loop structures. You can achieve systematic and efficient testing of various components by annotating a test method with @RepeatedTest and specifying the desired number of repetitions.
The above are the enhancements made in JUnit 5 to make the testing process smoother and more effective; in the following section of this JUnit tutorial, we will look into the generic features of JUnit irrespective of their versions.
Conditional tests give you a way of executing different tests based on specific environmental conditions. This feature becomes particularly advantageous when adapting your test runs to multiple environments.
JUnit 4 is a single-JAR legacy release in maintenance mode. JUnit 5 introduced the modular Jupiter API that most teams write today. JUnit 6 keeps that same API but requires Java 17.
The short answer: JUnit 4 is a single-JAR legacy release in maintenance mode, JUnit 5 introduced the modular Jupiter API that almost everyone writes today, and JUnit 6 keeps that same Jupiter API while moving the runtime baseline to Java 17.
That last point matters for planning: upgrading from JUnit 5 to JUnit 6 is largely a toolchain and dependency exercise, not a test rewrite. Moving from JUnit 4 to JUnit 5 is the migration that actually changes how you write tests.
| Features | JUnit 4 | JUnit 5 | JUnit 6 |
|---|---|---|---|
| Architecture | Single jar file containing all components. | Composed of three subcomponents: JUnit Platform, JUnit Jupiter, and JUnit Vintage. | Same three subcomponents, with junit-platform-runner and junit-platform-jfr removed (JFR support folded into junit-platform-launcher). |
| Required JDK Version | Java 5 or higher | Java 8 or higher. | Java 17 or higher (Kotlin 2.1 or higher). |
| Assertions | org.junit.Assert with assert methods. | org.junit.jupiter.Assertions with enhanced assert methods, including assertThrows() and assertAll(). | Unchanged from JUnit 5; the Jupiter assertion API carries over as-is. |
| Assumptions | org.junit.Assume with various methods | org.junit.jupiter.api.Assumptions with a reduced set of methods. | Unchanged from JUnit 5. |
| Tagging and Filtering | @category annotation | @tag annotation. | @tag annotation. |
| Test Suites | @RunWith and @Suite annotation | @Suite, @SelectPackages, and @SelectClasses annotations. | Same annotations; the legacy @RunWith-based runner module is gone. |
| Non-public Test Methods | It must be public. | It can be package-protected, with no requirement for a public no-args constructor. | Same as JUnit 5. |
| 3rd Party Integration | Lacks dedicated support for third-party plugins. | The JUnit platform project facilitates third-party integration, defining the TestEngine API for testing frameworks. | Same TestEngine API; third-party engines target the JUnit Platform unchanged. |
| Legacy Test Support | Native. | JUnit 3 and 4 tests run via the Vintage engine. | Vintage engine is deprecated, intended only as a temporary bridge while migrating to Jupiter. |
| Current Status | Maintenance mode; critical bug fixes only. | Actively used; still the most common version in production. | Current generation. Released September 30, 2025; latest patch 6.1.2 on July 12, 2026. |
Version details above are from the official JUnit 6 User Guide and JUnit release notes.
If you wish to learn how JUnit 4 is slightly difference from JUnit 5, follow the video given below and get more information.
If you wish to migrate JUnit 4 to JUnit 5, get complete guidance on how to migrate by referring to this blog on how to execute JUnit 4 with JUnit 5. Teams planning the next upgrade should also explore what's new in JUnit 6 and the JUnit 6 migration guide to stay ahead of framework changes.
A JUnit test is a Java method annotated with @Test that exercises one unit of code and asserts the result. It runs in isolation, so a failure points at one behaviour, not a whole flow.
A JUnit test is a Java unit test that uses the JUnit framework to ensure the proper functioning of specific units of source code. These units, typically methods or classes, are scrutinized independently, allowing developers to detect, diagnose, and address issues early in development.
The simplicity and precision of JUnit tests contribute to maintaining the overall integrity and reliability of the application. The structured approach provided by the JUnit framework facilitates test automation, integration into development workflows, and the consistent maintenance of high code quality standards throughout the Software Development Life Cycle (SDLC).
The next section covers what that buys a team in practice.
JUnit testing catches regressions in seconds instead of in QA, documents how each method is meant to behave, and makes refactoring safe by proving behaviour still holds after a change.
In this section, we will understand why JUnit testing is important and how it helps enhance the automated testing process more effectively.
JUnit testing holds significant importance in Java development, offering a range of advantages for testing Java-based/other projects. Key benefits include:
Unit testing validates the smallest pieces of code, usually single methods, by running them in isolation to confirm they behave as expected. It is normally the first phase of testing.
Unit testing validates the smallest pieces of code by running them in isolation. It is the first test phase and stops small bugs from becoming costly ones.
Tests at this level catch regressions in seconds rather than in QA and document how a method should behave. They also make refactoring safe: change the implementation, and the tests confirm behaviour holds.
To carry out unit testing, developers use unit testing frameworks to automate this process and validate code accuracy quickly and repeatedly. JUnit is that framework for Java, and the rest of this tutorial covers it in depth.
JUnit provides annotations to identify test methods, assertions to verify expected results, and test runners to execute everything automatically, eliminating the need for manual inspection and delivering instant feedback.
JUnit annotations are predefined text elements available in the Java API, assisting the JVM in identifying the intended nature of methods or classes for testing.
In simpler terms, these annotations explicitly indicate methods or classes, attributing specific properties such as testing, disabling tests, ignoring tests, and more. To learn more about JUnit Annotations, follow the video tutorial below!
We will cover JUnit annotations that are well-known to every developer and tester. Below are the JUnit annotations used in JUnit 4.
@BeforeClass: It initializes any object in a running test case. When we instantiate an object in the BeforeClass method, it is only invoked once. The primary function of the @BeforeClass JUnit annotation is to execute some statements before all of the test cases specified in the script.
@BeforeClass
public static void SetUpClass() {
// Initialization code goes here
System.out.println("This is @BeforeClass annotation");
}
@Before: This annotation is used whenever we wish to initialize an object during the method's execution. Assuming we have five test cases, the Before method will be called five times before each test method. As a result, it would be invoked every time the test case is run. Test environments are usually set up using this annotation.
@Before
public void SetUp() {
// Setting up the test environment
System.out.println("This is @Before annotation");
}
@Test: Attaching @Test to a public void method marks it as a test case. A single automation script can contain many such test methods.
@Test
public void Addition() {
// Test method for addition
}
@Test
public void Multiplication() {
// Test method for multiplication
}
@After: Whatever we initialized in the @Before annotation method should be released in the @After annotation method. As a result, this annotation is executed after each test method. The primary function of the @After annotation is to delete temporary data. The TearDown() releases resources or cleans up the test environment in @Before.
@After
public void TearDown() {
// Cleaning up the test environment
System.out.println("This is @After annotation");
}
@AfterClass: Anything initialised in @BeforeClass should be released here. It runs once, after all tests finish, and TearDownClass() releases those resources.
@AfterClass
public static void TearDownClass() {
// Release your resources here
System.out.println("This is @AfterClass annotation");
}
@Ignore: The @Ignore annotation directs JUnit to skip the execution of the annotated method. This proves useful when a particular code module is unavailable for a specific test case.
The test case is prevented from failing by temporarily placing the concerned code module within the @Ignore annotated method.
In JUnit 4, this annotation provides detailed reporting, helping you keep track of the number of tests that were ignored and the number of tests that ran and failed.
@Ignore
public void IgnoreMessage()
{
String info = "JUnit Annotation Blog" ;
assertEquals(info,"JUnit Annotation Blog");
System.out.println("This is @Ignore annotation");
}
To understand JUnit annotation better, below is the compiled code with output representing all the JUnits annotations in Selenium.
package JUnitAnnotationBlog;
import static org.junit.Assert.assertEquals;
import org.junit.After;
import org.junit.AfterClass;
import org.junit.Before;
import org.junit.BeforeClass;
import org.junit.Ignore;
import org.junit.Test;
public class JUnitAnnotations {
int a=10;
int b=5;
Object c;
@BeforeClass
public static void SetUpClass()
{
//Initialization code goes here
System.out.println("This is @BeforeClass annotation");
}
@Before
public void SetUp()
{
// Setting up the test environment
System.out.println("This is @Before annotation");
}
@Test
public void Addition()
{
c= a+b;
assertEquals(15,c);
System.out.println("This is first @Test annotation method= " +c);
}
@Test
public void Multiplication()
{
c=a*b;
assertEquals(50,c);
System.out.println("This is second @Test annotation method= " +c);
}
@After
public void TearDown()
{
// Cleaning up the test environment
c= null;
System.out.println("This is @After annotation");
}
@AfterClass
public static void TearDownClass()
{
//Release your resources here
System.out.println("This is @AfterClass annotation");
}
@Ignore
public void IgnoreMessage()
{
String info = "JUnit Annotation Blog" ;
assertEquals(info,"JUnit Annotation Blog");
System.out.println("This is @Ignore annotation");
}
}
JUnit 5 renamed most of these annotations and changed how a few behave. The table below maps the JUnit 4 name to its JUnit 5 equivalent.
Notably, as of JUnit 5, a significant change is evident, since test classes and methods no longer require public visibility.
Let's now navigate through the key JUnit 5 annotations commonly used.
import org.junit.jupiter.api.Test;
import static org.junit.jupiter.api.Assertions.assertEquals;
class JUnit5Test {
@Test
void TestNewJUnit5() {
assertEquals(10, 7+7);
}
}
In this context, you must declare a source that provides arguments for each invocation used within the test method.
For instance, consider the following example illustrating a parameterized test using the @ValueSource annotation to specify a String array as the source of arguments.
import org.junit.jupiter.params.ParameterizedTest;
import org.junit.jupiter.params.provider.ValueSource;
import static org.junit.jupiter.api.Assertions.assertTrue;
class JUnit5Test {
@ParameterizedTest
@ValueSource(strings = { "Kali", "eali", "dani" })
void endsWithI(String str) {
assertTrue(str.endsWith("i"));
}
}
Each iteration of a repeated test functions similarly to the execution of a standard @Test method. This feature proves especially valuable, notably in UI testing scenarios involving Selenium.
Below is a simpler example of repeating a test using flipping a coin:
import org.junit.jupiter.api.DisplayName;
import org.junit.jupiter.api.RepeatedTest;
import org.junit.jupiter.api.RepetitionInfo;
import org.junit.jupiter.api.TestInfo;
import static org.junit.jupiter.api.Assertions.assertTrue;
class CoinFlipTest {
@RepeatedTest(5)
@DisplayName("Coin Flip Test")
void flipCoin(RepetitionInfo repetitionInfo, TestInfo testInfo) {
String result = flipACoin();
System.out.println(testInfo.getDisplayName() + " - Result: "+ result);
// Ensure the result is either "Heads" or "Tails"
assertTrue(result.equals("Heads") || result.equals("Tails"));
}
private String flipACoin() {
// Simulate flipping a coin and return the result
return (Math.random() < 0.5) ? "Heads" : "Tails";
}
}
Here @RepeatedTest simulates flipping a coin five times. The flipCoin method returns Heads or Tails at random, and the test asserts the result is one of the two.
import org.junit.jupiter.api.DisplayName;
import org.junit.jupiter.api.Test;
import org.junit.jupiter.api.TestInfo;
@DisplayName("DisplayName TestMu AI")
class JUnit5Test {
@Test
@DisplayName("Custom test name")
void testWithDisplayName() {
}
@Test
@DisplayName("Print test name")
void printDisplayName(TestInfo testInfo) {
System.out.println(testInfo.getDisplayName());
}
}
import org.junit.jupiter.api.*;
class JUnit5Test {
@BeforeEach
void setUp(TestInfo testInfo) {
String callingTest = testInfo.getTestMethod().get().getName();
System.out.println("Initializing for test: " + callingTest);
}
@Test
void firstTest() {
System.out.println("Executing first test 1");
}
@Test
void secondTest() {
System.out.println("Executing second test 2");
}
}
import org.junit.jupiter.api.*;
class JUnit5Test {
@Test
void firstTest() {
System.out.println("Executing first test");
}
@Test
void secondTest() {
System.out.println("Executing second test");
}
@AfterEach
void tearDown(TestInfo testInfo) {
String callingTest = testInfo.getTestMethod().get().getName();
System.out.println("Tearing down after test: " + callingTest);
}
}
In this example, the tearDown() method is annotated with @AfterEach and runs after each test method, providing a way to perform cleanup or reset operations specific to each test.
import org.junit.jupiter.api.*;
class JUnit5Test {
@BeforeAll
static void setUpAll() {
System.out.println("Initialization before all tests");
}
@Test
void firstTest() {
System.out.println("Executing first test");
}
@Test
void secondTest() {
System.out.println("Executing second test");
}
}
import org.junit.jupiter.api.*;
class JUnit5Test {
@Test
void firstTest() {
System.out.println("Executing first test");
}
@Test
void secondTest() {
System.out.println("Executing second test");
}
@AfterAll
static void tearDownAll() {
System.out.println("Only run once after all tests");
}
}
In the above example of this JUnit tutorial, the tearDownAll() method is annotated with @AfterAll and runs once after all tests, providing a mechanism to perform cleanup tasks that are common to all test methods.
import org.junit.jupiter.api.Tag;
import org.junit.jupiter.api.Test;
@Tag("smoke")
class JUnit5Test {
@Test
@Tag("login")
void validLoginTest() {
// Test logic for valid login
}
@Test
@Tag("search")
void searchTest() {
// Test logic for search functionality
}
}
In this example, the JUnit 5 Test class is tagged with smoke, and two test methods (validLoginTest and searchTest) are further tagged with login and search, respectively. This allows for selective execution of tests based on the assigned tags, facilitating the creation of focused test suites.
import org.junit.jupiter.api.Disabled;
import org.junit.jupiter.api.Test;
@Disabled
class DisabledClassDemo {
@Test
void testWillBeSkipped() {
// Test logic to be skipped
}
}In this example, the entire class DisabledClassDemo is annotated with @Disabled, causing all @Test methods within the class to be skipped.
import org.junit.jupiter.api.Disabled;
import org.junit.jupiter.api.Test;
class DisabledTestsDemo {
@Disabled
@Test
void testWillBeSkipped() {
// Test logic to be skipped
}
@Test
void testWillBeExecuted() {
// Test logic to be executed
}
}
In this example, the testWillBeSkipped method is individually annotated with @Disabled, leading to the exclusion of only that specific test, while testWillBeExecuted remains enabled and will be executed.
JUnit assertions allow developers to validate expected outcomes and behaviors within their Java code. These assertions ensure the correctness of the application's functionality during testing. With JUnit Assertions, developers can construct dependable test suites, enhancing the reliability and effectiveness of their testing processes.
To learn more about JUnit Assertions, follow the complete video tutorial guide, get valuable insights, and learn when and how to use assertions.
Assertions are a core element in Selenium automation. They verify that the actual outcome of a test matches the expected result.
Assertions sit after actions in the code, comparing actual results against expected ones. A match passes the test; a mismatch fails the assertion and marks the test failed.
JUnit provides a set of built-in assertion methods that handle this validation in Java-based test scripts.
For better understanding, let us look into the JUnit 4 Assertions with examples below.
The syntax for assertEquals()is as follows:
Assert.assertEquals(String expected, String actual);
Assert.assertEquals(String message, String expected, String actual);The assertFalse() method takes a parameter value set to true for a condition within a method. The JUnit assertTrue() function serves two primary purposes:
These methods contribute to effective result validation and error handling in automated testing scenarios.
The syntax for assertArrayEquals() is as follows:
Assert.assertArrayEquals(Object[] expected, Object[] actual);
Assert.assertArrayEquals(String message, Object[] expected, Object[] actual);
);This method proves useful for comparing arrays and ensuring that their content matches the expected values, supporting reliable assertion handling in automated testing scenarios.
The syntax for assertNull() is as follows:
Assert.assertNull(Object obj);
Assert.assertNull(String msg, Object obj);
The syntax for assertNotNull() is as follows:
Assert.assertNotNull(Object obj);
Assert.assertNotNull(String msg, Object obj);These methods are valuable for effective null value checking and assertion handling in automated testing scenarios.
The syntax for assertSame() is as follows:
Assert.assertSame(Object expected, Object actual);
Assert.assertSame(String message, Object expected, Object actual);
The syntax for assertNotSame() is as follows:
Assert.assertNotSame(Object expected, Object actual);
Assert.assertNotSame(String message, Object expected, Object actual);The syntax for assertTrue() is as follows:
Assert.assertTrue(boolean condition);The syntax for assertTrue() that accepts two parameters is as follows:
Assert.assertTrue(String message, boolean condition);
The syntax for assertFalse() is as follows:
Assert.assertFalse(boolean condition);
The syntax for assertFalse() that accepts two parameters is as follows:
Assert.assertFalse(String message, boolean condition);These functions handle assertions in automated testing scenarios, allowing for verification of conditions based on true or false outcomes.
The syntax for fail() is as follows:
Assert.fail();
The fail() method takes no parameters and triggers an AssertionFailedError immediately. Deliberately failing a test sounds counterintuitive, but it is useful during development and debugging.
The syntax for assertThat() is as follows:
Assert.assertThat(String message, T actual, Matcher<? super T> matcher);
Assert.assertThat(T actual, Matcher<? super T> matcher);
The assertThat() assertion enables more expressive and readable tests using Matcher objects defining success conditions.
JUnit 5 has retained many assertion methods from JUnit 4 and introduced several new ones that build on Java 8 support. In this version, assertions apply to all primitive types, objects, and arrays, whether they consist of primitives or objects.
A notable change is the reordering of parameters in the assertions, placing the output message parameter as the last. Java 8 support allows the output message to be a Supplier, facilitating lazy evaluation.
Let's look closer at the assertions with equivalents in JUnit 4:
These updates in JUnit 5 enhance the flexibility and readability of assertions in test cases. Let us look at some JUnit 5 Asserestion below with examples for better understanding.
The syntax for assertIterableEquals() is as follows:
assertIterableEquals(Iterable<?> expected, Iterable<?> actual);
assertIterableEquals(String message, Iterable<?> expected, Iterable<?> actual);Example
Here iterableEqualsPositive() asserts across two iterables holding the same elements in the same order. The types differ: one is an ArrayList, the other a LinkedList.
@Test
void iterableEqualsPositive() {
Iterable<String> iterat1 = new ArrayList<>(asList("Java", "Junit", "Test"));
Iterable<String> iterat2 = new LinkedList<>(asList("Java", "Junit", "Test"));
assertIterableEquals(iterat1, iterat2);
}
In this example, the assertion passes successfully as the sequence and number of elements in both iterables are identical, fulfilling the criteria for deep equality. This flexibility in handling iterables of different types enhances the utility of assertIterableEquals() in various testing scenarios.
Here is how the algorithm works for each pair of expected and actual lines:
The syntax for assertLinesMatch() is as follows:
assertLinesMatch(List<String> expected, List<String> actual);Example
In the provided example, the assertLinesMatch assertion is demonstrated. The expected list contains a regular expression that matches the elements of the actual list.
@Test
void linesMatchExample() {
List<String> expected = Arrays.asList("apple", "banana", ".*");
List<String> actual = Arrays.asList("apple", "banana", "orange");
assertLinesMatch(expected, actual);
}The assertion passes because the regular expression in the expected list matches the corresponding elements in the actual list. Staged matching allows several comparison scenarios across string lists.
The syntax for assertThrows() in JUnit 5 is as follows:
assertThrows(Class<? extends Throwable> expectedType, Executable executable);Example
In the following example, the assertion is used to test if the length of a null string (arr) throws a NullPointerException.
@Test
void exceptionTestingPositive() {
String arr = null;
Exception exception = assertThrows(NullPointerException.class, () -> arr.length());
assertEquals(null, exception.getMessage());
}
The syntax for assertTimeout() in JUnit 5 is as follows:
assertTimeout(Duration timeout, Executable executable);Example
In the following example, assertTimeout() is set to 2 seconds, indicating that the assertion should be completed within this time frame. The test scenario involves waiting for 1 second and then performing the assertion.
@Test
void assertTimeoutPositive() {
int a = 4;
int b = 5;
assertTimeout(
ofSeconds(2),
() -> {
// code that should complete within 2 seconds
Thread.sleep(1000);
}
);
assertEquals(9, (a + b));
}
The syntax for assertTimeoutPreemptively() in JUnit 5 is as follows:
assertTimeoutPreemptively(Duration timeout, Executable executable);Example
In the provided JUnit 5 test method, assertPreemptiveTimeoutNegative(), the objective is to demonstrate the use of assertTimeoutPreemptively() by intentionally causing a test failure due to a timeout.
@Test
void assertPreemptiveTimeoutNegative() {
int a = 4;
int b= 5;
assertTimeoutPreemptively(
ofSeconds(2),
() -> {
// code that requires less then 2 seconds to execute
Thread.sleep(5000);
assertEquals(9, (a + b));
}
);
}
The key difference is that assertTimeoutPreemptively() runs the executable in a separate thread and aborts it once the timeout passes. assertTimeout() lets it keep running, which can affect later code.
Note: JUnit 6 keeps the same Jupiter API, so the assertions above compile unchanged after you upgrade.
A parameterized test in JUnit sources its data from parameters rather than hardcoded values. JUnit then runs the test once per data set the method provides.
Here are two practical approaches to using JUnit Parameterized Tests.
There are also some benefits of adapting to JUnit parameterized tests, some of which are listed below.
Adopting parameterized tests aligns with the separation of concerns, resulting in more maintainable and efficient test suites. This approach simplifies the test code, improving test coverage and reducing duplication.
Parameterized tests in JUnit 5 enable the execution of a single test method multiple times with various arguments, facilitating the testing of methods with different input values or combinations.
@ParameterizedTest
@ValueSource(ints = {3, 9, 77, 191})
void testIfNumbersAreOdd(int number) {
assertTrue(calculator.isOdd(number), "Check: " + number);
}
@ParameterizedTest
@CsvSource({"3,4", "4,14", "15,-2"})
void testMultiplication(int value1, int value2) {
assertEquals(value1 * value2, calculator.multiply(value1, value2));
}
enum Color {
RED, GREEN, BLUE
}
@ParameterizedTest
@EnumSource(Color.class)
void testWithEnum(Color color) {
assertNotNull(color);
}
// Contents of the .csv file
// src/test/resources/test-data.csv
// 10, 2, 12
// 14, 3, 17
// 5, 3, 8
@ParameterizedTest
@CsvFileSource(resources = "/your-file-name.csv")
void testWithCsvFileSource(String input1, String input2, String expected) {
int iInput1 = Integer.parseInt(input1);
int iInput2 = Integer.parseInt(input2);
int iExpected = Integer.parseInt(expected);
assertEquals(iExpected, calculator.add(iInput1, iInput2));
}
static Stream<Arguments> generateTestCases() {
return Stream.of(
Arguments.of(101, true),
Arguments.of(27, false),
Arguments.of(34143, true),
Arguments.of(40, false)
);
}
@ParameterizedTest
@MethodSource("generateTestCases")
void testWithMethodSource(int input, boolean expected) {
// the isPalindrome(int number) method checks if the given
// input is palindrome or not
assertEquals(expected, calculator.isPalindrome(input));
}
import org.junit.jupiter.api.extension.ExtensionContext;
import org.junit.jupiter.params.ParameterizedTest;
import org.junit.jupiter.params.provider.Arguments;
import org.junit.jupiter.params.provider.ArgumentsProvider;
import org.junit.jupiter.params.provider.ArgumentsSource;
import java.util.stream.Stream;
import static org.junit.jupiter.api.Assertions.assertNotNull;
class CustomArgumentsProviderTest {
static class StringArgumentsProvider implements ArgumentsProvider {
String[] fruits = {"Grape", "mango", "Papaya"};
@Override
public Stream<? extends Arguments> provideArguments(ExtensionContext extensionContext) throws Exception {
return Stream.of(fruits).map(Arguments::of);
}
}
@ParameterizedTest
@ArgumentsSource(StringArgumentsProvider.class)
void testWithCustomArgumentsProvider(String fruit) {
assertNotNull(fruit);
}
}import org.junit.jupiter.api.BeforeEach;
import org.junit.jupiter.api.Nested;
import org.junit.jupiter.api.Test;
class ExampleTest {
@BeforeEach
void setup1() {}
@Test
void test1() {}
@Nested
class NestedTest {
@BeforeEach
void setup2() {}
@Test
void test2() {}
@Test
void test3() {}
}
}
For more, see this dedicated guide on nested tests in JUnit 5 . It covers the challenges and benefits of organising tests hierarchically.
JUnit is not the only option on the JVM. These frameworks either complement it or replace it, depending on whether you need unit-level checks or full browser automation.
Java remains the preferred language for testing web applications. Below are widely used unit testing frameworks for Selenium with Java automation of websites and web applications.
Teams following BDD also rely on JBehave testing, where Given-When-Then scenarios execute natively alongside JUnit tests using Java and Maven.
TestNG is a rapid and highly adaptable test automation framework positioned as a next-generation alternative to JUnit. Its widespread adoption among Java developers and testers is attributed to its comprehensive features and capabilities.
Unlike older frameworks, it removes several limitations through concise annotations, grouping, sequencing, and parameterization. Together these make TestNG one of the best test automation frameworks.
Some of the key features of TestNG are as follows.
Choosing between TestNG and JUnit is rarely obvious. This JUnit tutorial compares JUnit 5 vs TestNG to help you decide based on your test automation requirements.
Selenide targets web UI automation rather than unit testing. Built on Selenium WebDriver in Java, it simplifies browser interaction for automated web application testing.
Though not built for unit testing, Selenide is widely used for end-to-end and functional testing. Its API keeps tests expressive while automating navigation, element interaction, and validation.
Some of the key features of Selenide are as follows.
Gauge targets acceptance testing rather than unit testing. It is open-source, modular, and supports multiple languages. It uses markdown as the testing language, which keeps specs readable, and works with VS Code.
Some of the key features of Gauge are as follows.
Serenity BDD is an open-source framework for acceptance and regression testing, renowned for its detailed, informative reports. It supports Java and JavaScript (via SerenityJS) for comprehensive testing.
Key features:
Cucumber is a Behavior Driven Development (BDD) framework that allows writing tests in plain English, which are then converted into code. It's versatile across programming languages and widely used in JavaScript and TypeScript projects.
Key features:
Geb is a web test automation framework suiting a diverse range of web applications. Its features simplify writing, executing, and maintaining web tests.
Some of the key features of Geb are as follows.
Explore various automation testing frameworks to find the one that suits your project needs. Referring to this guide on the best test automation frameworks provides valuable insights for an informed selection process.
With JUnit you can add dependencies through Maven or as local dependencies (External Libraries). JUnit also runs against both a local Selenium Grid and a cloud grid such as TestMu AI.
The setup walkthrough earlier in this JUnit tutorial covers the environment step by step.
Selenium with JUnit suits cloud-based web testing through its cross-browser and multi-language support. TestMu AI runs those suites across 10,000+ real devices and 3,000+ browser and OS combinations.
To begin automation testing with JUnit and Selenium, follow these instructions for smooth test execution.
After downloading these libraries and adding Jars files to your Selenium project,follow this comprehensive guide on JUnit automation testing with Selenium.
Enable parallel testing in JUnit 5 by setting junit.jupiter.execution.parallel.enabled to true in junit-platform.properties, then tag your test classes with @Execution(CONCURRENT).
Parallel test execution has a large impact on speed in Selenium. Serial execution still works for a few browser and OS combinations, but beyond that, Quality Assurance teams need parallel runs.
You can also subscribe to the TestMu AI YouTube Channel and stay updated with the latest tutorials and updates on web application testing, selenium testing, Playwright testing, and more.
While a local Selenium Grid enables parallel testing with Selenium, it is rarely practical across many browser, operating system, and device combinations. An online Selenium Grid on TestMu AI covers those combinations without local infrastructure.
In such cases, opting for a cloud-based Selenium Grid like TestMu AI proves highly advantageous. It facilitates faster parallel test execution by harnessing the advantages of the Selenium Grid.
To start with TestMu AI, you must first create an account on TestMu AI. To do so, follow the given instructions below.
Step 1: Create a TestMu AI account.
Step 2: Get your Username and Access Key by going to your Profile avatar from the TestMu AI dashboard and selecting Account Settings from the list of options.
Step 3: Copy your Username and Access Key from the Password & Security tab.

Step 4: Generate Capabilities containing details like your desired browser and its various operating systems and get your configuration details on TestMu AI Capabilities Generator.

Step 5: Now that you have both the Username, Access key, and capabilities copied, all you need to do is paste it into your test script as shown below.
Now that you have collected all the necessary data, the next step is to integrate the TestMu AI credentials into the testing script. Before proceeding, outline the test scenario to guide us through the automation on the TestMu AI Selenium Grid for parallel test execution.
Test Scenario:
|
Below is the code demonstration for the test scenario running JUnit 5 tests on a cloud-based Selenium Grid using TestMu AI:
import org.openqa.selenium.By;
import org.junit.jupiter.api.*;
import org.openqa.selenium.WebElement;
import org.openqa.selenium.interactions.Actions;
import org.openqa.selenium.remote.DesiredCapabilities;
import org.openqa.selenium.remote.RemoteWebDriver;
import org.openqa.selenium.support.ui.ExpectedConditions;
import org.openqa.selenium.support.ui.WebDriverWait;
import java.net.MalformedURLException;
import java.net.URL;
import java.util.List;
import java.time.Duration;
public class RunningTestsInParallelInGrid {
String username = "YOUR_USERNAME"; //Enter your username
String accesskey = "YOUR_ACCESS_KEY"; //Enter your accesskey
static RemoteWebDriver driver = null;
String gridURL = "@hub.lambdatest.com/wd/hub";
String urlToTest = "https://www.testmuai.com/";
@BeforeAll
public static void start() {
System.out.println("=======Running junit 5 tests in parallel in TestMu AI Grid has started========");
}
@BeforeEach
public void setup() {
System.out.println("Setting up the drivers and browsers");
DesiredCapabilities capabilities = new DesiredCapabilities();
capabilities.setCapability("browserName", "chrome"); //To specify the browser
capabilities.setCapability("version", "70.0"); //To specify the browser version
capabilities.setCapability("platform", "win10"); // To specify the OS
capabilities.setCapability("build", "Running_ParallelJunit5Tests_In_Grid"); //To identify the test
capabilities.setCapability("name", "Parallel_JUnit5Tests");
capabilities.setCapability("network", true); // To enable network logs
capabilities.setCapability("visual", true); // To enable step by step screenshot
capabilities.setCapability("video", true); // To enable video recording
capabilities.setCapability("console", true); // To capture console logs
try {
driver = new RemoteWebDriver(new URL("https://" + username + ":" + accesskey + gridURL), capabilities);
} catch (MalformedURLException e) {
System.out.println("Invalid grid URL");
} catch (Exception e) {
System.out.println(e.getMessage());
}
}
@Test
@DisplayName("Title_Test")
@Tag("Sanity")
public void launchAndVerifyTitle_Test() {
String methodName = Thread.currentThread()
.getStackTrace()[1]
.getMethodName();
System.out.println("********Execution of "+methodName+" has been started********");
System.out.println("Launching TestMu AI website started..");
driver.get(urlToTest);
driver.manage().window().maximize();
driver.manage().timeouts().pageLoadTimeout(Duration.ofSeconds(10));
String actualTitle = driver.getTitle();
System.out.println("The page title is "+actualTitle);
String expectedTitle ="Most Powerful Cross Browser Testing Tool Online | TestMu AI";
System.out.println("Verifying the title of the webpage started");
Assertions.assertEquals(expectedTitle, actualTitle);
System.out.println("The webpage has been launched and the title of the webpage has been veriified successfully");
System.out.println("********Execution of "+methodName+" has ended********");
}
@Test
@DisplayName("Login_Test")
@Tag("Sanity")
public void login_Test() {
String methodName = Thread.currentThread()
.getStackTrace()[1]
.getMethodName();
System.out.println("********Execution of "+methodName+" has been started********");
System.out.println("Launching TestMu AI website started..");
driver.get(urlToTest);
driver.manage().window().maximize();
driver.manage().timeouts().pageLoadTimeout(Duration.ofSeconds(10));
WebElement login = driver.findElement(By.xpath("//a[text()='Login']"));
login.click();
WebElement username = driver.findElement(By.xpath("//input[@name="email"]"));
WebElement password = driver.findElement(By.xpath("//input[@name="password"]"));
WebDriverWait wait = new WebDriverWait(driver, Duration.ofSeconds(20));
wait.until(ExpectedConditions.visibilityOf(username));
username.clear();
username.sendKeys("acvdd@gmail.com");
password.clear();
password.sendKeys("abc@123");
WebElement loginButton = driver.findElement(By.xpath("//button[text()='Login']"));
loginButton.click();
driver.manage().timeouts().pageLoadTimeout(Duration.ofSeconds(10));
String actual = driver.getTitle();
String expected = "Welcome - TestMu AI";
Assertions.assertEquals(expected, actual);
System.out.println("The user has been successfully logged in");
System.out.println("********Execution of "+methodName+" has ended********");
}
@Test
@DisplayName("Logo_Test")
public void logo_Test() {
String methodName = Thread.currentThread()
.getStackTrace()[1]
.getMethodName();
System.out.println("********Execution of "+methodName+" has been started********");
System.out.println("Launching TestMu AI website started..");
driver.get(urlToTest);
driver.manage().window().maximize();
driver.manage().timeouts().pageLoadTimeout(Duration.ofSeconds(10));
System.out.println("Verifying of webpage logo started..");
WebElement logo = driver.findElement(By.xpath("//*[@id="header"]/nav/div/div/div[1]/div/a/img"));
boolean is_logo_present = logo.isDisplayed();
if(is_logo_present) {
System.out.println("The logo of TestMu AI is displayed");
}
else {
Assertions.assertFalse(is_logo_present,"Logo is not present");
}
System.out.println("********Execution of "+methodName+" has ended********");
}
@Test
@DisplayName("Blog_Test")
public void blogPage_Test() {
String methodName = Thread.currentThread()
.getStackTrace()[1]
.getMethodName();
System.out.println("********Execution of "+methodName+" has been started********");
System.out.println("Launching TestMu AI website started..");
driver.get(urlToTest);
driver.manage().window().maximize();
driver.manage().timeouts().pageLoadTimeout(Duration.ofSeconds(10));
WebElement resources = driver.findElement(By.xpath("//*[text()='Resources ']"));
List<WebElement> options_under_resources = driver.findElements(By.xpath("//*[text()='Resources ']/../ul/a"));
boolean flag = resources.isDisplayed();
if(flag) {
System.out.println("Resources header is visible in the webpage");
Actions action = new Actions(driver);
action.moveToElement(resources).build().perform();
WebDriverWait wait = new WebDriverWait(driver, Duration.ofSeconds(20));
wait.until(ExpectedConditions.visibilityOfAllElements(options_under_resources));
for(WebElement element : options_under_resources) {
if(element.getText().equals("Blog")){
System.out.println("Clicking Blog option has started");
element.click();
System.out.println("Clicking Blog option has ended");
driver.manage().timeouts().pageLoadTimeout(Duration.ofSeconds(20));
Assertions.assertEquals("TestMu AI Blogs", driver.getTitle());
break;
}
else
Assertions.fail("Blogs option is not available");
}
}
else {
Assertions.fail("Resources header is not visible");
}
System.out.println("********Execution of "+methodName+" has ended********");
}
@Test
@DisplayName("Cerification_Test")
public void certificationPage_Test() {
String methodName = Thread.currentThread()
.getStackTrace()[1]
.getMethodName();
System.out.println("********Execution of "+methodName+" has been started********");
System.out.println("Launching TestMu AI website started..");
driver.get(urlToTest);
driver.manage().window().maximize();
driver.manage().timeouts().pageLoadTimeout(Duration.ofSeconds(10));
WebElement resources = driver.findElement(By.xpath("//*[text()='Resources ']"));
List<WebElement> options_under_resources = driver.findElements(By.xpath("//*[text()='Resources ']/../ul/a"));
boolean flag = resources.isDisplayed();
if(flag) {
System.out.println("Resources header is visible in the webpage");
Actions action = new Actions(driver);
action.moveToElement(resources).build().perform();
WebDriverWait wait = new WebDriverWait(driver, Duration.ofSeconds(20));
wait.until(ExpectedConditions.visibilityOfAllElements(options_under_resources));
for (int i = 0; i < options_under_resources.size(); i++) {
String value = options_under_resources.get(i).getText();
if (value.equals("Certifications")) {
System.out.println("Clicking Certifications option has started");
action.moveToElement(options_under_resources.get(i)).build().perform();
options_under_resources.get(i).click();
System.out.println("Clicking Certifications option has ended");
driver.manage().timeouts().pageLoadTimeout(Duration.ofSeconds(20));
String expectedCertificationPageTitle = "TestMu AI Selenium Certifications - Best Certifications For Automation Testing Professionals";
String actualCertificationPageTitle = driver.getTitle();
Assertions.assertEquals(expectedCertificationPageTitle, actualCertificationPageTitle);
break;
}
}
}
System.out.println("********Execution of "+methodName+" has ended********");
}
@Test
@DisplayName("Support_Test")
public void supportPage_Test() {
String methodName = Thread.currentThread()
.getStackTrace()[1]
.getMethodName();
System.out.println("********Execution of "+methodName+" has been started********");
System.out.println("Launching TestMu AI website started..");
driver.get(urlToTest);
driver.manage().window().maximize();
driver.manage().timeouts().pageLoadTimeout(Duration.ofSeconds(10));
WebElement supportHeader = driver.findElement(By.xpath("(//div//*[text()='Support'])[1]"));
boolean flag = supportHeader.isDisplayed();
if(flag) {
System.out.println("support header is visible in the webpage");
supportHeader.click();
}
else {
Assertions.fail("support header is not visible");
}
System.out.println("********Execution of "+methodName+" has ended********");
}
@AfterEach
public void tearDown() {
System.out.println("Quitting the browsers has started");
driver.quit();
System.out.println("Quitting the browsers has ended");
}
@AfterAll
public static void end() {
System.out.println("Tests ended");
}
}
Shown below is the execution snapshot, which indicates that the tests are executing in parallel:

To verify the test execution status, go to the TestMu AI automation dashboard. There, you can review the test execution status and even watch a video recording of the test process.

Please refer to our JUnit tutorial on parallel testing with JUnit and Selenium to learn more.
Local parallel execution runs out of road once the suite outgrows one machine. HyperExecute is an AI-native test orchestration cloud that runs test suites up to 70% faster than traditional grids.
Rather than queueing tests in front of a browser grid, it places your test script and every execution component in a single isolated environment, then decides how the suite is split.
For a JUnit suite that means the same mvn test command, distributed across just-in-time machines instead of a hub-and-node topology. The capabilities that matter here:
Setup steps are in the getting started with HyperExecute documentation.
These use cases go past a single passing test into the patterns real suites need: grouped execution, cross-browser runs, and reporting that survives a CI pipeline.
The Jupiter sub-project is a TestEngine for running Jupiter-based tests on the platform. It also defines the TestEngine API, so new frameworks can plug in. Its model draws on JUnit 4's conventions.
To understand this better we will look at a use case by following the below test scenario.
Test Scenario:
Below is the code for the above test scenario.
package demo;
import org.junit.jupiter.api.*;
import org.openqa.selenium.By;
import org.openqa.selenium.WebElement;
import org.openqa.selenium.interactions.Actions;
import org.openqa.selenium.chrome.ChromeOptions;
import org.openqa.selenium.remote.DesiredCapabilities;
import org.openqa.selenium.remote.RemoteWebDriver;
import org.openqa.selenium.support.ui.ExpectedConditions;
import org.openqa.selenium.support.ui.WebDriverWait;
import java.net.MalformedURLException;
import java.net.URL;
import java.util.ArrayList;
import java.util.HashMap;
import java.util.Arrays;
import java.util.List;
import java.time.Duration;
@TestMethodOrder(MethodOrderer.OrderAnnotation.class)
public class RunTestsInCloud {
String username = "YOUR_USERNAME"; //Enter your username
String accesskey = "YOUR_ACCESSKEY"; //Enter your accesskey
static RemoteWebDriver driver = null;
String gridURL = "@hub.lambdatest.com/wd/hub";
String urlToTest = "https://www.testmuai.com/";
@BeforeAll
public static void start() {
System.out.println("=======Starting junit 5 tests in TestMu AI Grid========");
}
@BeforeEach
public void setup() {
System.out.println("Setting up the drivers and browsers");
ChromeOptions browserOptions = new ChromeOptions();
browserOptions.setPlatformName("Windows 10"); // To specify the OS
browserOptions.setBrowserVersion("121.0"); //To specify the browser version
HashMap<String, Object> ltOptions = new HashMap<String, Object>();
ltOptions.put("username", "YOUR_LT_USERNAME");
ltOptions.put("accessKey", "YOUR_LT_ACCESS_KEY");
ltOptions.put("project", "YOUR_PROJECT");
ltOptions.put("selenium_version", "4.0.0"); //To specify the Selenium version
ltOptions.put("build", "Running_Junit5Tests_In_Grid"); //To identify the test
ltOptions.put("name", "JUnit5Tests");
ltOptions.put("console", "true"); // To capture console logs
ltOptions.put("visual", true); // To enable step by step screenshot
ltOptions.put("network", true); // To enable network logs
ltOptions.put("video", true); // To enable video recording
ltOptions.put("w3c", true);
browserOptions.setCapability("LT:Options", ltOptions);
try {
driver = new RemoteWebDriver(new URL("https://" + username + ":" + accesskey + gridURL), browserOptions);
} catch (MalformedURLException e) {
System.out.println("Invalid grid URL");
} catch (Exception e) {
System.out.println(e.getMessage());
}
}
/*To test the tabs available in the main page like Resources,Documentation,login etc */
@Test
@DisplayName("HeaderTabs_Test")
@Tag("Smoke")
@Order(1)
public void headers_Test() {
String methodName = Thread.currentThread()
.getStackTrace()[1]
.getMethodName();
System.out.println("********Execution of "+methodName+" has been started********");
System.out.println("Launching TestMu AI website started..");
driver.get(urlToTest);
driver.manage().window().maximize();
driver.manage().timeouts().pageLoadTimeout(Duration.ofSeconds(10));
List<WebElement> elements = driver.findElements(By.xpath("//*[contains(@class,'md:text-right')]/a"));
List<String> actualList = new ArrayList<>();
for(WebElement ele :elements){
actualList.add(ele.getText());
}
System.out.println("Actual elements : "+actualList);
List<String> expectedList = Arrays.asList("Platform","Enterprise","Resources","Developers","Pricing","Login","Book a Demo","Get Started Free");
System.out.println("Expected elements : "+expectedList);
boolean boolval = actualList.equals(expectedList);
System.out.println(boolval);
Assertions.assertTrue(boolval);
System.out.println("********Execution of "+methodName+" has ended********");
}
@Test
@DisplayName("LTBrowser_Test")
@Tag("Smoke")
@Order(2)
public void click_LTBrowser_Test() {
String methodName = Thread.currentThread()
.getStackTrace()[1]
.getMethodName();
System.out.println("********Execution of "+methodName+" has been started********");
System.out.println("Launching TestMu AI website started..");
driver.get(urlToTest);
driver.manage().window().maximize();
driver.manage().timeouts().pageLoadTimeout(Duration.ofSeconds(10));
driver.findElement(By.xpath("//a[text()='Login']")).click();
driver.findElement(By.xpath("//input[@name="email"]")).sendKeys("example@example.com");
driver.findElement(By.xpath("//input[@name="password"]")).sendKeys("Demo@123");
driver.findElement(By.xpath("//button[text()='Login']")).click();
driver.manage().timeouts().pageLoadTimeout(Duration.ofSeconds(20));
List <WebElement> options = driver.findElements(By.xpath("//div[contains(@class,'aside__menu__item')]//a"));
for(WebElement ele : options){
if(ele.getText().equals("LT Browser")) {
ele.click();
break;
}
}
driver.manage().timeouts().implicitlyWait(Duration.ofSeconds(20));
String actualText = driver.findElement(By.xpath("//*[@class='lt__demo__box__title']")).getText();
String expectedText = "LT Browser 2.0 Best Browser For Developers";
Assertions.assertEquals(expectedText, actualText);
System.out.println("The user has been successfully navigated to LT browser page");
System.out.println("********Execution of "+methodName+" has ended********");
}
@Test()
@DisplayName("editProfile_Test")
@Order(3)
public void editProfile_Test() {
String methodName = Thread.currentThread()
.getStackTrace()[1]
.getMethodName();
System.out.println("********Execution of "+methodName+" has been started********");
System.out.println("Launching TestMu AI website started..");
driver.get(urlToTest);
driver.manage().window().maximize();
driver.manage().timeouts().pageLoadTimeout(Duration.ofSeconds(10));
driver.findElement(By.xpath("//a[text()='Login']")).click();
driver.findElement(By.xpath("//input[@name="email"]")).sendKeys("example@example.com");
driver.findElement(By.xpath("//input[@name="password"]")).sendKeys("Demo@123");
driver.findElement(By.xpath("//button[text()='Login']")).click();
driver.manage().timeouts().pageLoadTimeout(Duration.ofSeconds(20));
driver.findElement(By.id("profile__dropdown")).click();
driver.findElement(By.xpath("//*[@class='profile__dropdown__item']")).click();
String actualTitle = driver.getTitle();
Assertions.assertEquals(actualTitle,"Account Settings");
System.out.println("********Execution of "+methodName+" has ended********");
}
@Test
@DisplayName("ResourcesOption_Test")
@Order(4)
public void getListOfOptionsUnderResourcesTab() {
String methodName = Thread.currentThread()
.getStackTrace()[1]
.getMethodName();
System.out.println("********Execution of "+methodName+" has been started********");
System.out.println("Launching TestMu AI website started..");
driver.get(urlToTest);
driver.manage().window().maximize();
driver.manage().timeouts().pageLoadTimeout(Duration.ofSeconds(10));
WebElement resources = driver.findElement(By.xpath("//*[text()='Resources ']"));
List<WebElement> options_under_resources = driver.findElements(By.xpath("//*[text()='Resources ']/../ul/a"));
boolean flag = resources.isDisplayed();
if(flag) {
System.out.println("Resources header is visible in the webpage");
Actions action = new Actions(driver);
action.moveToElement(resources).build().perform();
WebDriverWait wait = new WebDriverWait(driver, Duration.ofSeconds(20));
wait.until(ExpectedConditions.visibilityOfAllElements(options_under_resources));
List<String> options = new ArrayList<>();
for(WebElement element : options_under_resources) {
options.add(element.getText());
}
System.out.println(options);
List<String> list = Arrays.asList("Blog", "Webinars", "Certifications", "Learning Hub", "Videos", "Newsletter", "TestMu AI for Community", "Customer Stories");
boolean boolval = list.equals(options);
System.out.println(boolval);
Assertions.assertTrue(boolval);
}
else {
Assertions.fail("Resources header is not visible");
}
System.out.println("********Execution of "+methodName+" has ended********");
}
@AfterEach
public void tearDown() {
System.out.println("Quitting the browsers has started");
driver.quit();
System.out.println("Quitting the browsers has ended");
}
@AfterAll
public static void end() {
System.out.println("Tests ended");
}
}
You can view the complete JUnit Jupiter tutorial. It covers Jupiter's fundamentals, its unit testing capabilities, and how to run JUnit tests in Jupiter.
Combining JUnit with TestNG in Selenium automation uses TestNG's advanced features for better test management. TestNG offers more annotations, test grouping, and reliable parallel execution compared to JUnit.
Key advantages of TestNG over JUnit:
TestNG is preferred for parallel testing in Selenium. Use a cloud-based Selenium Grid like TestMu AI for secure, fast execution.
Test Scenario: Navigate to TodoMVC, enter text, and validate it appears in the list.
| Browser | Version | Platform |
| Chrome | 121.0 | Windows 10 |
| Safari | 17.0 | macOS Big Sur |
| Firefox | 122.0 | Windows 8 |
Sample code:
@Test
public void testParallel() {
driver.get("https://todomvc.com/examples/react/#/");
driver.findElement(By.className("new-todo")).sendKeys("TestMu AI Cross Browser Testing");
int totalElements = driver.findElements(By.xpath("//ul[@class='todo-list']/li")).size();
Assert.assertEquals(1, totalElements);
}
The same pattern applies when a suite mixes JUnit and TestNG runners in one Selenium project.
JUnit 5 Mockito integration simplifies unit testing by mocking dependencies. Mockito creates mock objects to isolate the code under test, using annotations like @Mock and methods like mock(). This approach enhances test reliability and speed.
Example: Mock a database service to test query logic without real database calls.
import org.junit.jupiter.api.Test;
import org.junit.jupiter.api.extension.ExtendWith;
import org.mockito.Mock;
import org.mockito.junit.jupiter.MockitoExtension;
import static org.junit.jupiter.api.Assertions.assertTrue;
import static org.mockito.Mockito.when;
@ExtendWith(MockitoExtension.class)
public class ServiceTest {
@Mock
Database databaseMock;
@Test
public void testQuery() {
when(databaseMock.isAvailable()).thenReturn(true);
Service service = new Service(databaseMock);
boolean result = service.query("* from t");
assertTrue(result);
}
}
For cross-browser testing with JUnit 5 and Mockito, integrate Selenium for end-to-end validation. Learn more in our JUnit 5 Mockito tutorial.
package MockitoDemo.MockitoDemo;
import org.junit.jupiter.api.AfterAll;
import org.junit.jupiter.api.AfterEach;
import org.junit.jupiter.api.Assertions;
import org.junit.jupiter.api.BeforeAll;
import org.junit.jupiter.api.BeforeEach;
import org.junit.jupiter.api.Test;
import org.junit.jupiter.api.parallel.Execution;
import org.junit.jupiter.api.parallel.ExecutionMode;
import org.junit.jupiter.params.ParameterizedTest;
import org.junit.jupiter.params.provider.Arguments;
import org.junit.jupiter.params.provider.MethodSource;
import org.openqa.selenium.By;
import org.openqa.selenium.WebElement;
import org.openqa.selenium.MutableCapabilities;
import org.openqa.selenium.chrome.ChromeOptions;
import org.openqa.selenium.firefox.FirefoxOptions;
import org.openqa.selenium.safari.SafariOptions;
import org.openqa.selenium.remote.DesiredCapabilities;
import org.openqa.selenium.remote.RemoteWebDriver;
import org.openqa.selenium.support.ui.ExpectedConditions;
import org.openqa.selenium.support.ui.WebDriverWait;
import java.util.HashMap;
import java.util.stream.Stream;
import java.net.MalformedURLException;
import java.net.URL;
import java.time.Duration;
import static org.junit.jupiter.params.provider.Arguments.arguments;
@Execution(ExecutionMode.CONCURRENT)
public class CrossbrowserDemo {
String username = "YOUR_LT_USERNAME";
String accesskey = "YOUR_LT_ACCESS_KEY";
static RemoteWebDriver driver = null;
String gridURL = "@hub.lambdatest.com/wd/hub";
String urlToTest = "https://www.testmuai.com/";
@BeforeAll
public static void start() {
System.out.println("=======Starting junit 5 tests in TestMu AI Grid========");
}
@BeforeEach
public void setup(){
System.out.println("=======Setting up drivers and browser========");
}
public void browser_setup(String browser) {
System.out.println("Setting up the drivers and browsers");
MutableCapabilities capabilities = null;
if(browser.equalsIgnoreCase("Chrome")) {
ChromeOptions browserOptions = new ChromeOptions();
browserOptions.setPlatformName("Windows 10"); // To specify the OS
browserOptions.setBrowserVersion("121.0"); //To specify the browser version
HashMap<String, Object> ltOptions = new HashMap<String, Object>();
ltOptions.put("username", "YOUR_LT_USERNAME");
ltOptions.put("accessKey", "YOUR_LT_ACCESS_KEY");
ltOptions.put("visual", true); // To enable step by step screenshot
ltOptions.put("video", true); // To enable video recording
ltOptions.put("network", true); // To enable network logs
ltOptions.put("build", "JUnit5Tests_Chrome"); //To identify the test
ltOptions.put("name", "JUnit5Tests_Chrome");
ltOptions.put("console", "true"); // To capture console logs
ltOptions.put("selenium_version", "4.0.0");
ltOptions.put("w3c", true);
browserOptions.setCapability("LT:Options", ltOptions);
capabilities = browserOptions;
}
if(browser.equalsIgnoreCase("Firefox")) {
FirefoxOptions browserOptions = new FirefoxOptions();
browserOptions.setPlatformName("Windows 10"); // To specify the OS
browserOptions.setBrowserVersion("122.0"); //To specify the browser version
HashMap<String, Object> ltOptions = new HashMap<String, Object>();
ltOptions.put("username", "YOUR_LT_USERNAME");
ltOptions.put("accessKey", "YOUR_LT_ACCESS_KEY");
ltOptions.put("visual", true); // To enable step by step screenshot
ltOptions.put("video", true); // To enable video recording
ltOptions.put("network", true); // To enable network logs
ltOptions.put("build", "Running_Junit5Tests_In_Grid_Firefox"); //To identify the test
ltOptions.put("name", "JUnit5Tests_Firefox");
ltOptions.put("console", "true"); // To capture console logs
ltOptions.put("w3c", true);
browserOptions.setCapability("LT:Options", ltOptions);
capabilities = browserOptions;
}
if(browser.equalsIgnoreCase("Safari")) {
SafariOptions browserOptions = new SafariOptions();
browserOptions.setPlatformName("macOS Big sur"); // To specify the OS
browserOptions.setBrowserVersion("17.0"); //To specify the browser version
HashMap<String, Object> ltOptions = new HashMap<String, Object>();
ltOptions.put("username", "YOUR_LT_USERNAME");
ltOptions.put("accessKey", "YOUR_LT_ACCESS_KEY");
ltOptions.put("visual", true); // To enable step by step screenshot
ltOptions.put("video", true); // To enable video recording
ltOptions.put("network", true); // To enable network logs
ltOptions.put("build", "Running_Junit5Tests_In_Grid_Safari"); //To identify the test
ltOptions.put("name", "JUnit5Tests_Safari");
ltOptions.put("console", "true"); // To capture console logs
ltOptions.put("w3c", true);
browserOptions.setCapability("LT:Options", ltOptions);
capabilities = browserOptions;
}
try {
driver = new RemoteWebDriver(new URL("https://" + username + ":" + accesskey + gridURL), capabilities);
} catch (MalformedURLException e) {
System.out.println("Invalid grid URL");
} catch (Exception e) {
System.out.println(e.getMessage());
}
}
@ParameterizedTest
@MethodSource("browser")
public void launchAndVerifyTitle_Test(String browser) {
browser_setup(browser);
String methodName = Thread.currentThread()
.getStackTrace()[1]
.getMethodName();
driver.get(urlToTest);
driver.manage().window().maximize();
driver.manage().timeouts().pageLoadTimeout(Duration.ofSeconds(10));
String actualTitle = driver.getTitle();
System.out.println("The page title is "+actualTitle);
String expectedTitle ="Next-Generation Mobile Apps and Cross Browser Testing Cloud";
System.out.println("Verifying the title of the webpage started");
Assertions.assertEquals(expectedTitle, actualTitle);
System.out.println("The webpage has been launched and the title of the webpage has been veriified successfully");
System.out.println("********Execution of "+methodName+" has ended********");
}
@ParameterizedTest
@MethodSource("browser")
public void login_Test(String browser) {
browser_setup(browser);
String methodName = Thread.currentThread()
.getStackTrace()[1]
.getMethodName();
driver.get(urlToTest);
driver.manage().window().maximize();
driver.manage().timeouts().pageLoadTimeout(Duration.ofSeconds(10));
WebElement login = driver.findElement(By.xpath("//a[text()='Login']"));
login.click();
WebElement username = driver.findElement(By.xpath("//input[@name='email']"));
WebElement password = driver.findElement(By.xpath("//input[@name='password']"));
WebDriverWait wait = new WebDriverWait(driver, Duration.ofSeconds(20));
wait.until(ExpectedConditions.visibilityOf(username));
username.clear();
username.sendKeys("example001@gmail.com");
password.clear();
password.sendKeys("R999@89");
WebElement loginButton = driver.findElement(By.xpath("//button[text()='Login']"));
loginButton.click();
driver.manage().timeouts().pageLoadTimeout(Duration.ofSeconds(10));
String actual = driver.getTitle();
String expected = "Dashboard";
Assertions.assertEquals(expected, actual);
System.out.println("The user has been successfully logged in");
System.out.println("********Execution of "+methodName+" has ended********");
}
@ParameterizedTest
@MethodSource("browser")
public void logo_Test(String browser) {
browser_setup(browser);
String methodName = Thread.currentThread()
.getStackTrace()[1]
.getMethodName();
System.out.println("********Execution of "+methodName+" has been started********");
System.out.println("Launching TestMu AI website started..");
driver.get(urlToTest);
driver.manage().window().maximize();
driver.manage().timeouts().pageLoadTimeout(Duration.ofSeconds(10));
System.out.println("Verifying of webpage logo started..");
WebElement logo = driver.findElement(By.xpath("//*[@id="header"]/nav/div/div/div[1]/div/a/img"));
boolean is_logo_present = logo.isDisplayed();
if(is_logo_present) {
System.out.println("The logo of TestMu AI is displayed");
}
else {
Assertions.assertFalse(is_logo_present,"Logo is not present");
}
System.out.println("********Execution of "+methodName+" has ended********");
}
@AfterEach
public void tearDown() {
System.out.println("Quitting the browsers has started");
driver.quit();
System.out.println("Quitting the browsers has ended");
}
@AfterAll
public static void end() {
System.out.println("Tests ended");
}
static Stream<Arguments> browser() {
return Stream.of(
arguments("Chrome"),
arguments("Firefox"),
arguments("Safari")
);
}
}
Explore the JUnit 5 Mockito tutorial for a detailed, step-by-step guide. It covers the setup and the common mocking patterns in depth.
JUnit 5 introduces an extension model for custom features. Unlike JUnit 4, it provides built-in extension points, so developers add capabilities by implementing interfaces rather than subclassing a runner.
Here's an example using the Mockito extension:
public class Database {
public boolean isAvailable() {
// TODO implement the access to the database
return false;
}
public int getUniqueId() {
return 42;
}
}
public class Service {
private Database database;
public Service(Database database) {
this.database = database;
}
public boolean query(String query) {
return database.isAvailable();
}
@Override
public String toString() {
return "Using database with id: " + String.valueOf(database.getUniqueId());
}
}
The test class:
import org.junit.jupiter.api.Test;
import org.junit.jupiter.api.extension.ExtendWith;
import org.mockito.Mock;
import org.mockito.junit.jupiter.MockitoExtension;
import static org.junit.jupiter.api.Assertions.assertNotNull;
import static org.junit.jupiter.api.Assertions.assertTrue;
import static org.mockito.Mockito.when;
@ExtendWith(MockitoExtension.class)
public class ServiceTest {
@Mock
Database databaseMock;
@Test
public void testQuery () {
assertNotNull(databaseMock);
when(databaseMock.isAvailable())
.thenReturn(true);
Service t = new Service(databaseMock);
boolean check = t.query("* from t");
assertTrue(check);
}
}
For more on JUnit 5 extensions, check our JUnit 5 extensions.
These practices come from suites that got slow, flaky, or unreadable, and what stopped it. Each one targets a specific failure mode rather than general advice.
Keep Tests Simple and Focused
Use Descriptive Test Names
Avoid Random Values at Runtime
Never Test Implementation Details
Handle Edge Cases
Apply the Arrange-Act-Assert (AAA) Pattern
Follow the AAA pattern for structuring tests:
Adapting to these best practices ensures that your JUnit tests are effective, maintainable, and provide meaningful insights into the behavior of your code.
JUnit remains one of the most reliable frameworks for Java unit testing, and JUnit 5 takes it further with a modular architecture, improved annotations, enhanced assertions, and better support for parameterized and parallel testing.
JUnit 6 continues that direction on a Java 17 baseline, so the Jupiter API you learn here carries forward unchanged; the upgrade is mostly a toolchain and dependency exercise rather than a rewrite.
Whether you are writing a first test or running JUnit with Selenium on a cloud grid, the fundamentals here give you a foundation. For depth, follow the linked guides on Jupiter, Mockito, and parallel testing.
Author
Saniya Gazala is a Product Marketing Manager and Community Evangelist at TestMu AI with 2+ years of experience in software QA, manual testing, and automation adoption. She holds a B.Tech in Computer Science Engineering. At TestMu AI, she leads content strategy, community growth, and test automation initiatives, having managed a 5-member team and contributed to certification programs using Selenium, Cypress, Playwright, Appium, and KaneAI. Saniya has authored 15+ articles on QA and holds certifications in Automation Testing, Six Sigma Yellow Belt, Microsoft Power BI, and multiple automation tools. She also crafted hands-on problem statements for Appium and Espresso. Her work blends detailed execution with a strategic focus on impact, learning, and long-term community value.
Reviewer
Srinivasan Sekar is Director of Engineering at TestMu AI (formerly LambdaTest), where he leads engineering and open-source initiatives behind the Selenium and Appium automation grid and owns TestMu AI's MCP Server. A committer to Appium and a contributor to Selenium, WebdriverIO, Taiko, and AppiumTestDistribution, he brings over 15 years of experience in quality engineering and open-source technologies. He is the author of the Apress book 'The MCP Standard: A Developer's Guide to Building Universal AI Tools with the Model Context Protocol,' a Certified Kubernetes and Cloud Native Associate, and an international conference speaker. Before TestMu AI he spent over eight years at Thoughtworks as a Principal Consultant and Quality Architect. Srinivasan holds a B.Tech in Information Technology from Anna University.
Did you find this page helpful?
More Related Blogs
TestMu AI forEnterprise
Get access to solutions built on Enterprise
grade security, privacy, & compliance