

Power Your Software Testing with AI Agents and Cloud
The Native AI-Agentic Cloud Platform to Supercharge Quality Engineering. Test Intelligently and Ship Faster.


- TestMu AI (Formerly LambdaTest)
- /
- Blog
- /
- JUnit Annotations: JUnit 5 List with Examples
JUnit Annotations: JUnit 5 List with Examples
We will look at examples of JUnit annotations in Selenium, their order of execution, few special JUnit annotations, and their demonstration on Selenium Grid.
Last Updated on:
JUnit annotations mark which methods in a Selenium test class run setup, execute a test, or perform teardown, so JUnit knows when to call each one. Common annotations include @Test, @Before, @After, @BeforeClass, and @AfterClass, and the same pattern carries into Selenium automation testing with JUnit across a full test suite. This guide covers why JUnit is popular, what annotations exist, worked examples for each one, their execution order, annotations for specific purposes, key attributes, and running them with cross browser testing on Selenium Grid.
This chapter is part of the JUnit tutorial, which covers setup, annotations, assertions, parameterized tests, and Selenium runs.
Overview
To structure Selenium test cases in Java, use JUnit annotations to define execution phases like setup, test execution, and teardown. Testers can run these automated tests locally using Selenium Grid or scale them using parallel execution on the TestMu AI cloud platform.
Core Annotations for Test Flow
- @Test: Marks a public void method containing Selenium actions and assertions as a runnable test case, allowing JUnit to identify and execute the test.
- @BeforeEach and @Before: Run before every individual test case to initialize objects, launch browsers, and set up the required test environment.
- @AfterEach and @After: Execute after every individual test case to close browsers, release initialized objects, and delete temporary teardown data.
- @BeforeAll and @BeforeClass: Execute once per class before any tests run, initializing global resources such as WebDriver or grid sessions.
- @AfterAll and @AfterClass: Run once per class after all tests finish executing to release global initializations and clean up resources.
- @Disabled and @Ignore: Prevent specific unstable or incomplete test methods from executing, which helps avoid unnecessary test suite failures.
Data and Suite Management
- @ParameterizedTest: Runs a single test multiple times using different arguments provided by source annotations like @ValueSource to verify various inputs.
- @RepeatedTest: Executes a specific test method a defined number of times based on a repetition parameter specified within the annotation.
- @RunWith: Invokes a specified runner class, such as Suite.class, to control and execute a grouped collection of multiple test classes.
- @Parameters: Defines a set of test data as a list of object arrays, requiring the @RunWith annotation to execute tests using a Parameterized runner.
Execution Platforms and Best Practices
- TestMu AI: Provides a cloud-based Selenium Grid to run automated cross-browser tests in parallel, ensuring scalable and rapid test execution.
- Selenium Grid: Enables parallel execution of automated test scripts across multiple browsers, browser versions, and operating systems to ensure consistent application behavior.
- The standard JUnit execution sequence in Selenium automation follows a strict order of @BeforeAll, @BeforeEach, @Test, @AfterEach, and finally @AfterAll.
- To prevent test flakiness and ensure browser isolation, keep tests independent and avoid sharing WebDriver sessions between different test cases.
This article is my attempt to help you use JUnit annotations in Selenium as a professional tester would. We would be looking at examples of JUnit annotations in Selenium, their order of execution, along with some special JUnit annotations that are used for a specific purpose. We will also be looking into a collective code for executing each example of JUnit annotation in Selenium. At last, we will perform cross browser testing with What is Selenium Grid using JUnit annotations.
Before we head on to JUnit annotations in Selenium, let us quickly recap the reasons behind JUnit’s popularity among the tester community. If you are preparing for an interview you can learn more through Selenium interview questions.
Why JUnit Is So Popular Among Testers?
JUnit without a doubt, is considered as one of the top Java test frameworks. Below are the pointers behind it.
- Open Source Framework
- Offers integrations with IDEs such as Eclipse, IntelliJ etc. so you could test run your code quickly and easily.
- Offers integration with CI/CD tools such as Jenkins, Teamcity etc. to help you create a sturdy delivery pipeline.
- Offers assertions to help you conveniently compare actual results with the expected results.
- Offers annotations to help you identify the type of test methods.
- Provides a facility to create a test suite which further includes multiple test cases and even other test suites.
- Provides Test Runner to help your easily execute a Test Suite.
- Makes the test code more readable, elegant and increases the quality.
- Provides JUnit Test Report Generation in HTML format.

What Are JUnit Annotations?
As stated in the pros above, JUnit Annotations in Selenium help to identify the type of methods we have defined in our test code. But the question that arises here is, how do we use JUnit annotations in Selenium? What are the keywords that defines JUnit annotations in Selenium? When to use JUnit annotations in Selenium? If you are going through the same questions then I will help you get to the answer of them by the end of this article.
So, basically Annotations are the meta-tags that provides additional information about the methods and classes defined in our code structure. In order to execute Selenium WebDriver testing with JUnit, it is necessary to add JUnit Annotations in our script.
Note: JUnit Annotations would only be accessible in JUnit 4 plus versions and it requires at least JDK(Java Development Kit) 1.5 version.
Below is the list of every JUnit annotation in Selenium that will be covered in this blog.
Common JUnit Annotations In Selenium
- @BeforeClass
- @Before
- @Test
- @After
- @AfterClass
- @Ignore
JUnit annotations In Selenium For Specific Purposes
- @ParameterizedTest
- @RunWith
- @RepeatedTest
- @Parameters

Austin Siewert
Co-Founder, Steadfast Systems
Discovered @TestMu AI yesterday. Best browser testing tool I've found for my use case. Great pricing model for the limited testing I do 👏
2M+ Devs and QAs rely on TestMu AI
Deliver immersive digital experiences with Next-Generation Mobile Apps and Cross Browser Testing Cloud

This JUnit certification establishes testing standards for those who wish to advance their careers in Selenium automation testing with JUnit.
Here’s a short glimpse of the JUnit certification from TestMu AI:

Digging Deeper with Examples of JUnit Annotations In Selenium WebDriver
Now, we look at each annotation one by one and at the end, I’ll present you the entire compiled code representing all the annotations along with the console output, at the end of this section.
@BeforeClass
This annotation is used to initialize any object that we use in our running test case. Whenever, we initialize any object in BeforeClass method, it would be invoked only once. The primary purpose of @BeforeClass JUnit annotation is to execute some statements before all the test cases mentioned in the script.
@BeforeClass
    public static void SetUpClass()
    {
            //Initialization code goes here
            System.out.println("This is @BeforeClass annotation");
    }
@Before
This annotation is used whenever we want to initialize any object for the time the method is being used. Suppose, we are having 5 test cases, the Before method will be called before each test method for 5 times. So, it would be invoked every time the test case is executed. This annotation is usually used for setting up the test environment.
@Before
    public void SetUp()
    {
            // Setting up the test environment
            System.out.println("This is @Before annotation");
    }
@Test
This annotation tells JUnit that the public void method() to which it is attached can be run as a test case. This annotation includes the test method for an application that you want to test. A single automation test script may comprise numerous test methods in it.
@Test
    public void Addition()
    {
            c= a+b;
            assertEquals(15,c);
            System.out.println("This is first @Test annotation method= " +c);
    }

    @Test
    public void Multiplication()
    {
            c=a*b;
            assertEquals(50,c);
            System.out.println("This is second @Test annotation method= " +c);
    }
@After
Whatever we have initialized in @Before annotation method, that initialization should be released in @After annotation method. So, this annotation is executed every time after each test method. The primary purpose of @After annotation is to teardown. Teardown is a process of deleting temporary data. Teardown can also be used to define the default values or to wipe the slate clean of the test environment.
@After
    public void TearDown()
    {
            // Cleaning up the test environment
            c= null;
            System.out.println("This is @After annotation");
    }
@AfterClass
Whatever we have initialized in @BeforeClass annotation method, that initialization should be released in @AfterClass annotation method. So, this annotation is executed once but it will be executed after all tests has finished executing.
@AfterClass
    public static void TearDownClass()
    {
            //Release your resources here
            System.out.println("This is @AfterClass annotation");
    }
@Ignore
This annotation tells JUnit that this method shall not be executed. In scenarios, where our code module is not ready in a particular test case, we can temporarily put that code module in @Ignore annotation method to avoid test case failure. Native JUnit 4 offers powerful reporting to help you realize the count of tests that were ignored along with count of tests that run and count of tests that failed.
@Ignore
    public void IgnoreMessage()
    {
       String info = "JUnit Annotation Blog" ;
       assertEquals(info,"JUnit Annotation Blog");
       System.out.println("This is @Ignore annotation");
    }
Here is the compiled code with output representing all the JUnits annotations in Selenium WebDriver:
package JUnitAnnotationBlog;


import static org.junit.Assert.assertEquals;

import org.junit.After;
import org.junit.AfterClass;
import org.junit.Before;
import org.junit.BeforeClass;
import org.junit.Ignore;
import org.junit.Test;

public class JUnitAnnotations {

    int a=10;
    int b=5;
    Object c;


    @BeforeClass
    public static void SetUpClass()
    {
            //Initialization code goes here
            System.out.println("This is @BeforeClass annotation");
    }


    @Before
    public void SetUp()
    {
            // Setting up the test environment
            System.out.println("This is @Before annotation");
    }


    @Test
    public void Addition()
    {
            c= a+b;
            assertEquals(15,c);
            System.out.println("This is first @Test annotation method= " +c);
    }

    @Test
    public void Multiplication()
    {
            c=a*b;
            assertEquals(50,c);
            System.out.println("This is second @Test annotation method= " +c);
    }


    @After
    public void TearDown()
    {
            // Cleaning up the test environment
            c= null;
            System.out.println("This is @After annotation");
    }


    @AfterClass
    public static void TearDownClass()
    {
            //Release your resources here
            System.out.println("This is @AfterClass annotation");
    }

    @Ignore
    public void IgnoreMessage()
    {
       String info = "JUnit Annotation Blog" ;
       assertEquals(info,"JUnit Annotation Blog");
       System.out.println("This is @Ignore annotation");
    }


}
Console Output Of JUnit Annotations in Selenium WebDriver

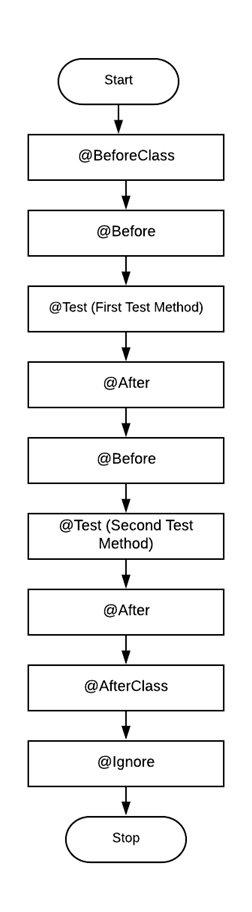
Execution Sequence Of JUnit Annotations For Selenium
A basic process flowchart of JUnit Annotations that would help you understanding the flow, step by step.
Annotations In JUnit For Specific Purposes
In earlier section we covered most basic JUnit annotations in Selenium. Now, I will show you some advanced JUnit annotations along with their specific purpose.

@ParameterizedTest
This annotation is somewhat similar to @Test annotation, the difference is that it is used to identify the parameterized test methods. We can also make use of @ValueSource annotation for providing the method parameters after annotating the test method. Keep in mind, that the data type for a parameters could be of any type such as String or Integer. In the below sample code, the variable “data” of String type passed as a parameter takes an argument from the source annotation.
The primary purpose of this annotation is to run a test multiple times with different arguments.
Note: Add the below libraries before using these annotation
org.junit.jupiter.params.ParameterizedTest org.junit.jupiter.params.provider.ValueSource
Example:
@ParameterizedTest
    @ValueSource(strings = {"LambdaTest", "JUnit", "Annotations", "Blog"})
    void ExampleCode(String data)
    {
       assertNotNull(data);
    }
Output:

@RepeatedTest
This annotation which has been introduced in JUnit 5 is used to run test method several times as per the requirement. The number of repetitions that you want a test to go under, can be passed as a parameter to @RepeatedTest annotation.
Example
@Test
    @RepeatedTest(5)
    public void Addition()
    {
        int a=10;
        int b=5;
        Object c;

        c= a+b;
        assertEquals(15,c);
        System.out.println("This is @RepeatedTest annotation method= " +c);
    }
Output

3) @RunWith
When a class is annotated with @RunWith annotation, JUnit invokes the class which are annotated to execute the test. This annotation basically runs with @SuiteClasses Annotation which specifies a group of many classes to be executed. Each class in a suite executes after the execution of prior running class.
Note: It is necesarry to add org.junit.runner.RunWith librarby in order to use this annotation.
Example
@RunWith(Suite.class)
@Suite.SuiteClasses({
  TestSample1.class,
  TestSample2.class,
  TestSample3.class,
  TestSample4.class,
  TestSample5.class,
})

public class JunitTest {
            // This class remains empty, it is used only as a holder for the above annotations.
}
@Parameters
Note: Do not get confused between @ParameterizedTest annotation and @Parameters annotation. @Parameters annotation requires @RunWith annotation to specify that the test would run with Parameterized runner. However, in @ParameterizedTest annotations, @ValueSource would be used as a source annotation to pass arguments.
While using @Parameters annotation, we use @RunWith annotation to specify that the test will run with Parameterized Runner. The runner looks for a method that initialize the test, provides values for the test and executes the test. In the below code, the value-set is defined as list Object arrays which is annotated with @Parameters. A parameterized test is a common test which is executed again and again using test parameters.This saves a lot of time for developers in executing the same test with different input types.
Example
@RunWith(Parameterized.class)
public class Blog1 {

   String name, password;

   @Parameters
   public Object[][] getData()
   {
   Object[][] info = {{"ramit1","ramitd11"}, {"ramit2","ramitd22"}};
   return info;
   }

   public Blog1(String id, String pass)
   {
       this.name = id;
       this.password= pass;

   }

   @Test
   public void Sample()
   {
       SampleCode.login(name, password);
   }
}


Below is the code for SampleCode class used in above example:


public class SampleCode
{
    public static void login(String name, String password)
        {
            System.out.println(“Login credentials are ”  + name + password ) ;
         }
}
Output

This JUnit Tutorial for beginners and professionals will help you learn JUnit Annotations in Selenium.

Attributes Used With JUnit Annotations In Selenium WebDriver
These test annotations in JUnit have multiple attributes that can be used for our test method:
1) timeout – To specify timeout for each test case, timeout attribute is specified within @Test annotation. Timeout time is specified in milliseconds. For example, suppose, you know your particular test case takes around 15-20 seconds to get executed and you want your test to fail if it takes more than 20 seconds to get executed, then you can use this attribute as @Test(timeout=20000) for your particular test case. If an execution fails then the progress bar would get red instead of green.
Example:
@Test(timeout=10000)
    public void ExampleCode() throws InterruptedException
    {
            System.setProperty("webdriver.chrome.driver","C:\Users\Lenovo-I7\Desktop\Selenium\chromedriver.exe");

        WebDriver driver = new ChromeDriver();
        driver.get("https://www.testmuai.com/");
        driver.manage().window().maximize();

        driver.findElement(By.xpath("//*[@id='bs-example-navbar-collapse-1']/ul/li[6]/a")).click();
        Thread.sleep(2000);  //Login Page Button

        driver.findElement(By.xpath("//*[@id='app']/section/form/div/div/input[1]")).sendKeys("ramit@lambdatest.com");
            //Username

        driver.findElement(By.xpath("//*[@id='app']/section/form/div/div/input[2]")).sendKeys("Hello1234");
        Thread.sleep(2000);  //Password

        driver.quit();
    }
-> Now, if you want to put this same timeout for multiple test cases, it is not necessary to add timeout attribute within each and every @Test annotation you have specified in your script. In such case, you can use @Rule annotation to define a global timeout that would be applicable for each @Test method annotation of your script.
Example:
@Rule
public Timeout globalTimeout = Timeout.seconds(10); // 10 seconds max per test method
2) expected – This is a special feature introduced by JUnit 4 which provides the facility to trace an exception that was expected from the execution of a particular code. There are different kinds of exceptions that are probably expected while running a code, such as, NoSuchMethodException, ArithmeticException, IndexOutOfBoundsExceptions etc. For example, you expect occurrence of exception from your code when a particular number is divided by zero, in this case, you would be using ArithmeticException. If the excepted exception does not occur then the test execution will fail.
Example:
@Test(expected= ArithmeticException.class)
    public void ExampleCode()
      {
            int a= 10,b=0,c;

            c=a/b;

            System.out.println("Value= " +c);
    }
How Do AI Tools Help Write and Maintain JUnit Annotations?
AI coding assistants speed up JUnit annotation work by generating the boilerplate and catching annotation misuse before a test runs. Four use cases matter most for Selenium test suites.
- AI test scaffolding: Coding assistants like GitHub Copilot and Claude Code generate a starting @Test method with the matching @Before or @BeforeEach setup, based on the WebDriver code already in the file, reducing the copy-paste boilerplate that JUnit annotations require across a large Selenium suite.
- Automated annotation linting: IDE AI assistants such as IntelliJ IDEA's AI Assistant flag a missing @After teardown or a @Test method with no assertion, catching a mistake before the suite runs on Selenium Grid.
- AI-assisted flaky test triage: Machine-learning based test analytics group failures by pattern, distinguishing a genuine assertion failure from a flaky WebDriver timeout, so a team knows whether to fix the test or the environment.
- AI-generated test data: Tools that pair with @ParameterizedTest and @ValueSource can propose edge-case input values, such as boundary numbers or malformed strings, instead of a developer hand-picking them.
None of this replaces understanding what each annotation does. It just removes the manual, repetitive part of writing and checking them.
Performing Cross Browser Testing with JUnit annotations On Selenium Grid
Cross Browser Testing, as the name suggests, is a practice to test your website or web-application on different browsers, browser versions and on different operating systems as well, making sure that the particular application works as expected in desired configurations without any compromise in quality. Primarily, with browser compatibility testing, we test the appearance and functionality of a website. The purpose of cross browser testing is to provide consistent behavior of any application on different browsers, devices and platforms. Selenium helps us to perform automated cross browser testing for pacing our go-to-market delivery.
Selenium comes under 4 variants –
- Selenium IDE
- Selenium RC
- Selenium WebDriver
- Selenium Grid
Selenium Grid would be the best option for automated cross browser testing, as it empowers users to perform parallel testing in Selenium for which we would be using Java with JUnit framework. For this, we would be running our automated test script on TestMu AI, a cross browser testing tool to realize the use of common JUnit annotations in Selenium by performing cross browser testing
Below is the code using which will first go to Apple’s website → iPad → iPad Air → Why iPad. Our code will then capture a screenshot of the last webpage i.e. Why iPad, and will store it in my local machine. I will be making use of TestMu AI Selenium Grid for running my below automation script to perform automated cross browser testing.
package LambdaAutoPack;

import java.io.File;
import java.io.IOException;
import java.net.MalformedURLException;
import java.net.URL;

import org.apache.commons.io.FileUtils;
import org.junit.After;
import org.junit.AfterClass;
import org.junit.Before;
import org.junit.BeforeClass;
import org.junit.Ignore;
import org.junit.Test;
import org.openqa.selenium.By;
import org.openqa.selenium.JavascriptExecutor;
import org.openqa.selenium.OutputType;
import org.openqa.selenium.TakesScreenshot;
import org.openqa.selenium.remote.DesiredCapabilities;
import org.openqa.selenium.remote.RemoteWebDriver;

public class JUnitAnnotation {

    public String username = "ramitdlambdatest";
    public String accesskey = "abcd1234";
    public static RemoteWebDriver driver = null;
    public String gridURL = "@hub.lambdatest.com/wd/hub";
    boolean status = false;

    @BeforeClass
    public static void setUpClass()
    {
       System.out.println("Cross Browser Testing on LambdaTest");
       System.out.println("Testing on High Sierra, Chrome 72, Resolution-1920x1080");

    }


    @Before
    public void setUp() throws Exception {
       DesiredCapabilities capabilities = new DesiredCapabilities();
        capabilities.setCapability("browserName", "Chrome");
        capabilities.setCapability("version", "72.0");
        capabilities.setCapability("platform", "macOS High Sierra"); // If this cap isn't specified, it will just get the any available one
        capabilities.setCapability("build", "JUnit Annotations");
        capabilities.setCapability("name", "MyBlog");
        capabilities.setCapability("network", true); // To enable network logs
        capabilities.setCapability("visual", true); // To enable step by step screenshot
        capabilities.setCapability("video", true); // To enable video recording
        capabilities.setCapability("console", true); // To capture console logs
        capabilities.setCapability("resolution","1920x1080");


        try {
            driver = new RemoteWebDriver(new URL("https://" + username + ":" + accesskey + gridURL), capabilities);
        } catch (MalformedURLException e) {
            System.out.println("Invalid grid URL");
        } catch (Exception e) {
            System.out.println(e.getMessage());
        }
    }

    @Test
    public void testSimple() throws Exception {
    try {


            driver.get("https://www.apple.com/");
            driver.manage().window().maximize();

            driver.findElement(By.xpath("//*[@id='ac-globalnav']/div/ul[2]/li[3]")).click();
            Thread.sleep(2000);

            driver.findElement(By.cssSelector("#chapternav > div > ul > li.chapternav-item.chapternav-item-ipad-air > a")).click();
                Thread.sleep(2000);

                driver.findElement(By.linkText("Why iPad")).click();
                Thread.sleep(2000);

        } catch (Exception e) {
            System.out.println(e.getMessage());
        }
   }

    @After
    public void tearDown() throws Exception {
       if (driver != null) {
            ((JavascriptExecutor) driver).executeScript("lambda-status=" + status);
        }
    }

    @AfterClass
    public static void teardownClass() throws IOException
    {
       File screenshotFile = ((TakesScreenshot)driver).getScreenshotAs(OutputType.FILE);
       FileUtils.copyFile(screenshotFile, new File("D:\Testing.png"));
       driver.quit();
    }

    @Ignore
    public void IgnoreMethod()
    {
       System.out.println("Some modules are not yet ready, please ignore");
    }
}
Code Walkthrough
The above code will trigger my test in Google Chrome 72 on Mac High Sierra. If you wish to perform the test on some other browser + OS configuration then you can do so by simple changing the desired capabilities. TestMu AI provides a DesiredCapabilities Generator to help you with coded values based on your selections from drop-down list values.
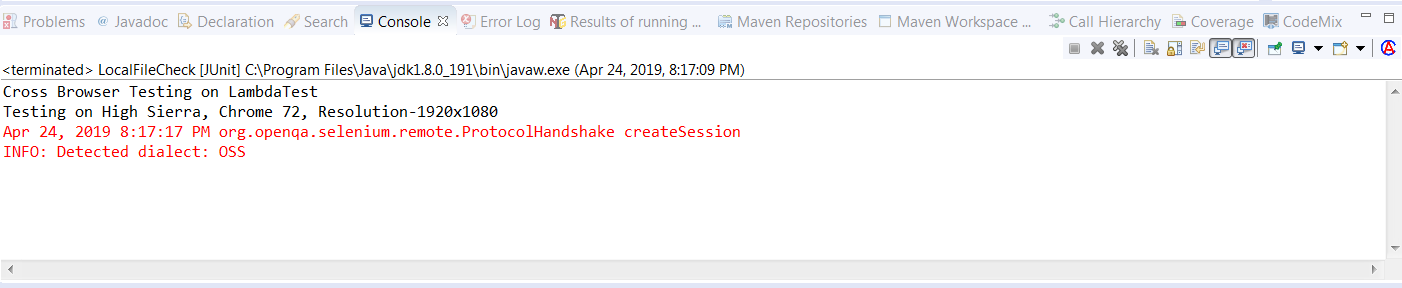
Since the @BeforeClass annotation method executes only once, I have mentioned the conclusion of this script there itself i.e. Cross Browser Testing on operating system-High Sierra, browser- Chrome, version-72 and resolution- 1920×1080
Coming to @Before annotation method, I have passed the desired capabilities from the capability generator provided by TestMu AI which defines the configurations(OS, Browser, Browser version, Resolution) on which you want your test to run on along with the desired Build name. The same capabilities would be used for each test method since the @Before annotation method executes before each test case.
The @Test annotation method would include your test case of an application that you want to test. In this test method I have written a small automation script that would execute on TestMu AI Selenium Grid which includes live video streaming of selenium test and show the output on IDE console as well. You can create as many @Test annotation depending upon your different project test case executions.
The @After annotation method that executes after each test method shows the status of each test case that whether it has passed or failed. According to the status, you can decide whether the test case needs any improvisation or not.
The @AfterClass annotation method which gets executed only once after the execution of all the test methods, would take the screenshot of the web page that was last accessible through the script and would save the screenshot in the mentioned directory/folder.
@Ignore annotation would just show that some modules of this particular web application has not been fully developed and are still in progress. So, the @Ignore annotation method won’t show any output.
Output
Below is the video that would show you the complete execution of my above automation test script on TestMu AI Selenium Grid.

Summarizing It All!
We have covered all the JUnit annotations in Selenium along with their explanation and sample code. We have also performed automated cross browser testing with the help of JUnit annotations in Selenium Grid on a cloud-based cross browser testing tool, TestMu AI.
JUnit annotations are very powerful feature of JUnit, and help to improve code structure by making JUnit tests easier and more readable. Use of these annotations totally depends on your project requirement, using an appropriate annotation at correct place would be very helpful for developers as well as for other team members.
Remember, JUnit annotations for Selenium would only work in JUnit 4 plus versions and would also require to import this particular library, “org.junit.”
Execute your automation script using JUnit annotations on TestMu AI Selenium Grid now! Happy testing. 🙂

JUnit Annotations
JUnit annotations are predefined text elements available in the Java API, assisting the JVM in identifying the intended nature of methods or classes for testing.
In simpler terms, these annotations explicitly indicate methods or classes, attributing specific properties such as testing, disabling tests, ignoring tests, and more. To learn more about JUnit Annotations, follow the video tutorial below!
JUnit 4 Annotations
We will cover JUnit annotations that are well-known to every developer and tester. Below are the JUnit annotations used in JUnit 4.
@BeforeClass: It initializes any object in a running test case. When we instantiate an object in the BeforeClass method, it is only invoked once. The primary function of the @BeforeClass JUnit annotation is to execute some statements before all of the test cases specified in the script.
@BeforeClass
public static void SetUpClass() {
    // Initialization code goes here
    System.out.println("This is @BeforeClass annotation");
}
@Before: This annotation is used whenever we wish to initialize an object during the method's execution. Assuming we have five test cases, the Before method will be called five times before each test method. As a result, it would be invoked every time the test case is run. Test environments are usually set up using this annotation.
@Before
public void SetUp() {
    // Setting up the test environment
    System.out.println("This is @Before annotation");
}
@Test: Attaching @Test to a public void method marks it as a test case. A single automation script can contain many such test methods.
@Test
public void Addition() {
    // Test method for addition
}


@Test
public void Multiplication() {
    // Test method for multiplication
}
@After: Whatever we initialized in the @Before annotation method should be released in the @After annotation method. As a result, this annotation is executed after each test method. The primary function of the @After annotation is to delete temporary data. The TearDown() releases resources or cleans up the test environment in @Before.
@After
public void TearDown() {
    // Cleaning up the test environment
    System.out.println("This is @After annotation");
}
@AfterClass: Anything initialised in @BeforeClass should be released here. It runs once, after all tests finish, and TearDownClass() releases those resources.
@AfterClass
public static void TearDownClass() {
    // Release your resources here
    System.out.println("This is @AfterClass annotation");
}
@Ignore: The @Ignore annotation directs JUnit to skip the execution of the annotated method. This proves useful when a particular code module is unavailable for a specific test case.
The test case is prevented from failing by temporarily placing the concerned code module within the @Ignore annotated method.
In JUnit 4, this annotation provides detailed reporting, helping you keep track of the number of tests that were ignored and the number of tests that ran and failed.
@Ignore
    public void IgnoreMessage()
    {
       String info = "JUnit Annotation Blog" ;
       assertEquals(info,"JUnit Annotation Blog");
       System.out.println("This is @Ignore annotation");
    }
To understand JUnit annotation better, below is the compiled code with output representing all the JUnits annotations in Selenium.
package JUnitAnnotationBlog;

 import static org.junit.Assert.assertEquals;

 import org.junit.After;
 import org.junit.AfterClass;
 import org.junit.Before;
 import org.junit.BeforeClass;
 import org.junit.Ignore;
 import org.junit.Test;

 public class JUnitAnnotations {

     int a=10;
     int b=5;
     Object c;


     @BeforeClass
     public static void SetUpClass()
     {
             //Initialization code goes here
             System.out.println("This is @BeforeClass annotation");
     }


     @Before
     public void SetUp()
     {
             // Setting up the test environment
             System.out.println("This is @Before annotation");
     }


     @Test
     public void Addition()
     {
             c= a+b;
             assertEquals(15,c);
             System.out.println("This is first @Test annotation method= " +c);
     }

     @Test
     public void Multiplication()
     {
             c=a*b;
             assertEquals(50,c);
             System.out.println("This is second @Test annotation method= " +c);
     }


     @After
     public void TearDown()
     {
             // Cleaning up the test environment
             c= null;
             System.out.println("This is @After annotation");
     }


     @AfterClass
     public static void TearDownClass()
     {
             //Release your resources here
             System.out.println("This is @AfterClass annotation");
     }

     @Ignore
     public void IgnoreMessage()
     {
        String info = "JUnit Annotation Blog" ;
        assertEquals(info,"JUnit Annotation Blog");
        System.out.println("This is @Ignore annotation");
     }


 }
JUnit 5 renamed most of these annotations and changed how a few behave. The table below maps the JUnit 4 name to its JUnit 5 equivalent.
Junit 5 Annotations
Notably, as of JUnit 5, a significant change is evident, since test classes and methods no longer require public visibility.
Let's now navigate through the key JUnit 5 annotations commonly used.
- @Test : This annotation signifies that a method is a test method. It's important to note that this annotation doesn't take any attributes.
import org.junit.jupiter.api.Test;
import static org.junit.jupiter.api.Assertions.assertEquals;


class JUnit5Test {

    @Test
    void TestNewJUnit5() {
        assertEquals(10, 7+7);
    }
}
In this context, you must declare a source that provides arguments for each invocation used within the test method.
For instance, consider the following example illustrating a parameterized test using the @ValueSource annotation to specify a String array as the source of arguments.
import org.junit.jupiter.params.ParameterizedTest;
import org.junit.jupiter.params.provider.ValueSource;


import static org.junit.jupiter.api.Assertions.assertTrue;


class JUnit5Test {


    @ParameterizedTest
    @ValueSource(strings = { "Kali", "eali", "dani" })
    void endsWithI(String str) {
        assertTrue(str.endsWith("i"));
    }
}
Each iteration of a repeated test functions similarly to the execution of a standard @Test method. This feature proves especially valuable, notably in UI testing scenarios involving Selenium.
Below is a simpler example of repeating a test using flipping a coin:
import org.junit.jupiter.api.DisplayName;
import org.junit.jupiter.api.RepeatedTest;
import org.junit.jupiter.api.RepetitionInfo;
import org.junit.jupiter.api.TestInfo;


import static org.junit.jupiter.api.Assertions.assertTrue;


class CoinFlipTest {


    @RepeatedTest(5)
    @DisplayName("Coin Flip Test")
    void flipCoin(RepetitionInfo repetitionInfo, TestInfo testInfo) {
        String result = flipACoin();


        System.out.println(testInfo.getDisplayName() + " - Result: "+ result);


        // Ensure the result is either "Heads" or "Tails"
        assertTrue(result.equals("Heads") || result.equals("Tails"));
    }


    private String flipACoin() {
        // Simulate flipping a coin and return the result
        return (Math.random() < 0.5) ? "Heads" : "Tails";
    }
}
Here @RepeatedTest simulates flipping a coin five times. The flipCoin method returns Heads or Tails at random, and the test asserts the result is one of the two.
import org.junit.jupiter.api.DisplayName;
import org.junit.jupiter.api.Test;
import org.junit.jupiter.api.TestInfo;


@DisplayName("DisplayName TestMu AI")
class JUnit5Test {
    @Test
    @DisplayName("Custom test name")
    void testWithDisplayName() {
    }


    @Test
    @DisplayName("Print test name")
    void printDisplayName(TestInfo testInfo) {
        System.out.println(testInfo.getDisplayName());
    }
}
import org.junit.jupiter.api.*;


class JUnit5Test {


    @BeforeEach
    void setUp(TestInfo testInfo) {
        String callingTest = testInfo.getTestMethod().get().getName();
        System.out.println("Initializing for test: " + callingTest);
    }


    @Test
    void firstTest() {
        System.out.println("Executing first test 1");
    }


    @Test
    void secondTest() {
        System.out.println("Executing second test 2");
    }
}
import org.junit.jupiter.api.*;


class JUnit5Test {


    @Test
    void firstTest() {
        System.out.println("Executing first test");
    }


    @Test
    void secondTest() {
        System.out.println("Executing second test");
    }


    @AfterEach
    void tearDown(TestInfo testInfo) {
        String callingTest = testInfo.getTestMethod().get().getName();
        System.out.println("Tearing down after test: " + callingTest);
    }
}
In this example, the tearDown() method is annotated with @AfterEach and runs after each test method, providing a way to perform cleanup or reset operations specific to each test.
import org.junit.jupiter.api.*;
class JUnit5Test {


    @BeforeAll
    static void setUpAll() {
        System.out.println("Initialization before all tests");
    }
    @Test
    void firstTest() {
        System.out.println("Executing first test");
    }
    @Test
    void secondTest() {
        System.out.println("Executing second test");
    }
}
import org.junit.jupiter.api.*;
class JUnit5Test {
    @Test
    void firstTest() {
        System.out.println("Executing first test");
    }


    @Test
    void secondTest() {
        System.out.println("Executing second test");
    }
    @AfterAll
    static void tearDownAll() {
        System.out.println("Only run once after all tests");
    }
}
In the above example of this JUnit tutorial, the tearDownAll() method is annotated with @AfterAll and runs once after all tests, providing a mechanism to perform cleanup tasks that are common to all test methods.
import org.junit.jupiter.api.Tag;
import org.junit.jupiter.api.Test;
@Tag("smoke")
class JUnit5Test {


    @Test
    @Tag("login")
    void validLoginTest() {
        // Test logic for valid login
    }
    @Test
    @Tag("search")
    void searchTest() {
        // Test logic for search functionality
    }
}
In this example, the JUnit 5 Test class is tagged with smoke, and two test methods (validLoginTest and searchTest) are further tagged with login and search, respectively. This allows for selective execution of tests based on the assigned tags, facilitating the creation of focused test suites.

import org.junit.jupiter.api.Disabled;
import org.junit.jupiter.api.Test;
@Disabled
class DisabledClassDemo {
    @Test
    void testWillBeSkipped() {
        // Test logic to be skipped
    }
}
In this example, the entire class DisabledClassDemo is annotated with @Disabled, causing all @Test methods within the class to be skipped.
import org.junit.jupiter.api.Disabled;
import org.junit.jupiter.api.Test;
class DisabledTestsDemo {
    @Disabled
    @Test
    void testWillBeSkipped() {
        // Test logic to be skipped
    }
  @Test
    void testWillBeExecuted() {
        // Test logic to be executed
    }
}
In this example, the testWillBeSkipped method is individually annotated with @Disabled, leading to the exclusion of only that specific test, while testWillBeExecuted remains enabled and will be executed.
Author

Ramit Dhamija
Blogs: 10


Ramit Dhamija is a DevOps Engineer with 6+ years of experience in software testing, Java-based test automation, and cloud infrastructure. At TestMu AI, he contributed to automation frameworks that enhanced cross-browser testing reliability. Skilled in Java, Selenium, Kubernetes, and AWS, he also holds certifications including CKA and ISTQB. Ramit earned his MCA in Computer Science from Birla Institute of Technology, Mesra, and specializes in bridging QA practices with modern DevOps pipelines.
On This Page
- Why JUnit Is So Popular Among Testers?
- What Are JUnit Annotations?
- Digging Deeper with Examples of JUnit Annotations In Selenium WebDriver
- Execution Sequence Of JUnit Annotations For Selenium
- Annotations In JUnit For Specific Purposes
- Attributes Used With JUnit Annotations In Selenium WebDriver
- AI Tools for JUnit Annotations
- Performing Cross Browser Testing with JUnit annotations On Selenium Grid
- Summarizing It All!
- JUnit Annotations
JUnit Annotations in Selenium FAQs
Did you find this page helpful?
More Related Blogs
TestMu AI forEnterprise
Get access to solutions built on Enterprise
grade security, privacy, & compliance
- Advanced access controls
- Advanced data retention rules
- Advanced Local Testing
- Premium Support options
- Early access to beta features
- Private Slack Channel
- Unlimited Manual Accessibility DevTools Tests