

Power Your Software Testing with AI Agents and Cloud
The Native AI-Agentic Cloud Platform to Supercharge Quality Engineering. Test Intelligently and Ship Faster.


- TestMu AI (Formerly LambdaTest)
- /
- Blog
- /
- How to Write JUnit Test Cases: Step-by-Step Guide
How to Write JUnit Test Cases: Step-by-Step Guide
Learn how to write JUnit test cases step by step with @Test, assertions, and arrange-act-assert, using runnable JUnit 6 examples and a real Selenium cloud run.
Last Updated on:
A JUnit test case is a Java method annotated with @Test that calls one unit of code and checks the result with an assertion such as assertEquals or assertThrows. Each test follows the arrange-act-assert pattern: set up the input, call the method, and assert the outcome. JUnit marks the test as failed when an assertion does not hold.
This guide writes JUnit test cases for a small CartCalculator class on JUnit 6.1.3, runs them with Maven, and then runs a Selenium JUnit test on the TestMu AI cloud grid. Every code block was compiled and executed on JDK 21 with Maven on September 22, 2026, and the console output shown comes from those runs. For the framework basics first, read the JUnit tutorial.
Overview
To write a JUnit test case, create a test class under src/test/java, add a method annotated with @Test, and structure it as arrange-act-assert: build the input, call the method under test, and verify the result with an assertion such as assertEquals. Run it with mvn test or from your IDE.
- @Test method: marks one test case. In JUnit 5 and JUnit 6 the method must not be private or abstract and must not return a value, and the public modifier is optional.
- Assertions: assertEquals, assertThrows, and assertAll compare the expected result with the actual one. A failing assertEquals reports both values, for example expected 175.0 but was 170.0.
- Lifecycle annotations: @BeforeEach and @AfterEach run around every test method, while @BeforeAll and @AfterAll run once per class and must be static unless the class uses the per-class lifecycle.
- JUnit 6: the current major version, first released on September 30, 2025, requires Java 17 and gives Platform, Jupiter, and Vintage one shared version number. Test methods written for JUnit 5 keep working.
- Cloud execution: the same JUnit class runs Selenium tests on the TestMu AI cloud grid when the local driver is replaced with a RemoteWebDriver that sends LT:Options capabilities.
What Is a JUnit Test Case?
A JUnit test case is one test method that checks a single behavior of your code. It lives in a test class named after the class it tests with a Test suffix, such as CartCalculatorTest for CartCalculator, inside src/test/java so the build compiles it separately from production code.
Every JUnit test case is built from the same parts:
- The @Test annotation - tells the JUnit Jupiter engine to run the method as a test.
- Arrange - creates the object under test and its input data.
- Act - calls the one method being tested.
- Assert - compares the actual result with the expected value. A failed assertion throws an AssertionFailedError, and JUnit marks the test as failed.
JUnit runs through the build tool you already use. Maven Surefire and Gradle both execute JUnit tests, and IntelliJ IDEA runs a single test method from the icon beside it, so unit testing a Java project needs no separate test runner.
How to Write JUnit Test Cases
- Add JUnit to the build - import the JUnit BOM and add the junit-jupiter artifact.
- Create the class under test - in src/main/java.
- Create a test class - in src/test/java, in the same package, with a name ending in Test.
- Write a @Test method - arrange the input, act on the method, and assert the outcome.
- Run the test - with mvn test, with a single method selected through -Dtest, or from the IDE.
- Read the result - a failure prints the expected value, the actual value, and the line that failed.
Step 1: Add JUnit to the build
Import the junit-bom in dependencyManagement and add junit-jupiter, which pulls in the junit-jupiter-api, junit-jupiter-params, and junit-jupiter-engine artifacts. The BOM keeps every JUnit artifact on one version, so 6.1.3 is set in a single place.
<properties>
    <maven.compiler.release>17</maven.compiler.release>
</properties>

<dependencyManagement>
    <dependencies>
        <dependency>
            <groupId>org.junit</groupId>
            <artifactId>junit-bom</artifactId>
            <version>6.1.3</version>
            <type>pom</type>
            <scope>import</scope>
        </dependency>
    </dependencies>
</dependencyManagement>

<dependencies>
    <dependency>
        <groupId>org.junit.jupiter</groupId>
        <artifactId>junit-jupiter</artifactId>
        <scope>test</scope>
    </dependency>
</dependencies>

<build>
    <plugins>
        <plugin>
            <groupId>org.apache.maven.plugins</groupId>
            <artifactId>maven-surefire-plugin</artifactId>
            <version>3.6.0</version>
        </plugin>
    </plugins>
</build>
JUnit 6 needs Java 17 or later, and the JUnit 6.0.0 release notes also drop support for Maven Surefire and Failsafe versions below 3.0.0. On an older JDK, set the BOM to the JUnit 5 line (5.14.4 is its latest release) and keep the rest of this guide unchanged. The JUnit environment setup guide covers Gradle and IDE configuration.
Step 2: Create the class under test
CartCalculator returns a price after a percentage discount and rejects any percentage outside 0 to 100, which gives the tests a normal path, two boundaries, and an error path to cover.
package com.example;

public class CartCalculator {

    public double applyDiscount(double price, int percent) {
        if (percent < 0 || percent > 100) {
            throw new IllegalArgumentException("Discount must be between 0 and 100, got " + percent);
        }
        return price - (price * percent / 100.0);
    }
}
Step 3 and Step 4: Create the test class and write a @Test method
Create CartCalculatorTest in src/test/java/com/example and write the first test case with one comment per arrange-act-assert phase:
package com.example;

import org.junit.jupiter.api.DisplayName;
import org.junit.jupiter.api.Test;

import static org.junit.jupiter.api.Assertions.assertEquals;

class CartCalculatorTest {

    private final CartCalculator calculator = new CartCalculator();

    @Test
    @DisplayName("15% off 200.00 returns 170.00")
    void appliesPercentageDiscount() {
        // Arrange
        double price = 200.00;
        int percent = 15;

        // Act
        double discounted = calculator.applyDiscount(price, percent);

        // Assert
        assertEquals(170.00, discounted, 0.001);
    }
}- No public modifier - the JUnit User Guide recommends omitting it on test classes and methods; they only need to be non-private.
- A fresh instance per test - JUnit creates a new instance of the test class before each test method, so the calculator field starts clean every time.
- Expected value first - assertEquals takes the expected value, then the actual value. The third argument, 0.001, is the tolerance for comparing double values.
Step 5: Run the test
Run the whole suite with mvn test, or select one method with the Class#method syntax:
mvn test -Dtest=CartCalculatorTest#appliesPercentageDiscount[INFO] T E S T S
[INFO] -------------------------------------------------------
[INFO] Running com.example.CartCalculatorTest
[INFO] Tests run: 1, Failures: 0, Errors: 0, Skipped: 0, Time elapsed: 0.087 s -- in com.example.CartCalculatorTest
[INFO]
[INFO] Results:
[INFO]
[INFO] Tests run: 1, Failures: 0, Errors: 0, Skipped: 0
[INFO]
[INFO] ------------------------------------------------------------------------
[INFO] BUILD SUCCESSIn IntelliJ IDEA, the run icon beside the class or method does the same. More command-line options, such as running by tag or package, are in how to run JUnit tests from the command line.

Step 6: Read the result
Change the expected value in the assertion from 170.00 to 175.00 and run the same command. This is the verbatim failure report:
[INFO]  T E S T S
[INFO] -------------------------------------------------------
[INFO] Running com.example.CartCalculatorTest
[ERROR] Tests run: 1, Failures: 1, Errors: 0, Skipped: 0, Time elapsed: 0.118 s <<< FAILURE! -- in com.example.CartCalculatorTest
[ERROR] com.example.CartCalculatorTest.appliesPercentageDiscount -- Time elapsed: 0.077 s <<< FAILURE!
org.opentest4j.AssertionFailedError: expected: <175.0> but was: <170.0>
	at org.junit.jupiter.api.Assertions.assertEquals(Assertions.java:1063)
	at com.example.CartCalculatorTest.appliesPercentageDiscount(CartCalculatorTest.java:27)

[INFO]
[INFO] Results:
[INFO]
[ERROR] Failures:
[ERROR]   CartCalculatorTest.appliesPercentageDiscount:27 expected: <175.0> but was: <170.0>
[INFO]
[ERROR] Tests run: 1, Failures: 1, Errors: 0, Skipped: 0
[INFO]
[INFO] ------------------------------------------------------------------------
[INFO] BUILD FAILURE
The report names the failed method, prints the expected and actual values, and points at line 27 of CartCalculatorTest, which is the assertion. Because the expected value went first, the message reads the right way round.
Writing JUnit Test Cases With Annotations
JUnit annotations control when setup and teardown code runs around your test cases. BasicTest uses @BeforeAll, @BeforeEach, @AfterEach, @AfterAll, @Test, @DisplayName, and @Disabled together so the execution order is visible in the console:
package com.example;

import org.junit.jupiter.api.AfterAll;
import org.junit.jupiter.api.AfterEach;
import org.junit.jupiter.api.BeforeAll;
import org.junit.jupiter.api.BeforeEach;
import org.junit.jupiter.api.Disabled;
import org.junit.jupiter.api.DisplayName;
import org.junit.jupiter.api.Test;

@DisplayName("Demo Test class")
public class BasicTest {

    @BeforeAll
    public static void beforeAllTest() {
        System.out.println("Before All method called!!");
    }

    @BeforeEach
    public void beforeEachTest() {
        System.out.println("Before Each method called!!");
    }

    @DisplayName("This is a demo test")
    @Test
    public void testMethodOne() {
        System.out.println("Test Method One Called!!");
    }

    @Test
    @Disabled("This test is disabled to demo disable annotation")
    public void disabledTest() {
        System.out.println("This is a disabled test!!");
    }

    @Test
    public void testMethodTwo() {
        System.out.println("Test Method Two Called!!");
    }

    @AfterEach
    public void afterEachMethod() {
        System.out.println("After Each method called!!");
    }

    @AfterAll
    public static void afterAllMethod() {
        System.out.println("After All method called!!");
    }
}
- @DisplayName - the class-level annotation makes reports show Demo Test class instead of BasicTest, and the method-level one renames testMethodOne().
- @BeforeAll and @AfterAll - beforeAllTest() runs once before any test, and afterAllMethod() runs once after the last one. Both are static.
- @BeforeEach and @AfterEach - beforeEachTest() and afterEachMethod() run around every test method that executes.
- @Disabled - disabledTest() is skipped, and the reason string appears in the report.
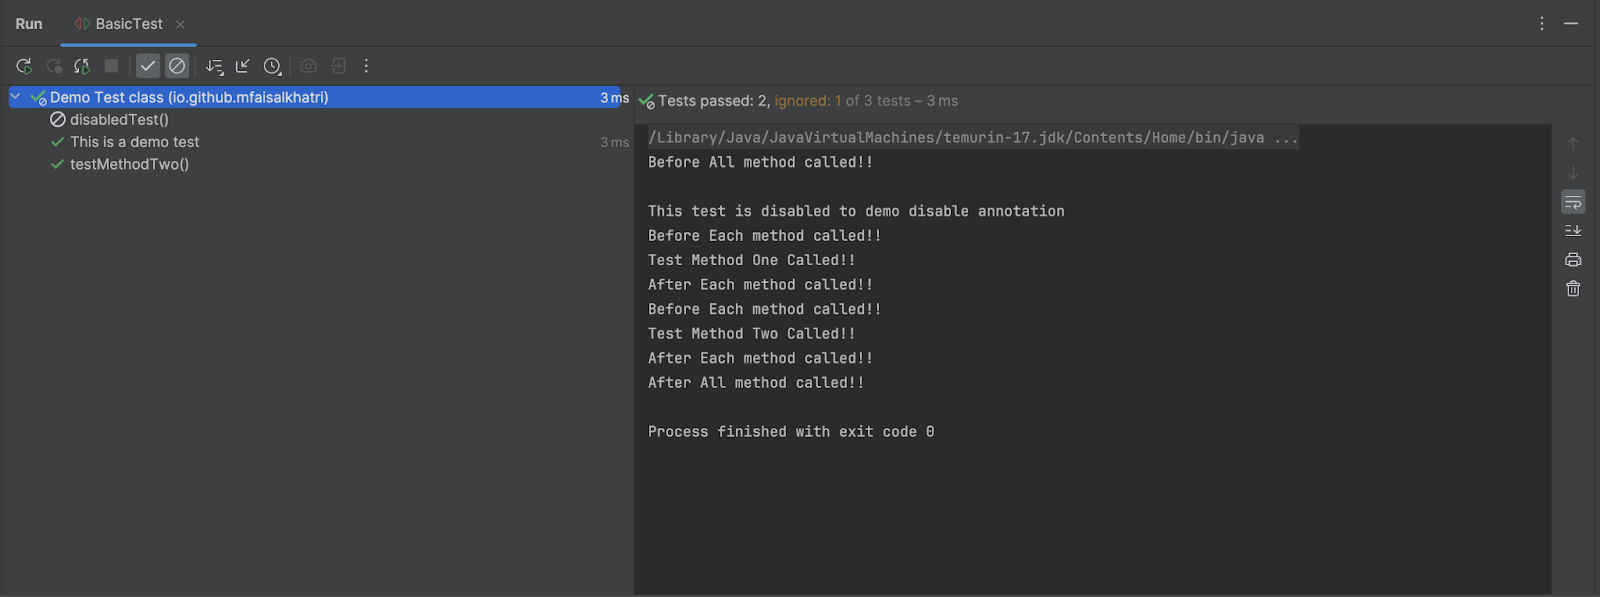
Running mvn test -Dtest=BasicTest on JUnit 6.1.3 prints the lifecycle in order. The disabled test never runs, so its setup and teardown hooks do not fire either:
[INFO] Running Demo Test class
Before All method called!!
Before Each method called!!
Test Method One Called!!
After Each method called!!
Before Each method called!!
Test Method Two Called!!
After Each method called!!
After All method called!!
[WARNING] Tests run: 3, Failures: 0, Errors: 0, Skipped: 1, Time elapsed: 0.802 s -- in Demo Test class
IntelliJ IDEA shows the same run as a tree, with the display names and the reason for the skipped test:

Writing JUnit Test Cases With Assertions
The happy path is one test case. The error path and the boundaries need their own. Add these two methods to CartCalculatorTest, along with static imports for assertThrows and assertAll from org.junit.jupiter.api.Assertions:
@Test
void rejectsDiscountAboveHundredPercent() {
    IllegalArgumentException error = assertThrows(IllegalArgumentException.class,
            () -> calculator.applyDiscount(200.00, 120));

    assertEquals("Discount must be between 0 and 100, got 120", error.getMessage());
}

@Test
void handlesBoundaryDiscounts() {
    assertAll("boundary discounts",
            () -> assertEquals(200.00, calculator.applyDiscount(200.00, 0), 0.001),
            () -> assertEquals(0.00, calculator.applyDiscount(200.00, 100), 0.001));
}- assertThrows - passes only when the lambda throws the given exception type, and returns the exception so the next line can check its message.
- assertAll - executes every grouped assertion even after one fails and reports all failures together, according to the JUnit assertions documentation, so one run shows both boundary results.
- assertTrue and assertFalse - check a boolean condition. Prefer assertFalse(isValid) over assertEquals(false, isValid), because the intent reads directly.
For assertions inside browser tests, see these JUnit assertions examples for Selenium.

Writing Parameterized JUnit Test Cases
When the same check applies to many inputs, one @ParameterizedTest replaces a copy-pasted test per value. Each @CsvSource row becomes one invocation, and the name attribute builds a readable label for it:
@ParameterizedTest(name = "{0} with {1}% off = {2}")
@CsvSource({
    "100.00, 10, 90.00",
    "59.99, 0, 59.99",
    "80.00, 25, 60.00"
})
void appliesDiscountAcrossPrices(double price, int percent, double expected) {
    assertEquals(expected, calculator.applyDiscount(price, percent), 0.001);
}
The annotations come from org.junit.jupiter.params, which junit-jupiter already includes. Surefire counts every CSV row as a test, so the complete CartCalculatorTest class reports 6 tests for its 4 methods:
[INFO] Running com.example.CartCalculatorTest
[INFO] Tests run: 6, Failures: 0, Errors: 0, Skipped: 0, Time elapsed: 0.702 s -- in com.example.CartCalculatorTest
Other argument sources, such as @MethodSource and @ValueSource, are covered in this JUnit parameterized test guide.
How to Write JUnit Test Cases for Web Applications on the Cloud
CartCalculatorTest needs no browser, but JUnit also drives Selenium tests for web applications, and those need real browsers. TestMu AI Automation Cloud runs an existing Selenium JUnit class across 3,000+ browser and OS combinations without a local grid, and it records network logs, console logs, video, screenshots, and command logs for every session. Running a JUnit suite there covers cross-browser testing without maintaining browser machines of your own.
The test below opens the eCommerce Playground login page, signs in with a demo account, and asserts that the My Account page opens. Add selenium-java (4.49.0 at the time of writing) as a test dependency next to junit-jupiter:
package com.example;

import org.junit.jupiter.api.AfterAll;
import org.junit.jupiter.api.BeforeAll;
import org.junit.jupiter.api.Test;
import org.openqa.selenium.By;
import org.openqa.selenium.chrome.ChromeOptions;
import org.openqa.selenium.remote.RemoteWebDriver;

import java.net.MalformedURLException;
import java.net.URI;
import java.time.Duration;
import java.util.HashMap;
import java.util.Map;

import static org.junit.jupiter.api.Assertions.assertEquals;

public class LoginTest {

    private static RemoteWebDriver driver;

    @BeforeAll
    public static void setup() throws MalformedURLException {
        String userName = System.getenv("LT_USERNAME");
        String accessKey = System.getenv("LT_ACCESS_KEY");
        String gridUrl = "https://" + userName + ":" + accessKey + "@hub.lambdatest.com/wd/hub";

        driver = new RemoteWebDriver(URI.create(gridUrl).toURL(), getChromeOptions());
        driver.manage().timeouts().pageLoadTimeout(Duration.ofSeconds(30));
        System.out.println("TestMu AI session ID: " + driver.getSessionId());
    }

    public static ChromeOptions getChromeOptions() {
        ChromeOptions browserOptions = new ChromeOptions();
        browserOptions.setPlatformName("Windows 11");
        browserOptions.setBrowserVersion("latest");

        Map<String, Object> ltOptions = new HashMap<>();
        ltOptions.put("project", "JUnit Test Cases Blog");
        ltOptions.put("build", "Ecommerce Playground Login");
        ltOptions.put("name", "Login with valid credentials");
        browserOptions.setCapability("LT:Options", ltOptions);

        return browserOptions;
    }

    @Test
    public void testLoginFunction() {
        driver.get("https://ecommerce-playground.lambdatest.io/index.php?route=account/login");

        driver.findElement(By.id("input-email")).sendKeys("davidjacob@demo.com");
        driver.findElement(By.id("input-password")).sendKeys("Password123");
        driver.findElement(By.cssSelector("input.btn")).click();

        String myAccountHeader = driver.findElement(By.cssSelector("#content h2")).getText();
        assertEquals("My Account", myAccountHeader);
    }

    @AfterAll
    public static void tearDown() {
        if (driver != null) {
            driver.quit();
        }
    }
}- setup() - reads LT_USERNAME and LT_ACCESS_KEY from environment variables so the access key never lands in source control, opens one RemoteWebDriver session over HTTPS, and prints the session ID.
- getChromeOptions() - requests the latest Chrome on Windows 11. The LT:Options map sets the project, build, and test names shown on the dashboard. The Automation Capabilities Generator produces this block for any other browser and OS.
- testLoginFunction() - fills the email and password fields, clicks Login, and asserts the page header with the expected value first.
- tearDown() - quits the session after the last test, so it does not stay open on the grid until it times out.
Export your credentials from the TestMu AI dashboard and run the class:
export LT_USERNAME=<your-username>
export LT_ACCESS_KEY=<your-access-key>
mvn test -Dtest=LoginTest
[INFO] T E S T S
[INFO] -------------------------------------------------------
[INFO] Running com.example.LoginTest
Sept 22, 2026 1:59:12 PM org.openqa.selenium.remote.tracing.opentelemetry.OpenTelemetryTracer createTracer
INFO: Using OpenTelemetry for tracing
TestMu AI session ID: 7c03f569e5f6f645b9c2710624d984e2
[INFO] Tests run: 1, Failures: 0, Errors: 0, Skipped: 0, Time elapsed: 18.97 s -- in com.example.LoginTest
[INFO]
[INFO] Results:
[INFO]
[INFO] Tests run: 1, Failures: 0, Errors: 0, Skipped: 0
[INFO]
[INFO] ------------------------------------------------------------------------
[INFO] BUILD SUCCESSThe TestMu AI sessions API returned this record for that run:
- Test ID - DA-WIN-17458-1790065755606083631TSE
- Build and test name - Ecommerce Playground Login, Login with valid credentials
- Environment - Chrome on Windows 11 (platform win11)
- Status and duration - completed in 8 seconds
- Artifacts recorded - video, screenshots, and console, network, command, and Selenium logs, with no extra capabilities set
When the suite grows to hundreds of JUnit classes, HyperExecute runs JUnit tests by splitting them across parallel machines, and TestMu AI puts the gain at up to 70% faster than a traditional grid.

Note: Run your JUnit Selenium tests on 3,000+ browser and OS combinations with TestMu AI. Start testing for free
JUnit 4 vs JUnit 5 vs JUnit 6
JUnit 6.0.0 was released on September 30, 2025, and 6.1.3 is the current release on Maven Central. For writing test cases, JUnit 6 keeps the JUnit 5 Jupiter API, so every example in this guide also compiles and passes on JUnit 5.14.4. The differences are in the Java baseline and the packaging:
| Criteria | JUnit 4 | JUnit 5 | JUnit 6 |
|---|---|---|---|
| Java baseline | Java 5 | Java 8 | Java 17 |
| Architecture | One junit JAR, with Hamcrest as a dependency | JUnit Platform, JUnit Jupiter, and JUnit Vintage, with Platform on its own 1.x version | The same three modules, sharing one version number |
| Test annotation package | org.junit | org.junit.jupiter.api | org.junit.jupiter.api |
| Lifecycle annotations | @BeforeClass, @Before, @After, @AfterClass | @BeforeAll, @BeforeEach, @AfterEach, @AfterAll | Same as JUnit 5 |
| Disabling and tagging | @Ignore and @Category | @Disabled and @Tag | Same as JUnit 5 |
| Extensions | Runners through @RunWith, and Rules through @Rule | Extension model through @ExtendWith | Same as JUnit 5 |
| Running JUnit 4 tests | Native | Through the Vintage engine | Through the Vintage engine, now deprecated |
If an existing suite still uses JUnit 4 annotations, the Vintage engine runs it on the JUnit Platform while you migrate, as shown in how to execute JUnit 4 tests with JUnit 5. For the upgrade itself, follow the JUnit 6 migration guide, and for the new features, see what's new in JUnit 6.
JUnit 5 and JUnit 6 Annotations
These are the annotations you use most when writing JUnit test cases, with the JUnit 4 annotation each one replaces:
| Annotation | What it does | JUnit 4 equivalent |
|---|---|---|
| @Test | Marks a method as a test case | @Test from org.junit |
| @BeforeEach | Runs before every test method in the class | @Before |
| @AfterEach | Runs after every test method in the class | @After |
| @BeforeAll | Runs once before all tests; static unless the class uses the per-class lifecycle | @BeforeClass |
| @AfterAll | Runs once after all tests; static unless the class uses the per-class lifecycle | @AfterClass |
| @DisplayName | Sets a readable name for a class or method in reports | None |
| @Disabled | Skips a test class or method, with an optional reason | @Ignore |
| @ParameterizedTest | Runs a method once per set of arguments | The Parameterized runner |
| @Nested | Groups related tests in a non-static inner class | The experimental Enclosed runner |
| @Tag | Labels tests so the build can include or exclude them | @Category |
| @ExtendWith | Registers an extension, such as a Mockito or Spring extension | @RunWith and @Rule |
@Nested classes help when one class under test has several states to cover. This guide on nested tests in JUnit 5 shows the pattern.
JUnit Best Practices for Writing Test Cases
- Name the behavior - appliesPercentageDiscount and rejectsDiscountAboveHundredPercent say what broke when they fail; testApplyDiscount2 does not. Add @DisplayName when the report needs a full sentence.
- Keep arrange, act, and assert separate - one block each, as in the first CartCalculatorTest method, so a reader sees the input, the call, and the check without tracing the code.
- Test one behavior per method - when one behavior needs several checks, group them in assertAll so a single run reports every failing check.
- Put the expected value first - assertEquals(expected, actual). Reversing the arguments swaps the values in the failure message and sends the reader after the wrong one.
- Use a tolerance for floating-point values - assertEquals(170.00, discounted, 0.001) instead of an exact comparison of two doubles.
- Cover boundaries and invalid input - 0, 100, and 120 percent test both edges and the error path of applyDiscount(), and @ParameterizedTest keeps those cases in one method.
- Keep tests independent - avoid sharing mutable state through static fields. JUnit already creates a new test class instance per test method, and @BeforeEach can reset anything else.
- Keep unit tests free of external systems - replace databases, network calls, and clocks with test doubles, as this guide on JUnit 5 and Mockito shows, so each test runs fast and gives the same result every time.
How to Auto-Generate JUnit Test Cases
IntelliJ IDEA generates a JUnit test class without any AI. Place the caret on the class name, press Alt+Enter, and select Create Test. In the Create Test dialog, pick the testing library and the methods to cover, and IntelliJ IDEA creates the test class in the test sources root with a test method for each one, as described in its Create tests documentation. The generated methods are stubs, so the arrange, act, and assert lines are still yours to write.
AI tools go further and draft the test bodies:
- GitHub Copilot - suggests test methods and assertions as ghost text while you type, including in IntelliJ IDEA, and Copilot Chat can draft a full suite of unit tests on request, according to the GitHub Copilot documentation.
- JetBrains AI Assistant - a plugin for IntelliJ IDEA that needs a JetBrains AI subscription or your own API key. Place the caret in a class or method and choose AI Actions, then Generate Unit Tests.
- Diffblue Cover - writes JUnit tests for compiled Java code with reinforcement learning instead of prompts, according to the Diffblue Cover documentation.
A generated test asserts what the code does today, not what it should do. If applyDiscount() had a rounding bug, a generated assertEquals would lock the wrong number in as the expected value, so check every generated expected value against the requirement before merging. The free test case generator drafts test scenarios from a plain description, and this comparison of AI unit test generation approaches covers when each one fits.
Skip the setup and install the Selenium Skill for Claude Code, Copilot & Cursor with one command.

Conclusion
Copy the pom and CartCalculatorTest from this guide, run mvn test, and then change one expected value to see how JUnit reports a failure. When your suite needs real browsers, point the same JUnit classes at the TestMu AI online JUnit testing grid using the Selenium with JUnit documentation. To check what you have learned, take the free JUnit certification.
Author

Faisal Khatri
Blogs: 40


Mohammad Faisal Khatri is a Software Testing Professional with 17+ years of experience in manual exploratory and automation testing. He currently works as a Senior Testing Specialist at Kafaat Business Solutions and has previously worked with Thoughtworks, HCL Technologies, and CrossAsyst Infotech. He is skilled in tools like Selenium WebDriver, Rest Assured, SuperTest, Playwright, WebDriverIO, Appium, Postman, Docker, Jenkins, GitHub Actions, TestNG, and MySQL. Faisal has led QA teams of 5+ members, managing delivery across onshore and offshore models. He holds a B.Com degree and is ISTQB Foundation Level certified. A passionate content creator, he has authored 100+ blogs on Medium, 40+ on TestMu AI, and built a community of 25K+ followers on LinkedIn. His GitHub repository “Awesome Learning” has earned 1K+ stars.
Reviewer

Srinivasan Sekar
Reviewer
Srinivasan Sekar is Director of Engineering at TestMu AI (formerly LambdaTest), where he leads engineering and open-source initiatives behind the Selenium and Appium automation grid and owns TestMu AI's MCP Server. A committer to Appium and a contributor to Selenium, WebdriverIO, Taiko, and AppiumTestDistribution, he brings over 15 years of experience in quality engineering and open-source technologies. He is the author of the Apress book 'The MCP Standard: A Developer's Guide to Building Universal AI Tools with the Model Context Protocol,' a Certified Kubernetes and Cloud Native Associate, and an international conference speaker. Before TestMu AI he spent over eight years at Thoughtworks as a Principal Consultant and Quality Architect. Srinivasan holds a B.Tech in Information Technology from Anna University.
JUnit Test Cases FAQs
Did you find this page helpful?
More Related Blogs
TestMu AI forEnterprise
Get access to solutions built on Enterprise
grade security, privacy, & compliance
- Advanced access controls
- Advanced data retention rules
- Advanced Local Testing
- Premium Support options
- Early access to beta features
- Private Slack Channel
- Unlimited Manual Accessibility DevTools Tests