

Power Your Software Testing with AI Agents and Cloud
The Native AI-Agentic Cloud Platform to Supercharge Quality Engineering. Test Intelligently and Ship Faster.


- TestMu AI (Formerly LambdaTest)
- /
- Blog
- /
- JUnit Automation Testing With Selenium
JUnit Automation Testing With Selenium
Guide on automated JUnit testing with Selenium for a web application through a simple script for browser testing. Start with your automated JUnit testing.
Last Updated on:
Setting up JUnit automation testing with Selenium starts with two jar files, junit.jar and hamcrest-core.jar, added to the project's build path alongside the Selenium jars. From there, scripts can scale onto JUnit's Parameterized and RunnerScheduler classes to run the same test across multiple browsers on a 2000+ browser Selenium grid in parallel.
JUnit supplies the structure: @BeforeClass opens the browser, @Test drives the page and asserts the result, and @AfterClass closes the session.
This guide covers downloading the JUnit jars, adding them to your Selenium project, incorporating JUnit into your first script, parallel testing, JUnit 5 and Selenium 4 changes, and cloud testing.
Key Takeaways
- JUnit automation testing with Selenium needs junit.jar and hamcrest-core.jar on the Java build path alongside the Selenium WebDriver jars.
- The @BeforeClass annotation opens the browser once before any JUnit test method in the class runs, and @AfterClass closes the browser after the last method finishes.
- JUnit assertions validate Selenium results, for example by comparing the current URL after a form submission against the expected redirect target.
- A helper class that extends Parameterized and implements RunnerScheduler lets JUnit 4 run one Selenium test method across several browsers at the same time.
- JUnit 5 replaces @BeforeClass with @BeforeAll, moves assertions to org.junit.jupiter.api.Assertions, and drops the separate hamcrest-core jar.
- A RemoteWebDriver pointed at a cloud Selenium grid hub runs the same JUnit test on browser and platform combinations that are not installed locally.
However, cross browser testing could be highly time-consuming if executed manually. Think about how many browser versions you would need to encounter from legacy to modern and the surplus variety of browsers available in the market. You also would have to consider specific browsers offered by specific mobile vending companies. There are ways you could fast track your manual cross browser testing effort and automation testing sits on top of the list for saving every day time and effort.
This article references automation testing with JUnit and Selenium for a web application through a simple script. If you are preparing for an interview you can learn more through Junit interview questions.
JUnit is an open source unit testing tool that helps to test units of code. It is mainly used for unit testing Java project, however, it can be used with Selenium Webdriver to automate testing of Web applications. So you can even perform automation testing of a web application with JUnit. To be precise JUnit is a unit testing framework for Java that helps to write test cases in a more structured and better format. Selenium and JUnit can be used independently of each other, though, testing with JUnit and Selenium combined helps to write test cases in a more structured way. We will be walking through the following sections for Selenium automation testing with JUnit framework for automating test script for web application testing over an online Selenium grid:
- Downloading JUnit Jars.
- Adding Jars to your Selenium project.
- Incorporating JUnit annotations and method into your first selenium scripts.
- Cloud testing with JUnit and Selenium Using TestMu AI.
Step 1. Downloading JUnit Jars
JUnit jar files can be downloaded from https://github.com/JUnit-team/JUnit4/wiki/Download-and-Install. The major jar files included are:
- junit.jar
- hamcrest-core.jar
Download and save these files in your system.
Key Takeaway: JUnit 4 ships as two downloadable jar files, junit.jar and hamcrest-core.jar, and both must be saved locally before a Selenium project can reference them.
Step 2. Adding Jars To Your Selenium Project
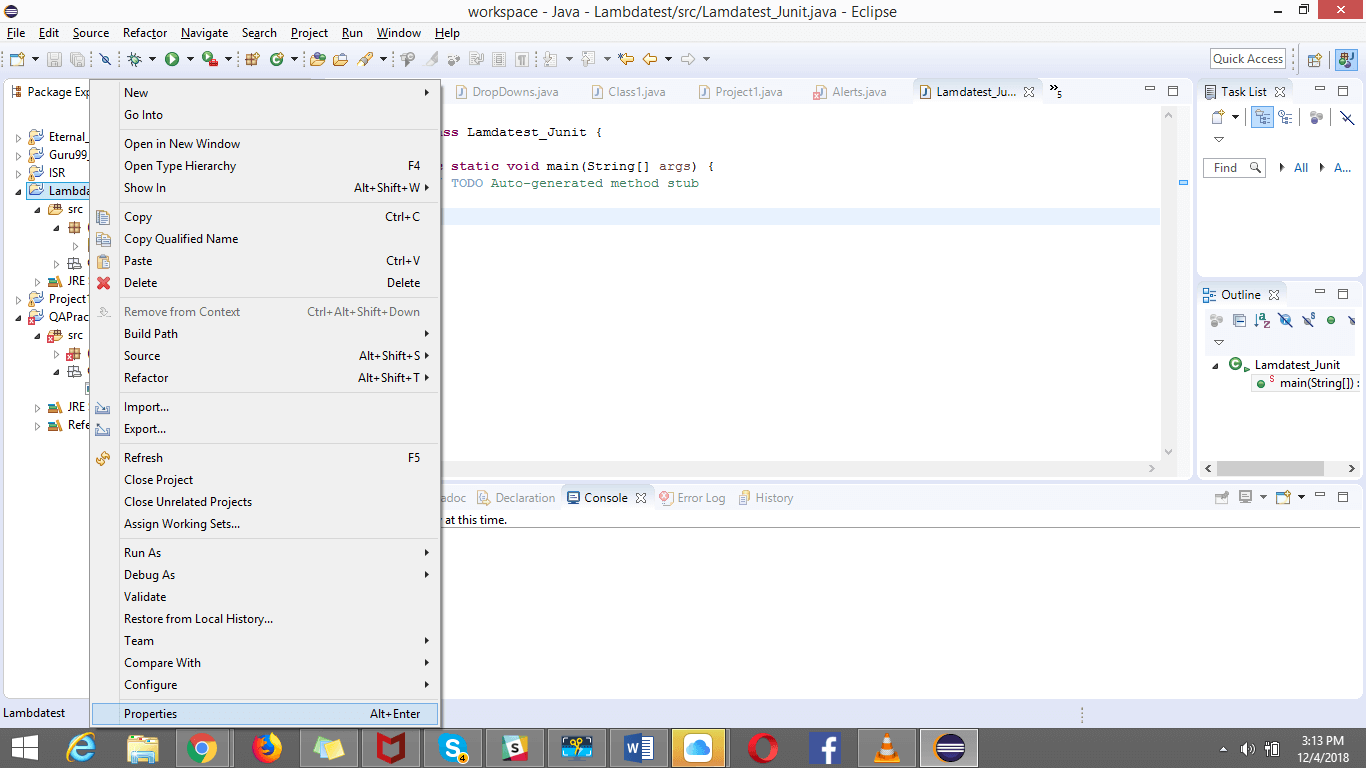
In order to add your JUnit external jar files into your project, you need to have an advanced code editor/compiler tool of your preference. I usually work with eclipse so I would be narrating using the same. You also need to have Selenium jar files downloaded. In order to install eclipse, you can refer to its official website. Based on your operating system windows or OS, you can download accordingly. Post Eclipse setup you can download your Selenium jar files from its official website. In order to create your Selenium webdriver scripts, you need to use user language-specific drivers. In our case, we are using Java, though Selenium grid supports multiple languages like C#, Ruby, Python, Javascript along with Java. Download the Selenium jar files and include them into your code editor/compiler workspace, now for automating test script for testing with JUnit and Selenium grid, we need to include our downloaded JUnit Jar files. Follow the below steps to do so:
- Right click on your created project and select properties:
- Click on Java build path from the options:
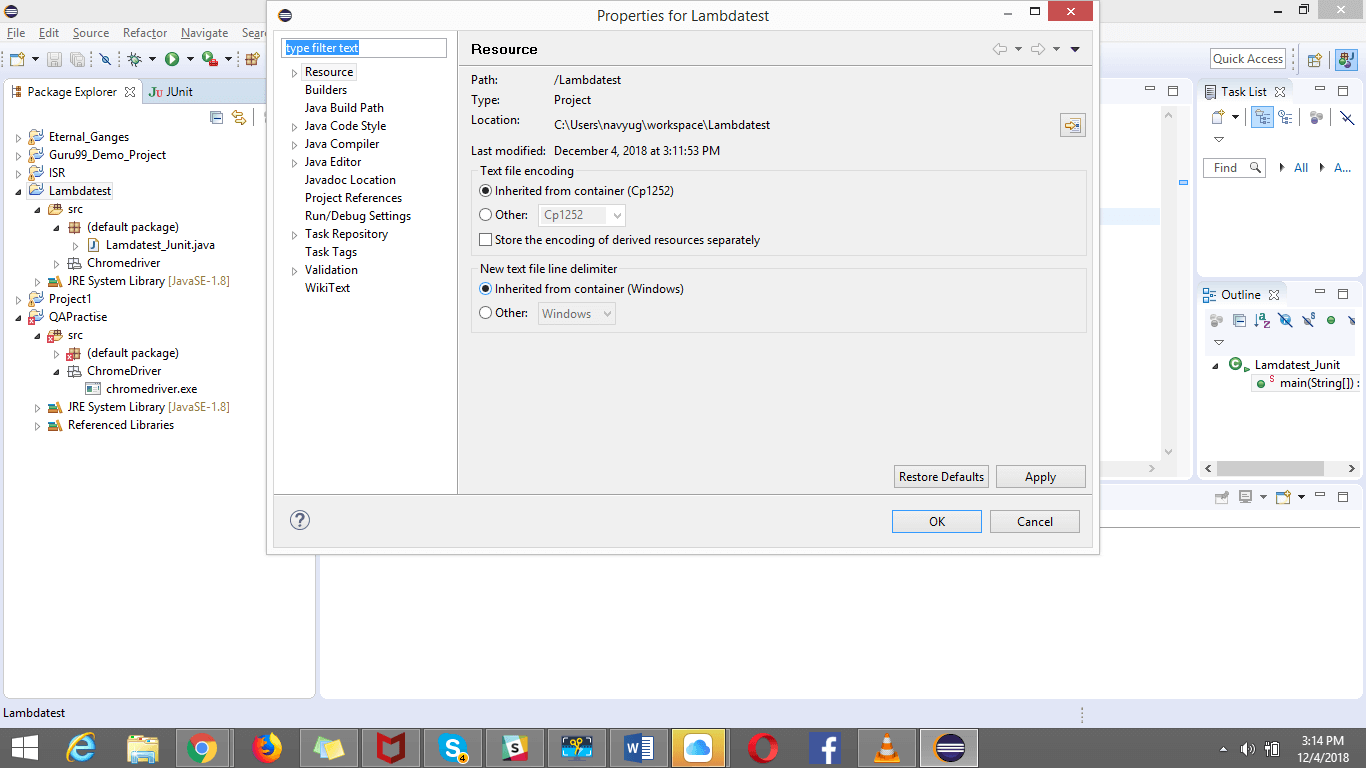
- Click on the ‘Add external Jars’ button and add your downloaded JUnit Jar files and click ‘OK’ post that:
This adds the JUnit jar files to your Selenium project. The major class file/source files that are commonly used in this JUnit Jar files are:
- Assertions
- Annotations
- Parameterized
- Ignore
- TestListeners etc
For a detailed list of the class files or source files, refer to the official JUnit documentation. Now, let us incorporate JUnit into your Selenium project for proceeding web application testing with JUnit and Selenium.

Austin Siewert
Co-Founder, Steadfast Systems
Discovered @TestMu AI yesterday. Best browser testing tool I've found for my use case. Great pricing model for the limited testing I do 👏
2M+ Devs and QAs rely on TestMu AI
Deliver immersive digital experiences with Next-Generation Mobile Apps and Cross Browser Testing Cloud

This JUnit certification establishes testing standards for those who wish to advance their careers in Selenium automation testing with JUnit.
Here’s a short glimpse of the JUnit certification from TestMu AI:

Key Takeaway: Adding the JUnit jars through Eclipse Project Properties and Java Build Path exposes the Assertions, Annotations, Parameterized and Ignore classes to every Selenium script in the project.
Step 3. Incorporating JUnit To Your Selenium Script
The first block for building collaboration in this article, for testing with JUnit and Selenium for a web application would be to create our first JUnit Selenium simple script on https://www.testmuai.com/.
Reference Code:
import static org.junit.Assert.*;
    import java.util.concurrent.TimeUnit;
    import org.junit.AfterClass;
    import org.junit.BeforeClass;
    import org.junit.Test;
    import org.openqa.selenium.By;
    import org.openqa.selenium.WebDriver;
    import org.openqa.selenium.chrome.ChromeDriver;


    public class Lamdatest_Junit {

        static WebDriver driver;

        @BeforeClass
        public static void BrowserOpen()
        {
            System.setProperty("webdriver.chrome.driver", "path of your chromedriver");
            driver= new ChromeDriver() ;
            driver.manage().timeouts().implicitlyWait(5, TimeUnit.SECONDS);
        }

        @Test
        public void Register_User()
        {
            driver.manage().timeouts().implicitlyWait(15, TimeUnit.SECONDS);
            driver.get("https://www.testmuai.com/ ");
            driver.manage().window().maximize();
            driver.findElement(By.xpath("//a[text()='Free Sign Up']")).click();
            driver.findElement(By.xpath("//input[@name='organization']")).sendKeys("LambdaTest");
            driver.findElement(By.xpath("//input[@name='first_name']")).sendKeys("Test");
            driver.findElement(By.xpath("//input[@name='last_name']")).sendKeys("User");
            driver.findElement(By.xpath("//input[@name='email']")).sendKeys("User2@gmail.com");
            driver.findElement(By.xpath("//input[@name='password']")).sendKeys("TestUser123");
            driver.findElement(By.xpath("//input[@name='phone']")).sendKeys("9412262090");
            driver.findElement(By.xpath("//button[text()='SIGN UP']")).click();
            String url= driver.getCurrentUrl();
            assertEquals("fail- unable to register", url, "https://accounts.lambdatest.com/user/email-verification");
        }


        @AfterClass
        public static void BrowserClose()
        {

            driver.quit();
        }


        }
Key Takeaway: A JUnit Selenium script keeps browser setup in a @BeforeClass method, the page actions and assertions in a @Test method, and browser teardown in an @AfterClass method.
Details:
The above script opens the browser with https://www.testmuai.com/ and clicks on ‘free sign up’ button to register. Post register, the script will check the URL it is redirected to in order to ensure a successful registration. We have used two classes of JUnit one is Annotations class and the other Assertions.
The script consists of three sections:
- @BeforeClass – This annotation runs the piece of code before starting any annotation in the class. As you can see, here we have opened the chrome browser before performing any action on it. The main actions are performed in the @Test annotation marked method.
- @Test – This test method carries the functionality where the application is opened and the registration process is carried out. To validate the result we have used assertion class where we are validating the success of the registration process using the context of current URL. This test annotation runs the piece of code after the @BeforeClass and @BeforeTest method and before the @AfterTest and @AfterClass method.
- @AfterClass- This annotation tells JUnit to run the piece of code once all the test have been executed. This annotation method usually carries the process of closing the browser post all action items have been performed.
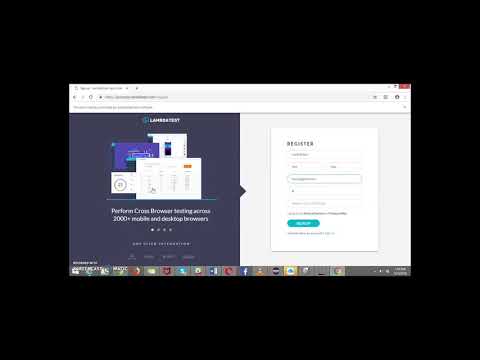
Attaching video of the execution of the above script:
So far you have seen how to automate your web app testing with JUnit and Selenium using a local webdriver instance. However, there is a downside to that. You can only invoke the automated cross browser testing over the browsers that are installed in your machine. Plus, you need to have your machine every time that you aim for running automation testing with JUnit and Selenium for a web app. TestMu AI is a cloud based cross browser testing tool that offers supports with Selenium grid, providing a solution to every obstacle you face while performing automation testing using your local machine. TestMu AI offers a Selenium grid consisting 2000+ browsers for you to perform automation testing effortlessly.
Let me demonstrate how you could easily perform automation testing using TestMu AI.
To run your test suite on our Selenium grid, you have to configure a couple of capabilities so that your tests execute on a remote browser. Refer to our Capability Generator Tool to help you fetch your desired capabilities at ease.
WebDriver driver = new RemoteWebDriver(new URL("https://" + username + ":" + accesskey + "@hub.lambdatest.com/wd/hub"),
    DesiredCapabilities.firefox());
Now let’s start with a simple Selenium WebDriver test. Below is a JUnit Selenium script that will open a sample to-do application which will do following task:
- Mark first two items as mark done.
- Add a new item in the list.
- Return the added item.
import org.junit.After;
    import org.junit.Before;
    import org.junit.Test;
    import org.junit.runner.RunWith;
    import org.openqa.selenium.JavascriptExecutor;
    import org.openqa.selenium.WebDriver;
    import org.openqa.selenium.remote.CapabilityType;
    import org.openqa.selenium.remote.DesiredCapabilities;
    import org.openqa.selenium.remote.RemoteWebDriver;
    import java.net.URL;

    public class JUnitTodo {
         public String username = "YOUR_USERNAME";
        public String authkey = "YOUR_ACCESS_KEY";
        public static RemoteWebDriver driver = null;
        public String gridURL = "@hub.lambdatest.com/wd/hub";
        boolean status = false;

        @Before
        public void setUp() throws Exception {
           DesiredCapabilities capabilities = new DesiredCapabilities();
            capabilities.setCapability("browserName", "chrome");
            capabilities.setCapability("version", "70.0");
            capabilities.setCapability("platform", "win10"); // If this cap isn't specified, it will just get the any available one
            capabilities.setCapability("build", "LambdaTestSampleApp");
            capabilities.setCapability("name", "LambdaTestJavaSample");
            capabilities.setCapability("network", true); // To enable network logs
            capabilities.setCapability("visual", true); // To enable step by step screenshot
            capabilities.setCapability("video", true); // To enable video recording
            capabilities.setCapability("console", true); // To capture console logs
            try {
                driver = new RemoteWebDriver(new URL("https://" + username + ":" + accesskey + gridURL), capabilities);
            } catch (MalformedURLException e) {
                System.out.println("Invalid grid URL");
            } catch (Exception e) {
                System.out.println(e.getMessage());
            }
        }

        @Test
        public void testSimple() throws Exception {
           try {
                  //Change it to production page
                driver.get("https://4dvanceboy.github.io/lambdatest/lambdasampleapp.html");

                  //Let's mark done first two items in the list.
                  driver.findElement(By.name("li1")).click();
                driver.findElement(By.name("li2")).click();

                 // Let's add an item in the list.
                  driver.findElement(By.id("sampletodotext")).sendKeys("Yey, Let's add it to list");
                driver.findElement(By.id("addbutton")).click();

                  // Let's check that the item we added is added in the list.
                String enteredText = driver.findElementByXPath("/html/body/div/div/div/ul/li[6]/span").getText();
                if (enteredText.equals("Yey, Let's add it to list")) {
                    status = true;
                }
            } catch (Exception e) {
                System.out.println(e.getMessage());
            }
        }

        @After
        public void tearDown() throws Exception {
           if (driver != null) {
                ((JavascriptExecutor) driver).executeScript("lambda-status=" + status); // relay whether the test has passed or failed as marked by the user
                driver.quit();
            }
        }
    }
You could also test your local files through TestMu AI Selenium grid for performing automation testing of a web application with JUnit and Selenium. You can do with the help of advanced capabilities provided by TestMu AI Capabilities Generator. These advanced capabilities will help you to:
- Perform test on your locally hosted web pages.
- Generate browser console logs for every step executed through your test.
- Configure a custom time zone for executing your test.
- Generate network logs through your test execution.
If we want to activate all of the above-mentioned advanced capabilities then you need to add the below desired capabilities:
DesiredCapabilities capabilities = new DesiredCapabilities();
    capabilities.setCapability("tunnel",true); // allows you to run tests for your locally hosted web pages.
    capabilities.setCapability("console",true); // generates console logs
    capabilities.setCapability("network",true); // generates network logs
    capabilities.setCapability("timezone","UTC+12");  //considering you want your test to run on the time zone UTC+12.
Key Takeaway: A RemoteWebDriver built from a grid hub URL, a username and an access key sends the same JUnit test to a remote browser, and capabilities such as build, name, video and console control what the grid records.
Parallel Testing
TestMu AI also provides the ability to perform parallel test execution. With TestMu AI parallel testing you could run a similar test across multiple browsers, simultaneously. This helps to bring down the time taken on test build activities, significantly. Here is an example of parallel testing performed to automate web application testing with JUnit and Selenium using TestMu AI.
To run a test on different browsers at the same time, you will need to create a helper class that extends paramerterized class (org.junit.runners.Parameterized) and implements RunnerScheduler class
(org.junit.runners.model.RunnerScheduler) to support JUnit tests in parallel. See the example below:
import java.util.concurrent.ExecutorService;
    import java.util.concurrent.Executors;
    import java.util.concurrent.TimeUnit;

    import org.junit.runners.Parameterized;
    import org.junit.runners.model.RunnerScheduler;

    public class Parallelized extends Parameterized {

        private static class ThreadPoolScheduler implements RunnerScheduler {
            private ExecutorService executor;

            public ThreadPoolScheduler() {
                String threads = System.getProperty("junit.parallel.threads", "15");
                int numThreads = Integer.parseInt(threads);
                executor = Executors.newFixedThreadPool(numThreads);
            }

            @Override
            public void finished() {
                executor.shutdown();
                try {
                    executor.awaitTermination(10, TimeUnit.MINUTES);
                } catch (InterruptedException exc) {
                    throw new RuntimeException(exc);
                }
            }

            @Override
            public void schedule(Runnable childStatement) {
                executor.submit(childStatement);
            }
        }

        public Parallelized(Class<?> klass) throws Throwable {
            super(klass);
            setScheduler(new ThreadPoolScheduler());
        }
    }
Here is an example of JUnit Test, this would be representing the helper class used above for executing the parallel testing.
import org.openqa.selenium.By;
    import org.openqa.selenium.Platform;
    import org.openqa.selenium.WebDriver;
    import org.openqa.selenium.remote.DesiredCapabilities;
    import org.openqa.selenium.remote.RemoteWebDriver;
    import org.junit.After;
    import org.junit.Before;
    import org.junit.Test;
    import org.junit.runner.RunWith;
    import org.junit.runners.Parameterized;
    import java.net.MalformedURLException;
    import java.net.URL;
    import java.util.LinkedList;

    @RunWith(Parallelized.class)
    public class JUnitConcurrentTodo {
         public String username = "YOUR_USERNAME";
        public String accesskey = "YOUR_ACCESS_KEY";
        public String gridURL = "@hub.lambdatest.com/wd/hub";

         public String platform;
         public String browserName;
         public String browserVersion;


        public RemoteWebDriver driver = null;

         boolean status = false;

            @Parameterized.Parameters
         public static LinkedList<String[]> getEnvironments() throws Exception {
            LinkedList<String[]> env = new LinkedList<String[]>();
            env.add(new String[]{"WIN10", "chrome", "70.0"});
            env.add(new String[]{"macos 10.12","firefox","62.0"});
            env.add(new String[]{"WIN8","internet explorer","11"});
            return env;
        }


       public JUnitConcurrentTodo(String platform, String browserName, String browserVersion) {
            this.platform = platform;
            this.browserName = browserName;
            this.browserVersion = browserVersion;
         }

        @Before
        public void setUp() throws Exception {
           DesiredCapabilities capabilities = new DesiredCapabilities();
            capabilities.setCapability("browserName", browser);
            capabilities.setCapability("version", browserVersion);
            capabilities.setCapability("platform", platform); // If this cap isn't specified, it will just get the any available one
            capabilities.setCapability("build", "JUnitParallelSample");
            capabilities.setCapability("name", "JUnitParallelSampleTest");
            capabilities.setCapability("network", true); // To enable network logs
            capabilities.setCapability("visual", true); // To enable step by step screenshot
            capabilities.setCapability("video", true); // To enable video recording
            capabilities.setCapability("console", true); // To capture console logs
            try {
                driver = new RemoteWebDriver(new URL("https://" + username + ":" + accesskey + gridURL), capabilities);
            } catch (MalformedURLException e) {
                System.out.println("Invalid grid URL");
            } catch (Exception e) {
                System.out.println(e.getMessage());
            }
        }

        @Test
        public void testParallel() throws Exception {
           try {
                  //Change it to production page
                driver.get("https://4dvanceboy.github.io/lambdatest/lambdasampleapp.html");

                  //Let's mark done first two items in the list.
                  driver.findElement(By.name("li1")).click();
                driver.findElement(By.name("li2")).click();

                 // Let's add an item in the list.
                  driver.findElement(By.id("sampletodotext")).sendKeys("Yey, Let's add it to list");
                driver.findElement(By.id("addbutton")).click();

                  // Let's check that the item we added is added in the list.
                String enteredText = driver.findElementByXPath("/html/body/div/div/div/ul/li[6]/span").getText();
                if (enteredText.equals("Yey, Let's add it to list")) {
                    status = true;
                }
            } catch (Exception e) {
                System.out.println(e.getMessage());
            }
        }

        @After
        public void tearDown() throws Exception {
           if (driver != null) {
                ((JavascriptExecutor) driver).executeScript("lambda-status=" + status);
                driver.quit();
            }
        }
    }
Key Takeaway: A JUnit 4 helper class that extends Parameterized and implements RunnerScheduler with a fixed thread pool runs one Selenium test method against several browser, version and platform combinations at the same time.
What Changed In JUnit 5 And Selenium 4?
JUnit 5 renamed the lifecycle annotations and moved assertions into a new package, and Selenium 4 removed the DesiredCapabilities factory methods and the findElementBy shortcut methods. Six changes affect the scripts shown here.
- Lifecycle annotations: JUnit 5 replaces @BeforeClass with @BeforeAll and @AfterClass with @AfterAll, while @Before and @After become @BeforeEach and @AfterEach.
- Assertions package: assertions move from org.junit.Assert to org.junit.jupiter.api.Assertions, and the optional failure message becomes the last argument instead of the first.
- Dependencies: the junit-jupiter aggregate artifact replaces junit.jar and hamcrest-core.jar, so Hamcrest is no longer a required dependency for a JUnit test.
- Parallel execution: JUnit 5 enables parallel runs in junit-platform.properties with junit.jupiter.execution.parallel.enabled=true, replacing a custom class that extends Parameterized and implements RunnerScheduler.
- DesiredCapabilities: Selenium 4 removed factory methods such as DesiredCapabilities.firefox() in favour of browser options classes such as ChromeOptions and FirefoxOptions, which are passed straight to RemoteWebDriver.
- findElementBy shortcuts: Selenium 4 removed RemoteWebDriver methods such as findElementByXPath and findElementById, so element lookups are written as driver.findElement(By.xpath(...)).
The scripts in this guide are written for JUnit 4 and Selenium 3 APIs. They compile against those versions, so check the JUnit and Selenium versions declared in your build file before copying a sample into a JUnit 5 or Selenium 4 project.
Key Takeaway: Migrating a JUnit 4 Selenium suite to JUnit 5 means renaming @BeforeClass and @AfterClass to @BeforeAll and @AfterAll, switching the assertion import to org.junit.jupiter.api.Assertions, and moving parallel settings into junit-platform.properties.
Web Application Testing With JUnit and Selenium On Cloud Is A Must
Cloud testing means testing cloud-based applications that are hosted on a cloud. Using Selenium along with JUnit to test cloud services for web apps becomes the most obvious choice due to its capabilities to run the script on multiple browsers and platforms with any language support one choose for. The reason makes the incorporation between JUnit and Selenium a lucrative choice for performing cross browser testing. With the use of JUnit, it provides a more structured way of writing your test that leads to better maintenance, quality and effectiveness as compared to without using any frameworks like JUnit. TestMu AI as a cross browser testing tool could help you significantly cut short on the time and effort you put in for executing automation testing with JUnit and Selenium. TestMu AI offers a Selenium grid consisting more than 2000+ browsers and also supports multiple programming languages such as Javascript, Python, Ruby, C# and PHP. Using Maven and Jenkins with Selenium and JUnit helps make a more powerful, smoother and end to end automation experience for cloud-based application, thereby providing for robustness to the whole flow.
Key Takeaway: Running JUnit and Selenium tests on a cloud Selenium grid removes the browser and platform limits of a single local machine while the test code itself stays unchanged.

Automation Testing With JUnit and Selenium
Selenium with JUnit suits cloud-based web testing through its cross-browser and multi-language support. TestMu AI runs those suites across 10,000+ real devices and 3,000+ browser and OS combinations.
To begin automation testing with JUnit and Selenium, follow these instructions for smooth test execution.
- Download JUnit Jars.
- Add Jars to your Selenium project.
- Integrate JUnit annotations and methods into your Selenium test scripts.
After downloading these libraries and adding Jars files to your Selenium project,follow this comprehensive guide on JUnit automation testing with Selenium.
Author

Sadhvi Singh
Blogs: 8


Sadhvi Singh is a software testing and quality engineering leader with 14+ years of experience driving automation, performance, and AI-augmented QA initiatives. Currently Director of Quality Engineering at Brevo, she specializes in API and UI automation, performance testing, CI/CD integration, and vulnerability management systems (SCA, SAST, DAST). Sadhvi is ISTQB Foundation and Advanced Test Analyst certified and has led large QA teams across enterprise environments.
JUnit Selenium FAQs
Did you find this page helpful?
More Related Blogs
TestMu AI forEnterprise
Get access to solutions built on Enterprise
grade security, privacy, & compliance
- Advanced access controls
- Advanced data retention rules
- Advanced Local Testing
- Premium Support options
- Early access to beta features
- Private Slack Channel
- Unlimited Manual Accessibility DevTools Tests