

Power Your Software Testing with AI Agents and Cloud
The Native AI-Agentic Cloud Platform to Supercharge Quality Engineering. Test Intelligently and Ship Faster.


- TestMu AI (Formerly LambdaTest)
- /
- Blog
- /
- Unit Testing in Java: Concepts, JUnit Example, and Tips
Unit Testing in Java: Concepts, JUnit Example, and Tips
Learn how to perform Java unit testing using JUnit with step-by-step guidance on setup, writing test cases, and ensuring your code works as expected.
Last Updated on:
Java unit testing checks a single method or class in isolation using a framework like JUnit, without starting the full application or its dependencies.
JUnit annotations such as @Test and @BeforeEach and assertions like assertEquals() run each check independently, so one broken method fails only its own test.
This guide covers why JUnit fits Java testing, setting up a project, writing your first test, running JUnit tests with Selenium, and best practices.
Overview
To perform Java unit testing, write test cases using the JUnit framework to verify individual code units like methods and classes. For scaling these tests across multiple browsers and operating systems without maintaining local infrastructure, execute your test suite on the TestMu AI cloud platform.
- Test structure and assertions: JUnit provides annotations like @Test and assertions like assertEquals() to verify individual methods and classes in isolation, keeping tests readable and easy to maintain.
- Java development environment: IntelliJ IDEA provides a comprehensive development environment to write, manage, and execute Java unit tests, supporting JDK 8 or above.
- Eclipse IDE integration: Eclipse serves as an integrated development environment to write, manage, and execute Java unit tests, requiring Java JDK 8 or above.
- Maven build automation: Maven integrates JUnit 5 into your project by adding dependencies to the pom.xml file, allowing you to run test suites using command-line execution.
- Gradle build automation: Gradle integrates JUnit 5 into your project by adding dependencies to the build.gradle file, allowing you to run test suites using command-line execution.
- Web UI automation: Selenium simulates user interactions on web applications, allowing you to run automated UI tests across browsers in combination with JUnit assertions.
- Cross-browser cloud testing: TestMu AI provides an online Selenium Grid to run JUnit tests across various browsers and operating systems without maintaining local infrastructure.
Why Use JUnit for Unit Testing?
JUnit is the default testing framework for Java. It’s lightweight, extensible, and supported by every major IDE and CI/CD tool.
Features:
- Annotations: JUnit annotations like @Test, @BeforeEach, and @AfterAll to define test structure. It keeps your tests readable and easy to maintain.
- Built-In Assertions: JUnit assertions provide methods like assertEquals(), assertThrows(), and assertNotNull() to verify small units of logic precisely.
- Parameterization: JUnit parameterized tests let you run the same test with different input values using the @ParameterizedTest annotation, helping validate a unit under various conditions.
- Mocking and Dependency Injection: Works with mocking frameworks (like Mockito), making it easier to isolate and test units without relying on actual dependencies.
If you are getting started with JUnit, we recommend checking out this JUnit tutorial.
Setting Up a Project
To get started, make sure you have the following:
- An IDE, such as IntelliJ IDEA or Eclipse, to write and perform Java unit testing.
- Install Java JDK 8 or above version.
- Set up a build tool such as Maven or Gradle.
Maven: To use Maven, add the following to the pom.xml file:
<dependencies>
  <dependency>
    <groupId>org.junit.jupiter</groupId>
    <artifactId>junit-jupiter</artifactId>
    <version>5.8.2</version>
    <scope>test</scope>
  </dependency>
</dependencies>
Gradle: For Gradle, add the following to the build.gradle file:
dependencies {
    testImplementation 'org.junit.jupiter:junit-jupiter:5.8.2'
}

test {
    useJUnitPlatform()
}

Writing Your First Unit Test
Let’s walk through the process of writing a basic unit test in Java.
Test Scenario:
Verify that a basic calculator performs arithmetic operations: addition, subtraction, multiplication, and division.
Here’s the Calculator class:
public class Calculator {
    public int add(int a, int b) {
        return a + b;
    }
    public int subtract(int a, int b) {
        return a - b;
    }
    public double divide(int a, int b) {
        if (b == 0) throw new IllegalArgumentException("Cannot divide by zero");
        return (double) a / b;
    }
}

Implementation:
Let’s write unit tests to verify the basic arithmetic operations (addition, subtraction, multiplication, and division). It includes edge cases like zero and negative numbers and ensures exceptions are thrown for invalid operations like division by zero.
@DisplayName("Calculator Tests")
class CalculatorTest {
    private final Calculator calculator = new Calculator();

    @Test
    @DisplayName("Test addition with zero")
    void testAddWithZero() {
        assertEquals(5, calculator.add(5, 0));
        assertEquals(5, calculator.add(0, 5));
        assertEquals(0, calculator.add(0, 0));
    }

    @Test
    @DisplayName("Test addition with negative numbers")
    void testAddWithNegativeNumbers() {
        assertEquals(-8, calculator.add(-5, -3));
        assertEquals(2, calculator.add(5, -3));
        assertEquals(-2, calculator.add(-5, 3));
    }

    @Test
    @DisplayName("Test subtraction with zero")
    void testSubtractWithZero() {
        assertEquals(5, calculator.subtract(5, 0));
        assertEquals(-5, calculator.subtract(0, 5));
        assertEquals(0, calculator.subtract(0, 0));
    }

    @Test
    @DisplayName("Test subtraction with negative numbers")
    void testSubtractWithNegativeNumbers() {
        assertEquals(-2, calculator.subtract(-5, -3));
        assertEquals(8, calculator.subtract(5, -3));


        assertEquals(-8, calculator.subtract(-5, 3));
    }

    @Test
    @DisplayName("Test multiplication with zero")
    void testMultiplyWithZero() {
        assertEquals(0, calculator.multiply(5, 0));
        assertEquals(0, calculator.multiply(0, 5));
        assertEquals(0, calculator.multiply(0, 0));
    }

    @Test
    @DisplayName("Test multiplication with negative numbers")
    void testMultiplyWithNegativeNumbers() {
        assertEquals(15, calculator.multiply(-5, -3));
        assertEquals(-15, calculator.multiply(5, -3));
        assertEquals(-15, calculator.multiply(-5, 3));
    }

    @Test
    @DisplayName("Test division by zero")
    void testDivideByZero() {
        assertThrows(IllegalArgumentException.class, () -> calculator.divide(5, 0));
    }

    @Test
    @DisplayName("Test division with zero numerator")
    void testDivideWithZeroNumerator() {
        assertEquals(0.0, calculator.divide(0, 5));
    }

    @Test
    @DisplayName("Test division with negative numbers")
    void testDivideWithNegativeNumbers() {
        assertEquals(1.6666666666666667, calculator.divide(-5, -3));
        assertEquals(-1.6666666666666667, calculator.divide(5, -3));
        assertEquals(-1.6666666666666667, calculator.divide(-5, 3));
    }
}
Code Walkthrough:
- The CalculatorTest class uses JUnit 5 annotations to test basic arithmetic operations: addition, subtraction, multiplication, and division using a Calculator object. Each method checks correctness using assertEquals or assertThrows.
- The tests cover edge scenarios such as operations with zero, negative numbers, and division by zero. These ensure the calculator behaves correctly under various common and boundary conditions.
- Each test method is annotated with @DisplayName for clearer reporting. The tests are grouped logically, making the suite well-structured and easy to maintain or expand.
Test Execution:
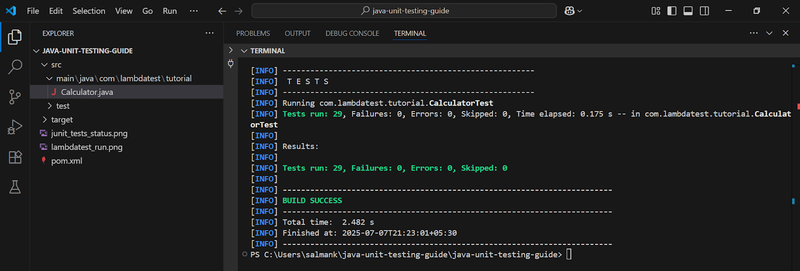
Run the below command to execute the test:
mvn test -Dtest=CalculatorTest
Performing JUnit Testing With Selenium
While unit tests validate your logic in isolation, they don’t ensure that your web application behaves as intended across browsers. That’s where UI testing comes in.
By using Selenium, you can simulate user interactions, and with JUnit, you get features like annotations and assertions for structuring and executing test cases. When combining Selenium with JUnit, you can automate your tests across browsers to ensure your web application behaves as intended at the user interface level.
Test Scenario:
- Go to the Simple Form Demo page of TestMu AI Selenium Playground.
- Enter the first and second values in the form.
- Click on the Get Sum button.
- Verify that the correct sum is displayed.
Implementation:
To run this test, make sure you’ve added the following Selenium dependency in your pom.xml file:
<dependency>
    <groupId>org.seleniumhq.selenium</groupId>
    <artifactId>selenium-java</artifactId>
    <version>4.15.0</version>
</dependency>
Below is the test script that uses Selenium to automate the behavior of a simple calculator UI.
@TestInstance(TestInstance.Lifecycle.PER_CLASS)
@DisplayName("Calculator Addition Tests")
public class LocalSeleniumCalculatorTest {
    private WebDriver driver;

    @BeforeAll
    void setUp() {
        driver = new ChromeDriver();
        driver.manage().window().maximize();
    }

  @AfterAll
    void tearDown() {
        if (driver != null) {
            driver.quit();
        }
    }

    @ParameterizedTest(name = "Test Case {index}: {0} + {1} = {2}")
    @CsvSource({
        "5, 7, 12",
        "1, 1, 2",
        "-2, 3, 1",
        "100, 200, 300",
        "1000000, 2000000, 3000000",
        "999999, 1, 1000000",
        "abc, def, Entered value is not a number",
        "xyz, 123, Entered value is not a number",
        "2147483647, 1, 2147483648",
        "'', '', Entered value is not a number",
        "' ', ' ', Entered value is not a number"
    })
    @DisplayName("Test calculator addition with various inputs")
    void testAddition(String a, String b, String expected) {
        driver.get(TestConfig.APP_URL);
        WebElement firstInput = driver.findElement(By.id("sum1"));
        WebElement secondInput = driver.findElement(By.id("sum2"));
        WebElement getSumButton = driver.findElement(By.xpath("//button[text()='Get Sum']"));

        firstInput.clear();
        firstInput.sendKeys(a);
        secondInput.clear();
        secondInput.sendKeys(b);
        getSumButton.click();

        WebElement result = driver.findElement(By.id("addmessage"));
        assertEquals(expected, result.getText());
    }
}
Code Walkthrough:
- The @BeforeAll annotation sets up the ChromeDriver and maximizes the browser window before any test runs. Since this method only runs once for the entire class, the @TestInstance(TestInstance.Lifecycle.PER_CLASS) annotation allows us to use non-static setup methods.
- After all tests finish, the @AfterAll annotation ensures the browser is closed. The @ParameterizedTest annotation allows this single test method to run multiple times, each with a different set of input values.
- The @CsvSource annotation provides these combinations. The name field ensures each test case is labeled clearly in reports, showing the inputs and expected output.
- The testAddition() method navigates to the calculator web app and inputs the values into the calculator’s fields. It clicks the “Get Sum” button, retrieves the result, and asserts that the displayed result matches the expected output.
Test Execution:
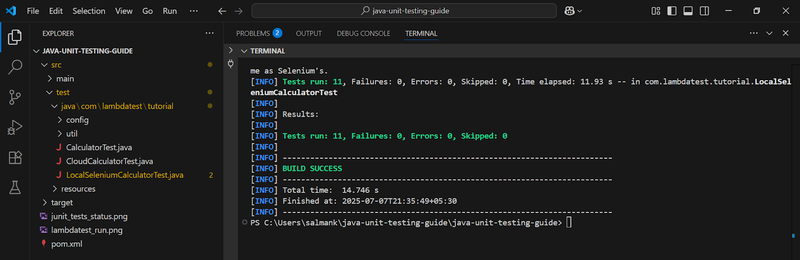
Run the below command to execute the test:
mvn test -Dtest=LocalSeleniumCalculatorTest
Running UI tests locally is a great starting point. However, to catch layout bugs, inconsistent DOM behavior, and platform-specific quirks, you need cross-browser testing, and that’s where TestMu AI comes in.
TestMu AI is a GenAI-native test execution platform that provides an online Selenium Grid to run JUnit tests across multiple browsers and OS combinations without maintaining your infrastructure.
To get started, check out this documentation on JUnit testing on TestMu AI.
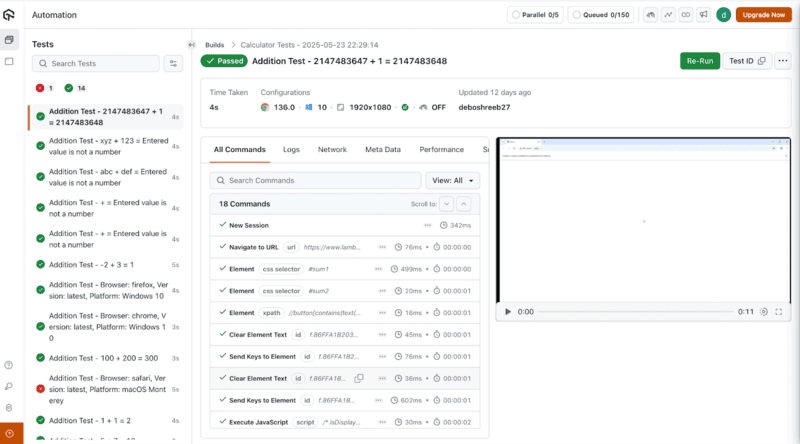
To run Selenium JUnit tests on TestMu AI instead of your local machine, you need to replace the local WebDriver instance with a RemoteWebDriver that connects to TestMu AI cloud Selenium Grid using the URL https://
After that, you need to configure Selenium automation capabilities to define the browser, version, platform, and other settings.
You can generate these capabilities from the TestMu AI Automation Capabilities Generator.
Test Execution:
Run the below command to execute the test:
mvn test -Dtest=CloudCalculatorTest
Best Practices for Java Unit Testing
Here are some of the best practices you can follow while performing Java unit testing:
- Use Clear and Descriptive Test Names: Avoid vague names like test1. A method like testDivideByZeroThrowsException() immediately conveys intent.
- Write Focused and Isolated Tests: Each test should cover one behavior or scenario. This keeps failures easy to trace and reduces false positives from unrelated changes.
- Test Both Success and Failure Paths: Don’t just test the happy path. If your code throws exceptions in certain conditions, verify those cases explicitly with assertThrows.
- Avoid Testing Private Methods Directly: Focus on public APIs. If a private method is hard to test through public behavior, consider extracting it into a separate class with its tests.
- Keep Tests Fast and Deterministic: Unit tests should run in milliseconds and produce the same result every time. Avoid relying on timeouts, threads, or external systems.
- Always Prepare and Clean Up the State: Use @BeforeEach to create new objects for every test and @AfterEach to clean up if needed. Avoid shared mutable state between tests.
- Avoid Tight Coupling: Ensure that your tests are loosely coupled during implementation. This makes it easier to refactor code and update tests independently.
Looking to speed up and simplify your test creation process? Explore how AI unit test generation can automate and enhance your Java testing workflow.
How Do AI Tools Generate JUnit Unit Tests Now?
AI tools generate JUnit tests two ways: an LLM assistant drafts tests from a prompt, or a reinforcement-learning tool writes verified tests without one.
- GitHub Copilot: drafts JUnit tests for a selected class or method through Copilot Chat inside IntelliJ IDEA, VS Code, or Visual Studio, based on the code it can already see.
- JetBrains AI Assistant: adds a right-click Generate Tests with AI action inside IntelliJ IDEA that creates a test file using the project's own JUnit 5 and Mockito setup.
- Diffblue Cover: uses reinforcement learning and symbolic analysis instead of an LLM, so the JUnit tests it writes compile and pass without a developer fixing hallucinated assertions.
- What still needs a human: every AI-generated test still needs a developer to confirm it asserts the correct behavior, not just whatever the code currently returns.
Conclusion
By now, you’ve seen how JUnit can streamline your testing workflow by writing clear, maintainable unit tests. We have also seen how you can scale JUnit tests with tools like Selenium and perform Java unit testing in the cloud. This approach not only saves time and reduces bugs but also helps you ship with confidence, knowing your code is tested and reliable.
What is a JUnit Test?
A JUnit test is a Java method annotated with @Test that exercises one unit of code and asserts the result. It runs in isolation, so a failure points at one behaviour, not a whole flow.
A JUnit test is a Java unit test that uses the JUnit framework to ensure the proper functioning of specific units of source code. These units, typically methods or classes, are scrutinized independently, allowing developers to detect, diagnose, and address issues early in development.
The simplicity and precision of JUnit tests contribute to maintaining the overall integrity and reliability of the application. The structured approach provided by the JUnit framework facilitates test automation, integration into development workflows, and the consistent maintenance of high code quality standards throughout the Software Development Life Cycle (SDLC).
For a step-by-step walkthrough that builds one from scratch, with a class under test, assertions, exception and boundary cases, and the Maven output of each run, see how to write JUnit test cases.
The next section covers what that buys a team in practice.
Why is JUnit Testing Important?
JUnit testing catches regressions in seconds instead of in QA, documents how each method is meant to behave, and makes refactoring safe by proving behaviour still holds after a change.
In this section, we will understand why JUnit testing is important and how it helps enhance the automated testing process more effectively.
JUnit testing holds significant importance in Java development, offering a range of advantages for testing Java-based/other projects. Key benefits include:
- Early detection of issues during development, enhancing code reliability.
- Promoting deeper code comprehension, leading to fewer bugs and a more readable codebase.
- As an open-source framework, it benefits from a broad community, fostering collaboration and knowledge sharing.
- Its compatibility with Test-Driven Development (TDD) makes it a valuable tool for developers aiming to build reliable Java applications.
What is Unit Testing?
Unit testing validates the smallest pieces of code, usually single methods, by running them in isolation to confirm they behave as expected. It is normally the first phase of testing.
Unit testing validates the smallest pieces of code by running them in isolation. It is the first test phase and stops small bugs from becoming costly ones.
Tests at this level catch regressions in seconds rather than in QA and document how a method should behave. They also make refactoring safe: change the implementation, and the tests confirm behaviour holds.
To carry out unit testing, developers use unit testing frameworks to automate this process and validate code accuracy quickly and repeatedly. JUnit is that framework for Java, and the rest of this tutorial covers it in depth.
JUnit provides annotations to identify test methods, assertions to verify expected results, and test runners to execute everything automatically, eliminating the need for manual inspection and delivering instant feedback.
Top Java Unit Testing Frameworks
JUnit is not the only option on the JVM. These frameworks either complement it or replace it, depending on whether you need unit-level checks or full browser automation.
Java remains the preferred language for testing web applications. Below are widely used unit testing frameworks for Selenium with Java automation of websites and web applications.
Teams following BDD also rely on JBehave testing, where Given-When-Then scenarios execute natively alongside JUnit tests using Java and Maven.
TestNG
TestNG is a rapid and highly adaptable test automation framework positioned as a next-generation alternative to JUnit. Its widespread adoption among Java developers and testers is attributed to its comprehensive features and capabilities.
Unlike older frameworks, it removes several limitations through concise annotations, grouping, sequencing, and parameterization. Together these make TestNG one of the best test automation frameworks.
Some of the key features of TestNG are as follows.
- Grouping: It categorizes test methods for organized test execution based on criteria like functional areas or priority levels.
- Parallel Execution: Its built-in support for concurrent test execution, optimizing performance with multi-core processors.
- Data-Driven Testing: It reads test data from various sources, enabling efficient test generation and execution with multiple datasets.
- Listener Mechanism: This is a listener mechanism for custom responses to test execution events, facilitating report generation, logging, and environment setup.
- Dependency Management: It specifies dependencies between test methods, ensuring logical execution and maintaining scenario integrity.
Choosing between TestNG and JUnit is rarely obvious. This JUnit tutorial compares JUnit 5 vs TestNG to help you decide based on your test automation requirements.
Selenide
Selenide targets web UI automation rather than unit testing. Built on Selenium WebDriver in Java, it simplifies browser interaction for automated web application testing.
Though not built for unit testing, Selenide is widely used for end-to-end and functional testing. Its API keeps tests expressive while automating navigation, element interaction, and validation.
Some of the key features of Selenide are as follows.
- Fluent API for Readable Tests: A fluent API chains commands, keeping tests for complex page actions concise.
- Natural Language Assertions: Assertions written in plain English convert automatically to Selenium commands for verifying page state.
- Automatic AJAX Handling: It detects and manages AJAX requests, simplifying testing for applications relying on asynchronous data loading.
- Stability and Reliability: Handles stale element exceptions and timeouts, which keeps test execution reliable.
Gauge
Gauge targets acceptance testing rather than unit testing. It is open-source, modular, and supports multiple languages. It uses markdown as the testing language, which keeps specs readable, and works with VS Code.
Some of the key features of Gauge are as follows.
- Readability with Markdown: This framework uses markdown, which keeps tests readable compared to traditional programming languages.
- Multi-language Support: It supports JavaScript, Java, C#, Python, and Ruby; Gauge facilitates test creation in multiple programming languages
- Extensibility with Plugins: It boasts a diverse range of plugins, enriching the framework's functionality and adaptability.
- Built-in Parallelization Support: Users of this framework benefit from built-in support for parallelization, enabling the creation of scalable and efficient tests.
Serenity BDD
Serenity BDD is an open-source framework for acceptance and regression testing, renowned for its detailed, informative reports. It supports Java and JavaScript (via SerenityJS) for comprehensive testing.
Key features:
- Built-in Selenium Integration: Web testing with Selenium built in.
- RestAssured Integration: Effective REST API testing.
- Screenplay Pattern: Maintainable tests with structured approach.
- Parallel Testing: Efficient simultaneous test execution.
Cucumber
Cucumber is a Behavior Driven Development (BDD) framework that allows writing tests in plain English, which are then converted into code. It's versatile across programming languages and widely used in JavaScript and TypeScript projects.
Key features:
- Collaborative Test Writing: Enables non-technical team members to contribute.
- Modular Scripts: Reusable step definitions for maintainable tests.
- CI/CD Integration: Automates testing in development pipelines.
- Parallel Testing: Supports simultaneous test execution.
Geb
Geb is a web test automation framework suiting a diverse range of web applications. Its features simplify writing, executing, and maintaining web tests.
Some of the key features of Geb are as follows.
- Intuitive API: It provides a concise API that keeps web tests readable.
- Flexibility: Excels at diverse web applications, including single-page apps and JavaScript frameworks like Angular and React.
- Feature Set: It supports page objects, data-driven testing, and custom assertions, facilitating the creation of complex web tests.
- Groovy Integration: Integrated with Groovy, It allows for creating concise and expressive tests, enhancing the testing experience.
Explore various automation testing frameworks to find the one that suits your project needs. Referring to this guide on the best test automation frameworks provides valuable insights for an informed selection process.
With JUnit you can add dependencies through Maven or as local dependencies (External Libraries). JUnit also runs against both a local Selenium Grid and a cloud grid such as TestMu AI.
The setup walkthrough earlier in this JUnit tutorial covers the environment step by step.
Author

Deboshree
Blogs: 1


Deboshree B. is a community contributor with 8+ years of experience as a backend engineer, working on large-scale, production systems. She has held engineering roles at Stripe, CRED, Walmart Global Tech, and Goldman Sachs, contributing to backend services built with Scala, SQL, and cloud platforms such as AWS. Deboshree focuses on building reliable, scalable systems and brings strong experience across enterprise and fintech environments. She holds a Bachelor’s degree in Computer Science.
Java Unit Testing FAQs
Did you find this page helpful?
More Related Blogs
TestMu AI forEnterprise
Get access to solutions built on Enterprise
grade security, privacy, & compliance
- Advanced access controls
- Advanced data retention rules
- Advanced Local Testing
- Premium Support options
- Early access to beta features
- Private Slack Channel
- Unlimited Manual Accessibility DevTools Tests