

Power Your Software Testing with AI Agents and Cloud
The Native AI-Agentic Cloud Platform to Supercharge Quality Engineering. Test Intelligently and Ship Faster.


- TestMu AI (Formerly LambdaTest)
- /
- Blog
- /
- JUnit 4 vs JUnit 5 vs JUnit 6: Differences and Migration
JUnit 4 vs JUnit 5 vs JUnit 6: Differences and Migration
Is JUnit 4 different than JUnit 5? In this blog, learn the differences in annotations, how to migrate tests from JUnit4, and to execute tests with JUnit 5.
Last Updated on:
This article is a part of our Learning Hub. For more in-depth resources, check out our hub on JUnit Tutorial.
To execute JUnit 4 tests with JUnit 5, add the JUnit Vintage engine beside JUnit Jupiter and run both on the JUnit Platform.
The Vintage engine discovers JUnit 4 classes and the Jupiter engine discovers JUnit 5 classes, so existing Selenium test suites keep running during migration.
This guide covers what JUnit 5 is, JUnit 5 vs JUnit 4, annotations and their execution flow, migration steps, AI-assisted migration, a Selenium example, and JUnit 5 advantages.
Overview
To execute JUnit 4 tests with JUnit 5, add the JUnit Vintage Engine and JUnit Jupiter dependencies to your project to run them on the JUnit 5 platform. This setup allows you to run legacy JUnit 4 tests alongside new JUnit 5 tests without modifying your existing test suites.
Why This Matters
- Legacy compatibility: JUnit Vintage Engine runs existing JUnit 4 tests under the JUnit 5 platform without requiring any modifications to your legacy code.
- Modern test design: JUnit Jupiter offers a cleaner annotation model, including @BeforeEach and @AfterEach, to improve test structure and support advanced features like parameterized testing.
- Ecosystem integration: JUnit 5 provides stronger, out-of-the-box support across modern IDEs, build systems, and plugin ecosystems compared to older versions.
How to Run JUnit 4 Tests in JUnit 5
- Dependency configuration: Adding the junit-vintage-engine library alongside JUnit Jupiter to your project dependencies enables the JUnit 5 platform to recognize and execute legacy tests.
- Incremental migration: JUnit 5 Platform executes both legacy JUnit 4 and new JUnit 5 tests together, allowing teams to modernize their test suites gradually.
- Cloud execution: TestMu AI allows teams to perform Selenium automation testing on the cloud using their integrated JUnit 4 and JUnit 5 test suites.
What Is JUnit 5 And How It Stands Out From Previous Versions?
JUnit 5 is the fifth major version of JUnit, which is primarily composed of three different sub-components: JUnit Platform, JUnit Jupiter, and JUnit Vintage. Before getting to know about these components, one essential requirement about JUnit 5 is that runtime JUnit 5 requires Java version 8 (or any other higher versions). However, the unit tests can still be compiled with the previous Java versions and tested with JUnit 5. Now let me take you all through the three sub-components that have been mentioned earlier.
JUnit platform is the basic foundation of the testing framework, which helps in framework development. JUnit Jupiter is used for writing the tests and the JUnit Vintage is used for running earlier versions of JUnit tests such as JUnit 3 and JUnit 4 based tests.
JUnit 6.0.0, released on September 30, 2025, is now the current major version. It keeps the same Platform, Jupiter and Vintage split, raises the minimum Java version to 17, and gives all three components one shared version number, per the JUnit 6.0.0 release notes.
In further sections of this JUnit 5 tutorial, we would deep dive into JUnit 5 vs JUnit 4 comparison along with the demonstration of the respective JUnit versions from Selenium automation testing point of view.
Explore this video tutorial to learn how to seamlessly execute JUnit 4 tests using JUnit 5.

To get tutorials on automation testing, Selenium testing, and more, subscribe to the TestMu AI YouTube Channel.
JUnit 5 vs JUnit 4
In this section of the JUnit 5 tutorial, we look at how JUnit 5 stacks in front of JUnit 4?
JUnit 5 is different from JUnit 4? Let us understand the differences in the JUnit 5 vs JUnit 4 comparison:
- In JUnit 4, everything is composed and wrapped together unlike JUnit 5. JUnit 5 is composed of three components namely JUnit Platform, JUnit Jupiter, and JUnit Vintage.
- JUnit 4 requires a Java version of 5 (or above) while JUnit 5 requires Java version 8 (or even higher).
- JUnit 4 doesn’t support any third-party integration plugins and IDE’s. In JUnit 5, the JUnit Platform provides support for build tools and popular IDE’s like Eclipse, Visual Studio, and IntelliJ.
- JUnit Asserts are an integral part of the JUnit framework. In JUnit 4, assertions (or asserts) are grouped under org.junit.Assert package which contains all the assertion methods. In JUnit 5, assertion methods are grouped and can be imported from org.junit.jupiter.api.Assertions
- When returning error messages in assertion, the order of the parameters differs.
In JUnit 4,
public static void assertEquals(String message, long expected, long actual)
In JUnit 5,
public static void assertEquals(long expected, long actual, String message)
- Like assertions, Assumptions methods are also imported from different packages in JUnit 4 and JUnit 5. In JUnit 4, they are imported from org.junit.Assume and in JUnit 5 they are imported from org.junit.jupiter.api.Assumptions
Here are some of the annotations that changed in JUnit 5:
JUnit 4
JUnit 5
@Before
@BeforeEach
@After
@AfterEach
@BeforeClass
@BeforeAll
@AfterClass
@AfterAll
@Ignore
@Disabled
@Category
@Tag
To learn more about the core difference between JUnit 4 vs JUnit 5 follow the short video given below.

@Rule and @ClassRule annotations in JUnit 4 are removed. Instead, @ExtendWith and @RegisterExtension should be used.
Now that we know about the JUnit 4 and JUnit 5 annotations, let’s look at the annotations in more detail in this section of the JUnit 5 Tutorial:
- In JUnit 4, we have used @Test annotation which can accept parameters. However in JUnit 5, the @Test annotation doesn’t accept any parameters.
Usage of @Test annotation in JUnit 4
@Test(expected = Exception.class)
    public void testThrowsException() throws Exception {
    }
Usage of @Test annotation in JUnit 5
@Test
    void testThrowsException() throws Exception {
        Assertions.assertThrows(Exception.class, () -> {

        });
    }
Read How To Setup a JUnit Environment For Your First Test?

Austin Siewert
Co-Founder, Steadfast Systems
Discovered @TestMu AI yesterday. Best browser testing tool I've found for my use case. Great pricing model for the limited testing I do 👏
2M+ Devs and QAs rely on TestMu AI
Deliver immersive digital experiences with Next-Generation Mobile Apps and Cross Browser Testing Cloud

This JUnit certification establishes testing standards for those who wish to advance their careers in Selenium automation testing with JUnit.
Here’s a short glimpse of the JUnit certification from TestMu AI:

Annotations In JUnit 4 And JUnit 5
In this section of JUnit 5 tutorial, we look at major JUnit annotations used in JUnit 4 and JUnit 5. Most of the annotations in JUnit 5 are similar to annotations in JUnit 4. Let us first look into the annotations used in JUnit 5 and then list out the detailed JUnit 5 vs JUnit 4 comparison.
- @Test – Annotation used for declaring a test.
- @TestFactory – Annotation used for defining a method which is a test factory for dynamic tests that are generated at runtime.
- @RepeatedTest – Annotation used to specify that the method is a template for the tests that can be repeated a specific number of times. For example, the below test method is annotated with @RepeatedTest and the method will be repeated automatically for 5 times.
@RepeatedTest(5)
    public void print(){
      // write some code to be executed
    }
Purpose
JUnit 5
JUnit 4
To define and declare a test
@Test
@Test
To execute before all test methods in the current class
@BeforeAll
@BeforeClass
To execute before each test method
@BeforeEach
@Before
To execute after all test methods in the current class
@AfterAll
@AfterClass
To execute after each test method
@AfterEach
@After
For tagging and filtering the tests
@Tag
@Category
To disable a test method or class
@Disabled
@Ignore
For nested tests
@Nested
Not available in JUnit 4

Sequential Execution Flow Of Annotations In JUnit 5
Let us see the sequence in which these annotations are executed in JUnit 5.
Step 1: The method implemented under the @BeforeAll annotation is executed once.
Step 2: The method implemented under the @BeforeEach annotation executes before the first test.
Step 3: The method implemented under the @Test annotation is executed.
Step 4: The method implemented under the @AfterEach annotation runs after the test case is executed.
Step 5: The method implemented under the @AfterAll annotation will be executed at the end.
In Selenium Automation Testing with the JUnit, you might want to implement multiple test scenarios (or methods) under the same class (or different classes). As seen in the earlier part of the JUnit 5 tutorial, it is essential to know the execution order of the methods implemented under different annotations.
Here is order of execution in case there are two or more test methods in the class:
Step 1: The method implemented under the @BeforeAll annotation is executed once.
Step 2: The method implemented under the @BeforeEach annotation executes before the first test.
Step 3: The method implemented under the @Test annotation is executed.
Step 4: The method implemented under the @AfterEach annotation runs after the test case is executed.
Step 5: The method implemented under the @BeforeEach annotation is executed before the second test case.
Step 6: The method implemented under the @Test annotation is executed.
Step 7: The method implemented under the @AfterEach annotation is executed after the execution of the second test case.
Step 8: The method that has been annotated with @AfterAll is executed once at the end.
Thus, for multiple test cases, the methods implemented under @BeforeAll and @AfterAll annotations are executed only once, at the beginning and end of the test.On the other hand, test methods implemented under the @BeforeEach and @AfterEach annotations are executed before and after respectively for each and every test case.
So far in this JUnit 5 tutorial, we have covered the basics of JUnit 5 framework, annotations of JUnit 5, and life cycle of the annotations.
You might be eager to know what should be done with the tests created using the JUnit 4 framework? It is relatively easy to migrate JUnit 4 to JUnit 5 framework, let’s have a detailed look at the migration process in further sections of the JUnit 5 tutorial.
How To Migrate From JUnit 4 to JUnit 5?
One of the common questions that comes to JUnit users is ‘Is it possible to run JUnit 4 tests in JUnit 5’? By the end of this section of JUnit 5 tutorial, you would be in a position to run JUnit 4 tests in JUnit 5. You can migrate tests written in JUnit 4 to JUnit 5 with minimal effort. Here are the steps to perform the migration:
- The JUnit Vintage engine in JUnit 5 helps in running existing test cases written in JUnit 4 (or JUnit 3) utilizing the JUnit Platform.
- Annotations like @Before and @After in existing JUnit 4 tests have to be replaced with equivalent annotations in JUnit 5 (i.e. @BeforeEach and @AfterEach respectively).
- Import correct package for Assertions (i.e. org.junit.jupiter.api.Assertions) and Assumptions (i.e. org.junit.jupiter.api.Assumptions).
- Remove the JUnit 4 annotations that are no longer supported in JUnit 5 and replace those annotations with ones supported in JUnit 5.
- In case your JUnit 4 project is defined with certain rules, the migration has to be done gradually. There are a few rules of JUnit 4 that are compatible with JUnit Jupiter.
- The junit-jupiter-migration support module provides support for the @Ignore annotation in JUnit 4 which is equivalent to Jupiter's @Disabled annotation. JUnit 6 deprecated the junit-jupiter-migrationsupport module and will remove it in the next major version.
The Vintage engine is a bridge, not a permanent setup. JUnit 6 deprecated the JUnit Vintage engine, which still runs JUnit 4 classes but reports an INFO-level discovery issue when it finds one, according to the same JUnit 6.0.0 release notes. Plan to convert the remaining JUnit 4 classes to Jupiter.

Can AI Assistants Migrate JUnit 4 Tests to JUnit 5?
Yes. AI coding assistants such as GitHub Copilot and Claude Code can rewrite JUnit 4 test classes to JUnit 5, but a compile step and a full test run still have to confirm every change.
Start with a deterministic tool for the mechanical edits. The OpenRewrite JUnit4to5Migration recipe swaps lifecycle annotations, moves assertions to org.junit.jupiter.api.Assertions, converts @RunWith to @ExtendWith, and replaces JUnit 4 dependencies with Jupiter ones.
Whether a recipe or an assistant makes the edit, check these points in every converted class:
- Assertion message order: JUnit 4 puts the failure message first in assertEquals and JUnit 5 puts it last, so the argument has to move, not only the import.
- Expected exceptions: the JUnit 5 @Test annotation takes no parameters, so @Test(expected = Exception.class) has to become an Assertions.assertThrows call.
- Custom rules: a project-specific @Rule or @ClassRule has no ready Jupiter equivalent, so an assistant has to write an extension and register it with @ExtendWith or @RegisterExtension.
- Vintage engine removal: keep junit-vintage-engine until the last JUnit 4 class is converted, because a JUnit 4 class with no engine to discover it stops running without failing the build.
- Test count comparison: compare the number of executed tests before and after the migration to catch any class that dropped out of the run.
Treat assistant output as a draft pull request. Review each diff and rerun the suite on the same browsers and platforms the JUnit 4 tests used.
JUnit 5 vs JUnit 4 Comparison In Action
We take a simple example on how to run the tests written in JUnit 4 and JUnit 5 together in a project. For example, let us see how to run the project that contains unit tests built using JUnit 4 and JUnit 5.
In our project demonstrating the aspects listed so far in this JUnit 5 tutorial, let us assume that we have tests written using JUnit 4. Now we shall add the tests using JUnit 5 for which we would be adding few dependencies. So our pom.xml file would look like below:
<?xml version="1.0" encoding="UTF-8"?>
<project xmlns="http://maven.apache.org/POM/4.0.0"
         xmlns:xsi="http://www.w3.org/2001/XMLSchema-instance"
         xsi:schemaLocation="http://maven.apache.org/POM/4.0.0 http://maven.apache.org/xsd/maven-4.0.0.xsd">
    <modelVersion>4.0.0</modelVersion>

    <groupId>RunJUnitTest</groupId>
    <artifactId>RunJUnitTest</artifactId>
    <version>1.0-SNAPSHOT</version>

    <dependencies>
        <dependency>
            <groupId>org.slf4j</groupId>
            <artifactId>slf4j-nop</artifactId>
            <version>1.7.28</version>
            <scope>test</scope>
        </dependency>
        <dependency>
            <groupId>org.junit.platform</groupId>
            <artifactId>junit-platform-launcher</artifactId>
            <version>1.2.0</version>
        </dependency>
        <dependency>
            <groupId>org.junit.jupiter</groupId>
            <artifactId>junit-jupiter-engine</artifactId>
            <version>5.2.0</version>
        </dependency>
        <dependency>
            <groupId>org.junit.vintage</groupId>
            <artifactId>junit-vintage-engine</artifactId>
            <version>5.2.0</version>
        </dependency>
        <dependency>
            <groupId>org.junit.jupiter</groupId>
            <artifactId>junit-jupiter-api</artifactId>
            <version>5.2.0</version>
            <scope>test</scope>
        </dependency>
        <dependency>
            <groupId>junit</groupId>
            <artifactId>junit</artifactId>
            <version>4.12</version>
            <scope>test</scope>
        </dependency>
        <dependency>
            <groupId>org.slf4j</groupId>
            <artifactId>slf4j-nop</artifactId>
            <version>1.7.28</version>
            <scope>test</scope>
        </dependency>
        <dependency>
            <groupId>org.seleniumhq.selenium</groupId>
            <artifactId>selenium-java</artifactId>
            <version>4.0.0-alpha-7</version>
        </dependency>
        <dependency>
            <groupId>org.seleniumhq.selenium</groupId>
            <artifactId>selenium-remote-driver</artifactId>
            <version>4.0.0-alpha-7</version>
        </dependency>
        <dependency>
            <groupId>org.seleniumhq.selenium</groupId>
            <artifactId>selenium-chrome-driver</artifactId>
            <version>4.0.0-alpha-7</version>
        </dependency>
        <dependency>
            <groupId>junit</groupId>
            <artifactId>junit</artifactId>
            <version>4.12</version>
            <scope>test</scope>
        </dependency>
        <dependency>
            <groupId>org.apache.httpcomponents</groupId>
            <artifactId>httpclient</artifactId>
            <version>4.5.13</version>
        </dependency>
        <!-- https://mvnrepository.com/artifact/net.coobird/thumbnailator -->
        <dependency>
            <groupId>net.coobird</groupId>
            <artifactId>thumbnailator</artifactId>
            <version>0.4.14</version>
        </dependency>
        <!-- https://mvnrepository.com/artifact/ru.yandex.qatools.ashot/ashot -->
        <dependency>
            <groupId>ru.yandex.qatools.ashot</groupId>
            <artifactId>ashot</artifactId>
            <version>1.5.4</version>
        </dependency>
    </dependencies>

    <properties>
        <maven.compiler.source>15</maven.compiler.source>
        <maven.compiler.target>15</maven.compiler.target>
    </properties>

</project>
For demonstration of JUnit 4 and JUnit 5, we perform operations on the TestMu AI ToDo App which is also used in the blog titled How to run JUnit tests from command line.
Test Scenario
- Navigate to the URL https://github.com/LambdaTest/sample-todo-app in the latest version of Chrome on Windows 10.
- Click on the web elements with li1 and li2.
- Add a new element to the list titled Happy Testing at TestMu AI.
- Assert if the new element is not added to the list
This demonstrates the use of the JUnit framework for the purpose of Selenium automation testing.
Below is the test written using JUnit 4
import org.openqa.selenium.By;
import org.openqa.selenium.JavascriptExecutor;
import org.openqa.selenium.WebDriver;
import org.openqa.selenium.remote.DesiredCapabilities;
import org.openqa.selenium.remote.RemoteWebDriver;
import java.net.MalformedURLException;
import java.net.URL;

/* JUnit related imports */
import org.junit.*;

public class JUnit4Demo
{
    static WebDriver driver = null;
    static String URL = "https://lambdatest.github.io/sample-todo-app/";
    public static String status = "passed";
    static String username = "user-name";
    static String access_key = "access-key";

    @Before
    public void beforeMethod() throws MalformedURLException {
        System.out.println("=======Running @Before for JUnit 4=======");
        DesiredCapabilities capabilities = new DesiredCapabilities();
        capabilities.setCapability("build", "[Java] Demonstration of running JUnit4 tests on LambdaTest Grid");
        capabilities.setCapability("name", "[Java] Demonstration of running JUnit4 tests on LambdaTest Grid");
        capabilities.setCapability("platform", "Windows 10");
        capabilities.setCapability("browserName", "Chrome");
        capabilities.setCapability("version","latest");
        capabilities.setCapability("tunnel",false);
        capabilities.setCapability("network",true);
        capabilities.setCapability("console",true);
        capabilities.setCapability("visual",true);

        driver = new RemoteWebDriver(new URL("https://" + username + ":" + access_key + "@hub.lambdatest.com/wd/hub"), capabilities);

        /* driver = new ChromeDriver(); */
        System.out.println("Started session");
    }

    @Test
    public void simpleJunit4Test() throws InterruptedException
    {
        System.out.println("Running a simple Junit 4 test.");
        driver.navigate().to(URL);
        driver.manage().window().maximize();

        try
        {
            /* Let's mark the first two items in the list. */
            driver.findElement(By.name("li1")).click();
            driver.findElement(By.name("li2")).click();

            /* Let's add an item to the list. */
            driver.findElement(By.id("sampletodotext")).sendKeys("Happy Testing at LambdaTest");
            driver.findElement(By.id("addbutton")).click();

            /* Let's check that the item we added is added in the list. */
            String enteredText = driver.findElement(By.xpath("/html/body/div/div/div/ul/li[6]/span")).getText();
            if (enteredText.equals("Happy Testing at LambdaTest"))
            {
                System.out.println("Demonstration of running JUnit tests is complete");
            }
        }
        catch (Exception e)
        {
            System.out.println(e.getMessage());
        }
    }

    @After
    public void afterMethod()
    {
        System.out.println("=======Running @After for JUnit 4=======");
        if (driver != null)
        {
            ((JavascriptExecutor) driver).executeScript("lambda-status=" + status);
            driver.quit();
        }
    }
}
Let us add a test using JUnit 5 in the same project
import org.openqa.selenium.By;
import org.openqa.selenium.JavascriptExecutor;
import org.openqa.selenium.WebDriver;
import org.openqa.selenium.remote.DesiredCapabilities;
import org.openqa.selenium.remote.RemoteWebDriver;
import java.net.MalformedURLException;
import java.net.URL;

/* JUnit related imports */
import org.junit.jupiter.api.AfterEach;
import org.junit.jupiter.api.BeforeEach;
import org.junit.jupiter.api.Test;

public class RunUnitTests
{
    static WebDriver driver = null;
    static String URL = "https://lambdatest.github.io/sample-todo-app/";
    public static String status = "passed";
    static String username = "user-name";
    static String access_key = "access-key";

    @BeforeEach
    public void beforeEachMethod() throws MalformedURLException {
        System.out.println("=======Running @BeforeEach for JUnit 5=======");
        DesiredCapabilities capabilities = new DesiredCapabilities();
        capabilities.setCapability("build", "[Java] Demonstration of running JUnit5 tests on LambdaTest Grid");
        capabilities.setCapability("name", "[Java] Demonstration of running JUnit5 tests on LambdaTest Grid");
        capabilities.setCapability("platform", "Windows 10");
        capabilities.setCapability("browserName", "Chrome");
        capabilities.setCapability("version","latest");
        capabilities.setCapability("tunnel",false);
        capabilities.setCapability("network",true);
        capabilities.setCapability("console",true);
        capabilities.setCapability("visual",true);

        driver = new RemoteWebDriver(new URL("https://" + username + ":" + access_key + "@hub.lambdatest.com/wd/hub"), capabilities);

        /* driver = new ChromeDriver(); */
        System.out.println("Started session");
    }

    @Test
    public void simpleJunit5Test() throws InterruptedException
    {
        System.out.println("Running a simple Junit 5 test.");
        driver.navigate().to(URL);
        driver.manage().window().maximize();

        try
        {
            /* Let's mark the first two items in the list. */
            driver.findElement(By.name("li1")).click();
            driver.findElement(By.name("li2")).click();

            /* Let's add an item to the list. */
            driver.findElement(By.id("sampletodotext")).sendKeys("Happy Testing at LambdaTest");
            driver.findElement(By.id("addbutton")).click();

            /* Let's check that the item we added is added in the list. */
            String enteredText = driver.findElement(By.xpath("/html/body/div/div/div/ul/li[6]/span")).getText();
            if (enteredText.equals("Happy Testing at LambdaTest"))
            {
                System.out.println("Demonstration of running JUnit tests is complete");
            }
        }
        catch (Exception e)
        {
            System.out.println(e.getMessage());
        }
    }

    @AfterEach
    public void afterEachMethod()
    {
        System.out.println("=======Running @AfterEach for JUnit 5=======");
        if (driver != null)
        {
            ((JavascriptExecutor) driver).executeScript("lambda-status=" + status);
            driver.quit();
        }
    }
}
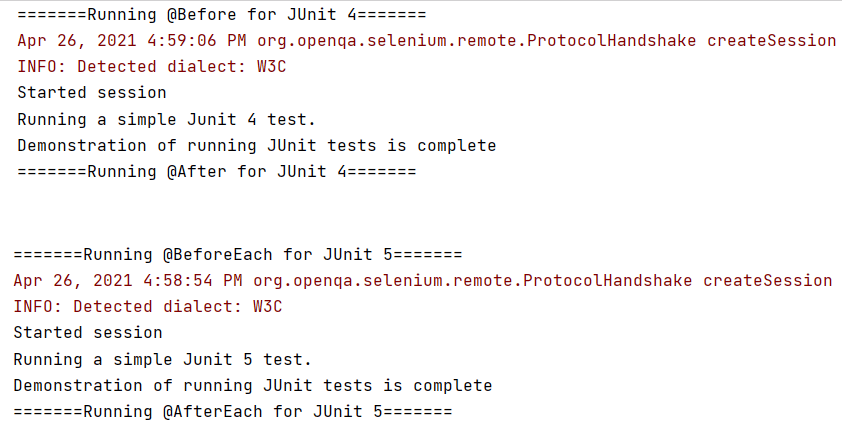
Upon execution,you will see the results of both the tests in the console like the one below.
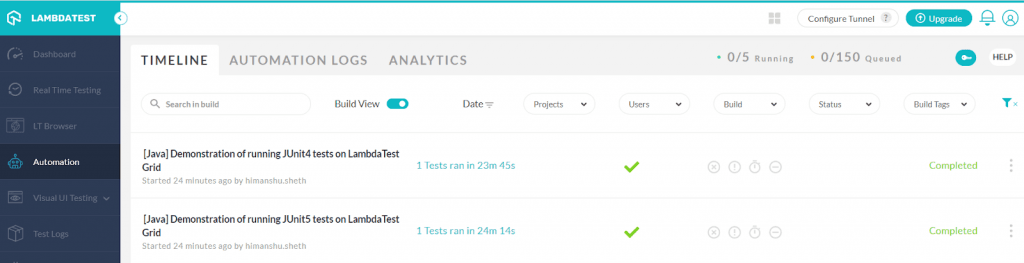
Here is the execution snapshot from the Automation dashboard of TestMu AI. As seen below, the tests have executed successfully.
This JUnit Tutorial for beginners and professionals will help you learn how to use JUnit framework with Selenium and Java for performing Selenium automation testing.

Advantages Of Using JUnit 5 For Unit Testing
So far, in this JUnit 5 tutorial, we have covered all the essential aspects of JUnit 4 as well as Junit 5, including a head-on JUnit 5 vs JUnit 4 comparison. Now that you are aware about the annotations in JUnit 5, let’s look at the advantages of using JUnit 5 for unit testing. Some of the major advantages are mentioned below:
- It provides unique features to define the tests in comparison to the previous versions.
- It helps in utilizing the lambda functions in the tests for assertions as well as assumptions.
- It provides prominent annotations with well-defined purposes that can be used to enhance the unit tests.
- It supports the usage of multiple runners.
- It has unique extensible architecture.
- It supports migration of existing tests written with previous JUnit versions.
Wrapping it up!
In this JUnit 5 tutorial, we looked into JUnit 5 components and their features, newly introduced annotations, and approach to migrate tests from JUnit 4 to Junit 5. I hope you got a good grasp of the JUnit 5 framework. If you are an existing JUnit user, this JUnit 5 tutorial can be used as a handy guide for migration of tests to JUnit 5 as well as to get started with the JUnit framework. When you are ready for the next step, explore JUnit 6 migration to keep your test suite aligned with the latest framework evolution.
To prepare for interviews, the JUnit interview questions set covers the JUnit 4 and JUnit 5 differences explained here in question-and-answer form.
Feel free to share this article with your peers and let us know how you are using JUnit 5 for Selenium automation testing.
Happy Testing…! 😊
Austin Siewert
Co-Founder, Steadfast Systems
Discovered @TestMu AI yesterday. Best browser testing tool I've found for my use case. Great pricing model for the limited testing I do 👏
2M+ Devs and QAs rely on TestMu AI
Deliver immersive digital experiences with Next-Generation Mobile Apps and Cross Browser Testing Cloud
What Is the Difference Between JUnit 4, JUnit 5, and JUnit 6?
JUnit 4 is a single-JAR legacy release in maintenance mode. JUnit 5 introduced the modular Jupiter API that most teams write today. JUnit 6 keeps that same API but requires Java 17.
The short answer: JUnit 4 is a single-JAR legacy release in maintenance mode, JUnit 5 introduced the modular Jupiter API that almost everyone writes today, and JUnit 6 keeps that same Jupiter API while moving the runtime baseline to Java 17.
That last point matters for planning: upgrading from JUnit 5 to JUnit 6 is largely a toolchain and dependency exercise, not a test rewrite. Moving from JUnit 4 to JUnit 5 is the migration that actually changes how you write tests.
| Features | JUnit 4 | JUnit 5 | JUnit 6 |
|---|---|---|---|
| Architecture | Single jar file containing all components. | Composed of three subcomponents: JUnit Platform, JUnit Jupiter, and JUnit Vintage. | Same three subcomponents, with junit-platform-runner and junit-platform-jfr removed (JFR support folded into junit-platform-launcher). |
| Required JDK Version | Java 5 or higher | Java 8 or higher. | Java 17 or higher (Kotlin 2.1 or higher). |
| Assertions | org.junit.Assert with assert methods. | org.junit.jupiter.Assertions with enhanced assert methods, including assertThrows() and assertAll(). | Unchanged from JUnit 5; the Jupiter assertion API carries over as-is. |
| Assumptions | org.junit.Assume with various methods | org.junit.jupiter.api.Assumptions with a reduced set of methods. | Unchanged from JUnit 5. |
| Tagging and Filtering | @category annotation | @tag annotation. | @tag annotation. |
| Test Suites | @RunWith and @Suite annotation | @Suite, @SelectPackages, and @SelectClasses annotations. | Same annotations; the legacy @RunWith-based runner module is gone. |
| Non-public Test Methods | It must be public. | It can be package-protected, with no requirement for a public no-args constructor. | Same as JUnit 5. |
| 3rd Party Integration | Lacks dedicated support for third-party plugins. | The JUnit platform project facilitates third-party integration, defining the TestEngine API for testing frameworks. | Same TestEngine API; third-party engines target the JUnit Platform unchanged. |
| Legacy Test Support | Native. | JUnit 3 and 4 tests run via the Vintage engine. | Vintage engine is deprecated, intended only as a temporary bridge while migrating to Jupiter. |
| Current Status | Maintenance mode; critical bug fixes only. | Actively used; still the most common version in production. | Current generation. Released September 30, 2025; latest patch 6.1.2 on July 12, 2026. |
Version details above are from the official JUnit 6 User Guide and JUnit release notes.
If you wish to learn how JUnit 4 is slightly difference from JUnit 5, follow the video given below and get more information.
If you wish to migrate JUnit 4 to JUnit 5, get complete guidance on how to migrate by referring to this blog on how to execute JUnit 4 with JUnit 5. Teams planning the next upgrade should also explore what's new in JUnit 6 and the JUnit 6 migration guide to stay ahead of framework changes.
Author

Shalini Baskaran
Blogs: 11


Shalini Baskaran is a Senior Software Engineer with over 7 years of experience in test automation, quality engineering, and SDET practices. She is skilled in Selenium, Cucumber, JBehave, TestNG, Cypress, REST-Assured, Postman, SOAP UI, Jenkins, GitHub Actions, Docker, JMeter, AWS, Kibana, and Datadog. She has designed automation frameworks that reduced test script development time and integrated testing into CI/CD pipelines across banking, telecom, and cloud domains.
On This Page
- What Is JUnit 5 And How It Stands Out From Previous Versions?
- JUnit 5 vs JUnit 4
- Annotations In JUnit 4 And JUnit 5
- Sequential Execution Flow Of Annotations In JUnit 5
- How To Migrate From JUnit 4 To JUnit 5?
- AI-Assisted JUnit Migration
- Advantages Of Using JUnit 5 For Unit Testing
- What Is the Difference Between JUnit 4, JUnit 5, and JUnit 6?
JUnit 4 and JUnit 5 FAQs
Did you find this page helpful?
More Related Blogs
TestMu AI forEnterprise
Get access to solutions built on Enterprise
grade security, privacy, & compliance
- Advanced access controls
- Advanced data retention rules
- Advanced Local Testing
- Premium Support options
- Early access to beta features
- Private Slack Channel
- Unlimited Manual Accessibility DevTools Tests