

Power Your Software Testing with AI Agents and Cloud
The Native AI-Agentic Cloud Platform to Supercharge Quality Engineering. Test Intelligently and Ship Faster.


- TestMu AI (Formerly LambdaTest)
- /
- Learning Hub
- /
- JBehave Testing
JBehave Testing: A Detailed Guide [2026]
Learn JBehave testing with this guide. Set up BDD in Java, write Given-When-Then stories, run tests on a cloud Selenium Grid, and debug common pitfalls.
Last Updated on:
JBehave testing binds behavior scenarios to Java test scripts. It turns acceptance criteria into executable tests inside your build pipeline.
When a JBehave scenario fails, it maps to a real business flow breaking, not a CSS selector changing.
Overview
JBehave is a Java-based Behavior-Driven Development (BDD) framework that uses Given-When-Then syntax to bridge the gap between business requirements and test automation. To get started, developers set up a Maven project, write plain-text story files, implement Java step definitions, and configure a runner class.
- JBehave Framework: JBehave is a Java-based BDD framework that uses Given-When-Then syntax to create executable test stories, bridging the gap between business requirements and test automation.
- Maven Project Setup: Maven manages project dependencies by integrating JBehave core, Selenium WebDriver, and JUnit within the pom.xml file to establish the testing environment.
- Story Files: Plain-text .story files use Given-When-Then format to describe user scenarios in plain language, mapping business requirements directly to test cases.
- Step Definitions: Java classes use @Given, @When, and @Then annotations to map plain-text story steps directly to executable Java code logic.
- JUnitStories Runner: The JUnitStories runner class loads story files, binds them to their corresponding Java step definitions, and configures the output reporting formats.
- TestMu AI: TestMu AI is a cloud-based quality engineering platform used to run JBehave and Selenium tests on real browsers for instant cross-browser validation.
- Cucumber: Cucumber is an alternative BDD framework that supports multiple languages, making it ideal for cross-language teams compared to the Java-centric JBehave.
What Is JBehave?
JBehave is the Behavior-Driven Development (BDD) framework built for Java. It expresses tests as plain-language user stories that double as living documentation. It was originally created by Dan North, the pioneer of BDD, as the first framework to put behavior, rather than technical unit tests, at the center of testing.
It uses its own plain-text story format that employs Given-When-Then keywords to structure each scenario. Each keyword carries a distinct responsibility in the test flow.
- Given sets preconditions. The user is on the login page, the database has seed data, the API token is valid.
- When triggers the action under test. Entering credentials, submitting a form, calling an endpoint.
- Then asserts the expected outcome. The dashboard loads, the response code is 200, the order appears in the queue.
JBehave Architecture Overview
Here is the component breakdown of JBehave:
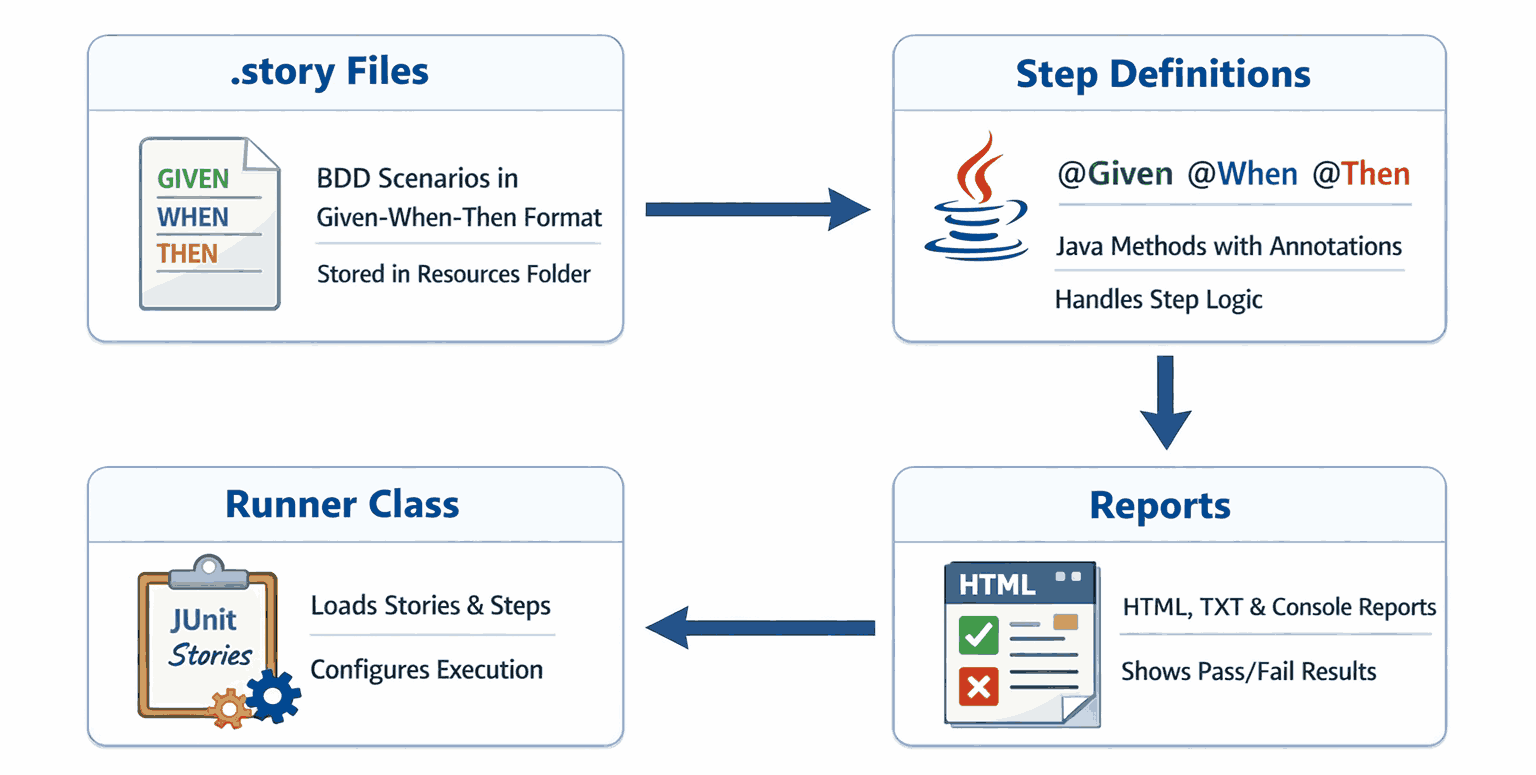
- .story File: Plain-text BDD scenarios in Given-When-Then format. Store them in a dedicated resources folder, version-controlled but separate from Java code.
- Step Definitions: Java classes with @Given, @When, @Then annotations containing execution logic. Mismatched regex is the top reason steps show as PENDING.
- Runner Class: Loads stories, connects step definitions, and configures output. Most teams extend JUnitStories and override configuration() and stepsFactory().
- Reports: JBehave generates HTML, TXT, and console reports. The HTML report shows every story, scenario, and step with pass/fail status.
The Origin of JBehave: Dan North and the Birth of BDD
JBehave's history is really the history of BDD itself. In the mid-2000s, Dan North was looking for a better way to teach and practice test-driven development. He found that framing tests around behavior and business language, rather than around technical units, made them far easier for teams to understand and agree on. That idea became Behavior-Driven Development (BDD).
North built JBehave as the first tool to put that philosophy into practice, a Java-focused framework that shifted the focus from low-level unit assertions to human-readable, business-driven behavior. The Given-When-Then vocabulary that is now standard across BDD tools traces directly back to this work. Understanding that lineage explains JBehave's design: it is Java-native and specification-first because it was born to make behavior, not code, the shared source of truth.
Why Use JBehave for BDD in Java?
JBehave integrates natively with Java, uses plain-language Given-When-Then stories, and aligns developers, QA, and business teams around shared executable specifications.
- Human-Readable Stories. JBehave scenarios use Given-When-Then syntax that non-technical stakeholders can review without reading Java code.
- Integration with Java. Integrates directly with Maven, Gradle, JUnit, and TestNG. Step definitions use @Given, @When, @Then annotations on standard Java methods.
- Separation of Concerns. Story files (.story) hold the specification. Java classes hold the execution logic. Product owners review scenarios without touching code.
- Modular and Configurable. Group stories by feature, inject parameters from external tables, customize reports, and run stories in parallel for large suites.
- Seamless Integration. Plugs into Maven and Gradle build lifecycles with Spring dependency injection and automation testing in CI/CD pipeline tools like Jenkins.
- Team Collaboration. Stories are plain-text files in version control. Product owners, QA, and developers edit and review them through pull requests.
- Community and Ecosystem. Maintained since 2003 with a stable API and thorough documentation. Teams needing long-term BDD stability choose JBehave for Java.
If you are exploring other BDD frameworks for Java, you can also refer to this guide on Cucumber testing for comparison.
JBehave vs. Cucumber: Key Differences Explained
JBehave and Cucumber are the two best-known BDD frameworks, and choosing between them is the most common question teams ask. Both use Given-When-Then, but they differ in language ecosystem, file formats, and tooling. In practice, Cucumber has become the modern industry standard thanks to its polyglot support and larger ecosystem, while JBehave is often seen as a mature, Java-centric choice favored by teams deep in the Java and Spring world.
| Dimension | JBehave | Cucumber |
|---|---|---|
| Language ecosystem | Java-only | Polyglot (Java, Ruby, JS, Kotlin, and more) |
| Syntax standard | Given-When-Then, custom story grammar | Strict Gherkin |
| File format | .story files | .feature files |
| Tooling / IDE support | Good on Java IDEs (IntelliJ, Eclipse) via plugins | Broad, first-class plugins across many IDEs |
| Reporting | Built-in HTML, TXT, and console reports | Pluggable reporters, large plugin ecosystem |
| Best for | Java/Spring-heavy teams wanting deep native integration | Cross-language teams and the modern industry default |
The short version: pick JBehave when your stack is firmly Java and you want the tightest Java and Spring integration; pick Cucumber when you need cross-language support or want to align with the most widely adopted BDD tooling. If neither fits, and the real cost is maintaining step definitions that break every time the UI shifts, it is worth weighing a Cucumber alternative that runs plain-English flows without glue code.
How to Set Up JBehave
Clone the sample project, run mvn clean install to download JBehave Core and Selenium dependencies, and optionally set cloud credentials to run tests on a remote grid.
You need Java 17 or later and Maven 3.8 or later installed on your machine.
An IDE such as IntelliJ IDEA or Eclipse with the JBehave Support plugin is strongly recommended for step navigation and syntax validation.
For this guide, I'll run tests on a cloud Selenium Grid offered by TestMu AI (Formerly LambdaTest).
TestMu AI is a full-stack agentic AI quality engineering platform that helps teams test smarter and deliver faster. It runs Selenium testing with Behave on real browsers instantly, with no local infrastructure setup needed. The same platform carries story-driven BDD onto native mobile through App Automation, so you can drive the same scenarios with Appium Java and JBehave on real devices.

Note: Run JBehave tests across 3000 real environments. Try TestMu AI Now!
Step 1: Clone the Sample Project
Clone the sample project to get a working JBehave structure:
git clone https://github.com/Ravikumar7210/LambdaTest_JBehave_Testing.git
cd jbehave-login-test
This project includes:
- .story files for BDD scenarios.
- Java step definitions using JBehave annotations.
- Selenium WebDriver configuration for local and cloud execution.
Step 2: Install Dependencies
Ensure Maven is installed, then run:
mvn clean installThis downloads all required libraries, including:
- JBehave Core for BDD story execution.
- Selenium with Java for browser automation.
- JUnit for test orchestration.
Step 3: Configure Your TestMu AI Credentials (Optional)
Skip this step if you are running tests locally. To run on a cloud Selenium Grid like TestMu AI, set your credentials as environment variables:
set LT_USERNAME=your_user_name
set LT_ACCESS_KEY=your_access_key
Or add them permanently via System Properties → Environment Variables. Never hardcode credentials in source files.
How to Write and Run Your First JBehave Test
Write a .story file with Given-When-Then steps, implement Java step definitions, configure a JUnitStories runner, and execute with mvn test locally or on a cloud grid.
1. Create a Maven Project
Use Spring Initializr or your IDE to create a new Maven project. Add the following dependencies in pom.xml:
<properties>
    <java.version>17</java.version>
    <spring-boot.version>3.3.4</spring-boot.version>
    <jbehave.version>5.2.0</jbehave.version>
    <selenium.version>4.26.0</selenium.version>
    <webdrivermanager.version>5.9.1</webdrivermanager.version>
    <maven.compiler.source>${java.version}</maven.compiler.source>
    <maven.compiler.target>${java.version}</maven.compiler.target>
</properties>

<dependencyManagement>
    <dependencies>
        <dependency>
            <groupId>org.springframework.boot</groupId>
            <artifactId>spring-boot-dependencies</artifactId>
            <version>${spring-boot.version}</version>
            <type>pom</type>
            <scope>import</scope>
        </dependency>
    </dependencies>
</dependencyManagement>

<dependencies>
    <!-- Spring Boot core -->
    <dependency>
        <groupId>org.springframework.boot</groupId>
        <artifactId>spring-boot-starter</artifactId>
    </dependency>

    <!-- JBehave core + Spring integration -->
    <dependency>
        <groupId>org.jbehave</groupId>
        <artifactId>jbehave-core</artifactId>
        <version>${jbehave.version}</version>
    </dependency>
    <dependency>
        <groupId>org.jbehave</groupId>
        <artifactId>jbehave-spring</artifactId>
        <version>${jbehave.version}</version>
    </dependency>

    <!-- Selenium WebDriver -->
    <dependency>
        <groupId>org.seleniumhq.selenium</groupId>
        <artifactId>selenium-java</artifactId>
        <version>${selenium.version}</version>
    </dependency>

    <!-- WebDriverManager (optional for local runs) -->
    <dependency>
        <groupId>io.github.bonigarcia</groupId>
        <artifactId>webdrivermanager</artifactId>
        <version>${webdrivermanager.version}</version>
    </dependency>

    <!-- Testing stack -->
    <dependency>
        <groupId>org.springframework.boot</groupId>
        <artifactId>spring-boot-starter-test</artifactId>
        <scope>test</scope>
    </dependency>
    <dependency>
        <groupId>org.junit.jupiter</groupId>
        <artifactId>junit-jupiter</artifactId>
        <scope>test</scope>
    </dependency>
</dependencies>
2. Create Your Story File
Create a file at src/main/resources/stories/login.story:
Narrative:
In order to access my account
As a registered user
I want to log in and see my dashboard

Scenario: Valid login
Given the user is on the login page
When the user enters valid credentials
Then the user should see the dashboard
This story describes a user journey in plain language. I keep steps free of selectors, waits, and browser configuration - that boundary is what makes stories readable to non-engineers.
3. Write Step Definitions
Create a class at: src/test/java/steps/LoginSteps.java
This class maps each .story step to a Java method using JBehave annotations. The annotation text must match the story wording exactly.
@Component
public class LoginSteps {

    @Autowired
    private WebDriver driver;
    private WebDriverWait wait;

    @BeforeScenario
    public void beforeScenario() {
        driver.manage().window().maximize();
        wait = new WebDriverWait(driver, Duration.ofSeconds(20));
        ltLog("Starting scenario: Valid login");
    }

    @AfterScenario
    public void tearDown() {
        if (driver != null) {
            ltLog("Closing WebDriver after scenario");
            driver.quit();
        }
    }

    @Given("the user is on the login page")
    public void openLoginPage() throws InterruptedException {
        driver.get("https://ecommerce-playground.lambdatest.io/index.php?route=account/login");
        Thread.sleep(1000);
        wait.until(ExpectedConditions.visibilityOfElementLocated(By.id("input-email")));
        ltLog("Navigated to login page and email field visible");
    }

    @When("the user enters valid credentials")
    public void enterCredentials() {
        driver.findElement(By.id("input-email")).sendKeys("ravi12345@gmail.com");
        driver.findElement(By.id("input-password")).sendKeys("Ravil@1234");
        driver.findElement(By.cssSelector("input[type='submit']")).click();
        ltLog("Entered credentials and submitted login form");
    }

    @Then("the user should see the dashboard")
    public void verifyDashboard() {
        try {
            By heading = By.cssSelector("h2");
            By breadcrumbLast = By.cssSelector("ul.breadcrumb li:last-child");
            wait.until(ExpectedConditions.or(
                ExpectedConditions.textToBePresentInElementLocated(heading, "My Account"),
                ExpectedConditions.textToBePresentInElementLocated(breadcrumbLast, "Account")
            ));
            ltLog("Dashboard verified (heading/breadcrumb matched)");
            ltMarkStatus("passed", "Login scenario completed successfully");
        } catch (TimeoutException e) {
            ltLog("Dashboard verification timed out");
            ltMarkStatus("failed", "Dashboard not visible after login");
            throw e;
        }
    }


    private void ltLog(String message) {
        try {
            ((JavascriptExecutor) driver).executeScript("lambda-comment=" + message);
        } catch (Exception ignored) { }
    }

    private void ltMarkStatus(String status, String reason) {
        try {
            ((JavascriptExecutor) driver).executeScript("lambda-status=" + status);
            ((JavascriptExecutor) driver).executeScript("lambda-comment=" + reason);
        } catch (Exception ignored) { }
    }
}
4. Configure the Runner
Create a runner class at: src/test/java/runners/LoginStoryRunner.java
This class tells JBehave where to find stories, which step classes to use, and what report formats to produce.
@SpringBootTest
public class JBehaveRunnerTest {

    @Autowired
    private ApplicationContext context;

    @Test
    void runStories() {
        Configuration configuration = new MostUsefulConfiguration()
            .useStoryLoader(new LoadFromClasspath(this.getClass()))
            .useStoryReporterBuilder(new StoryReporterBuilder()
                .withDefaultFormats()
                .withFormats(Format.CONSOLE, Format.TXT, Format.HTML)
                .withPathResolver(new FilePrintStreamFactory.ResolveToSimpleName())
            );

        InjectableStepsFactory stepsFactory = new SpringStepsFactory(configuration, context);

        StoryFinder finder = new StoryFinder();
        // Pick up all .story files under /stories/
        List<String> stories = finder.findPaths(
            codeLocationFromClass(this.getClass()),
            "stories/*.story",
            ""
        );

        Embedder embedder = new Embedder();
        embedder.useConfiguration(configuration);
        embedder.useStepsFactory(stepsFactory);
        embedder.runStoriesAsPaths(stories);

        // Quit driver after all stories
        WebDriver driver = context.getBean(WebDriver.class);
        if (driver != null) {
            System.out.println("Closing WebDriver session at end of run");
            driver.quit();
        }
    }
}
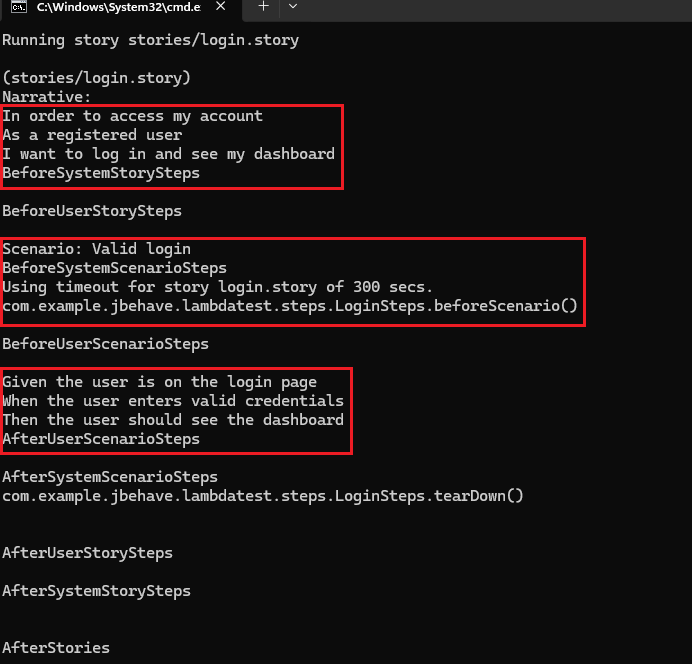
5. Run the Test
Run the below command to execute the test:
mvn testThis will:
- Launch a browser session locally or on the cloud grid if credentials are configured.
- Execute the login scenario.
- Generate a report at target/jbehave/view/index.html.
- Show the logs on the CMD panel.
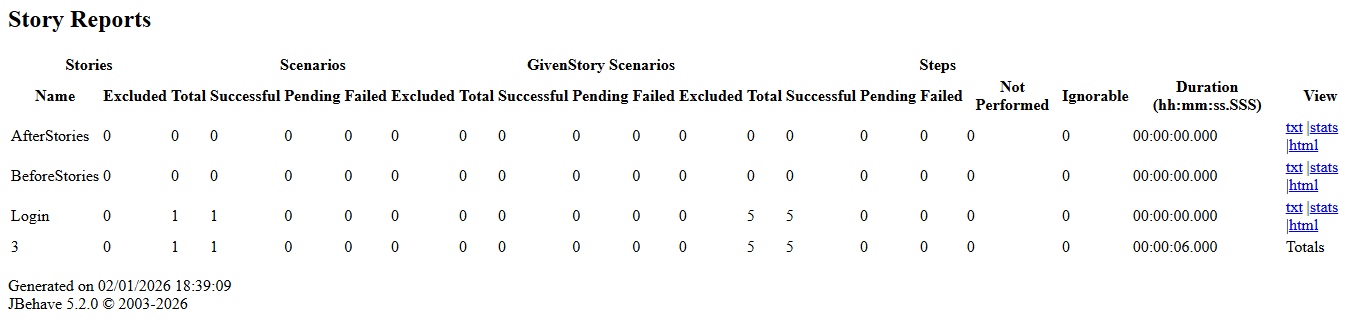
6. View Test Results
Open target/jbehave/view/index.html in your browser. It groups failures by story and scenario so you can trace which flow broke.
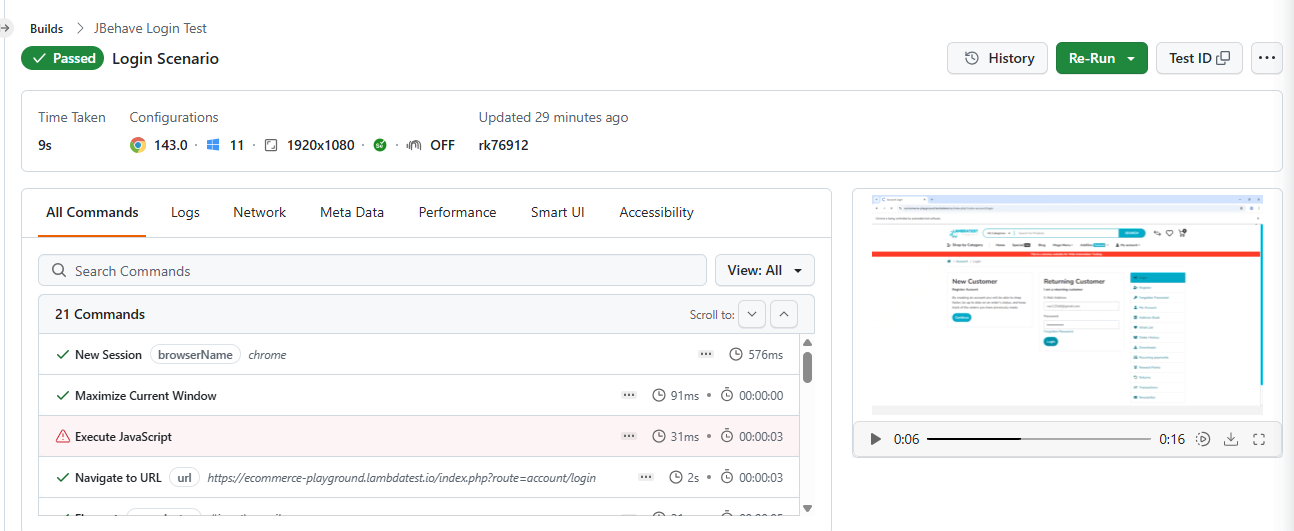
The TestMu AI Web Automation dashboard shows session details, execution logs, video recordings, and screenshots for each JBehave test run.
Advanced JBehave Configuration: Using MostUsefulConfiguration and StepsFactory
As suites grow, a clean runner class keeps configuration maintainable. JBehave provides MostUsefulConfiguration, a sensible-defaults base configuration, and a StepsFactory to supply your step classes, which together remove a lot of the boilerplate you would otherwise write by hand compared with a plain JUnit setup.
- MostUsefulConfiguration: Ships with the common defaults (story loader, reporters, parameter converters) already wired, so you configure only what you need to change instead of assembling everything from scratch.
- InstanceStepsFactory: The simplest StepsFactory, hand it your step class instances and it registers them with the embedder. Use it for plain Java projects without a DI container.
- SpringStepsFactory: The Spring-backed variant, it pulls step beans from the application context so your steps get full dependency injection.
public class StoryRunner extends JUnitStories {

    @Override
    public Configuration configuration() {
        // Sensible defaults, override only what you need
        return new MostUsefulConfiguration()
            .useStoryReporterBuilder(
                new StoryReporterBuilder()
                    .withFormats(Format.CONSOLE, Format.HTML));
    }

    @Override
    public InjectableStepsFactory stepsFactory() {
        // Register step classes without boilerplate
        return new InstanceStepsFactory(configuration(), new LoginSteps());
    }
}
This pattern, MostUsefulConfiguration for defaults plus a StepsFactory for step wiring, is the recommended way to structure a JBehave runner. Swap InstanceStepsFactory for SpringStepsFactory when you need Spring-managed beans, as shown in the Spring example earlier in this guide.
Common Pitfalls in JBehave Testing
Most JBehave failures trace back to the same recurring mistakes. I've seen these patterns across projects of different sizes, and knowing them before you hit them saves significant debugging time.
- Not Following BDD Principles. Teams often write JBehave stories in isolation without involving product owners or QA, resulting in tests that reflect technical assumptions rather than actual business requirements or user behavior.
- Overly Complex or Ambiguous Stories. Scenarios that cover multiple behaviors in one block become difficult to read, maintain, and debug. Failures are ambiguous when a single scenario tests several independent conditions at once.
- Vague and Overloaded Steps. Step methods that perform multiple actions at once make it impossible to isolate failures. Overloaded steps also break reusability and inflate the number of distinct step definitions needed across the suite.
- Unmatched Step Definitions. Steps without a matching Java method are marked PENDING. By default, JBehave does not fail the build for pending steps, which can create a false sense of coverage if reports are not reviewed carefully.
- Poor Story Organization. Scenarios that depend on a specific execution order or shared mutable state become flaky and unpredictable. Tests fail intermittently when run in parallel or executed in a different sequence.
- Misconfigured Project. Incorrect classpath setup, missing step registrations, or wrong runner configuration cause JBehave to silently skip stories entirely, producing no output and making the root cause very difficult to diagnose.
- Neglecting Test Data Management. Hardcoded values in story files make scenarios fragile and difficult to scale. Changing a single value requires editing multiple story files rather than updating one centralized, reusable data source.
- Poor Error Handling in Step Definitions. Catching broad exceptions in step definitions hides the actual cause of failure. Generic error messages make it hard to identify which step failed and what application state it was in.
- Not Leveraging IDE or Tooling Support. Without IDE support, unmatched story steps are invisible until runtime. Developers waste time hunting for typos in step text that a JBehave plugin would flag instantly while editing.
- Poor Reporting Setup. Without configured reporters, JBehave outputs raw text that is hard to parse after failures. Teams lose visibility into which specific steps failed and under what scenario conditions they occurred.
Debugging Tips for JBehave Testing
When a test fails, the root cause is rarely obvious. In my experience, these tips help you pinpoint the problem quickly without guesswork.
- Use Your IDE Debugger. Place a breakpoint inside the failing step method and run JUnitStories in debug mode to pause execution and inspect variable state at the exact point of failure.
- Use JBehave Reports Efficiently. After a test run, open target/jbehave/view/index.html in your browser. It provides step-level failure traces, full stack details, and scenario status across all executed story files.
- Enable Verbose Logging. Add PrintStreamStepMonitor to your configuration to log each step as it executes. This reveals which steps matched, were skipped, or had parameters injected during the test run.
- Validate Story Syntax and Paths. If no stories execute, start with a single minimal story to isolate the issue. Override storyPaths() explicitly in your JUnitStories runner to confirm path resolution is correct.
- Use Dry-Run Methods. Call .doDryRun(true) in your configuration to validate that all story steps are correctly wired to Java methods without actually executing any test logic or browser interactions.
- Check Parameter Injection. When steps fail with unexpected values, verify that $variable placeholders in story text match the @Named annotations in your step method signatures for correct parameter binding.

Conclusion
This guide covered JBehave from the ground up, including its architecture, the reasons Java teams choose it for BDD, and how its Given-When-Then model maps business requirements to executable tests.
The walkthrough covered setting up a Maven project, writing story files, mapping steps to Java methods, configuring a runner class, and executing tests with HTML reports.
Common pitfalls like misconfigured runners, unmatched step definitions, and poor story organization were also addressed alongside practical debugging techniques for tracing failures quickly.
Teams scaling JBehave beyond local execution often rely on cloud platforms for Selenium with Java automation testing, where TestMu AI provides access to real browsers and OS combinations.
Citations
- JBehave Official Documentation: https://jbehave.org/
Author

Ravi Kumar
Blogs: 3


Ravi Kumar is a frontend web developer and technical writer with over 3 years of experience in web development. He holds a B.Tech in Information Technology from BVCOE, affiliated with GGSIPU, Delhi, and is skilled in HTML, CSS, JavaScript, Tailwind CSS, and React. At Infosys, he worked as a Senior Software Engineer on the GST project, creating manuals for tax officers and taxpayers that are now live on India's GST portal. Ravi contributes technical guides to TestMu AI (formerly LambdaTest), including tutorials on JBehave BDD testing, code coverage tools, and CSS animation, and shares web development tips with an audience of nearly 10,000 followers on X.
Reviewer

Sushobhit Dua
Reviewer
Sushobhit Dua is an Engineering Manager at TestMu AI (formerly LambdaTest), leading SmartUI, the visual regression and visual testing product. He manages the team that builds and ships SmartUI and maintains and cuts releases of the open-source SmartUI CLI. He works primarily in Core Java, Spring Boot, and Gradle, and is an AMCAT Certified Software Engineer. He brings over 10 years of software engineering experience, with earlier work as a Software Engineer at ecare Technology Labs. Sushobhit owns the SmartUI roadmap and the engineering decisions behind it.


JBehave Testing FAQs
Did you find this page helpful?
More Related Blogs
TestMu AI forEnterprise
Get access to solutions built on Enterprise
grade security, privacy, & compliance
- Advanced access controls
- Advanced data retention rules
- Advanced Local Testing
- Premium Support options
- Early access to beta features
- Private Slack Channel
- Unlimited Manual Accessibility DevTools Tests