

Power Your Software Testing with AI Agents and Cloud
The Native AI-Agentic Cloud Platform to Supercharge Quality Engineering. Test Intelligently and Ship Faster.


- TestMu AI (Formerly LambdaTest)
- /
- Learning Hub
- /
- Getting Started With TestCafe: Examples And Best Practices
Getting Started With TestCafe: Examples And Best Practices
This TestCafe tutorial will explore how to set up TestCafe and perform end-to-end automation with TestCafe.
Last Updated on:
OVERVIEW
Software testing is as important as developing the application. Whether it is an application or a web app, every software requires rigorous testing processes after development.
These ensure that the software under test meets the requirements and it's bug-free before deploying to production.
End-to-end testing, on the other hand, ensures that the specific actions a user is supposed to perform in the application are tested and are working accordingly.
Most importantly, if the user's actions can be automated and tested during the development phase, exactly how a real user will perform them, even before the user performs the actions in production?
Then this makes software testing an important stage in the Software Development Life Cycle (SDLC) phases.
Overview
Use TestCafe to run automated, end-to-end web application tests directly in the browser without WebDriver. This Node.js framework is best for JavaScript and TypeScript developers who need fast, zero-configuration local testing, while TestMu AI is best for scaling these tests across cloud-based browsers and devices.
What is TestCafe
- TestCafe: TestCafe is an open-source Node.js framework that runs automated end-to-end web tests directly in the browser without WebDriver or external plugins.
How to Get Started with TestCafe
- Getting started: Developers can get started by installing TestCafe via Node.js, creating a test file in JavaScript or TypeScript, and running tests locally or remotely.
- CI pipelines: Running TestCafe in headless mode allows developers to integrate automated end-to-end tests seamlessly into continuous integration pipelines.
- Live Mode: Using the `--live` console flag automatically reruns TestCafe tests whenever changes are saved in the test code.
Key TestCafe Metrics to Track
- Test Pass/Fail Rate: Tracking pass and fail rates using built-in or custom reporters helps teams measure overall test suite success.
- Execution Time: Monitoring test execution times helps developers identify and optimize slow-running tests to keep the deployment pipeline fast.
- Coverage Metrics: Evaluating coverage metrics allows teams to assess feature and module coverage across their entire automated test suite.
- Performance Metrics: Tracking page load speed, Time to First Byte (TTFB), and DOM Ready Time helps monitor application performance during test runs.
- Defect Metrics: Monitoring defect density, leakage, and rework effort helps teams analyze test quality and improve the overall software development lifecycle.
Advanced Testing and Integrations
- Page Object Model (POM): Structuring tests with the Page Object Model allows developers to create reusable selectors and actions for easier test maintenance.
- Role-Based Testing: Managing user sessions and authentication scenarios with TestCafe roles simplifies testing multi-user workflows and preserves login states across tests.
- API Testing: Using the built-in `t.request()` method allows developers to perform API validations directly alongside their frontend user interface tests.
- Cloud Testing: Integrating TestCafe with cloud services like TestMu AI enables parallel test execution across multiple browsers and devices simultaneously.
In this TestCafe tutorial, we will explore how to automate and test user actions in development. We will also explore how to set up TestCafe and perform end-to-end testing.
What is TestCafe?
TestCafe is an open-source automation testing framework for web applications. It is designed to make end-to-end testing of web applications easier and more efficient.
TestCafe natively supports JavaScript and TypeScript. TypeScript works out of the box with no compiler setup of your own, and CoffeeScript is supported too. Because TestCafe runs on Node.js, a test file is just an ordinary module, so any npm package can be imported straight into it. There are no bindings for Java, Python, C#, or Ruby, which is the single fastest way to rule TestCafe in or out for your team.
What sets TestCafe apart from most of its competitors is not a feature but an architectural decision: it does not drive the browser through WebDriver or the Chrome DevTools Protocol at all. That choice explains nearly everything else about the framework, including its zero-configuration setup, its automatic waiting, and its limitations. The next section covers how it actually works.
How Does TestCafe Work? The Reverse Proxy Architecture
Almost every other browser automation framework talks to the browser from the outside. Selenium sends commands over the WebDriver protocol to a driver binary. Playwright and Puppeteer speak the Chrome DevTools Protocol (CDP) or an equivalent. Both approaches need something browser-specific sitting between your test and the page.
TestCafe does neither. It runs a reverse proxy server on your own machine, positioned between the browser and the site under test. Every request the browser makes goes to the proxy, the proxy fetches the real resource, and then it does two things before handing the response back:
- URL rewriting. The proxy rewrites every URL in the page, in its markup, its stylesheets, and its JavaScript, so that they point back at the proxy rather than at the original host. This is what keeps the browser inside the proxied world instead of navigating away to the real site on the first link click.
- Script injection. While it has the page open, the proxy injects TestCafe's own driver script into it.
The consequence is the whole design. Your test code ends up running inside the page, in the same JavaScript context as the application, driving it from within. The browser is never automated in the conventional sense. As far as it knows, it loaded a normal web page from localhost and that page happens to be clicking its own buttons.
That is why the setup is so short. There is no driver binary to version-match against your browser, no browser extension to install, and no CDP endpoint to expose. Any browser that can load a URL can run TestCafe tests, which is also why remote and mobile devices work by simply opening a link the proxy prints for you.
It also explains the automatic waiting that makes TestCafe tests read so cleanly. A framework driving the browser from outside has to poll and ask whether an element is ready yet. TestCafe's driver is already in the page, watching the DOM directly, so waiting for an element is a local question rather than a round trip. The absence of manual timeouts is not a convenience layer bolted on top; it falls out of where the code runs.
Two details from later in this tutorial make more sense once you know this. The createTestCafe('localhost', 1337, 1338) call takes two port numbers because the proxy needs them, not because the test runner does. And if you watch a test run, the address bar shows a rewritten localhost URL rather than the site's real address, which is the proxy being visible for a moment.
This architecture is a genuine trade-off rather than a free win, and the next sections cover both halves of it.
What is End-to-End Testing?
End-to-end (E2E) testing is a type of software testing that ensures the application behaves as expected from the user's perspective. It involves testing the entire software stack from the front end to the back end, including all the external systems and integrations. E2E testing can help identify issues such as broken links, missing elements, and incorrect functionality.
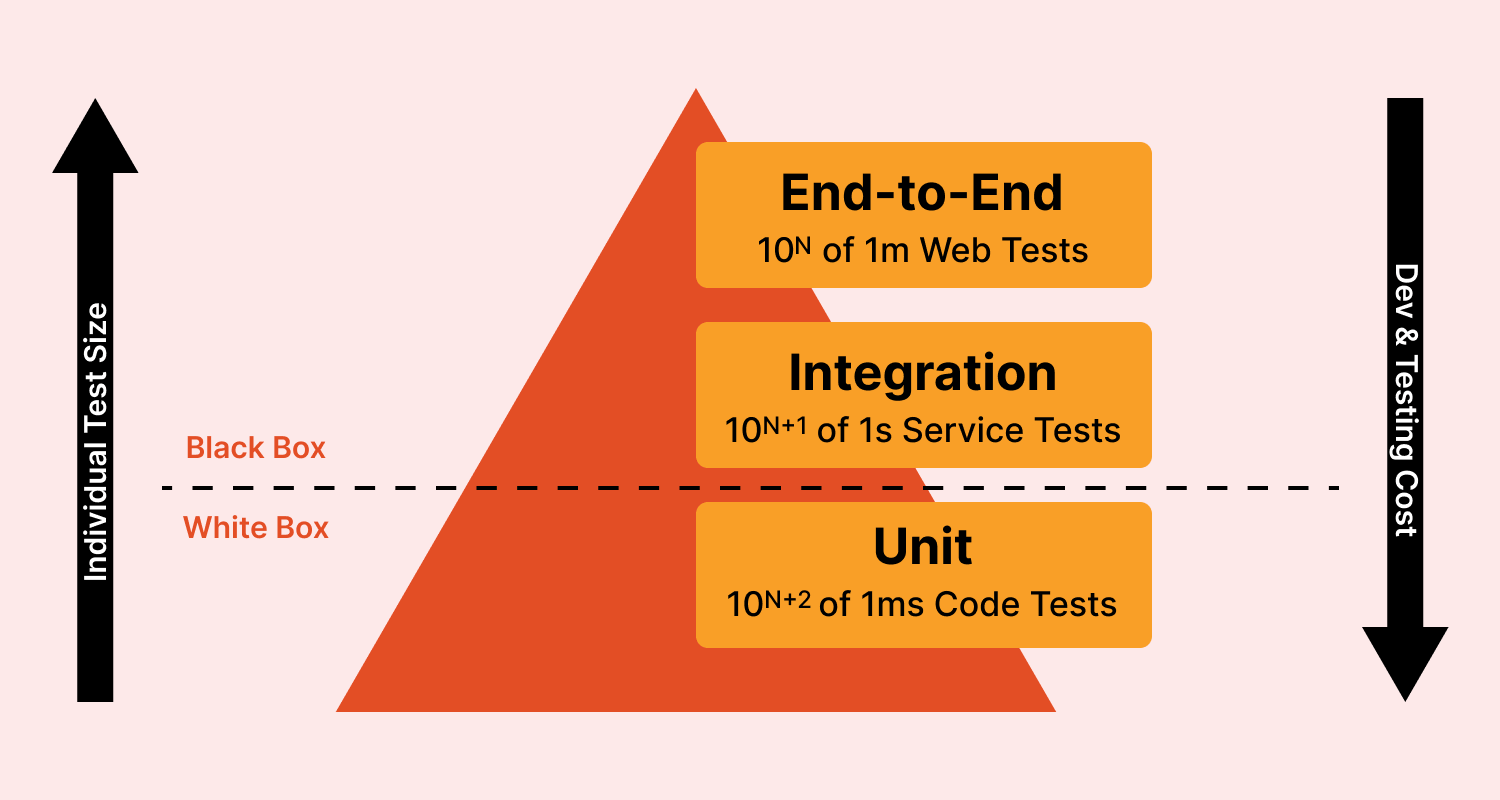
Looking at the Test Pyramid below, end-to-end testing fits into the black box testing pyramid because it assesses the system solely from the user's perspective without knowing what is happening within it.
Run TestCafe Tests on the cloud! Try TestMu AI Now!
Benefits of TestCafe
TestCafe is a powerful and versatile test automation framework that offers a variety of benefits over its competitors.
- Comprehensive Test Automation
- Ease of use
- Cost Effectiveness
- Faster Setup Process
- Chromium
- Chrome
- Safari
- Microsoft Edge
- Mozilla Firefox
- Opera
- Clean and Maintainable Code
- Support for testing on mobile browsers
- Headless Browser Testing
- Reduced Test Flakiness Or Stable Tests
- Continuous Integration
TestCafe provides comprehensive test automation capabilities with support for multiple languages and technologies such as JavaScript, TypeScript, etc.
It provides many features, including test case management, test data management, and test environment setup.
TestCafe is designed to be easy to use, allowing users to create and execute tests quickly. It also provides an intuitive user interface to help users get up and running quickly.
TestCafe is a cost-effective solution for test automation as it is an open-source framework.
TestCafe is known to have the fastest setup process since it doesn't require the use of any Web drivers or other testing software such as Cypress, Nightwatch, etc. It runs on Node.js and uses the browser you already have installed.
Here's a list of supported browsers. TestCafe supports a wide array of modern browsers. The latest versions of the following browsers work without any extra configuration:
With TestCafe, you don't need to insert manual timeouts and use cumbersome boilerplate expressions, which helps you to spend less time tracking issues but instead focusing on the important thing, which is writing the test.
TestCafe supports mobile testing with different mobile browsers. You can easily stimulate your web application with mobile browsers and test out your functionalities and exactly how your mobile phone users will interact with your application.
It also allows you to run headless browser testing, which is essential for automating your testing with test automation tools such as TestMu AI.
Flaky tests are defined as tests that return both passes and failures despite no changes to the code or the test itself. TestCafe has a built-in waiting mechanism that helps eliminate test flakiness.
Continuous integration is the process of automating the integration of code changes from multiple contributors into a single software project. TestCafe can be integrated seamlessly with continuous integration to run continuous end-to-end testing on individual code changes or during code integration.

Limitations of the TestCafe Framework
The benefits above are real, and every one of them is paid for. Most of TestCafe's limitations trace directly back to the proxy architecture, which is why they are worth understanding as a set rather than as a list of unrelated quirks.
- Proxy overhead on every request. Nothing reaches the browser without being fetched, parsed, rewritten, and re-served. On a small page that cost is invisible. On an application pulling hundreds of resources, the rewriting work is real, and it is why TestCafe rarely wins throughput comparisons against CDP-based tools that talk to the browser directly.
- Rewriting can break unusual pages. The proxy has to rewrite JavaScript to keep URLs pointing at itself, which means it has to understand your application's code well enough to modify it safely. Applications doing dynamic URL construction, aggressive service worker caching, or strict Content Security Policy can behave differently under the proxy than in a normal browser. When this bites, it is a hard class of bug to diagnose, because the failure is in the layer you were not thinking about.
- Native browser dialogs are outside the page. A JavaScript alert, confirm, prompt, or beforeunload dialog is browser chrome, not DOM, so a script living inside the page cannot see or click it. TestCafe's answer is t.setNativeDialogHandler(), which registers a handler in advance. The consequence is sharper than it first looks: TestCafe cannot interact with a native dialog until you have initialized a handler, and if a dialog appears before you call it, the test fails with an error rather than simply ignoring it. You have to anticipate every dialog rather than react to one, and anything genuinely outside the page, such as a native file picker or a basic auth prompt, needs a similar workaround rather than an ordinary click.
- Synthetic events, not OS-level input. TestCafe simulates actions by dispatching events in the page rather than by driving the operating system's real mouse and keyboard. For the overwhelming majority of tests this is indistinguishable. For code that inspects low-level event properties, or interactions that depend on true native input, the simulation can diverge from what a real user would produce.
- Multi-window support exists, but only in some places. TestCafe went years without it, introduced it in beta in 2020, and today gives you t.openWindow(), t.closeWindow(), and t.switchToWindow() for pop-ups and OAuth flows. The catch is where it runs: multi-window mode works only in locally installed Chrome, Chromium, Edge 84+, and Firefox. It is not available in cloud browsers, in remote browsers, or during Chromium mobile device emulation. That is worth knowing before you architect around it, because it means any test that opens a second window stays on local machines and cannot move to a cloud grid with the rest of your suite. Playwright, designed around browser contexts from the start, does not have this split.
- A smaller ecosystem. Playwright and Selenium have more plugins, more integrations, and far more Stack Overflow answers about the specific strange thing your app does. That gap is not a technical judgment about TestCafe, but it is a real cost when you are stuck at 6pm.
None of this makes TestCafe a poor choice. It makes it a specific one. If your priority is getting a JavaScript or TypeScript team writing stable cross-browser tests with almost no setup, the trade is a good one. If you need deep browser control, CDP-level network manipulation, or heavy multi-window orchestration, you are fighting the architecture rather than using it, and a CDP-based framework will cost you less.
Advanced TestCafe Features
TestCafe has some advanced features that can help boost how you write end-to-end tests. In this section of this TestCafe tutorial, we will explore some of these advanced features for TestCafe end-to-end testing.
- TestCafe Studio
- TestCafe Plugins
The TestCafe Studio is a cross-platform IDE for end-to-end web testing. It is a lightweight, fast, and reliable desktop application that allows you to record and edit tests interactively. You can use it to create test scripts or codeless tests.
Though it is not free, it can be very useful for codeless automation and QAs who are not software engineers or cannot use the CLI TestCafe to automate end-to-end web testing.
The functionality of TestCafe can be extended with the use of Plugins. You can select from various plugins created to solve specific functionalities in TestCafe or create a custom plugin to fit your specific needs.
You can quickly install a new plugin by following these steps:
Navigate to your project directory and open a terminal.
Run the following command with the plugin name you intend to install. For example,
npm install --save-dev {pluginName}You can select from a list of plugins available for free on the TestCafe website.
// Here's an example
npm install --save-dev testcafe-browser-provider-lambdatest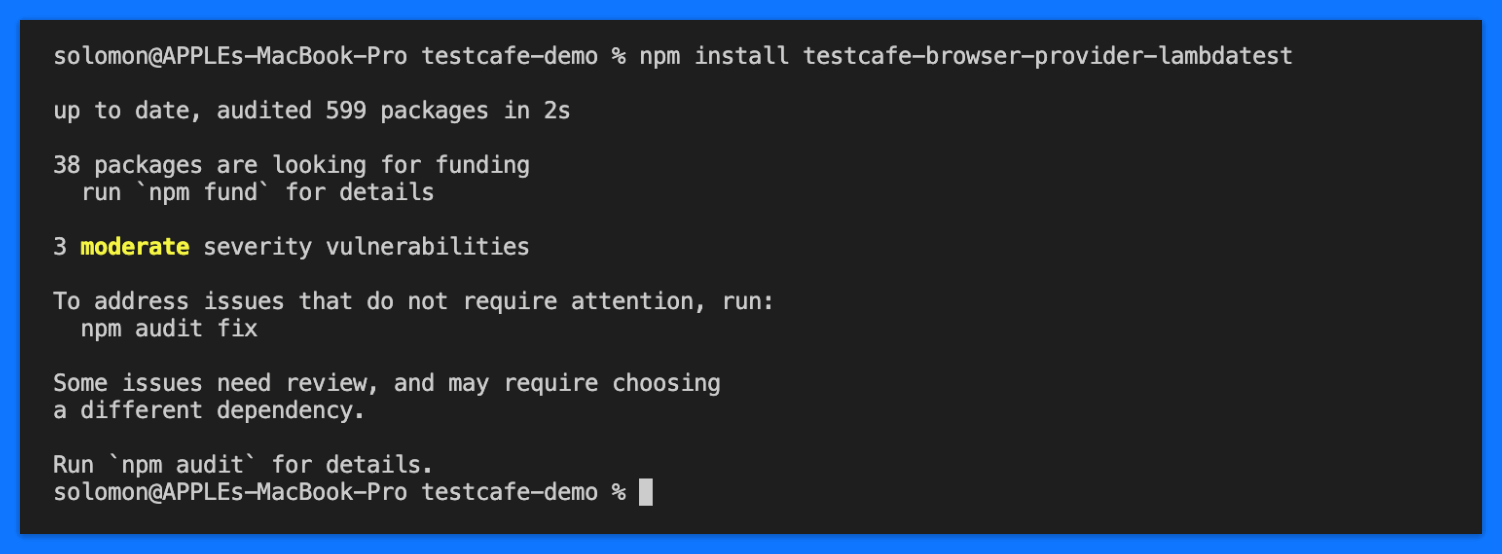
In this TestCafe tutorial, we will show you how to use the TestMu AI TestCafe plugin to automate running your test with TestMu AI Cloud Grid.
TestCafe has several built-in reporters you can use to generate reports for your test cases. However, most times, you need a specific need based on your requirements. You can create a custom reporter that serves your needs in that case.
To generate test reports using one of the built-in TestCafe reporters, follow the steps below:
- First, You can install any custom reporters of your choice by searching for the NPM package, or you can choose any of the built-in reporters listed on the TestCafe website. In this example, we will install the json reporter
- Next, you can use two methods to generate a report for your test suites.
First, Using the command line (CLI) approach, you can specify json as your reporter of choice.
testcafe all ./tests/sample-test.js -r jsonSecondly, you can use the JavaScript approach:
await runner.browsers('all')
.src('./tests/sample-test.js')
.reporter('json')
.run();
await runner.browsers('all')
.src('./tests/sample-test.js')
.reporter('json', 'report.json') // Output will be in JSON
 .run();
The reporter function in this second instance employs json format and designates the JSON file to report to, with the resulting output also being in JSON format.
That's all for creating reporters and specifying the type of reporter to use in your project based on your project requirements. You can create a custom reporter and use it with the runner
Getting Started With TestCafe
As a prerequisite, you should be comfortable building projects with Node.js and using testing libraries for unit and component-level tests.
For the rest of this tutorial we will write end-to-end tests against the authentication flow of a demo eCommerce website, covering both registration and login.
Create the project
Create a folder to hold your project files:
mkdir testcafe-projectOpen it in your editor and initialize a Node.js project, which creates the package.json file:
npm init -y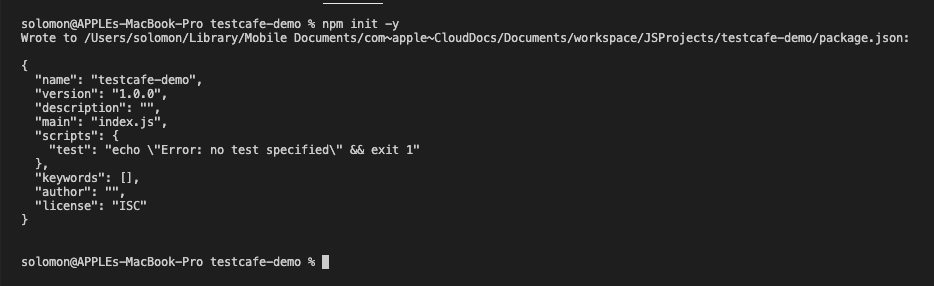
Install TestCafe
TestCafe can be installed globally and reused across every project, or locally within one. We will install it locally on the demo project:
npm install --save-dev testcafe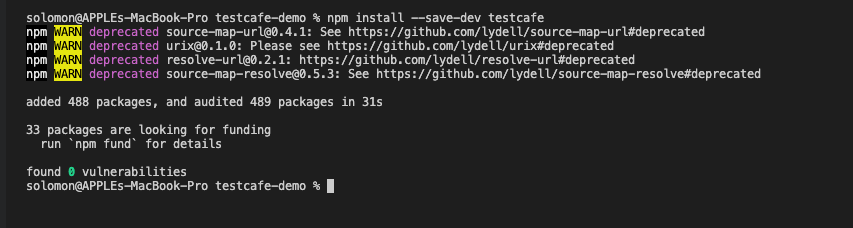
You can learn more about the different ways you can install and configure TestCafe.
Writing TestCafe Tests
In this section of the TestCafe tutorial, we will explore how to write test cases with TestCafe and use different assertions functions to determine the state of our test cases.
Creating a test suite with TestCafe starts by identifying the important actions the user is required to take in your application and creating test cases that cover these specific actions.
In this TestCafe tutorial, we are testing a checkout system to ensure the user can successfully checkout after adding items to their cart.
However, before writing the test, here are some of the concepts you need to understand.
TestCafe Assertions
Assertions are very important as they allow you to compare the actual state of your application to your expectations. Assertions are important and necessary to determine the success state of your test.
The simplest form of assertion begins with the invocation of the expect keyword and piping it with different assertion functions to determine the truth or falsity state of your test.
await t.expect(x).eql(y);Assertions are the backbone of software testing, including unit, integration, and end-to-end testing. Any test without an explicit success condition is inconclusive and is set to automatic failure if any of the following happens:
- TestCafe cannot reach the test page URL.
- TestCafe cannot perform a test action.
- Your website throws a JavaScript error.
Nevertheless, you still need to know if the test actions have had the desired effect. Hence the reason for using Assertions.

TestCafe Selectors
TestCafe Selectors are used to locate targets for test actions and assertions. They are similar to CSS selectors in purpose. It filters the DOM and returns the page elements that match your criteria.
TestCafe includes three ways of using the selectors to target elements viz:
- Keyword-based selectors: This type looks for elements that match the CSS Selector argument.
- Function-based selectors: It filters the DOM with a client-side function.
- Selector-based Selectors: It extends other selectors' queries.
The selector methods narrow down your element selection. Unlike CSS Keyword queries, Selector methods can freely traverse the DOM tree.
Here's an example of using a Selector:
Selector('#big-red-button');With the example above, you have selected any element where the ID is big-red-button
Testing Modern SPA Components (React, Angular, Vue)
The selectors above target the DOM, and on a modern single-page application the DOM is an implementation detail. You wrote a TodoItem component; what reaches the browser is a div with a class like css-1x2y3z4 that a build step generated and will regenerate differently next week. Selecting that class couples your test to output nobody authored and nobody controls.
TestCafe's answer is a set of selector extensions that query the framework's component tree instead of the rendered DOM. Because TestCafe's driver already runs inside the page, it can reach the React, Angular, or Vue internals directly, which is what makes this possible at all.
Install the one matching your framework:
npm install --save-dev testcafe-react-selectors
# or testcafe-angular-selectors
# or testcafe-vue-selectors
Selecting React components
The React extension supports React 16 and later. Import ReactSelector and call waitForReact() before your tests run, so the extension can hook into the component tree once the app has mounted. It waits up to 10 seconds by default, and you can pass your own timeout as waitForReact(5000) if your app takes longer to mount:
import { ReactSelector, waitForReact } from 'testcafe-react-selectors';

fixture`Todo App`
    .page`http://localhost:3000`
    .beforeEach(async () => {
        await waitForReact();
    });

test('Selecting by component name and props', async t => {
    // By component name, not by CSS class
    const list = ReactSelector('TodoList');

    // Narrow by the props you actually passed the component
    const urgentItem = ReactSelector('TodoItem').withProps({ priority: 'high' });

    await t.expect(list.exists).ok();
    await t.click(urgentItem.find('button'));
});
The point is that the test now reads in the vocabulary you built the app in. A refactor that changes class names, restructures wrapper divs, or swaps a styling library leaves it untouched, because none of that changes the fact that a TodoItem with a high priority prop is on the screen.
You can nest component names to express hierarchy, chain down the tree with findReact(), and inspect a component's props and state directly:
// Only TodoItems rendered inside a TodoList
const nested = ReactSelector('TodoList TodoItem');

// Or chain down the component tree explicitly
const chained = ReactSelector('TodoApp').findReact('TodoItem');

// Read the component's actual props and state
test('Assert on component state', async t => {
    const { props, state } = await ReactSelector('TodoItem').getReact();

    await t.expect(props.priority).eql('high');
    await t.expect(state.completed).eql(false);
});
Angular and Vue work the same way through AngularSelector and VueSelector, each with its own wait helper. The concept transfers directly; only the import changes.
When not to use component selectors
There is a real objection worth taking seriously. Component selectors couple your tests to your internal component structure, which is a private implementation detail your users never see. Rename a component during a refactor and the test breaks even though nothing a user could notice has changed. That is the same coupling problem as CSS classes, moved up a layer.
Two practical constraints matter just as much, and the first catches people out. The extension resolves components by their original class names, so a production build that minifies them breaks every component selector you have written. In practice that means these tests run against an unminified or development build rather than the artifact you actually ship, which is a meaningful gap if your bundler behaves differently in production. The second is narrower: the search starts at the root React component, so you cannot anchor a query above it. ReactSelector('body MyComponent') returns null rather than matching.
The pragmatic split most teams land on: use ordinary selectors on stable, user-visible anchors, ideally dedicated test IDs or accessible roles and labels, for tests that describe user behavior. Reach for component selectors when you specifically need to assert on props or state that never surfaces in the DOM, or when the rendered output is genuinely unaddressable. Component selectors are a sharp tool for a narrow problem rather than a replacement for the default.
Running TestCafe Tests
In the section of the TestCafe tutorial, we will explore two ways you can run your test for results. TestCafe allows you to run your test locally during development or automate it using any of the pre-configured plugins or libraries. In this TestCafe tutorial, we will be automating the process using the LamdaTest TestCafe plugin.
How to run TestCafe tests locally?
However, before we automate the process, let's explore how to run our test cases locally during development.
To run your test cases locally, it's as simple as typing in the following commands below in your terminal and specifying the test file you want to execute as shown below:
testcafe chrome getting-started.jsYour result might be similar to the one below:

Alternatively, you can create a configuration file and specify all the options you want your TestCafe to use before running your test. For instance, you can specify the browsers, your test files and folders, and many other settings using the testcafe.createRunner object.
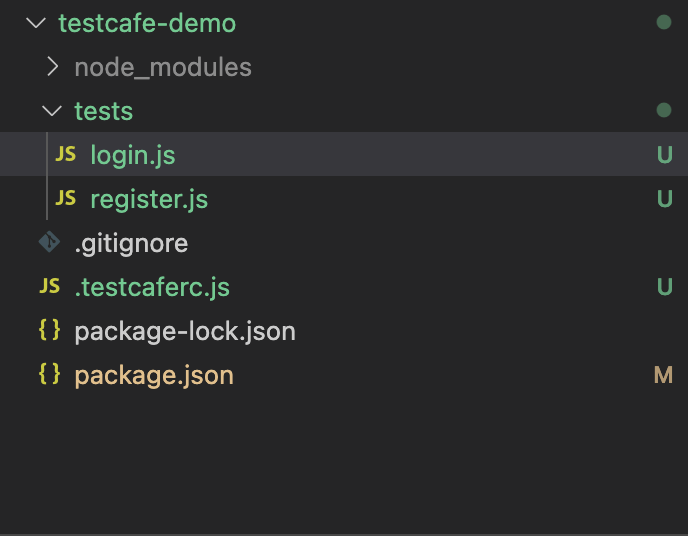
Let's see an example of how to configure our TestCafe using the configuration file. First, create a file called .testcaferc.js in your root folder and add the following codes.
const createTestCafe = require('testcafe');
const testcafe = await createTestCafe('localhost', 1337, 1338);

try {
    const runner = testcafe.createRunner();

    await runner
        .src(["tests/login.js", "tests/register.js"])
        .browsers(["chrome", "safari"])
        .run();
}
finally {
    await testcafe.close();
}
In this code snippet above, you have successfully created a new TestCafe instance to run on localhost port 1337 or 1338.
const testcafe = await createTestCafe('localhost', 1337, 1338);Next, we created the TestCafe runner object and passed on all our specific configurations as shown below:
    const runner = testcafe.createRunner();

const failed = await runner
    .src(["tests/login.js", "tests/register.js"])
    .browsers(["chrome", "safari"])
    .run();
Finally, we closed the TestCafe instance in the finally block as shown below:
finally {
    await testcafe.close();
}
In this TestCafe tutorial, that's all the configuration we need to run our test cases. You can learn more about some of the configuration methods available with TestCafe.
Lastly, add the following code to the scripts section of your package.json file, as shown below.
"scripts": {
    "start": "node index.js"
    "test": "testcafe"
}
Now, to run any test, simply type the following into your terminal:
npm run test
}
That covers running tests locally. Next, we will set up a project from scratch and run it both locally and remotely using the TestMu AI TestCafe plugin, which is what you want if you plan to automate the process through a CI/CD tool.
Testing Registration and Login
In this section of the TestCafe tutorial, we will test the registration process of our eCommerce website. Here's a screenshot of the registration page, and you can start by visiting the website here.
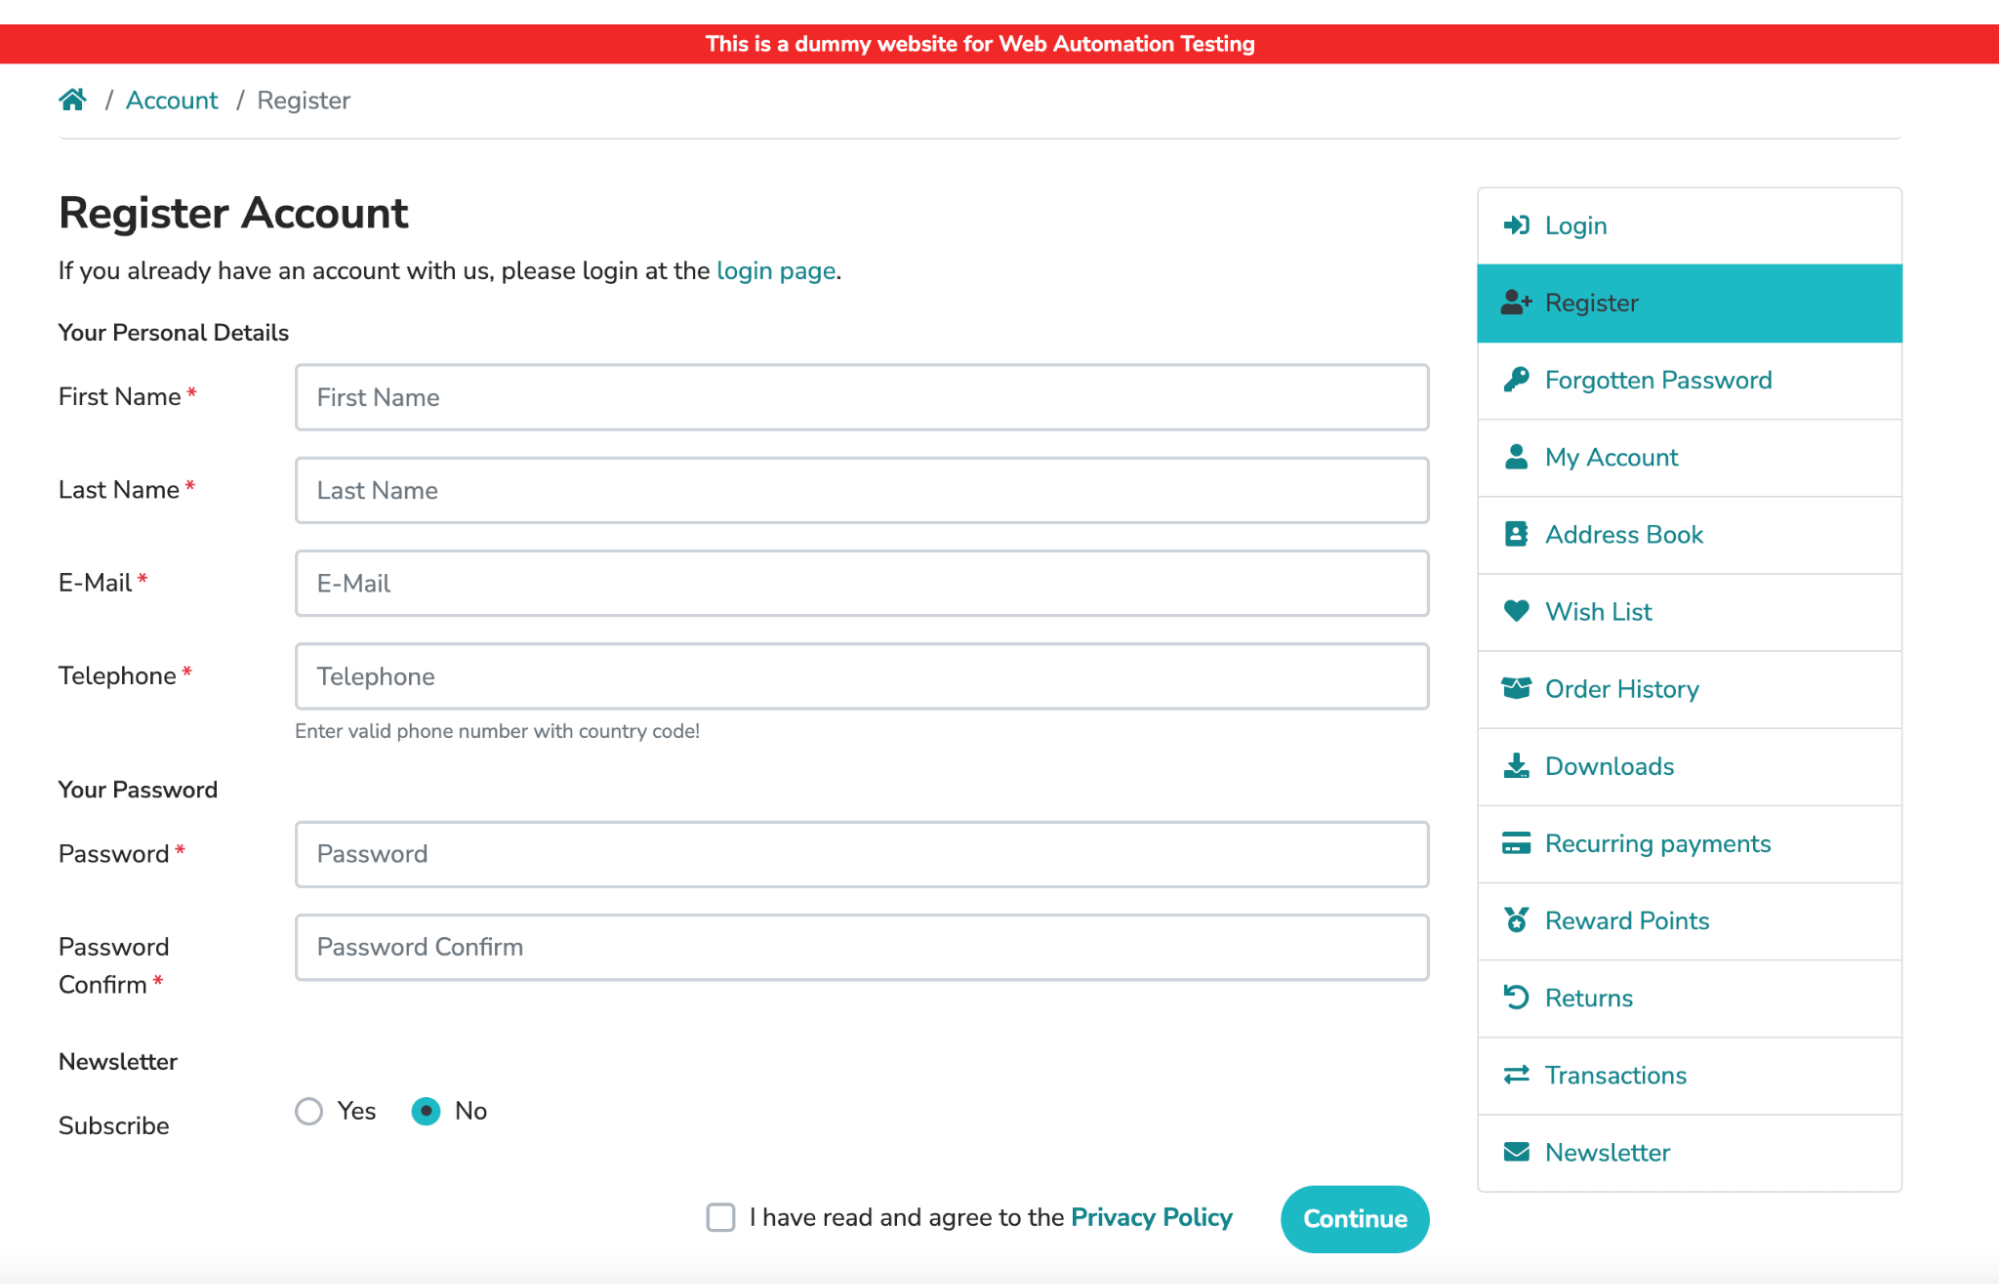
We will use TestCafe to simulate the user's action by automating the process of filling out the form and clicking the Continue button to register the user.
Test Scenario (Chrome Browser)
|
To run the test, follow the steps outlined below.
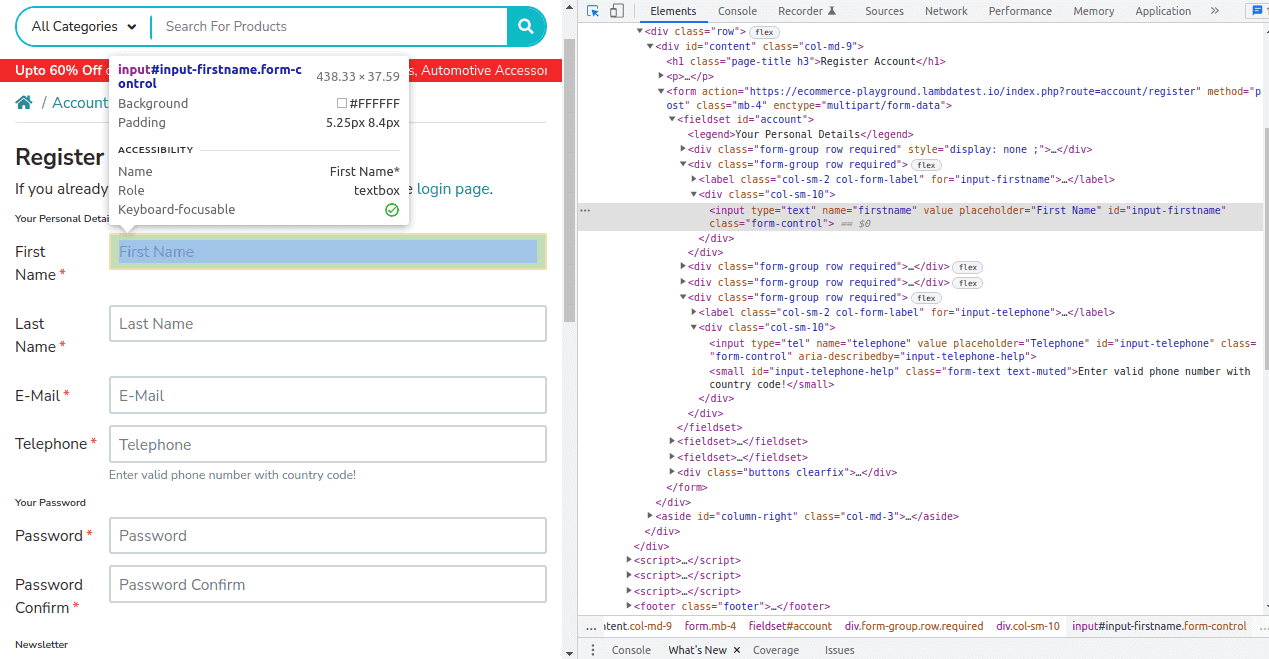
- Create a file inside the tests folder called register.js, as shown in the project structure screenshot above, and paste it into the following code snippet.
const { Selector } = require("testcafe");

fixture`Register Page`
    .page`https://ecommerce-playground.lambdatest.io/index.php?route=account/register`;

test("Register a user", async (t) => {
    await t
        .typeText(Selector("#input-firstname"), "Solomon")
        .typeText(Selector("#input-lastname"), "Eseme")
        .typeText(Selector("#input-email"), "solomon@example.com")
        .typeText(Selector("#input-telephone"), "0712345678")
        .typeText(Selector("#input-password"), "Password123!")
        .typeText(Selector("#input-confirm"), "Password123!")
        .click(Selector("#input-agree"))
        .click(Selector("input.btn-primary"));
});
        .typeText(Selector("#input-firstname"), "Solomon")
        .typeText(Selector("#input-lastname"), "Eseme")
        .typeText(Selector("#input-email"), "solomon@example.com")
        .typeText(Selector("#input-telephone"), "0712345678")
        .typeText(Selector("#input-password"), "Password123!")
        .typeText(Selector("#input-confirm"), "Password123!")
        .click(Selector("#input-agree"))
.click(Selector("input.btn-primary"));testcafe chrome tests/register.js
Now the login flow
Login is the same pattern with fewer moving parts, so it is worth attempting yourself before reading on. Only three things change: the fixture URL points at the login route, there are two inputs instead of six, and there is no checkbox to tick. Finding the locators and running the file work exactly as they just did.
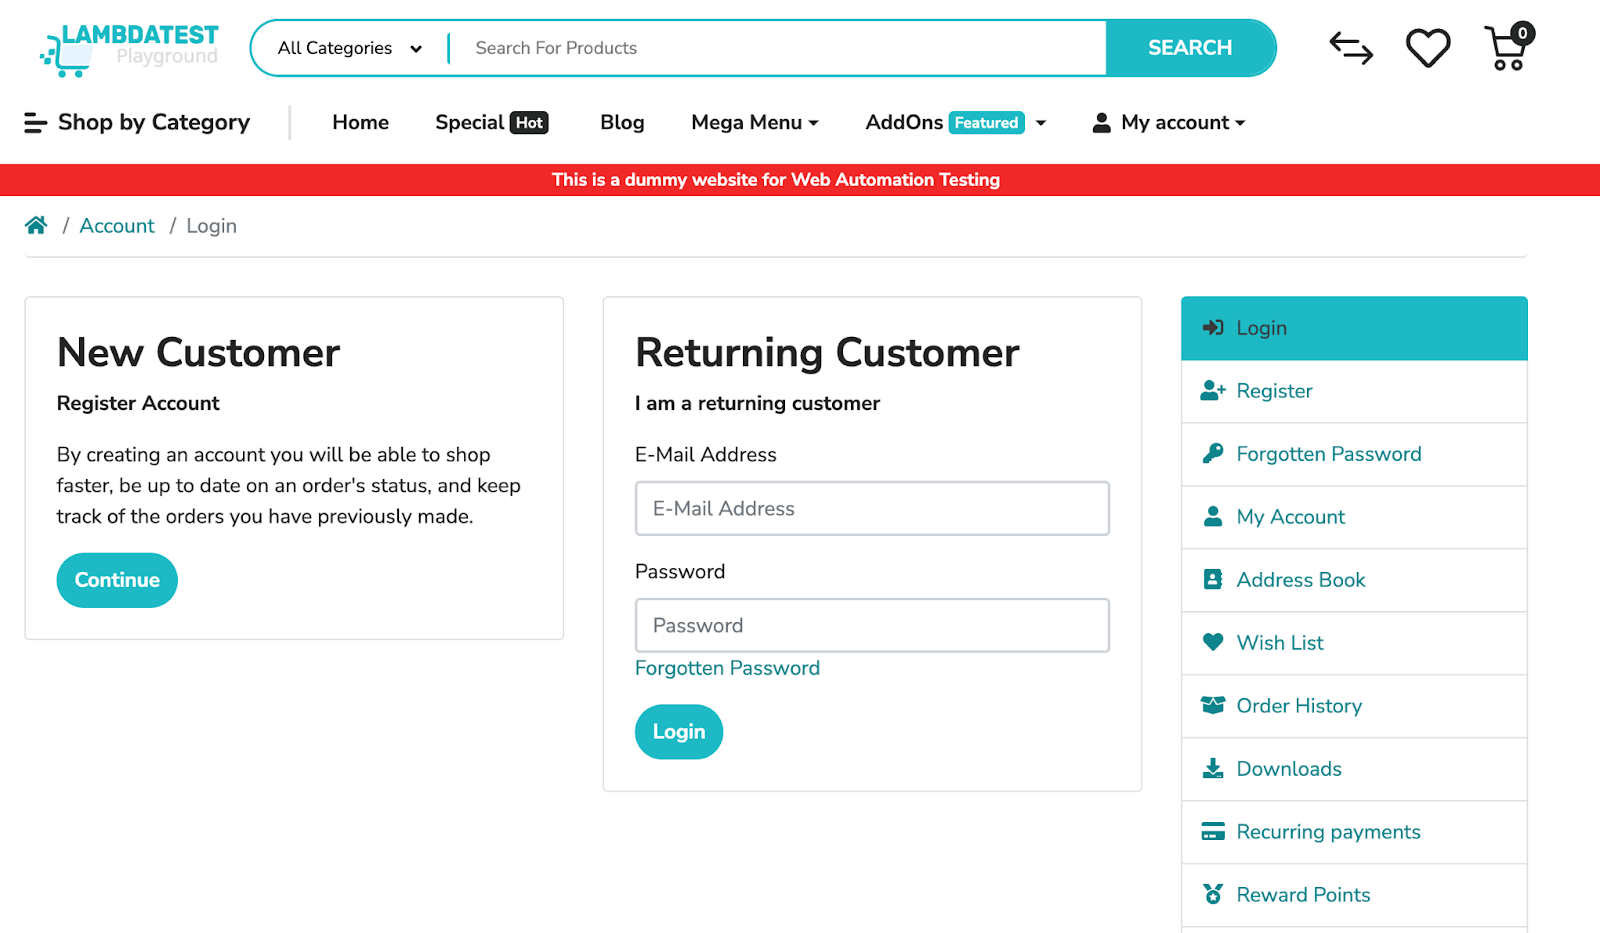
Test Scenario (Chrome Browser)
|
Create tests/login.js alongside your register.js file:
const { Selector } = require("testcafe");

fixture`Login Page`
    .page`https://ecommerce-playground.lambdatest.io/index.php?route=account/login`;

test("Login a user", async (t) => {
    await t
        .typeText(Selector("#input-email"), "solomon@example.com")
        .typeText(Selector("#input-password"), "Password123!")
        .click(Selector("input.btn-primary"));
});
Run it exactly as before, pointing at the new file:
testcafe chrome tests/login.js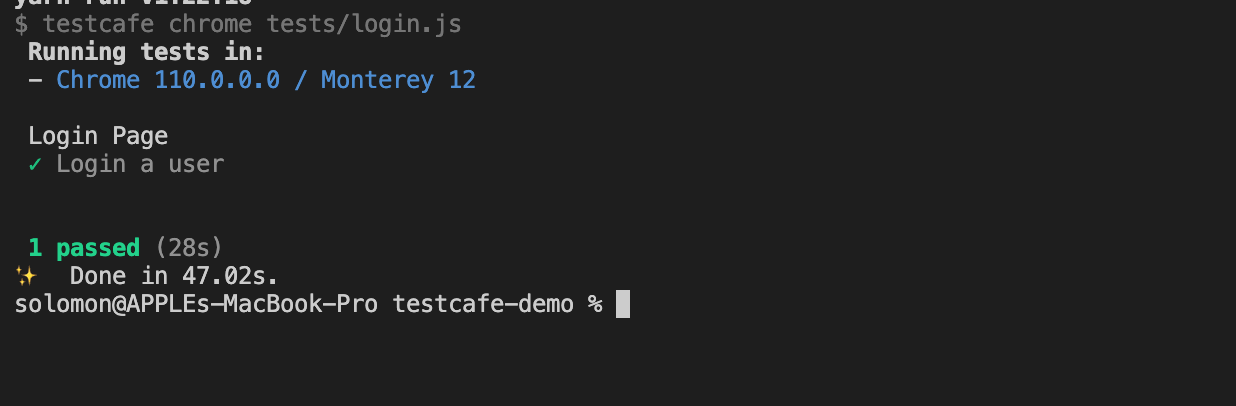
One caveat worth noticing, because it bites people in real suites: these two tests are order-dependent by accident. The login test only passes if that email was registered first, and the registration test only passes on its first run, since the second attempt hits an account that already exists. Real suites fix this by generating a unique email per run or resetting state in a fixture hook. It is the kind of detail a tutorial skips and a CI pipeline finds for you on day two.
Next, we will run these same tests on remote machines using the TestMu AI TestCafe plugin, which is what you want once they live in a CI/CD pipeline.
Running Tests on Remote Machines
In this section of the TestCafe tutorial, we will describe how to integrate TestCafe into the CircleCI build process and run tests in the TestMu AI cloud testing service.
TestMu AI is a digital experience testing cloud that lets developers and testers perform TestCafe testing across 3000+ real browsers and OS combinations. You can also leverage Selenium testing for parallelization and run them over TestMu AI scalable cloud and achieve faster test execution cycles and test coverage.

Subscribe to the TestMu AI YouTube Channel for test automation tutorials around Selenium, Playwright, Appium, and more.
Before we start, you should know about CircleCI and how to create and manage projects with it. If not, create an account with CircleCI and create a new project, as shown below.
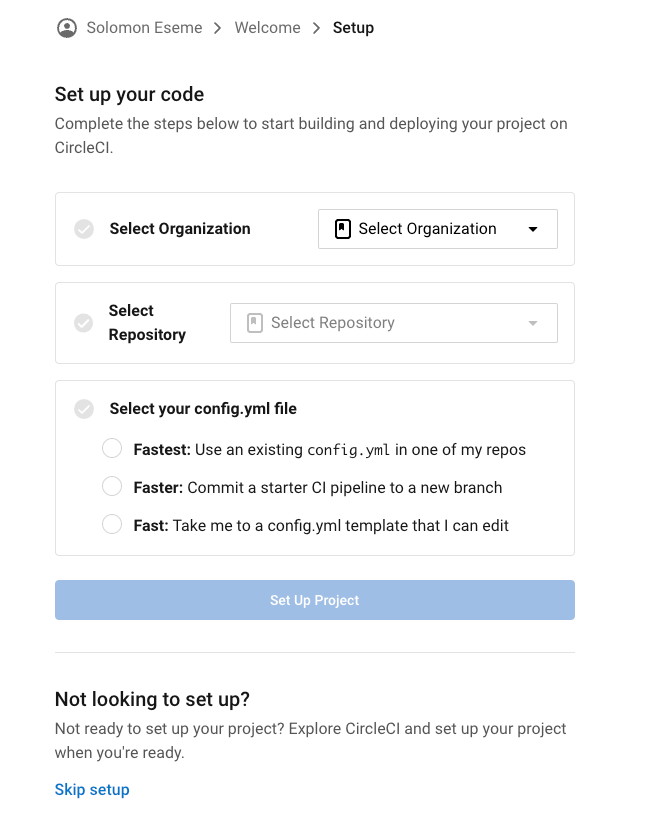
Before here, make sure to create a .circleci/config.yml file inside your project and add the following code snippet.
version: 2.1
orbs:
 node: circleci/node@4.1.0
jobs:
 test:
   executor:
     name: node/default
     tag: lts
   steps:
     - checkout
     - node/install-packages
     - run:
         command: npm run test
     - store_test_results:
         path: /tmp/test-results
workflows:
 e2e-test:
   jobs:
     - test
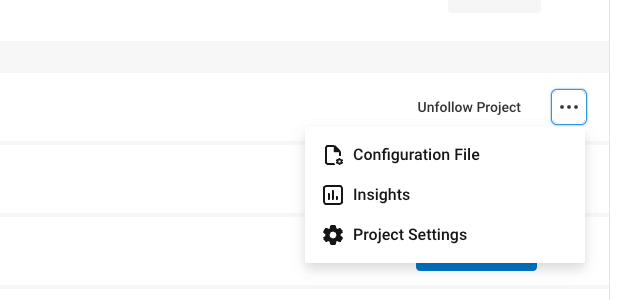
If you already have an account, skip ahead and create a new project. Once the project is set up, click the dropdown icon and select Configuration File to confirm CircleCI has picked up the config above from your main branch:
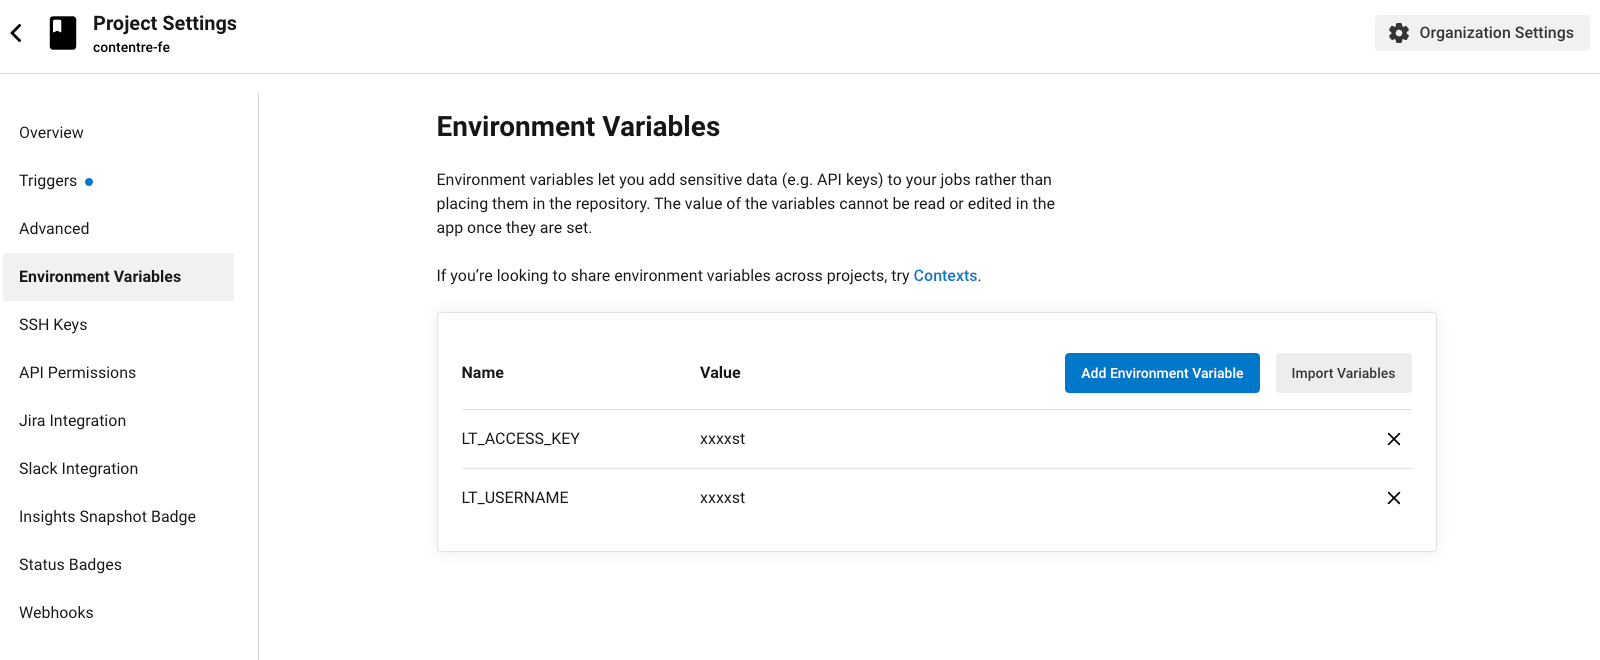
Next, select Project Settings and click on the Environment Variables menu to add your TestMu AI credentials gotten from signing up with TestMu AI.
Next, install the TestMu AI plugin into your project and configure it as follows.
npm install --save-dev testcafe-browser-provider-lambdatest testcafe-reporter-xunitFinally, to make sure that CircleCI picked up your testing command, let the following be added to your package.json file as shown below:
{
  "scripts": {
    "test": "testcafe "lambdatest:Chrome@110.0:Windows 11" tests/**/* -r xunit:/tmp/test-results/res.xml"
  },
  "devDependencies": {
    "testcafe": "*",
    "testcafe-reporter-xunit": "*",
    "testcafe-browser-provider-lambdatest": "*"
  }
}
First, we have the test command set to use TestMu AI TestCafe plugin, and secondly, we installed all the required development dependencies for TestMu AI TestCafe plugin.
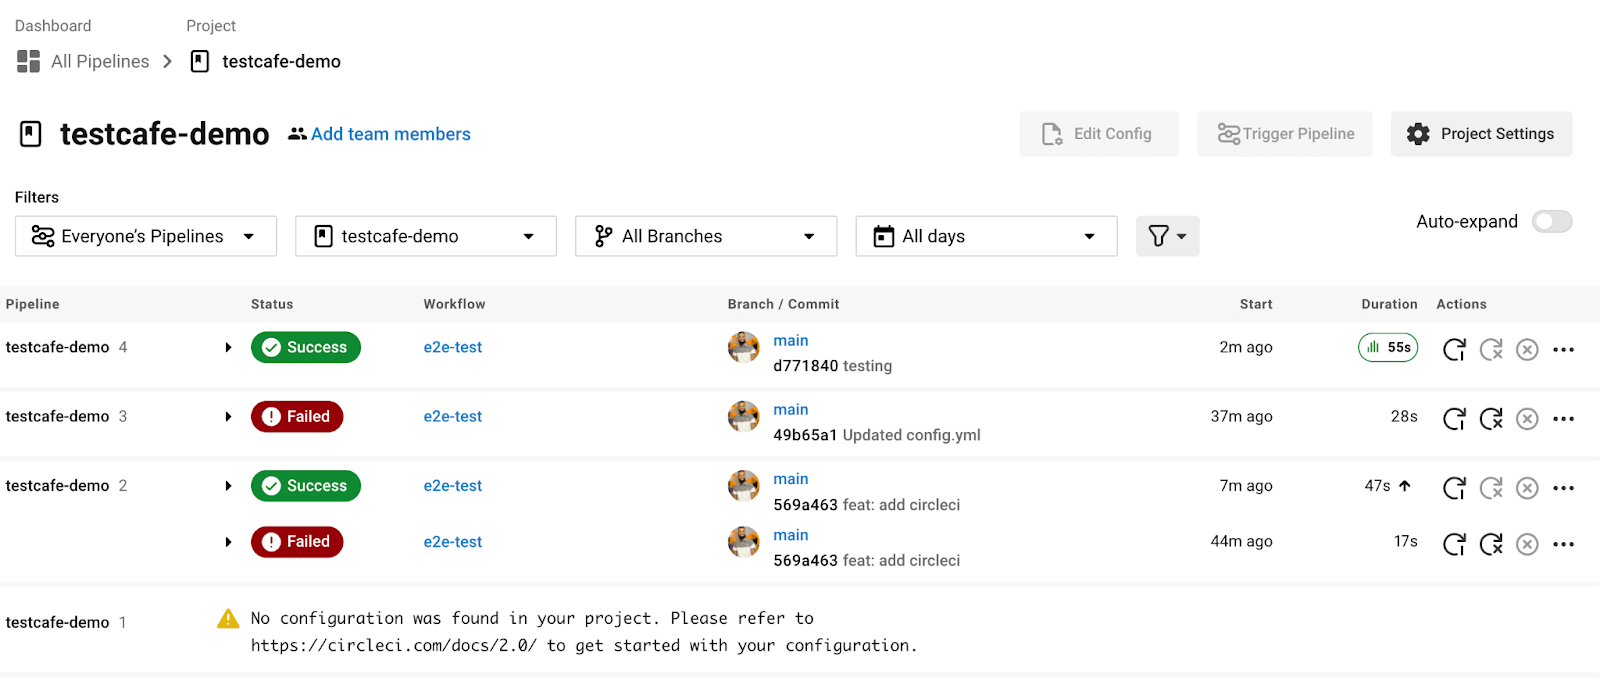
If everything is done correctly, when you make changes to your codebase and push the changes to your GitHub, CircleCI will pick it up from there and run your test automatically for you. You can also add triggers in the CircleCI dashboards and view the result of the test as shown below:
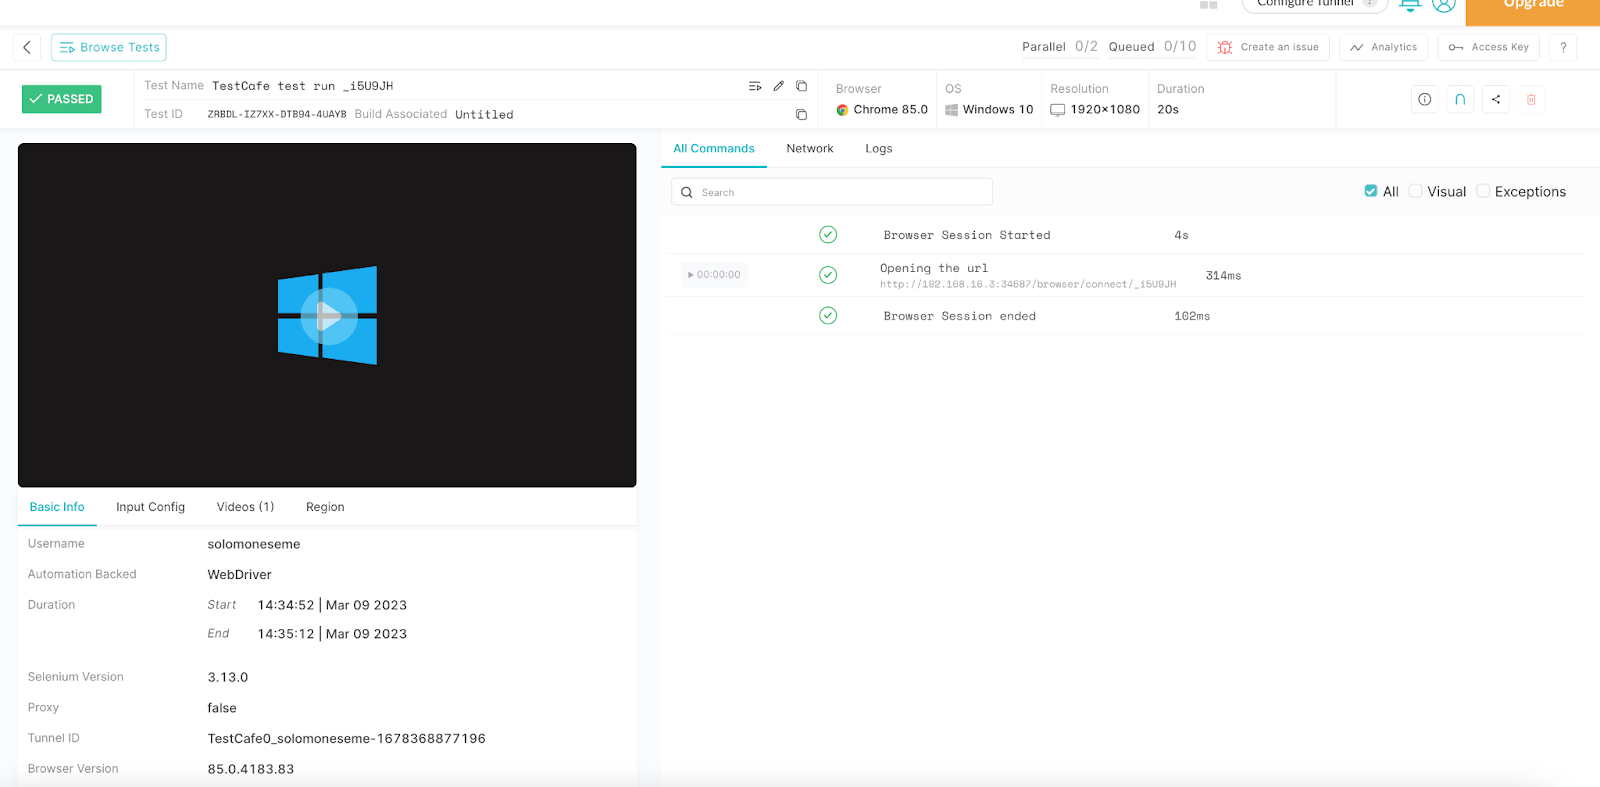
Also, in our TestMu AI Dashboard, you can preview the test and inspect if it's passing or not. If it fails, you can also inspect where the error comes from. Below is a screenshot of our TestMu AI Dashboard for this test.
In this section of the TestCafe tutorial, we explore how to run TestCafe test cases locally and how to automate the process using TestMu AI and CircleCI.
If you are a developer or a tester, the Selenium JavaScript 101 certification offered by TestMu AI is designed to recognize the proficiency of developers and testers in utilizing JavaScript for developing automated browser tests.

Summary
Software testing is as important as developing the application. Whether it is an application or a web app, every software requires rigorous testing processes after development. Therefore, in this TestCafe tutorial, we explored end-to-end testing using TestCafe – one of the most popular end-to-end testing tools.
We learned how to automate your testing with the TestMu AI TestCafe plugin and CircleCI while testing the authentication process of our website.
Author

Solomon Eseme
Blogs: 4


Solomon Eseme is a Software Engineer with over 5 years of experience in backend development. He is the Founder and CTO of Mastering Backend, a platform dedicated to helping backend engineers enhance their skills. Solomon has contributed to impactful projects, including those that helped secure $20M in funding. He is passionate about building scalable, secure systems and promoting clean code principles. With over 11,000 followers on LinkedIn, Solomon’s network includes QA engineers, software testers, developers, DevOps professionals, tech enthusiasts, AI innovators, and tech leaders. He is also skilled in AWS, GraphQL, and blockchain technologies.
On This Page
- What is TestCafe?
- How Does TestCafe Work? The Reverse Proxy Architecture
- What is End-to-End Testing?
- Benefits of TestCafe
- Limitations of the TestCafe Framework
- Advanced TestCafe Features
- Getting Started With TestCafe
- Writing TestCafe Tests
- Testing Modern SPA Components (React, Angular, Vue)
- Running TestCafe Tests
- Testing Registration and Login
- Running Tests on Remote Machines
Frequently asked questions
Did you find this page helpful?
More Related Learning Hubs
TestMu AI forEnterprise
Get access to solutions built on Enterprise
grade security, privacy, & compliance
- Advanced access controls
- Advanced data retention rules
- Advanced Local Testing
- Premium Support options
- Early access to beta features
- Private Slack Channel
- Unlimited Manual Accessibility DevTools Tests