
Automate Android and iOS App Tests in the Cloud
Run Your Appium, Espresso, XCUITest, and Maestro Suites as They Are, in Parallel on 50,000+ Real Devices.

Espresso Android Testing Tutorial: Write and Run UI Tests
Learn Espresso Android testing: set up Espresso 3.7.0, write Kotlin and Java UI tests, fix flaky waits with Idling Resources, and run tests on real devices.
Last Updated on:
"Use Espresso to write concise, beautiful, and reliable Android UI tests." That is the first line of Google's own Espresso documentation, and it is a fair summary of why I like this framework.
With Espresso Android testing, you write a few short lines that tap, type, and check what is on the screen, and Espresso takes care of the waiting that usually makes mobile UI tests flaky. You do not need a separate server or driver to start, because Espresso runs right next to your app on the device.
Android makes these checks more important than on most platforms, because your users are spread across many OS versions. StatCounter's worldwide Android version share for September 2026 shows Android 16 on 37.6% of devices, Android 15 on 15.9%, and Android 14 on 12.07%, so a test that passes on one emulator image only tells you about part of your audience.
I'll walk you through Espresso the way I would explain it to a new teammate: what it is, how it works, how to write your first test, and how to run Espresso tests on real Android devices with TestMu AI.
Key Takeaways
- Espresso Android testing is automated UI testing with Google's Espresso framework, where each test finds a view, performs an action such as a tap or typing, and checks the result in Kotlin or Java.
- Espresso waits for your app to be idle before every step, so tests rarely need sleep calls, and idling resources extend that waiting to background work such as network calls.
- Every Espresso test is built from three API pieces: ViewMatchers to find a view, ViewActions to act on it, and ViewAssertions to check it.
- To write your first test you need espresso-core (3.7.0 is the current stable release), the AndroidJUnitRunner, and device animations turned off.
- Espresso only tests Android apps from inside the app, so Appium is the better fit when one test suite has to cover both Android and iOS.
- TestMu AI runs Espresso suites on real Android devices from a single API call, and you can run the same suite on several devices at the same time.
What Is Espresso Android Testing?
Espresso Android testing is automated UI testing for Android apps with Espresso, an open-source framework from Google that ships as part of the AndroidX Test library. An Espresso test opens a screen of your app on a device or emulator, finds views such as buttons and text fields, acts on them, and asserts what the screen shows next.
Google built Espresso for developers who already know the app's code. The Espresso overview says its full power is unlocked by people who are familiar with the codebase under test, which is why your tests can use the same view IDs and resources as the app and usually live in the same project.
You will often hear Espresso called a grey-box framework. Your tests can reach the app's IDs and state like a developer would, while still clicking and typing through the screen the way a real user does.
Why Is Espresso Android Testing Important?
On an active Android project, a new build shows up after almost every commit. Checking each one by hand is slow, and it is the kind of work that gets skipped when a release is close. These are the situations where I reach for Espresso:
- Every build needs a quick check of the screens people use most, such as sign-in, search, and checkout.
- Slow back-end calls should not decide whether your UI tests pass, so the tests need to wait for the app instead of guessing a delay.
- New Android versions change permissions and system behavior, so Android app testing has to cover more than one OS version.
- An Android emulator online is great for day-to-day checks, and real devices catch the hardware and manufacturer differences before your users do.
Espresso handles all of these with tests that are short to write and stable enough to run on every build.
Key Features of the Espresso Framework
- Automatic synchronization - The Espresso overview explains that before each action Espresso waits until the main thread has no pending messages, no AsyncTask is running, and every idling resource you registered is idle. For background work Espresso cannot see, you register an idling resource, which is the cleanest way to stop a flaky test caused by timing.
- Intent stubbing - Espresso-intents checks the intents your app sends to other apps and can return a fake result, so a test does not depend on the phone app or camera app behaving the same way every time. Android's Espresso-intents guide describes it as Mockito for Android intents.
- Small, readable API - Most tests only need onView() to find something, perform() to act on it, and check() to confirm the result.
- WebView support - The Espresso-web module tests pages that load inside your app, such as sign-in screens and help pages (see this guide to WebView testing).
- No server in the middle - Espresso runs alongside your app instead of sending commands through a server the way Selenium RemoteWebDriver does, so you see results as soon as a test finishes.
- Kotlin and Java - You write tests in the same languages as your Android code and run them from Android Studio or from Gradle.
If you keep one habit from this tutorial, I would make it this one: every time you feel the urge to add Thread.sleep() to a failing test, stop and add an idling resource instead.
How to Run Your First Android Espresso Test
To run your first Android Espresso test, you need your app APK, your Espresso test APK, and a device. An emulator or a phone plugged into your laptop is fine while you write tests, but before a release I want to see them pass on the phones people actually carry (see emulator vs simulator vs real device testing).
A real device cloud saves you from buying and maintaining those phones yourself. With TestMu AI's App Automation, you upload your app and your Espresso test APK and run them on real Android devices from a cloud of 50,000+ real devices.
Prerequisites
- An Android project with Espresso set up. The section on creating Espresso UI tests below shows the Gradle lines, and Android's Espresso setup guide has the full details.
- Your app built as an .apk file, and your Espresso tests built as a separate test .apk file.
- A TestMu AI account, with the username and access key shown on your dashboard.
Upload Your Application
Send your app's .apk file to the upload API, using your username and access key for authentication. Keep the app ID from the response, because you will need it to start the build.
curl -u "YOUR_USERNAME:YOUR_ACCESS_KEY" \
  --location --request POST 'https://manual-api.lambdatest.com/app/uploadFramework' \
  --form 'appFile=@"/path/to/app-debug.apk"' \
  --form 'type="espresso-android"'
Uploading Test Suite
Next, upload the test .apk the same way. The response gives you a test suite ID.
curl -u "YOUR_USERNAME:YOUR_ACCESS_KEY" \
  --location --request POST 'https://manual-api.lambdatest.com/app/uploadFramework' \
  --form 'appFile=@"/path/to/app-debug-androidTest.apk"' \
  --form 'type="espresso-android"'
Executing the Test
Now start the build with both IDs and the device you want. Devices are written as the model name, a hyphen, and the Android version, such as Galaxy S21 5G-12.
curl -u "YOUR_USERNAME:YOUR_ACCESS_KEY" \
  --location --request POST 'https://mobile-api.lambdatest.com/framework/v1/espresso/build' \
  --header 'Content-Type: application/json' \
  --data-raw '{
    "app": "APP_ID",
    "testSuite": "TEST_SUITE_ID",
    "device": ["Galaxy S21 5G-12"],
    "queueTimeout": 10800,
    "IdleTimeout": 150,
    "deviceLog": true,
    "network": false,
    "build": "my-first-espresso-build"
  }'
View Test Execution
Open the build in the TestMu AI Automation dashboard to see which test cases passed or failed, along with their logs. The Espresso testing guide in the TestMu AI docs lists every option you can pass to a build, such as a geolocation.
If your Android delivery already runs through a mobile CI service, you can trigger the same TestMu AI build straight from your pipeline by running Espresso tests in Bitrise, so every commit fans out to the device cloud without leaving your existing workflow.
Running Tests in Parallel
To run the same suite on several phones at once, list more than one device in the device array. To decide which phones belong in that list, build an Android device matrix from your own user analytics.
curl -u "YOUR_USERNAME:YOUR_ACCESS_KEY" \
  --location --request POST 'https://mobile-api.lambdatest.com/framework/v1/espresso/build' \
  --header 'Content-Type: application/json' \
  --data-raw '{
    "app": "APP_ID",
    "testSuite": "TEST_SUITE_ID",
    "device": ["Galaxy S21 5G-12", "Pixel 9-16", "Galaxy S25-15"],
    "queueTimeout": 10800,
    "IdleTimeout": 150,
    "deviceLog": true,
    "build": "my-first-espresso-build"
  }'
Once your suites outgrow a single device, you can run Espresso jobs in parallel on HyperExecute, which splits your tests into shards across devices, either automatically or by class and package.
Why TestMu AI for Espresso Testing?
- Your Espresso tests run on real phones from the Real Device Cloud, which has 50,000+ real devices, so you test on the hardware your users own.
- Parallel testing runs one suite on many devices at the same time, instead of one after another.
- HyperExecute, the test orchestration engine, splits large suites into shards and retries flaky failures for up to 70% faster runs.
- Geolocation testing lets you check location-based features as if the phone were in another country.
- You can capture device logs, network logs, and video for each session, so a failure comes with the evidence you need to fix it.
- Builds trigger from 120+ CI/CD and DevOps tools, so Espresso runs can become a normal step in your pipeline.

Note: Run your Espresso suite on real Android devices with TestMu AI and see every test result in one dashboard. Start testing for free.
How Does the Espresso Testing Framework Work?
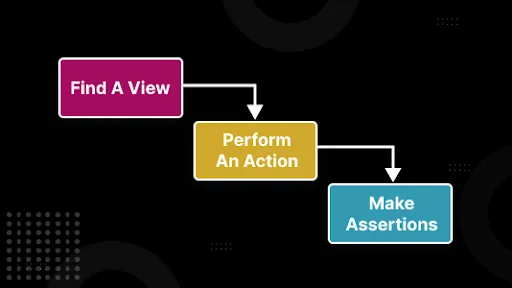
Before you automate anything, think about what a person does on the screen. They look for something, they tap it or type into it, and then they look at what changed. Espresso follows the same pattern for every step of a test:
- Find a view in the screen's view hierarchy, for example the button with the ID login_button.
- Do something with that view, such as clicking it or typing text into it.
- Check the result, and note that you do not always need an action first, because you can find a view and assert on it straight away.
If you come from Selenium, one thing may surprise you: Espresso has no getView() or getCurrentActivity(). Android's Espresso basics guide explains that holding on to views and activities and using them off the UI thread is a major source of flaky tests, so Espresso does not give you those handles.
When you need something custom, you write your own ViewAction or ViewAssertion, and Espresso still runs it safely on the UI thread.
Components of Espresso's API
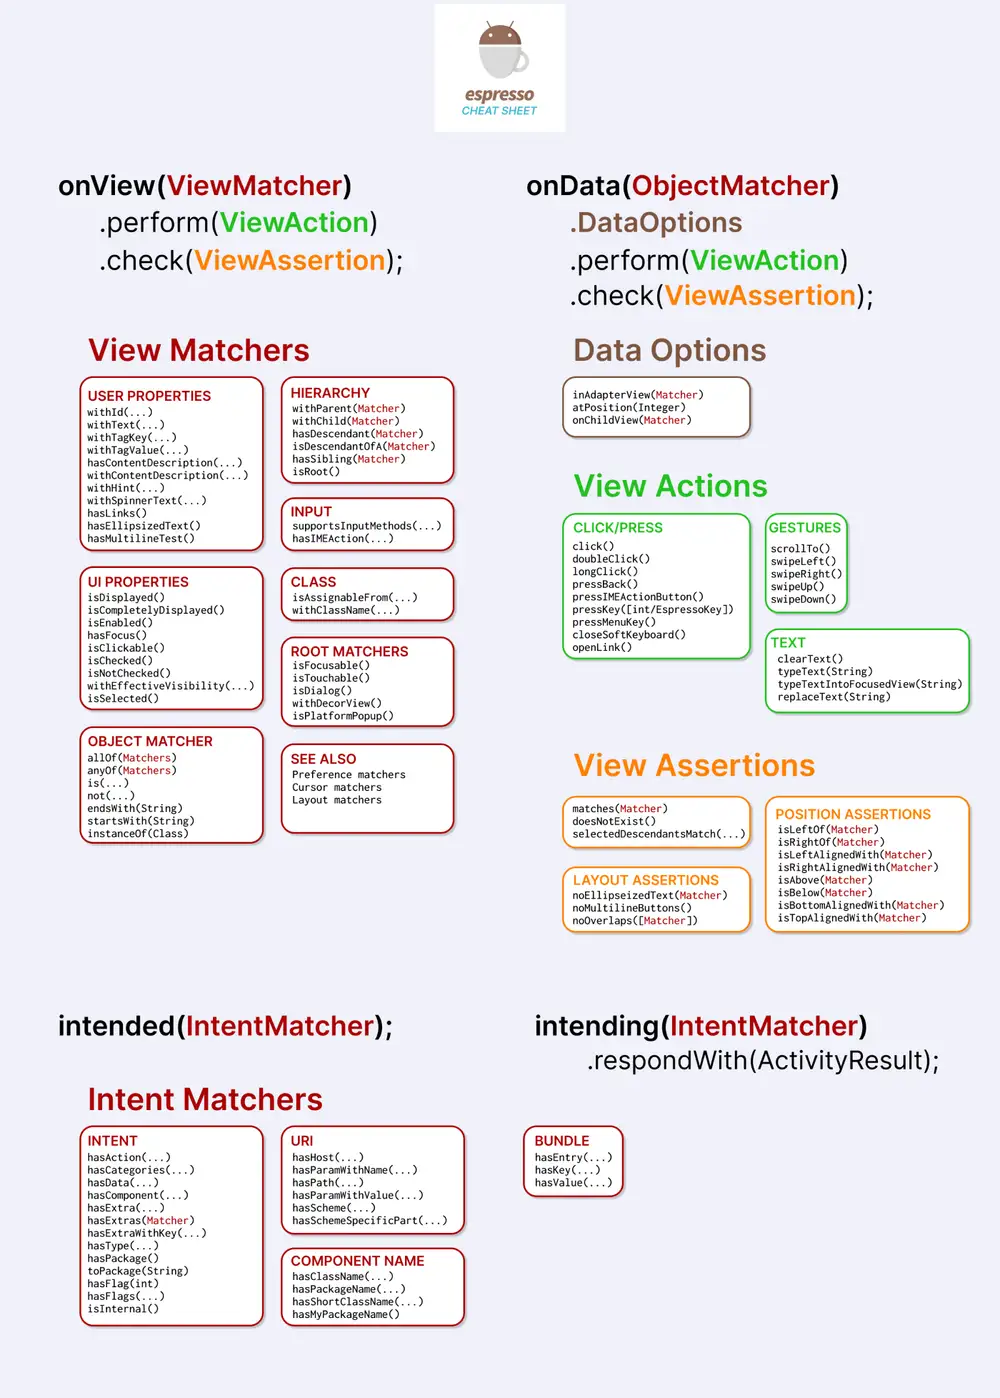
Espresso's API is small, and that is a big part of why it is easy to pick up. Almost every test chains the same pieces together, and Android's Espresso basics guide groups them into the Espresso entry point, ViewMatchers, ViewActions, and ViewAssertions, each with its own job:
- Espresso - The entry point where every interaction starts, through onView() or onData(), plus actions that are not tied to one view, such as pressBack().
- ViewMatchers - These find a view on the current screen. You pass one or more of them to onView(), for example withId(), withText(), or isDisplayed().
- ViewActions - These act on the view you found. You pass them to perform(), for example click(), typeText(), scrollTo(), or closeSoftKeyboard().
- ViewAssertions - These check the view's state. You pass them to check(), and most of the time you will use matches(), or doesNotExist() when something should be gone.
Use onView() for views that are always part of the layout. For lists built with AdapterView, such as ListView, GridView, and Spinner, use onData(), because only some rows exist on screen at a time and onData() brings the row you want into view before acting on it.
How to Create Espresso UI Tests for Android?
To create an Espresso UI test for Android, add the Espresso libraries to your app module, point Gradle at the AndroidJUnitRunner, turn off device animations, and then write a test class in the androidTest folder. You only do the setup once per project, so it is worth getting right.
- Add Espresso and the AndroidX Test libraries under androidTestImplementation. The AndroidX Test release notes list Espresso 3.7.0, runner and rules 1.7.0, and ext.junit 1.3.0 as the stable versions released on July 30, 2025.
- In defaultConfig, set testInstrumentationRunner to androidx.test.runner.AndroidJUnitRunner so Gradle knows how to run the tests.
- On your test device, open Developer options and turn off Window animation scale, Transition animation scale, and Animator duration scale, which the Espresso setup guide recommends to avoid flaky results.
// app/build.gradle.kts
android {
    defaultConfig {
        testInstrumentationRunner = "androidx.test.runner.AndroidJUnitRunner"
    }
}

dependencies {
    androidTestImplementation("androidx.test.espresso:espresso-core:3.7.0")
    androidTestImplementation("androidx.test:runner:1.7.0")
    androidTestImplementation("androidx.test:rules:1.7.0")
    androidTestImplementation("androidx.test.ext:junit:1.3.0")
}
For the test itself, I like to start with a login screen, because almost every other flow in an app depends on it. Put the class in app/src/androidTest and swap the view IDs for the ones in your own layout.
Java
import static androidx.test.espresso.Espresso.onView;
import static androidx.test.espresso.action.ViewActions.click;
import static androidx.test.espresso.action.ViewActions.closeSoftKeyboard;
import static androidx.test.espresso.action.ViewActions.typeText;
import static androidx.test.espresso.assertion.ViewAssertions.matches;
import static androidx.test.espresso.matcher.ViewMatchers.isDisplayed;
import static androidx.test.espresso.matcher.ViewMatchers.withId;
import static androidx.test.espresso.matcher.ViewMatchers.withText;

import androidx.test.ext.junit.rules.ActivityScenarioRule;
import androidx.test.ext.junit.runners.AndroidJUnit4;
import androidx.test.filters.LargeTest;
import org.junit.Rule;
import org.junit.Test;
import org.junit.runner.RunWith;

@RunWith(AndroidJUnit4.class)
@LargeTest
public class LoginTest {

    @Rule
    public ActivityScenarioRule<LoginActivity> activityRule =
            new ActivityScenarioRule<>(LoginActivity.class);

    @Test
    public void validLogin_showsWelcomeMessage() {
        onView(withId(R.id.username)).perform(typeText("demo_user"), closeSoftKeyboard());
        onView(withId(R.id.password)).perform(typeText("secret123"), closeSoftKeyboard());
        onView(withId(R.id.login_button)).perform(click());

        onView(withId(R.id.welcome_text))
                .check(matches(isDisplayed()))
                .check(matches(withText("Welcome, demo_user")));
    }
}
Kotlin
import androidx.test.espresso.Espresso.onView
import androidx.test.espresso.action.ViewActions.click
import androidx.test.espresso.action.ViewActions.closeSoftKeyboard
import androidx.test.espresso.action.ViewActions.typeText
import androidx.test.espresso.assertion.ViewAssertions.matches
import androidx.test.espresso.matcher.ViewMatchers.isDisplayed
import androidx.test.espresso.matcher.ViewMatchers.withId
import androidx.test.espresso.matcher.ViewMatchers.withText
import androidx.test.ext.junit.rules.ActivityScenarioRule
import androidx.test.ext.junit.runners.AndroidJUnit4
import androidx.test.filters.LargeTest
import org.junit.Rule
import org.junit.Test
import org.junit.runner.RunWith

@RunWith(AndroidJUnit4::class)
@LargeTest
class LoginTest {

    @get:Rule
    val activityRule = ActivityScenarioRule(LoginActivity::class.java)

    @Test
    fun validLogin_showsWelcomeMessage() {
        onView(withId(R.id.username)).perform(typeText("demo_user"), closeSoftKeyboard())
        onView(withId(R.id.password)).perform(typeText("secret123"), closeSoftKeyboard())
        onView(withId(R.id.login_button)).perform(click())

        onView(withId(R.id.welcome_text))
            .check(matches(isDisplayed()))
            .check(matches(withText("Welcome, demo_user")))
    }
}
Both versions do the same thing: ActivityScenarioRule opens LoginActivity before the test and closes it afterwards. The test finds the username and password fields by their IDs, types into them, and closes the keyboard so it does not cover the Log in button. It then taps Log in and checks that the welcome message is on screen with the right text.
Run it from Android Studio, or from the terminal with ./gradlew connectedAndroidTest while a device or emulator is connected. I name tests after the result I expect, like validLogin_showsWelcomeMessage, because a name like testLogin3 tells you nothing when a build goes red and you need to know which behavior broke.
Espresso Android Cheat Sheet
Once you have written a few tests, you will mostly be looking up which matcher, action, or assertion to use. Keep this Espresso cheat sheet open while you work. It groups the common view matchers, view actions, view assertions, data options, and intent matchers on one page.
Limitations of the Espresso Framework
I like Espresso a lot, but it is not the right tool for every job. Its limits come from the same design that makes it fast: it runs inside one Android app, from that app's own codebase, so anything outside that app is out of reach. Keep these limits in mind before you commit to it:
- It only tests Android apps, so for iOS automation testing you need XCUITest or a cross-platform tool such as Appium.
- It works inside one app at a time, so it cannot tap system dialogs, notifications, or other apps. For those steps, Google's other framework, UI Automator, is the usual choice.
- Tests are written in Kotlin or Java only, so teams that write tests in Python or JavaScript need a different framework.
- You need access to the app's source code, because tests are compiled against the app's resource IDs into a test APK.
- It checks what users see and do, and it does not measure performance, battery use, or back-end correctness.
Espresso vs Appium: Which One Should You Choose?
Both Espresso and Appium wait for your app's UI before acting, but they are built for different jobs. Appium is usually picked for end-to-end testing across mobile platforms, while Espresso is built for UI testing of Android apps from the inside. The Appium Espresso driver README puts it simply: UiAutomator2 is a black-box testing framework, and Espresso is grey-box.
| Espresso | Appium |
| Tests the UI of Android apps. | Tests native, hybrid, and mobile web apps on Android and iOS. |
| Runs inside your app's process on the device. | Runs a server that sends commands to a driver on the device. |
| Setup is a few Gradle lines in your Android project. | Setup needs the Appium server and a driver for each platform. |
| Supports Kotlin and Java. | Supports Java, Python, JavaScript, C#, Ruby, and more. |
| Best when the app's developers own the tests and run them on every commit. | Best when one suite must cover Android and iOS, or testers work without the app's source code. |
My rule of thumb: if only Android matters and the people who build the app will also own the tests, start with Espresso. If you ship on both Android and iOS, start with the Appium tutorial instead.

Final Words
If you are new to Espresso Android testing, my advice is to keep the first step small: add espresso-core 3.7.0 to one app module and adapt the login test above to your own main screen. Once it passes on your emulator, upload both APKs to TestMu AI and run the same test on the Android versions your users actually have.
When the basics feel comfortable, the free Android Espresso Testing 101 Certification lets you validate your Espresso skills with a credential you can share with hiring teams.
Author

Sai Krishna
Blogs: 23

Sai Krishna is Director of Engineering at TestMu AI, where he leads agentic AI for quality engineering, building AI agents that autonomously drive mobile and conversational test automation. His current focus is Agent Testing and Model Context Protocol (MCP) support for mobile. He is a core contributor and member of the Appium open-source project and the creator of AppiumTestDistribution and appium-device-farm. With over 14 years of experience including more than 9 years at Thoughtworks as a Principal Consultant, he holds a BSc in Electronics and speaks regularly at TestMu and Appium Conf on Appium, mobile automation, and agentic AI in testing.
Reviewer

Siddhant Sinha
Reviewer
Siddhant Sinha is a Lead Member of Technical Staff at TestMu AI architecting Kane CLI, the command-line tool for browser automation from the terminal, where natural-language flows run in a real Chrome browser and return pass or fail with shareable proof. He has spent over three years at TestMu AI building scalable platforms that run tests at scale on real Android and iOS devices. His expertise covers platform architecture, large-scale distributed systems, and CLI design, shaped by earlier cloud-native engineering at Semut.io, including building Elasticsearch as a service.
Espresso Testing FAQs
Did you find this page helpful?
More Related Learning Hubs







TestMu AI forEnterprise
Get access to solutions built on Enterprise
grade security, privacy, & compliance
- Advanced access controls
- Advanced data retention rules
- Advanced Local Testing
- Premium Support options
- Early access to beta features
- Private Slack Channel
- Unlimited Manual Accessibility DevTools Tests