

Power Your Software Testing with AI Agents and Cloud
The Native AI-Agentic Cloud Platform to Supercharge Quality Engineering. Test Intelligently and Ship Faster.


- TestMu AI (Formerly LambdaTest)
- /
- Blog
- /
- How To Run Your Appium Cucumber Tests On Cloud
How To Run Your Appium Cucumber Tests On Cloud
This Appium Cucumber tutorial will guide you to install Appium and Cucumber to carry out the mobile application testing process on a cloud testing platform
Last Updated on:
This Appium Cucumber tutorial runs plain-English Gherkin scenarios against real Android and iOS devices.
Cucumber reads .feature files written in Gherkin and maps every Given, When, and Then step to a Java step definition, and that step definition calls Appium to drive the app under test.
This guide covers what Appium is, what BDD is, what Gherkin is, what Cucumber is, why teams test on cloud testing platforms, how to configure an Appium Cucumber project, and how to run that test on the cloud.
Key Takeaways
- Appium is an open-source mobile automation testing tool for native, hybrid, and mobile-web applications on Android and iOS, and Appium tests can be written in Java, Python, JavaScript, or C#.
- Behavior Driven Development (BDD) defines how an application should behave from the end user's perspective and helps bridge the gap between technical and non-technical team members.
- Cucumber is an open-source BDD testing framework that reads Gherkin scenarios from plain-language feature files and uses step definitions to map each business-readable step to automation code.
- Gherkin scenarios use the keywords Feature, Scenario, Given, When, Then, And, and But, where Given sets the context, When interacts with the system, and Then checks the outcome.
- An Appium Cucumber project in Java needs a JDK, JUnit, IntelliJ IDEA, a Maven project, and Appium installed through npm or Appium Desktop, with Cucumber, Gherkin, Appium, and Extent Reports dependencies in pom.xml.
- Running Appium Cucumber tests on a cloud testing platform of real devices increases test coverage, accelerates test execution, and gives access to the latest Android and iOS devices.
What is Appium?
Appium is an open-source mobile application automation testing tool for testing native applications, mobile-web applications, and hybrid applications on Android or iOS platforms. It is one of the most used and widely adopted test automation frameworks for mobile application testing
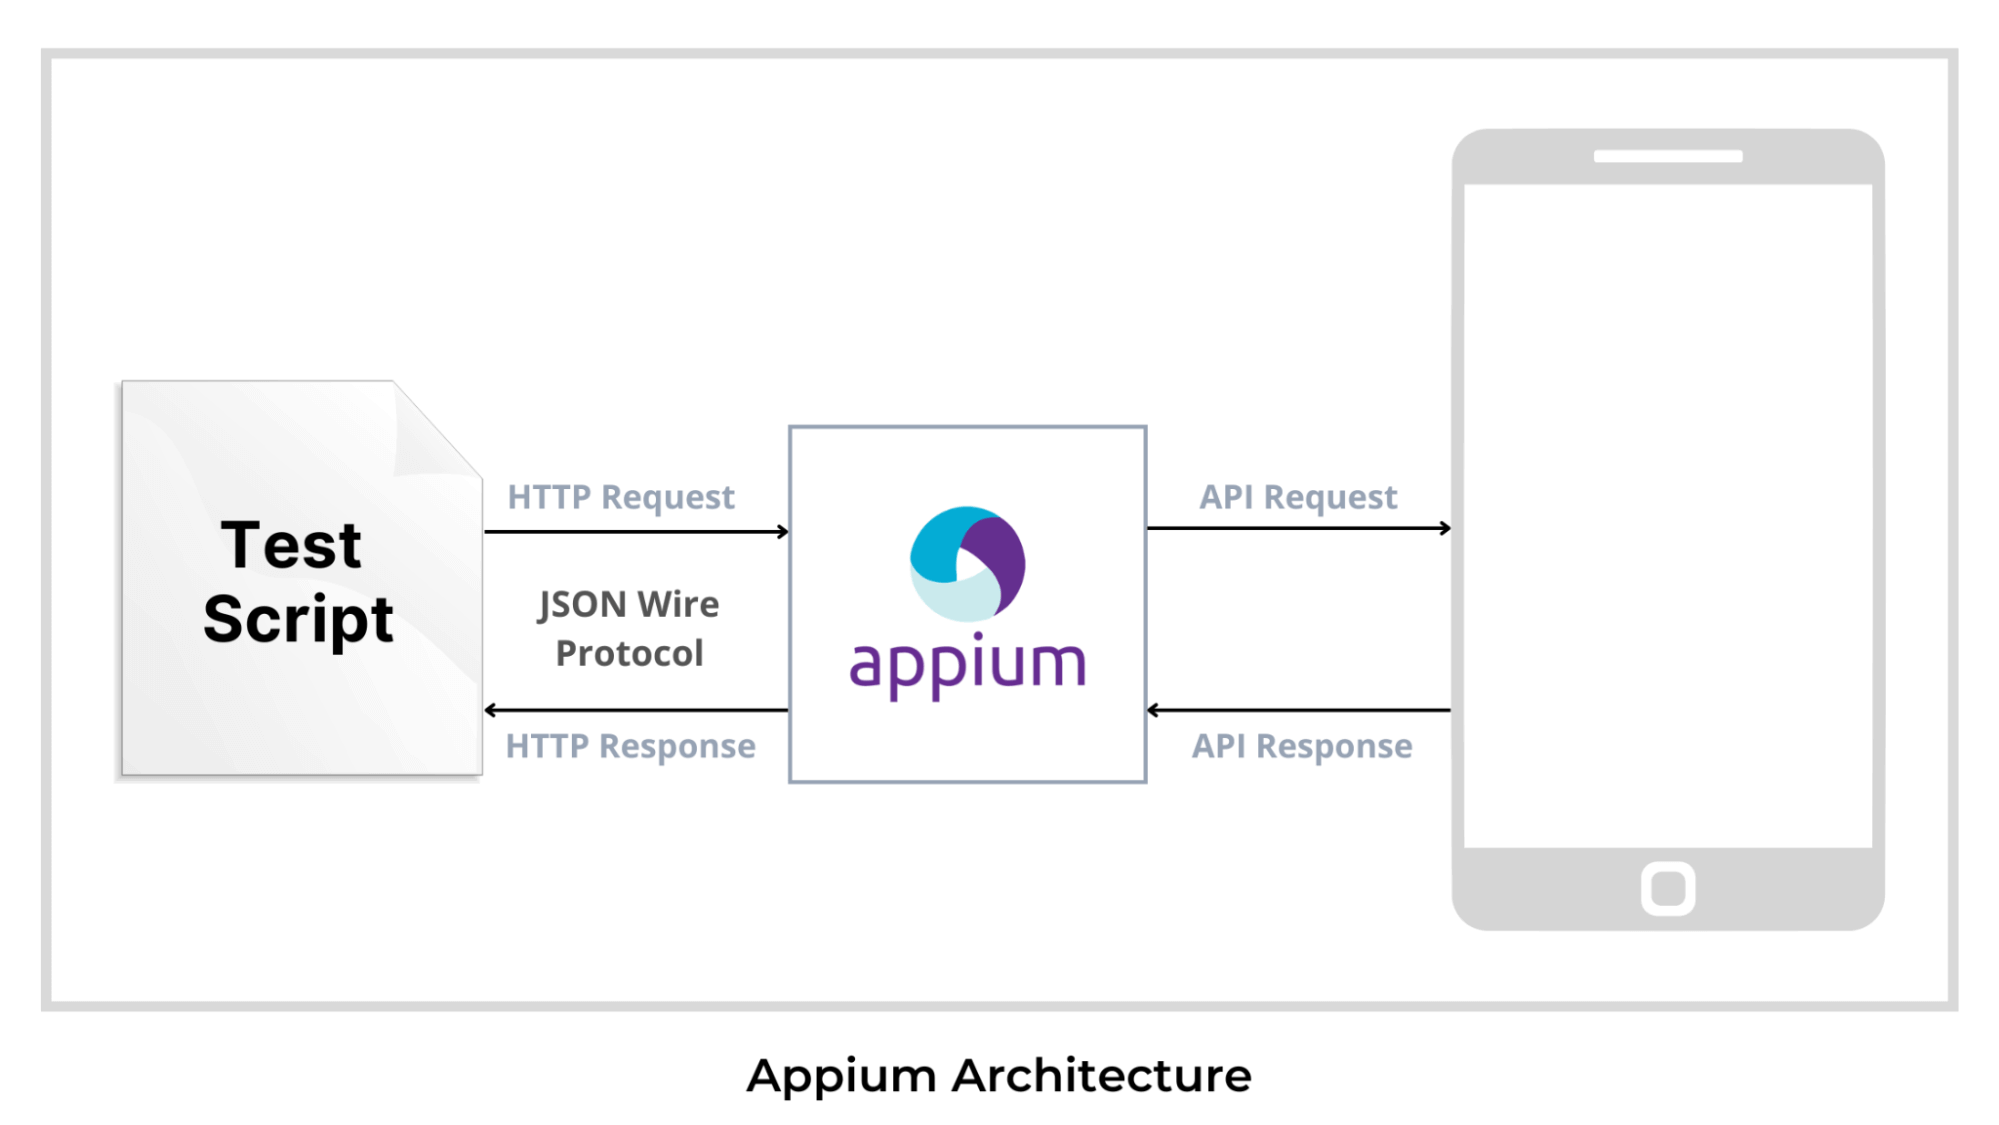
Following is the Appium architecture diagram that will help you understand the Appium framework.
Advantages of using Appium:
- Appium is an open-source tool that supports both Android and iOS.
- Appium tests can be written in multiple programming languages like Java, Python, JavaScript, C#, etc.
With Appium 3 now officially released, the migration from Appium 2 focuses on improved driver management, enhanced plugin compatibility, and a more streamlined architecture for consistent mobile automation across platforms.
For the convenience of testing our application, we will use the Behaviour Driven Development (BDD) framework. So we are using Cucumber as it uses the BDD framework. The main advantage of using the BDD framework is that it helps to bridge the gap between the technical and the non-technical team. The tests are easy to understand as they are written in plain English language syntax called Gherkin.
So now let us understand what is BDD, Gherkin, and Cucumber.
Key Takeaway: Appium automates native, hybrid, and mobile-web applications on both Android and iOS, and Appium tests can be written in Java, Python, JavaScript, or C#.

What is BDD?
Behavior Driven Development (BDD) is a software development process that helps to create simple scenarios to define how an application should behave from the end user’s perspective.
Key Takeaway: Behavior Driven Development describes application behavior from the end user's point of view, which lets technical and non-technical team members agree on a scenario before any code is written.
What is Gherkin?
Gherkin syntax used to write tests in Cucumber helps us document examples of the behavior our stakeholders want. To write test scenarios using Gherkin, we must deeply understand the keywords used in the Gherkin language and write our test scenario using these keywords.
Some Keywords used in Gherkin language:
- Feature: Describes a software feature.
- Scenario: Defines how a system should behave under certain circumstances.
- Given: Sets the context where the scenario happens.
- When: This is used to interact with the system.
- Then: Used to check the outcome of the interaction.
- And, But: Used to add more steps to the scenario’s Given, When, or Then section.
Key Takeaway: Gherkin uses the keywords Feature, Scenario, Given, When, Then, And, and But, where Given sets the context, When performs the interaction, and Then checks the outcome.
What is Cucumber?
Cucumber is a testing framework that uses the Behavior Driven Development (BDD) methodology and is designed to help build bridges between the technical and non-technical members of a software team.
Advantages of using Cucumber:
- It is an open-source tool and is maintainable and scalable.
- It uses the Gherkin syntax, which is simple and easy to use.
- It is helpful for business stakeholders who can’t easily read code.
Key Takeaway: Cucumber reads Gherkin feature files and maps each business-readable step to a step definition in code, which keeps the test specification readable for stakeholders who do not read Java.
How does the Cucumber work?
The Cucumber reads your specifications from plain-language text files called features. It then checks for the scenarios to test and runs them against your system. It then executes each scenario as a list of steps. The feature file must follow a basic syntax rule known as Gherkin. Cucumber associates the feature file with step definitions, which maps the business-readable language of each step into code.
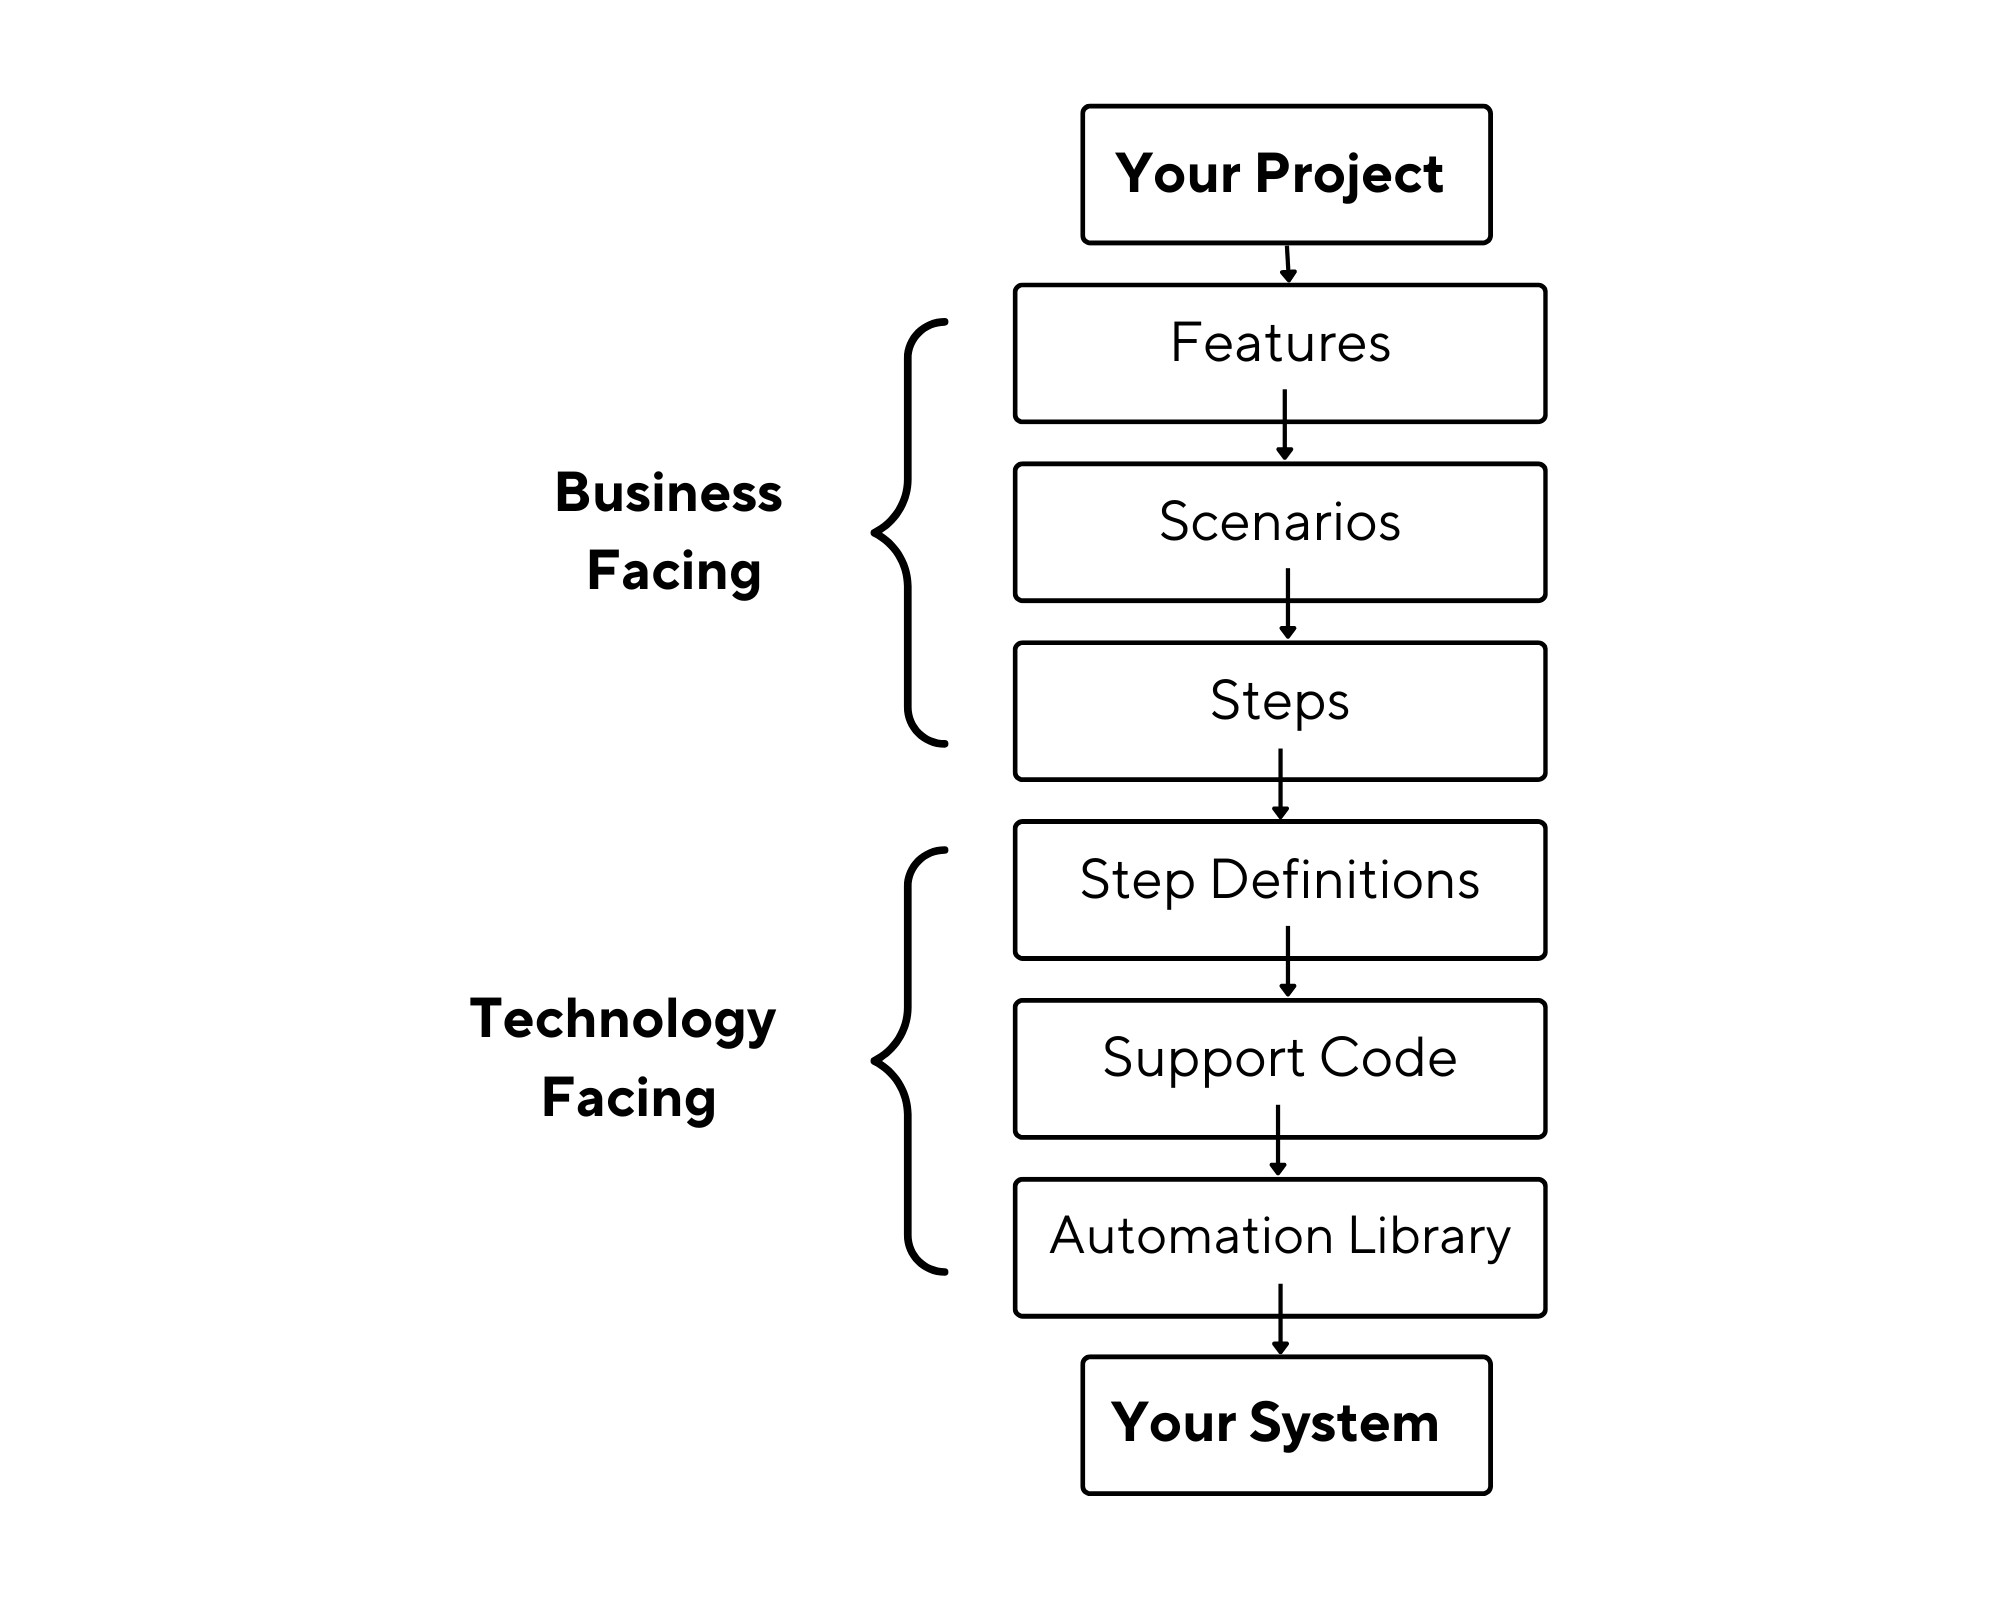
Code of a sample Feature file used in Cucumber:
@homePage
Feature: Verify General Store page Scenarios

  @verifyUserAbleToRedirectToShoppingPage @regression
  Scenario Outline: Verify user is able to redirect to the shopping page
    Given User is on General Store page
    When User select the country <country>
    And User enters the name <name>
    And User selects the gender <gender>
    And User clicks on the let's Shop button
    Then User is able to redirects to the products page

    Examples:
      | country|name |gender|
      | India  |Nisha|Female|
Code sample of a Step Definition file:
package steps;

import core.Initialize;
import io.cucumber.java.en.And;
import io.cucumber.java.en.Given;
import io.cucumber.java.en.Then;
import io.cucumber.java.en.When;
import org.junit.Assert;

public class GeneralStoreSteps extends Initialize {


    @Given("User is on General Store page")
    public void userIsOnGeneralStorePage() {
        Assert.assertTrue("User isn't redirect to the general store page",isElementDisplayed(generalStoreScreen.generalStorePage));
    }

    @When("^User select the country ([^"]*)$")
    public void userSelectTheCountryCountry(String country) throws InterruptedException {
        generalStoreScreen.selectCountry(country);
    }

    @And("^User enters the name ([^"]*)$")
    public void userEntersTheNameName(String name) {
        generalStoreScreen.nameInputBox.sendKeys(name);
        hideKeyboard();
    }

    @And("^User selects the gender ([^"]*)$")
    public void userSelectsTheGenderGender(String gender) {
        generalStoreScreen.selectGender(gender);
    }

    @And("^User clicks on the let's Shop button$")
    public void userClicksOnTheLetSShopButton() {
        generalStoreScreen.shopBtn.click();
    }

    @Then("^User is able to redirects to the products page$")
    public void userIsAbleToRedirectsToTheProductsPage() {
        Assert.assertTrue("User isn't redirect to the products page",isElementDisplayed(generalStoreScreen.productsPage));
    }
}


Note: Automate your apps on Appium cloud of 3000+ environments. Try TestMu AI Now!
Why test on cloud testing platforms?
The combination of the Appium and Cucumber can be used for testing your iOS and Android mobile applications in the cloud using different cloud testing platforms. To thoroughly test your application, it is important to use it on real devices to ensure that the application’s behavior is as expected for your end-users.
Given the various devices and operating system combinations available in the market, traditional testing methods have become challenging and time-consuming. A cloud testing platform provides access to a range of real devices on the cloud at scale. This helps us access the required testing infrastructure to carry out test execution.
You can also subscribe to the TestMu AI YouTube Channel and stay updated with the latest tutorials around Selenium testing, Cypress E2E testing, CI/CD, and more.
Benefits of using a cloud testing platform:
- Increased test coverage
- Testing on thousands of real devices.
- Using a cloud testing platform can accelerate test execution time.
- Cloud testing platforms provide access to the latest set of devices for testing.
Test Scenario that we will be running in the project:
We are testing the functionalities of a shopping application, ‘General store’ As we can see in the above code, we will be running a simple scenario where a user can redirect to the shopping page. The steps are as follows in the Gherkin format.
Scenario Outline: Verify user is able to redirect to the shopping page Given User is on General Store pageWhen User select the country < country > And User enters the name < name >And User selects the gender < gender >And User clicks on the let’s Shop button Then User is able to redirects to the products page
Now we need to configure our Appium Cucumber project.
Key Takeaway: Running Appium Cucumber tests on a cloud of real Android and iOS devices widens device coverage and shortens test execution time compared with maintaining an in-house device lab.

Configuring your Appium Cucumber project
To configure your Appium Cucumber project we need to perform the following steps:
- You will have to first set up Java along with an IDE. You can ignore this step if you already have the Java setup. Following this, you must set up JUnit and IntelliJ IDEA IDE. To install Java, you need to download JDK and run the installer. Following this, you need to validate the JAVA_HOME setting.
- While JUnit is used as a unit testing framework, IntelliJ IDEA is an integrated development environment (IDE) written in Java and Kotlin. To Install Java, JUnit, and IntelliJ IDEA IDE, you can refer to this blog on setting JUnit environment.
- Following this, you need to create a Maven project and add dependencies. To install Maven, you can download the latest Maven distribution. Once the zip file is downloaded, you can unzip it in the folder you want to install and later set its path in the PATH environment variable.
export PATH=/path/to/apache-maven-3.8.6/bin:$PATHYou can use the command
run mvn -vto check for the maven version installed. - To install Appium, you can do it via NPM or by downloading Appium Desktop. If you want to run Appium through an npm install, you will need Node.js and NPM. You can refer to this Appium tutorial to install Appium.
- You can add the dependencies for Cucumber, Gherkin, Appium, and Extent Reports as shown in the below code:
Example of POM.xml:
<?xml version="1.0" encoding="UTF-8"?>
<project xmlns="http://maven.apache.org/POM/4.0.0"
         xmlns:xsi="http://www.w3.org/2001/XMLSchema-instance"
         xsi:schemaLocation="http://maven.apache.org/POM/4.0.0 http://maven.apache.org/xsd/maven-4.0.0.xsd">
    <modelVersion>4.0.0</modelVersion>

    <groupId>org.example</groupId>
    <artifactId>MobileAutomationFramework</artifactId>
    <version>1.0-SNAPSHOT</version>

    <properties>
        <maven.compiler.source>1.8</maven.compiler.source>
        <maven.compiler.target>1.8</maven.compiler.target>
        <project.build.sourceEncoding>UTF-8</project.build.sourceEncoding>
    </properties>

    <dependencies>


        <dependency>
            <groupId>junit</groupId>
            <artifactId>junit</artifactId>
            <version>4.11</version>
            <scope>test</scope>
        </dependency>

        <dependency>
            <groupId>io.appium</groupId>
            <artifactId>java-client</artifactId>
            <version>7.6.0</version>
        </dependency>
        <dependency>
            <groupId>com.github.javafaker</groupId>
            <artifactId>javafaker</artifactId>
            <version>0.15</version>
        </dependency>
        <dependency>
            <groupId>io.cucumber</groupId>
            <artifactId>cucumber-java</artifactId>
            <version>6.8.1</version>
        </dependency>
        <!-- https://mvnrepository.com/artifact/io.cucumber/cucumber-picocontainer -->
        <dependency>
            <groupId>io.cucumber</groupId>
            <artifactId>cucumber-picocontainer</artifactId>
            <version>6.8.1</version>
        </dependency>
        <!-- https://mvnrepository.com/artifact/io.cucumber/cucumber-junit -->
        <dependency>
            <groupId>io.cucumber</groupId>
            <artifactId>cucumber-junit</artifactId>
            <version>6.8.1</version>
            <scope>test</scope>
        </dependency>
        <!-- https://mvnrepository.com/artifact/io.cucumber/gherkin -->
        <dependency>
            <groupId>io.cucumber</groupId>
            <artifactId>gherkin</artifactId>
            <version>15.0.2</version>
        </dependency>
        <!-- https://mvnrepository.com/artifact/io.cucumber/cucumber-jvm -->
        <dependency>
            <groupId>io.cucumber</groupId>
            <artifactId>cucumber-jvm</artifactId>
            <version>6.8.1</version>
            <type>pom</type>
        </dependency>


        <dependency>
            <groupId>tech.grasshopper</groupId>
            <artifactId>extentreports-cucumber6-adapter</artifactId>
            <version>2.13.0</version>
        </dependency>

        <dependency>
            <groupId>com.aventstack</groupId>
            <artifactId>extentreports</artifactId>
            <version>5.0.4</version>
        </dependency>

        <dependency>
            <groupId>org.apache.logging.log4j</groupId>
            <artifactId>log4j-core</artifactId>
            <version>2.17.1</version>
        </dependency>
        <dependency>
            <groupId>log4j</groupId>
            <artifactId>log4j</artifactId>
            <version>1.2.17</version>
        </dependency>

        <dependency>
            <groupId>org.json</groupId>
            <artifactId>json</artifactId>
            <version>20210307</version>
            <scope>test</scope>
        </dependency>

        <!-- https://mvnrepository.com/artifact/com.github.mkolisnyk/cucumber-runner -->
        <dependency>
            <groupId>com.github.mkolisnyk</groupId>
            <artifactId>cucumber-runner</artifactId>
            <version>1.3.3</version>
        </dependency>

    </dependencies>
    <build>
        <pluginManagement><!-- lock down plugins versions to avoid using Maven defaults (may be moved to parent pom) -->
            <plugins>
                <!-- clean lifecycle, see https://maven.apache.org/ref/current/maven-core/lifecycles.html#clean_Lifecycle -->
                <plugin>
                    <artifactId>maven-clean-plugin</artifactId>
                    <version>3.1.0</version>
                </plugin>
                <!-- default lifecycle, jar packaging: see https://maven.apache.org/ref/current/maven-core/default-bindings.html#Plugin_bindings_for_jar_packaging -->
                <plugin>
                    <artifactId>maven-resources-plugin</artifactId>
                    <version>3.0.2</version>
                </plugin>
                <plugin>
                    <artifactId>maven-compiler-plugin</artifactId>
                    <version>3.8.0</version>
                </plugin>
                <plugin>
                    <artifactId>maven-surefire-plugin</artifactId>
                    <version>2.22.1</version>
                </plugin>
                <plugin>
                    <artifactId>maven-jar-plugin</artifactId>
                    <version>3.0.2</version>
                </plugin>
                <plugin>
                    <artifactId>maven-install-plugin</artifactId>
                    <version>2.5.2</version>
                </plugin>
                <plugin>
                    <artifactId>maven-deploy-plugin</artifactId>
                    <version>2.8.2</version>
                </plugin>
                <!-- site lifecycle, see https://maven.apache.org/ref/current/maven-core/lifecycles.html#site_Lifecycle -->
                <plugin>
                    <artifactId>maven-site-plugin</artifactId>
                    <version>3.7.1</version>
                </plugin>
                <plugin>
                    <artifactId>maven-project-info-reports-plugin</artifactId>
                    <version>3.0.0</version>
                </plugin>
                <plugin>
                    <groupId>org.apache.maven.plugins</groupId>
                    <artifactId>maven-compiler-plugin</artifactId>
                    <configuration>
                        <source>1.8</source>
                        <target>1.8</target>
                    </configuration>
                </plugin>
            </plugins>
        </pluginManagement>
    </build>
</project>
Once your project setup is done you can start with the execution of the project.
Key Takeaway: An Appium Cucumber project in Java needs a JDK, JUnit, IntelliJ IDEA, and a Maven pom.xml carrying the Cucumber, Gherkin, Appium, and Extent Reports dependencies.
How to run your Appium Cucumber test on the cloud?
Cloud based Appium testing platforms like TestMu AI offer reliability, scalability, security, and high performance while performing Appium Cucumber tests. It enables development and testing teams to speed up their release cycles by providing access to a cloud of over 3000 real iOS and Android devices for automating mobile app testing.
For running Cucumber tests at scale on the TestMu AI HyperExecute grid, refer to the Cucumber on HyperExecute grid guide.
This tutorial uses Java, but TestMu AI also supports Appium Cucumber tests in Ruby. See the Appium Ruby Cucumber documentation for the Ruby equivalent setup on the TestMu AI real device cloud.
Note: To access the TestMu AI cloud testing platform, you need a TestMu AI username and accessKey.
Step 1: Upload your mobile application on the cloud testing platform.
Your mobile application can be uploaded directly to the TestMu AI platform or through the ‘curl’ command:
Step 2: Upload your application through the curl command.
Use this command: curl -u
"YOUR_LAMBDATEST_USERNAME:YOUR_LAMBDATEST_ACCESS_KEY" --location --request POST 'https://manual-api.lambdatest.com/app/upload/realDevice' --form 'name="Android_App"' --form 'url="https://prod-mobile-artefacts.lambdatest.com/assets/docs/proverbial_android.apk"'
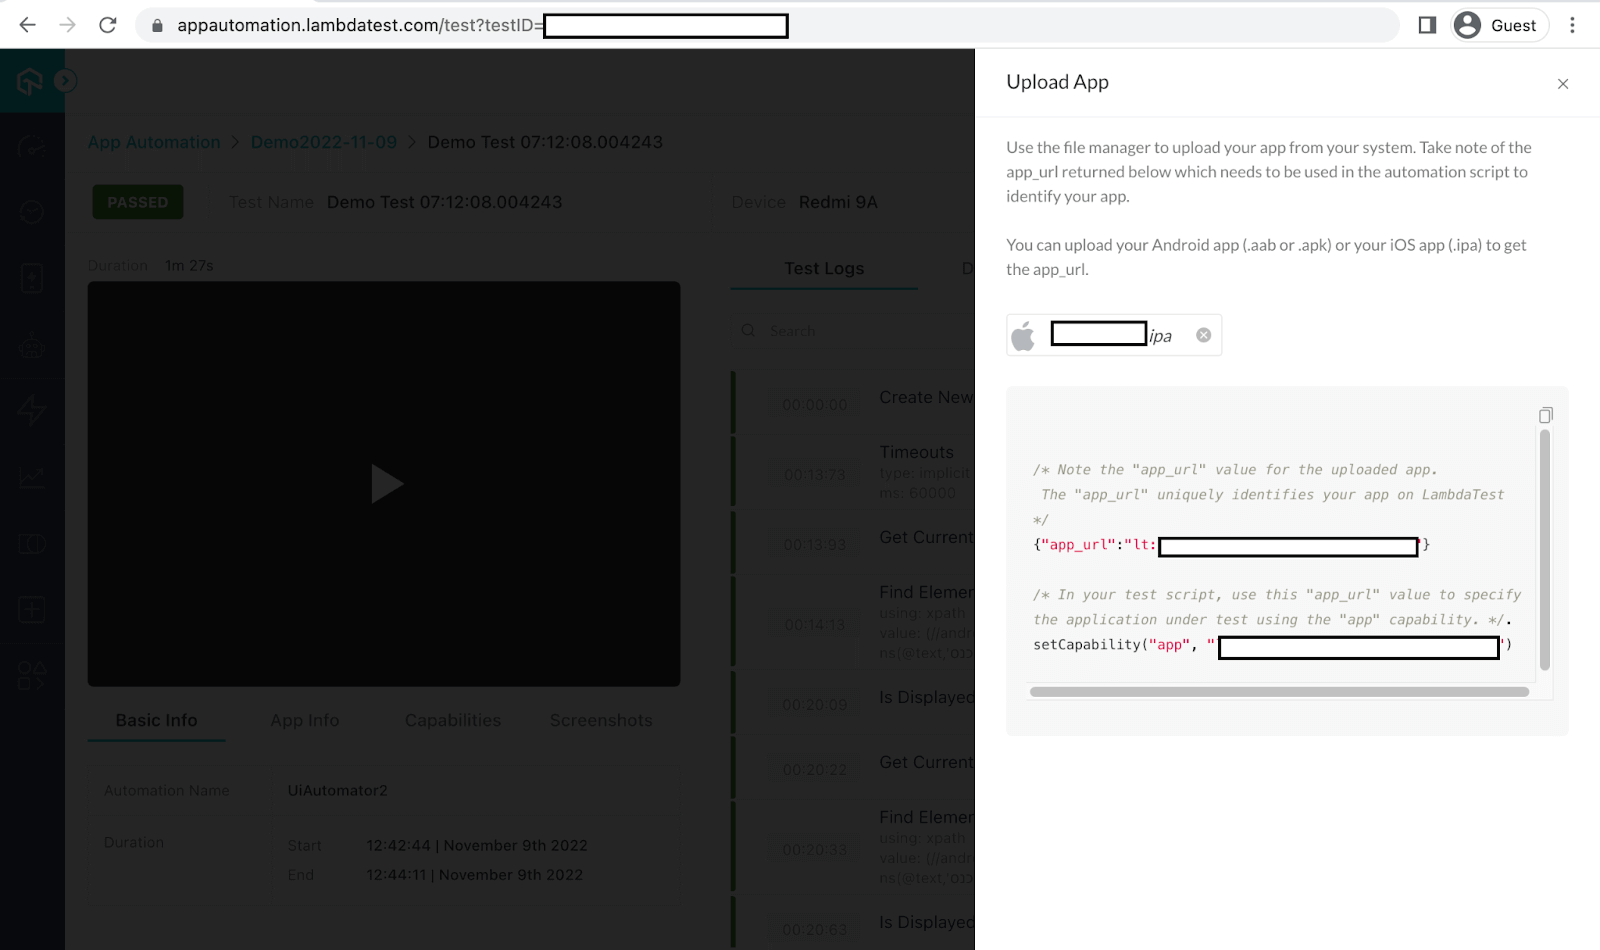
Step 3: Upload your mobile application on the TestMu AI platform.
https://app.lambdatest.com/console/realtime/app
Step 4: Define the Capabilities and Properties file.
Once your mobile application is uploaded on the TestMu AI platform, you will receive app id details that need to be passed into the capabilities parameter.
Following are the changes you will have to make in your project’s Capabilities and Properties file. You can get a copy of the capabilities from the TestMu AI Capabilities Generator. Before running your tests, you must update the username and accessKey in the scripts by referring to the TestMu AI Profile Section.
Set the desired capabilities and properties.
package core;

import io.appium.java_client.AppiumDriver;
import io.appium.java_client.MobileElement;
import io.appium.java_client.ios.IOSDriver;
import io.appium.java_client.pagefactory.AppiumFieldDecorator;
import io.appium.java_client.remote.AndroidMobileCapabilityType;
import io.appium.java_client.remote.MobileCapabilityType;
import io.appium.java_client.service.local.AppiumDriverLocalService;
import org.openqa.selenium.remote.DesiredCapabilities;
import org.openqa.selenium.support.PageFactory;

import java.io.FileInputStream;
import java.io.IOException;
import java.net.MalformedURLException;
import java.net.URL;
import java.time.LocalTime;
import java.util.Properties;

public class DeviceCapabilities {

    public static AppiumDriver<MobileElement> driver;
    public static Properties prop;
    public static DesiredCapabilities capabilities;
    public static AppiumDriverLocalService service;


    /**
     * This method is initializing elements through page factory
     */
    public DeviceCapabilities() {
        PageFactory.initElements(new AppiumFieldDecorator(driver), this);
    }

    /**
     * Method to identify the platform
     *
     * @return
     * @throws Exception
     */
    public AppiumDriver<MobileElement> SetCapabilities() throws Exception {
        SetProperty();
        try {
            if (prop.getProperty("PlatformName").equalsIgnoreCase("Android")) {
                driver = initAndroid();
            } else if (prop.getProperty("PlatformName").equalsIgnoreCase("ios")) {
                driver = initIOS();
            }
        } catch (MalformedURLException e) {
            e.printStackTrace();
        }
        return driver;
    }

    /**
     * Method is used to set property
     *
     * @throws IOException
     */
    public void SetProperty() throws IOException {
        FileInputStream fis =
                new FileInputStream(
                        System.getProperty("user.dir") + "/src/test/resources/config/config.properties");
        prop = new Properties();
        prop.load(fis);
    }


    /**
     * Capabilities for android device
     *
     * @return
     * @throws Exception
     */
    public AppiumDriver<MobileElement> initAndroid() throws Exception {
        capabilities = new DesiredCapabilities();
        if (prop.getProperty("Platform").equalsIgnoreCase("remote-lambda")) {
            capabilities.setCapability("build","MobileAutomation(build-75) "+java.time.LocalDate.now());
            capabilities.setCapability("name", "Mobile Automation Test "+ LocalTime.now());
            capabilities.setCapability("deviceName", prop.getProperty("LambdaTestAndroidDeviceName"));
            capabilities.setCapability("platformVersion", prop.getProperty("LambdaTestAndroidPlatformVersion"));
            capabilities.setCapability("platformName", prop.getProperty("LambdaTestAndroidPlatformName"));
            capabilities.setCapability("isRealMobile", prop.getProperty("LambdaTestIsRealMobile"));
            capabilities.setCapability("app", prop.getProperty("LambdaTestAndroidApp"));
            capabilities.setCapability("deviceOrientation", prop.getProperty("LambdaTestDeviceOrientation"));
            capabilities.setCapability("console", prop.getProperty("LambdaTestConsole"));
            capabilities.setCapability("network", prop.getProperty("LambdaTestNetwork"));
            capabilities.setCapability("visual", prop.getProperty("LambdaTestVisual"));
            capabilities.setCapability("devicelog", prop.getProperty("LambdaTestDeviceLog"));
            String hub = "https://" + prop.getProperty("LambdaTestUserName") + ":" + prop.getProperty("LambdaTestAccessKey") + prop.getProperty("LambdaTestGridURL");
            return driver = new AppiumDriver(new URL(hub), capabilities);
        } else if (prop.getProperty("Platform").equalsIgnoreCase("local")) {
            System.out.println("Opening App");
            capabilities.setCapability(MobileCapabilityType.PLATFORM_VERSION, prop.getProperty("PlatformVersion"));
            capabilities.setCapability(MobileCapabilityType.PLATFORM_NAME, prop.getProperty("PlatformName"));
            capabilities.setCapability(MobileCapabilityType.DEVICE_NAME, prop.getProperty("RealDeviceName"));
            capabilities.setCapability(MobileCapabilityType.AUTOMATION_NAME, "UiAutomator2");
            capabilities.setCapability(MobileCapabilityType.APP, System.getProperty("user.dir") + prop.getProperty("App"));
            capabilities.setCapability("appPackage", prop.getProperty("AppPackage"));
            capabilities.setCapability("appActivity", prop.getProperty("AppActivity"));
            capabilities.setCapability("noReset", "false");
            capabilities.setCapability("autoGrantPermissions", true);
            capabilities.setCapability(AndroidMobileCapabilityType.RESET_KEYBOARD, false);
            capabilities.setCapability(AndroidMobileCapabilityType.UNICODE_KEYBOARD, false);
            return new AppiumDriver<MobileElement>(new URL(prop.getProperty("AppiumUrl")), capabilities);
        } else {
            return null;
        }
    }

    /**
     * Capabilities for IOS device
     *
     * @return
     * @throws Exception
     */
    public IOSDriver<MobileElement> initIOS() throws Exception {
        capabilities = new DesiredCapabilities();
        if (prop.getProperty("Platform").equalsIgnoreCase("remote-lambda")) {
            capabilities.setCapability("build","Mobile Automation(ios build-75) "+java.time.LocalDate.now());
            capabilities.setCapability("name", "Mobile Automation Test "+ LocalTime.now());
            capabilities.setCapability("deviceName", prop.getProperty("LambdaTestiOSDeviceName"));
            capabilities.setCapability("platformVersion", prop.getProperty("LambdaTestiOSPlatformVersion"));
            capabilities.setCapability("platformName", prop.getProperty("LambdaTestiOSPlatformName"));
            capabilities.setCapability("isRealMobile", prop.getProperty("LambdaTestIsRealMobile"));
            capabilities.setCapability("app", prop.getProperty("LambdaTestiOSApp"));
            capabilities.setCapability("deviceOrientation", prop.getProperty("LambdaTestDeviceOrientation"));
            capabilities.setCapability("console", prop.getProperty("LambdaTestConsole"));
            capabilities.setCapability("network", prop.getProperty("LambdaTestNetwork"));
            capabilities.setCapability("visual", prop.getProperty("LambdaTestVisual"));
            capabilities.setCapability("devicelog", prop.getProperty("LambdaTestDeviceLog"));
            String hub = "https://" + prop.getProperty("LambdaTestUserName") + ":" + prop.getProperty("LambdaTestAccessKey") + prop.getProperty("LambdaTestGridURL");
            return new IOSDriver<MobileElement>(new URL(hub), capabilities);
        } else if (prop.getProperty("Platform").equalsIgnoreCase("local")) {
            capabilities = new DesiredCapabilities();
            capabilities.setCapability(MobileCapabilityType.AUTOMATION_NAME, "XCUITest");
            capabilities.setCapability(MobileCapabilityType.PLATFORM_VERSION, prop.getProperty("IosRealDevicePlatformVersion"));
            capabilities.setCapability(MobileCapabilityType.PLATFORM_NAME, "iOS");
            capabilities.setCapability(MobileCapabilityType.DEVICE_NAME, prop.getProperty("IosRealDeviceName"));
            capabilities.setCapability("udid", prop.getProperty("IosRealDeviceUdid"));
            capabilities.setCapability(MobileCapabilityType.APP, System.getProperty("user.dir") + prop.getProperty("IosApp"));
            capabilities.setCapability("appPackage", prop.getProperty("AppPackage"));
            capabilities.setCapability("appActivity", prop.getProperty("AppActivity"));
            capabilities.setCapability("noReset", "false");
            capabilities.setCapability("autoGrantPermissions", true);
            return new IOSDriver<MobileElement>(new URL("http://0.0.0.0:4723/wd/hub"), capabilities);
        } else {
            return null;
        }
    }

}
Step 5: Properties file to select Devices on which you need to execute your tests.
You need to update your TestMu AI username and accesskey in the parameters and add the APP url provided by TestMu AI when the app is loaded on TestMu AI.
#For local device
PlatformName=Android
PlatformVersion=12
RealDeviceName=Pixel 3a
AppActivity=com.androidsample.generalstore
AppPackage=com.androidsample
App=/src/test/resources/app/General-Store.apk
AppiumUrl=http://0.0.0.0:4723/wd/hub

# localDevice:local , LambdaTest:remote-lambda
Platform=remote-lambda

LambdaTestUserName=
LambdaTestAccessKey=
LambdaTestGridURL=@mobile-hub.lambdatest.com/wd/hub
LambdaTestIsRealMobile=true
LambdaTestDeviceOrientation=portrait
LambdaTestConsole=true
LambdaTestNetwork=false
LambdaTestVisual=true
LambdaTestDeviceLog=true

#Android
#add your app id for android and ios
LambdaTestAndroidApp=lt://APP1016055184166
LambdaTestAndroidDeviceName=Pixel 6
LambdaTestAndroidPlatformVersion=12
LambdaTestAndroidPlatformName=Android

#IOS
LambdaTestiOSDeviceName=iPhone 6s
LambdaTestiOSPlatformVersion=14
LambdaTestiOSPlatformName=ios
#LambdaTestiOSApp=
Step 6: Configuring your Cucumber tests.
In Cucumber, the step definition code links methods with an expression that links it to one or more Gherkin steps mentioned in the feature file. When Cucumber starts executing a Gherkin step in a scenario, it will look for a matching step definition to execute.
Cucumber file: Cucumber executes each step in a scenario one at a time. The steps follow Given, When, Then, And.
Feature file:
@homePage
Feature: Verify General Store page Scenarios

  @verifyUserAbleToRedirectToShoppingPage @regression
  Scenario Outline: Verify user is able to redirect to the shopping page
    Given User is on General Store page
    When User select the country <country>
    And User enters the name <name>
    And User selects the gender <gender>
    And User clicks on the let's Shop button
    Then User is able to redirects to the products page

    Examples:
      | country|name |gender|
      | India  |Nisha|Female|
Step definition file code:
package steps;

import core.Initialize;
import io.cucumber.java.en.And;
import io.cucumber.java.en.Given;
import io.cucumber.java.en.Then;
import io.cucumber.java.en.When;
import org.junit.Assert;

public class GeneralStoreSteps extends Initialize {


    @Given("User is on General Store page")
    public void userIsOnGeneralStorePage() {
        Assert.assertTrue("User isn't redirect to the general store page",isElementDisplayed(generalStoreScreen.generalStorePage));
    }

    @When("^User select the country ([^"]*)$")
    public void userSelectTheCountryCountry(String country) throws InterruptedException {
        generalStoreScreen.selectCountry(country);
    }

    @And("^User enters the name ([^"]*)$")
    public void userEntersTheNameName(String name) {
        generalStoreScreen.nameInputBox.sendKeys(name);
        hideKeyboard();
    }

    @And("^User selects the gender ([^"]*)$")
    public void userSelectsTheGenderGender(String gender) {
        generalStoreScreen.selectGender(gender);
    }

    @And("^User clicks on the let's Shop button$")
    public void userClicksOnTheLetSShopButton() {
        generalStoreScreen.shopBtn.click();
    }

    @Then("^User is able to redirects to the products page$")
    public void userIsAbleToRedirectsToTheProductsPage() {
        Assert.assertTrue("User isn't redirect to the products page",isElementDisplayed(generalStoreScreen.productsPage));
    }
}
Step 7: Execute and view your tests.
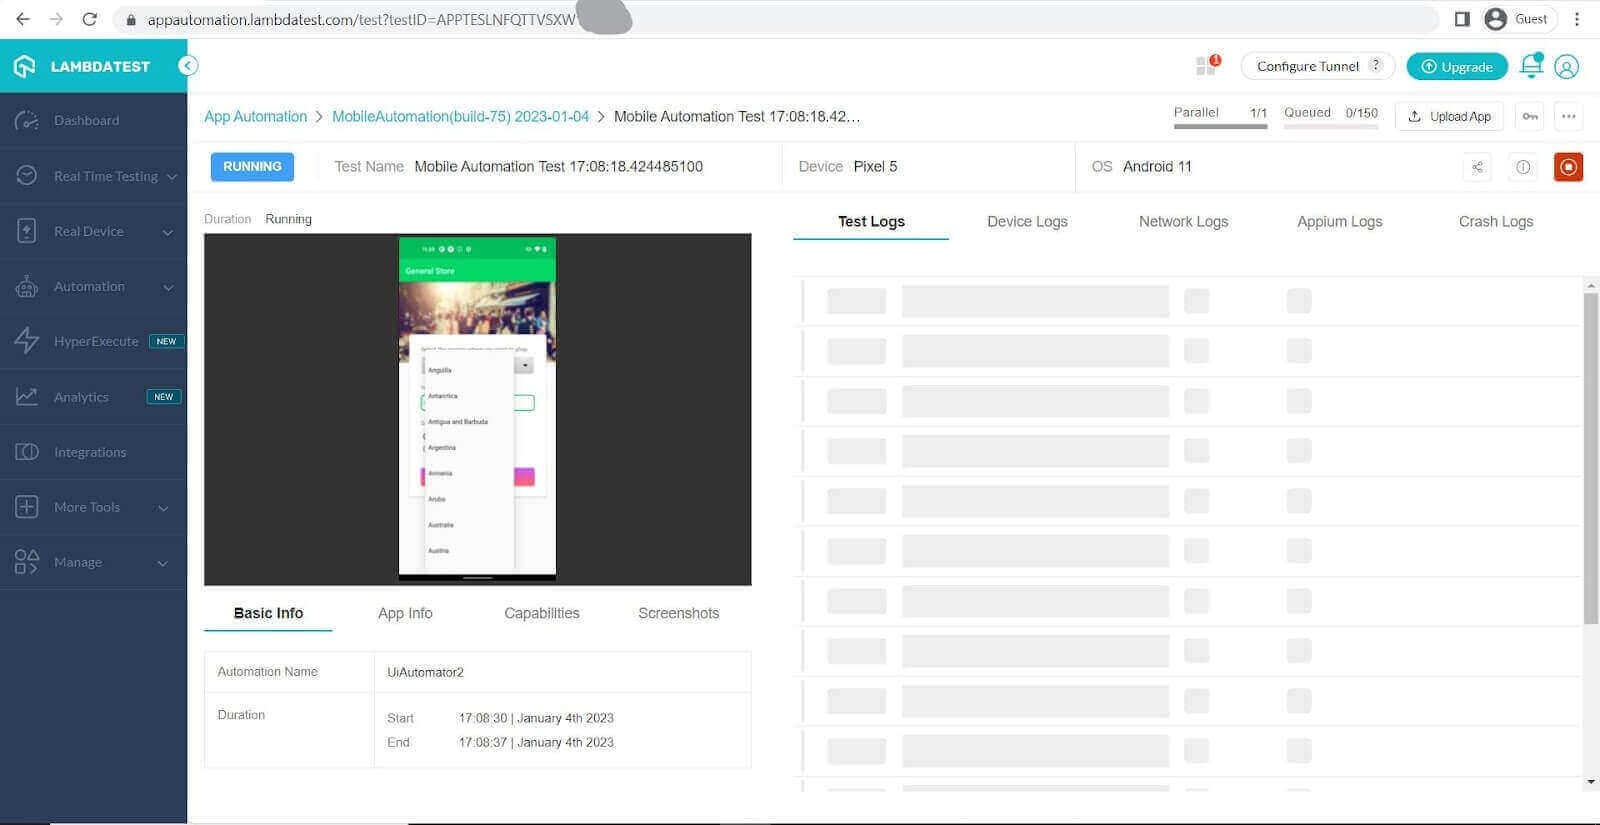
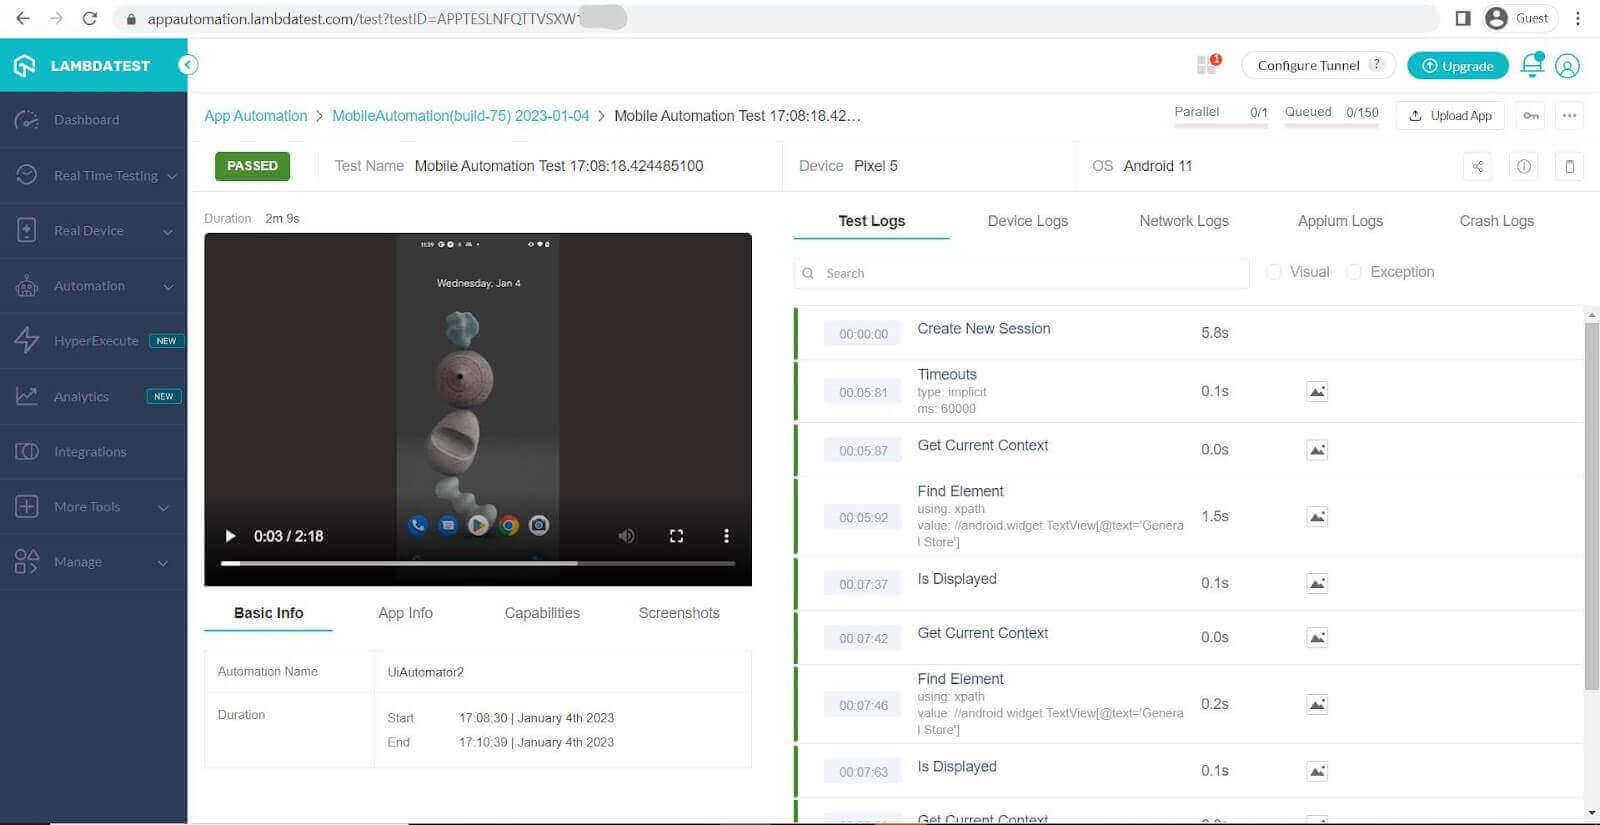
Once you have executed your tests you can view the results of your tests on the TestMu AI Dashboard as seen in the pictures below.
Here we can see the test running in the background:
Here we can see the dashboard after the test is passed.
Note: Boost your efficiency by ultimate guide of Appium Commands Cheat Sheet for Developers.
Key Takeaway: To run an Appium Cucumber test on a cloud device, upload the app, pass the returned app ID with the username and accessKey in the capabilities file, then read the run on the dashboard.
How Do AI Agents Run Appium Cucumber Tests?
AI agents run Appium Cucumber tests through an Appium MCP server, which turns a plain-language instruction into standard Appium commands against a real device or simulator.
The Model Context Protocol sits between the assistant and the driver. That changes four things in a Cucumber project:
- MCP server as the driver: the agent never touches the device. It calls the MCP server, which issues the Appium command and returns the UI hierarchy, app install state, and session logs.
- Step definition drafting: an MCP-connected assistant such as GitHub Copilot or Claude reads a .feature file and drafts the Java step definitions that bind each Given, When, and Then step.
- Intent-based steps: an instruction like "log in and open the products page" is resolved at run time, instead of replaying a fixed tap sequence recorded against one screen layout.
- Accessibility id lookup: the MCP server exposes the element tree, so the agent can select an accessibility id rather than an XPath that breaks on the next build.
The limit is ownership. An agent proposes Gherkin steps and step definitions, but the feature file is the contract with the business, so a human still reviews the wording and the assertions before the scenario is merged. Non-deterministic step resolution also makes a failure harder to reproduce, so pin the agent-generated steps into committed code once they pass.
Key Takeaway: An Appium MCP server lets an AI assistant issue Appium commands and draft Cucumber step definitions, while a human still approves the Gherkin feature file that defines the expected behavior.
Conclusion
In the above Appium Cucumber tutorial, we saw the step-by-step method to install Appium and Cucumber and how it can be used to carry out the Appium mobile testing process on a cloud testing platform. We also saw the benefits of using a cloud testing platform and how it can be a cost-effective and quicker way to test your applications across different platforms.

Author

Mayank Bhola
Blogs: 8


Mayank Bhola is Co-Founder and Head of Products at TestMu AI (formerly LambdaTest), where he leads the entire product portfolio across KaneAI, Kane CLI, HyperExecute, SmartUI, the Real Device Cloud, Accessibility, and other software testing product lines. As an early Lead Architect he designed and built the company's flagship Tunnel technology from scratch, created the React-based automation platform, and architected the data-intensive pipelines and FAAS services that scale it. He brings more than 10 years of experience in software development and product engineering, with earlier roles as Head of Technology at Juggernaut Books and Senior Software Engineer at PressPlay TV and Zomato. Mayank holds a B.Tech in Computer Engineering from JIIT Noida.
Reviewer

Navin Chandra
Reviewer
Navin Chandra is a Member of Technical Staff at TestMu AI (formerly LambdaTest), building the open-source automation that powers its Selenium and Appium cloud grid. A committer to both Selenium and Appium, he implemented WebDriver BiDi support in Selenium for real-time browser events and bidirectional control and is developing Apple's iOS RemoteXPC protocol in Appium to enable low-level wireless communication with iOS system services. He contributes to Selenium across multiple language bindings as a member of the Selenium GitHub organization. He has served as a Google Summer of Code mentee and mentor at openSUSE and an LFX mentee at CNCF's KubeArmor, and is a SUSE Certified Deployment Specialist. Navin holds a B.Tech in Computer Science.
Appium Cucumber FAQs
Did you find this page helpful?
More Related Blogs
TestMu AI forEnterprise
Get access to solutions built on Enterprise
grade security, privacy, & compliance
- Advanced access controls
- Advanced data retention rules
- Advanced Local Testing
- Premium Support options
- Early access to beta features
- Private Slack Channel
- Unlimited Manual Accessibility DevTools Tests