

Power Your Software Testing with AI Agents and Cloud
The Native AI-Agentic Cloud Platform to Supercharge Quality Engineering. Test Intelligently and Ship Faster.


- TestMu AI (Formerly LambdaTest)
- /
- Blog
- /
- How to Perform Mobile App Testing From the Command Line
How to Perform Mobile App Testing From the Command Line
Run Android and iOS app tests from the terminal: boot emulators and simulators, run Gradle, xcodebuild, and Appium, then run the suite on real devices in CI.
Published on:
A mobile suite that only runs when someone presses the play button in Android Studio or Xcode never reaches CI. Android ships its own tools (emulator, adb, Gradle), iOS ships others (simctl, xcodebuild), and Appium adds a third layer on top. This guide covers mobile app testing from the command line on both platforms.
You will boot headless devices, run Espresso, XCUITest, and Appium tests, drive emulators and simulators with plain-English Kane CLI objectives, and send the Appium suite to real devices on TestMu AI, all from a terminal.
TL;DR
To test a mobile app from the command line, boot a device, then run the platform test command: ./gradlew connectedAndroidTest for Android and xcodebuild test with an iOS Simulator destination for iOS. Appium adds one cross-platform suite, and a cloud Appium hub runs that suite on real devices from any terminal or CI job.
- Headless Android emulator: emulator -avd name -no-window starts a virtual device with no display, which is what CI servers need; adb then installs the app and reports when boot has completed.
- iOS Simulator control: xcrun simctl boot and bootstatus -b start a simulator and block until it is ready. Requires macOS: yes, because the iOS Simulator and xcodebuild run only on a Mac.
- Build once, test many: xcodebuild build-for-testing followed by test-without-building compiles the app a single time and reruns it on as many simulator destinations as you pass.
- Plain-English objectives: Kane CLI runs an objective such as "tap Text and verify the heading reads Proverbial" against an Android Emulator or iOS Simulator with --target, and testrun run --remote sends saved tests to HyperExecute emulators and simulators from any OS. Runs on physical phones: no, so real-device coverage stays with Appium, Espresso, or XCUITest.
- Real-device runs over HTTPS: setting isRealMobile to true in Appium capabilities on TestMu AI moves the same script from an emulator to a physical phone, with video and device logs recorded per session.
- Exit codes as the gate: Gradle, xcodebuild, and a WebDriver script all exit non-zero on a failed test, so a CI job can block a merge without parsing any report.
The Mobile Testing CLI Toolchain at a Glance
Android and iOS split the market too evenly to test one and ship both. StatCounter's mobile OS market share for August 2026 puts Android at 67.61% and iOS at 32.36%, so a CLI workflow needs a command for every step on both sides.
| Step | Android | iOS (macOS only) |
|---|---|---|
| Create a device | android emulator create --profile=... (avdmanager create avd is now deprecated) | xcrun simctl create "Name" <device type> <runtime> |
| Boot headless | emulator -avd NAME -no-window -no-audio -no-boot-anim | xcrun simctl boot "iPhone 16" |
| Wait until ready | adb wait-for-device, then poll getprop sys.boot_completed | xcrun simctl bootstatus "iPhone 16" -b |
| Install the app | adb install -r app-debug.apk | xcrun simctl install booted MyApp.app |
| Run native UI tests | ./gradlew connectedAndroidTest (Espresso) | xcodebuild test -destination ... (XCUITest) |
| Run one test | adb shell am instrument -e class ... | -only-testing:Target/Class/method |
| Find results | build/reports/androidTests/connected/ | the .xcresult bundle from -resultBundlePath |
| Real devices | Cloud Appium hub or Espresso build API | Cloud Appium hub or XCUITest build API |
Skipping the first three rows produces CI failures that look like app bugs: a test that starts before the device finishes booting fails on install, not on an assertion. The block below brings up one device per platform and returns only when each is ready. If emulators are new to you, start with what is an emulator.
# Android: find, boot, and wait for a headless emulator
emulator -list-avds
emulator -avd Pixel_8_API_34 -no-window -no-audio -no-boot-anim &
adb wait-for-device
adb shell 'while [ "$(getprop sys.boot_completed)" != "1" ]; do sleep 2; done'

# iOS: list, boot, and wait for a simulator (macOS only)
xcrun simctl list devices available
xcrun simctl boot "iPhone 16"
xcrun simctl bootstatus "iPhone 16" -b
Android's avdmanager reference now marks the tool as deprecated and points to the new Android CLI, where android emulator create builds a device from a named profile. Older CI scripts still work, but new pipelines should use the new command.
How to Run Android Tests From the Command Line
On Android, Gradle runs tests from the terminal. Android's guide to testing from the command line defines two entry points: ./gradlew test for local JVM tests and ./gradlew connectedAndroidTest for instrumented tests that need a device. The second one builds the app APK and the test APK, installs both, and runs every test.
# Local JVM unit tests (no device needed)
./gradlew test

# Instrumented tests on every connected device or emulator
./gradlew connectedAndroidTest        # short form: ./gradlew cAT

# One module, one build variant
./gradlew mylibrary:connectedDebugAndroidTest

# One test class through adb, after both APKs are installed
adb shell am instrument -w \
  -e class com.example.app.CheckoutTest \
com.example.app.test/androidx.test.runner.AndroidJUnitRunner- Gradle vs adb - Gradle rebuilds and reinstalls on every run. Once both APKs are installed, am instrument reruns a single class in seconds, which suits debugging a flaky test.
- Where results land - instrumented reports go to build/reports/androidTests/connected/, and the XML beside them is what JUnit report actions in CI read.
- Multiple devices - connectedAndroidTest runs on every device adb can see. Use ANDROID_SERIAL=emulator-5554 to pin a run to one device.
Installing, pulling logs, granting permissions, and clearing app data between runs are all adb subcommands. This list of ADB commands covers the ones worth scripting.
How to Run iOS Tests From the Command Line
On iOS, xcodebuild runs both XCTest unit tests and XCUITest UI tests. Apple's TN2339 documents the split that matters in CI: build-for-testing compiles once and writes an .xctestrun file, and test-without-building reruns that build on any destination without recompiling.
# Build once, then run the same build on any simulator
xcodebuild build-for-testing \
  -workspace MyApp.xcworkspace -scheme MyApp \
  -destination 'platform=iOS Simulator,name=iPhone 16'

xcodebuild test-without-building \
  -workspace MyApp.xcworkspace -scheme MyApp \
  -destination 'platform=iOS Simulator,name=iPhone 16' \
  -only-testing:MyAppUITests/CheckoutTests \
-resultBundlePath build/CheckoutTests.xcresult- Destination strings - 'platform=iOS Simulator,name=iPhone 16' picks a simulator by name. Add OS= to pin a runtime, or use id= with a UDID from simctl list when two simulators share a name.
- Several destinations - pass -destination more than once and xcodebuild runs the suite on each target in one invocation.
- Result bundles - -resultBundlePath keeps logs, screenshots, and attachments in one .xcresult file that you can archive as a CI artifact.
Everything in this section needs a Mac. If your pipeline runs on Linux or Windows, the real-device section below starts iOS runs over HTTPS instead. The XCUITest tutorial covers writing the tests themselves.
Running Appium From the Terminal
Espresso and XCUITest live inside each app repository and use each platform's language. Appium is the choice when one suite, in one language, has to drive both platforms. The current major version is Appium 3, and the Appium 3 migration guide raises the minimum to Node.js 20.19 and npm 10, which is the first thing to check on an older CI image.
npm install -g appium          # Appium 3 needs Node.js 20.19+ and npm 10+
appium setup mobile             # uiautomator2, espresso, and (macOS) xcuitest drivers
appium driver doctor uiautomator2
appium --port 4723 & # then point your test client at http://127.0.0.1:4723- appium setup mobile - installs the uiautomator2 and espresso drivers, plus xcuitest on macOS, along with the images and inspector plugins.
- appium driver doctor - checks a driver's prerequisites (ANDROID_HOME, JDK, Xcode) before a test fails with an unclear session error.
- The server is optional in the cloud - against a hosted hub you skip the local server entirely and point the client at the remote URL, as the real-device section below shows.
For the commands you will use inside the tests (taps, swipes, context switches), keep the Appium commands cheat sheet open, and the Appium tutorial goes deeper on framework setup.
How to Test Mobile Apps With Kane CLI
Espresso, XCUITest, and Appium all need someone to write the test code. Kane CLI skips that step: you write the objective in plain English, and it drives an Android Emulator or iOS Simulator, checks the result on screen, and returns pass or fail. There are no selectors or capability files. The Kane CLI mobile docs list three run targets: desktop (Chrome, the default), emulator (a virtual Android device), and simulator (a virtual iOS device).
Every Kane CLI mobile run uses a virtual device, whether it boots on your Mac or on HyperExecute. Physical phones are not a Kane CLI target, so a test that depends on hardware-specific behavior belongs on the Appium, Espresso, or XCUITest real-device runs in the next section.
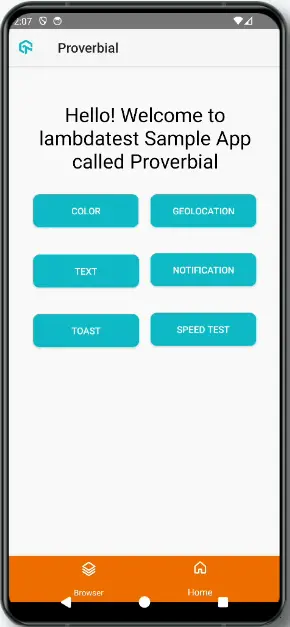
The walkthrough below runs a three-step smoke test against the Proverbial sample Android app on a Pixel 7 emulator in HyperExecute, from a Windows 11 terminal. Local runs on an Apple Silicon Mac use the same test file and are covered at the end. The commands and output shown are from Kane CLI 0.8.18 with the remote-execution plugin 0.5.0.
Step 1: Install Kane CLI and the Remote-Execution Plugin
Install the @testmuai/kane-cli package from npm and confirm the version.
npm install -g @testmuai/kane-cli
kane-cli --version0.8.18Log in, then install the plugin that sends runs to HyperExecute and confirm it is healthy. The login step also asks for the Test Manager project and folder that saved tests go to; Esc keeps the defaults.
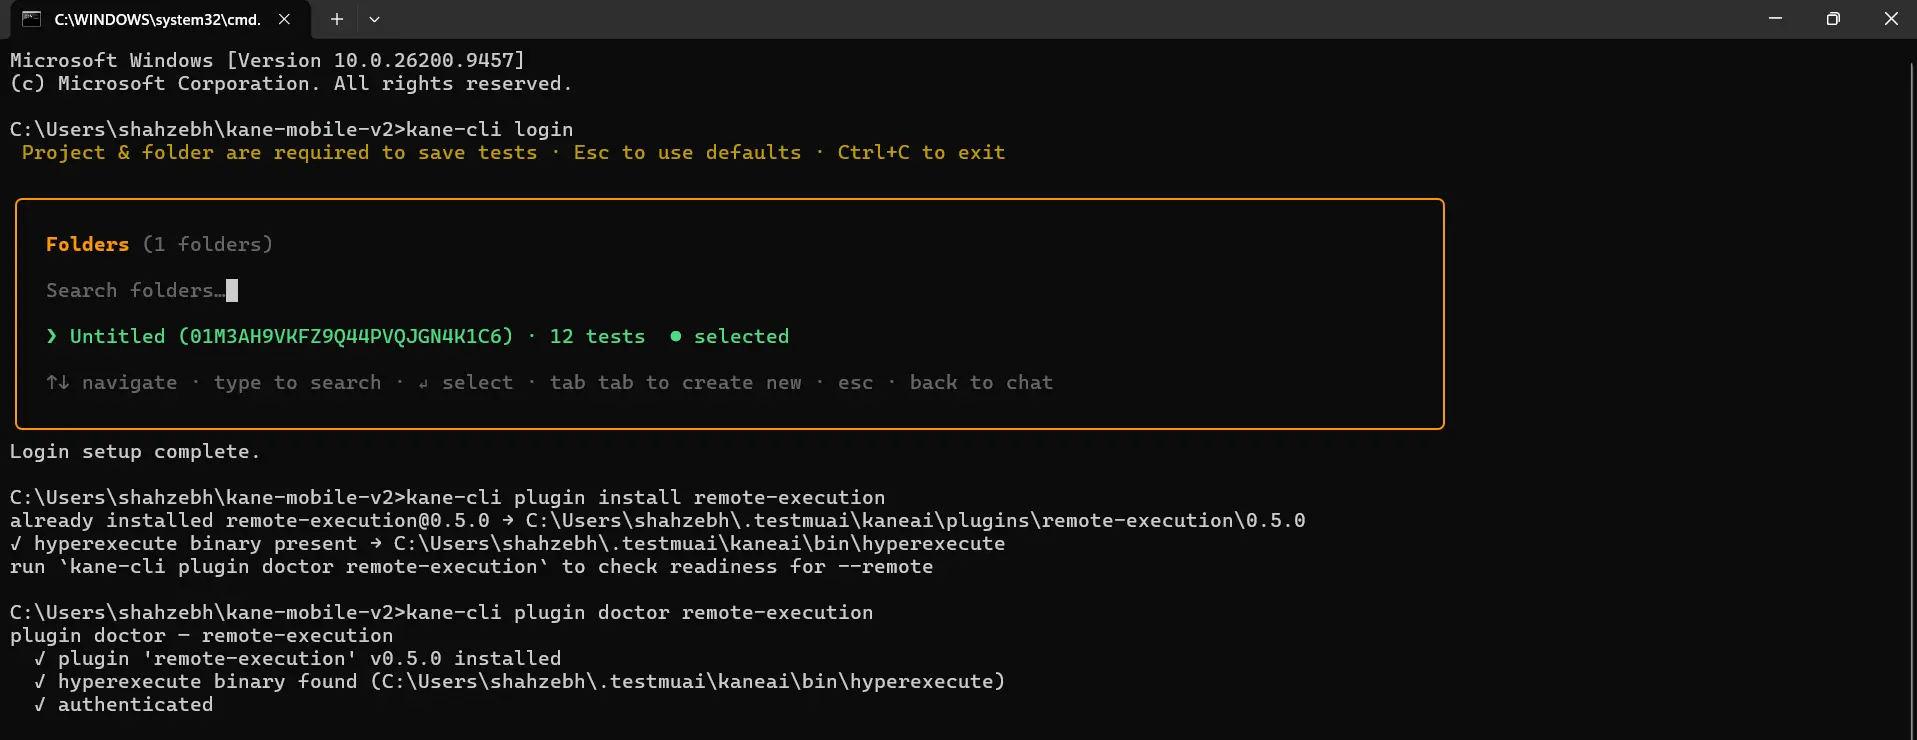
Remote runs need a TestMu AI plan with HyperExecute and macOS runner concurrency, because the emulator boots on a macOS host in the grid. Nothing else is installed locally: no Android Studio, no Xcode, no adb.
Step 2: Create a Project Folder With the Sample App
Kane CLI installs a build you give it, so you need an APK rather than a Play Store app. This walkthrough uses proverbial_android.apk, the TestMu AI sample app with Color, Text, Toast, Notification, Geolocation and Speed Test buttons on its main screen. Any debug APK of your own app works the same way.
Create a dedicated project folder and keep the APK and the test file side by side at its root. A remote run zips this folder and uploads it, so it should hold only the files the test needs.
mkdir C:\Users\<you>\kane-mobile-v2The folder ends up like this:
kane-mobile-v2\
  proverbial_android.apk
  proverbial-smoke_test.md
Step 3: Write the Test in Plain English
A Kane CLI test is a Markdown file whose name ends in _test.md. The YAML front matter declares the mobile target, the OS version and the app. Each ## heading is one step, and the sentence under it is the objective.
Save this as proverbial-smoke_test.md:
---
mode: testing
target: emulator
os_version: '14'
app: ./proverbial_android.apk
---

## Main screen
If a permission dialog appears, allow it. Verify the app's main screen shows buttons labeled Text, Notification and Toast.

## Text screen
Tap the Text button and verify the text Proverbial is displayed.

## Toast
Go back to the main screen, tap the Toast button and verify a toast message appears at the bottom of the screen.
Write each step as something the agent can see and check on screen: a button label, a piece of text, a toast. A mobile run starts inside the app, so the first step asserts what the first screen shows rather than launching anything. The device is chosen on the command line at run time, so the file stays portable across devices and OS versions.
Confirm Kane CLI discovers the file:
kane-cli testmd list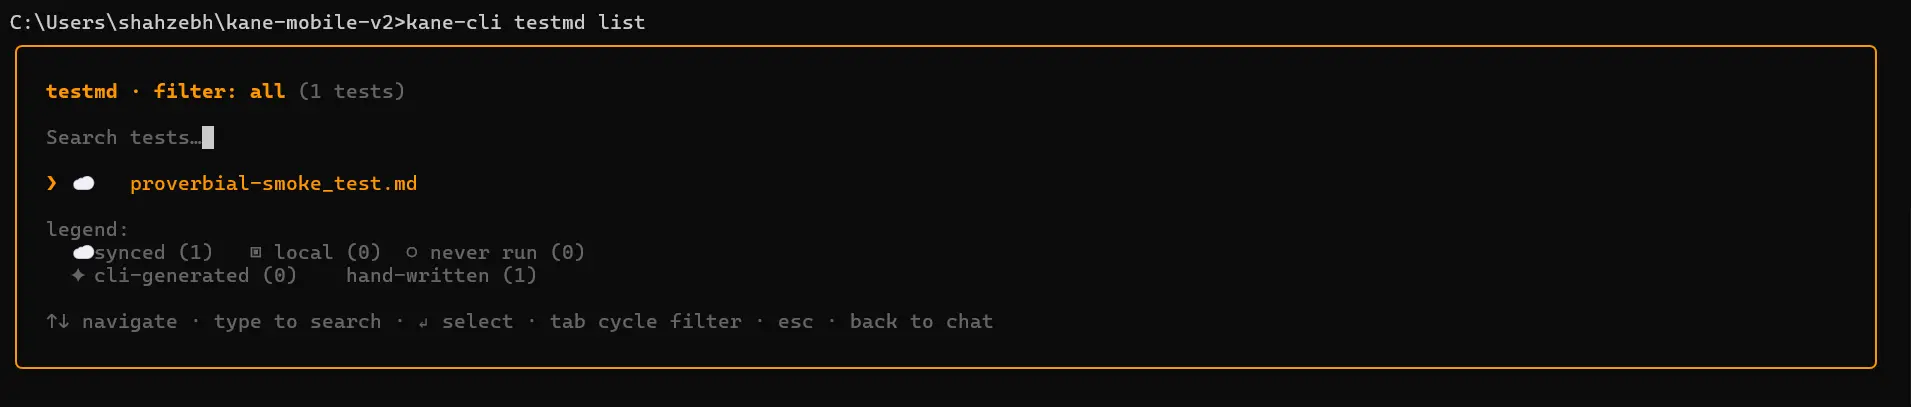
Step 4: Pick a Device From the HyperExecute Catalog
List the emulator profiles the grid can provision. Each profile prints as one NDJSON line, and a final line carries the total and the supported OS versions, which a CI script can parse to choose a device.
kane-cli devices list --target emulator --remote...
{"name":"Pixel 7","brand":"Google","config_name":"pixel-7","os_versions":["14","15"],"avd_ids":{"14":"pixel-7-14","15":"pixel-7-15"}}
{"name":"Pixel 9","brand":"Google","config_name":"pixel-9","os_versions":["15"],"avd_ids":{"15":"pixel-9-15"}}
...
{"total":126,"platform":"android","supported_os_versions":["13","14","15"],"generated_at":"2026-09-07T09:38:27Z","device_config_versions":{"13":"v0.0.4","14":"v0.0.9","15":"v0.0.16"},"origin":"cache"}At the time of writing the catalog holds 126 Android emulator profiles and 49 iOS simulator profiles (--target simulator --remote). This walkthrough uses Pixel 7 on Android 14, so the os_version in the test file and the --os-version flag both say 14.
Step 5: Dry Run, Then Run on HyperExecute
A dry run plans and validates the job, including the device choice and the front matter, without dispatching anything.
kane-cli testrun run proverbial-smoke_test.md --remote --device-name "Pixel 7" --os-version 14 --dry-runtestrun: testrun 1 paths
parallel=1 on-failure=continue
+ proverbial-smoke_test.md (mobile)
1 test(s) selected - plan validThe (mobile) tag confirms the front matter parsed. Drop --dry-run to run it. Kane CLI resolves the grid device, uploads the APK once and records its APP id, zips the project, and dispatches the job.
kane-cli testrun run proverbial-smoke_test.md --remote --device-name "Pixel 7" --os-version 14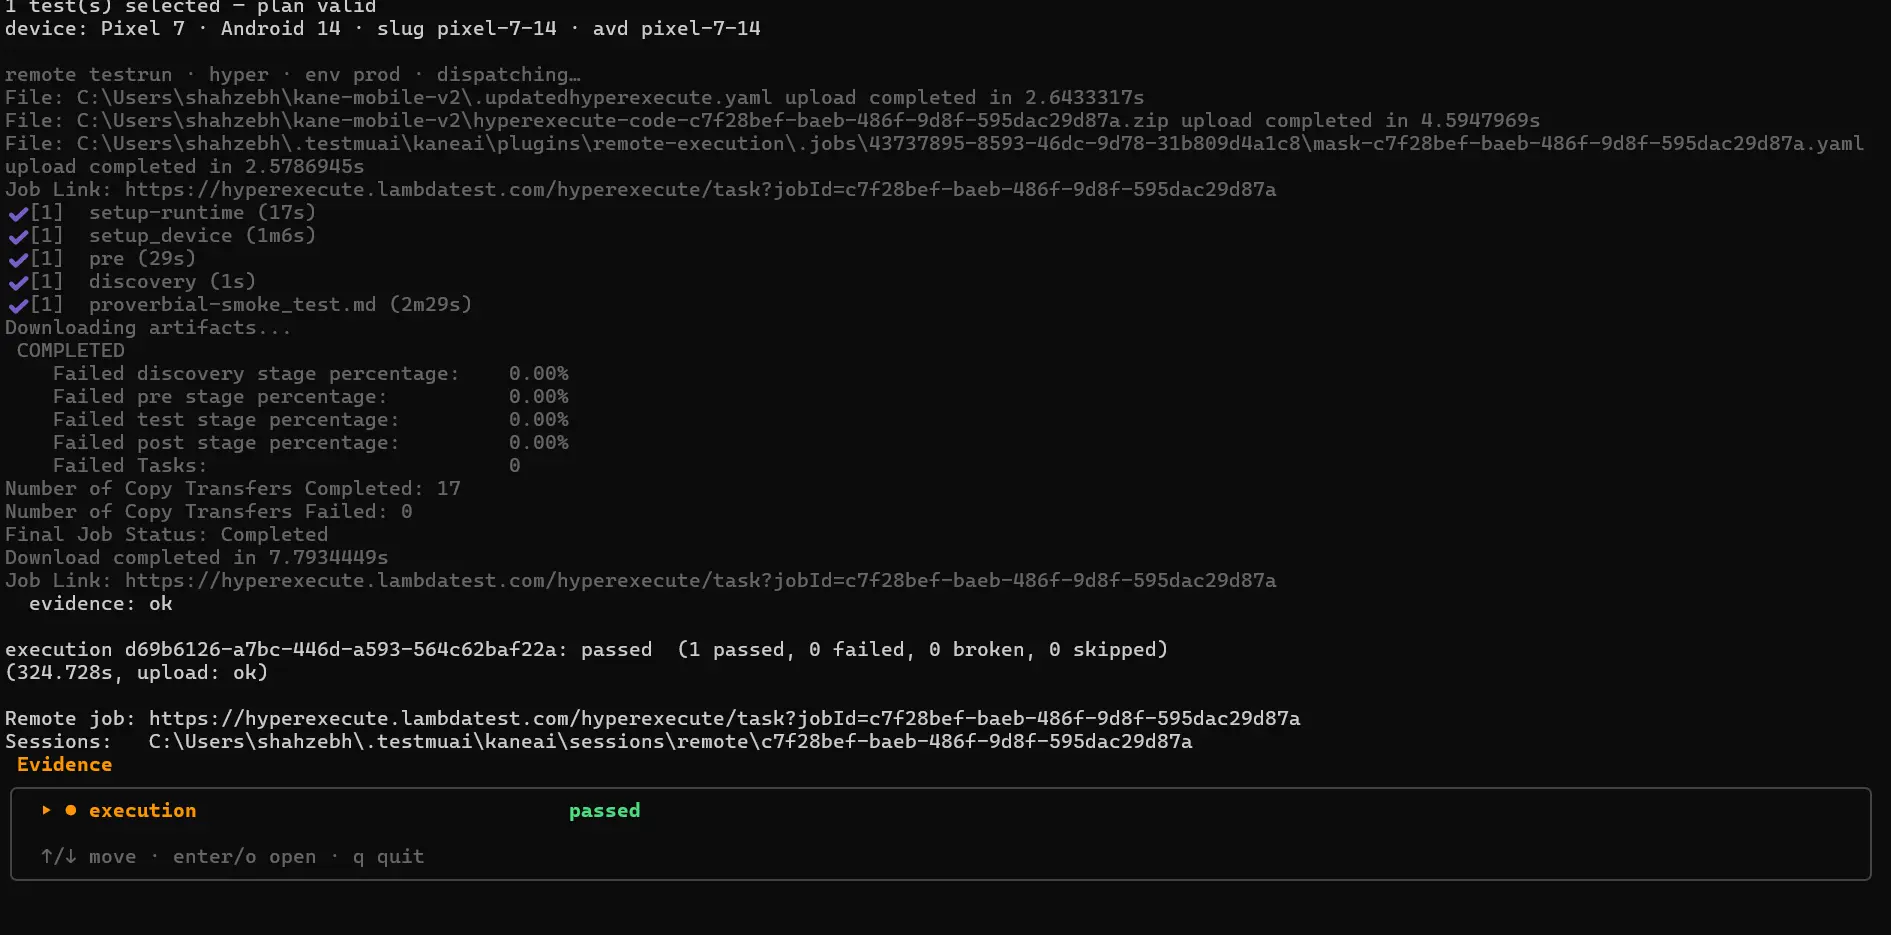
The stages tell the story: setup_device is the emulator booting on the macOS runner, pre installs Kane CLI there, and the test stage is the agent working through the three steps. This run took about five and a half minutes end to end, with the test stage itself at 2m29s. On later runs from the same machine, Kane CLI reuses the upload; to skip it on another machine, such as a CI runner, set app: in the front matter to the APP id from the first run.
Step 6: Read the Verdict and the Evidence
The per-step verdict lands next to the test file in output-proverbial-smoke\Result.md.
type output-proverbial-smoke\Result.md---
test: ../proverbial-smoke_test.md
status: passed
started: <timestamp>
duration_s: <seconds>
session_id: <session id>
---
# proverbial-smoke_test.md - Result
## Main screen ✓ passed (<duration>)
md5: a6ddce5d29da64f9abdee8238706271c
If a permission dialog appears, allow it. Verify the app's main screen shows buttons labeled Text, Notification and Toast.
## Text screen ✓ passed (<duration>)
md5: 9c5c81240e5fcaa41dba0e78d670940a
Tap the Text button and verify the text Proverbial is displayed.
## Toast ✓ passed (<duration>)
md5: e09355815e86c49308a8bb1bbdc80399
Go back to the main screen, tap the Toast button and verify a toast message appears at the bottom of the screen.The front matter records the run's status and duration, and each step carries its own verdict and duration, so the file doubles as the report a reviewer reads.
The evidence pack and screenshots are under %USERPROFILE%\.testmuai\kaneai\sessions\remote\<job id>, and the HyperExecute job page holds the stage logs and the emulator video. The exit code is 0 for passed, 1 for a failed step, and 2 for a preflight error, so a pipeline can gate on it directly.
Running the Same Test Locally on a Mac
Local mobile runs need macOS on Apple Silicon, with Xcode 16 or newer for the simulator and an arm64-v8a system image for the emulator. The doctor --install step pulls the tooling Kane CLI manages, then discovers, boots, and installs to the device itself, so you never call adb or simctl by hand. The same proverbial-smoke_test.md runs unchanged; only the command differs.
# One-time setup (macOS on Apple Silicon)
kane-cli doctor --target emulator --install     # or --target simulator
kane-cli devices list --target emulator

# Run the saved test on a local emulator
kane-cli testmd run proverbial-smoke_test.md --device-name "Pixel 7 API 35" --os-version 15

# Or run a one-line objective without a file
kane-cli run "Tap Text and verify the heading reads Proverbial" \
  --target emulator --app ./proverbial_android.apk \
  --device-name "Pixel 7 API 35" --os-version 15
Permission dialogs are handled by default: Kane CLI turns on auto_grant_permissions and auto_accept_alerts (kane-cli config show lists both). Add --agent for NDJSON output in CI, and use kane-cli testmd export to turn a passing mobile run into Appium Python that can join an existing suite.
For the evidence each mobile run seals and how mobile runs differ from web runs, see Kane CLI mobile automation and the TestMu Conf 2026 session on mobile app validation in the agentic loop.

Austin Siewert
Co-Founder, Steadfast Systems
Discovered @TestMu AI yesterday. Best browser testing tool I've found for my use case. Great pricing model for the limited testing I do 👏
2M+ Devs and QAs rely on TestMu AI
Deliver immersive digital experiences with Next-Generation Mobile Apps and Cross Browser Testing Cloud

Running Tests on Real Devices
Emulators and simulators, including the ones Kane CLI drives, miss hardware-specific behavior, and they also run whatever OS image you happened to install. TestMu AI app test automation runs Appium, Espresso, XCUITest, and Detox suites on 10,000+ real Android and iOS devices. With Appium, execution defaults to an emulator or simulator, and only isRealMobile: true sends the session to physical hardware.
The example below speaks the raw W3C WebDriver protocol through Node's built-in fetch, so it needs no client library. It opens a session on a real phone with TestMu AI's hosted sample app (lt://proverbial-android), taps four controls, marks the result, and exits with a CI-friendly code.
// smoke.mjs - Node 18+, no dependencies
const HUB = 'https://mobile-hub.lambdatest.com/wd/hub';
const auth = 'Basic ' + Buffer.from(`${process.env.LT_USERNAME}:${process.env.LT_ACCESS_KEY}`).toString('base64');
const [deviceName = 'Pixel 8', platformVersion = '14'] = process.argv.slice(2);

async function wd(method, path, body) {
  const res = await fetch(HUB + path, {
    method,
    headers: { Authorization: auth, 'Content-Type': 'application/json' },
    body: body && JSON.stringify(body),
  });
  const json = await res.json();
  if (!res.ok) throw new Error(`${method} ${path} -> ${res.status}: ${json.value?.message}`);
  return json.value;
}

const { sessionId } = await wd('POST', '/session', { capabilities: { alwaysMatch: {
  platformName: 'android',
  'lt:options': {
    deviceName, platformVersion, isRealMobile: true,
    app: 'lt://proverbial-android', autoGrantPermissions: true,
    build: 'Mobile App Testing From the Command Line', name: 'proverbial smoke',
    video: true, w3c: true,
  },
} } });

let status = 'passed';
try {
  for (const id of ['color', 'Text', 'toast', 'notification']) {
    const el = await wd('POST', `/session/${sessionId}/element`, { using: 'id', value: `com.lambdatest.proverbial:id/${id}` });
    await wd('POST', `/session/${sessionId}/element/${Object.values(el)[0]}/click`, {});
    console.log(`tap id/${id} OK`);
  }
} catch (err) {
  status = 'failed';
  console.error(err.message);
}
await wd('POST', `/session/${sessionId}/execute/sync`, { script: `lambda-status=${status}`, args: [] });
await wd('DELETE', `/session/${sessionId}`);
console.log(`session ${sessionId} ${status} on ${deviceName} / Android ${platformVersion}`);
process.exit(status === 'passed' ? 0 : 1);
Run it against a real Pixel 8 on Android 14 and the terminal shows each tap as it lands. Pass "Galaxy S20" "10" instead and the session joins the same build, so both OS versions sit side by side in one dashboard view.
$ export LT_USERNAME=... LT_ACCESS_KEY=...
$ node smoke.mjs "Pixel 8" "14"
tap id/color OK
tap id/Text OK
tap id/toast OK
tap id/notification OK
session 1096e5d3-7cc5-4c78-b5b1-6a0a6fa7b6a3 passed on Pixel 8 / Android 14
$ echo $?
0
For your own app, upload the build once and pass the returned lt:// id as the app capability. Espresso and XCUITest suites can skip Appium: upload the app and test packages, then start a build through the framework API. The Espresso testing and XCUITest getting started docs list every field of the build payload.
# Your own build: upload once, reuse the returned lt:// id in capabilities
curl -u "$LT_USERNAME:$LT_ACCESS_KEY" -X POST \
  "https://manual-api.lambdatest.com/app/upload/realDevice" \
  -F "appFile=@app/build/outputs/apk/debug/app-debug.apk" -F "name=checkout-build"

# Espresso without Appium: upload app + test APK (type=espresso-android), then start a build
curl -X POST "https://mobile-api.lambdatest.com/framework/v1/espresso/build" \
  -u "$LT_USERNAME:$LT_ACCESS_KEY" -H "Content-Type: application/json" \
  -d '{"app":"lt://APP_ID","testSuite":"lt://TEST_SUITE_ID","device":["Pixel 8-14"],"build":"nightly-espresso","deviceLog":true,"video":true}'
Every session records device logs, network logs, video, and screenshots without extra flags, so a red build in CI links straight to a replay instead of a request to reproduce the failure locally.

Note: Run the smoke script above on your own TestMu AI account: set LT_USERNAME and LT_ACCESS_KEY, then point it at any Android or iOS device in the real device cloud. Sign up for free.
Gating Mobile Test Runs in CI
The runner you pick sets the cost of every mobile job. GitHub's Actions billing page prices a standard macOS runner minute at roughly 10 times a Linux 2-core minute. Local iOS simulator runs need that macOS runner, while a real-device run in the cloud is only an HTTPS client and runs fine on ubuntu-latest.
name: mobile-smoke
on: [pull_request]
jobs:
  real-device-smoke:
    runs-on: ubuntu-latest          # no macOS runner needed for cloud devices
    timeout-minutes: 15
    strategy:
      matrix:
        device: [["Pixel 8", "14"], ["Galaxy S20", "10"]]
    steps:
      - uses: actions/checkout@v4
      - uses: actions/setup-node@v4
        with:
          node-version: 22
      - name: Real-device smoke test
        env:
          LT_USERNAME: ${{ secrets.LT_USERNAME }}
          LT_ACCESS_KEY: ${{ secrets.LT_ACCESS_KEY }}
run: node smoke.mjs "${{ matrix.device[0] }}" "${{ matrix.device[1] }}"- Exit code is the contract - smoke.mjs exits 1 on any failed step, Gradle and xcodebuild do the same, so the job fails and the pull request is blocked with no report parsing.
- Matrix per OS version - each matrix entry is a separate job, which runs the Android 10 and Android 14 sessions in parallel and names the failing version in the check list.
- Split by speed - run JVM unit tests (./gradlew test) on every push, and keep device runs for pull requests and nightly builds, where the extra minutes pay off. The same tag, shard, and rerun flags are covered in regression testing command line.
Kane CLI also runs on ubuntu-latest, in a separate job, because its remote runs use HyperExecute emulators and simulators rather than the real phones in this matrix: install it with npm, sign in with kane-cli login --username and --access-key from secrets, then call kane-cli testrun run --remote, which prints an NDJSON event stream in CI that a script can parse. The roundup of the best AI mobile app testing CLI tools covers when objective-based tests fit better than an Appium script.
Troubleshooting Command-Line Mobile Test Runs
The first row in the table below is easy to hit: without autoGrantPermissions, the smoke script passes on a Galaxy S20 with Android 10 but finds nothing on a Pixel 8 with Android 14. Android 13 (API level 33) added the POST_NOTIFICATIONS notification permission, and on the Pixel 8 its dialog covers the app. Adding autoGrantPermissions: true clears the dialog, and the script passes on both versions.
| Symptom | Likely cause | Fix |
|---|---|---|
| Passes on an old OS, element not found on a new one | A runtime permission dialog covers the app | autoGrantPermissions: true, or handle the dialog in the test |
| Emulator exits at once on a CI server | No display available for the emulator window | Start it with -no-window and -no-audio |
| INSTALL_FAILED or "device offline" on the first command | Tests started before boot completed | Poll sys.boot_completed, or use simctl bootstatus -b on iOS |
| "Unable to find a destination matching" | The simulator name or OS in -destination is not installed | Copy an exact name or id from xcrun simctl list devices available |
| Appium fails to start after an upgrade | Node.js older than Appium 3 supports | Upgrade Node.js, then rerun appium driver doctor |
| Cloud run behaves like an emulator | isRealMobile is missing, so the session defaults to a virtual device | Set isRealMobile: true in lt:options |
Conclusion
Start by making one test run headless on your laptop: boot a device with the toolchain block, then run ./gradlew connectedAndroidTest or xcodebuild test and confirm the exit code. After that works, copy smoke.mjs into the repository, add the two secrets, and let the CI matrix run it on real Android versions for every pull request.
The Appium Python docs have the same flow, including app upload and iOS capabilities.
Author

Sai Krishna
Blogs: 21

Sai Krishna is Director of Engineering at TestMu AI (formerly LambdaTest), where he leads agentic AI for quality engineering, building AI agents that autonomously drive mobile and conversational test automation. His current focus is Agent Testing and Model Context Protocol (MCP) support for mobile. He is a core contributor and member of the Appium open-source project and the creator of AppiumTestDistribution and appium-device-farm. With over 14 years of experience including more than 9 years at Thoughtworks as a Principal Consultant, he holds a BSc in Electronics and speaks regularly at TestMu and Appium Conf on Appium, mobile automation, and agentic AI in testing.
Reviewer

Srinivasan Sekar
Reviewer
Srinivasan Sekar is Director of Engineering at TestMu AI (formerly LambdaTest), where he leads engineering and open-source initiatives behind the Selenium and Appium automation grid and owns TestMu AI's MCP Server. A committer to Appium and a contributor to Selenium, WebdriverIO, Taiko, and AppiumTestDistribution, he brings over 15 years of experience in quality engineering and open-source technologies. He is the author of the Apress book 'The MCP Standard: A Developer's Guide to Building Universal AI Tools with the Model Context Protocol,' a Certified Kubernetes and Cloud Native Associate, and an international conference speaker. Before TestMu AI he spent over eight years at Thoughtworks as a Principal Consultant and Quality Architect. Srinivasan holds a B.Tech in Information Technology from Anna University.


Mobile Testing CLI FAQs
Did you find this page helpful?
More Related Blogs
TestMu AI forEnterprise
Get access to solutions built on Enterprise
grade security, privacy, & compliance
- Advanced access controls
- Advanced data retention rules
- Advanced Local Testing
- Premium Support options
- Early access to beta features
- Private Slack Channel
- Unlimited Manual Accessibility DevTools Tests