

Power Your Software Testing with AI Agents and Cloud
The Native AI-Agentic Cloud Platform to Supercharge Quality Engineering. Test Intelligently and Ship Faster.


- TestMu AI (Formerly LambdaTest)
- /
- Blog
- /
- Appium MCP: AI-Powered Mobile Test Automation
Appium MCP: AI-Powered Mobile Test Automation
Learn how Appium MCP brings AI-powered mobile test automation to Appium. Set up the Appium MCP server, run tests with Claude and Kiro, and scale on TestMu AI.
Last Updated on:
The Model Context Protocol, also termed MCP, an open standard introduced by Anthropic, lets AI assistants connect with external tools, APIs, and services through a unified interface. MCP is a game changer, as it enhances the interaction of AI assistants beyond the chat window.
Aptly dubbed "Appium on Steroids" by its own creators, Appium MCP takes Appium automation a notch above by combining the potential of Appium's mobile control capabilities with the MCP protocol. The Appium MCP server is designed to empower developers and QA engineers whereby they can leverage AI assistants with a suite of tools for AI mobile testing.
With Appium MCP, teams can harness the benefits of AI-powered mobile test automation, that too without requiring deep Appium expertise. In this guide, we deep dive into Appium MCP, its usage, and how it can be used at scale with a cloud testing platform like TestMu AI.
What is MCP (Model Context Protocol)?
Model Context Protocol (MCP), introduced by Anthropic in late 2024, is an open-source standard for connecting AI applications to external systems. MCP is also termed as USB-C for AI applications since MCP provides a standardized interface (akin to USB-C that provides a universal connector for hardware devices) that allows AI models to seamlessly connect with any external tools/systems.
AI assistants such as Claude, ChatGPT, and Google's Antigravity IDE, along with development tools like Kiro, Cursor, VS Code, MCPJam, and many others, have adopted MCP, making it a true "build once, integrate everywhere" standard.
Readers interested in exploring MCP in greater depth can refer to Appium Insights by Sai Krishna and The MCP Standard by Srinivasan Sekar respectively. Both the books provide a deeper look at the protocol and its role in AI-powered tool integrations.
What is Appium MCP?
As stated earlier, Appium MCP (or MCP Appium) is an intelligent MCP server built on top of Appium, the popular mobile automation framework. The Appium MCP server wraps standard Appium commands as agent-callable tools. It exposes capabilities such as creating and ending device sessions (Android UiAutomator2 / iOS XCUITest) and launching or restarting an app by package name or bundle ID.
It also supports finding elements using natural-language or accessibility-based detection, performing gestures (tap, swipe, scroll, long-press), capturing screenshots, and dumping the UI hierarchy. This is what lets an AI agent explore an app, generate locators, and author tests without you opening Appium Inspector manually.
The Appium MCP simplifies mobile app testing by letting QA engineers interact in natural language, automatically generate locators, and create tests for both Android and iOS apps.
Here are some of the salient features of Appium MCP:
| Feature | Description |
|---|---|
| Cross-Platform Support | Automate tests for both Android (UiAutomator2) and iOS (XCUITest) on real devices, emulators, and simulators |
| Locate Elements with AI | AI-assisted element location using natural language descriptions and vision models |
| Locator generation using priority-based strategies | AI-powered locator identification that tries locators in a ranked order, favoring the most favorable ones first - Accessibility ID, Resource ID/Name, ClassName, XPath, etc. |
| Device Session Management | Seamlessly create and manage Appium sessions on local and cloud-based Android and iOS devices, emulators, and simulators |
| AI-Assisted Test Generation | Pair Appium MCP with AI assistants like Claude for generating Appium test code using natural language |
| AI-Assisted Page Object Model Support | Pair Appium MCP with AI assistants like Claude to generate Page Object Model-based automation code using application context discovered during runtime |
| Multilingual Support | Automate mobile testing using natural instructions in languages such as English, Spanish, Chinese, Japanese, and Korean |
The open-source code of Appium MCP code is hosted on GitHub. At the time of writing this blog, the latest version of Appium MCP is 1.87.2.
Appium MCP Architecture
In simple terms, Appium MCP acts as a bridge between the AI assistants (e.g., Claude, Cline, Cursor, Kiro, etc.) and the Appium automation framework. It uses the Model Context Protocol (MCP) for exposing Appium capabilities as callable tools.
Since MCP is a standard protocol, the Appium MCP server also follows a layered architecture that has the fundamental layers : AI Client → MCP Protocol (JSON-RPC 2.0) → MCP Server → Underlying Service.
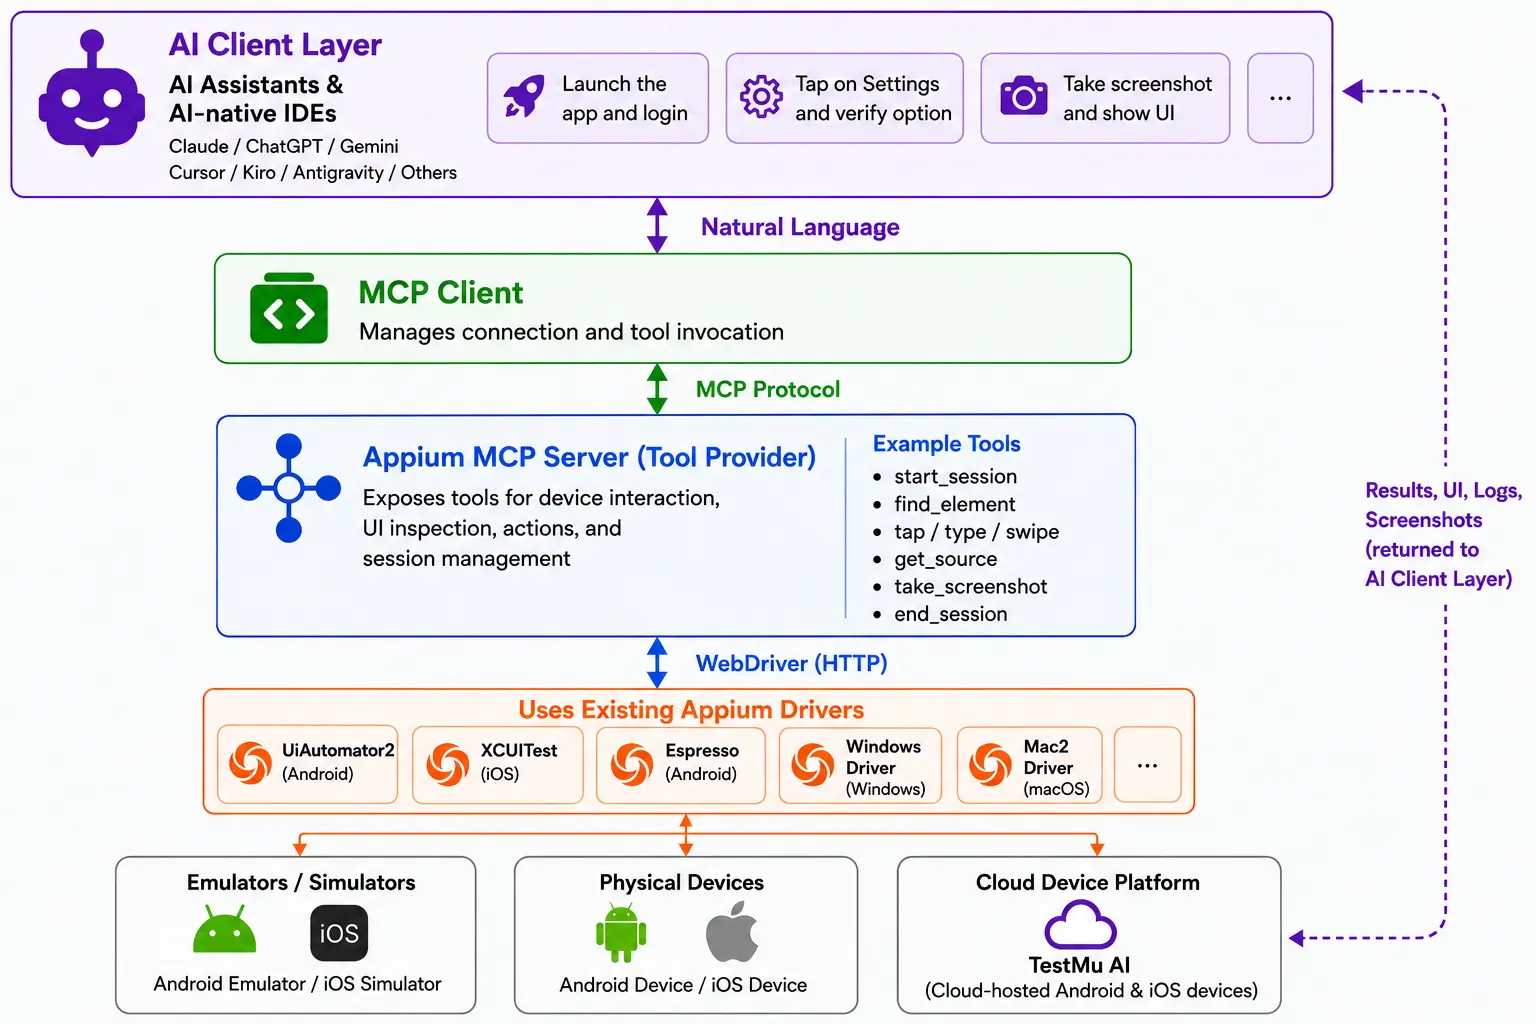
The diagram below illustrates the high-level architecture of Appium MCP:
1. AI Client Layer
As the name suggests, the AI client layer comprises AI assistants (e.g., Claude, ChatGPT, Gemini, etc.) and AI-native IDEs (e.g., Cursor, Kiro, Antigravity, etc.). It lets users interact with the Appium MCP server using natural language prompts.
The AI client interprets the user intent and translates those instructions into actions performed through Appium MCP.
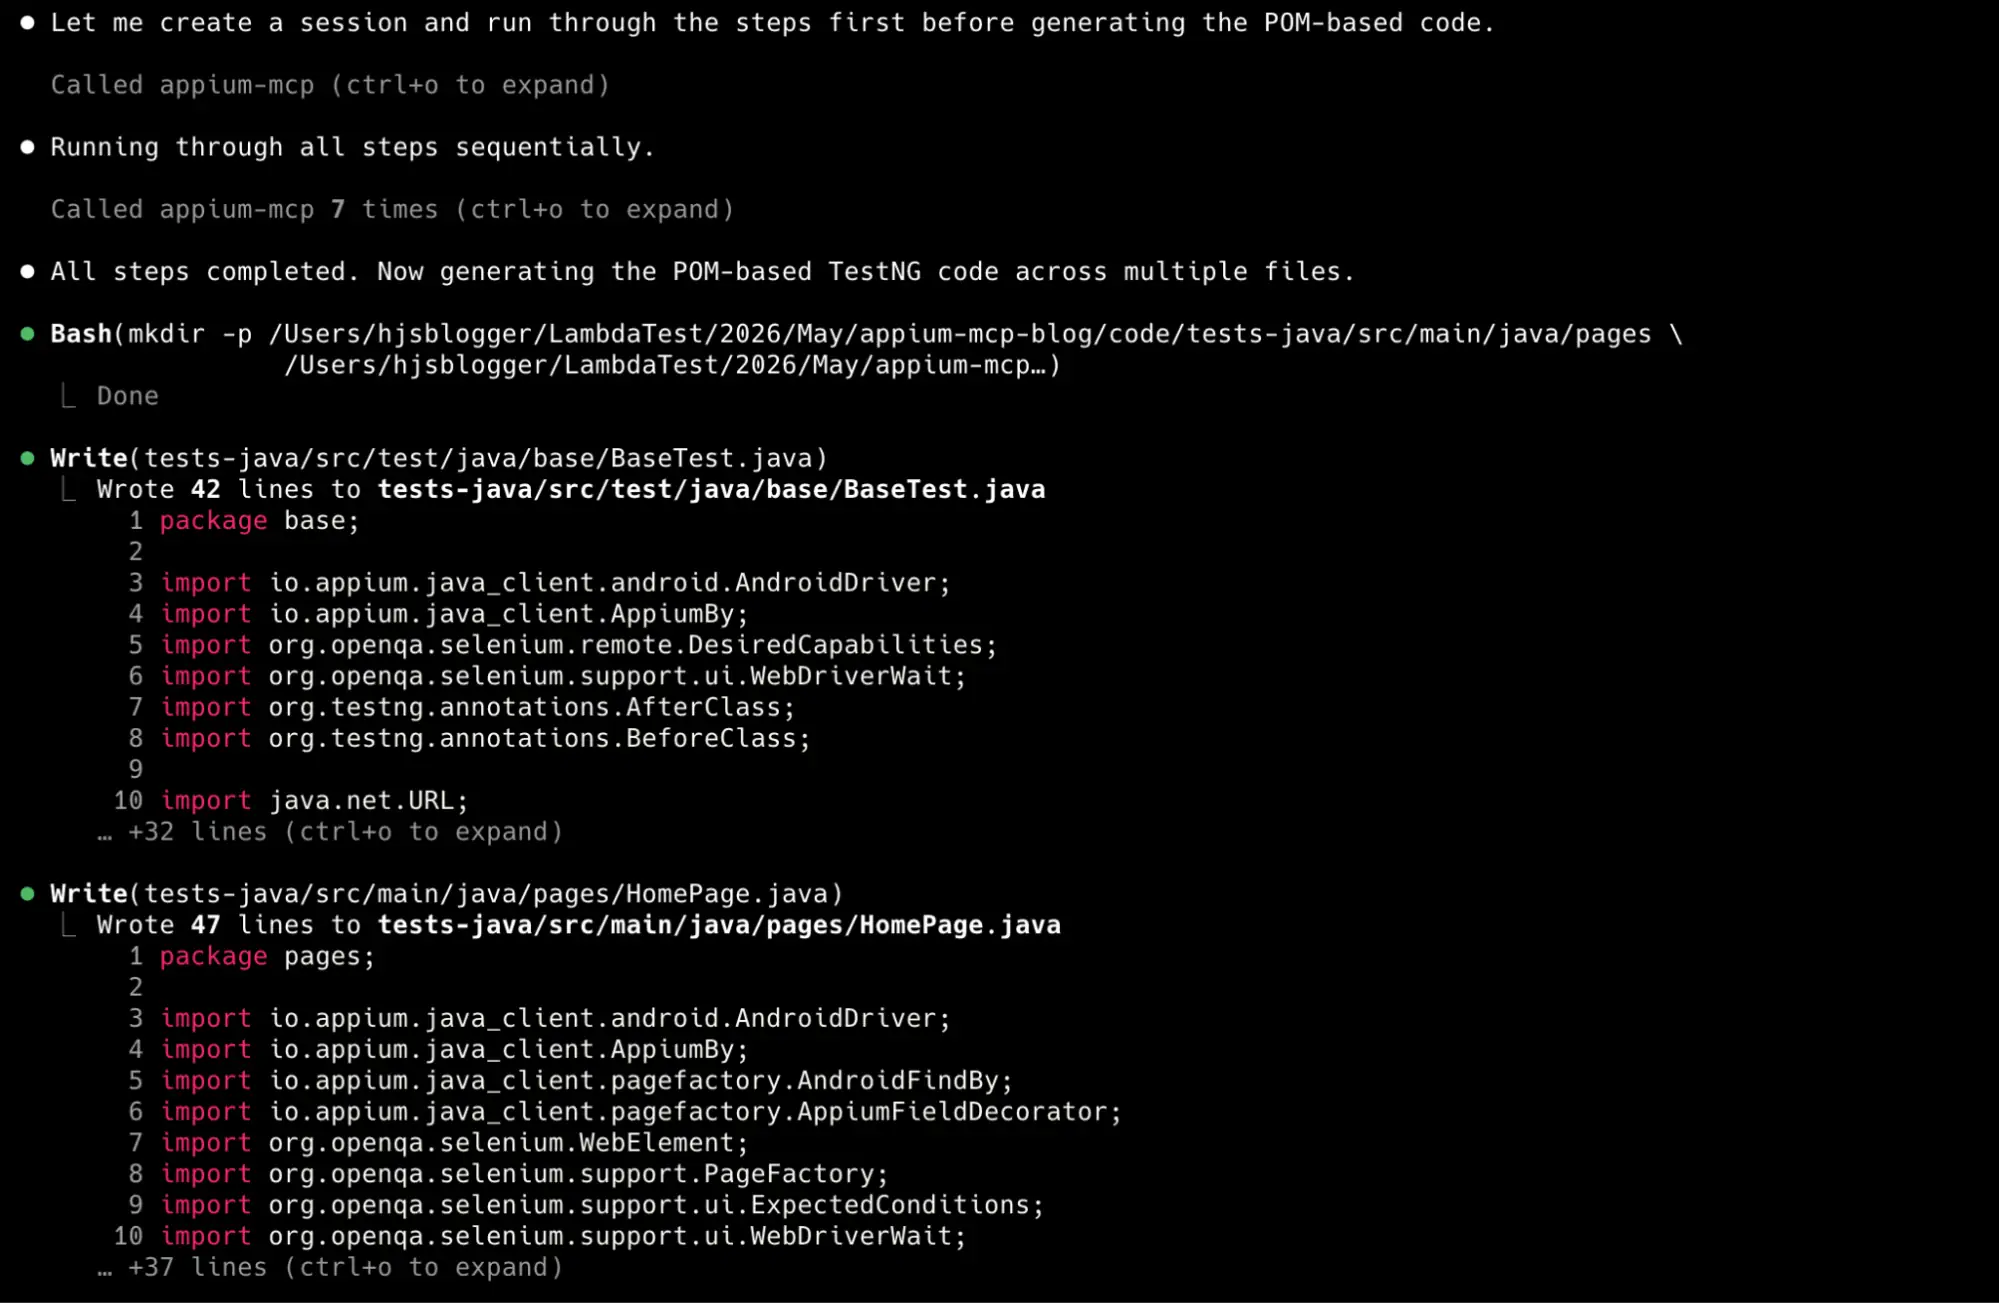
Figure 1: Appium MCP Architecture [image generated using AI]
2. MCP Client
The MCP client is embedded within the AI assistant or an AI-assisted IDE. It is the bridge between the user's intent and the Appium MCP server. It selects and invokes the appropriate MCP tool call request.
As seen from the bi-directional communication, responses from the Appium MCP Server are sent back to the AI, which then presents the results to the user.
3. Appium MCP Server
Serving as the primary connective bridge, the Appium MCP Server facilitates communication between the MCP client and the Appium automation framework (i.e., Appium server). It exposes mobile automation capabilities as a collection of callable MCP tools, such as find_element, tap, swipe, take_screenshot, etc., allowing AI assistants to execute specific mobile actions.
Upon receiving a tool invocation, the server converts it into standardized WebDriver commands that are further processed by the Appium Server. Subsequently, execution data and device feedback are routed back through the protocol to the MCP client.
4. Appium Server
The Appium server receives WebDriver-compliant commands from the MCP server. It then translates them into platform-specific instructions for the Device Under Test (DUT).
In the context of Appium MCP, the Appium server is more of an execution since it does the heavy lifting of session management and communication with the DUT (i.e., physical device, emulator, simulator).
5. Device Layer
This is the execution environment where Appium automation commands are executed. Though testing on emulators and simulators is a good starting point, cloud platforms like TestMu AI can be leveraged for scalable, cross browser testing.

How to setup Appium MCP
Let's look at how to install and configure Appium MCP so that we can utilize it for executing AI-driven mobile tests with Appium.
Before getting started, ensure the following are installed on your machine
- Node.js (v22 or higher)
- npm or yarn
- Java Development Kit (JDK 8 or higher)
- Android SDK for Android testing
- Xcode for iOS testing (macOS only)
You can refer to the Appium MCP setup guide for further details on setting up the prerequisites. Now that the prerequisites are met, let's install the Appium MCP server on the machine. It is important to note that Xcode is required for iOS testing (on local simulators & devices) and is only available on macOS.
Installing Appium MCP Server
Let's look at how to install and configure Appium MCP so that we can utilize it for executing AI-driven mobile tests with Appium.
For local execution, you need to install Appium on the host machine. Run the command npm install -g appium to install the latest version of Appium framework globally using the npm package. Run the command appium --version to verify if the installation is successful. At the time of writing this blog, the latest version of Appium is 3.2.0.
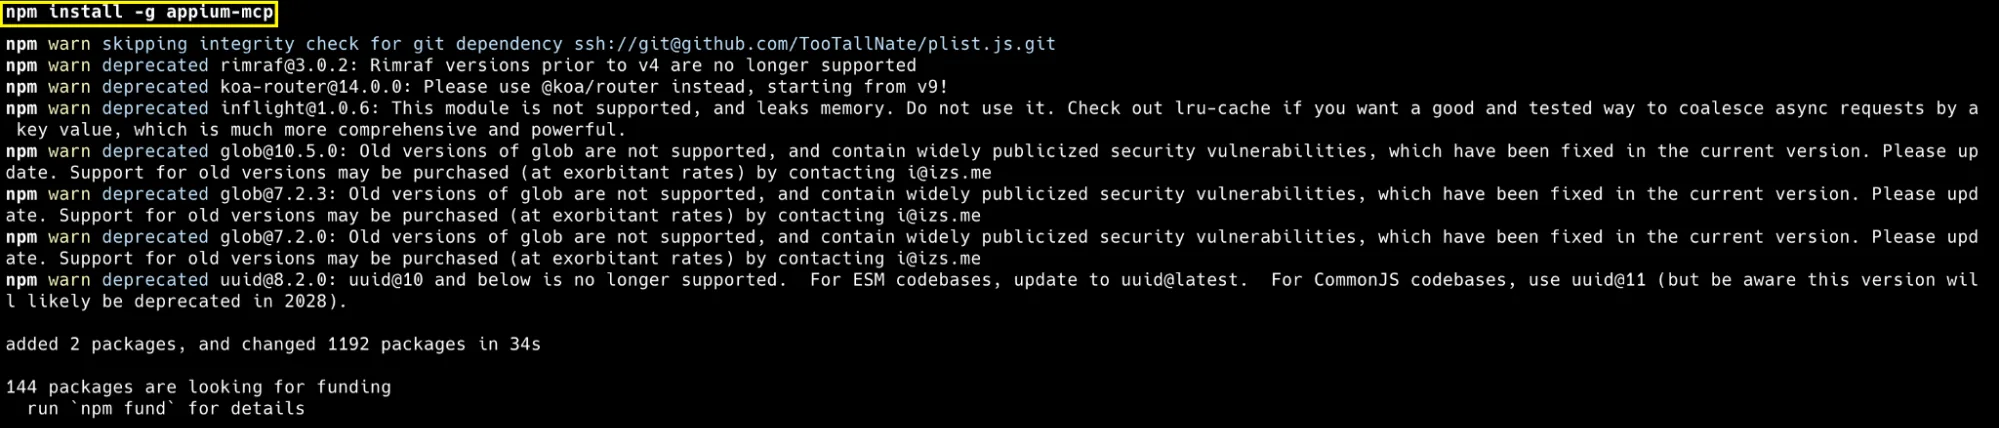
Now that Appium is installed, we install the Appium MCP by executing the npm install -g appium-mcp command in the terminal. It does a global installation of the Appium MCP package on the host machine, allowing it to be invoked from any directory on the host machine.
Run the command appium-mcp --help to confirm the installation. Alternatively, you can also run npx -y appium-mcp@latest in case you want to run Appium MCP server directly using npx without a global installation.
At the time of writing this blog, the latest version of Appium MCP is 1.87.2.

Configuring Appium MCP with AI Assistants
Appium MCP's full potential is unlocked when integrated with an AI assistant that turns complex mobile automation tasks into simple conversational commands. For this, your preferred assistant needs to be pointed to the Appium MCP server via its MCP configuration file.
In case you are using Claude CLI (instead of Claude Desktop), you do not need the MCP configuration file. Run the command claude mcp add appium-mcp -- npx -y appium-mcp@latest to automatically configure the MCP server for use with Claude Code CLI.
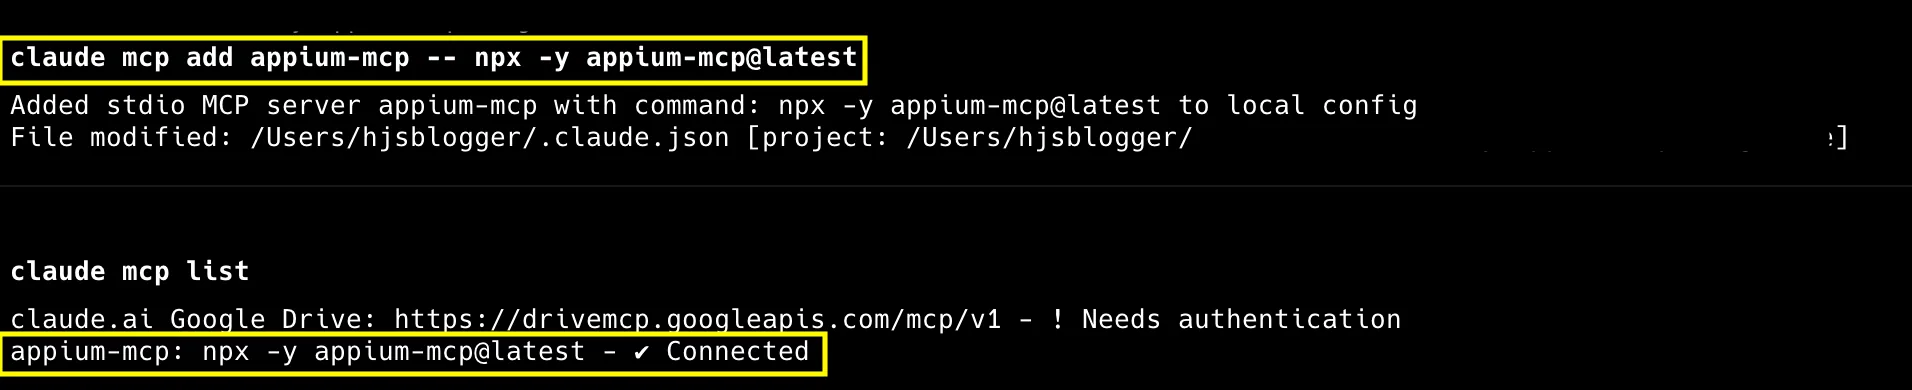
While Appium MCP integrates with multiple AI assistants and AI-native IDEs, this blog demonstrates its usage with Claude CLI and Kiro. The same concepts can be applied to other MCP-compatible clients with minimal changes.
How to configure Appium MCP with Claude Code CLI
First and foremost you require a Claude account and Claude Code CLI on the machine. Run the command npm install -g @anthropic-ai/claude-code in the terminal to install the Claude Code CLI.
To effectively utilize Appium MCP for executing tests across local hardware, emulators, simulators, or the TestMu AI cloud platform, we first update Claude's settings.json (usually at ~/.claude/settings.json).
Claude settings.json now has two entries:
- appium-mcp-local : points to localhost:4723 over http, no credentials needed
- appium-mcp-cloud : points to mobile-hub.lambdatest.com over https, reads credentials from $LT_USERNAME and $LT_ACCESS_KEY environment variables
Export the TestMu AI credentials (Username and Access Key) from your TestMu AI profile and set them as environment variables:
export LT_USERNAME="YOUR_LT_USERNAME"
export LT_ACCESS_KEY="YOUR_LT_ACCESS_KEY"
Here is the complete ~/claude/settings.json that can be readily used with Claude CLI:
{
  "mcpServers": {
    "appium-mcp-local": {
      "command": "npx",
      "args": [
        "-y",
        "appium-mcp@latest"
      ],
      "env": {
        "APPIUM_HOST": "localhost",
        "APPIUM_PORT": "4723",
        "APPIUM_PATH": "/",
        "APPIUM_PROTOCOL": "http"
      }
    },
    "appium-mcp-cloud": {
      "command": "npx",
      "args": [
        "-y",
        "appium-mcp@latest"
      ],
      "env": {
        "APPIUM_HOST": "mobile-hub.lambdatest.com",
        "APPIUM_PORT": "80",
        "APPIUM_PATH": "/wd/hub",
        "APPIUM_PROTOCOL": "https",
        "LT_USERNAME": "${LT_USERNAME}",
        "LT_ACCESS_KEY": "${LT_ACCESS_KEY}"
      }
    }
  }
}
With the Appium MCP server set, we set the capabilities for automating Appium tests on local and TestMu AI cloud grids. For automation on TestMu AI, we first upload the Proverbial Android app to the TestMu AI cloud. Run the following command on the terminal to upload the app:
curl -u "$LT_USERNAME:$LT_ACCESS_KEY" -X POST "https://manual-api.lambdatest.com/app/upload/realDevice" -F "appFile=@proverbial_android.apk" -F "name=proverbial_android" -F "type=android"

Now that we have the App ID in place, we create a JSON file (e.g., lt-rd-capabilities.json) that houses an array of Appium capabilities for testing the application on two different Android devices in parallel.
[
  {
    "platformName": "Android",
    "deviceName": "Galaxy S24",
    "platformVersion": "14",
    "app": "lt://APP1016025801781796939639692",
    "build": "[LT-MCP-Demo] Android Real Device on TestMu AI Cloud",
    "name": "[LT-MCP-Demo] Galaxy S24 Test",
    "isRealMobile": true,
    "region": "AP",
    "autoAcceptAlerts": true,
    "autoGrantPermissions": true
  },
  {
    "platformName": "Android",
    "deviceName": "Pixel 9",
    "platformVersion": "15",
    "app": "lt://APP1016025801781796939639692",
    "build": "[LT-MCP-Demo] Android Real Device on TestMu AI Cloud",
    "name": "[LT-MCP-Demo] Pixel 9 Test",
    "isRealMobile": true,
    "region": "AP",
    "autoAcceptAlerts": true,
    "autoGrantPermissions": true
  }
]
FileName - capabilities/lt-rd-capabilities.json
To simplify things, it is recommended to create an agent instruction file (e.g., agent.md) that contains the natural language test plan that tells the AI agent what to do, covering session setup, test steps, assertions, and teardown.
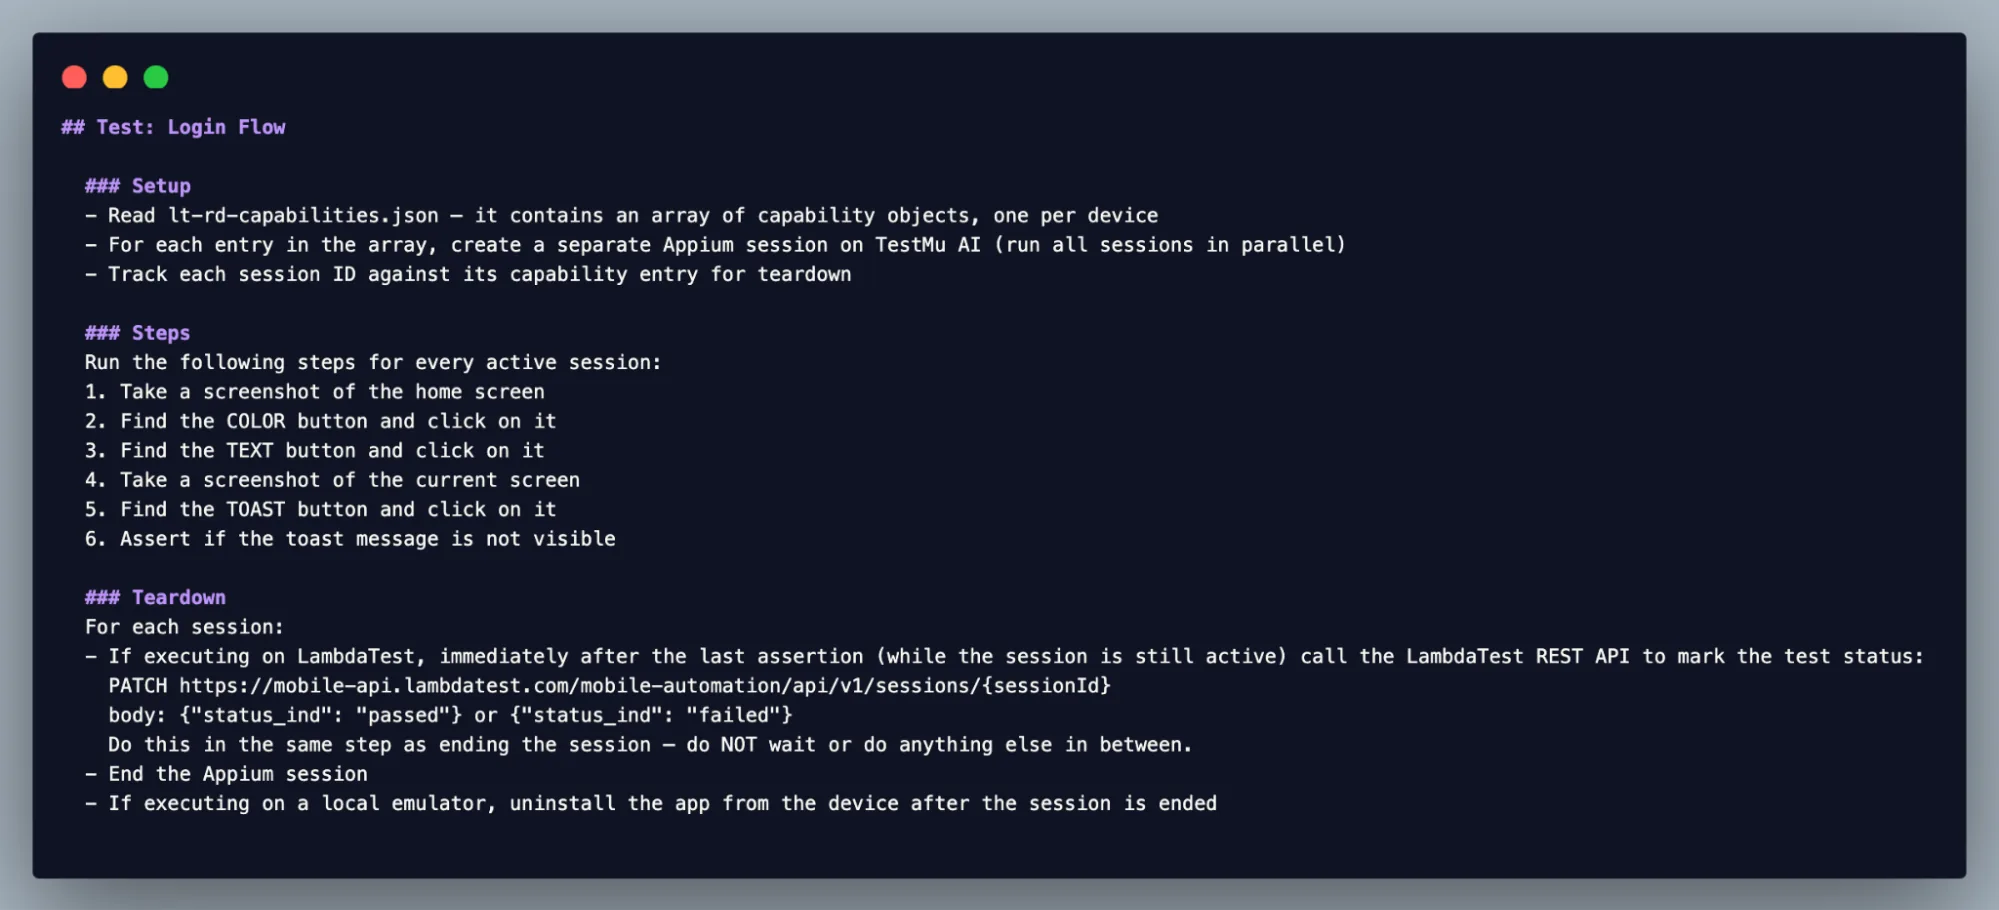
FileName - instructions/agent.md
The same agent instruction file can also be used for running tests on a local real device (or emulator/simulator). With the setup done, enter the following prompt in the Claude Code CLI to run the Appium tests using the Appium MCP server on the TestMu AI cloud grid.
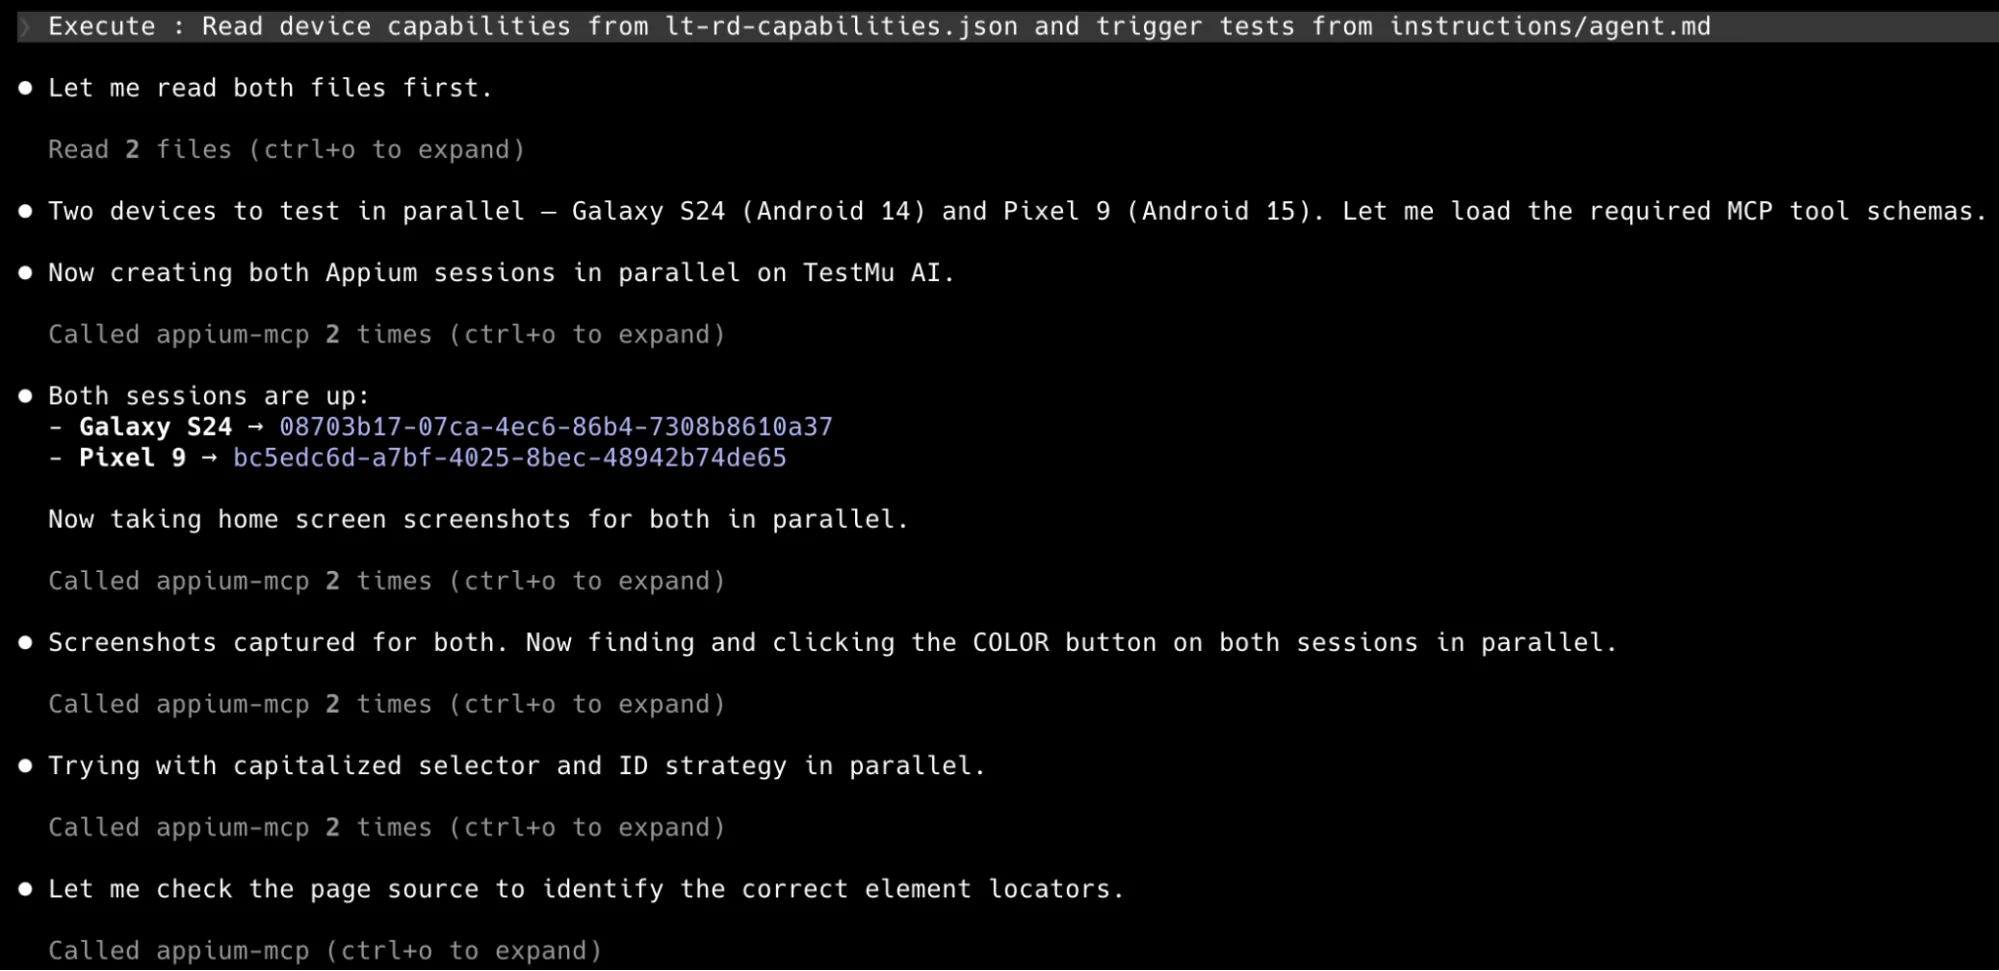
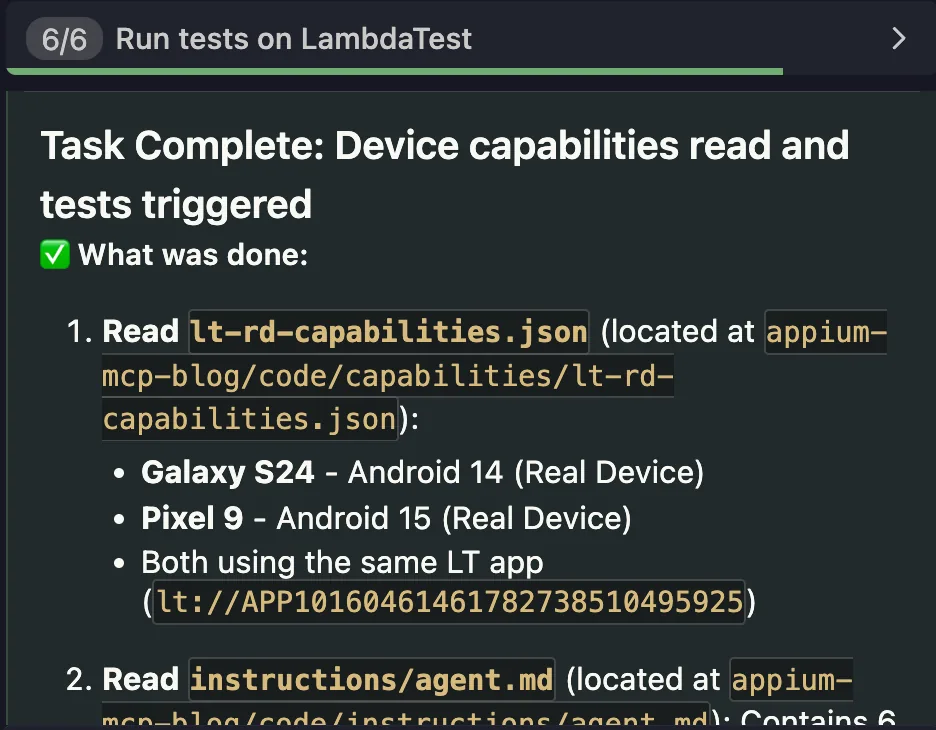
Prompt: Read device capabilities from lt-rd-capabilities.json and trigger tests from instructions/agent.md
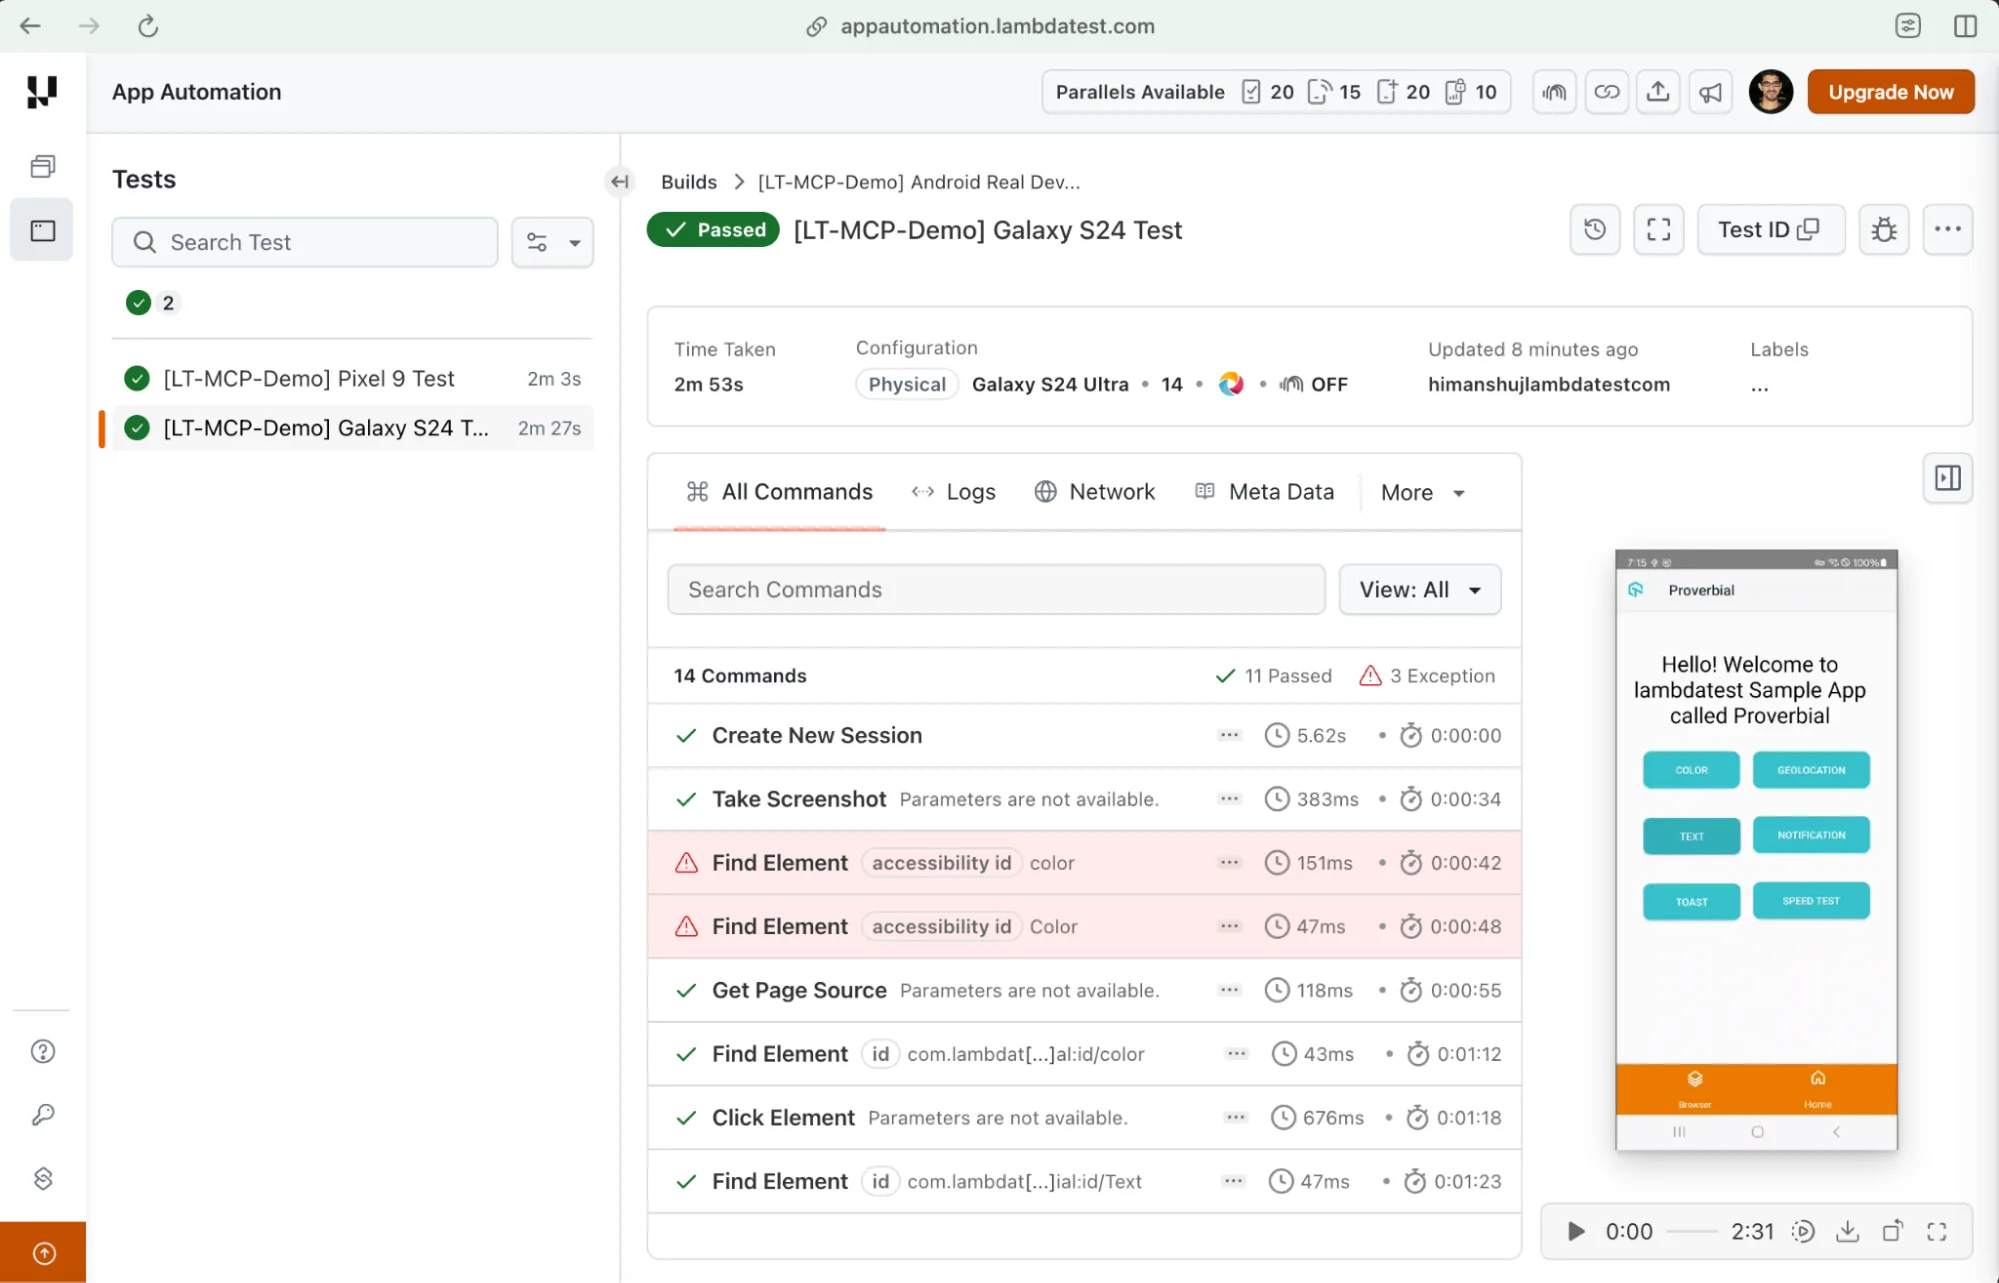
As seen below, the Claude CLI triggers the tests on the TestMu AI cloud grid via the Appium MCP server. Here a single test is running in parallel on two real devices on the cloud grid.
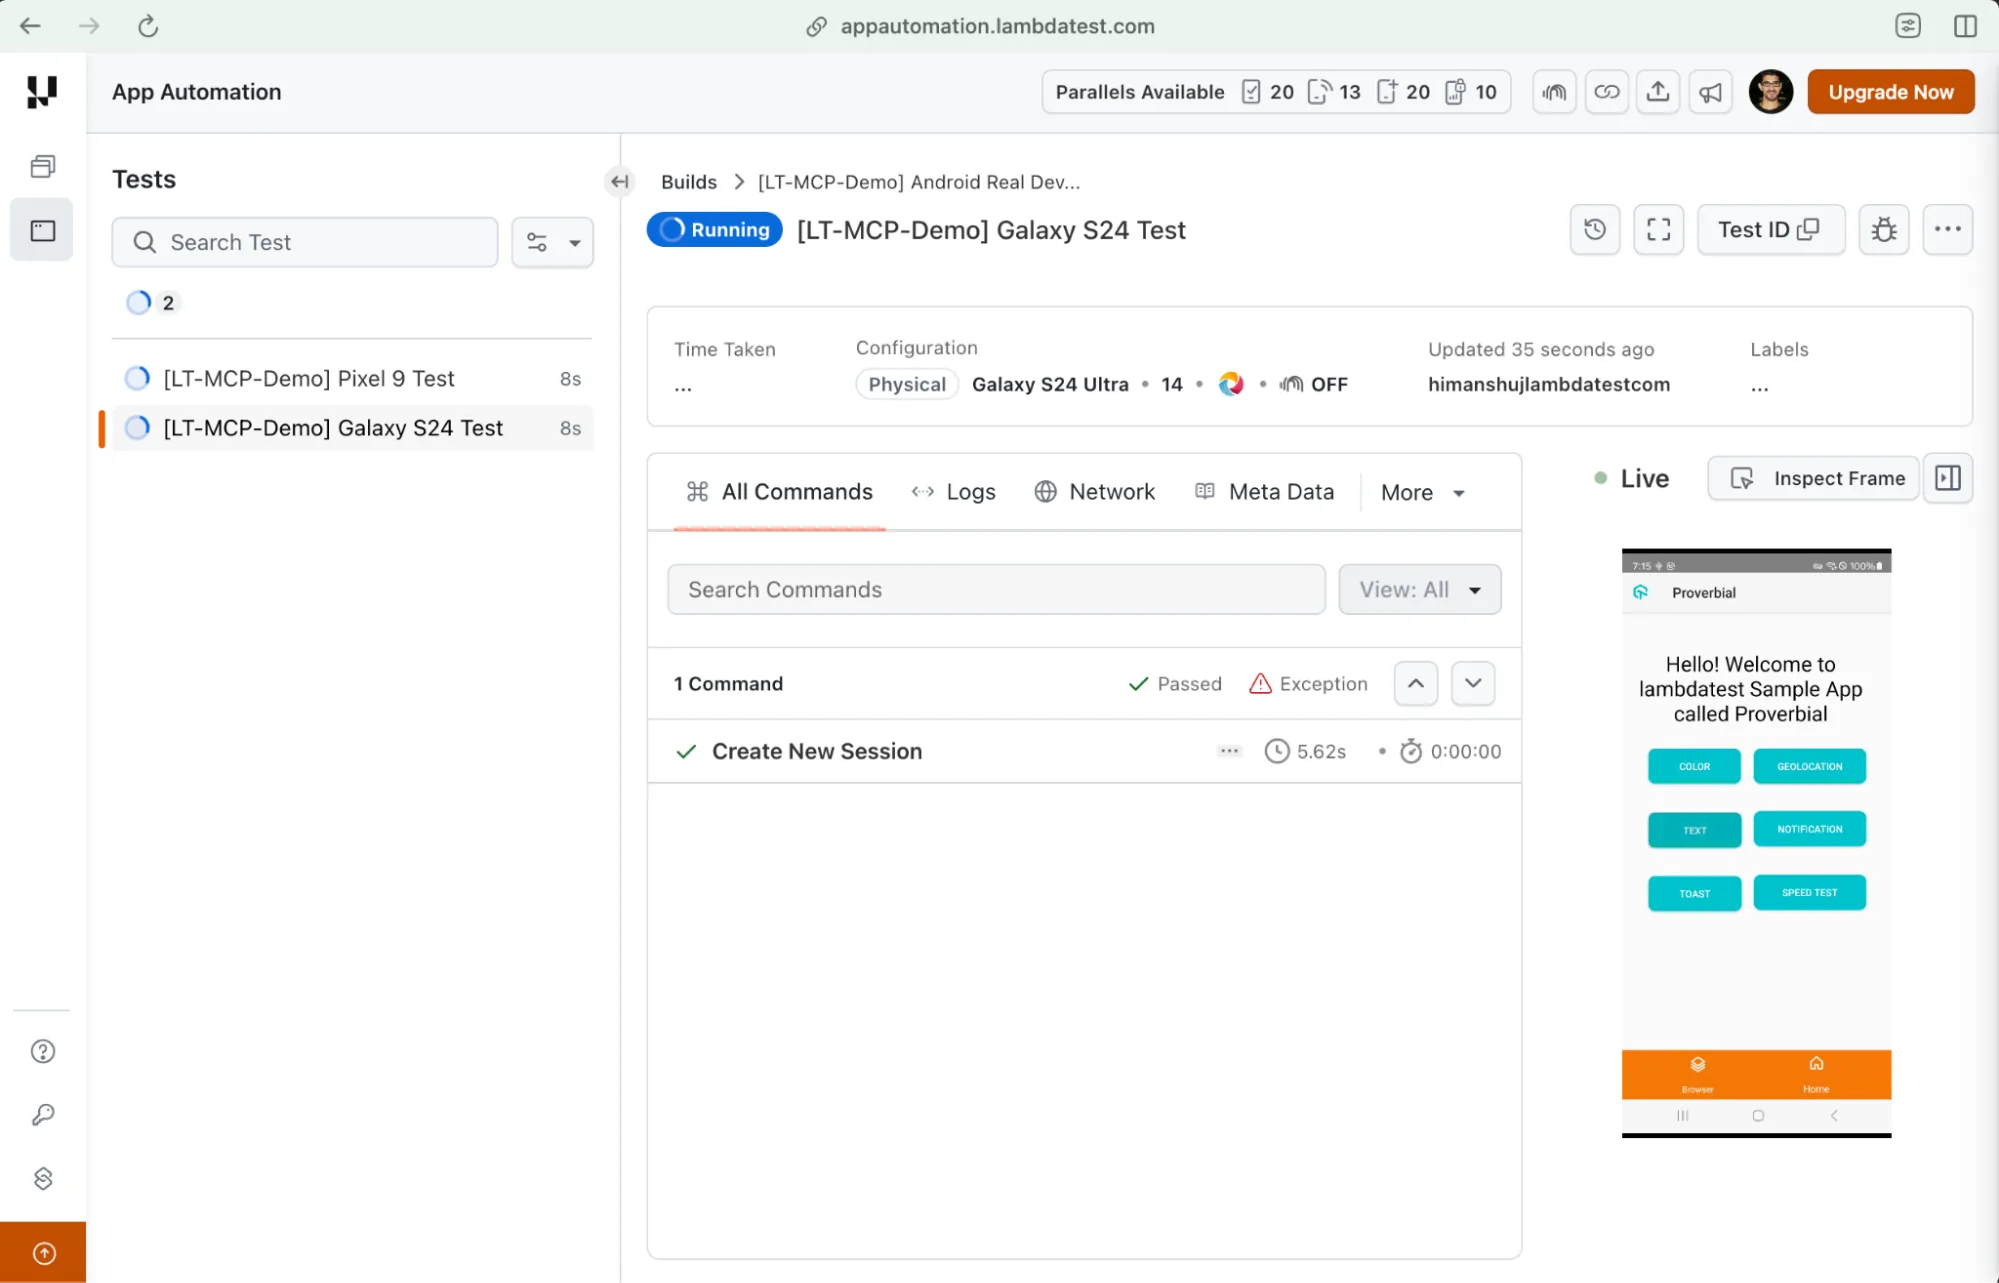
The test execution is successful and the test results can be viewed on the TestMu AI dashboard, with the test status also reflected on the Claude Code CLI.
For executing the tests on a local device (or emulator/simulator), run the following prompt after creating capabilities in lt-local-capabilities.json
{
  "platformName": "Android",
  "deviceName": "emulator-5554",
  "platformVersion": "14",
  "automationName": "UiAutomator2",
  "app": "app/proverbial_android.apk",
  "autoAcceptAlerts": true,
  "autoGrantPermissions": true
}
FileName - capabilities/lt-local-capabilities.json
Prompt: Read device capabilities from lt-local-capabilities.json and trigger tests from instructions/agent.md
To run the tests on a local emulator, launch your emulator of choice (e.g., emulator -avd Pixel_7_Android_34 -wipe-data) and update the device capabilities in lt-local-capabilities.json accordingly before triggering the tests via the Appium MCP server. The same agent instruction file (i.e., agent.md) can be used by simply tweaking the prompt.
Prompt: Read device capabilities from lt-local-capabilities.json and trigger tests from instructions/agent.md on local emulator
The demonstrations performed on Android real devices and emulators can be seamlessly replicated to test iOS apps (on real devices or simulators) using the Appium MCP server!
How to configure Appium MCP with Kiro
Kiro is a popular AI-powered IDE developed by AWS that supports agentic coding workflows. Cursor, Windsurf, and Antigravity are some of the other popular AI-IDEs that can be used with the Appium MCP server.
Since all the above IDEs are VS Code-based, Cline can be used across all of them, and the steps to configure the Appium MCP remain the same. In the case of Kiro, we also have the option of Kiro CLI however, we would keep it aside for the larger context of the blog.
We first install the Cline extension in the Kiro IDE. For installation, navigate to View → Extensions and search for Cline.
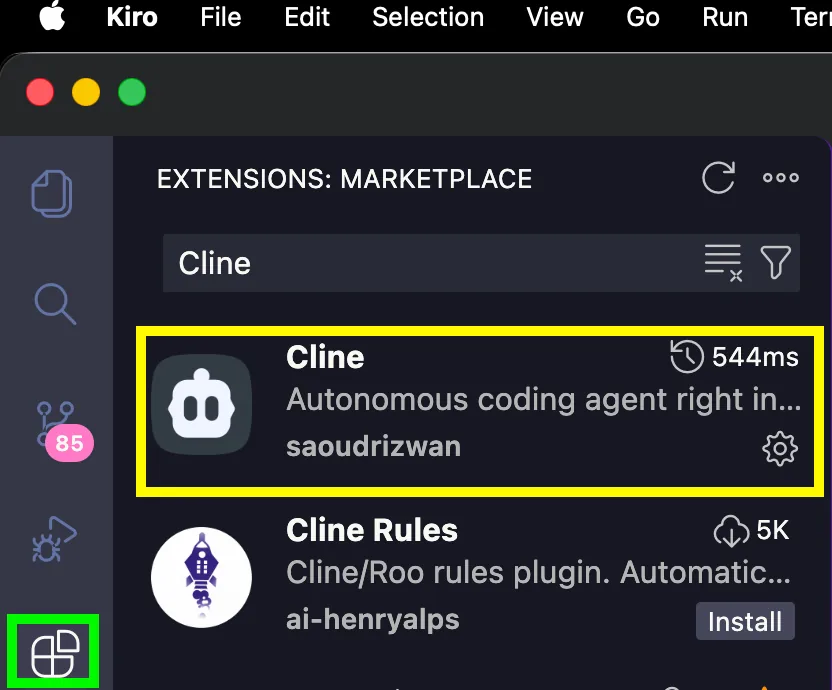
Now that the Cline extension is installed, add the MCP servers in the Cline JSON. In my case, Cline MCP Settings is located in ~/Library/Application\ Support//Kiro/User/globalStorage/saoudrizwan.claude-dev/settings/cline_mcp_settings.json (Example)
TestMu AI UserName and AccessKey need not be hard-coded in the Cline JSON, since it will expose the critical credentials to anyone with access to the configuration file. Instead export LT_USERNAME and LT_ACCESS_KEY in the Kiro terminal, as the MCP server server will pick up these environment variables automatically from the inherited shell environment.
{
  "mcpServers": {
    "appium-mcp-local": {
      "command": "npx",
      "args": ["-y", "appium-mcp@latest"],
      "env": {
        "APPIUM_HOST": "127.0.0.1",
        "APPIUM_PORT": "4723",
        "APPIUM_PATH": "/",
        "APPIUM_PROTOCOL": "http"
      }
    },
    "appium-mcp-cloud": {
      "command": "npx",
      "args": ["-y", "appium-mcp@latest"],
      "env": {
        "APPIUM_HOST": "mobile-hub.lambdatest.com",
        "APPIUM_PORT": "80",
        "APPIUM_PATH": "/wd/hub",
        "APPIUM_PROTOCOL": "https"
      }
    }
  }
}
FileName - cline_mcp_settings.json for Kiro & other AI-IDEs
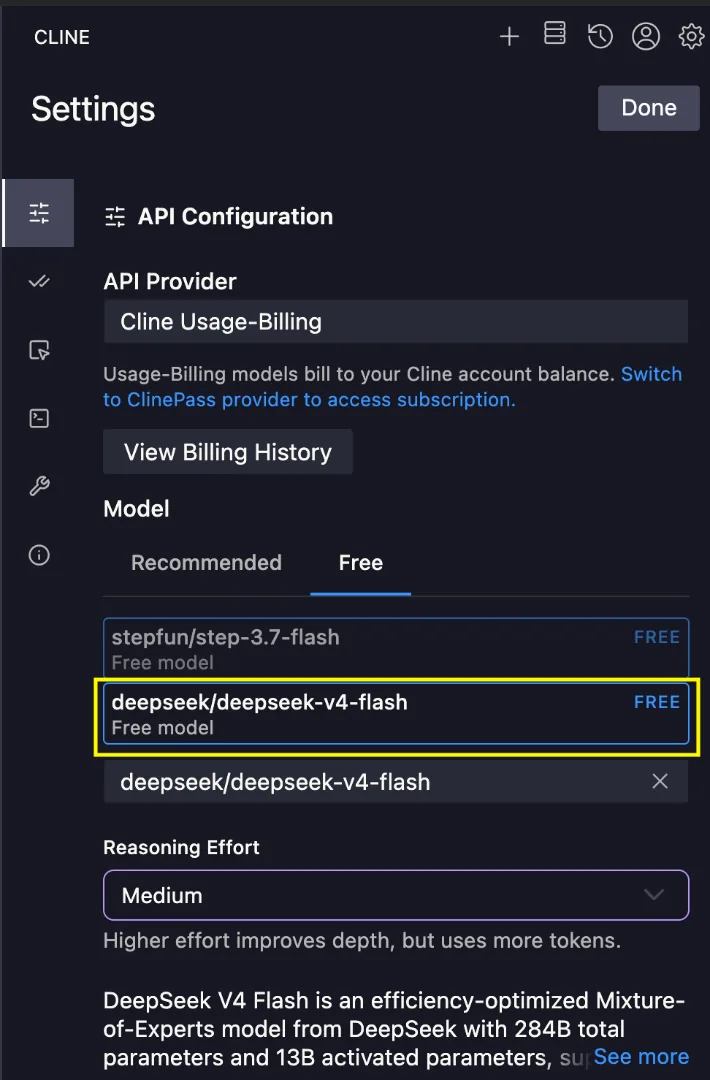
Rather than using Cline credits, it is recommended to use free models such as DeepSeek for cost-effective test execution.
With things all set, run the same prompt "Read device capabilities from lt-rd-capabilities.json and trigger tests from instructions/agent.md". As seen below, the instructions/steps in the agent instruction file executed successfully.
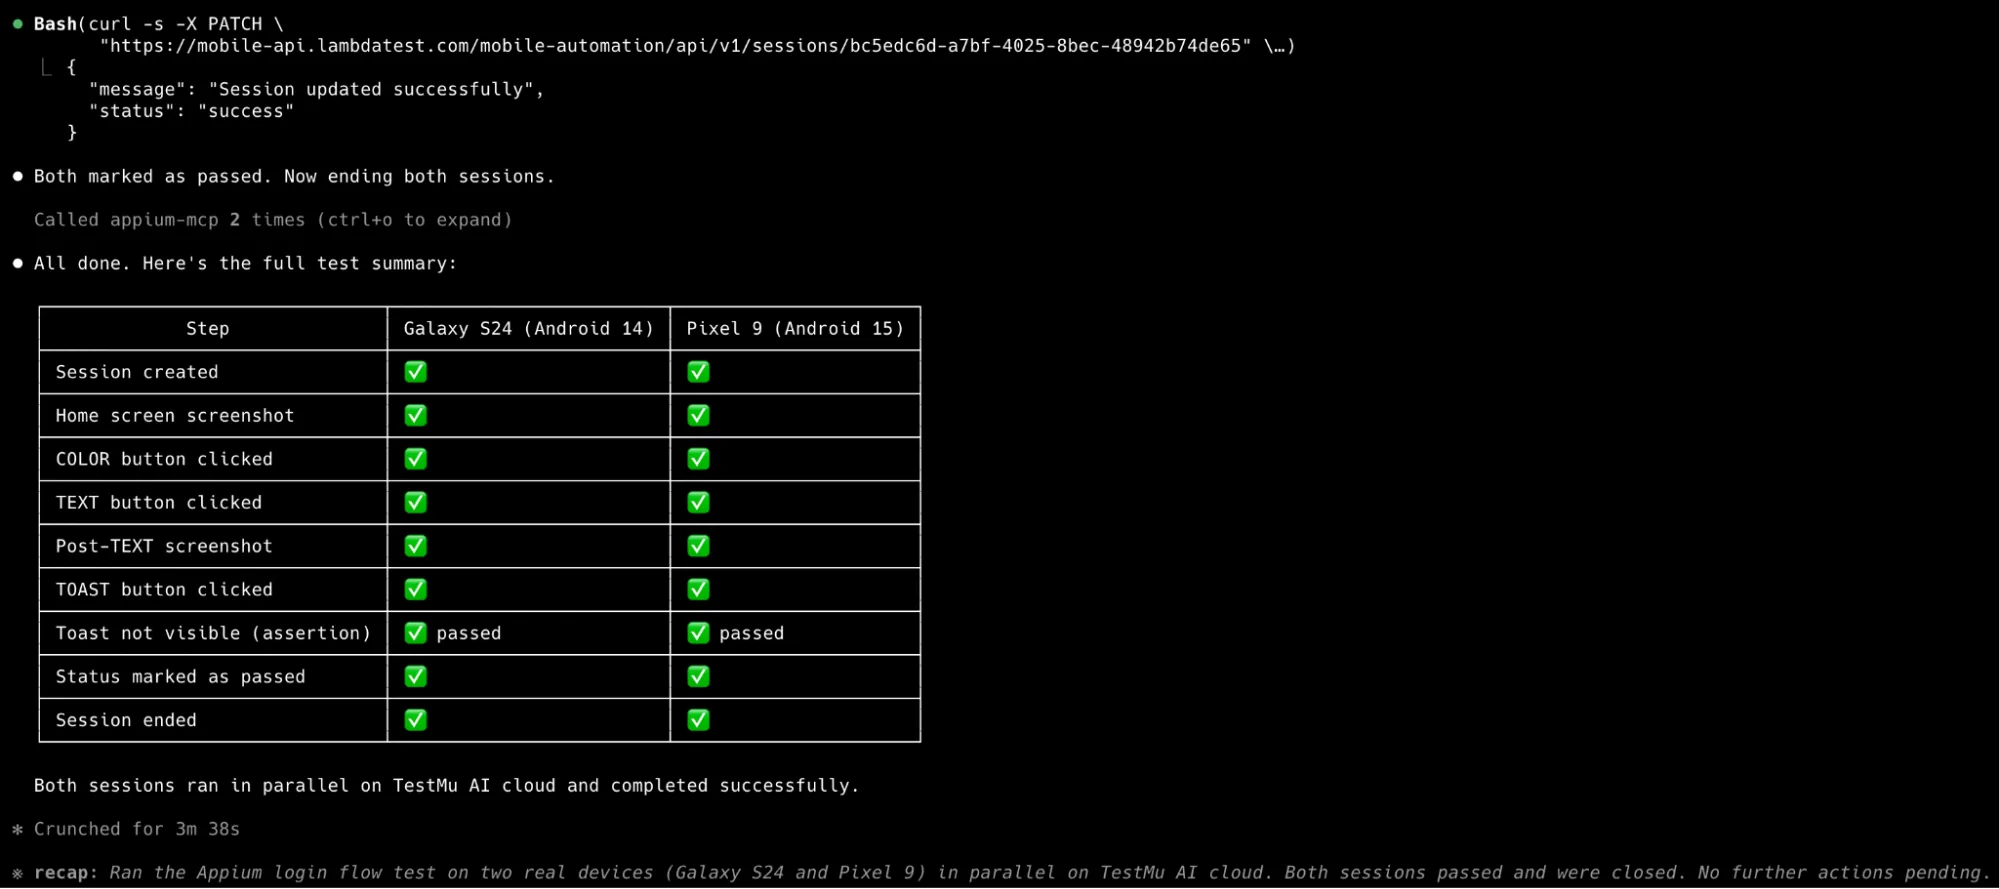
Like earlier, the same agent instruction file works seamlessly with local devices (emulators/simulators) on Kiro or any other AI-IDE that supports Cline.
In case you are using any other IDE or CLI, refer to the Appium MCP installation guide for the setup instructions.
Code Generation with Appium MCP
Till this point in time, we executed the tests using natural language prompts. Apart from execution, Appium MCP server can also be used to generate automated test code from natural language scenarios. It is highly beneficial for generating boilerplate code, saving significant time and effort that would otherwise be spent on repetitive setup, locator discovery, and test scaffolding.
Behind the scenes, Appium MCP utilizes the appium_generate_tests tool to engage with the application dynamically, producing precise automation scripts based on the actual element locators discovered during the session.
Let's generate Java/TestNG code that uses Page Object Model (POM) using the following sample prompt:
Generate a TestNG test script for the Proverbial Android app that clicks the COLOR, TEXT, and TOAST buttons and asserts the toast message. Use POM design Pattern and export the code in different files
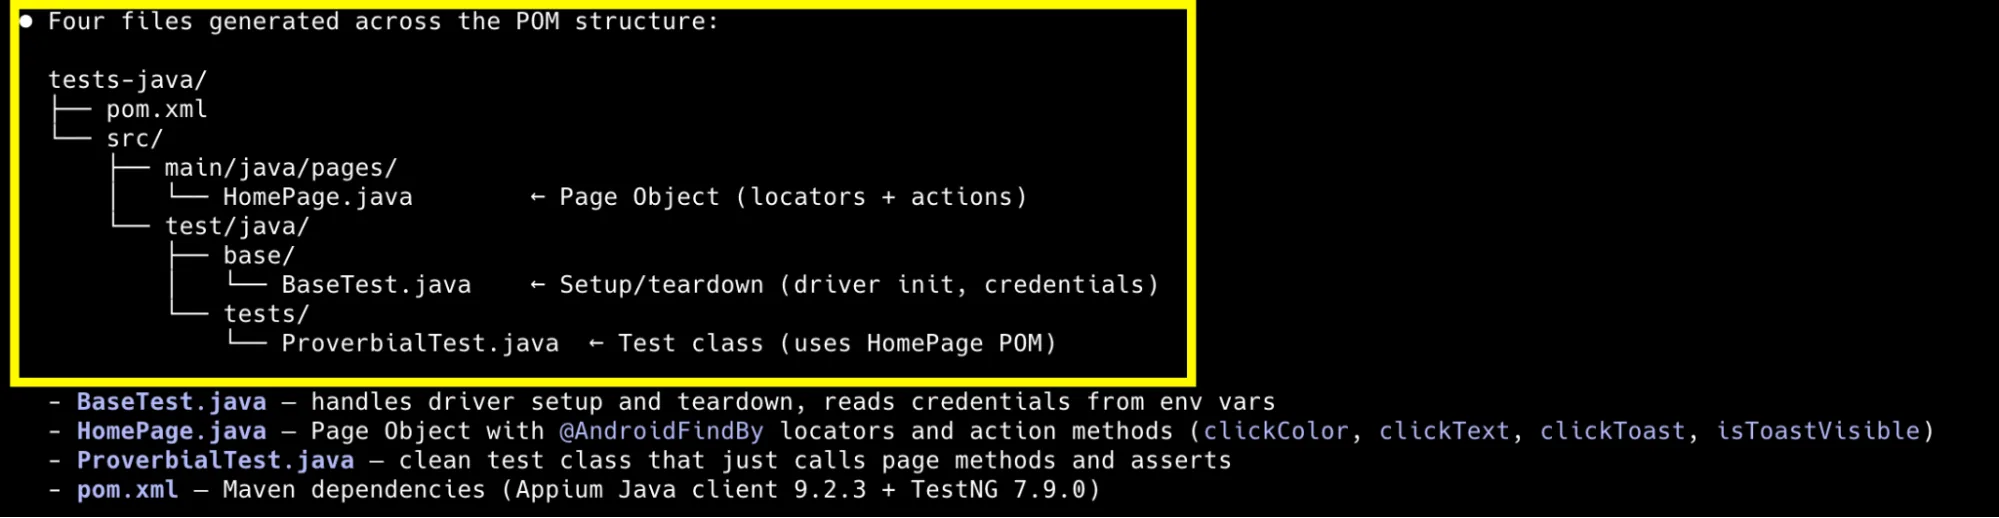
The agent generates the code across multiple files:
- A base test class for common setup and teardown logic
- A Page Object class with identified locators and reusable methods
- A test class that leverages the Page Object for executing test scenarios
- Organizes the generated code into a maintainable, scalable automation framework following the Page Object Model (POM)
Though Appium MCP natively supports Java/TestNG code generation through the appium_generate_tests tool, Claude CLI or Cline (in Kiro or any other AI-IDE) can be leveraged to generate code in other languages/frameworks (e.g., Python pytest) based on the session interactions.
Best Practices for using Appium MCP
Here are some of the Appium MCP-specific best practices that you can use in your automation project:
Optimize Appium Session Management
In any automation script a session needs to be established before executing the subsequent test steps. On similar lines, always create an Appium session before making any Appium MCP tool call.
As demonstrated earlier in this blog, you can create multiple Appium sessions on the TestMu AI cloud to execute tests in parallel across Android and iOS devices. This enables faster feedback cycles and significantly reduces the execution time of large mobile test suites.
Follow Recommended Tool Usage
Leverage the appium_find_element tool to identify specific UI components prior to executing mobile actions like tapping, inputting text, or long-pressing the element.
When a desired element remains hidden, make use of appium_gesture configured with action=scroll_to_element to ensure it is visible within the viewport before proceeding with further interaction.
{
  "tool": "appium_gesture",
  "arguments": {
    "action": "scroll_to_element",
    "strategy": "xpath",
    "selector": "//*[contains(@text,'My header')]",
    "direction": "down",
    "maxScrollAttempts": 40,
    "scrollDistancePreset": "medium"
  }
}
Leverage AI-Powered Element Detection
In cases where the traditional locator strategies (i.e., Accessibility ID, ID, platform-native predicates, XPath) are unavailable or unreliable, seek benefits of Appium MCP's AI-powered vision capabilities to identify elements using natural language descriptions.
For AI Vision element finding, you need to first set AI_VISION_ENABLED flat to true. Once vision-based identification is activated, prioritize the appium_ai tool rather than appium_find_element for all visual element detection tasks.
{
  "tool": "appium_ai",
  "arguments": {
    "action": "find_element",
    "instruction": "yellow search button at the bottom of the screen"
  }
}
This approach not only reduces the dependence on brittle locators but also improves the overall resilience and lowers maintenance efforts as the application's UI evolves.
MCP Server Configuration
Whether you are opting for the CLI route or using an MCP-compatible AI assistant, the underlying automation capabilities still remain the same. As demonstrated earlier with CLI and AI-IDE, it is suggested to have separate MCP server entries for local and cloud testing.
As a good security practice, never have hard-coded credentials in the MCP Server configuration file (e.g., cline_mcp_settings.json). It is suggested to pass them as environment variables instead.
Provide Clear Agent Instructions
When using Appium MCP with AI agents, provide clear and detailed instructions that define the test flow, expected validations, and execution constraints.
Well-structured instruction files (e.g., agent.md) helps the agent interpret the workflow correctly and produce more consistent test execution results.
### Teardown

For each session:

- If executing on LambdaTest, immediately after the last assertion (while the session is still active) call the LambdaTest REST API to mark the test status:

  PATCH https://mobile-api.lambdatest.com/mobile-automation/api/v1/sessions/{sessionId}

  body: {"status_ind": "passed"} or {"status_ind": "failed"}

  Do this in the same step as ending the session - do NOT wait or do anything else in between.

- End the Appium session

- If executing on a local emulator, uninstall the app from the device after the session is ended
Additionally, always include teardown steps to ensure Appium sessions are terminated properly, preventing orphaned sessions and conserving resources on the cloud grid.
Pair TestMu AI MCP with Appium MCP for Debugging
TestMu AI MCP Server lets you run, debug, and triage tests that powers HyperExecute, Automation, Visual Testing Tool, and Accessibility tools. All of this can be done directly from your IDE using natural language in Cursor, Claude, Copilot, and other MCP clients.
TestMu AI MCP server when used alongside Appium MCP helps fetch test details, command logs, and network logs directly from the TestMu AI cloud for deeper debugging and analysis.
In this TestMu Conf 2026 workshop, Srinivasan Sekar and Sai Krishna go deeper into this debugging workflow in Debug with Appium MCP, showing how the Model Context Protocol turns Appium into an AI-native testing platform that understands natural language commands.
Conclusion
The Appium MCP server delivers a substantial paradigm shift in mobile test automation, accelerating the velocity of test script creation while minimizing manual intervention. By combining the capabilities of Appium with agentic AI workflows, development and QA teams can bridge the gap between initial test concepts and develop fully executable automation scripts with unprecedented efficiency.
Furthermore, Appium MCP works seamlessly with custom AI agents and tools like GitHub Copilot, Kiro, Cursor, etc. making test generation smarter and more consistent across your project.
Author

Himanshu Sheth
Blogs: 142


Himanshu Sheth is the Director of Marketing (Technical Content) at TestMu AI, with over 8 years of hands-on experience in Selenium, Cypress, and other test automation frameworks. He has authored more than 130 technical blogs for TestMu AI, covering software testing, automation strategy, and CI/CD. At TestMu AI, he leads the technical content efforts across blogs, YouTube, and social media, while closely collaborating with contributors to enhance content quality and product feedback loops. He has done his graduation with a B.E. in Computer Engineering from Mumbai University. Before TestMu AI, Himanshu led engineering teams in embedded software domains at companies like Samsung Research, Motorola, and NXP Semiconductors. He is a core member of DZone and has been a speaker at several unconferences focused on technical writing and software quality.


Did you find this page helpful?
More Related Blogs
TestMu AI forEnterprise
Get access to solutions built on Enterprise
grade security, privacy, & compliance
- Advanced access controls
- Advanced data retention rules
- Advanced Local Testing
- Premium Support options
- Early access to beta features
- Private Slack Channel
- Unlimited Manual Accessibility DevTools Tests