

Power Your Software Testing with AI Agents and Cloud
The Native AI-Agentic Cloud Platform to Supercharge Quality Engineering. Test Intelligently and Ship Faster.


- TestMu AI (Formerly LambdaTest)
- /
- Blog
- /
- How to Install Java on Windows
How to Install Java on Windows
Learn how to easily install Java on Windows. This blog covers steps for both developers and casual users, troubleshooting tips, and more.
Last Updated on:
Installing Java on Windows means downloading a JDK from Oracle or an OpenJDK build, running the installer, then confirming it with java -version and javac -version in Command Prompt. Target a current LTS release such as Java 25, not the newest build, since non-LTS releases lose support within six months while LTS builds get years of updates. This guide covers Oracle JDK vs OpenJDK, downloading and installing Java, verifying the install, setting JAVA_HOME and Path, AI tools that catch version mismatches, uninstalling old versions, and troubleshooting.
Key Takeaways
- Windows Java installation requires the JDK, not the JRE, because only the JDK bundles the javac compiler needed to build Java programs.
- Java 25 is the current LTS release, and LTS builds receive updates for years while non-LTS releases lose support within six months.
- Running java -version and javac -version in a new Command Prompt after installation confirms both the runtime and compiler are on the Windows Path.
- Setting JAVA_HOME to the JDK folder and adding %JAVA_HOME%\bin to Path lets build tools like Maven and Gradle locate the JDK automatically.
- A leftover older Java installation ahead of a new one in the Windows Path variable can silently override the intended JDK version.
- IDEs such as IntelliJ IDEA and VS Code can detect a project's required Java version from its build file and prompt to install a matching JDK automatically.
Oracle JDK vs OpenJDK: Which One Should You Install?
Before downloading anything, there is one decision to make. You need the JDK (Java Development Kit), not just the JRE, because the JDK includes the compiler (javac) along with the runtime. If you only intend to run Java applications rather than write them, a runtime is enough, but almost everyone reading a guide like this wants the JDK.
The JDK itself comes in two flavours, and the difference is licensing rather than the language:
- Oracle JDK: Oracle’s own build, available from the official Oracle Java Downloads page. Recent versions are distributed under Oracle’s No-Fee Terms and Conditions, which permit development and production use at no cost, but Oracle has changed these terms more than once. If you are deploying commercially, read the current licence rather than relying on what was true for an earlier release.
- OpenJDK: The open source reference implementation that Oracle JDK itself is built from, released under the GPL with the classpath exception. It is free for any use, and several vendors ship ready-made Windows builds of it. The Microsoft Build of OpenJDK is a good default on Windows, and Eclipse Temurin, Amazon Corretto, and Azul Zulu are equally valid.
For the vast majority of developers, either works and your code behaves identically. Pick an OpenJDK build if you want to avoid licensing questions entirely, and Oracle JDK if your organisation wants Oracle’s commercial support.
On version, choose an LTS (Long Term Support) release rather than the newest number available. Java 25 is the current LTS most projects standardise on, and LTS releases receive updates for years, whereas non-LTS releases are superseded within six months. The steps below are the same whichever you pick.
How to Download and Install Java?
Let’s walk through the steps to install and set up Java on your system. For demonstration, we’ll install Java on Windows:
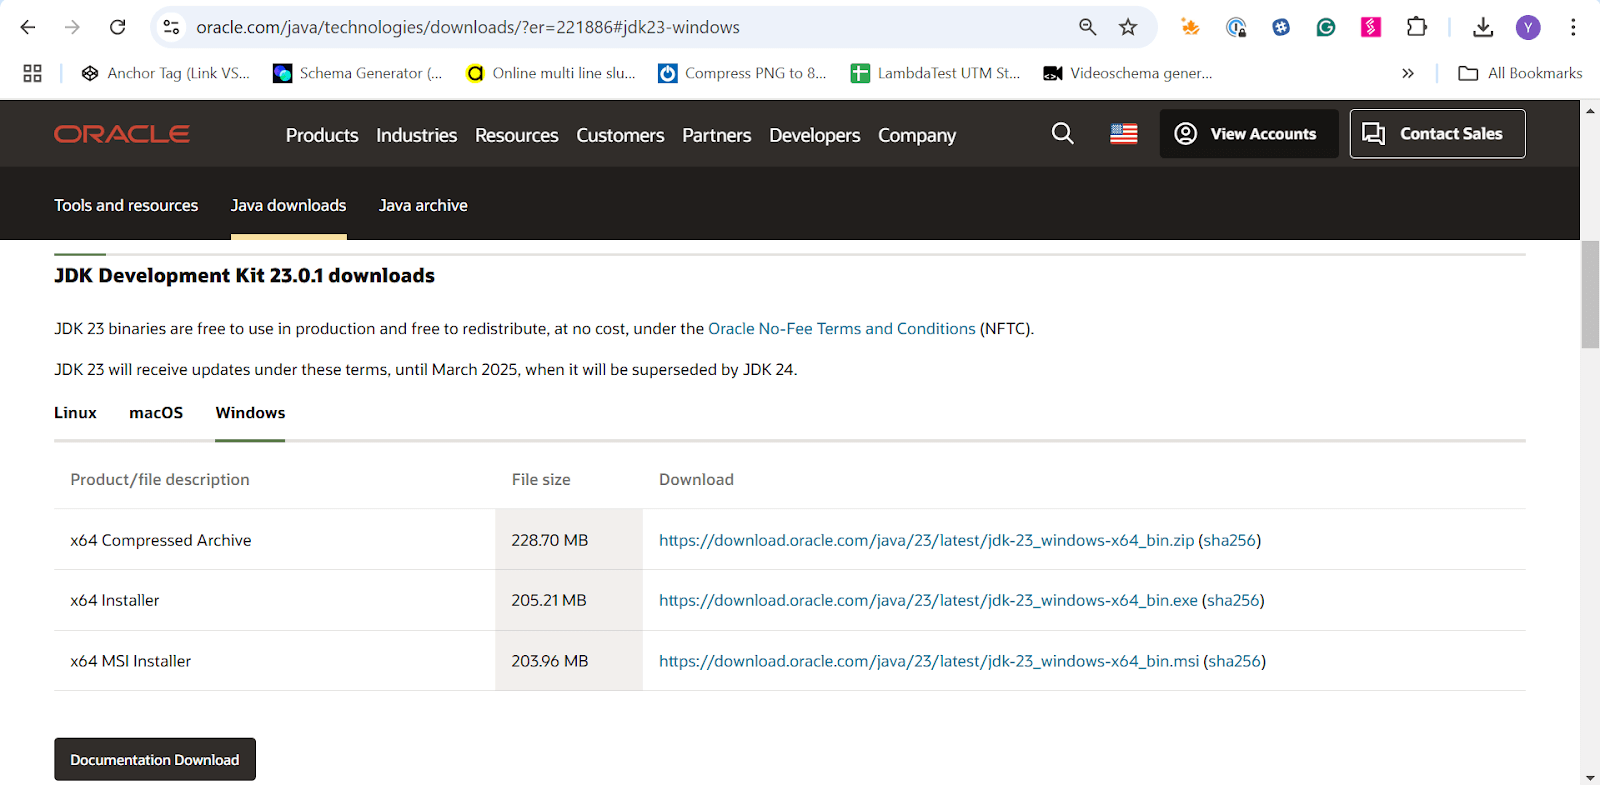
- Visit the official Oracle Java Downloads page and download the Java SE Development Kit (JDK) for Windows. Select the Windows tab and pick the x64 Installer, which is the right choice for virtually every modern PC. You will see two installer formats: the .exe is the standard graphical installer most people want, while the .msi is the Windows Installer package used for scripted or enterprise deployment. There is also an x64 Compressed Archive (a .zip), which installs nothing and requires you to configure everything by hand.
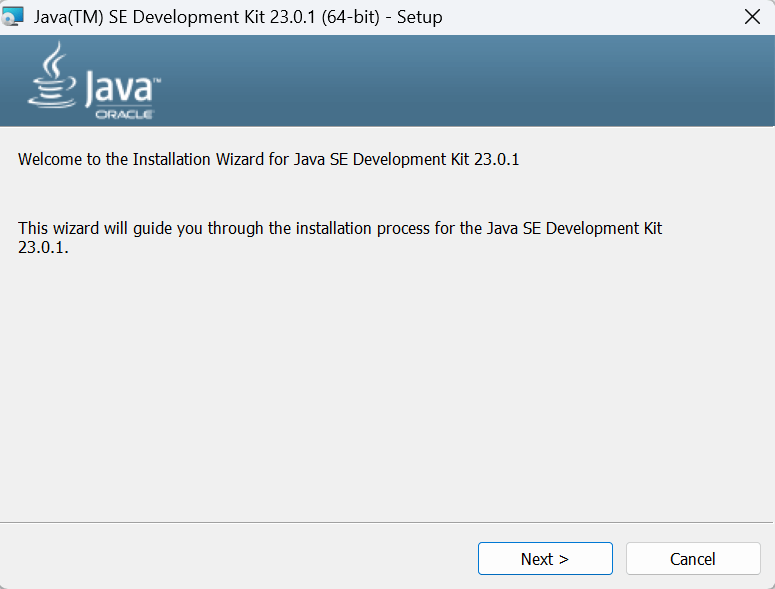
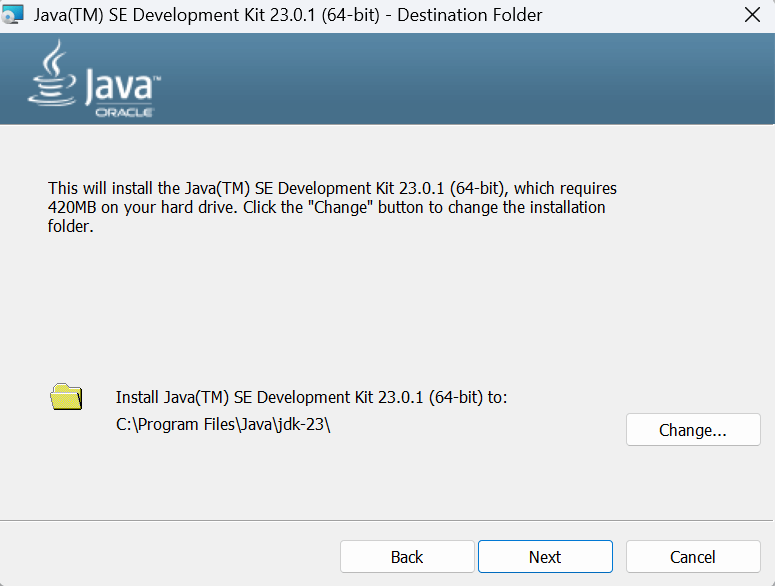
- Run the downloaded installer. Then, follow the on-screen instructions and keep clicking on Next. The wizard walks through three screens: a welcome step, a destination folder step, and a progress step. Note the destination folder it shows you, typically C:\Program Files\Java\jdk-25, because you will need that exact path shortly when setting JAVA_HOME. Leave it at the default unless you have a reason to change it.
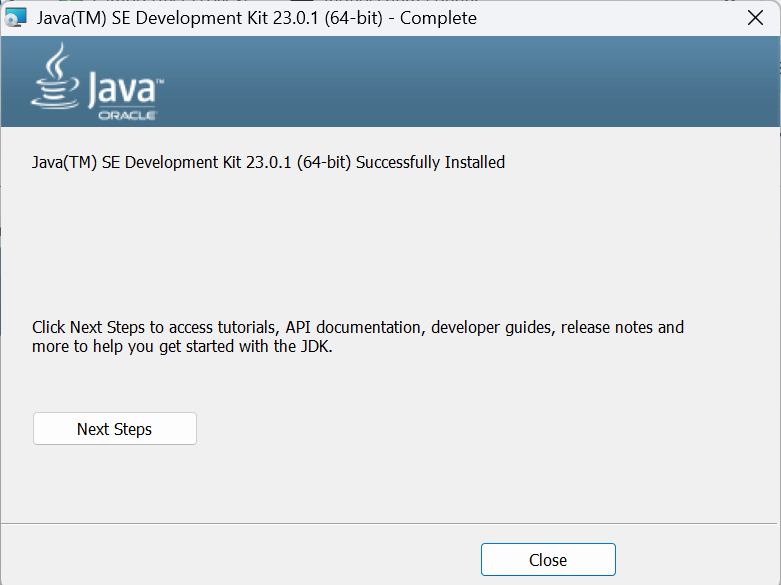
- Click Close when the wizard finishes. Java is now installed, but Windows may not recognise it from the command line yet, which is what the next two sections deal with.
How to Verify Your Java Installation on Windows
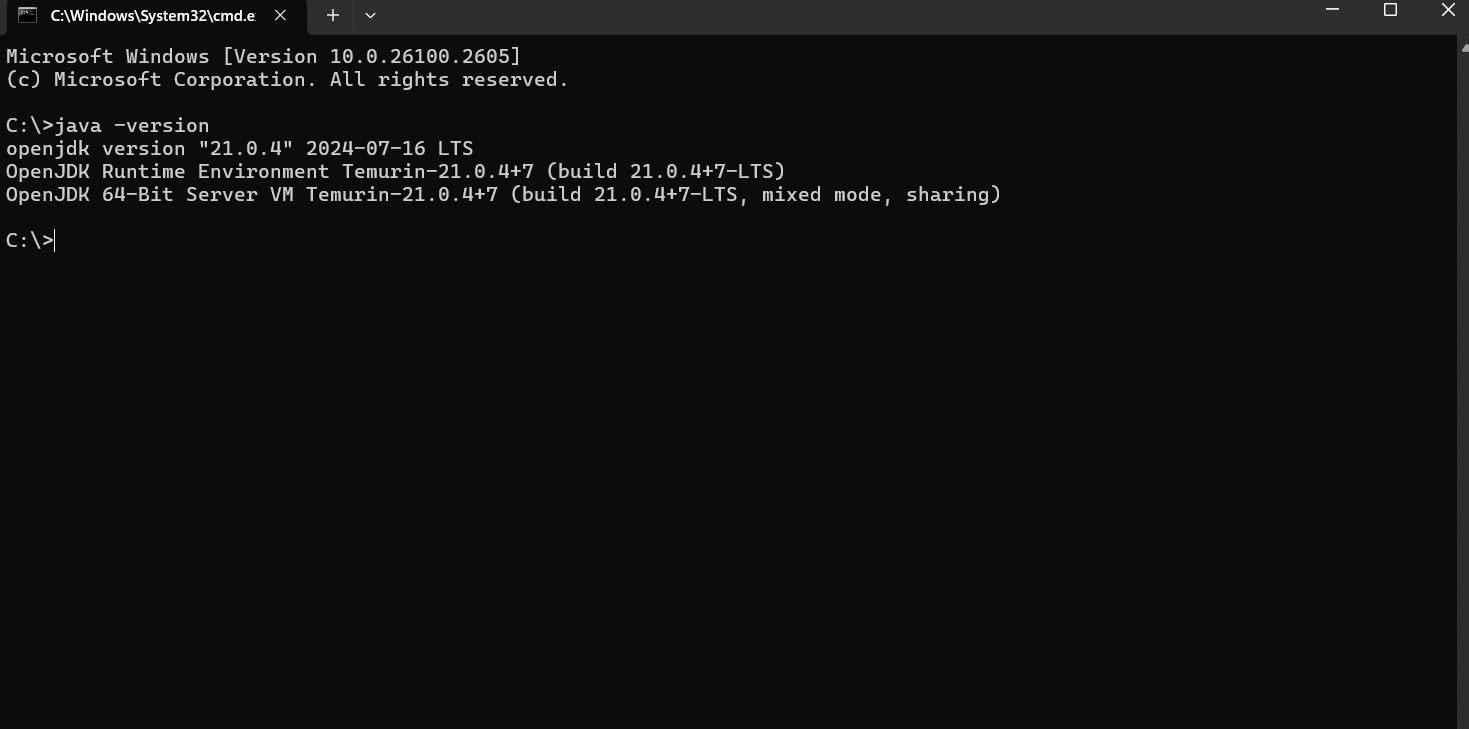
Before configuring anything, check what Windows can already see. Open the Command Prompt by pressing Win + R, typing cmd.exe, and pressing Enter (searching for “Command Prompt” in the Start menu works too). Then run these two commands:
java -version
javac -version
If the installation succeeded and Windows can find Java, you will see output similar to this:
java version "21.0.2" 2024-01-16 LTS
Java(TM) SE Runtime Environment (build 21.0.2+13-LTS-58)
Java HotSpot(TM) 64-Bit Server VM (build 21.0.2+13-LTS-58, mixed mode, sharing)

javac 21.0.2
The two commands test different things, which is why both matter. java -version reports the runtime, so it confirms you can run Java programs. javac -version reports the compiler, so it confirms you have a full JDK rather than just a runtime, and that the compiler is on your Path.
A common outcome is that java -version works while javac -version returns ‘javac’ is not recognized as an internal or external command. That is not a broken installation. It means the JDK’s bin directory is not on your Path, which the next section fixes. If neither command is recognised, open a new Command Prompt first, since an already-open window will not pick up environment changes.
Setting Up Environment Variables for Java
Two variables matter here. JAVA_HOME points at the JDK folder itself and is what build tools like Maven, Gradle, and many IDEs read to locate Java. Path is what lets you type java or javac in any Command Prompt without giving the full path. Set JAVA_HOME first, then reference it from Path, so that upgrading Java later means changing one value instead of hunting through your Path.
Let’s look at the steps to setup environment variables for Java installation on Windows:
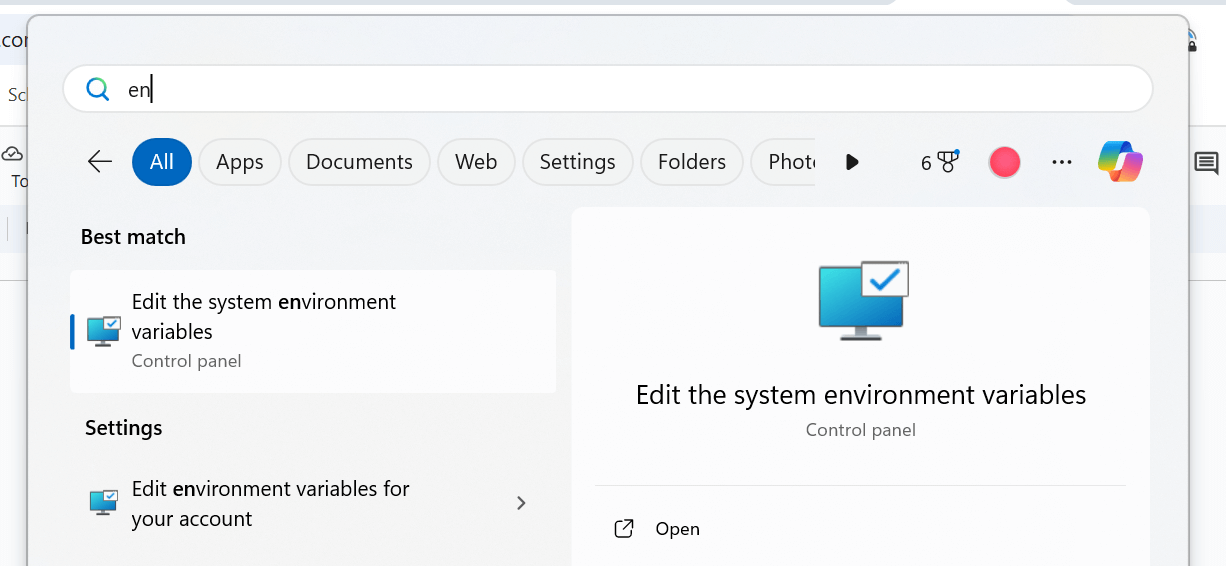
- Search for “Environment Variables” in the search box adjacent to the Start icon. Then, click Edit the system environment variables.
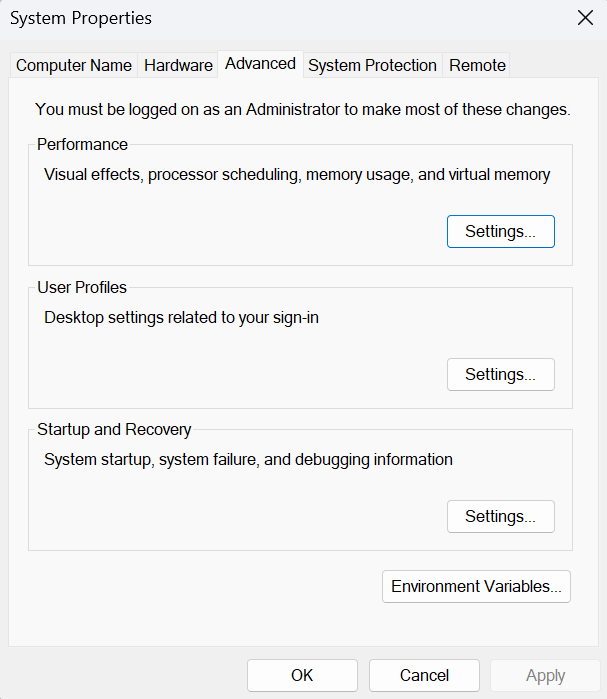
- In the System Properties window, click Environment Variables.
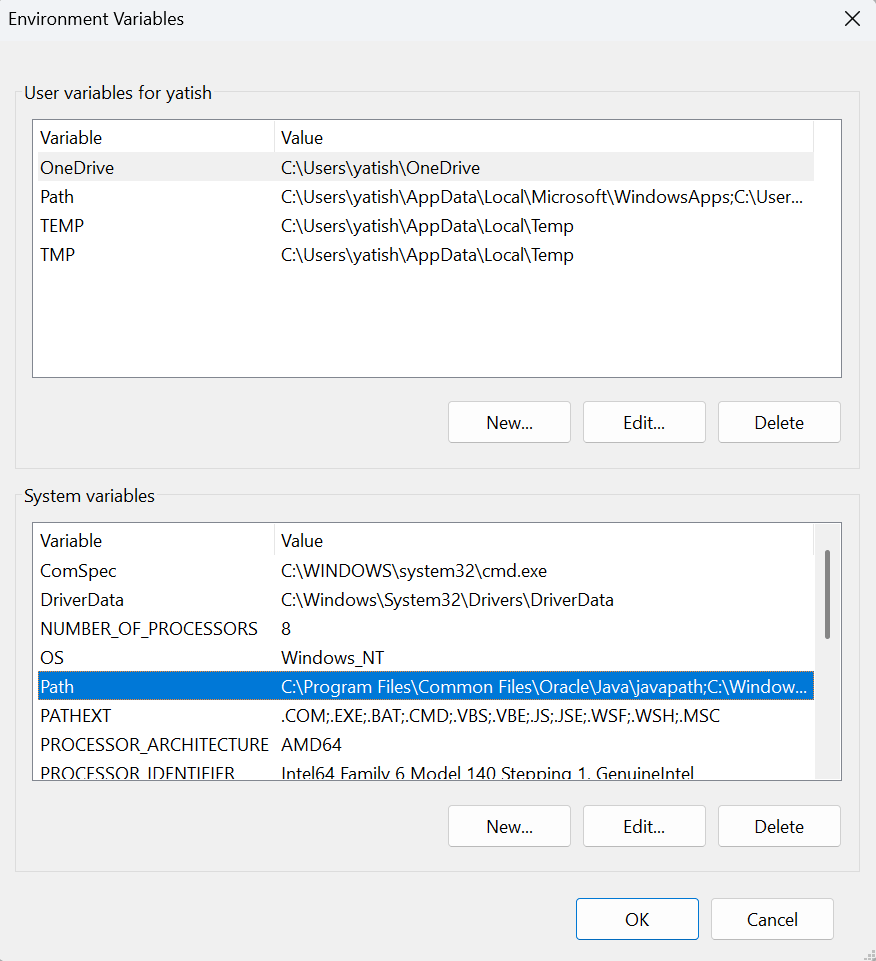
- Under System variables, click New. Set the variable name to JAVA_HOME and the variable value to your JDK folder, for example C:\Program Files\Java\jdk-25. This is the folder you noted during installation. Point it at the JDK root, not at the bin folder inside it, since tools expect JAVA_HOME to contain bin and lib. Click OK to save.
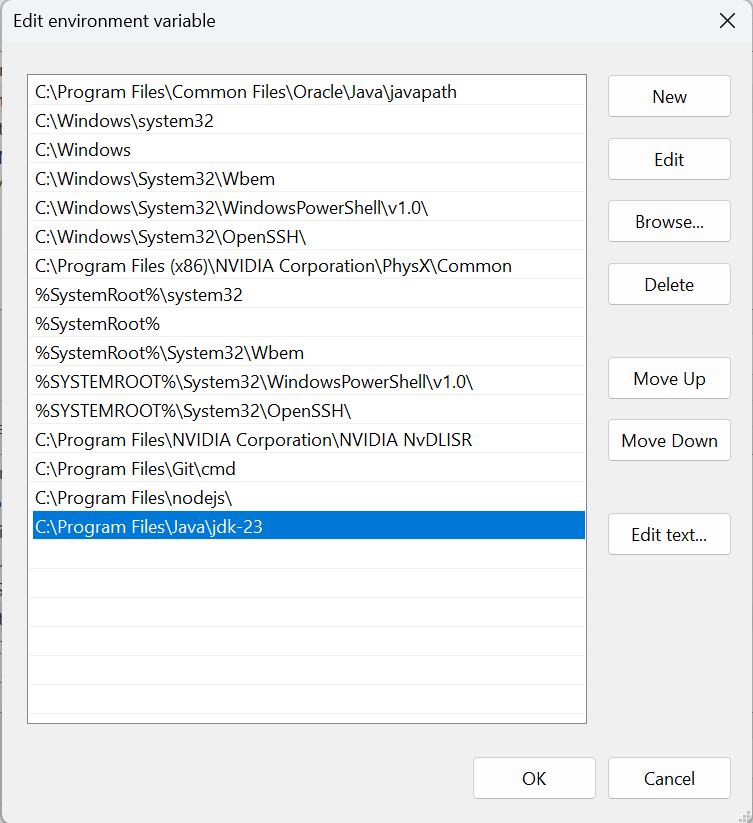
- Still in System variables, select the Path variable and click Edit. Click New and add the entry %JAVA_HOME%\bin, then click OK to save the changes. Using the variable rather than a hard-coded path means that when you upgrade Java, you only update JAVA_HOME and Path follows automatically.
- Open a new Command Prompt and run java -version and javac -version again to confirm the changes took effect. Both should now report your JDK version. Any Command Prompt that was already open will still be using the old environment, which is the most common reason this step appears to fail.
You can also confirm the variable itself resolved correctly by running:
echo %JAVA_HOME%If that prints your JDK path, JAVA_HOME is set. If it prints the literal text %JAVA_HOME%, the variable does not exist in that session, so re-check the spelling and open a fresh Command Prompt.
Can AI Tools Detect and Install the Right JDK Version Automatically?
Yes. Modern IDEs and AI coding assistants can detect a project's required Java version and fetch a matching JDK, though they cannot fix Windows environment variables for you.
- IDE-detected JDK installs: IntelliJ IDEA and VS Code's Java Extension Pack read a project's pom.xml or build.gradle, notice the declared Java version, and prompt to download the matching JDK instead of sending you back to the Oracle Java Downloads page.
- AI assistants flag mismatches: Asking GitHub Copilot or JetBrains AI Assistant to check a project's build file is a fast way to catch a Java version mismatch, a common failure point in TestNG and JUnit-based test suites that fail silently on the wrong major version.
- Testing frameworks pin versions: Selenium and Appium projects often declare an exact Java version in their build file, so a mismatched JDK is a frequent cause of failures in automation testing, cross browser testing, and android testing pipelines alike.
None of these tools set JAVA_HOME or update Path on Windows. That configuration still has to be done by hand, using the steps in the previous section.
How to Uninstall Older Java Versions on Windows
Old Java installations are the usual cause of the confusing situation where java -version reports a version you did not install. Windows resolves java using the first matching entry in Path, so a leftover older install sitting earlier in the list quietly wins, no matter what JAVA_HOME says. Removing versions you no longer need also closes off known vulnerabilities in unpatched runtimes.
To remove an older version safely:
- Open Settings with Win + I, then go to Apps and Installed apps (called Apps & features on Windows 10). The classic Control Panel and Programs and Features route works just as well.
- Search for “Java” to list every version present. You may see both Java (TM) SE Development Kit entries and older Java 8 Update runtime entries.
- Select the version you want to remove, click Uninstall, and follow the prompts. Keep the JDK you just installed.
- Return to Environment Variables and delete any leftover Path entries that still point at the removed folder. Uninstalling does not always clean these up, and a stale entry will keep causing the conflict you were trying to fix.
- Open a new Command Prompt and run java -version to confirm the correct version now answers.
Keeping several versions side by side is legitimate if different projects need different releases. In that case, leave them installed and switch between them by changing JAVA_HOME rather than uninstalling.
Troubleshooting Java Installation Issues
- Administrator Privileges: Ensure you have administrative access, as installation and environment variable setup require elevated permissions.
- Incorrect Path Configuration: Double-check that the JAVA_HOME and Path values are accurate.
- Firewall or Antivirus Interference: Temporarily disable firewalls or antivirus software if they block the installation process.

Conclusion
Installing Java on Windows is important for developers who depend on Java-based software applications. Once configured, you can easily execute Java-powered products or create Java-based software applications.
Author

Yatish Jhamb
Blogs: 3


Yatish Jhamb is a Community Contributor at TestMu AI, where he creates content on software testing, CI/CD, AI, and test automation. He holds certifications in Selenium, Appium, Playwright, Cypress, and KaneAI, and has contributed to technical blogs, SEO-focused tool pages, and video scripts for the QA community. His work bridges technical accuracy with clear, accessible content for testers and developers.


Frequently asked questions
Did you find this page helpful?
More Related Blogs
TestMu AI forEnterprise
Get access to solutions built on Enterprise
grade security, privacy, & compliance
- Advanced access controls
- Advanced data retention rules
- Advanced Local Testing
- Premium Support options
- Early access to beta features
- Private Slack Channel
- Unlimited Manual Accessibility DevTools Tests