

Power Your Software Testing with AI Agents and Cloud
The Native AI-Agentic Cloud Platform to Supercharge Quality Engineering. Test Intelligently and Ship Faster.


- TestMu AI (Formerly LambdaTest)
- /
- Blog
- /
- Storybook Visual Testing: A Visual Regression Tutorial
Storybook Visual Testing: How to Catch Visual Regressions in Stories
Storybook visual testing turns every story into a screenshot test. This tutorial runs the official SmartUI sample across Chrome, Firefox, Safari, and Edge, from the first baseline to a caught regression, with real console output.
Last Updated on:
Storybook visual testing captures a screenshot of every Storybook story, compares it with an approved baseline, and flags any story whose rendered output changed. Because each story renders one component state in isolation, a regression shows up on the exact button, header, or page state that broke, not somewhere inside a long automation testing flow.
Storybook renders the stories; a visual testing service captures and compares them. This tutorial uses TestMu AI SmartUI with the official smartui-storybook-sample project, and every command and console output below comes from a run of that sample on September 29, 2026, across Chrome, Firefox, Safari, and Edge at two viewports.
What Is Storybook Visual Testing?
Visual testing verifies how a UI looks rather than whether it works: layout, spacing, color, typography, and images. In Storybook, the unit of that check is the story.
The Storybook documentation defines it this way: "A story captures the rendered state of a UI component." A Button component might have Primary, Secondary, Large, and Small stories, and a visual test turns each one into a screenshot per browser and viewport.
Every visual testing tool for Storybook runs the same loop:
- Baseline - the first run captures every story and stores the screenshots as the reference. SmartUI reports it as "No comparisons run. This is a baseline build."
- Comparison - each later run captures the stories again and compares every screenshot with the baseline for the same story, browser, and viewport.
- Review - changed screenshots are marked with a mismatch percentage, and a reviewer approves an intended change (it becomes the new baseline) or rejects a regression.
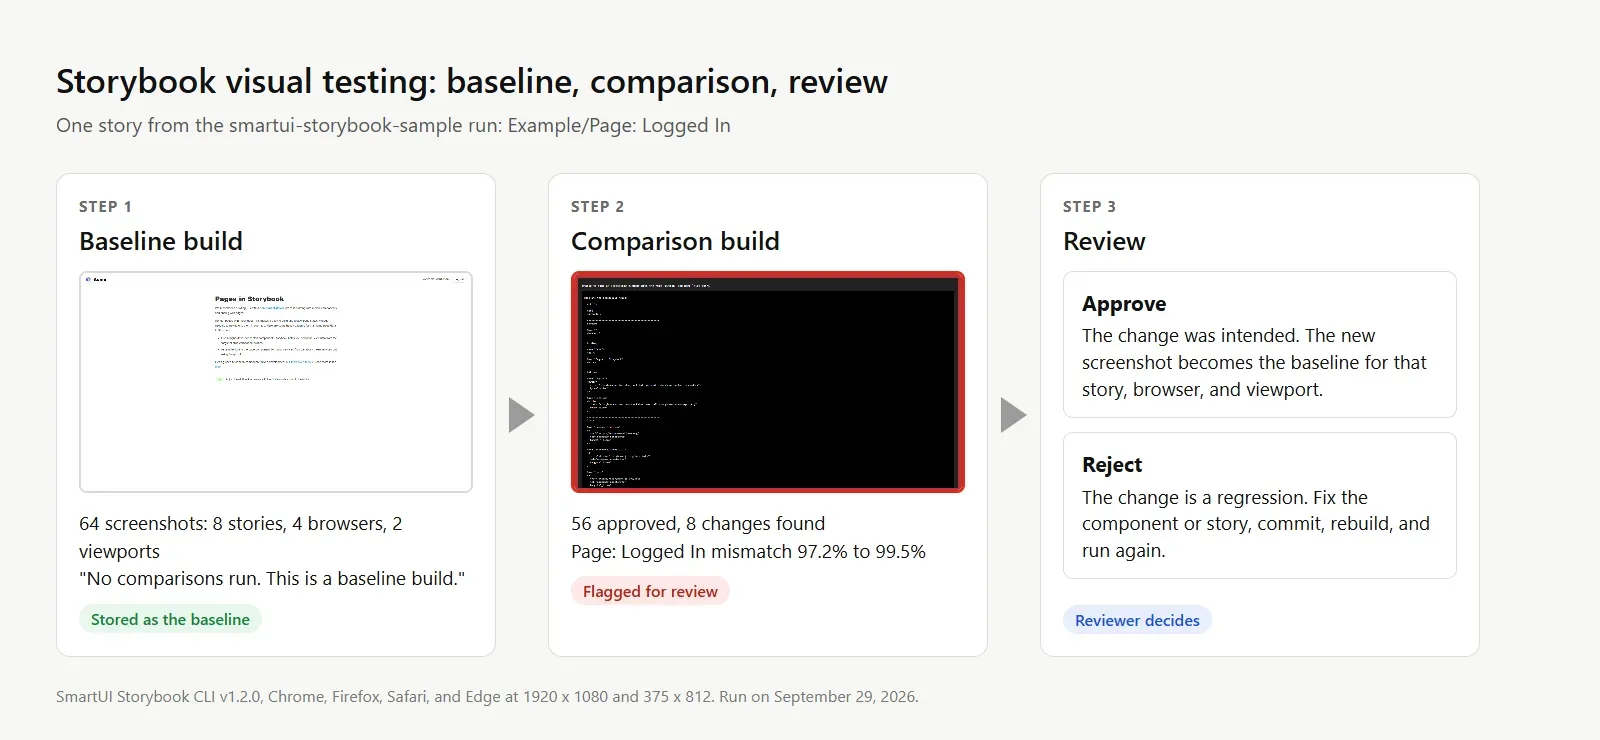
The diagram follows one story through this tutorial's run: the baseline build stored it, the comparison build flagged it as changed, and a reviewer decides whether the change becomes the new baseline. Pixel comparison is strict by design, so rendering noise such as anti-aliasing or font smoothing can also produce diffs; how a tool filters that noise, including AI-assisted approaches like a visual testing AI agent, is one of the main differences between tools.
How Is Visual Testing Different From Functional Testing?
Functional tests confirm that the application behaves as specified; visual tests confirm that it renders as designed. A checkout button can pass every functional assertion while sitting on top of the price label, which only a visual check reports.
| Visual Testing | Functional Testing | |
|---|---|---|
| Checks | Rendered appearance: layout, spacing, color, fonts, images | Behavior: inputs, outputs, business rules |
| Typical defects | Overlapping elements, clipped text, wrong theme color, broken responsive layout | Wrong calculation, failed form submission, broken navigation |
| Comparison method | Screenshot against an approved baseline | Assertion against an expected value |
| Tooling | A visual testing tool that captures and diffs screenshots | Test frameworks such as Playwright, Cypress, or Selenium |
Visual Tests vs Snapshot Tests vs Interaction Tests in Storybook
All of these test types reuse your stories, but each one compares something different:
| Test type | What it compares | What it catches | Common tooling |
|---|---|---|---|
| Visual test | Rendered pixels against an image baseline | Layout shifts, color, spacing, and font changes users can see | TestMu AI SmartUI, Chromatic, Playwright toHaveScreenshot() |
| Snapshot test | Serialized DOM or HTML markup against a stored copy | Markup changes, even when nothing looks different | Vitest or Jest toMatchSnapshot() with portable stories |
| Interaction test | Behavior scripted in a story's play function | Broken clicks, form states, and failed assertions | Storybook Vitest addon, Storybook test-runner |
Storybook's snapshot testing guide draws the line directly: "Visual tests are better suited for verifying appearance. Snapshot tests are useful for validating non-visual output and ensuring the DOM doesn't change."
A markup snapshot fails on a harmless class rename, while a visual test ignores markup and fails only when the rendered output changes. Interaction tests and the test-runner are covered in the Storybook testing guide, and DOM snapshots outside Storybook in this snapshot testing tutorial.
Benefits of Storybook for Visual Regression Testing
Storybook describes itself as a frontend workshop for building UI components and pages in isolation. Screenshot capture and comparison come from a separate tool, and Storybook's stories make close to ideal inputs for one:
- Isolated states - each story renders one component state without logging in, seeding data, or clicking through the app, so error, empty, and loading states get a stable screenshot. This is the same isolation that makes component testing fast.
- A ready-made test inventory - stories already exist for development and documentation, so turning them into visual tests needs no new test code.
- A deterministic static build - npm run build-storybook produces a storybook-static folder that renders the same way in CI and on a laptop, and that folder is what the SmartUI CLI uploads.
- Precise failure location - a diff on Example/Header: Logged In points at the header component, instead of a full-page screenshot where the cause could be anywhere.
- Framework coverage - the same workflow applies to React, Vue, Angular, and web components; the Storybook for Angular tutorial shows the Angular setup.
The Storybook repository on GitHub has 91.2k stars.
npm registry data shows the storybook package was downloaded 26,150,213 times between September 21 and September 27, 2026.

Storybook Visual Testing Tools Compared
The options differ in where screenshots are rendered, how a run is triggered, and where baselines live. Each row below was checked against the tool's live documentation in September 2026; pricing is left out because it changes often.
| Tool | How it runs | Browsers | Baselines and review |
|---|---|---|---|
| Chromatic (from the Storybook maintainers) | Storybook addon or CLI; stories render in Chromatic's cloud | Chrome, Firefox, Safari, Edge | Cloud baselines with branch tracking; review in the addon panel or web app, plus a pull request check |
| TestMu AI SmartUI | Storybook CLI uploads a static build, or tunnels to a running Storybook | Chrome, Firefox, Safari, Edge, at up to 5 viewports | Git-branch-aware cloud baselines; approve or reject in the SmartUI dashboard |
| Playwright toHaveScreenshot() (DIY) | Your own spec reads storybook-static/index.json and screenshots each story's iframe | The Playwright projects you configure (Chromium, Firefox, WebKit) | PNG baselines committed to the repo; review in the Playwright HTML report |
If your team already uses Chromatic, its addon is the lowest-friction path; the Chromatic alternative page compares it with SmartUI in detail. The DIY Playwright route has no licensing cost but makes you own baseline storage, review, and rendering consistency, since fonts render differently across operating systems; the Playwright screenshot comparison guide covers that setup. For a broader list, see these visual testing tools.

Note: SmartUI's free plan includes 2,000 screenshots, enough to baseline a small Storybook across four browsers. Try TestMu AI SmartUI free
How to Run Storybook Visual Tests With SmartUI
TestMu AI SmartUI is a visual regression testing platform with a dedicated Storybook CLI, @lambdatest/smartui-storybook. The CLI uploads your stories, renders them in the cloud in Chrome, Firefox, Safari, and Edge, and compares each screenshot with the baseline captured for the same story, browser, and viewport.
SmartUI's Smart Ignore engine filters anti-aliasing and font-rendering noise, and its branch-aware baselines follow your Git workflow, so a feature branch is compared against the right approved build. The steps below follow the SmartUI Storybook docs and the smartui-storybook-sample repository.

Prerequisites
- Node.js - the SmartUI Storybook docs list Node.js v20.3 or later, and current Storybook 10 releases need Node.js 20.19+ or 22.12+ per Storybook's migration guide. A current LTS release such as Node.js 22 or 24 covers both; the run in this tutorial used Node.js 24.14.
- Storybook 6.4 or later - the sample project is pinned to Storybook 6.5.16, so you can follow along without upgrading anything.
- A TestMu AI account - SmartUI projects and tokens are created from the account dashboard.
To add Storybook to your own project instead of the sample, the Storybook install guide uses the create command, which installs the latest release (10.6 in September 2026):
npm create storybook@latestCreate a SmartUI Project
Every Storybook build is stored in a SmartUI project, and the project token is how the CLI knows where to send it.
- Open the SmartUI Projects page and select New Project.
- In the New Project drawer, enter a project name, the approvers who can accept changes, and optional tags.
- Under Baseline Strategy, keep Git Strategy (the default) so each branch compares against its own baseline. Single Baseline compares every build against one project-wide baseline, and the choice cannot be changed after the project is created.
- Select Create Project, then copy the Project Token from the project's Project Settings; you will export it in the next section.
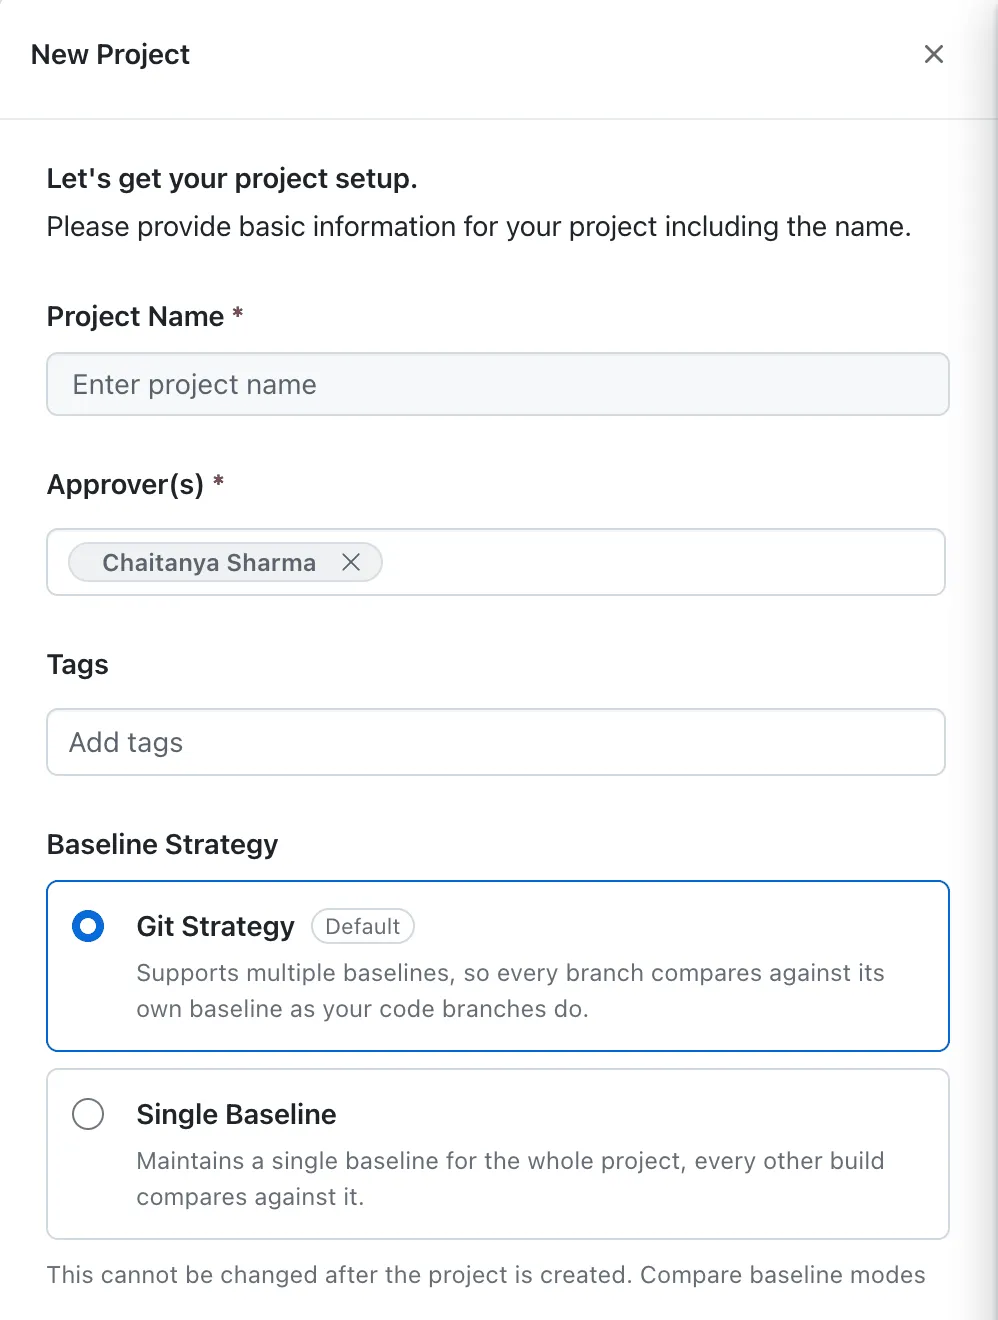
If your organization still uses standard project types, the drawer asks for a platform first; choose CLI for Storybook runs.
Capture the Baseline
Step 1. Clone the smartui-storybook-sample repository and move into it.
git clone https://github.com/LambdaTest/smartui-storybook-sample.git
cd smartui-storybook-sample
Step 2. Install the dependencies. The sample lists @lambdatest/smartui-storybook as a devDependency, so this also installs the SmartUI Storybook CLI and npx smartui works without a global install.
npm install
npx smartui --version
Use npm install, not npm ci: the sample's lock file does not list the SmartUI package, so npm ci stops with a lock file mismatch. Also keep @lambdatest/smartui-storybook separate from @lambdatest/smartui-cli. The general-purpose smartui-cli has no storybook command, and both packages register a smartui binary, so a global smartui-cli install can shadow the Storybook CLI and return "unknown command 'storybook'".
Step 3. On Storybook versions below 9, the CLI reads a stories.json file that Storybook only generates when buildStoriesJson is enabled in .storybook/main.js. The sample already sets it; in your own project, add it inside the existing config object:
// .storybook/main.js (Storybook 6.4 to 8.x)
module.exports = {
  // ...your existing stories, addons, and framework settings
  features: {
    buildStoriesJson: true,
  },
};
On Storybook 9 and later, skip this step. The build writes an index.json file, and the CLI reads that instead.
Step 4. Export the project token from your SmartUI project. The Storybook CLI requires it on every run.
# macOS / Linux
export PROJECT_TOKEN="123456#1234abcd-****-****-****-************"

# Windows Command Prompt
set PROJECT_TOKEN="123456#1234abcd-****-****-****-************"

# Windows PowerShell
$env:PROJECT_TOKEN="123456#1234abcd-****-****-****-************"
Step 5. Generate the SmartUI config file.
npx smartui config create .smartui.json
# [smartui] Created LambdaTest SmartUI config: .smartui.json
The generated file captures all four browsers at a single desktop viewport. The config below, used for this tutorial's run, adds a mobile viewport and a one-second wait. The file must stay plain JSON with no comments, because the CLI parses it strictly.
{
  "storybook": {
    "browsers": ["chrome", "firefox", "safari", "edge"],
    "viewports": [[1920, 1080], [375, 812]],
    "waitForTimeout": 1000,
    "include": [],
    "exclude": [],
    "customViewports": []
  }
}- browsers - chrome, firefox, safari, and edge are the accepted values.
- viewports - up to 5 [width, height] pairs, each dimension between 320 and 7680 pixels; a width on its own captures the full page.
- waitForTimeout - milliseconds to wait before each capture. The generated default of 0 prints an "Invalid config" warning on every run, so set a positive value.
- include and exclude - limit the capture to specific stories, or skip stories that change on every render.
Step 6. Build the static Storybook, then run SmartUI against the storybook-static folder.
npm run build-storybook
npx smartui storybook ./storybook-static --config .smartui.json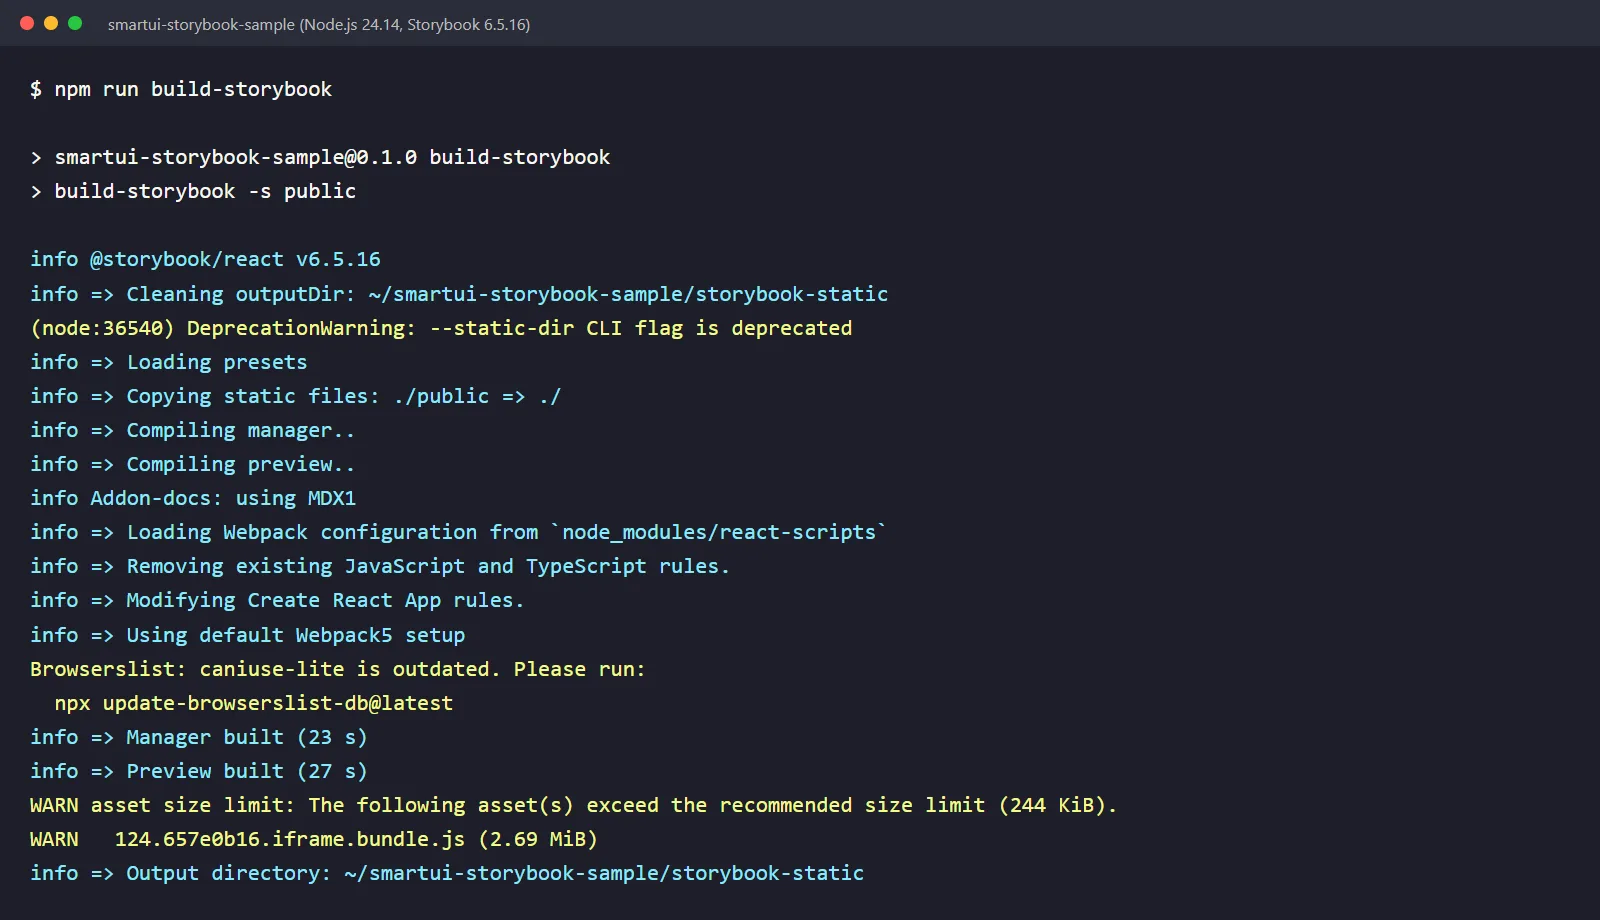
The build output above is from the same run, with webpack progress lines trimmed and paths shortened. The deprecation and browserslist warnings are expected on the Storybook 6.5 sample and do not affect the SmartUI run.
The first run is the baseline. This is the console output from the September 2026 run, with the update-check line and build ID removed and the project ID shortened:
SmartUI Storybook CLI v1.2.0
[smartui] Project Token Validated
[smartui] Stories found:  8
[smartui] Number of stories rendered may differ based on the config file.
[smartui] ./storybook-static compressed.
[smartui] Upload in progress...
[smartui] ./storybook-static uploaded.
[smartui] Build in progress...
[smartui] Build successful

[smartui] Build details:
 Build URL:  https://smartui.lambdatest.com/builds/01M3P6T5.../?searchBuild=smartui-c7409a8191
 Build Name:  smartui-c7409a8191
 Total Screenshots:  64
 Approved:  0
 Changes found:  0
 Rejected: 0

No comparisons run. This is a baseline build.
Eight stories, four browsers, and two viewports produced 64 screenshots, and the whole run took about 72 seconds. The build is attached to the current Git branch (master in the sample), and the build URL opens it in the SmartUI dashboard.
Catch a Visual Change
SmartUI ties each build to your latest Git commit and branch, so every comparison run follows the same order: edit, commit, rebuild, run.
# after editing a story or component
git add src/stories/Header.jsx
git commit -m "Change the Log in button label"
npm run build-storybook
npx smartui storybook ./storybook-static --config .smartui.json
Both the commit and the rebuild are required. The CLI uploads whatever is in storybook-static, so skipping the rebuild re-sends the old stories, and rerunning on a commit that already has a build stops with this message (pass --force-rebuild to override it):
[smartui] Build with commit 'eea1676' on branch 'master' already exists.
[smartui] Use option --force-rebuild to forcefully push a new build.
The September 2026 run reused the change from the original version of this tutorial: in src/stories/Page.stories.jsx, the LoggedIn story's play function was edited to look for a "Log out" button instead of "Log in". That edit changes no label. It breaks the play function, and Storybook renders its error screen for that story instead of the page.
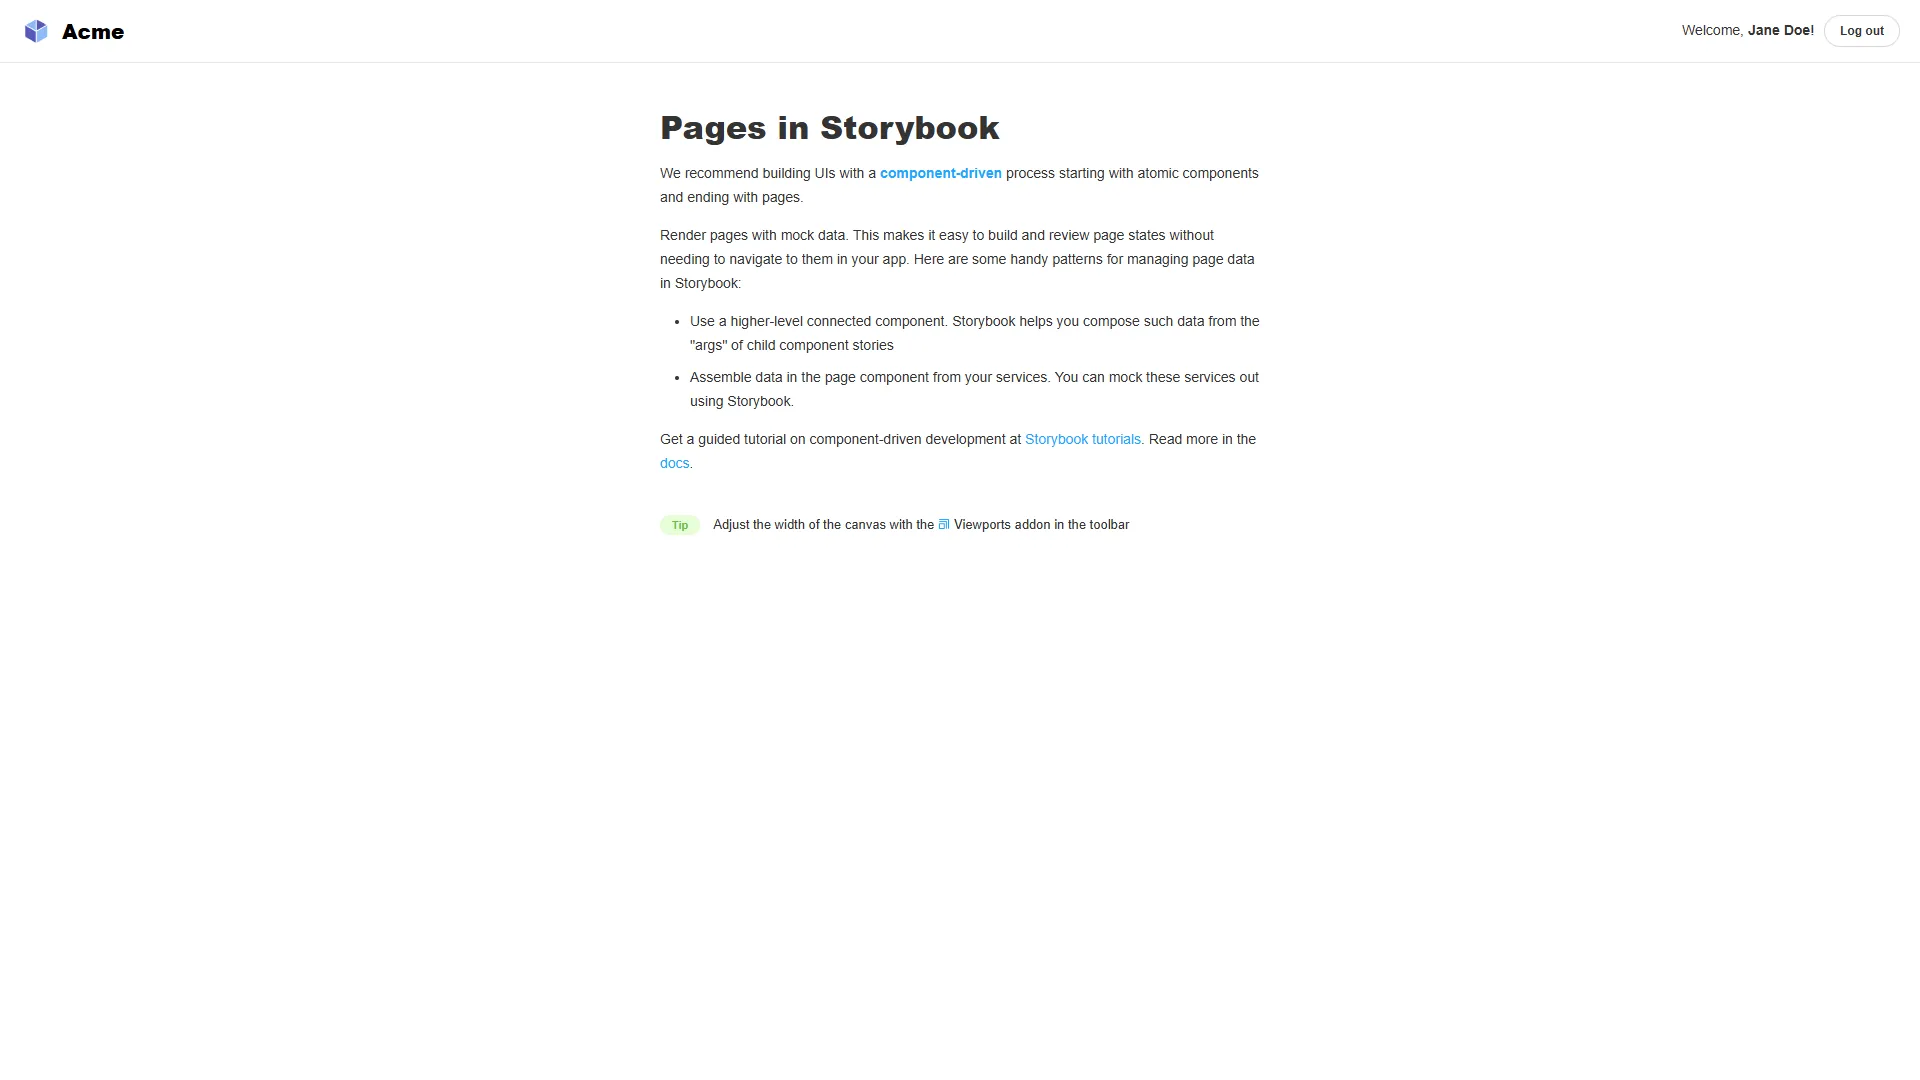
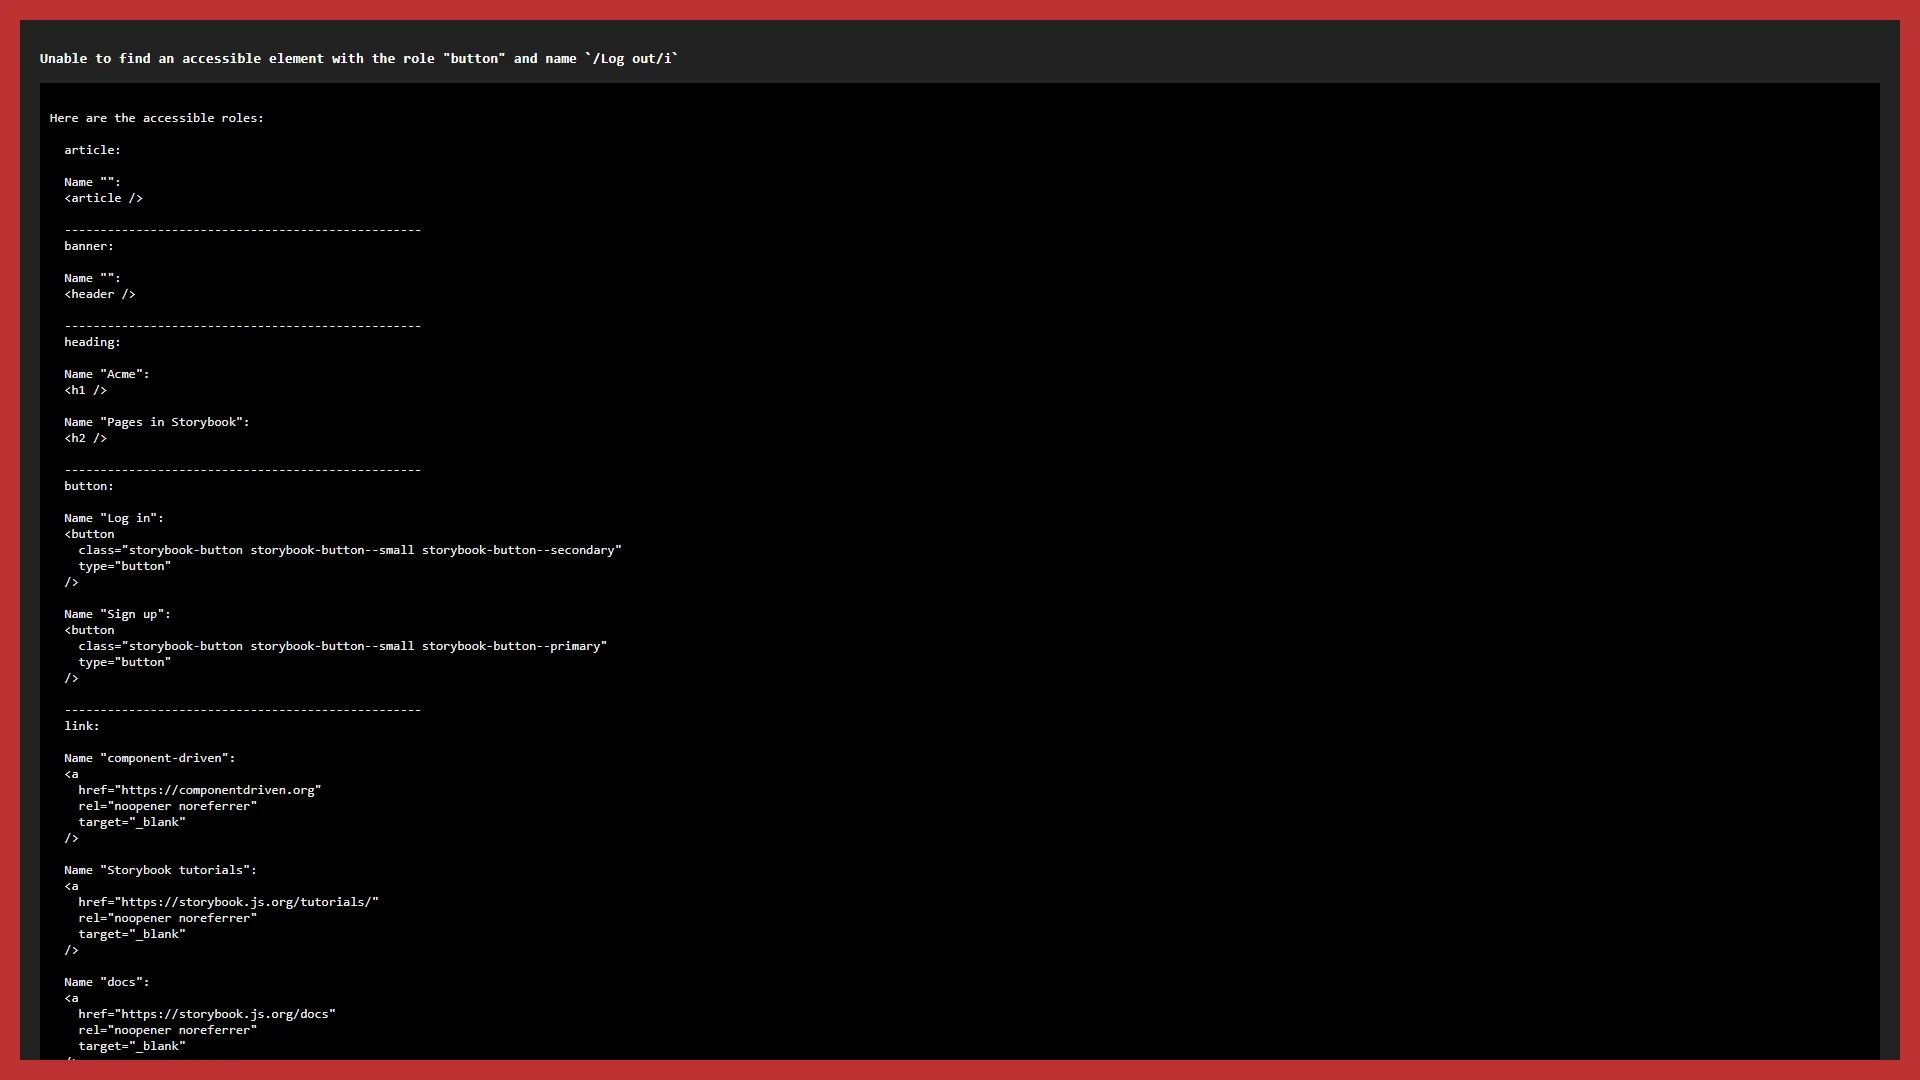
The first capture is the Page: Logged In story as it rendered in the baseline build. The second is the same story after the edit, captured locally from the rebuilt storybook-static folder.
SmartUI caught it. The comparison build approved 56 unchanged screenshots and flagged all 8 Example/Page: Logged In screenshots, one per browser and viewport (output trimmed, table borders simplified):
[smartui] Screenshots compared:  64
[smartui] Build successful

[smartui] Build details:
 Build Name:  smartui-af6c83ad98
 Total Screenshots:  64
 Approved:  56
 Changes found:  8
 Rejected: 0

 Sr. Number | Story                      | Mis-match %
 (rows 1-56 trimmed: every other story at 0)
 57         | Example/Page: Logged In    | 99.5459
 58         | Example/Page: Logged In    | 97.3714
 59         | Example/Page: Logged In    | 97.2355
 60         | Example/Page: Logged In    | 97.2355
 61         | Example/Page: Logged In    | 99.5009
 62         | Example/Page: Logged In    | 97.3859
 63         | Example/Page: Logged In    | 99.5009
64 | Example/Page: Logged In | 99.4533| Browser | 375 x 812 mismatch | 1920 x 1080 mismatch |
|---|---|---|
| Chrome | 97.2355% | 99.5009% |
| Edge | 97.2355% | 99.5009% |
| Firefox | 97.3714% | 99.5459% |
| Safari | 97.3859% | 99.4533% |
A visual test catches any change in rendered output, including a story that throws. For a pure visual diff, change something users see instead, such as the label="Log in" prop in src/stories/Header.jsx, then approve or reject the flagged screenshots in the SmartUI dashboard.
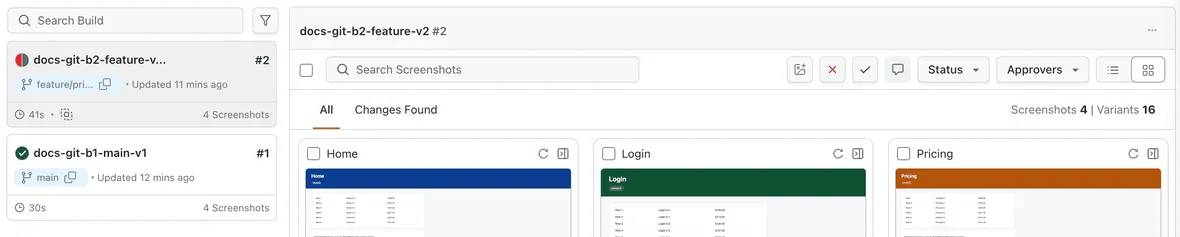
In the SmartUI dashboard, each build is listed with its Git branch and screenshot count, and the Changes Found tab narrows the grid to the screenshots that need a decision.
Run It in CI
A minimal GitHub Actions workflow, based on the sample repository's own CI file, runs the same commands on every pull request. Commit .smartui.json so CI uses the same browsers and viewports, and store the project token as a repository secret.
name: SmartUI Storybook
on:
  pull_request:
    branches: [master]
jobs:
  visual-tests:
    runs-on: ubuntu-latest
    steps:
      - uses: actions/checkout@v4
      - uses: actions/setup-node@v4
        with:
          node-version: 22
      - run: npm install
      - run: npm run build-storybook
      - run: npx smartui storybook ./storybook-static --config .smartui.json
        env:
          PROJECT_TOKEN: ${{ secrets.PROJECT_TOKEN }}
Watch the exit code. In the run above, the CLI exited with code 0 even though it found 8 changes, so a failing step will not block a merge. Gate pull requests on the SmartUI status check instead, through the SmartUI GitHub App or the GITHUB_URL variable described in the SmartUI GitHub Actions guide.
How to Keep Storybook Visual Tests Stable
These settings remove the most common sources of false diffs in Storybook visual tests:
- Set waitForTimeout - give fonts, images, and lazy content time to load before capture; 1000 milliseconds cleared the default-value warning in the sample run.
- Pin or exclude volatile stories - stories that show the current date, random data, or running animations produce a diff on every run, so give them fixed args or list them under exclude.
- Capture themes on purpose - the backgroundTheme option accepts light, dark, or both, and both captures every story twice, which doubles the screenshot count.
- Approve changes on the branch that made them - SmartUI compares a build with the latest approved build on the baseline branch, as the SmartUI Storybook Git branching guide explains, so approving intended changes before merging keeps the baseline clean.
- Filter rendering noise - Smart Ignore separates real layout changes from pixel shifts caused by anti-aliasing and font rendering.
- Test a running Storybook when needed - CLI v1.2.0 can also target a URL such as http://localhost:6006; it starts a TestMu AI tunnel and needs LT_USERNAME and LT_ACCESS_KEY set.
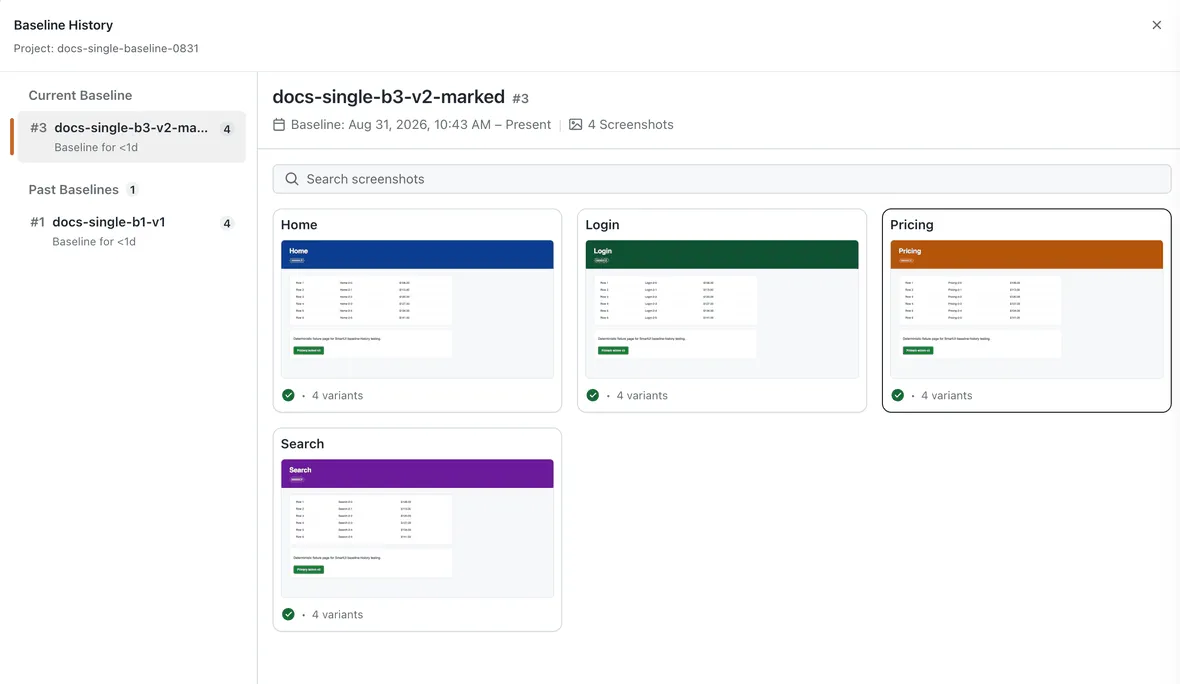
Approved builds become baselines, and the project's Baseline History panel lists the current baseline and every past one, which helps trace when an approved change entered the baseline.
For how visual regression testing works beyond component libraries, see the visual regression testing guide.
Conclusion
Start with the sample: clone it, create a CLI project in SmartUI, and run the baseline build so you can see the report before wiring in your own Storybook. Then reuse the same .smartui.json on your component library, add the workflow above to your pull requests, and follow the SmartUI Storybook documentation for URL mode, theme capture, and every config key. The SmartUI Storybook visual testing page covers plans and features for larger component libraries.
Author

Vipul Gupta
Blogs: 24


Vipul Gupta is a Sr. Lead SDET at Zupee with over 9 years of experience in functional and automation testing. He has built 10+ automation projects from scratch covering web, API, and mobile applications. Vipul is skilled in Selenium, Appium, Rest Assured, Playwright, Java, Python, Pytest, BDD, TDD, Maven, Jenkins, TestNG, and JUnit. He has successfully led end-to-end QA efforts, including setting up teams from scratch and managing a 15-member QA team to ensure manual and automation testing run in parallel from day one. Vipul graduated in B.Tech CSE from CGC College of Engineering and is followed by 3,000+ QA and SDET professionals on LinkedIn, reflecting his strong influence in the testing community.
Reviewer

Parth Mistry
Reviewer
Parth Mistry is a Member of Technical Staff at TestMu AI (formerly LambdaTest), building SmartUI, the visual regression testing product. He developed and owns the SmartUI CLI, a modular TypeScript tool built on Playwright for multi-browser automation, and built the Storybook CLI for visual regression of UI components. He maintains cross-language SDKs in Python, Java, Ruby, C#, and Node.js, and engineered a Node-based visual rendering service on Kafka, Redis, MySQL, and S3. His migration of that service to an event-driven, KEDA-autoscaled architecture improved execution speed by 60% and cut annual infrastructure cost by $9,600. He also built the end-to-end SmartUI integration with KaneAI. Parth is a Google Summer of Code 2024 contributor and an alumnus of IIT Jodhpur.


Storybook Visual Testing FAQs
Did you find this page helpful?
More Related Blogs
TestMu AI forEnterprise
Get access to solutions built on Enterprise
grade security, privacy, & compliance
- Advanced access controls
- Advanced data retention rules
- Advanced Local Testing
- Premium Support options
- Early access to beta features
- Private Slack Channel
- Unlimited Manual Accessibility DevTools Tests