
Catch Visual UI Bugs with SmartUI Visual Testing
Catch Layout, CSS, and Rendering Bugs across Browsers and Real Devices. Visual AI Filters Out Pixel Noise.

Snapshot Testing: How It Works, Why It Gets Brittle, and What to Use Instead
What snapshot testing is, how Jest and Vitest snapshots work, why snapshot suites get rubber-stamped, and when a visual diff or a smaller assertion fits.
Last Updated on:
Snapshot testing saves the output of a component or function as a baseline and fails the test when a later run produces different output. Snapshot testing comes in two kinds: serialized snapshots, which Jest and Vitest store as text in a .snap file by default, and visual snapshots, which save a screenshot of the rendered page and compare its pixels with an approved baseline.
As many modern apps are built with frameworks like React, Vue, Angular, and Next.js, even small component changes can cause visual regressions. To see snapshot testing in action, you can use Jest, a widely adopted JavaScript testing framework.
By using snapshot testing with Jest, you can automatically capture snapshots of your components and compare them on each test run, immediately highlighting any differences.
Snapshot testing with Jest also helps you detect regressions early, refactor code safely, update libraries confidently, and maintain a consistent user interface without relying on manual checks.
Key Takeaways
Snapshot testing saves a component's rendered output as a baseline file and fails any later run that produces different output. Jest and Vitest store serialized text snapshots in .snap files, while a visual testing tool compares screenshots of the rendered page, which catches CSS and rendering bugs that serialized markup cannot show.
- Serialized snapshots: Snapshot testing with Jest serializes a rendered component tree to text and diffs the next run against that saved string, which flags unintended UI changes without opening a browser.
- __snapshots__ folder: Jest writes snapshots into a __snapshots__ folder beside the test file on the first run, so the folder never has to be created by hand.
- Reviewable diffs: Jest snapshots are plain text files, which keeps a UI change reviewable as a diff inside a pull request and tracked in Git alongside the code.
- Visual snapshots: A visual testing tool such as TestMu AI SmartUI compares real screenshots pixel by pixel across browsers and devices, catching the CSS and rendering bugs a text snapshot cannot see.
- Behavior checks: React Testing Library pairs with Jest snapshot tests to simulate clicks, typing and form submissions, so a component is checked for behavior as well as for structure.
- Dynamic values: Timestamps, randomly generated IDs and animation states change on every run, so a snapshot test can fail even when nothing about the component is broken.
- Snapshot updates: Intentional UI changes are accepted by updating the saved snapshot, either by pressing u in Jest watch mode or by running npm run test:update, after the diff is reviewed.
- CI mode: Running jest --ci makes a missing snapshot fail the test instead of being written, so every baseline has to be committed and reviewed before the pipeline passes.
- Cross-browser rendering: TestMu AI runs automated visual tests across 3,000+ browser and OS combinations, which extends a local Jest snapshot suite to cross-browser rendering that one machine cannot reproduce.
Why Perform Snapshot Testing with Jest?
When building web applications, maintaining UI consistency across changes can be challenging. Snapshot testing, a form of visual testing, helps you detect unintended UI changes across different states of your components.
With frameworks like Jest, this process is simplified as Jest captures snapshots of your components on every test run and immediately highlights any differences.
Reasons to Perform Snapshot Testing With Jest:
- Automatic Snapshot Management: Jest generates and updates .snap files, so you don't need to manually track component outputs.
- Built-in Serialization: Complex React trees, DOM nodes, or JSON structures are converted into readable snapshot formats for accurate comparisons.
- Smart Diffing Engine: Only the changed parts of snapshots are highlighted, making it easy to spot unexpected updates.
- CI/CD Compatibility: Snapshot tests run automatically in pipelines, catching regressions before code reaches production.
- Custom Matchers and Serializers: Extend snapshot testing to handle unique UI libraries or data structures.
- Version Control Friendly: Text-based snapshots integrate with Git, making pull request reviews of UI changes straightforward.
To learn more about how the Jest framework supports effective unit testing, check out the Jest tutorial.
Why Do Snapshot Tests Get Brittle?
Snapshot tests get brittle because a snapshot fails on any change to the saved output, whether the change is a bug or an intended edit such as a renamed CSS class or a new wrapper element.
- Rubber-stamped updates: When most snapshot failures come from intended changes, reviewers rerun the tests with -u and approve the new snapshots without reading the diff, so a real regression can pass review.
- Shared components: A change to a component that many screens render, such as a button or a layout wrapper, changes every snapshot that contains the component, so one edit can break thousands of snapshots at once.
Visual Testing Tool vs. Snapshot Testing
Snapshot testing and a visual testing tool check different things: snapshot testing compares serialized text or DOM output, while a visual testing tool compares the pixels a user actually sees on a rendered page.
Jest never opens a browser to run a snapshot test. It renders the component tree to a string, freezes that string as the baseline, and diffs the next run against it character by character. That keeps snapshot tests fast and cheap enough to run on every commit, but it also means a snapshot test can pass while the page looks broken: a CSS override that pushes a button off-screen, a font that fails to load, or a color that renders wrong only in Safari never touches the serialized markup, so nothing in the snapshot changes.
A visual testing tool such as TestMu AI SmartUI, Percy, or Applitools instead captures an actual screenshot of the rendered page across real browsers and devices, then compares it against an approved baseline pixel by pixel or through an AI-filtered perceptual diff. That is the only way to catch a purely visual regression, since it inspects what rendered rather than what was serialized.
For a free, self-hosted screenshot tool, our BackstopJS guide covers setup, scenarios, Docker and CI.
On Android, the same idea runs on the JVM with Roborazzi.
Vitest has a visual option as well: in browser mode, toMatchScreenshot() compares a screenshot of an element against a reference image, and the Vitest visual regression guide recommends running those tests in Docker, in CI-only workflows or on a cloud service, because rendering varies from machine to machine.
Snapshot testing (Jest):
- Compares a serialized component tree or DOM as text or JSON, without opening a real browser.
- Runs in milliseconds, cheap enough to gate every commit.
- Blind to CSS and rendering bugs, since the markup can stay identical while the visual output breaks.
- Reviewed as a text diff inside a pull request.
Visual testing tool (SmartUI, Percy, Applitools):
- Compares an actual screenshot of the rendered page against an approved baseline.
- Runs across real browsers, operating systems, and devices.
- Catches purely visual regressions such as layout shifts, color changes, broken fonts and cross-browser rendering differences.
- Reviewed as a visual diff overlay, usually in a dashboard.
In practice, the two are complementary rather than a choice between one or the other. Jest snapshots protect component structure cheaply on every commit, and a visual testing tool covers what actually renders on screen at the points in the pipeline where that risk matters most.
A visual diff is the right tool only for rendered-UI regressions across browsers and devices. A visual testing tool does not fix DOM-snapshot brittleness, because a serialized Jest snapshot still fails on every intended markup change.
SmartUI ignores dynamic content and filters rendering noise before a diff reaches review. Its free tier includes 2,000 screenshots as a one-time lifetime allowance with 1-month build history, and the paid Visual Regression plan is priced by screenshot volume with unlimited user seats, according to TestMu AI pricing. Storybook visual testing covers running SmartUI screenshot comparisons on Storybook stories.
How to Set Up Snapshot Testing in React Using Jest?
To implement snapshot testing with Jest in your React project, you first need to prepare a proper environment. This ensures your tests run smoothly and that component snapshots are accurately captured and compared.
Setting Up the Environment
Let's begin setting up a complete environment for snapshot testing with Jest.
- Install Node.js: Make sure Node.js is installed on your system, as it's required to run and manage your React project and Jest tests. If it's not installed, download it from the official website: Node.js. After installation, verify it using the CLI commands:
node -vTo verify that npm is already present on your machine, run the following command:
npm -vnpm installNow that you have the dependencies installed, let's proceed with setting up a new React project.
Setting Up a New React Project
For new projects, it's recommended to use Vite instead of Create React App, as Vite offers faster setup and build times.
Why Create a React Project?
React's component-based architecture makes it ideal for snapshot testing with Jest. Each component renders a predictable UI, allowing Jest to capture and compare snapshots efficiently. This helps detect unintended visual or structural changes quickly.
However, Jest requires additional configuration to work with Vite because of their module system differences; Vite uses ES Modules (ESM), while Jest defaults to CommonJS. Jest's native ESM mode is still labeled experimental, and the Jest ESM TypeScript guide covers how to set it up.
You have two options:
- Configure Jest for Vite: Keep Jest and let babel-jest compile JSX and ES module imports, as the configuration below does. The vite-jest bridge that older guides suggest has had no release since version 0.1.4 in 2021, according to its npm listing.
- Use Vitest: Vite's native testing framework provides a Jest-compatible API, offering faster execution and seamless integration within the Vite ecosystem.
Vitest uses the same snapshot matchers as Jest, so a Vitest test imports expect from vitest, calls toMatchSnapshot() or toMatchInlineSnapshot(), and updates saved snapshots with vitest -u. As of November 2026, the latest Vitest release is Vitest 5.1.1, and the Vitest vs Jest comparison covers the two runners, including how to migrate from Jest to Vitest.
The example repository for this tutorial was built with Create React App, so it starts with npm start and keeps JSX in .js files. The Vite React template sets "type": "module" in package.json, names components .jsx and starts with npm run dev.
In a Vite project, save the Jest and Babel configs below as jest.config.cjs and babel.config.cjs. Saved as .js, a module.exports config stops Jest with "module is not defined in ES module scope".
Once your React project is set up with Vite, the next step is to integrate snapshot testing with Jest. This allows you to capture snapshots of your components and automatically compare them on each test run, ensuring any unintended changes in the UI are detected early and helping maintain a consistent interface across updates.
Before you start writing snapshot tests, you'll need to add Jest along with supporting libraries like React Testing Library, which complements snapshot testing by enabling user-focused component testing.
Once installed and configured, you can start creating and running tests efficiently.
Installing React Testing Library
When setting up snapshot testing with Jest, it's equally important to test how your components behave from a user's perspective. React Testing Library provides the tools you need to simulate real user interactions like clicks, typing, and form submissions, ensuring that your components not only look right but also function as intended. Teams with Enzyme suites can switch to it file by file, and React Testing Library vs Enzyme covers the steps, including what happens to their snapshots.
- Install dependencies: Use a package manager like npm or yarn to add React Testing Library and its user-event package. For example, run:
npm install --save-dev @testing-library/react @testing-library/dom @testing-library/user-eventReact Testing Library 16 lists @testing-library/dom as a peer dependency, so it is installed alongside rather than pulled in automatically.
Together, they provide a complete and reliable testing approach for your React components.
Adding Jest to the React Project
To add snapshot testing to your React project, you first need to install Jest and configure it properly. This setup ensures that your components can be tested reliably, and any unintended visual changes are detected early. As of November 2026, the latest Jest release is Jest 30.5.2.
- Install dependencies: Use a package manager like npm or yarn to add Jest and supporting libraries for snapshot testing. For example, run:
npm install --save-dev jest jest-environment-jsdom babel-jest @babel/core @babel/preset-env @babel/preset-react @testing-library/jest-dom identity-obj-proxyOr if you prefer yarn, run the following command below:
yarn add --dev jest jest-environment-jsdom babel-jest @babel/core @babel/preset-env @babel/preset-react @testing-library/jest-dom identity-obj-proxyJest 30 does not bundle the jsdom environment. Without jest-environment-jsdom, a run with testEnvironment set to jsdom stops with "Test environment jest-environment-jsdom cannot be found".
module.exports = {
  testEnvironment: "jsdom",
  setupFilesAfterEnv: ["<rootDir>/src/setupTests.js"],
  moduleNameMapper: {
    "\\.(css|less|scss|sass)$": "identity-obj-proxy",
    "\\.(jpg|jpeg|png|gif|svg)$": "<rootDir>/__mocks__/fileMock.js",
  },
  collectCoverageFrom: [
    "src/**/*.{js,jsx}",
    "!src/index.js",
    "!src/reportWebVitals.js",
  ],
  transform: {
    "^.+\\.(js|jsx)$": "babel-jest",
  },
  // Transform ES modules from LambdaTest and SmartUI packages
  transformIgnorePatterns: [
    "node_modules/(?!(@lambdatest|smartui|axios)/)",
  ],
  // Add module directories to help Jest find modules
  moduleDirectories: ["node_modules", "<rootDir>"],
  testPathIgnorePatterns: ["/node_modules/"],
};
Code Walkthrough:
- Browser-like Environment: Configures Jest to simulate a browser for running React component tests.
- CSS & Image Mocks: Ensures Jest can handle style and asset imports without errors.
- Coverage Files: Includes all source files except index.js and reportWebVitals.js for test coverage.
- Babel Transformation: Uses babel-jest to transform JSX and modern JavaScript so Jest can execute your tests.
Because the config hands .js and .jsx files to babel-jest, add a babel.config.js at the project root so Babel can compile JSX and ES module imports:
module.exports = {
  presets: [
    ["@babel/preset-env", { targets: { node: "current" } }],
    ["@babel/preset-react", { runtime: "automatic" }],
  ],
};
Then add these scripts to package.json, so npm test runs the suite and npm run test:update rewrites snapshots after an intended change:
"scripts": {
  "test": "jest",
  "test:update": "jest --updateSnapshot"
}
Verifying Your Setup
Before diving deeper into snapshot testing with Jest, it's essential to confirm that your testing environment is correctly configured. This initial verification ensures that Jest, React Testing Library, and your component setup are working smoothly before you begin capturing snapshots.
Create a simple test file, src/App.test.js, and add the test below:
import React from "react";
import { render } from "@testing-library/react";
import App from "./App";


test("renders app", () => {
  render(<App />);
});
Code Walkthrough:
- Render Validation: Ensures the main App component renders successfully without crashing.
- Testing Tools Integration: Uses React Testing Library to confirm component rendering within Jest's environment.
- Environment Verification: Confirms that your setup for snapshot testing with Jest is correctly configured and ready for use.
Key Takeaway: Setting up snapshot testing in React needs Node.js, a package manager, and a project scaffolded with Vite rather than Create React App for faster builds. Because Vite uses ES Modules while Jest defaults to CommonJS, Jest needs babel-jest and .cjs config files in a Vite project, or a switch to Vitest for its Jest-compatible API. Jest 30 also needs jest-environment-jsdom installed for the browser-like environment. jest.config.js then sets that environment, CSS and image mocks, coverage paths and Babel transformation, React Testing Library is added for user-level interaction, and a render of App.test.js confirms the setup works before the first snapshot is captured.

Note: To run your visual tests across 3,000+ browser and OS combinations, start free on TestMu AI.
How to Perform Snapshot Testing With Jest in React?
Let's demonstrate snapshot testing with Jest by building a realistic React component called UserCard, which consists of various visual elements such as images, text, and more, covering most scenarios you'll encounter in a production application.
For a quick visual walkthrough of this concept, watch the video below from TestMu AI.

Subscribe to the TestMu AI YouTube channel for more tutorials on testing and automation.
Configuring Global Setup File
To ensure your snapshot testing with Jest works consistently across your React project, you need a global setup file. This file configures the testing environment, sets up helpful extensions, and mocks certain browser APIs that Jest cannot access directly, such as window.matchMedia.
By doing this, you ensure that all your components render correctly during tests and that your snapshots reflect the real UI without unexpected errors.
Code Implementation:
import '@testing-library/jest-dom';
// Mock window.matchMedia
Object.defineProperty(window, 'matchMedia', {
writable: true,
value: jest.fn().mockImplementation(query => ({
matches: false,
media: query,
onchange: null,
addListener: jest.fn(),
removeListener: jest.fn(),
addEventListener: jest.fn(),
removeEventListener: jest.fn(),
dispatchEvent: jest.fn(),
})),
});
Code Walkthrough:
- DOM Matchers Support: Provides helpful DOM matchers through @testing-library/jest-dom for more readable and accurate assertions.
- Media Query Compatibility: Mocks window.matchMedia so components using media queries or responsive designs don't break during snapshot testing.
- Stable Snapshot Results: Keeps snapshot tests reliable by ensuring consistent component structure and behavior across test runs.
Handling Static Assets
When running snapshot testing with Jest, static files like images, SVGs, and stylesheets can cause unexpected issues since Jest doesn't process them the same way as a browser. To handle this, you can mock these assets so that Jest can focus only on component structure during snapshot comparisons.
Create a __mocks__ folder in your project root and add a fileMock.js file inside it. This mock ensures that asset imports are replaced with a simple stub during testing, preventing unnecessary test failures caused by missing files or formats.
module.exports = 'test-file-stub';
This setup ensures that your snapshot testing with Jest remains clean and predictable, focusing purely on the rendered output of your components instead of external resources like images or styles.
Now that your setup file is ready and can handle images, SVGs, and other static assets, let's create a UserCard React component that we can later use for snapshot testing with Jest.
Creating a User Profile Card Component
Firstly, let's create the component folder and a UserCard folder and add the UserCard.js file to it: src/components/UserCard/UserCard.js. Add the following basic card component to it:
Code Implementation:
import React from "react";
import PropTypes from "prop-types";
import "./UserCard.css";


const UserCard = ({
  user,
  showEmail = true,
  showBio = true,
  theme = "dark",
  onContactClick,
}) => {
  if (!user) {
    return (
      <div className="user-card user-card--empty">
        <p>NO USER DATA DETAILS</p>
      </div>
    );
  }


  const { name, email, bio, avatarUrl, role, isActive } = user;


  return (
    <div className={`user-card user-card--${theme}`}>
      <div className="user-card__header">
        {avatarUrl ? (
          <img
            src={avatarUrl}
            alt={`${name}'s avatar`}
            className="user-card__avatar"
          />
        ) : (
          <div className="user-card__avatar-placeholder">
            {name.charAt(0).toUpperCase()}
          </div>
        )}
        <div className="user-card__status">
          <span
            className={`status-indicator ${
              isActive
                ? "status-indicator--active"
                : "status-indicator--inactive"
            }`}
          />
          {isActive ? "Active" : "Inactive"}
        </div>
      </div>


      <div className="user-card__body">
        <h2 className="user-card__name">{name}</h2>
        {role && <p className="user-card__role">{role}</p>}


        {showEmail && email && (
          <p className="user-card__email">
            <span className="user-card__label">Email:</span> {email}
          </p>
        )}


        {showBio && bio && <p className="user-card__bio">{bio}</p>}
      </div>


      <div className="user-card__footer">
        <button
          onClick={onContactClick}
          className="user-card__button"
          aria-label={`Contact ${name}`}
        >
          Contact
        </button>
      </div>
    </div>
  );
};


UserCard.propTypes = {
  user: PropTypes.shape({
    name: PropTypes.string.isRequired,
    email: PropTypes.string,
    bio: PropTypes.string,
    avatarUrl: PropTypes.string,
    role: PropTypes.string,
    isActive: PropTypes.bool,
  }),
  showEmail: PropTypes.bool,
  showBio: PropTypes.bool,
  theme: PropTypes.oneOf(["light", "dark"]),
  onContactClick: PropTypes.func,
};


export default UserCard;

This component supports multiple states and optional display controls. It imports prop-types, so install that package with npm install prop-types.
The PropTypes block documents the expected props, but the React 19 upgrade guide says React 19 removes the propTypes checks and silently ignores them, and recommends TypeScript or another type-checking solution instead.
Code Walkthrough:
- Render User Avatar or Placeholder: Checks if avatarUrl is provided. If yes, renders the image; if not, displays the first letter of the user's name as a placeholder. This ensures snapshot testing with Jest captures both scenarios.
- Display User Status: Shows an active or inactive indicator based on the isActive prop. Snapshot tests validate different user states.
- Render User Name and Role: Displays the name and role of the user. Helps snapshot tests confirm that essential user information is always rendered correctly.
- Conditional Email Display: Checks showEmail prop before rendering the email. Snapshot tests capture variations when the email is shown or hidden.
- Conditional Bio Display: Checks showBio prop before rendering the bio. Snapshot tests capture both the presence and absence of the bio section.
- Apply Theme Classes: Uses theme prop (light or dark) to apply CSS classes. Snapshot tests validate visual differences across themes.
- Render Contact Button: Renders a button with the onContactClick handler. Snapshot tests ensure the button renders correctly and remains functional.
- Fallback for Missing User Data: If no user object is provided, it renders a placeholder message: "NO USER DATA DETAILS". Snapshot tests confirm the empty state renders consistently.
- PropTypes Declaration: Lists the expected type of each prop. React 19 does not run these checks, so the block serves as documentation unless the project moves to TypeScript.
Result:
The image below shows the output of the User profile card component. Start the app with the following command (npm run dev in a Vite project):
npm start
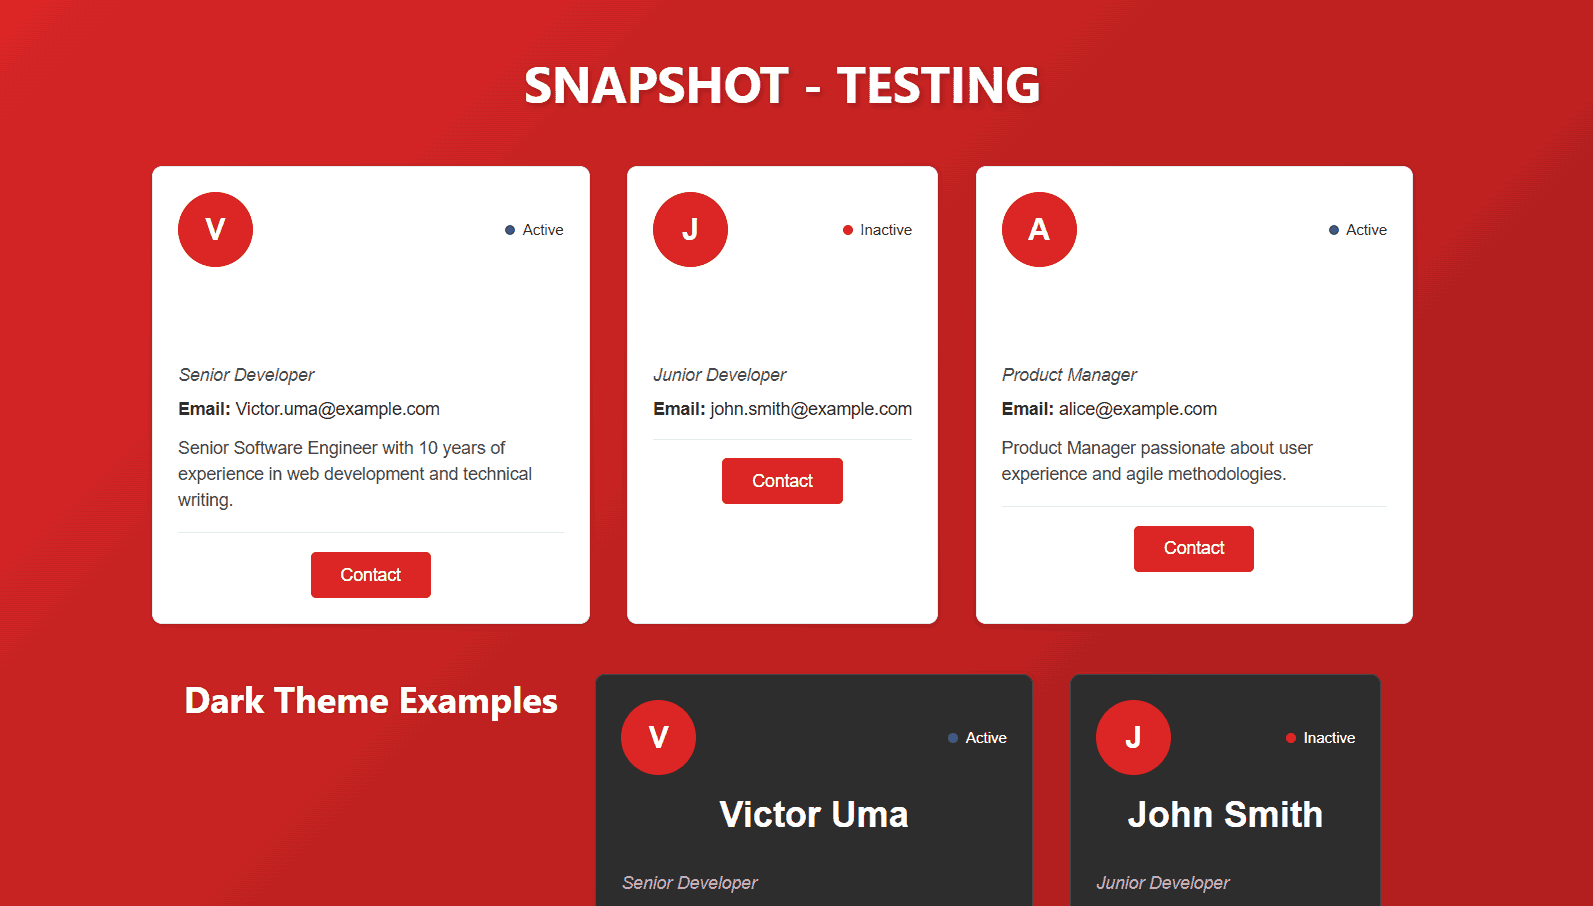
This UserCard component above demonstrates multiple user scenarios and themes, showing how different props (avatar, status, role, email, bio) render. It provides a clear example of the variations that snapshot testing with Jest will capture.
Once you have created the UserCard component, you can perform snapshot testing with Jest on this reusable React component. However, before that, you need to create the test data.
Creating the Test Data
Let's create a __mock__ file and add testData.js src/__mocks__/testData.js for reusable test fixtures:
const completeUser = {
  id: 1,
  name: "Victor Uma",
  email: "Victor.uma@example.com",
  avatarUrl: "https://i.pravatar.cc/150?img=1",
  bio: "Senior Software Engineer with 10 years of experience in web development and technical writing.",
  role: "Senior Developer",
  isActive: true,
};


const minimalUser = {
  id: 2,
  name: "John Smith",
  email: "john.smith@example.com",
  role: "Junior Developer",
  isActive: false,
};


const withoutAvatarUser = {
  id: 3,
  name: "Alice Johnson",
  email: "alice@example.com",
  avatarUrl: null,
  bio: "Product Manager passionate about user experience and agile methodologies.",
  role: "Product Manager",
  isActive: true,
};


// Export both formats
export const mockUsers = [completeUser, minimalUser, withoutAvatarUser]; // Array for components that need to iterate


export const mockUserObjects = {
  complete: completeUser,
  minimal: minimalUser,
  withoutAvatar: withoutAvatarUser,
}; // Objects for testing
Code Walkthrough:
- Define Mock Users: The mockUsers array contains multiple user objects representing different states and roles.
- Name & Email: Provides the primary identifiers for each user card. Used in the component to display user information.
- Bio: Optional field to test conditional rendering. Snapshot tests will capture cards with and without a bio.
- Role: Helps demonstrate different user roles visually in the component.
- isActive: Boolean flag representing the user's active status, used to conditionally render status indicators in the UserCard.
- Avatar Handling: The complete user carries an avatarUrl, while the minimal user omits it and the third user sets it to null, so the snapshots cover both the image and the placeholder initials. The key has to be avatarUrl, the prop name UserCard reads; a fixture key named avatar is ignored and every card falls back to initials.
- Reusability: Centralizing this test data makes it easy to reuse across multiple tests and components, keeping your snapshot tests consistent and maintainable.
Now that you have our UserCard component, let's write comprehensive snapshot tests to cover different rendering scenarios and learn how to run them effectively.
Creating the Test File
To perform snapshot testing with Jest on the UserCard component, you need to create a dedicated test file. In your project, add UserCard.test.js inside the src/components/UserCard/ folder:
Code Implementation:
import React from 'react';
import { render } from '@testing-library/react';
import UserCard from './UserCard';
import { mockUserObjects } from '../../__mocks__/testData';


describe('UserCard Snapshot Tests', () => {


  test('renders complete user card with all props', () => {
    const { container } = render(
      <UserCard
        user={mockUserObjects.complete}
        showEmail={true}
        showBio={true}
        theme="light"
      />
    );
    expect(container.firstChild).toMatchSnapshot();
  });


  test('renders user card in dark theme', () => {
    const { container } = render(
      <UserCard
        user={mockUserObjects.complete}
        theme="dark"
      />
    );
    expect(container.firstChild).toMatchSnapshot();
  });


  test('renders user card without email', () => {
    const { container } = render(
      <UserCard
        user={mockUserObjects.complete}
        showEmail={false}
      />
    );
    expect(container.firstChild).toMatchSnapshot();
  });


  test('renders user card without bio', () => {
    const { container } = render(
      <UserCard
        user={mockUserObjects.complete}
        showBio={false}
      />
    );
    expect(container.firstChild).toMatchSnapshot();
  });


  test('renders minimal user card', () => {
    const { container } = render(
      <UserCard user={mockUserObjects.minimal} />
    );
    expect(container.firstChild).toMatchSnapshot();
  });


  test('renders user card without avatar', () => {
    const { container } = render(
      <UserCard user={mockUserObjects.withoutAvatar} />
    );
    expect(container.firstChild).toMatchSnapshot();
  });


  test('renders empty state when no user provided', () => {
    const { container } = render(
      <UserCard user={null} />
    );
    expect(container.firstChild).toMatchSnapshot();
  });


  test('renders inactive user', () => {
    const inactiveUser = { ...mockUserObjects.complete, isActive: false };
    const { container } = render(
      <UserCard user={inactiveUser} />
    );
    expect(container.firstChild).toMatchSnapshot();
  });


  test('renders with onClick handler', () => {
    const mockHandler = jest.fn();
    const { container } = render(
      <UserCard
        user={mockUserObjects.complete}
        onContactClick={mockHandler}
      />
    );
    expect(container.firstChild).toMatchSnapshot();
  });
});
Code Walkthrough:
- Import Dependencies: Load React, React Testing Library's render, the UserCard component, and mock user data.
- Define Test Suite: Use describe() to group all snapshot tests for clarity.
- Render Component: Each render() mounts the UserCard in a virtual DOM for inspection.
- Snapshot Assertion: expect(container.firstChild).toMatchSnapshot() captures the component's rendered output for comparison.
- Test Variations: Includes complete card, dark theme, without email/bio, minimal card, without avatar, empty state, inactive user, and click handler scenarios.
- Purpose: Ensures snapshot testing with Jest catches unintended UI changes across all common variations of the UserCard component.
Running Snapshot Test :
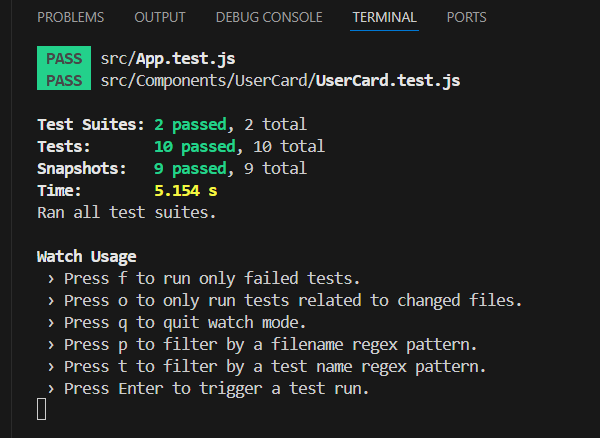
Run the following command in your terminal to execute the snapshot tests:
npm test
On the first run Jest by default generates a __snapshots__ folder in the test file's directory __snapshots__/UserCard.test.js.snap. The creation of this folder does not need to be done manually.:
Managing Snapshot Updates
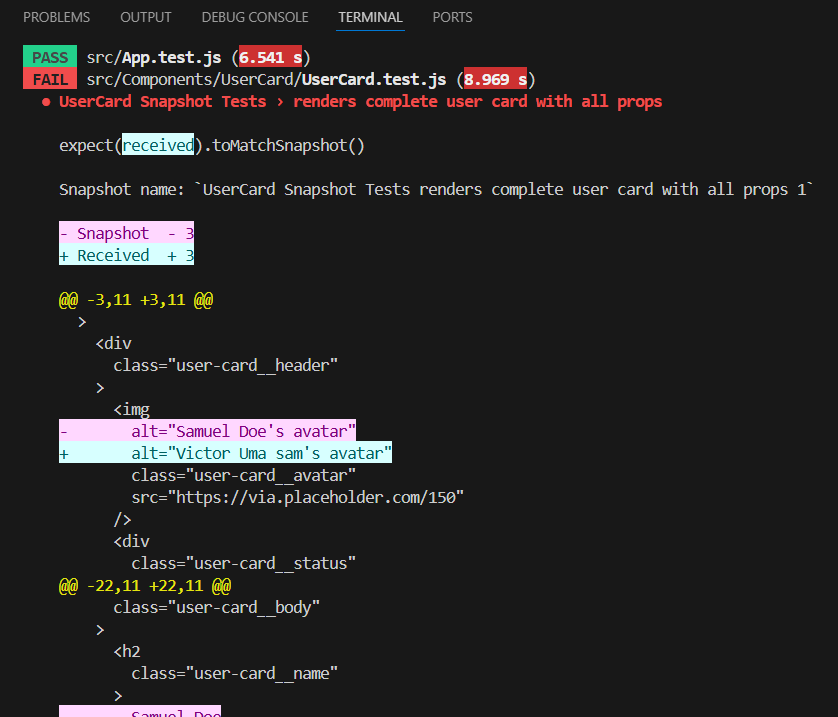
When a component changes, snapshot tests may fail by showing the differences between the previous snapshot and the new output. This helps you quickly identify unintended UI changes during Jest unit testing.
Handling Snapshot Changes:
Jest highlights changes in the component's rendered output when it differs from the saved snapshot. For example, modifying the testData.js or component structure may cause test failures, showing exactly what changed.
Updating Snapshots:
If the changes in your component are intentional, you can update the saved snapshots to reflect the new output.
- Interactive Mode: In watch mode, press u to update failing snapshots.
- Command Line: Run npm run test:update to update all snapshots.
- Specific Test: Update only a particular test with: npm test -- -u -t "renders complete user card"
With the setup above, the snapshot tests run locally. To check what actually renders, screenshot comparison tools compare each new screenshot against an approved baseline image.
Timestamps, randomly generated IDs and animation states still cause failures there, because they change on every run and no longer match the saved baseline. Visual testing tools differ mainly in how well they ignore that kind of change.
A cloud platform such as TestMu AI runs the visual checks across multiple browsers, OS versions and resolutions, and SmartUI can ignore dynamic regions so they do not fail the comparison.
Let's now execute the UserCard React component to see how you can use TestMu AI for performing visual testing at scale.
Key Takeaway: A working snapshot suite needs a global setup file that loads DOM matchers and mocks window.matchMedia, plus a fileMock.js stub so images, SVGs and stylesheets do not fail the run. The UserCard example shows why fixtures matter: mock users that vary avatar, status, role, email and bio let one test file cover the complete card, the dark theme, the minimal card, the missing-avatar fallback and the empty state. Jest creates the __snapshots__ folder on the first run, and later diffs are accepted with a watch-mode u or npm run test:update once the change is confirmed as intentional.
Running Snapshot Testing With Jest on Cloud
Performing visual testing on a cloud platform allows you to validate your UI across different browsers, devices, and operating systems simultaneously.
You can quickly identify layout inconsistencies, broken elements, or unexpected visual changes without relying on your local environment. This approach not only saves time but also ensures consistent results, especially when testing large applications with multiple components and responsive designs.
TestMu AI, a cloud testing platform allows you to perform automated visual testing across 3000+ browsers and OS combinations.
This offers a scalable approach to testing web applications across various OS and browser combinations. Its visual testing tool feature allows testers to validate the visual appearance of web applications by comparing screenshots, detecting pixel-level differences, analyzing PDF files, and identifying DOM rendering issues.
To get started with TestMu AI, follow the steps below.
- Create .env File:Securely store your TestMu AI credentials by creating a .env file in the root of your project and adding the following values:
LT_USERNAME="<your_username>"
LT_ACCESS_KEY="<your_access_key>"
const capabilities = {
  browserName: "Chrome",
  browserVersion: "latest",
  "LT:Options": {
    username: username,
    accessKey: accessKey,
    platformName: "Windows 10",
    project: "Snapshot Testing",
    build: "Build 1",
    name: "User Card Test",
    w3c: true,
    plugin: "node_js-node_js",
  },
};
https://${username}:${accessKey}@hub.lambdatest.com/wd/hubThis ensures your Jest tests connect to the TestMu AI cloud grid for executing snapshot comparisons across different browsers and devices.
npm install @lambdatest/smartui-cli @lambdatest/selenium-driver selenium-webdriver@lambdatest/selenium-driver is the SmartUI SDK for Selenium in JavaScript. Its smartuiSnapshot(driver, name) call captures the page at that point of a Selenium script, and the SmartUI CLI uploads each capture for comparison against the approved baseline, as the SmartUI Selenium JS SDK docs show.
These captures check the rendered page, unlike the Jest snapshots above, which compare serialized markup on your machine. The two suites run side by side: Jest guards component structure on every commit, and SmartUI checks how the UI looks in real browsers.
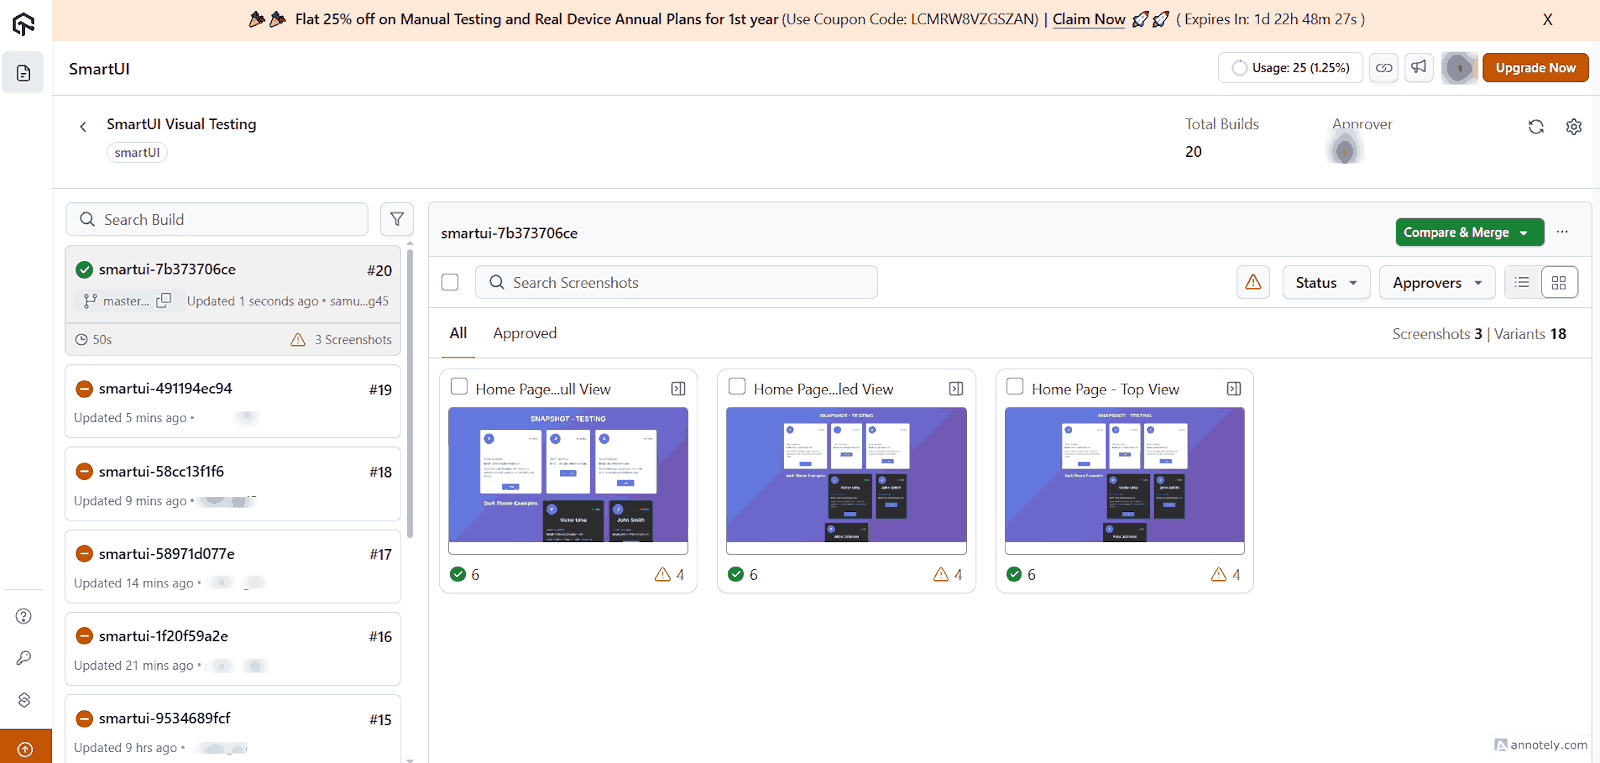
The above image shows a newly approved build on the SmartUI dashboard, with its screenshots listed under the 'Approved' label.
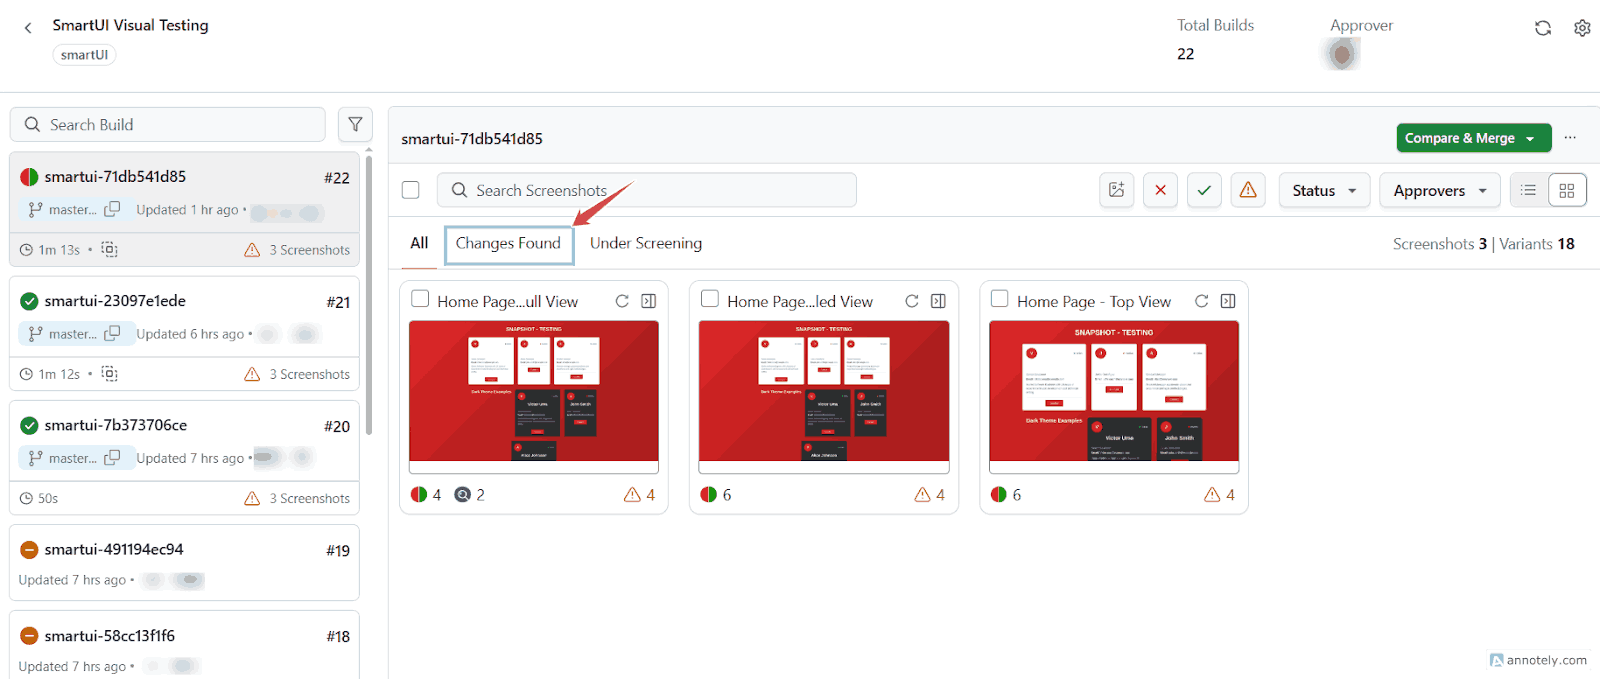
The above image shows TestMu AI SmartUI comparing the current build with the previous one and listing every impacted screenshot under the "Changes Found" tab. From there, a reviewer approves the expected updates and flags the regressions.
Test Execution:
With all the proper configuration, run the command below to execute your snapshot testing with Jest.
npm run test:smartui
In the example repository, that script wraps a Jest spec in the SmartUI CLI:
"test:smartui": "npx smartui --config .smartui.json exec -- jest src/lambdatest.spec.js --testPathIgnorePatterns=/node_modules/"The spec opens the running app at localhost:3000 and calls smartuiSnapshot() for each view. With PROJECT_TOKEN set, it drives a local Chrome, and SmartUI compares the captures on the browsers and viewports listed in .smartui.json, which are Chrome and Firefox at three widths in the repository. Without the token, the spec falls back to a Selenium session on the TestMu AI cloud grid.
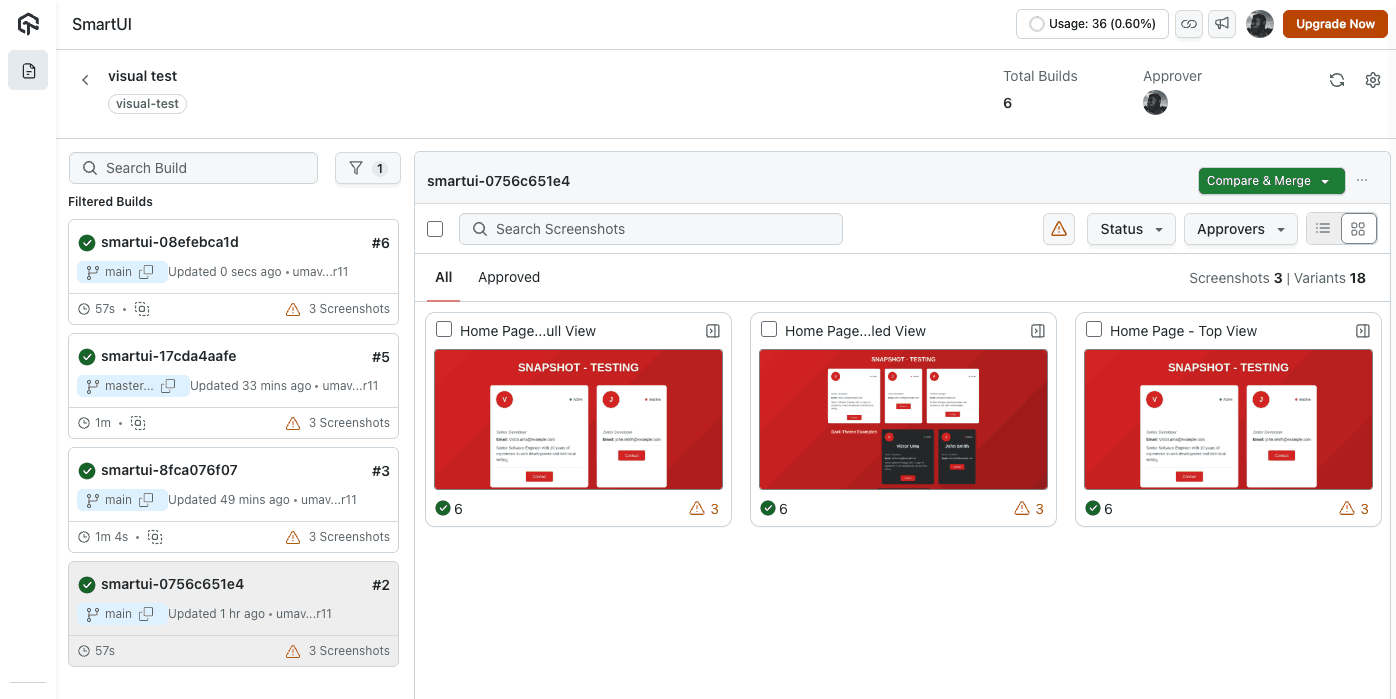
To get started with the snapshot testing with TestMu AI, follow this support documentation on Visual Regression tests with SmartUI.
Screenshot diffs still need someone to read them, which is the job the AI layer in SmartUI takes on. Visual AI testing compares each new screenshot against the approved baseline and filters out anti-aliasing differences, font rendering variation and dynamic content before a result reaches the dashboard, so a failed build points at a real layout or color regression instead of rendering noise.
Key Takeaway: Running snapshot testing on the cloud moves the check off one machine and onto TestMu AI's 3,000+ browser and OS combinations, so layout inconsistencies and broken elements show up on the browsers real users have. Setup is credential-driven: a .env file holds the username and access key copied from Account Settings, capabilities declare the browser, version, OS and resolution, and the Jest setup reads those values when it opens a session. The SmartUI dashboard then groups approved screenshots under Approved and impacted ones under Changes Found for review.
Best Practices for Snapshot Testing With Jest
To ensure your snapshot tests remain accurate, maintainable, and meaningful over time, follow these key best practices. These guidelines help you catch real UI regressions while avoiding unnecessary snapshot noise and false positives.
- Review Before Updating: Review a -u update like a code change and read the diff before you commit the new snapshot. Blind updates can hide bugs.
- Keep Snapshots Small: Snapshot small, stable outputs, such as one component or one serialized value, instead of a whole page tree. Smaller snapshots are easier to review and maintain.
- Use Inline Snapshots for Short Values: For a short string or a small object, toMatchInlineSnapshot() writes the snapshot into the test file, so the expected value sits next to the assertion in code review.
- Use Property Matchers for Dates and IDs: Pass property matchers such as expect.any(Date) to toMatchSnapshot() for generated fields, so a new timestamp or ID does not fail the snapshot while every other field is still checked exactly.
- Assert One Value Directly: When a test checks one value, such as a button label, assert that value with toBe() or toHaveTextContent() instead of snapshotting the whole component.
- Use Descriptive Test Names: Good: "renders user card in dark theme". Bad: "test 1". Clear names help identify purpose and intent.
- Test Multiple Scenarios: Cover different prop combinations, edge cases, and states to ensure comprehensive snapshot validation.
- Combine With Unit Tests: Use snapshot tests for structure verification and unit tests for logic verification, ensuring full component reliability.
- Commit Snapshots: Always commit snapshot files to version control alongside your component code to track UI changes accurately.
- Be Mindful of Testing Framework Differences: While Jest provides built-in snapshot testing, other unit testing frameworks like Jasmine and Mocha do not include this functionality out of the box. For end-to-end tests, Cypress snapshot testing covers how to take snapshots in Cypress.
- Mock External Dependencies: To avoid flaky snapshots, mock APIs, timers, or random data that could change between test runs.
- Regularly Clean Up Outdated Snapshots: Remove snapshots for deprecated components to prevent clutter and maintain test relevance.
Using Jest can simplify visual regression testing for React components, whereas Mocha or Jasmine may require additional libraries. For a detailed comparison of how each testing framework supports snapshot testing, check out this blog on Jest vs Mocha vs Jasmine.
Conclusion
You set up snapshot testing in this tutorial with Jest for your React application. You learned how snapshots work: They take your UI and tell you when it changes. If the change was intentional, you then update the snapshot.
If it was not, you may have just caught a new bug. Test cases for the UserCard component were written and connected to TestMu AI's cloud platform (though your local tests should suffice for the bulk of development).
A big thing to remember is: never blindly update your snapshots whenever a test fails. Look at what changed and examine if it is supposed to look different; therein lies actual value. The testing setup is ready for you to catch UI bugs before your users do.
Did your last release break the UI? TestMu AI's SmartUI catches visual regressions by comparing every screen to its baseline.
Author

Sushobhit Dua
Blogs: 4

Sushobhit Dua is an Engineering Manager at TestMu AI, leading SmartUI, the visual regression and visual testing product. He manages the team that builds and ships SmartUI and maintains and cuts releases of the open-source SmartUI CLI. He works primarily in Core Java, Spring Boot, and Gradle, and is an AMCAT Certified Software Engineer. He brings over 10 years of software engineering experience, with earlier work as a Software Engineer at ecare Technology Labs. Sushobhit owns the SmartUI roadmap and the engineering decisions behind it.
Reviewer

Mudit Singh
Reviewer
Mudit Singh is Co-Founder and Head of Growth at TestMu AI, and a member of the founding team that has grown the platform to 2.8M+ users across 132 countries. He drives growth and go-to-market across the full product portfolio, including KaneAI, Kane CLI, the Real Device Cloud, SmartUI, accessibility testing, and HyperExecute. Over more than eight years on the founding team he has helped build and bring these testing products to market from scratch, scaling the company from cross-browser testing into a full-stack agentic AI quality engineering cloud backed by Sequoia, Qualcomm Ventures, and Premji Invest. He brings over 15 years of experience building and marketing software products and holds a B.Tech in Computer Science from Jaypee Institute of Information Technology.
On This Page
- Why Perform Snapshot Testing with Jest?
- Snapshot Test Brittleness
- Visual Testing Tool vs. Snapshot Testing
- How to Set Up Snapshot Testing in React Using Jest?
- How to Perform Snapshot Testing With Jest in React?
- Running Snapshot Testing With Jest on Cloud
- Best Practices for Snapshot Testing With Jest
- Conclusion
Snapshot Testing FAQs
Did you find this page helpful?
More Related Learning Hubs






TestMu AI forEnterprise
Get access to solutions built on Enterprise
grade security, privacy, & compliance
- Advanced access controls
- Advanced data retention rules
- Advanced Local Testing
- Premium Support options
- Early access to beta features
- Private Slack Channel
- Unlimited Manual Accessibility DevTools Tests