
Catch Visual UI Bugs with SmartUI Visual Testing
Catch Layout, CSS, and Rendering Bugs across Browsers and Real Devices. Visual AI Filters Out Pixel Noise.

BackstopJS: How to Set Up Screenshot Tests That Hold Up in CI
BackstopJS step by step: install, backstop.json scenarios, reference/test/approve, Docker for stable screenshots, CI reports, and when to move to SmartUI.
Published on:
BackstopJS is a free, open-source (MIT) tool that takes a screenshot of your web pages, compares it to an approved reference image, and reports any pixel differences. You specify the pages and viewports in backstop.json, run reference, test, and approve. You can use Docker to ensure the screenshots are the same on all machines and then publish the JUnit report in CI.
TL;DR
BackstopJS (also searched as backstop js) is a free, MIT-licensed screenshot testing tool. It captures your pages in headless Chrome, compares each capture with an approved reference image, and fails the run when the pixel difference passes your threshold, so unintended UI changes stop the build.
BackstopJS Tutorial: Setup, Docker and Playwright
- BackstopJS cost: Free: Yes. BackstopJS is MIT-licensed with no paid tier, and its screenshots, references and reports stay on your own machine or CI runner.
- backstop.json scenarios: Each BackstopJS scenario needs only a label and a url. readySelector, hideSelectors and removeSelectors keep captures stable, so use them before you raise misMatchThreshold.
- BackstopJS Docker: Run backstop reference --docker and backstop test --docker so references and test runs render in the same BackstopJS container, which removes the Mac versus Linux text differences that fail CI.
- BackstopJS Playwright engine: Puppeteer is the default engine. Set engine to playwright and engineOptions.browser to chromium, firefox or webkit to capture the same scenarios in other browser engines.
- Approve filter: backstop approve --filter matches screenshot filenames, where label spaces become underscores, so a label of Pricing table is approved with --filter="Pricing_table".
BackstopJS in CI and at Team Scale
- Exit code: BackstopJS returns 0 when every scenario passes and 1 when any fails, so the CI step fails on its own. Upload backstop_data as an artifact with if: always() to keep the report.
- Team review: When a team outgrows one-person BackstopJS approvals, TestMu AI's SmartUI takes the same screenshots through its CLI upload command and adds shared review with baselines per Git branch.
What Is BackstopJS and When Should You Use It?
BackstopJS is a command-line tool for screenshot comparison. It renders pages in Chrome headless, captures the whole document, the viewport, or specific elements, and flags any scenario whose pixel difference exceeds the threshold you set. It is MIT-licensed (project site) and self-hosted: screenshots, references and reports stay in your repository or on your CI runner.
BackstopJS is a good fit when:
- You test a set of URLs (a marketing site, a CMS theme, a pattern library) across a few viewports.
- Screenshots must remain on your own infrastructure.
- One individual or a small team will review and approve the changes.
It's one of several approaches to visual regression testing. The Hub Guide will compare pixel, DOM, and visual AI methods if you're still in the process of deciding on a method rather than a tool.
How Do You Install BackstopJS and Create a Project?
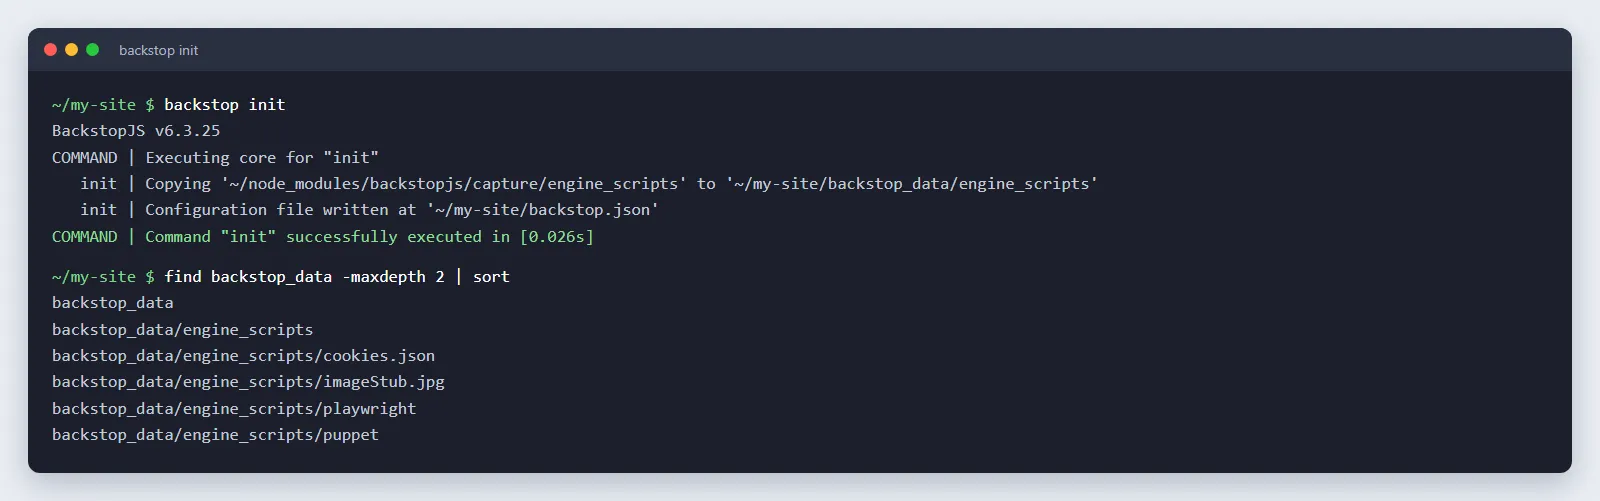
Install BackstopJS globally with npm, then scaffold a project:
npm install -g backstopjs
cd my-site
backstop init
backstop init will create a default config file and project scaffolding in the current directory and will overwrite any existing files, so only run it once. By default, BackstopJS works inside a backstop_data/ folder:
| Folder | What it holds |
|---|---|
bitmaps_reference | Approved reference screenshots |
bitmaps_test | Screenshots from each test run, in timestamped folders |
engine_scripts | Puppeteer or Playwright scripts that run before or after page load |
html_report | The interactive browser report |
json_report | JSON report output |
ci_report | JUnit XML for CI (default file xunit.xml) |
How Do You Write Your BackstopJS Scenarios in backstop.json?
Every scenario requires a label and a url. Everything else is then tuned by what BackstopJS captures. A working starting config:
{
  "id": "marketing_site",
  "viewports": [
    { "label": "phone", "width": 375, "height": 667 },
    { "label": "desktop", "width": 1440, "height": 900 }
  ],
  "scenarios": [
    {
      "label": "Home",
      "url": "https://staging.example.com/",
      "referenceUrl": "https://www.example.com/",
      "readySelector": "main",
      "hideSelectors": [".promo-countdown"],
      "removeSelectors": ["#cookie-banner"],
      "selectors": ["document"],
      "misMatchThreshold": 0.1
    },
    {
      "label": "Pricing table",
      "url": "https://staging.example.com/pricing",
      "readySelector": ".pricing-table",
      "selectors": [".pricing-table"],
      "requireSameDimensions": true
    }
  ],
  "engine": "puppeteer",
  "report": ["browser", "CI"]
}
What each field does, per the BackstopJS README:
| Field | What it does |
|---|---|
url | Page to test |
referenceUrl | A different environment to build references from (for example production while you test staging) |
readySelector | Waits until this selector exists before continuing |
readyEvent | Waits until this string is logged to the console |
delay | Waits a fixed number of milliseconds |
hideSelectors | Sets matching elements to visibility: hidden (space is kept) |
removeSelectors | Sets matching elements to display: none (space collapses) |
selectors | What to capture; defaults to document; viewport captures the viewport only |
misMatchThreshold | Percentage of different pixels allowed to pass |
requireSameDimensions | Fails the test if the captured element changes size |
The engine is puppeteer by default. Set it to playwright and use engineOptions.browser to render in Chromium, Firefox or WebKit.

Do you need the same screenshots across Chrome, Firefox, Safari and Edge?
Note: SmartUI from TestMu AI will capture your URL list in all four browsers and give your team a shared review and baseline workflow. Start free with the SmartUI CLI.
How Do Reference / Test / Approve Work?
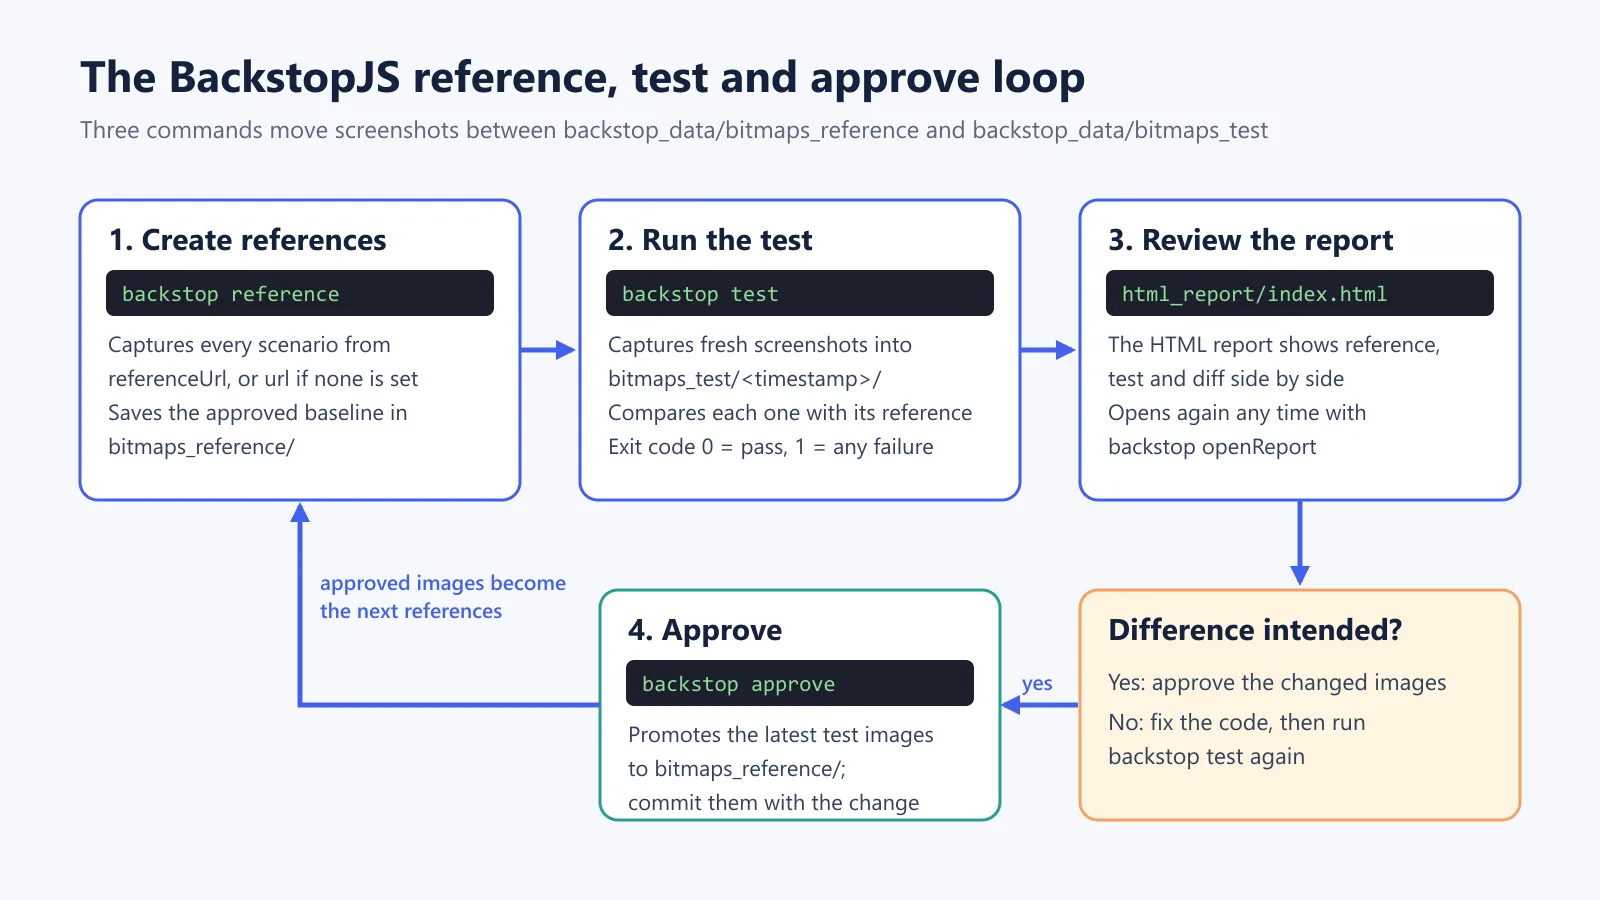
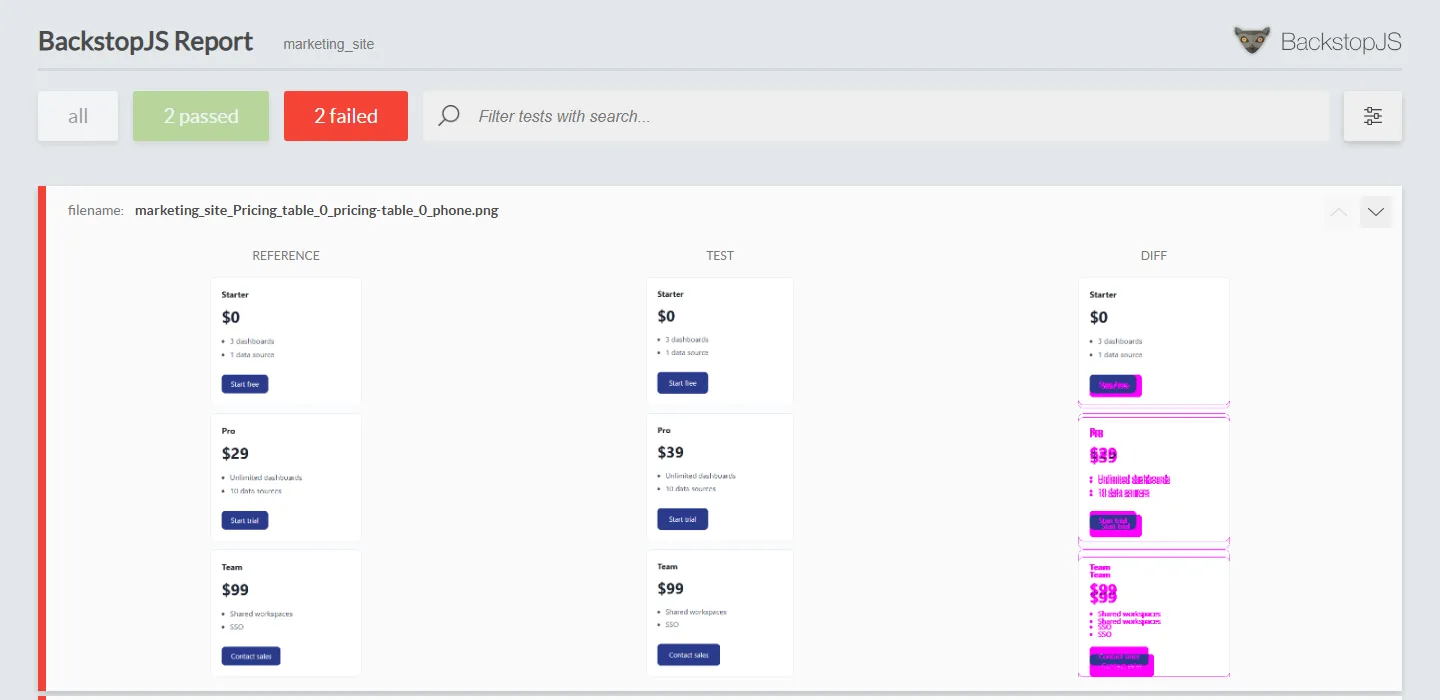
BackstopJS runs on three commands. Learn those, and you know the whole loop.
| Command | What it does | When to run it |
|---|---|---|
backstop reference | Deletes existing references and captures new ones from referenceUrl or url | First run, or after an intentional redesign |
backstop test | Captures fresh screenshots into bitmaps_test/<timestamp>/, compares them with references, opens the report | Every change, locally and in CI |
backstop approve | Promotes the changed images from the latest test run to the reference set | After you confirm a difference is intended |
backstop openReport | Opens the latest report in the browser | Reviewing a run |
All three accept a --filter regex, which keeps the local feedback fast. As per the README, test and reference match the regex against the scenario label; approve matches it against the screenshot filename. The labels are part of the filename, but spaces become underscores there.
backstop test --filter="Pricing table"
backstop approve --filter="Pricing_table"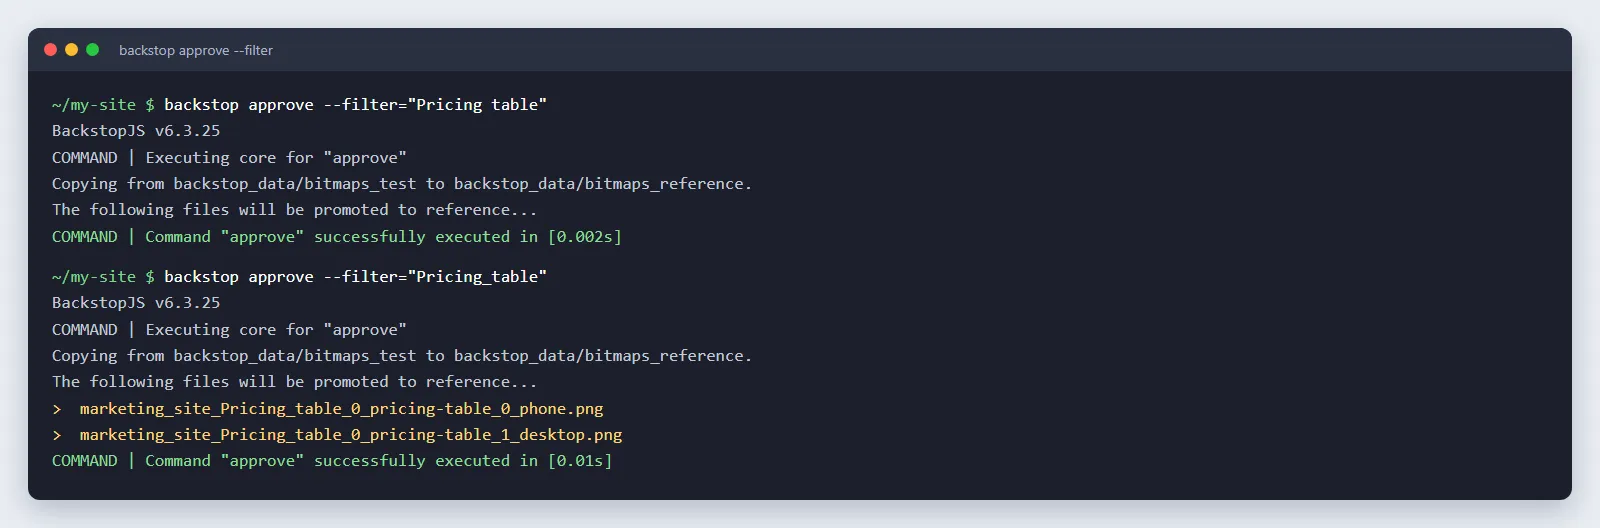
The README says that on the command line, BackstopJS returns 0 if the tests pass and 1 if anything fails. That exit code is what causes the CI job to pass or fail.
How Do You Deal With Dynamic Content in Your BackstopJS Scenarios?
BackstopJS gives you scenario-level options for timing, animation and changing content. Use them before you touch misMatchThreshold:
| Symptom | Cause | Fix |
|---|---|---|
| Random diffs in a carousel or countdown | Content changes between runs | hideSelectors for the element, so layout stays fixed |
| Cookie or chat banner covers the page | Third-party overlay | removeSelectors so it does not render at all |
| Half-loaded page captured | Screenshot taken too early | readySelector on an element that appears last, or readyEvent if your app logs a ready message |
| Fonts or images still loading | No reliable ready signal | delay as a last resort, after trying readySelector |
| Button state differs | Hover or focus left over | onReadyScript to put the page in a known state before capture |
| Element grew a few pixels | Real layout change | Keep requireSameDimensions: true and investigate |
onBeforeScript and onReadyScript both point to JavaScript files located in backstop_data/engine_scripts. onBeforeScript is for anything that needs to be in place prior to the page loading (e.g. cookies), and onReadyScript is for anything you want to do once the page is ready (e.g. open a menu, click a tab).
Why Do the BackstopJS Screenshots Differ Between Your Laptop and the CI?
Different environments will render the same page differently (especially text), so a reference taken on a Mac is going to not match a test run on a Linux CI runner pixel for pixel.
BackstopJS's response is the --docker flag. It runs it inside the official BackstopJS container (as per the README, which states this "will help with consistency" when you're comparing your references across environments):
backstop reference --docker
backstop test --docker
The rule is: capture your references and run your tests in the same renderer. If your CI is using --docker, then your references must be created using --docker as well. The image is published as backstopjs/backstopjs on Docker Hub.
How Do You Run BackstopJS in GitHub Actions?
Run the test in Docker, keep the report as a workflow artifact regardless of whether the job fails and let the exit code determine the build:
name: screenshot-tests
on: [pull_request]

jobs:
  backstop:
    runs-on: ubuntu-latest
    steps:
      - uses: actions/checkout@v7
      - uses: actions/setup-node@v7
        with:
          node-version: 22
      - run: npm install -g backstopjs
      - run: backstop test --docker
      - name: Keep the BackstopJS report
        if: always()
        uses: actions/upload-artifact@v7
        with:
          name: backstop-report
          path: backstop_data
With "report": ["browser", "CI"], the job also writes out JUnit XML to backstop_data/ci_report (a format that build systems like Jenkins can consume as test results). The bitmaps_reference should be committed to the repo. To approve a change, you simply run backstop approve locally (with --docker) and commit the new images in the PR.
Use the STABLE Checklist Before You Trust a BackstopJS Suite
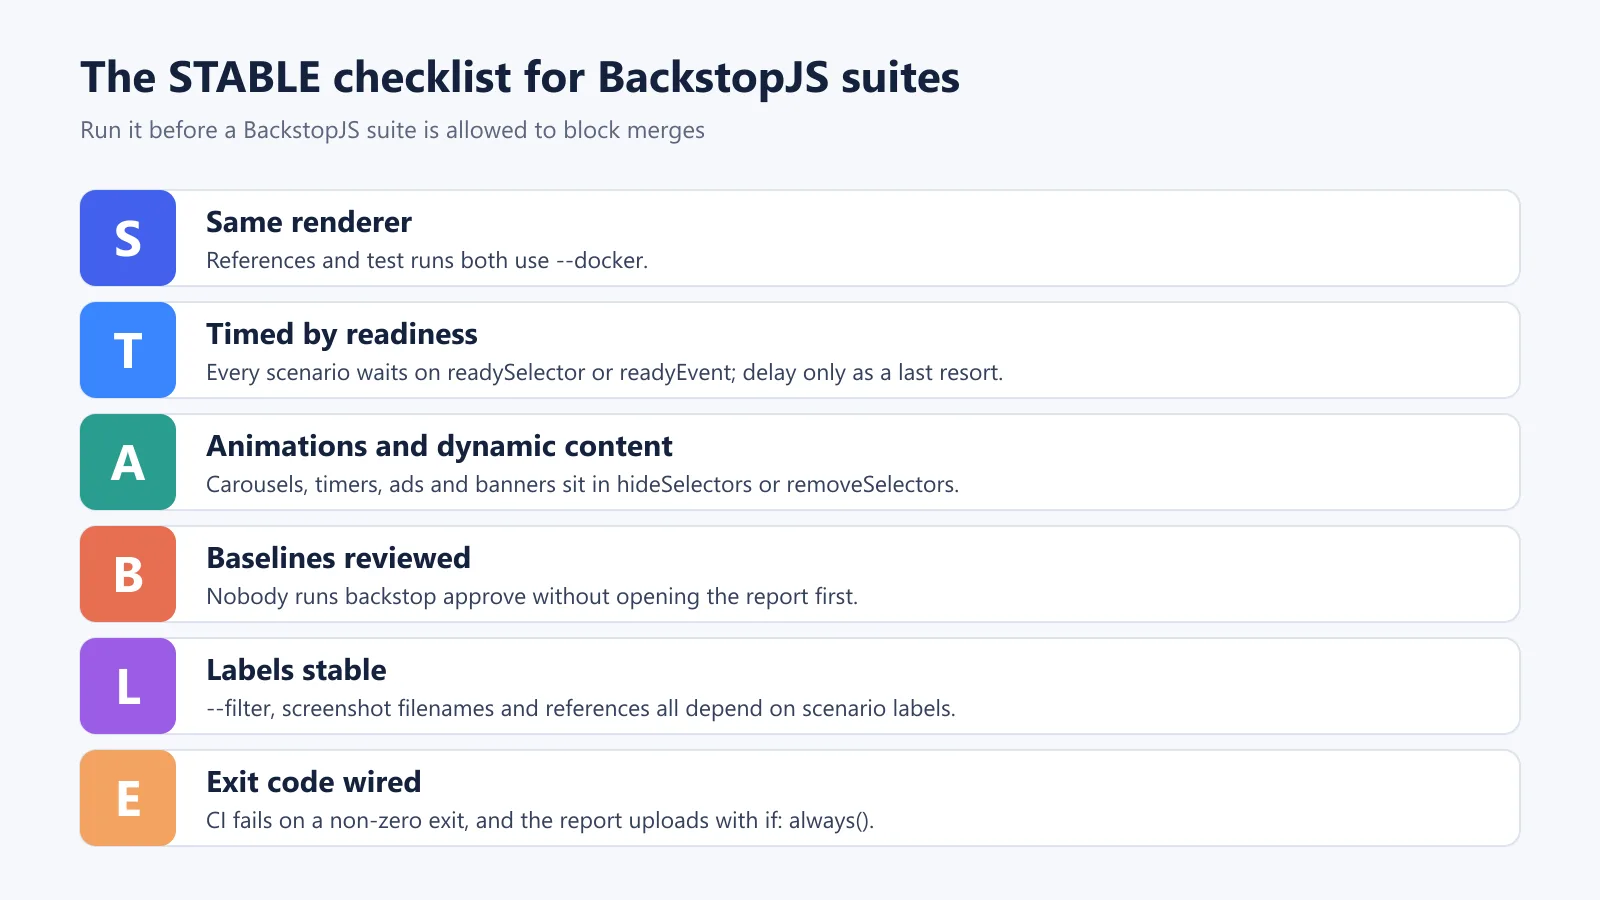
Run this STABLE checklist on any BackstopJS project before you let it block merges:
- S - Same renderer. Both the references and the test runs use
--docker. - T - Timed by readiness. Every scenario is waiting on
readySelectororreadyEvent. Only introduce adelayif nothing else will work. - A - Animations and dynamic content dealt with. Carousels, timers, ads, and banners are all in
hideSelectorsorremoveSelectors. - B - Baselines have been reviewed. No one runs a
backstop approvewithout opening the report first. - L - Labels are stable. The scenario labels will never change casually, as a number of things - the
--filter, the screenshot filenames, the references - all depend on them. - E - Exit code is wired. CI will fail on a non-zero exit, and the report will be uploaded with
if: always().
Where Does BackstopJS Stop Scaling?
BackstopJS does one thing extremely well. The problems start to emerge when you have a wider range of people and browsers involved.
The rate of releases has also slowed down. As of November 2026, the latest npm release is 6.3.25 (released 7th September 2024), and there's nothing newer on the npm registry.
| Factor | BackstopJS | SmartUI |
|---|---|---|
| Cost | Free, MIT licence | "2,000 screenshots free, then $199/mo for 15,000 (billed annually)" (SmartUI page, as of Nov 2026) |
| Where screenshots render | Your machine or CI runner (Docker recommended) | TestMu AI cloud |
| Browsers | Chrome headless via Puppeteer by default; Chromium, Firefox, WebKit via the Playwright engine | Chrome, Firefox, Safari and Edge listed in the CLI config |
| Review and approval | HTML report; backstop approve on one machine; references committed to git | Shared dashboard; baselines marked per build and per Git branch |
| Dynamic content | hideSelectors, removeSelectors, scripts | Smart Ignore, Ignore or Select Regions, execute hooks in the CLI |
| Release status | Latest npm release 6.3.25, published September 2024; no newer release as of November 2026 (npm registry) | Commercial product, maintained by TestMu AI |
| Best for | Solo developers, small URL sets, screenshots that must stay in-house | Teams that review diffs together across browsers and branches |
Stay on BackstopJS while one person can review every diff and your browser list is small. Move when approvals become the bottleneck, when you need Safari or Edge, or when you have several branches that need their own baselines.
How Do You Move BackstopJS Scenarios to SmartUI?
There are really two routes, and you can do the first one as you're planning the second.
Route 1: keep BackstopJS, send its screenshots over to SmartUI. The SmartUI CLI upload command will upload every JPG, JPEG, or PNG in the folder you point it at. Don't point it at backstop_data/bitmaps_test itself, as that folder contains one timestamped subfolder per run, so you'd end up uploading the old runs as well.
BackstopJS also writes a diff image for each failed capture into the same run folder (prefixed 'failed_diff_'). So just copy the test captures from the latest run into a clean folder and upload that:
npm install @lambdatest/smartui-cli
LATEST=$(ls -td backstop_data/bitmaps_test/*/ 2>/dev/null | head -1)
[ -n "$LATEST" ] || { echo "No BackstopJS run folder found"; exit 1; }
rm -rf smartui_upload && mkdir smartui_upload
find "$LATEST" -maxdepth 1 -type f -name '*.png' ! -name 'failed_diff_*' -exec cp {} smartui_upload/ \;
npx smartui upload smartui_upload --buildName "pr-checks"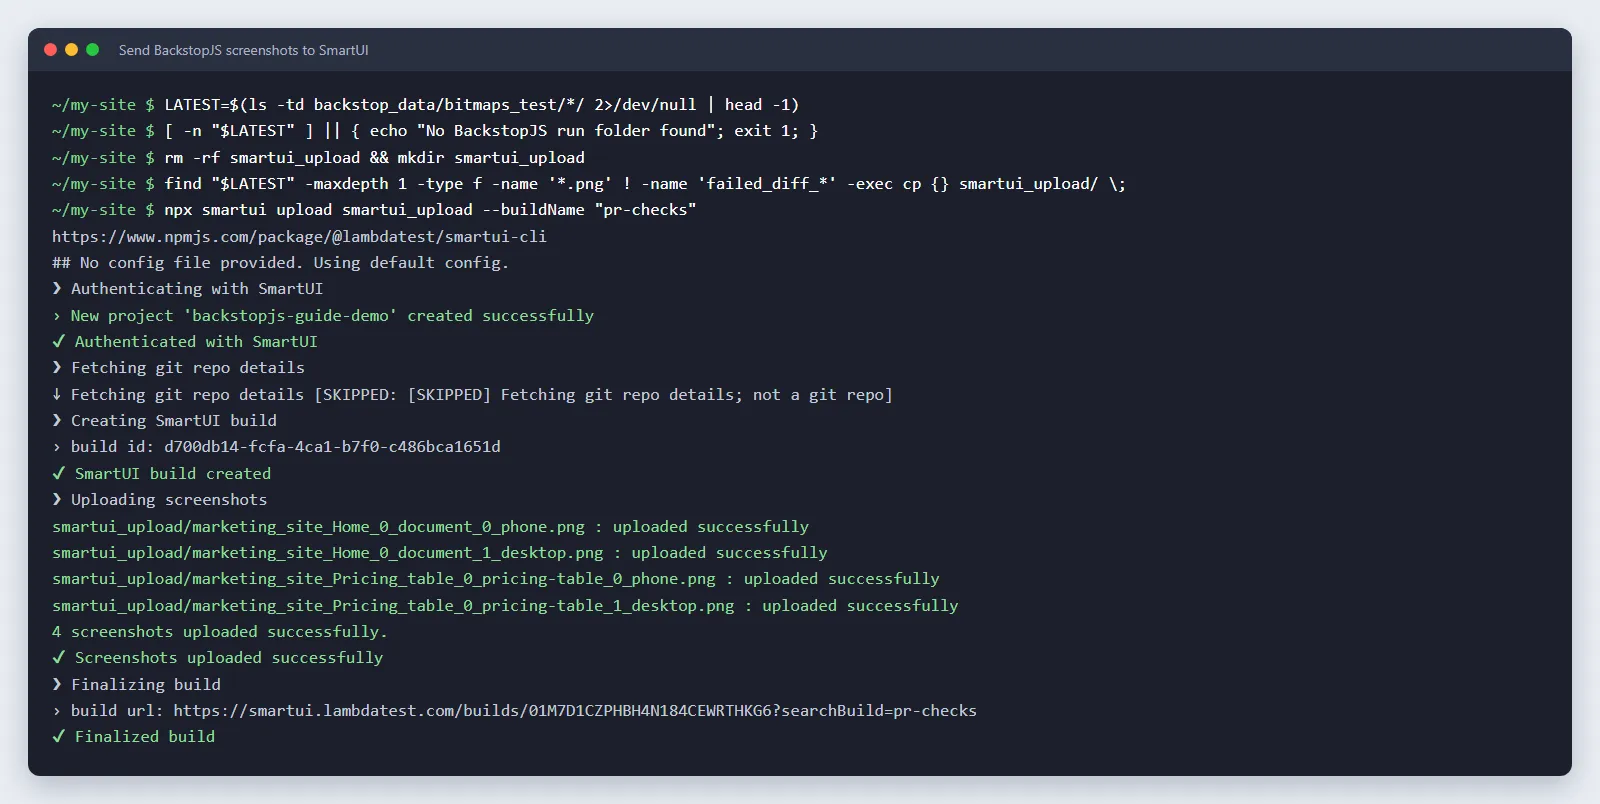
In GitHub Actions, a fresh checkout only has one run folder; the diff images still need to be excluded. Pass the token from secrets:
      - name: Send BackstopJS screenshots to SmartUI
        if: always()
        env:
          PROJECT_TOKEN: ${{ secrets.SMARTUI_PROJECT_TOKEN }}
        run: |
          npm install @lambdatest/smartui-cli
          LATEST=$(ls -td backstop_data/bitmaps_test/*/ 2>/dev/null | head -1)
          [ -n "$LATEST" ] || { echo "No BackstopJS run folder found"; exit 1; }
          mkdir -p smartui_upload
          find "$LATEST" -maxdepth 1 -type f -name '*.png' ! -name 'failed_diff_*' -exec cp {} smartui_upload/ \;
          npx smartui upload smartui_upload --buildName "pr-${{ github.event.number }}"
SmartUI compares screenshots by name and resolution (if you want to compare by name only, then use --ignoreResolutions). So keep your BackstopJS labels and viewports as stable as possible.
For a quick visual walkthrough of this concept, watch the video below from TestMu AI.
Subscribe to the TestMu AI YouTube channel for more tutorials on testing and automation.
Route 2: use SmartUI CLI capture of cases. SmartUI's static URL capture takes a urls.json file and a .smartui.json config and then renders each URL in Playwright browsers on the machine that runs the CLI, then uploads the screenshots. Map your BackstopJS config like so:
| BackstopJS | SmartUI static URL capture |
|---|---|
label | name |
url | url |
delay | waitForTimeout |
readySelector | No selector wait for static URL capture; execute scripts run inside the page, so use waitForTimeout |
onReadyScript click or state change | execute.beforeSnapshot |
removeSelectors | No documented option for static URL capture. Run JavaScript in execute.beforeSnapshot that removes the element, for example document.querySelector('#cookie-banner')?.remove() |
hideSelectors | No documented option for static URL capture. Run JavaScript in execute.beforeSnapshot that sets visibility = 'hidden' on the element, or mask it with SmartUI's Ignore or Select Regions in the dashboard |
viewports with selectors: ["document"] | web.viewports as [width]; SmartUI captures full page by default |
viewports with selectors: ["viewport"] | web.viewports as [width, height] for a viewport-only capture |
Element selectors such as .pricing-table | Not documented for static URL capture; capture the full page, or use a SmartUI SDK, whose ignoreDOM and selectDOM snapshot options (Selenium JavaScript SDK docs) take id, class, cssSelector or xpath |
engine browser choice | web.browsers in .smartui.json |
SmartUI's static URL capture docs only list browsers and viewports as the config keys and make no mention of a hide or remove option. The two rows above are therefore relying on the documented beforeSnapshot hook, which runs your code just prior to the snapshot. The ?. stops the line from throwing if the element is not present.
[
  {
    "name": "home",
    "url": "https://staging.example.com/",
    "waitForTimeout": 1000,
    "execute": {
      "beforeSnapshot": "document.querySelector('#cookie-banner')?.remove(); document.querySelectorAll('.promo-countdown').forEach(el => el.style.visibility = 'hidden')"
    }
  },
  {
    "name": "pricing-table",
    "url": "https://staging.example.com/pricing"
  }
]
npx smartui config:create .smartui.json
npx smartui capture urls.json --config .smartui.jsonThen set the browsers (Chrome, Firefox, Safari, Edge) and viewports in .smartui.json. After the first run, open the build and either Mark as Baseline or, under Project Settings > Build Settings > Git Settings, set a baseline branch (e.g., main).
If you're testing with Playwright directly, then compare that against Playwright screenshot comparison using toHaveScreenshot(), and you'll have a good basis for comparing the various visual testing tools out there for a proper comparison of the hosted and open source options.
Conclusion
Start with one scenario per page template at a phone and a desktop width, create the references with backstop reference --docker, and run backstop test --docker on every pull request. Work through the STABLE checklist before the suite is allowed to block a merge.
Ready to review screenshots as a team? Send your latest BackstopJS run to SmartUI with the SmartUI CLI or capture the same URLs across Chrome, Firefox, Safari and Edge. Start for free.
Did your last release break the UI? TestMu AI's SmartUI catches visual regressions by comparing every screen to its baseline.
Author

Sushobhit Dua
Blogs: 4

Sushobhit Dua is an Engineering Manager at TestMu AI, leading SmartUI, the visual regression and visual testing product. He manages the team that builds and ships SmartUI and maintains and cuts releases of the open-source SmartUI CLI. He works primarily in Core Java, Spring Boot, and Gradle, and is an AMCAT Certified Software Engineer. He brings over 10 years of software engineering experience, with earlier work as a Software Engineer at ecare Technology Labs. Sushobhit owns the SmartUI roadmap and the engineering decisions behind it.
Reviewer

Parth Mistry
Reviewer
Parth Mistry is a Member of Technical Staff at TestMu AI, building SmartUI, the visual regression testing product. He developed and owns the SmartUI CLI, a modular TypeScript tool built on Playwright for multi-browser automation, and built the Storybook CLI for visual regression of UI components. He maintains cross-language SDKs in Python, Java, Ruby, C#, and Node.js, and engineered a Node-based visual rendering service on Kafka, Redis, MySQL, and S3. His migration of that service to an event-driven, KEDA-autoscaled architecture improved execution speed by 60% and cut annual infrastructure cost by $9,600. He also built the end-to-end SmartUI integration with KaneAI. Parth is a Google Summer of Code 2024 contributor and an alumnus of IIT Jodhpur.


BackstopJS FAQs
Did you find this page helpful?
More Related Blogs

TestMu AI forEnterprise
Get access to solutions built on Enterprise
grade security, privacy, & compliance
- Advanced access controls
- Advanced data retention rules
- Advanced Local Testing
- Premium Support options
- Early access to beta features
- Private Slack Channel
- Unlimited Manual Accessibility DevTools Tests