
Catch Visual UI Bugs with SmartUI Visual Testing
Catch Layout, CSS, and Rendering Bugs across Browsers and Real Devices. Visual AI Filters Out Pixel Noise.

Roborazzi Tutorial: Set Up Android Screenshot Tests and Review Diffs in CI
Part of: Visual Testing Tool
Roborazzi tutorial: add JVM screenshot tests to an Android app with Robolectric, record and verify baselines, and review diffs in CI with SmartUI.
Published on:
Roborazzi is an open-source Android library that takes screenshots inside Robolectric tests on the JVM so you don't need an emulator. You add its Gradle plugin, annotate your tests with @GraphicsMode(GraphicsMode.Mode.NATIVE), call captureRoboImage(), then run recordRoborazziDebug to save the references and verifyRoborazziDebug to fail on changes.
This tutorial will take you from an empty module to screenshot tests that run on every PR. You'll set up Roborazzi, write a Compose screenshot test, record and verify references, stop CI from failing on font rendering, and send the screenshots to a shared review dashboard so that a designer can approve a change without having to open up Android Studio.
TL;DR
Roborazzi is an open-source Android screenshot testing library that renders UI inside Robolectric on the JVM, saves reference images, and fails a test when a new screenshot differs. It exists so Android teams can catch UI changes in fast local unit tests without running an emulator or a device.
Jetpack Compose Screenshot Testing With Roborazzi
- Emulator required: No. Roborazzi renders Android UI with Robolectric Native Graphics on the JVM, so screenshot tests run in the same Gradle task as your other local unit tests.
- Roborazzi Android setup: Apply the io.github.takahirom.roborazzi Gradle plugin, use Robolectric 4.10 alpha 1 or later, set isIncludeAndroidResources = true, and add @GraphicsMode(GraphicsMode.Mode.NATIVE) to every screenshot test class.
- Does Roborazzi work with Jetpack Compose?: Yes. Add the roborazzi-compose artifact, render the composable with a Compose test rule, and call captureRoboImage() on a node found with onNodeWithTag, with one stable file name per state.
- recordRoborazziDebug: The Roborazzi record task saves the reference images that later runs compare against. Run it on the Linux CI runner and commit the PNGs so references match the machine that verifies them.
- verifyRoborazziDebug: The Roborazzi verify task fails the build when any screenshot differs from its reference and writes an HTML report to build/reports/roborazzi/debug/index.html with a _compare.png image per change.
Android Screenshot Testing in CI: Roborazzi vs Paparazzi
- When to use Roborazzi vs Paparazzi: Both render Android UI on the host without an emulator. Roborazzi runs inside Robolectric, so a test can launch an activity and click through a flow before capture, while the Paparazzi Android library renders individual screens and components.
- Record references on the CI runner: Yes. Roborazzi screenshot tests draw text and shadows through low-level platform APIs, so record references on the same Linux CI runner that verifies them and keep any changeThreshold low.
- Team review: Roborazzi only reports that pixels changed. TestMu AI's SmartUI takes the same PNG folder through npx smartui upload, so reviewers approve or reject each Roborazzi diff in one dashboard.
- Size changes as SmartUI diffs: Only with -R. TestMu AI's SmartUI matches uploads on name and resolution by default, so a Roborazzi layout change that makes a capture taller arrives as a new screenshot unless every upload passes -R.
What Is Roborazzi and How Does It Work?
Roborazzi's README sums it up in one line: "Make JVM Android Integration Test Visible". It's a screenshot testing library that runs inside Robolectric using Robolectric Native Graphics to render your UI on the JVM.
Android's screenshot testing guide defines a screenshot test as taking a screenshot of the UI and then comparing it to a previously approved image (referred to as the 'reference' or 'golden' image). If the two images are the same, then the test passes. If they're not the same, then the tool generates a report.
Screenshot tests are a form of visual regression testing at the component level. As Robolectric runs as a local unit test, a screen will render in the same Gradle task as your other JVM tests, and you can use all of Robolectric's functionality (e.g., launch an activity, click through a flow, etc.) prior to the capture.
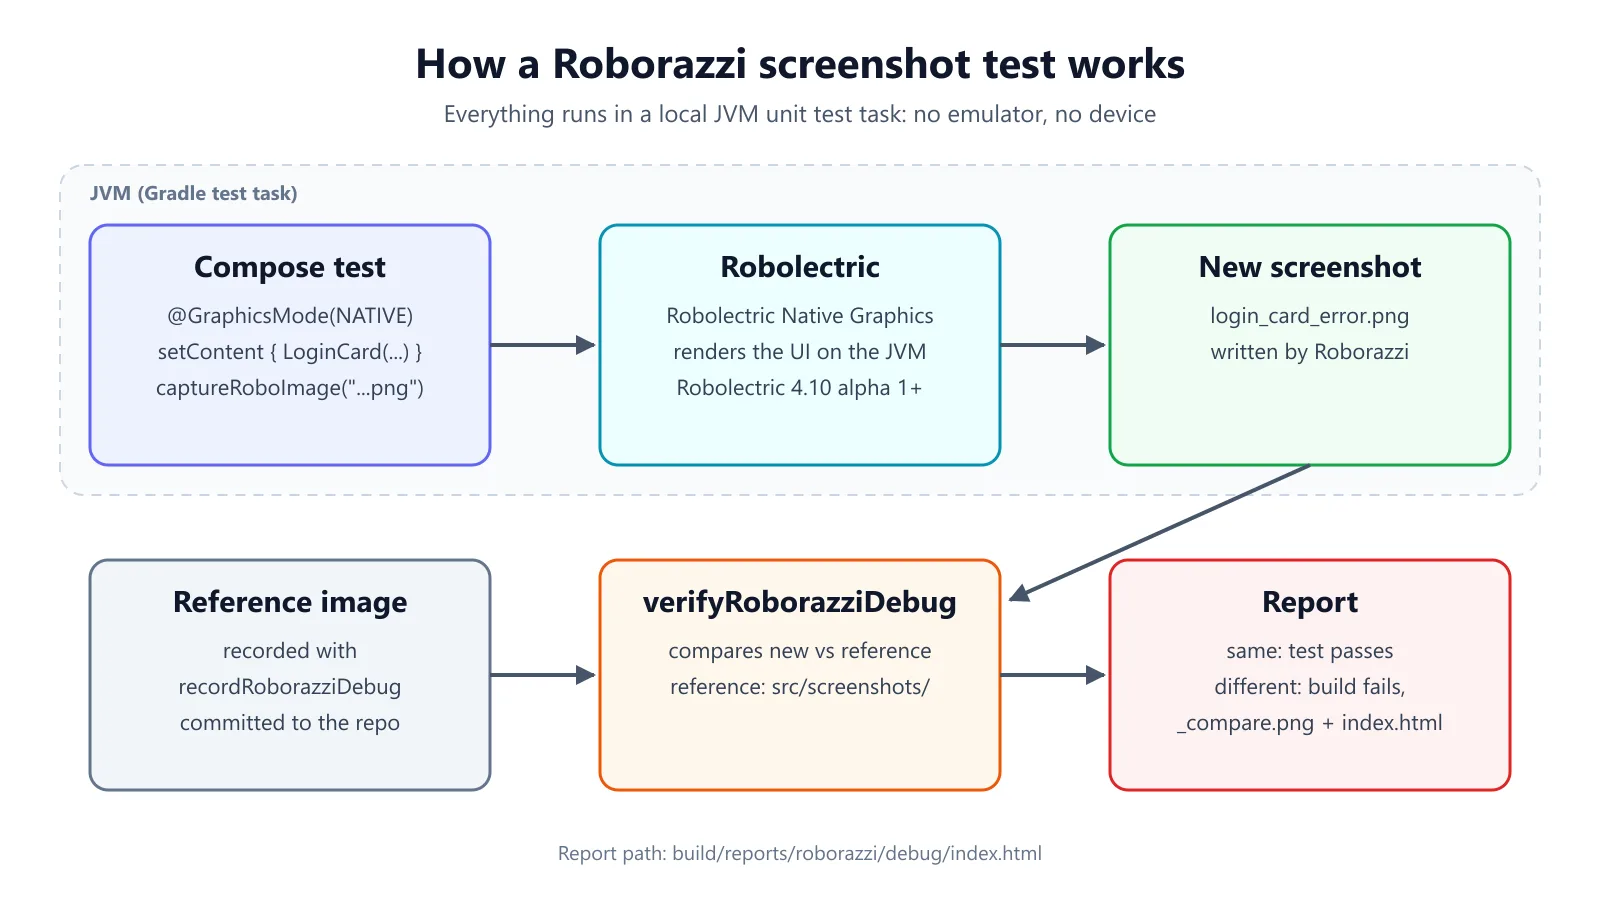
Android's screenshot testing guide neatly summarises the trade-off between host-side renderers. The layoutlib-based tools are focused on the static elements and are "typically easier to use". The ones that integrate with Robolectric Native Graphics can use all the features of Robolectric and hence can be used for tests of a much wider scope.
For a quick visual walkthrough of this concept, watch the video below from TestMu AI.
Subscribe to the TestMu AI YouTube channel for more tutorials on testing and automation.
How Does Roborazzi Stack Up Against Paparazzi and the Other Options?
| Tool | Where it renders | Needs a device or emulator | Record and verify | Best for |
|---|---|---|---|---|
| Roborazzi | JVM, inside Robolectric (Robolectric Native Graphics) | No | recordRoborazziDebug / verifyRoborazziDebug (plus compareRoborazziDebug) | Screens and flows that need Robolectric features, Compose and Views |
| Paparazzi | Host machine ("without a physical device or emulator") | No | recordPaparazziDebug / verifyPaparazziDebug; references default to src/test/snapshots | Rendering individual screens and components |
| Compose Preview Screenshot Testing | Host, using Layoutlib (experimental) | No | Driven from your Compose Previews | Teams already writing Previews for every state |
| Device screenshots (Appium + SmartUI on real devices) | Real Android and iOS hardware | Yes, cloud devices | Baselines and approvals in the SmartUI dashboard | Final check of OEM skins, fonts and system bars on real phones |
Roborazzi and Paparazzi both solve the same problem really: fast screenshot tests without the need for devices. Roborazzi is your choice if you're already using Robolectric for your tests or if you need to interact with the screen prior to taking the screenshot.
You'd still take device screenshots for the final layer as a JVM render simply won't show you what the manufacturer's skin does to your layout.
How Do You Go About Setting Up Roborazzi in an Android Project?
You need Robolectric 4.10 alpha 1 or later. The README lists this as a requirement for taking screenshots.
1. Declare the plugin in the root build.gradle.kts:
plugins {
    id("io.github.takahirom.roborazzi") version "1.79.0" apply false
}
2. Apply the plugin and add the module's dependencies in the build.gradle.kts:
plugins {
    id("com.android.application")
    id("io.github.takahirom.roborazzi")
}

android {
    testOptions {
        unitTests {
            isIncludeAndroidResources = true
            all {
                // Roborazzi README: more accurate shadows and elevation
                it.systemProperties["robolectric.pixelCopyRenderMode"] = "hardware"
            }
        }
    }
}

dependencies {
    testImplementation("junit:junit:4.13.2")
    testImplementation("org.robolectric:robolectric:4.18")
    testImplementation("io.github.takahirom.roborazzi:roborazzi:1.79.0")
    testImplementation("io.github.takahirom.roborazzi:roborazzi-compose:1.79.0")
    testImplementation("io.github.takahirom.roborazzi:roborazzi-junit-rule:1.79.0")
    // Keep your existing Compose UI test dependencies for createAndroidComposeRule
}
isIncludeAndroidResources = true comes from the Robolectric setup guide. If you're running your tests on Java 17 or above, you'll also need to add the --add-opens JVM flags from the Robolectric getting started page via unitTests.all.
The robolectric.pixelCopyRenderMode property is what the README recommends if you want to get the most accurate screenshots. The versions listed above are current as of November 2026.
Roborazzi 1.79.0 is the latest version on Maven Central. The full option reference can be found on the Roborazzi docs site.
How Do You Write Your Very First Roborazzi Screenshot Test?
Annotate the class with @GraphicsMode(GraphicsMode.Mode.NATIVE), render the UI and then call captureRoboImage() on the node you want. Give each image an explicit path so that the file names stay stable across runs.
@RunWith(AndroidJUnit4::class)
@GraphicsMode(GraphicsMode.Mode.NATIVE)
class LoginCardScreenshotTest {

    @get:Rule
    val composeTestRule = createAndroidComposeRule<ComponentActivity>()

    @Test
    fun loginCard_empty() {
        composeTestRule.setContent { LoginCard(email = "", errorText = null) }
        composeTestRule.onNodeWithTag("login_card")
            .captureRoboImage("src/screenshots/login_card_empty.png")
    }

    @Test
    fun loginCard_error() {
        composeTestRule.setContent { LoginCard(email = "a@b", errorText = "Enter a valid email") }
        composeTestRule.onNodeWithTag("login_card")
            .captureRoboImage("src/screenshots/login_card_error.png")
    }
}
LoginCard stands for your own composable; pass the states you want to be covered as arguments. For classic Views, the README pattern is onView(isRoot()).captureRoboImage().
Roborazzi can also capture a composable directly via captureRoboImage() { ... }, and its experimental Compose Preview support can generate screenshot tests from your @Preview functions via the generateComposePreviewRobolectricTests Gradle option.
Android's guidance on what to capture is definitely worth following: keep the number of screenshot tests to a minimum and maximize the amount of feedback. Don't do every combination of scenarios. Just pick the states that give you unique feedback (empty, error, long text, dark theme, etc.).
How Do You Record, Compare, and Verify Screenshots?
Roborazzi adds Gradle tasks for each mode:
# Save reference images
./gradlew recordRoborazziDebug

# Write comparison images (<name>_compare.png) without failing
./gradlew compareRoborazziDebug

# Fail the build if any screenshot differs from its reference
./gradlew verifyRoborazziDebug

# Verify, and record a new reference where differences are found
./gradlew verifyAndRecordRoborazziDebug
You can also pass the mode as a property to the normal test task, e.g., ./gradlew testDebugUnitTest -Proborazzi.test.verify=true. After a compare or verify run, you can open build/reports/roborazzi/debug/index.html to view the report.
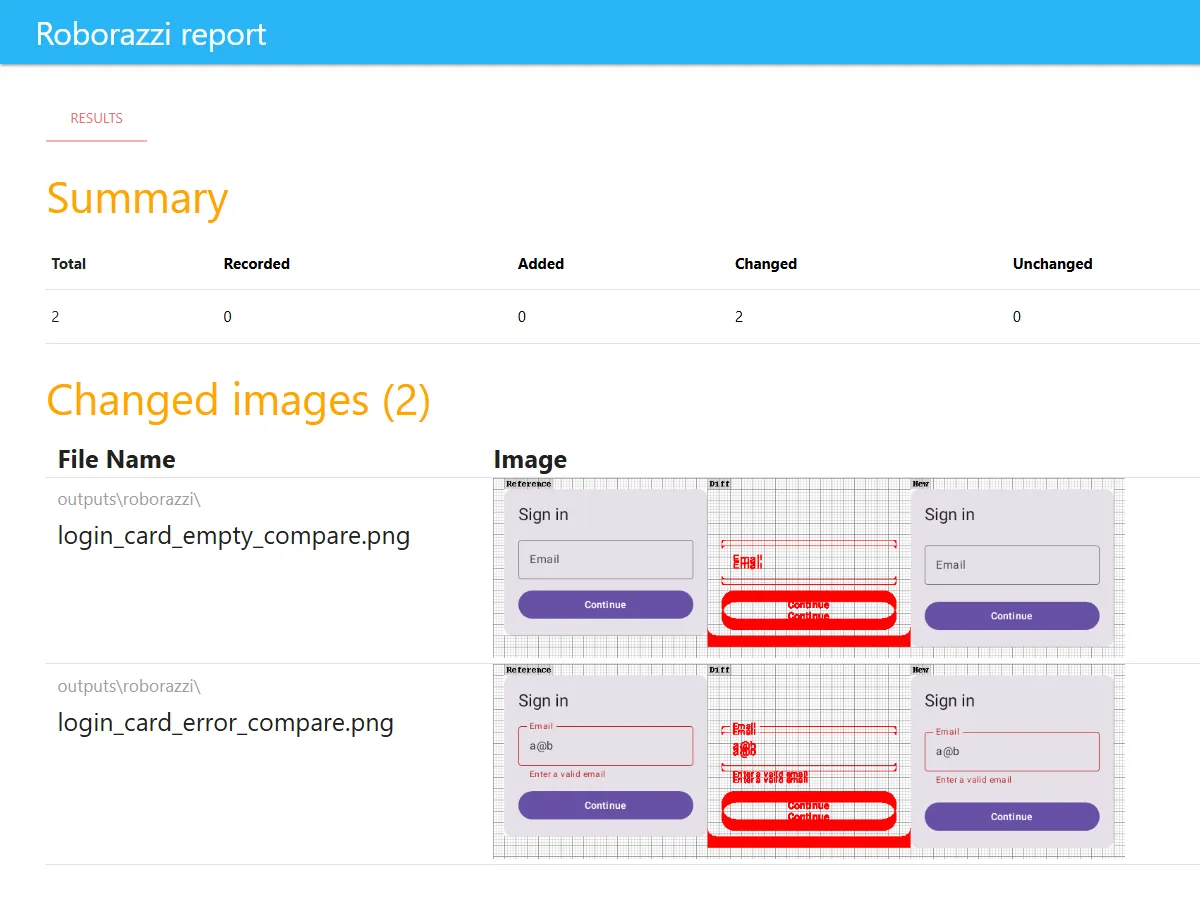
By default, Roborazzi writes the images to build/outputs/roborazzi. If you want committed references in a fixed folder, then set outputDir in the module:
roborazzi {
    outputDir.set(file("src/screenshots"))
}
This tutorial uses one baseline approach: reference images are committed into app/src/screenshots as Android's guide suggests to start with, and they are always captured on the Linux CI runner (see below).

Do you need sign-off from more than one person?
Note: Upload your Roborazzi screenshots into SmartUI via TestMu AI, and you can review, approve or reject each change all from one dashboard. Try SmartUI free.
Why Do the Roborazzi Tests Pass Locally and Fail in CI?
The usual reason is the platform. The Android screenshot guide makes it very clear that screenshot tests rely on low-level platform APIs to draw the text and the shadows, so "if you develop on a Mac and save new screenshots taken locally, you might see broken tests on a Linux CI machine". Even on one platform, a change to the library, OS or hardware can shift the pixels.
Android lists two fixes, and Roborazzi supports both:
1. Tolerate small changes. Roborazzi's compare options accept a change threshold. The README's example sets a 1% tolerance:
compareOptions = RoborazziOptions.CompareOptions(
    changeThreshold = 0.01, // For 1% accepted difference
)
Keep it low. A high threshold will hide the actual regressions you've added the test to catch.
2. Take reference screenshots on the CI server. Record on the same runner image that's used for verification.
The README sample workflows take a similar approach in that they store the screenshots from the push as an artifact and then have a verify workflow download that artifact so that both workflows run on the same runner image (macos-latest in the samples).
For committed references, add a manual workflow that records on ubuntu-latest and hands you the images to commit:
name: record-screenshots
on: workflow_dispatch

jobs:
  record:
    runs-on: ubuntu-latest
    steps:
      - uses: actions/checkout@v7
      - uses: actions/setup-java@v6
        with:
          distribution: temurin
          java-version: "17"
      - run: ./gradlew recordRoborazziDebug
      - uses: actions/upload-artifact@v7
        with:
          name: roborazzi-references
          path: app/src/screenshots
Run it from your pull request branch (i.e., the branch listed under Use workflow from in the Actions tab), download the artifact, have a look at it and commit it to app/src/screenshots in that pull request.
How Do You Run Roborazzi in GitHub Actions and Review the Diffs With SmartUI?
Roborazzi tells you that pixels have changed. It doesn't give your team a place to go and discuss and approve the change. The job below has verifyRoborazziDebug as the gate, uploads Roborazzi's report if it fails and always sends the current renders to the review dashboard.
SmartUI's CLI upload takes a folder of PNGs and JPGs and compares them against the project's Baseline build. Create a SmartUI project using CLI as the platform, copy the project token into a repo secret and then add a job like so:
name: screenshots
on: pull_request

jobs:
  roborazzi:
    runs-on: ubuntu-latest
    steps:
      - uses: actions/checkout@v7
      - uses: actions/setup-java@v6
        with:
          distribution: temurin
          java-version: "17"
      - uses: actions/setup-node@v7
        with:
          node-version: "24"

      - name: Verify against committed references
        run: ./gradlew verifyRoborazziDebug

      - name: Upload Roborazzi report
        if: failure()
        uses: actions/upload-artifact@v7
        with:
          name: roborazzi-report
          path: app/build/reports/roborazzi

      - name: Render current screenshots for review
        if: always()
        run: ./gradlew recordRoborazziDebug

      - name: Upload screenshots to SmartUI
        if: always()
        env:
          PROJECT_TOKEN: ${{ secrets.SMARTUI_PROJECT_TOKEN }}
        run: |
          npm install -g @lambdatest/smartui-cli
          npx smartui upload app/src/screenshots -F png -E -R \
            --buildName "pr-${{ github.event.pull_request.number }}" \
            --fetch-results smartui-results.json
The record step writes into the runner's throwaway checkout only; the job never commits or pushes, so the committed references stay untouched. What each SmartUI flag does, per the docs:
-F pnguploads only PNG files.-Estrips the file extensions sologin_card_error.pngbecomes the snapshotlogin_card_error.-Rcompares by name only, so a layout change that alters the capture height still shows as a diff.--buildNameis the name of the build. If you reuse an existing build name, it will append the screenshots to that build.--fetch-resultssaves the comparison results to a JSON file, which you can then keep as a CI artifact.
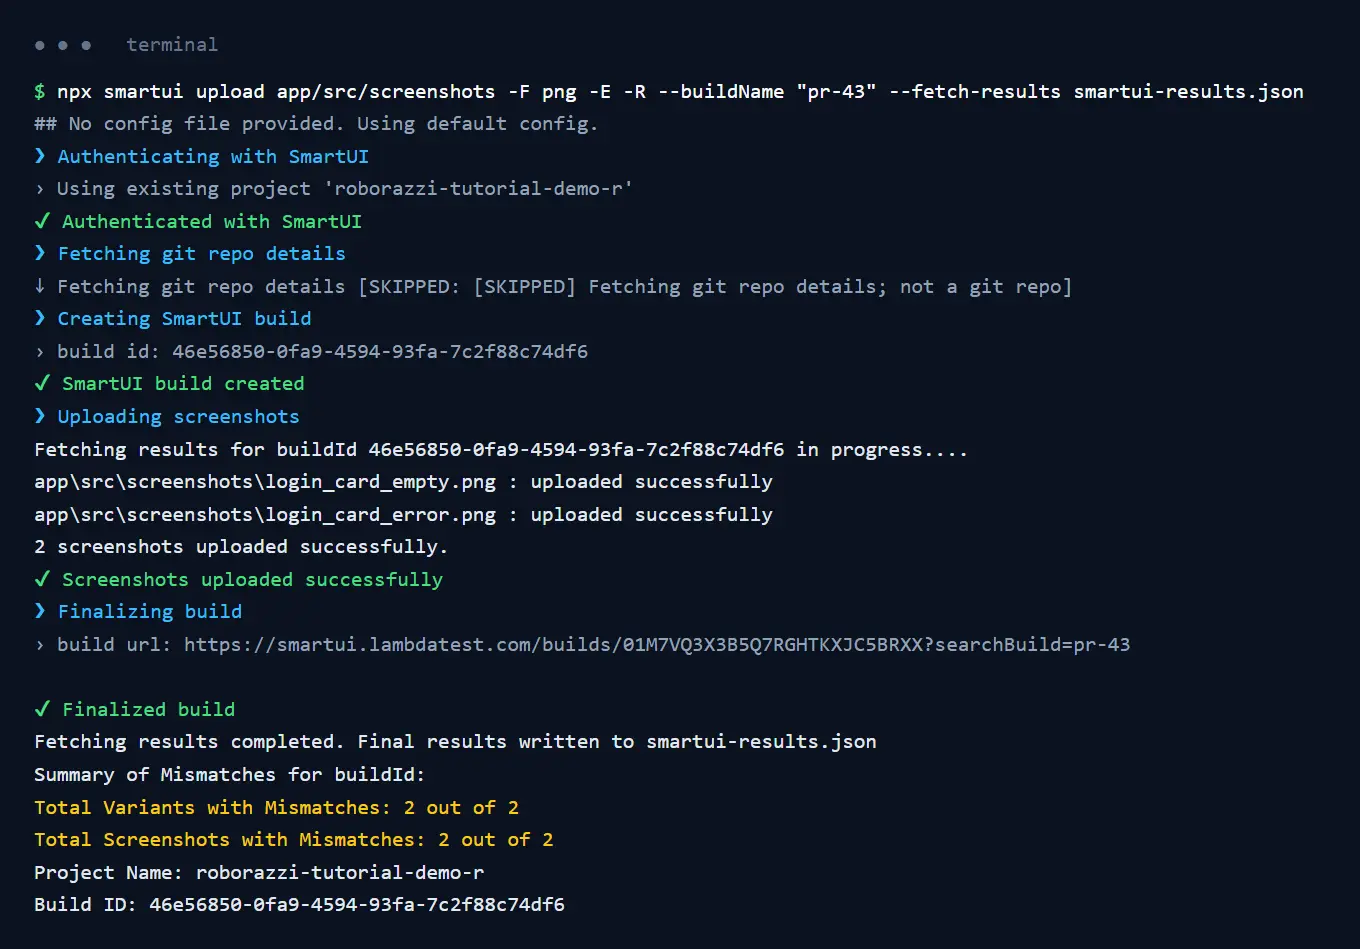
SmartUI CLI requires Node.js 20.3+ for 4.x and above, so Node 24 is fine. The token comes from PROJECT_TOKEN, so no credentials ever appear in the workflow file.
Reviewers then open the build in the SmartUI dashboard to accept or reject each diff. With SmartUI's default Git Strategy, each build is compared against the latest approved build on the project's baseline branch (which is set in Project Settings), so set that to main and approve main builds after you've merged. The SmartUI dashboard also has Smart Ignore and region-based ignore options for content that changes on every render.
For the same ideas in web frameworks, see our Playwright screenshot comparison guide and the BackstopJS tutorial. The same rules about stable rendering apply.
For a quick visual walkthrough of this concept, watch the video below from TestMu AI.

The Roborazzi CI Readiness Checklist
Run through these eight checks before you make screenshot tests a required status check:
- Robolectric is 4.10 alpha 1 or later, and every screenshot test class has
@GraphicsMode(GraphicsMode.Mode.NATIVE). isIncludeAndroidResources = trueis set intestOptions.unitTests.- Every capture has an explicit, stable filename that describes the state (e.g.,
login_card_error.png). - Each test covers just one state (not every possible combination of theme, locale and font size).
- References are recorded on the Linux CI runner via the manual record workflow rather than on a developer's laptop.
- Any change threshold is going to be very low, and it's all in the test file as to why.
verifyRoborazziDebuggates pull requests, andbuild/reports/roborazzi/debug/index.htmlis uploaded as an artifact when it fails.- The intended changes are approved in SmartUI and then committed as new references via the record workflow. They are never committed by deleting a reference.
Conclusion
Roborazzi gives Android teams screenshot tests that run on the JVM in seconds with record/compare/verify tasks that fit in any CI. Record on the runner, keep your thresholds tight, only record the states that actually matter and give your team one place to approve changes. Then you can add a small set of device screenshots for what only real devices can show.
Turn Roborazzi diffs into team decisions. Upload the CI screenshots into SmartUI and then go ahead and approve the visual changes on a per PR basis. Start with SmartUI via TestMu AI.
Did your last release break the UI? TestMu AI's SmartUI catches visual regressions by comparing every screen to its baseline.
Author

Sushobhit Dua
Blogs: 4

Sushobhit Dua is an Engineering Manager at TestMu AI, leading SmartUI, the visual regression and visual testing product. He manages the team that builds and ships SmartUI and maintains and cuts releases of the open-source SmartUI CLI. He works primarily in Core Java, Spring Boot, and Gradle, and is an AMCAT Certified Software Engineer. He brings over 10 years of software engineering experience, with earlier work as a Software Engineer at ecare Technology Labs. Sushobhit owns the SmartUI roadmap and the engineering decisions behind it.
Reviewer

Parth Mistry
Reviewer
Parth Mistry is a Member of Technical Staff at TestMu AI, building SmartUI, the visual regression testing product. He developed and owns the SmartUI CLI, a modular TypeScript tool built on Playwright for multi-browser automation, and built the Storybook CLI for visual regression of UI components. He maintains cross-language SDKs in Python, Java, Ruby, C#, and Node.js, and engineered a Node-based visual rendering service on Kafka, Redis, MySQL, and S3. His migration of that service to an event-driven, KEDA-autoscaled architecture improved execution speed by 60% and cut annual infrastructure cost by $9,600. He also built the end-to-end SmartUI integration with KaneAI. Parth is a Google Summer of Code 2024 contributor and an alumnus of IIT Jodhpur.


Roborazzi FAQs
Did you find this page helpful?
More Related Blogs







TestMu AI forEnterprise
Get access to solutions built on Enterprise
grade security, privacy, & compliance
- Advanced access controls
- Advanced data retention rules
- Advanced Local Testing
- Premium Support options
- Early access to beta features
- Private Slack Channel
- Unlimited Manual Accessibility DevTools Tests