

Power Your Software Testing with AI Agents and Cloud
The Native AI-Agentic Cloud Platform to Supercharge Quality Engineering. Test Intelligently and Ship Faster.


- TestMu AI (Formerly LambdaTest)
- /
- Blog
- /
- How to Clear History in Microsoft Edge
How to Clear History in Microsoft Edge
Learn how to clear history in Microsoft Edge on desktop, mobile, and with shortcuts. Boost privacy and performance by clearing history today.
Last Updated on:
Clear history in Microsoft Edge by opening the three-dot menu, choosing Settings, then Privacy, Search, and Services, clicking Choose what to clear, picking a time range, and selecting Clear now. Edge treats browsing history, cookies, and cached files as separate checkboxes in that dialog, so each one must be ticked to be deleted. This guide covers the desktop steps, automatic clearing on exit, Android and iPhone, keyboard shortcuts, and Copilot data.
Key Takeaways
- Clearing history in Microsoft Edge starts at the three-dot menu, then Settings, then Privacy, Search, and Services.
- The Choose what to clear dialog lists browsing history, cookies, and cached images as separate checkboxes that must each be ticked.
- A Time range menu limits the delete in Microsoft Edge to the last hour, the last 24 hours, or all time.
- Microsoft Edge can erase browsing history on exit through the setting Choose what to clear every time you close the browser.
- Ctrl + Shift + Delete on Windows and Command + Shift + Delete on Mac open the Clear browsing data dialog directly.
- Copilot chat history in Microsoft Edge is stored separately and is not removed by Clear browsing data.
Steps to Clear History in Microsoft Edge on Desktop
To clear browsing history in the latest version of MS Edge on desktop, follow the steps below.
- Open the Microsoft Edge browser.
- Click on the three horizontal dots (menu) in the top-right corner.
- Select Settings from the drop-down menu.
- In the Settings window, scroll down and click on Privacy, Search, and Services.
- Under the Delete browsing data section, click on Choose What to Clear.
- Select a Time range (Last hour, Last 24 hours, All Time).
- Click on Clear Now to remove the selected data.
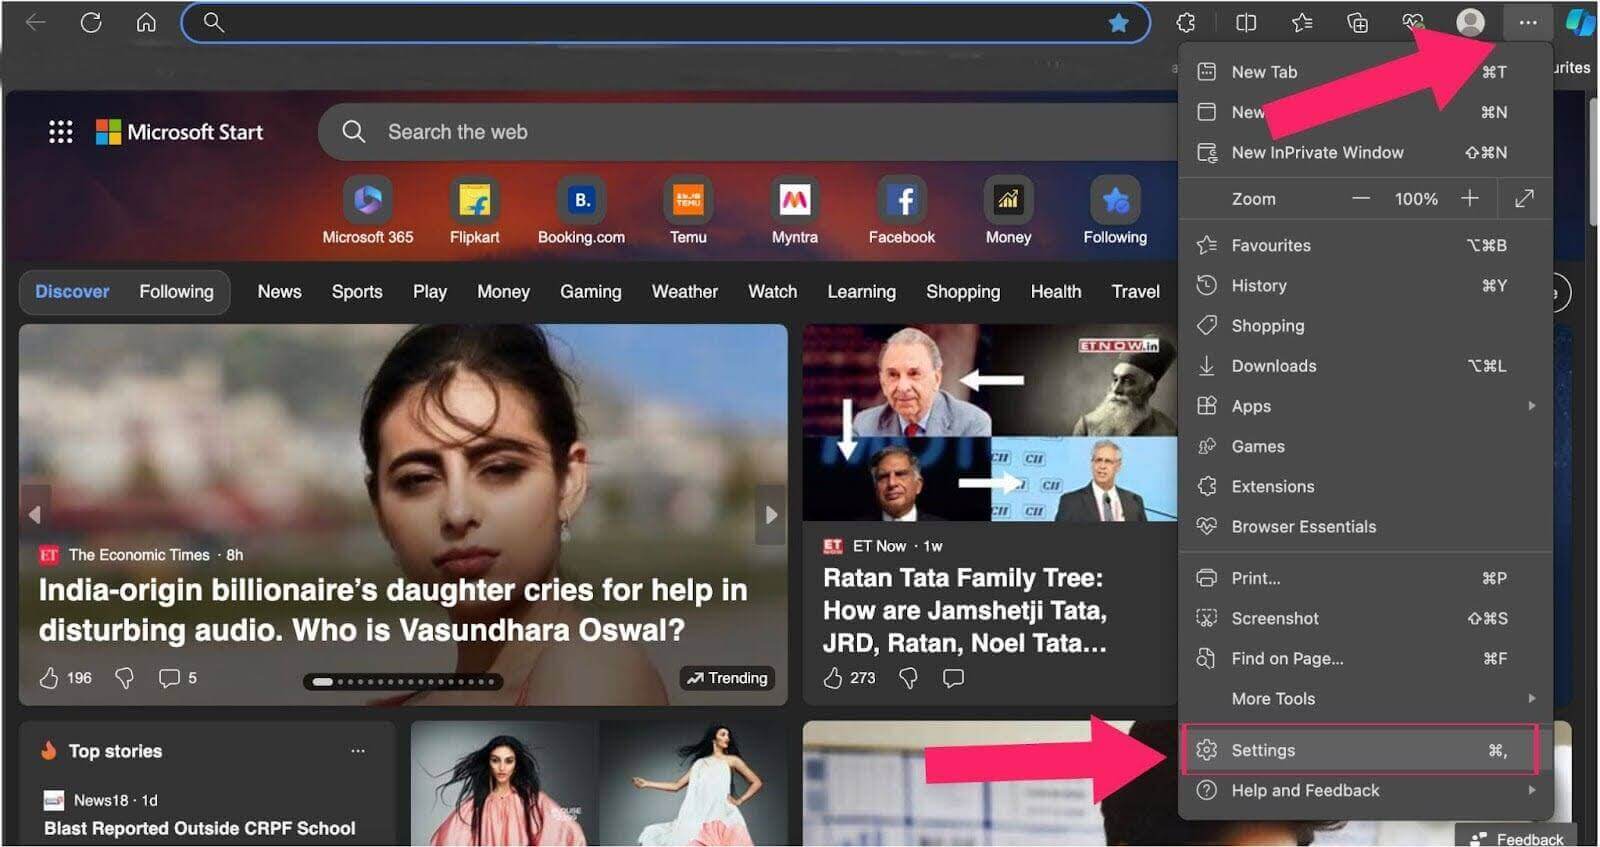
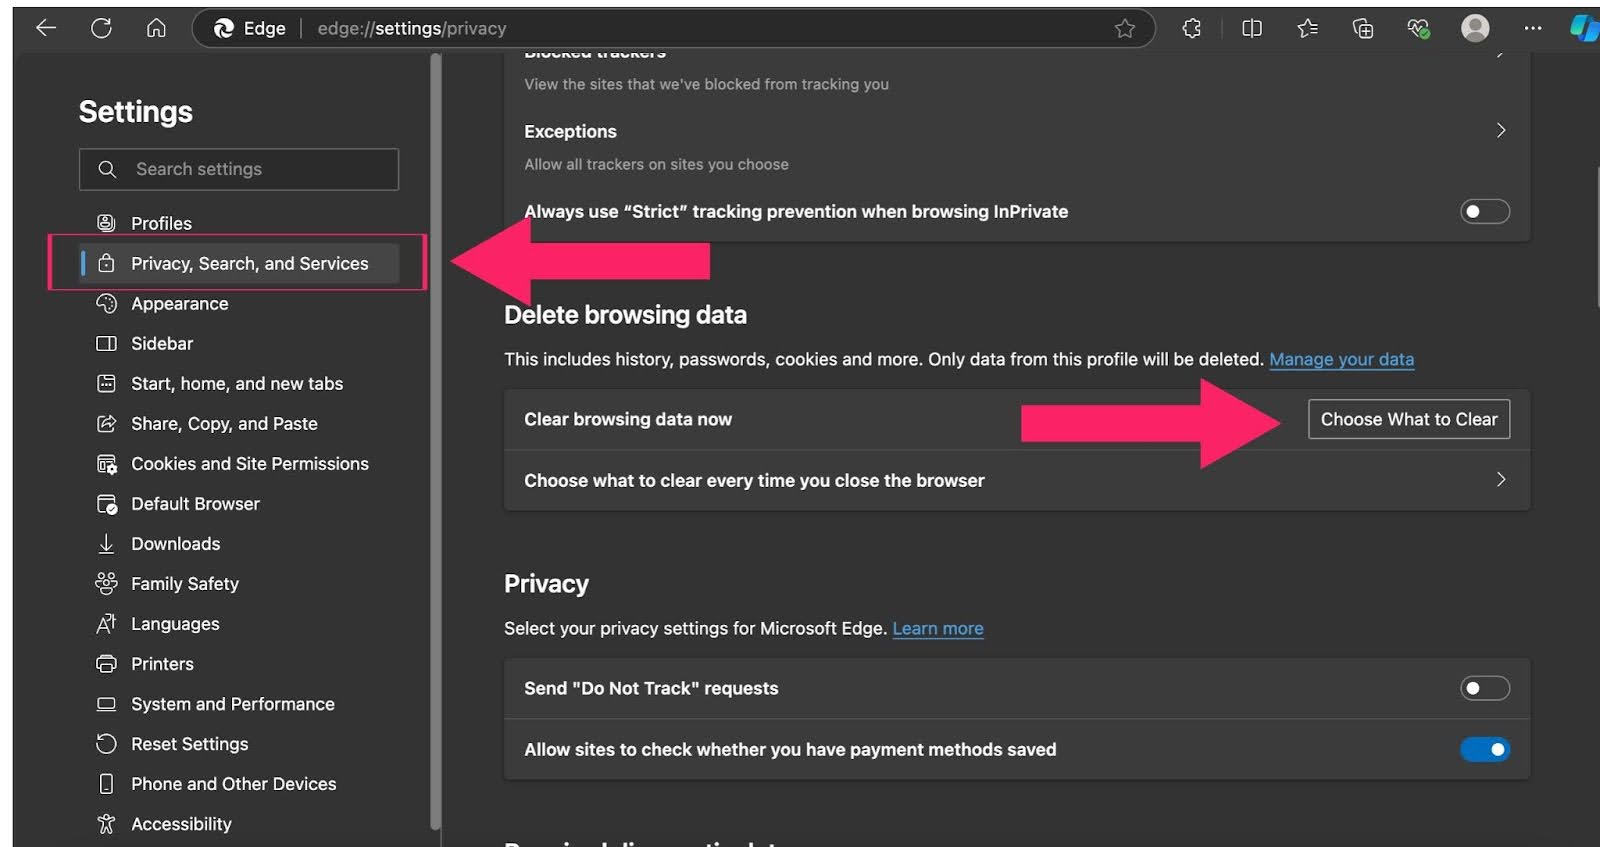
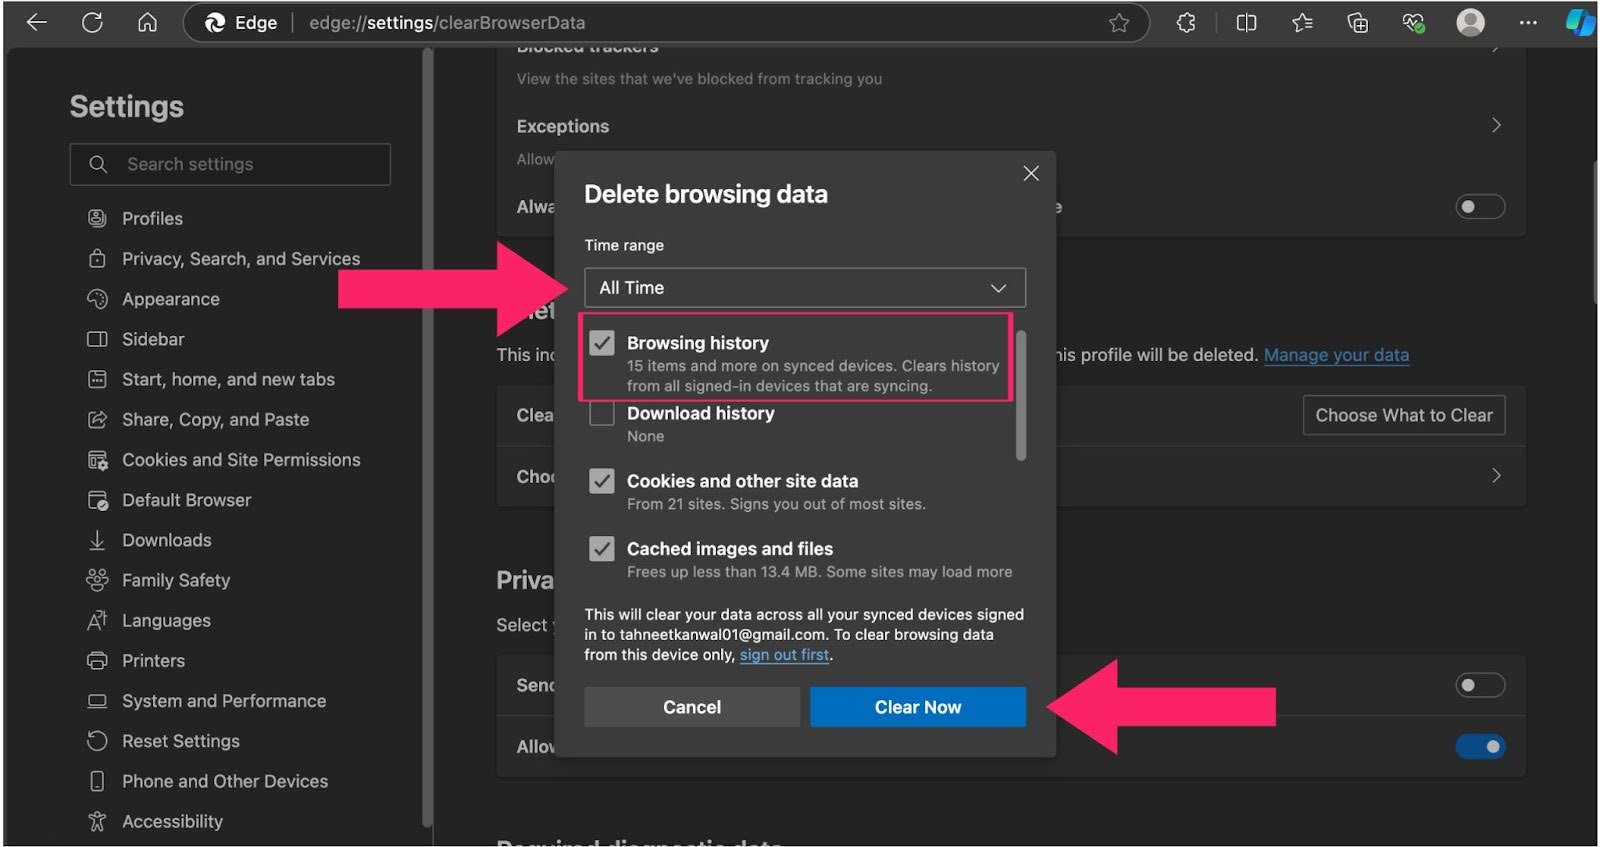
The above steps will help you keep your browsing activity private and ensure a smoother browsing experience!
Browsing history and cached files are separate checkboxes in the same dialog, so tick Cached images and files too if you also want to clear cache in Edge.
Steps to Automatically Clear History in Microsoft Edge
Follow these steps to automatically clear browsing data every time you close Microsoft Edge:
- Open Microsoft Edge and click on the three horizontal dots in the top-right corner.
- Select Settings from the menu.
- Navigate to Privacy, Search, and Services in the left-hand panel.
- Scroll down to the Clear browsing data section and click on Choose what to clear every time you close the browser.
- From the list of data types, toggle on Browsing history and any other data you’d like to clear automatically.
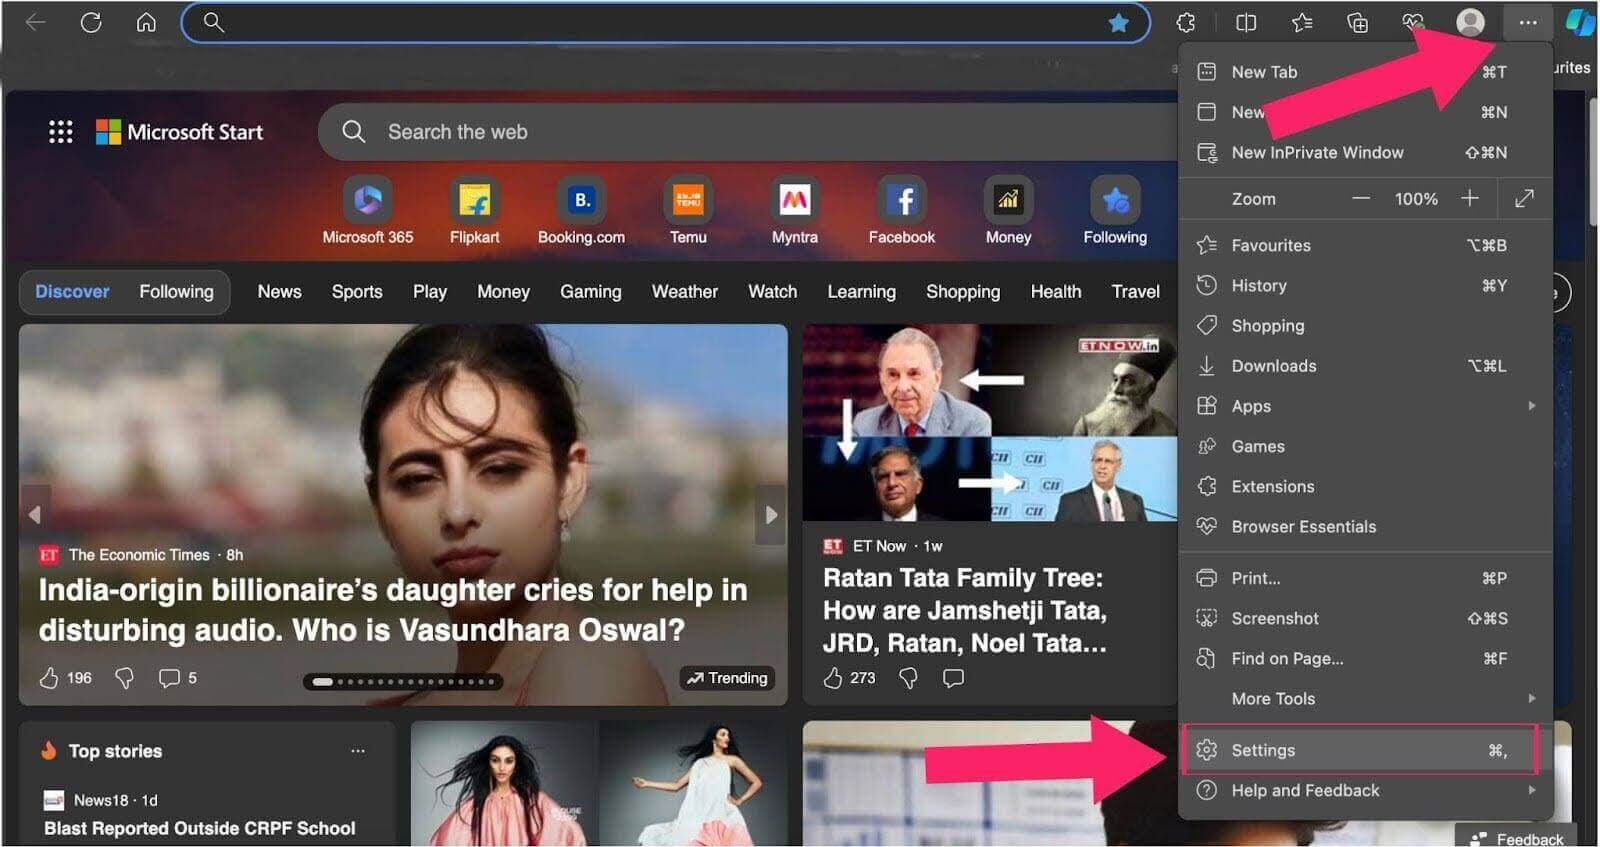
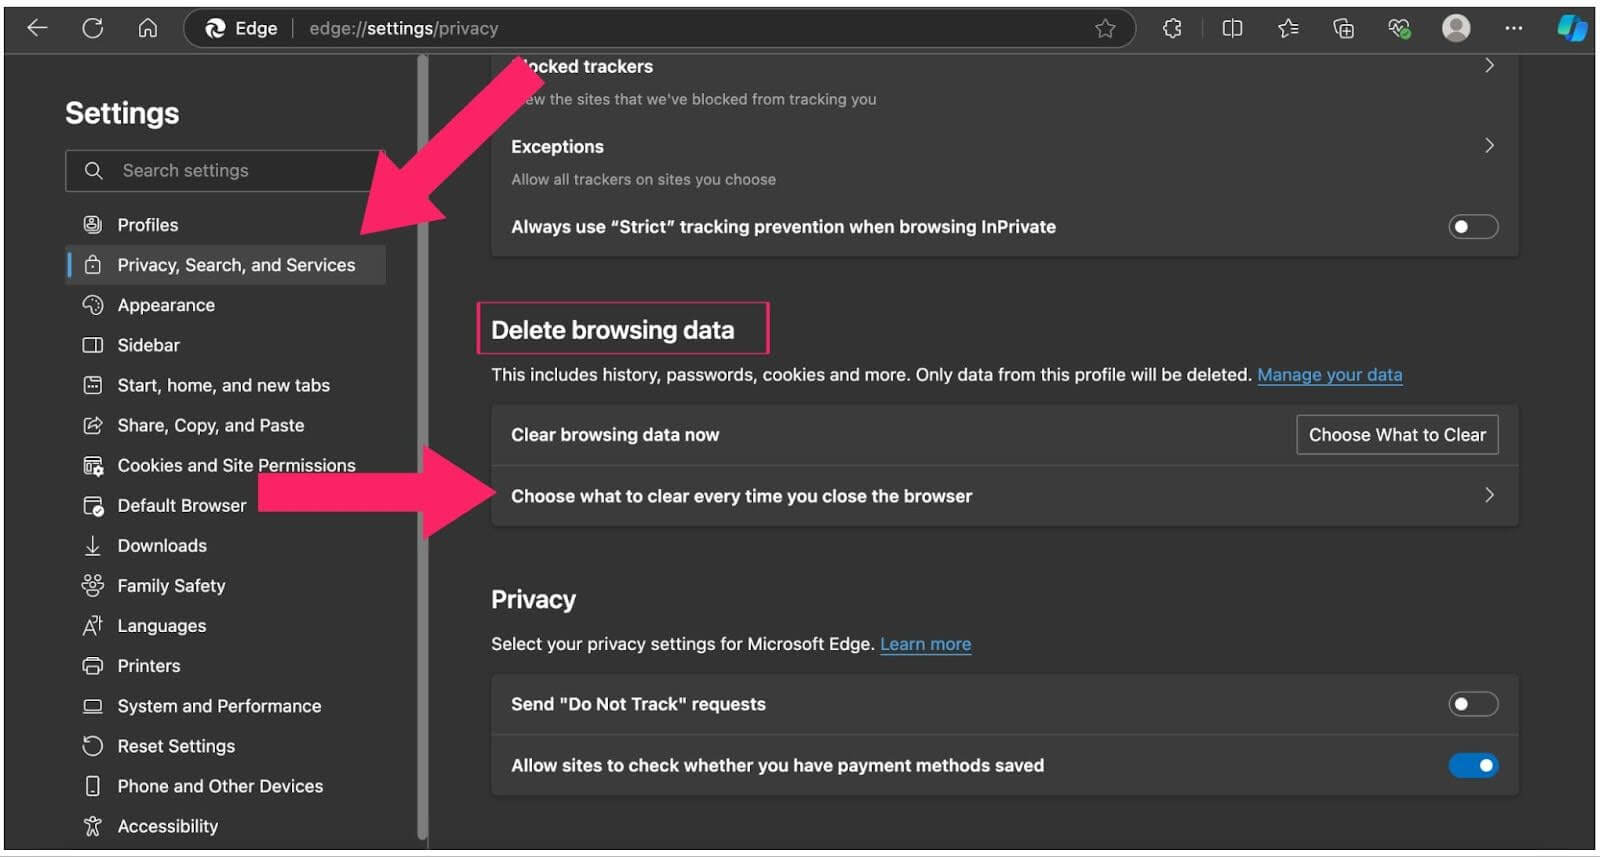
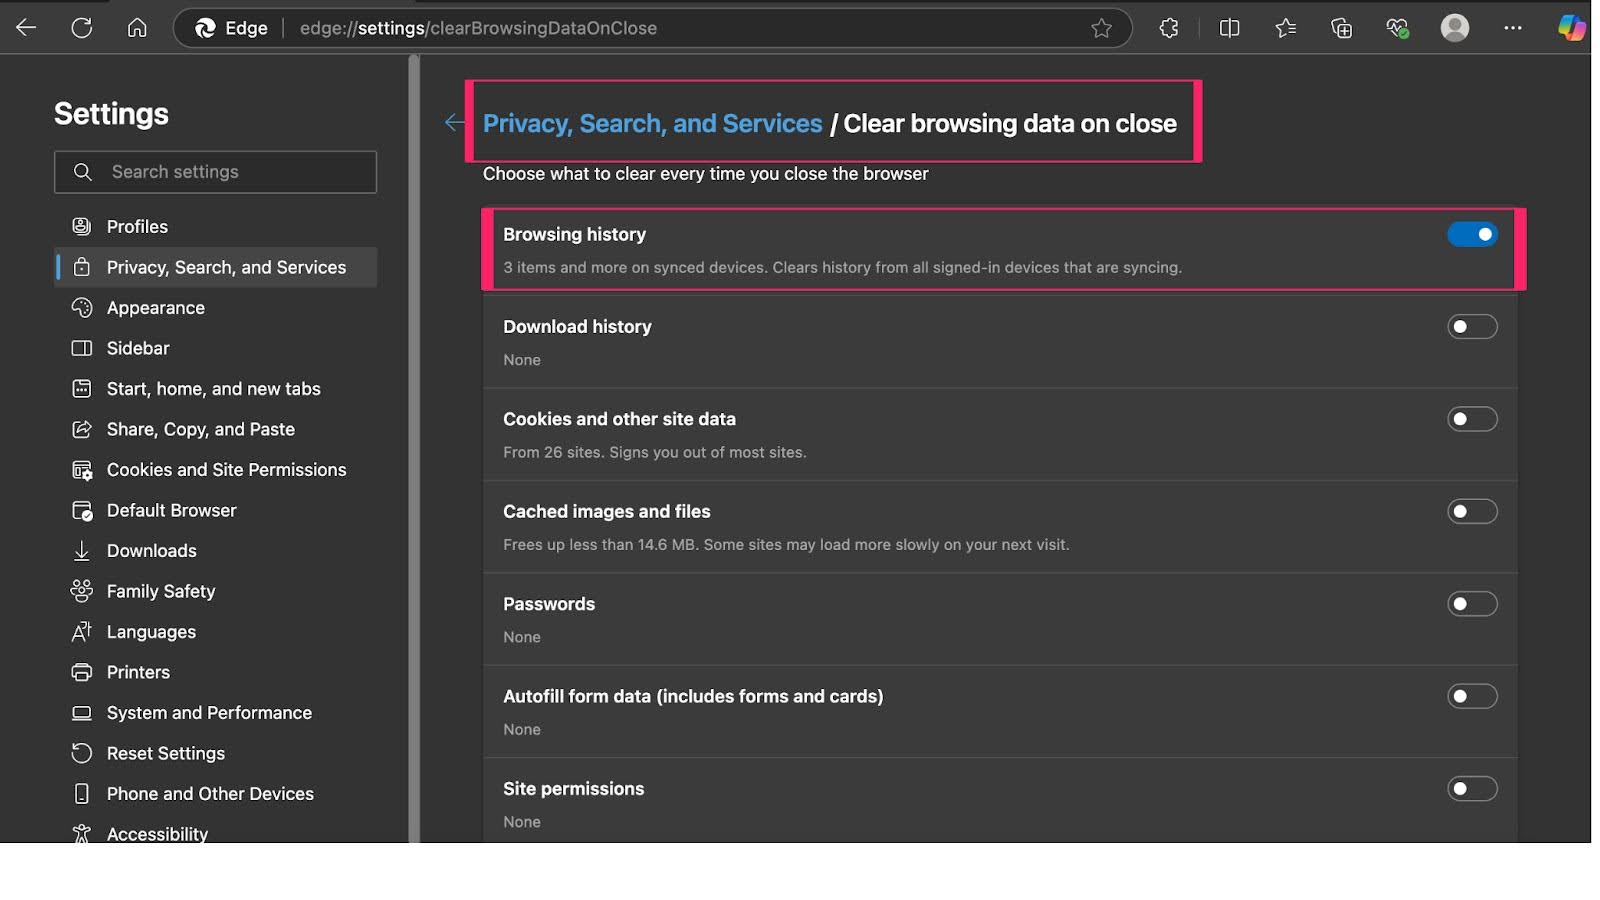
Once you have selected the desired options, close the settings tab. This feature ensures that your browsing history is always erased when you finish using the browser.
This feature helps maintain your privacy by ensuring that your browsing history is cleared every time you close the browser.
Steps to Clear History in Microsoft Edge on Mobile Device
Below, you will learn how to clear history in Microsoft Edge on Android and iPhone devices.
On Android:
Below are the steps to help you clear history in Microsoft Edge for Android devices.
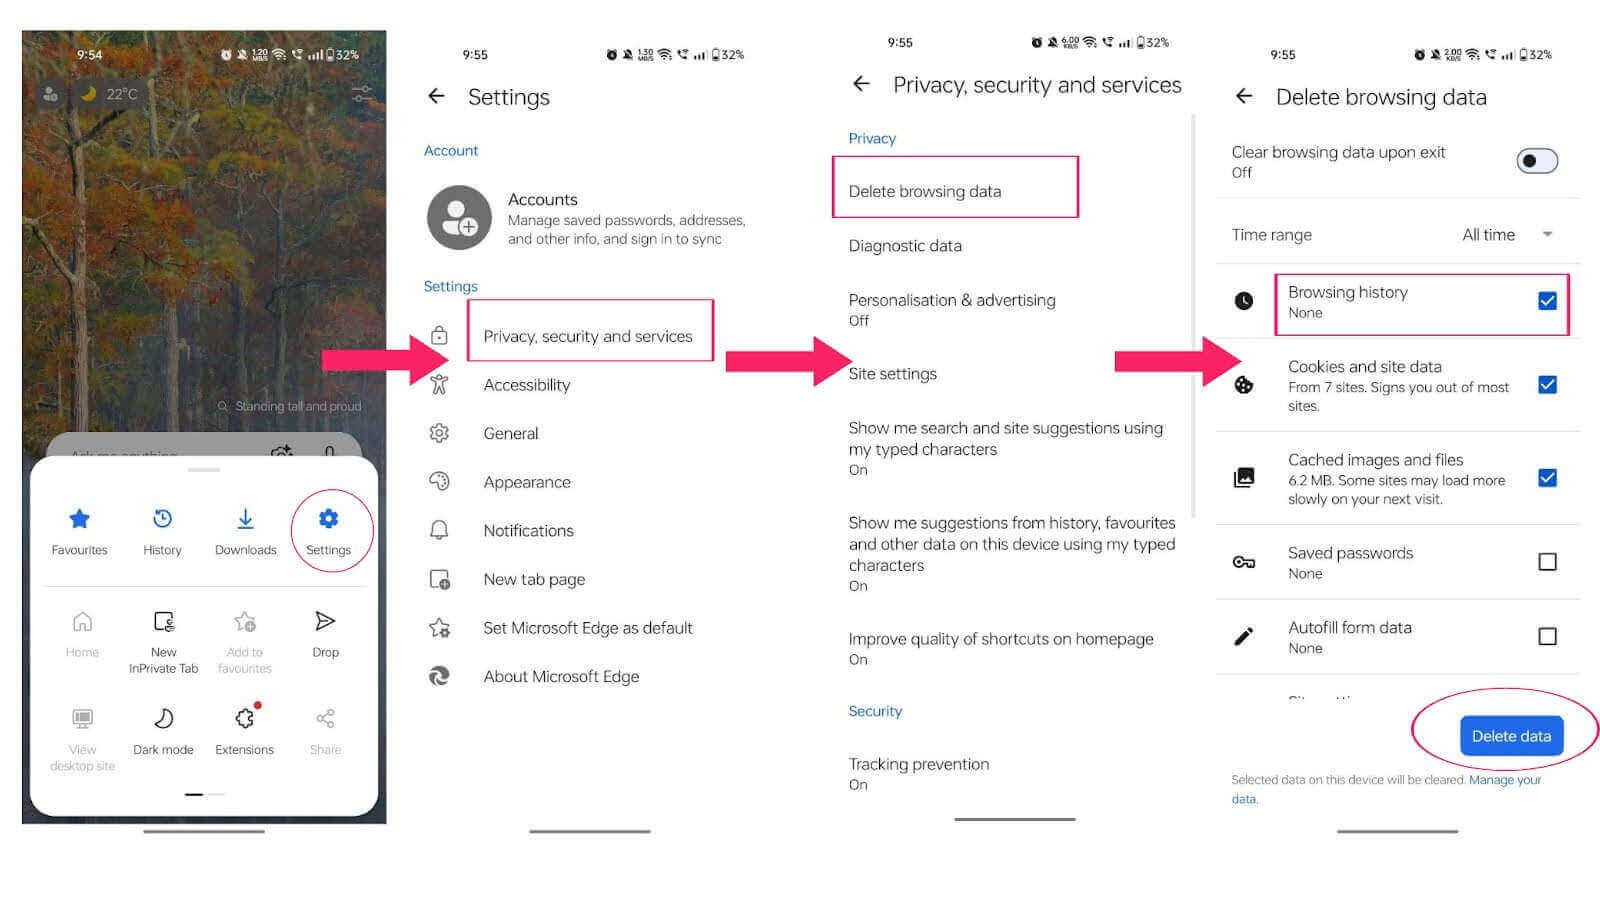
- Open the Microsoft Edge app on your Android device and tap the three-dot menu in the bottom or top corner.
- Navigate to Settings and select Privacy, security, and services from the menu.
- Tap Delete browsing data, which is the first option under the privacy settings.
- Choose All time from the Time range menu to clear the entire browsing history.
- Select the data you wish to delete, such as browsing history, cookies, and cached files.
- Scroll down and tap Delete data, then confirm by tapping Delete now.
On iPhone:
Below are the steps to help you clear history in Microsoft Edge for iPhone devices.
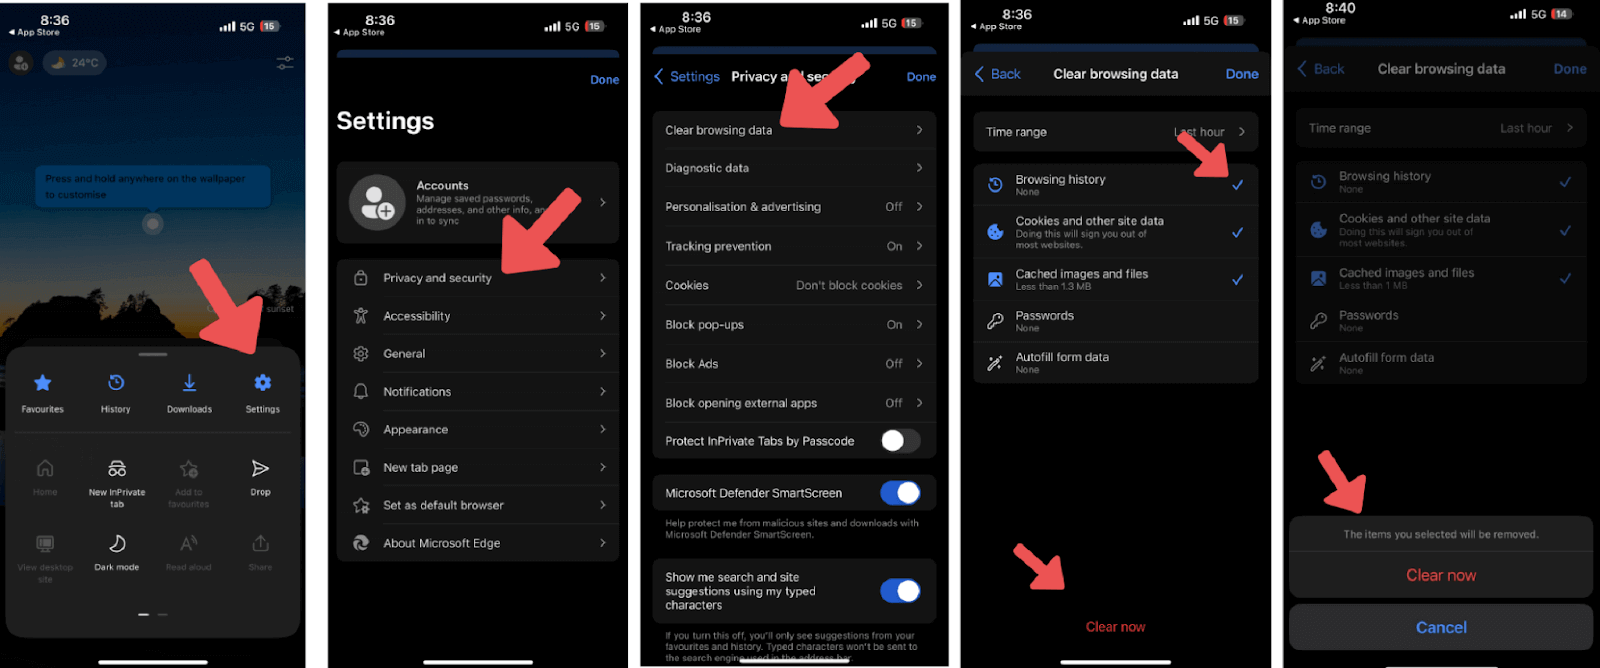
- Open the Microsoft Edge app on your iPhone and tap the three-dot menu located at the bottom.
- Go to Settings and tap on Privacy and security.
- Select Clear browsing data under the privacy options.
- Pick All time from the Time range menu for a full history deletion.
- Check the items you want to delete, such as browsing history, cookies, and cached images.
- Tap Clear browsing data, then confirm by selecting Clear.
Steps to Clear History in Microsoft Edge Using Keyboard Shortcuts
To quickly clear history on Microsoft Edge using keyboard shortcuts, follow these steps:
- Launch the browser on your desktop.
- Press Ctrl + Shift + Delete (Windows) or Command + Shift + Delete (Mac). This will open the Clear browsing data menu.
- Choose the types of data you want to delete, such as browsing history, cached images, and cookies.
- Select a time range (e.g., Last hour, Last 24 hours, or All time).
- Press the Clear now button to remove the selected data.
Using this shortcut helps you quickly and easily clear history on Microsoft Edge without navigating through the settings menu.
The same dialog also deletes Microsoft Edge cookies, which signs you out of every site you were logged into, so leave that checkbox unticked to keep those sessions.

Does Clearing Edge History Delete Copilot Chat Data?
No. Clear browsing data in Microsoft Edge removes browsing history, cookies, and cached files, but Copilot chat history sits in a separate store and survives that delete. Copilot reached Microsoft Edge after most clear-history guides were written, so the browser now keeps two activity trails instead of one.
- Copilot chat history: open Copilot in Microsoft Edge, select Settings, open the Privacy section, and use Clear history to delete the saved conversations.
- Microsoft privacy dashboard: account-level browsing and search activity is deleted at the Microsoft privacy dashboard, not from the browser dialog.
- Copilot search queries: deleting Copilot conversations leaves the related search queries in the account activity log, so run both deletes.
- Sync before deleting: turn sync off to limit the delete to the current device. With sync on, Clear now removes the data from every signed-in device.
- Missing Clear history: the Copilot privacy controls ship with recent builds, so run an Edge update if the option is not listed.
Copilot data and browsing history are governed by different settings pages, so one pass through Clear now does not remove everything Microsoft Edge has recorded about a session.
Conclusion
Clearing Microsoft Edge browsing history is crucial for protecting your privacy and enhancing browser performance. Whether you prefer to manually clear it on your desktop or mobile device, use keyboard shortcuts, or enable automatic clearing, these methods ensure a smoother browsing experience. Start implementing these techniques today to make the most of Microsoft Edge. Regularly managing your data by clearing history in Microsoft Edge keeps your browsing safe and efficient.
Author

Tahneet Kanwal
Blogs: 29


Tahneet Kanwal is a freelance technical content writer with over 2 years of hands-on experience in frontend development and technical writing. She holds a B.Tech in Information Technology from University College of Engineering and Technology (UCET). Tahneet creates clear, SEO-optimized content on web technologies, software testing, and automation tools, leveraging her skills in HTML, CSS, JavaScript, React, Tailwind CSS, and various tools like VS Code, GitHub, Figma, and Canva. She is the author of 30+ technical blogs and an open-source contributor through Hacktoberfest. She has also participated in the Google Cloud Arcade Facilitator Program and holds certifications as a Meta Android Developer (Coursera) and in Web Development (Internshala). Over time, she has evolved her writing to prioritize structure, readability, and SEO while maintaining technical depth.


Microsoft Edge History FAQs
Did you find this page helpful?
More Related Blogs
TestMu AI forEnterprise
Get access to solutions built on Enterprise
grade security, privacy, & compliance
- Advanced access controls
- Advanced data retention rules
- Advanced Local Testing
- Premium Support options
- Early access to beta features
- Private Slack Channel
- Unlimited Manual Accessibility DevTools Tests