

Power Your Software Testing with AI Agents and Cloud
The Native AI-Agentic Cloud Platform to Supercharge Quality Engineering. Test Intelligently and Ship Faster.


- TestMu AI (Formerly LambdaTest)
- /
- Blog
- /
- How to Use Selenium for Record and Playback
How to Use Selenium for Record and Playback
Learn how to use Selenium for record and playback tests. Simplify test automation with this step-by-step guide on capturing user actions and replaying them.
Last Updated on:
Selenium IDE, a browser extension for the Selenium framework, records and plays back test steps directly in the browser without requiring any coding skill or technical expertise. Its record and playback feature captures every click as a command, saves it as a reusable test script, and removes the repetitive manual testing otherwise needed to check the same interactions.
What Is Selenium IDE?
Selenium IDE is a browser extension that simplifies the process of creating automated tests for web applications. It allows you to record your actions on a website in the browser and playback those actions to verify the expected functionality.
It provides a user-friendly interface that allows you to quickly create and run test cases directly within your browser without requiring any technical expertise.
If you are new to Selenium, we recommend checking this guide on what is Selenium.
What Is Record and Playback in Selenium?
When it comes to codeless test automation, the record and playback feature in Selenium allows you to record your interactions with a website, and then you play them back to see if everything works as expected.
The record and playback feature is available within its ecosystem through the Selenium IDE. When you enable recording, the IDE captures every action you perform in the browser and translates it into a sequence of commands.
These commands are then saved as a test script, which can be executed later to replicate the same interactions. It also eliminates the need for repetitive manual testing and ensures consistency in test execution.

Note: Run Selenium IDE tests across 5000+ real environments. Try TestMu AI Today!
How to Record and Playback With Selenium?
Now, let’s look at how to use Selenium for record and playback tests.
Install the Selenium IDE
Selenium IDE is available as a free browser extension for both Chrome, through the Chrome Web Store, and Firefox, through Mozilla Add-ons. This guide uses Chrome to record and play back the test.
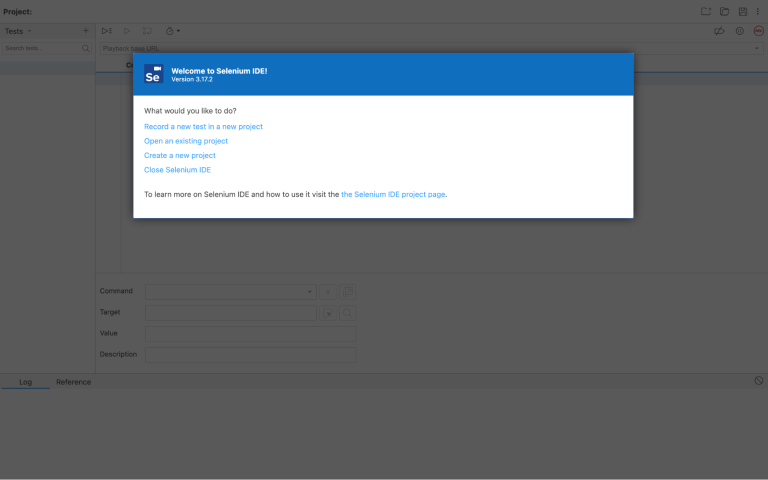
- Install the Selenium IDE Chrome extension.
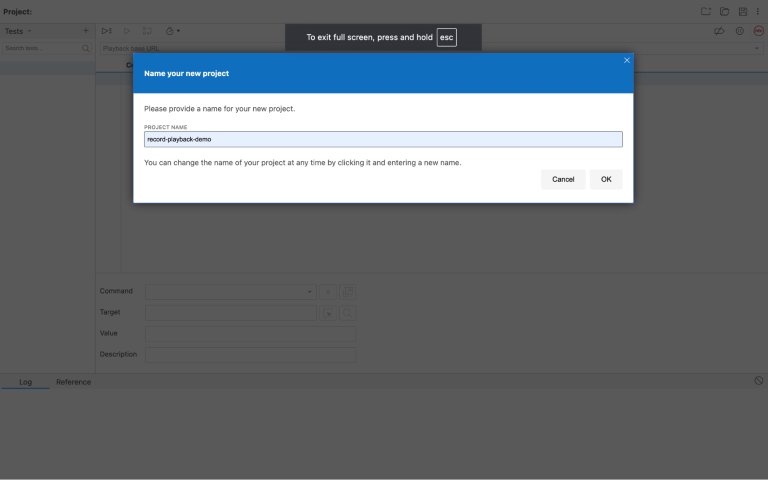
- Open the Selenium IDE and click on Create a new project.
- Give it a name and click OK.
Create a New Test
Now that we have a project ready, let’s create our first test in this project. For this purpose, we will use the TestMu AI eCommerce Playground website.
Currently, this is how our workspace looks like:
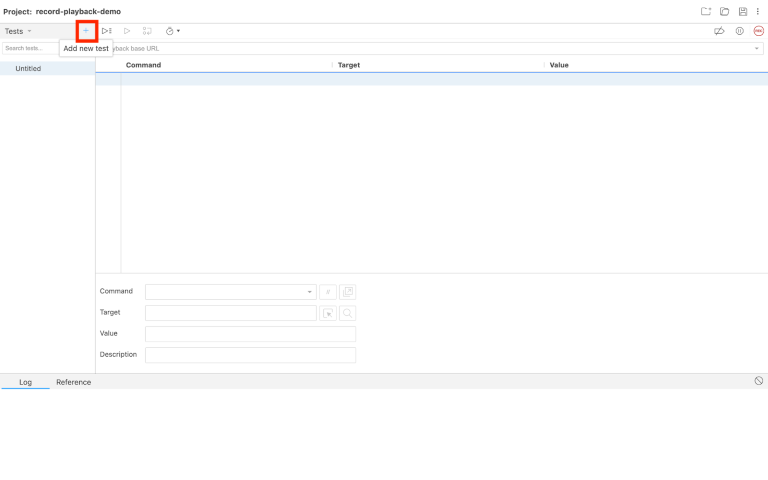
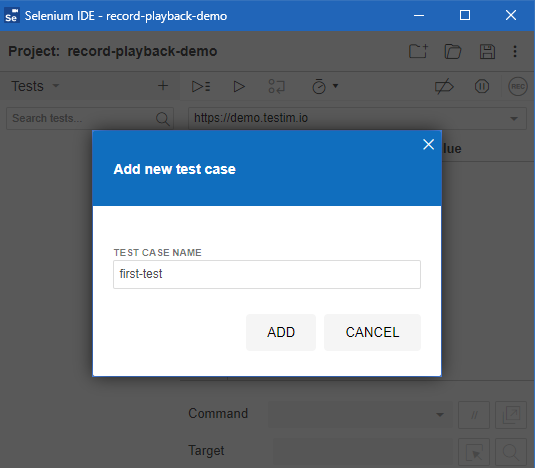
- Click on the Add new test button in the top left side and give the test a name:
- Click ADD and now we are ready to actually record the test and play it back.
Record the Test
Before you can start recording, you need to enter the URL of the website you want to test. To demonstrate this, we’ll use the TestMu AI eCommerce Playground. So, go ahead and paste this URL https://ecommerce-playground.lambdatest.io/ in the playback base URL field.
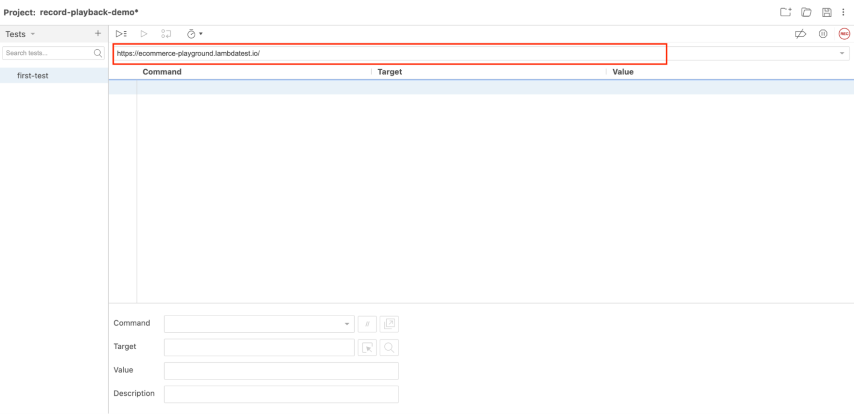
Once you enter the URL, click the recording button (at the top right in red). Selenium will open the website in a new tab and start recording all your interactions.
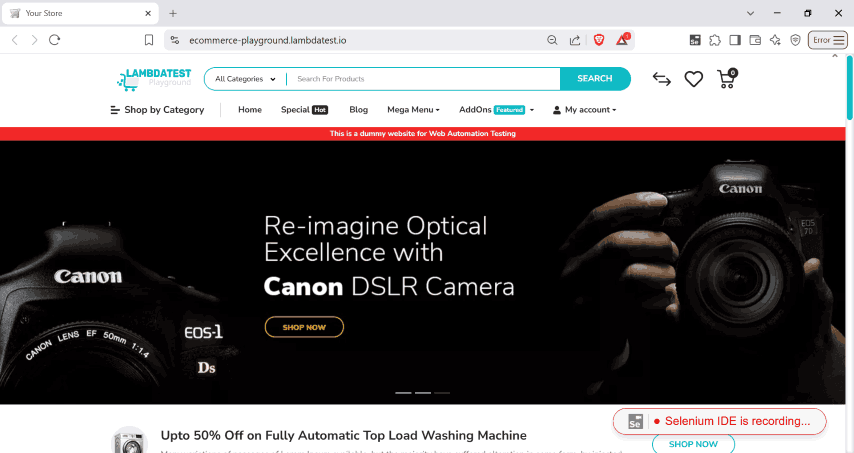
As you navigate through the website, Selenium records every action. This includes clicking buttons, filling out forms, selecting dropdown options, and navigating between web pages.
Now that recording is active, let’s follow the below steps will help you understand how Selenium IDE captures user interactions.
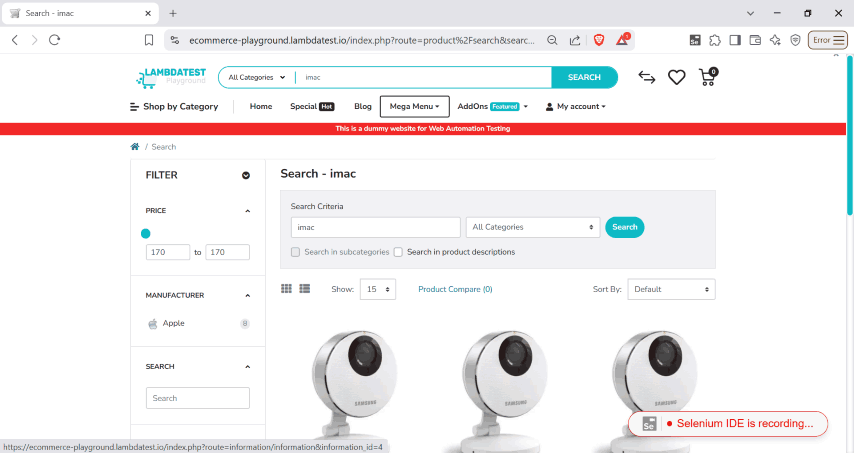
- Search for an iMac, check the results, and open a product page—Selenium IDE records each step.
- Click on the search bar, type “iMac,” and press Enter or click the search button.
- Click on any iMac product to open its details page—this click is also recorded.
- Once you have completed the actions, return to Selenium IDE and stop the recording.
The search results page appears, and Selenium IDE captures the navigation.
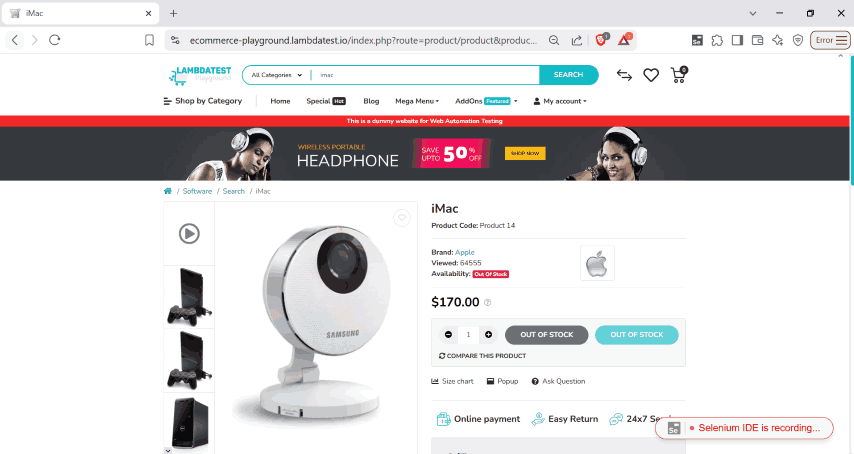
Now, let’s move on to the next step—playing back the test to see if it works as expected.
Playback the Test
Playing back a test in Selenium IDE allows you to automatically re-run the recorded steps and check whether the interactions you recorded work as intended.
Now, let’s see how we can playback the test we just recorded in the previous step.
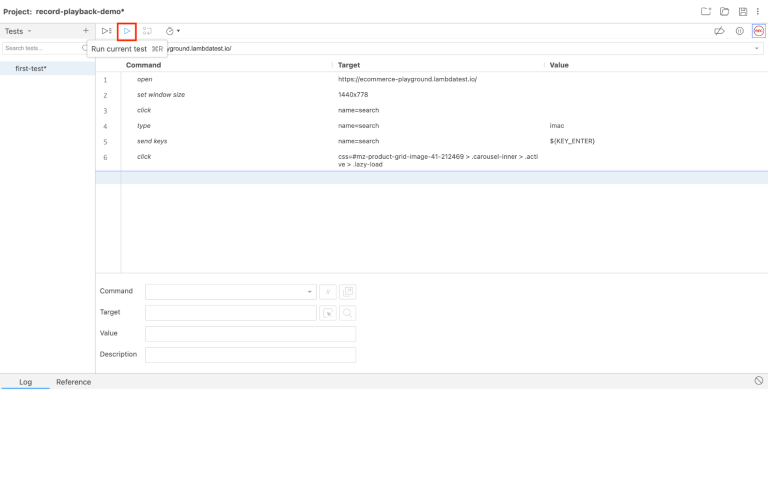
Here, at the top of the Selenium IDE window, you can see a Run current test button. Click it, and Selenium IDE will automatically execute each recorded action step by step.
You can also run multiple tests in a sequence by clicking the right arrow next to each test. This will execute every test in your project one after another.
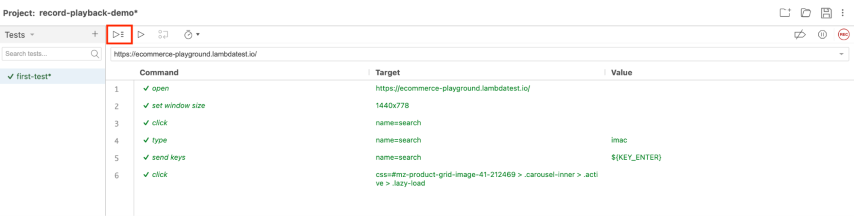
It becomes useful when verifying multiple workflows or features in a web application. Since our project has a single test, both buttons will have the same effect.
As the test runs, you’ll see the browser automatically repeat the recorded steps- navigating to the website, searching imac, viewing the results, and opening the product page just as you did while recording.
When this playback takes place, Selenium IDE offers feedback in real-time. If the test passes, all steps will run without errors. Selenium identifies a failed step and highlights it (for instance, if an element is not found or there are changes in the structure of the page). This makes it possible to quickly debug the test.
At the bottom of Selenium IDE’s window, you’ll see the test log showing the steps executed along with their timestamps and a message saying everything was executed successfully.
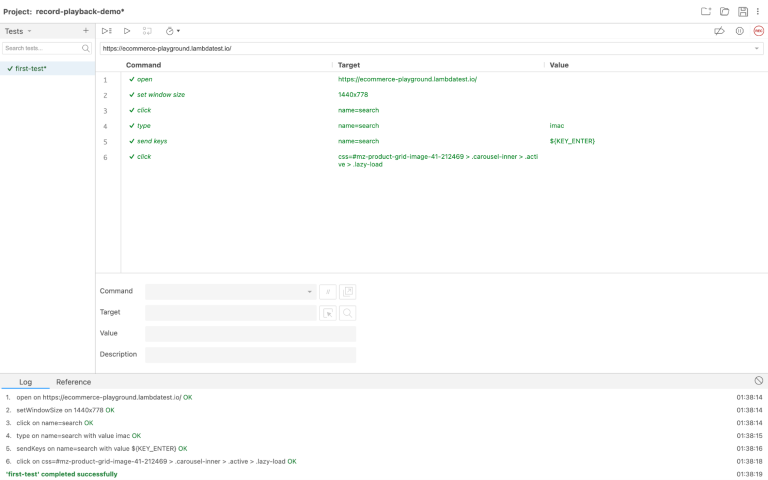
Now that we know how to record and playback a test, let’s explore how to export your test so it can be used in Selenium or other test automation frameworks.
Export a Test
Selenium IDE supports exporting tests in various programming languages and frameworks.
Let’s see how you can export your test:
- Click on the three dots menu located in the top left corner of the Selenium IDE window:
- Choose your preferred language/framework and other optional configurations, and click Export.
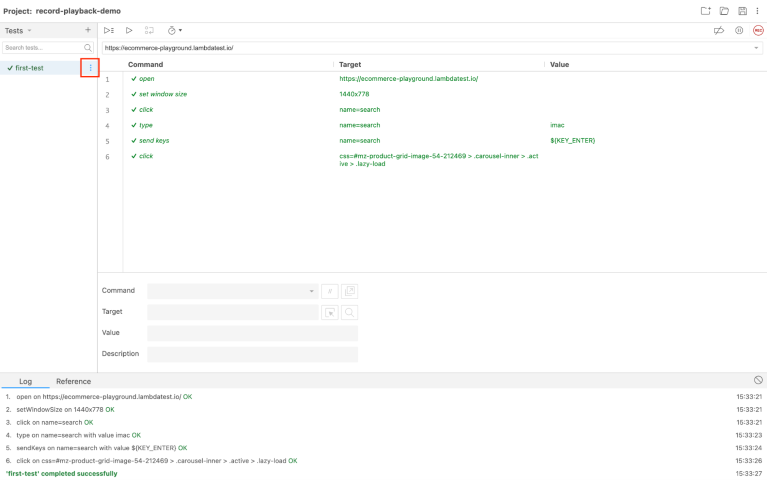
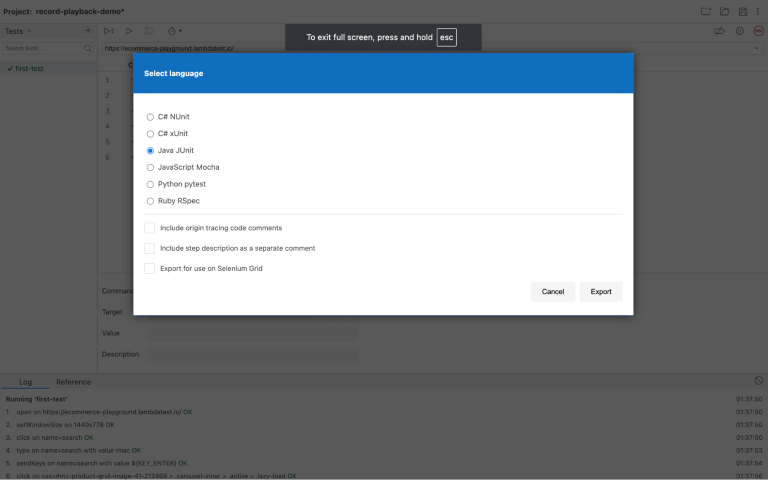
After selecting the format, simply save the file on your local machine and you are done.
The exported file will contain the test script in your chosen programming language. This script includes the commands and steps that Selenium IDE recorded.
You can now import this file into your development environment (e.g., Eclipse, IntelliJ IDEA, VS Code) and integrate it with your Selenium WebDriver project.
How to Run Selenium IDE Tests on the Cloud?
Up until now, we have learned how to record, playback, and export tests using the Selenium IDE. However, there are limitations to running tests on only your local browser. For instance, if you need to test on several browsers and operating systems to check how your website functions?
This is where cloud testing platforms like TestMu AI come into play. It is an AI-native test execution platform that enables you to execute Selenium IDE tests on a cloud-based grid.
TestMu AI provides you with access to various combinations of browsers and operating systems (Chrome, Firefox, Edge, Safari on Windows/macOS, etc.), which can help you run your tests in parallel, enabling faster software release cycles. Head over to this guide on running Selenium IDE tests on TestMu AI.

Austin Siewert
Co-Founder, Steadfast Systems
Discovered @TestMu AI yesterday. Best browser testing tool I've found for my use case. Great pricing model for the limited testing I do 👏
2M+ Devs and QAs rely on TestMu AI
Deliver immersive digital experiences with Next-Generation Mobile Apps and Cross Browser Testing Cloud

Now, let’s see how we can run the Selenium IDE tests on TestMu AI with just a few simple steps.
- Install Node.js.
- Connect Selenium IDE with TestMu AI. For that, you’ll need your Username and Access Key. To get the access, head over to your Account Settings > Password & Security.
- Install the Selenium IDE Runner (or the SIDE Runner) using the below given command:
npm install -g selenium-side-runner
This will help you run the tests outside the browser.
In earlier sections, we already created a test in the Selenium IDE, so let’s just export it.
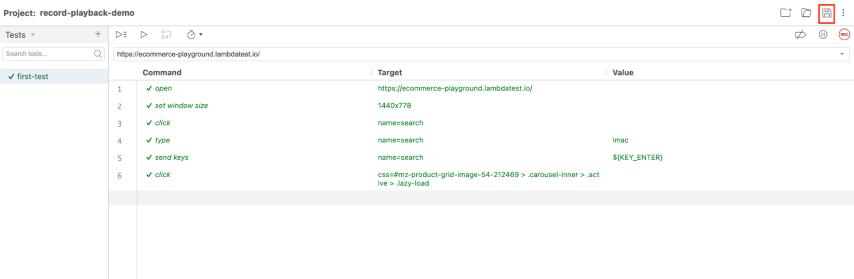
This file contains your recorded test case, which will be used to run tests on TestMu AI. You can also access the exported Selenium IDE project in this GitHub repository.
https://user-name:access-key@hub.lambdatest.com/wd/hub
So, in this step, specify the browsers and operating systems you want to test against. You can also use TestMu AI Automation Capabilities Generator to simplify this process.
For instance, to test on Chrome with Windows 11, we will use the following configuration for Selenium 4:
options = ChromeOptions()
options.browser_version = "latest"
options.platform_name = "Windows 11"
selenium-side-runner "your-test-file.side" --server
https://user-name:access-key@hub.lambdatest.com/wd/hub -c " options =
ChromeOptions() options.browser_version = "latest" options.platform_name = "Windows 11""
Ensure to replace your-test-file.side with the accurate file name of your Selenium IDE project.
With these steps, your Selenium IDE test is now running on the TestMu AI online Selenium Grid.
You can now check the test execution results directly from the TestMu AI Web Automation dashboard.
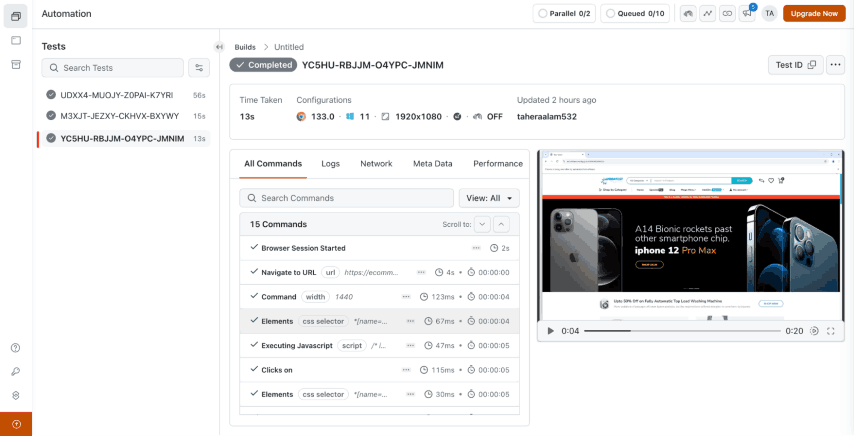
Best Practices to Use Selenium for Record and Playback
Record and playback is an easy way to automate tests without writing test scripts, but to make the most of this functionality, you’ll need to follow below best practices.
- Avoid using XPath whenever possible. It tends to break when a webpage’s structure changes. Instead, choose more reliable options like IDs, class names, or data attributes.
- Split your tests into smaller, reusable chunks. Instead of cramming multiple actions into a single test, create separate test cases for common tasks like logging in or form submissions.
- Web applications aren’t always static, so use control flow commands like if, while, and times to handle changing conditions. This helps make your tests more adaptable.
- Testing isn’t just about running actions—it’s about verifying results. Add assertions to check that the application behaves as expected at key points in your test.
- Automated tests often fail because they move too fast. Adding wait commands ensures the script pauses until elements are ready, preventing unnecessary failures.
- Recorded scripts aren’t perfect. Instead of relying on them as-is, take the time to refine them, adding logic to handle dynamic content and edge cases.
How Do AI Agents Change Record and Playback Testing in 2026?
AI agents now write a test script directly from a plain English description instead of recording clicks, and they can recover from a locator break that would stop a recorded Selenium IDE script cold.
- Natural language test generation: Tools like GitHub Copilot and Claude Code write a Selenium or Playwright script from a plain English description of the workflow, skipping the record step in this tutorial entirely.
- Self healing selectors: A recorded Selenium IDE script hardcodes the exact CSS or XPath it captured, so it breaks the moment the page changes. An agent can re-locate the same element after a DOM change instead of failing the run, which is why the XPath warning in the best practices above matters even more once AI drives the test.
- Agent driven browsing: A Playwright MCP server or a browser-use session lets an LLM operate a real browser turn by turn from an instruction such as search for an iMac and open the first result, so the recording becomes the agent's own reasoning trace instead of a saved command list.
- A real limitation: none of this removes the review step. An agent generated or agent driven run still needs a person to confirm the assertions match the intended behavior, and a Selenium IDE recording remains the faster choice for a one off regression check like the one in this tutorial.
Conclusion
If you are just getting started with test automation, then there is nothing better than using Selenium IDE to record and playback tests. It lets you record and replay tests, which makes it ideal for accelerating repetitive tasks.
That said, the record and playback feature is not without its limitations. It is good for simple tests and relatively static websites but not ideal for complex workflows or dynamic elements that update often.
You’ve just learned the fundamentals; now let’s get into Selenium IDE and automate some web tests!
Happy testing!
Citations
- Selenium IDE: https://www.selenium.dev/selenium-ide/
Author

Tahera Alam
Blogs: 14


Tahera is a freelance Frontend Developer and Technical Writer with over 2 years of hands-on experience in JavaScript, React, Next.js, TypeScript, Tailwind CSS, and Git/GitHub. She specializes in building responsive user interfaces and writing clear, engaging documentation, tutorials, and API guides on technologies like Selenium, Cypress, and modern web development. Tahera has contributed to open-source projects focused on improving UI components and documentation. She has built a following of 7,000+ on X, with some of her posts reaching 400,000+ views, showcasing her influence in the frontend and tech writing community. She currently collaborates with clients on web development and long-form technical content. Although her academic background is in Polity & IR (Bachelor’s) and English Literature (Master’s), she has built her technical expertise through continuous learning and real-world projects.


Frequently asked questions
Did you find this page helpful?
More Related Blogs
TestMu AI forEnterprise
Get access to solutions built on Enterprise
grade security, privacy, & compliance
- Advanced access controls
- Advanced data retention rules
- Advanced Local Testing
- Premium Support options
- Early access to beta features
- Private Slack Channel
- Unlimited Manual Accessibility DevTools Tests