

Power Your Software Testing with AI Agents and Cloud
The Native AI-Agentic Cloud Platform to Supercharge Quality Engineering. Test Intelligently and Ship Faster.


- TestMu AI (Formerly LambdaTest)
- /
- Blog
- /
- Top 28 Selenium WebDriver Commands in NUnit For Automation
28 Top Selenium WebDriver Commands in NUnit [2026]
Selenium WebDriver commands are the methods used to run your Selenium test automation scripts. Here are the commands you need to automate browser actions.
Last Updated on:
Selenium WebDriver commands in NUnit control every browser action a C# test performs, from opening a URL with Navigate() to selecting a dropdown value with SelectByText(). NUnit organizes these commands into test fixtures and [Test] methods through the IWebDriver interface, so each command runs inside a structured, repeatable test case. This guide covers what Selenium WebDriver commands are, Web Browser Commands, Web Element Commands, Drop Down Commands, and how AI agents now call these commands.
If you are preparing for an interview you can learn more through NUnit interview questions.
Overview
To automate browser testing in C#, use Selenium WebDriver to control browser actions and NUnit to structure test cases. This combination is best for managing browser lifecycles, interacting with web elements, handling dropdown menus, and integrating automated tests with continuous integration pipelines.
Web Browser Commands
- Best for launching pages: The Url command opens a specific webpage or retrieves the current page’s URL to manage the browser's active location during NUnit test execution.
- Best for verifying page identity: The Title command returns the title of the currently active browser window, allowing testers to verify they are on the correct webpage.
- Best for inspecting page HTML: The PageSource command retrieves the complete HTML source of the current webpage, which is useful for verifying underlying page content during automated testing.
- Best for ending sessions: The Quit() command closes all open browser instances and completely ends the WebDriver session to free up system resources after test execution.
- Best for closing active windows: The Close() command shuts down only the currently active browser window without ending the entire WebDriver session or closing other open windows.
- Best for browser history navigation: The Navigate() command provides browser navigation controls such as Back(), Forward(), Refresh(), and GoToUrl() to control the browser's movement during NUnit tests.
Web Element Commands
- Best for triggering actions: The Click() command clicks on a specific web element, such as a button, link, or checkbox, to simulate user interactions on the webpage.
- Best for checking element readiness: The Enabled property checks whether a specific web element is enabled and ready for user interaction, returning true if it is active.
- Best for verifying visibility: The Displayed property verifies if a specific web element is visible on the webpage, helping ensure that UI elements are rendered correctly.
- Best for resetting input fields: The Clear() command removes any existing text from editable input fields before sending new input, preventing data duplication during automated form entry.
- Best for entering text: The SendKeys() command enters text or keystrokes into editable fields, allowing automated scripts to fill out forms and input search queries.
- Best for retrieving element properties: The GetAttribute() command fetches the value of a specified attribute of a web element as a string, helping verify developer-defined properties.
- Best for verifying styles: The GetCssValue() command returns the value of a specified CSS property, such as background color, to validate the visual styling of web elements.
- Best for form submission: The Submit() command submits a form element to trigger form submission, acting as an alternative to clicking a dedicated submit button.
- Best for reading page content: The Text property retrieves the visible inner text content of a web element, collapsing whitespaces and removing leading or trailing spaces.
- Best for identifying HTML tags: The TagName property returns the HTML tag name of the selected web element, helping verify that the correct element type is being targeted.
- Best for verifying selections: The Selected property checks if a checkbox or radio button is currently selected, returning true if the element is checked.
- Best for measuring dimensions: The Size property gets the height and width dimensions of a web element or browser window, returning the values as a struct size.
Drop Down Commands
- Best for index-based selection: The SelectByIndex() command chooses an option from an HTML select dropdown menu based on its numerical index position, starting at zero.
- Best for index-based deselection: The DeselectByIndex() command removes a selection from a multi-select dropdown menu based on the option's numerical index position.
- Best for text-based selection: The SelectByText() command selects a dropdown option using its visible text, with an option to perform partial matching if needed.
- Best for text-based deselection: The DeselectByText() command removes a selection from a multi-select dropdown menu using the visible text of the option.
- Best for value-based selection: The SelectByValue() command selects a dropdown option based on its HTML value attribute, allowing precise option targeting during automated testing.
- Best for value-based deselection: The DeselectByValue() command removes a selection from a multi-select dropdown menu based on the option's HTML value attribute.
- Best for clearing multi-selects: The DeselectAll() command clears all currently selected options in a multi-select dropdown menu, resetting the element to an unselected state.
- Best for checking selection support: The IsMultiple property checks if a dropdown element supports multiple selections, returning true if multi-select is enabled on the page.
- Best for listing dropdown options: The Options property retrieves all available options within an HTML select element, returning them as a list for verification.
- Best for retrieving active selections: The AllSelectedOptions property gets all currently selected options within a multi-select dropdown menu for validation during automated testing.
Benefits of NUnit with Selenium
- Best for test structure: NUnit provides test structure, modularity, and reporting capabilities, allowing testers to group test cases, apply assertions, and integrate with CI tools like Jenkins or Azure DevOps.
Test Execution Platforms
- Best for cloud-based test execution: TestMu AI is an AI-powered test orchestration and execution platform that runs manual and automated tests at scale across over 10,000+ real devices, browsers, and operating systems.
What are Selenium Webdriver Commands?
Selenium Webdriver commands are the methods used to run your Selenium test automation scripts. You can use these browser commands to automate different browser actions to perform testing.
Selenium WebDriver commands in NUnit are divided in three different categories on the basis of different kinds of browser interactions. The commands are categorized based on the type of interaction and the element/application on which action is being performed. Automated browser testing involves the following Selenium commands:
- Web Browser Commands – Performs actions on the web browser (e.g. open, close, maximize, etc.)
- Web Element Commands – Performs actions on the WebElements in the current window (e.g. checking a button, entering text in a textbox, clicking a button, etc.)
- Drop Down Commands – Performs actions on the drop-down elements in the current window (e.g. selecting or deselecting a value from drop-down window).
Web Browser Commands
When C# is used along with the Selenium testing framework , the IWebDriver interface is used to perform actions on the web browser. To access the methods of the IWebDriver interface, an instance/driver object from IWebDriver should be created. The complete list of methods for IWebDriver comes up as soon as you press the dot key.
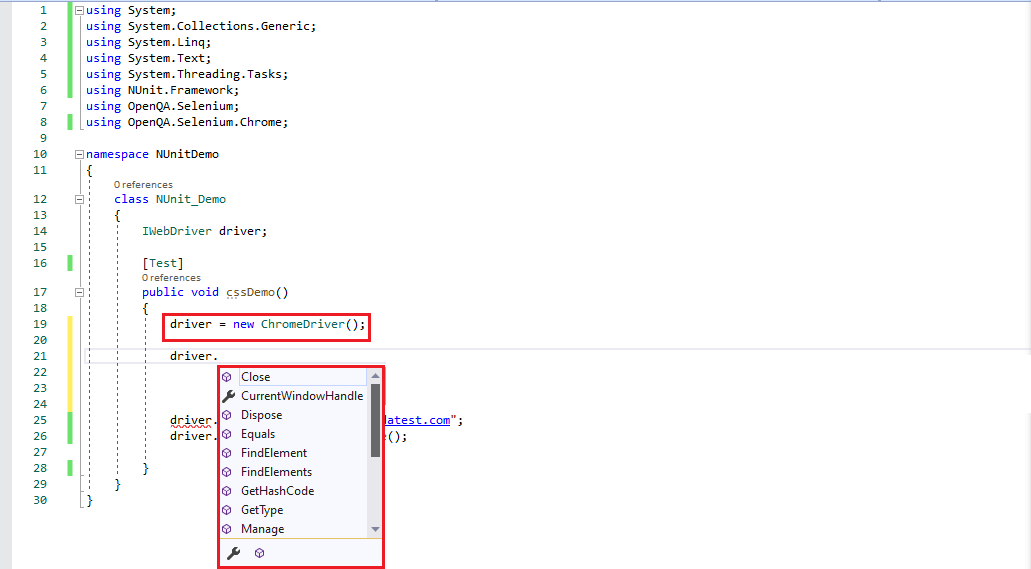
Below are the Selenium WebDriver Commands in Nunit for handling browsers:
1. Url
Using this Selenium WebDriver command you can Get or Set the URL/web page that needs to be displayed.
Syntax:
string IWebDriver.Url { get; set;}
Example
/* Selenium Webdriver command for URL*/
String URL;


driver = new ChromeDriver();
/* Set Operation */
driver.Url = "https://www.lambdatest.com/";
/* Get Operation */
URL = driver.Url;
2. Title
This Selenium WebDriver command gets the title of the current browser window.
Syntax:
string IWebDriver.Title{get;}
Example
/* Selenium Webdriver command for getting title */
String page_title;
driver = new ChromeDriver();
driver.Url = "https://www.lambdatest.com/";
page_title = driver.Title;
3. PageSource
You can get the source of the page that is loaded by the web browser with this Selenium WebDriver command.
Syntax:
string IWebDriver.PageSource{get;}
Example
/* Selenium Webdriver command for getting page source*/
String page_source;
driver = new ChromeDriver();
driver.Url = "https://www.lambdatest.com/";
page_source = driver.PageSource;
4. Quit()
You can quit the driver and close every browser window associated with this Selenium WebDriver command in NUnit.
Syntax:
void IWebDriver.Quit()
Example
/* Selenium Webdriver command for URL*/
driver = new ChromeDriver();
driver.Url = "https://www.lambdatest.com/";
/* Sleep for 4 seconds after page is displayed */
System.Threading.Thread.Sleep(4000);
/* Quit the window for this NUnit tutorial*/
driver.Quit();
5. Close()
With close() Selenium WebDriver command, you can close the current window, quit the browser in case if it is the last window open. In case you want more detailed information on how to handle multiple browsers windows in Selenium WebDriver you can refer to our blog.
Syntax:
void IWebDriver.Close()
Example
/* Selenium Webdriver command for Closing window*/
driver = new ChromeDriver();
driver.Url = "https://www.lambdatest.com/";
driver.Close();
6. Navigate()
With this Selenium WebDriver command in NUnit you can navigate the browser to another location i.e. Refresh the current window/Go Back to the previous window/Go to the next page as per browsing history/Go to a particular URL.
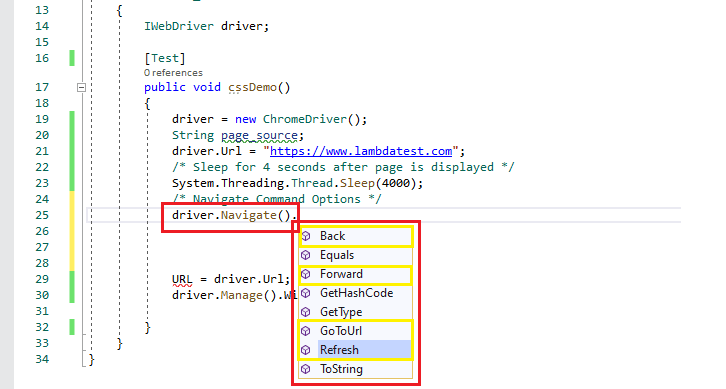
Syntax:
INavigation IWebDriver.Navigate()
Shown below are the different options available with the Navigate() command:
Back()
Move back a single entry as per the browser’s history.
Syntax:
void INavigation.Back()
Example:
driver.Navigate().Back();
Forward()
Move a single item forward as per the browser’s history
Syntax:
void INavigation.Forward()
Example:
driver.Navigate().Forward();
GoToUrl()
Navigate to a particular URL which is passed as a parameter to the Navigate() Selenium test automation command
Syntax:
void INavigation.GoToUrl(string url)
Example:
driver.Navigate().GoToUrl("https://www.lambdatest.com/")
Refresh()
Refresh the current browser window
Syntax:
void INavigation.Refresh()
Example:
driver.Navigate().Refresh();
Web Element Commands
While performing Selenium test automation with NUnit you’ll often have to rely on Selenium WebDriver command to perform operations on WebElements (e.g. textboxes, radio buttons, hyperlinks, etc.) on a page, that are triggered via the IWebElement interface.
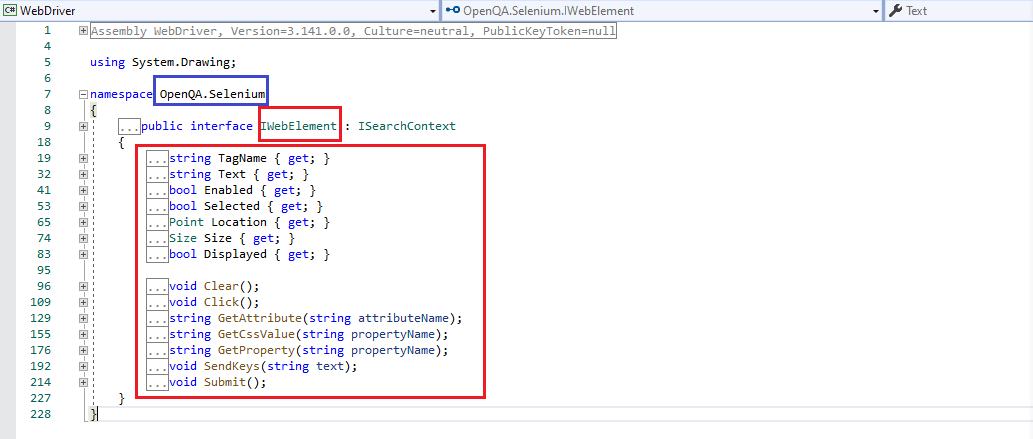
To find the details of a WebElement e.g. XPath, outerHTML, etc.; you can make use of the Inspect Tool available in web browsers like Chrome, Firefox, etc. Once the WebElement is located, you can perform the corresponding operation on that element. To know more about how to access WebElements, you can refer to our detailed article on Selenium locators.
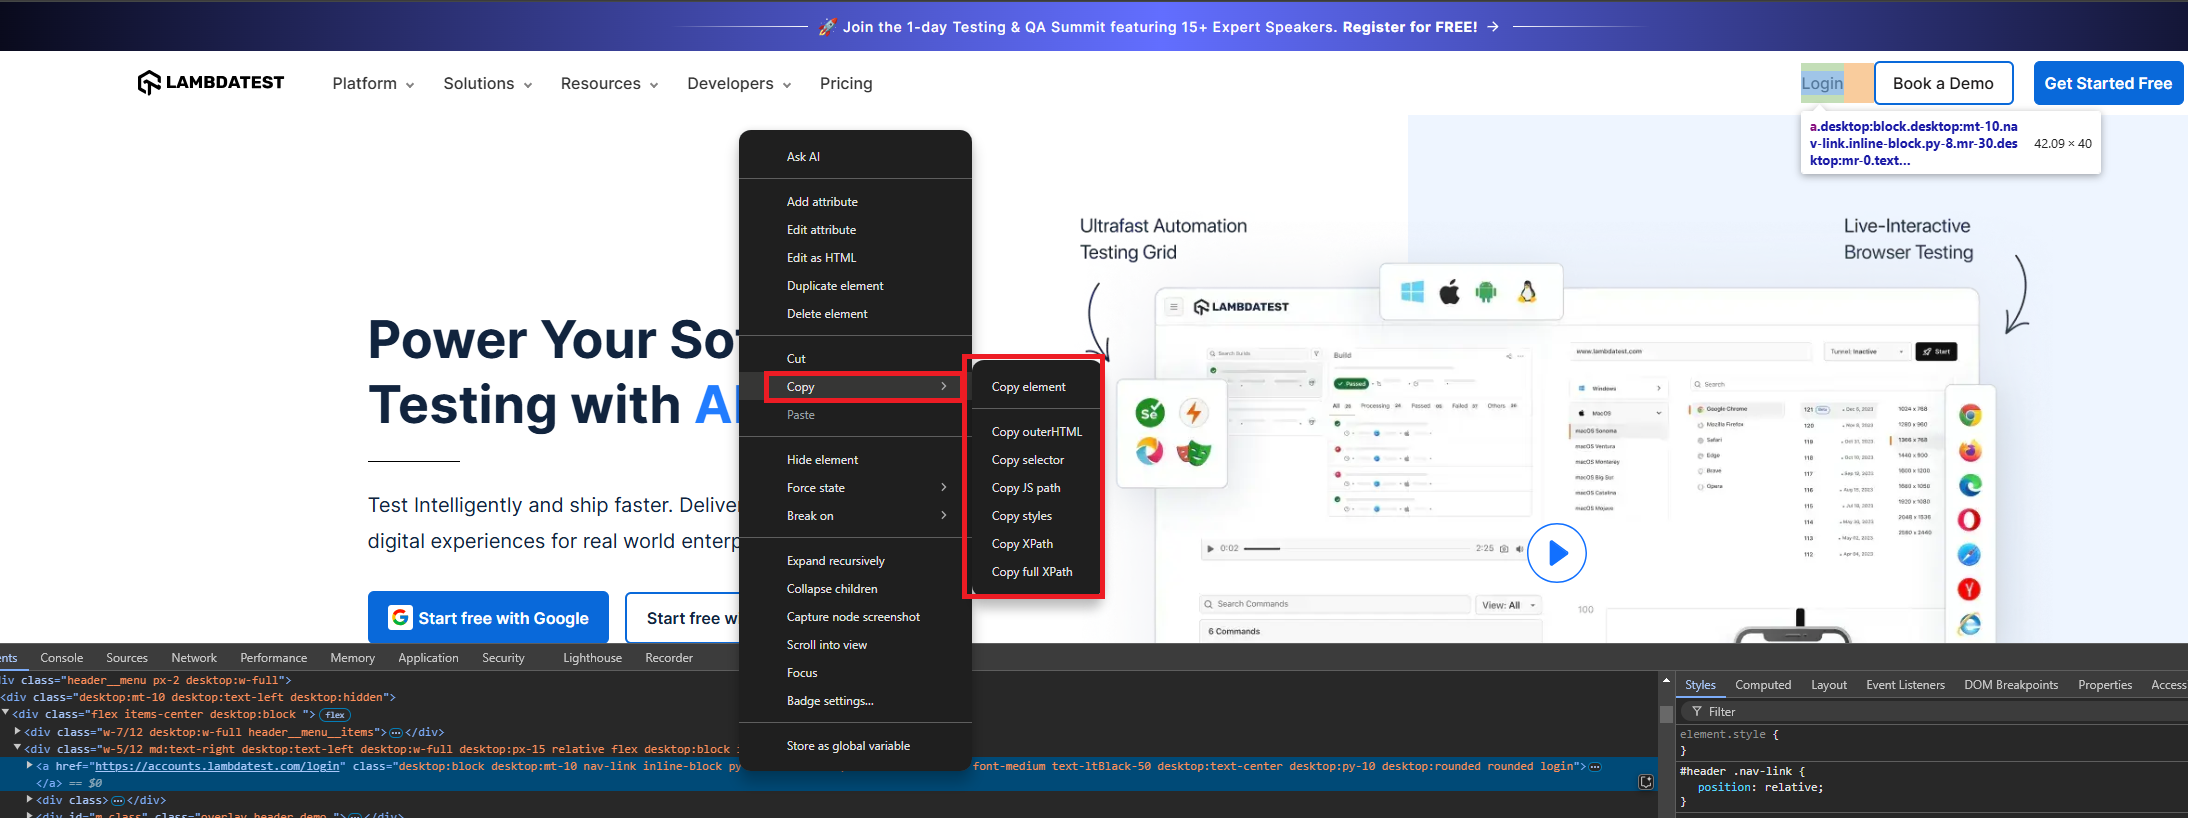
Shown below in this Nunit tutorial are the Selenium WebDriver command for WebElements.
To learn more about WebElements and how to interact with the elements, watch the complete video tutorials and get valuable.

To get started with your web automation journey you can Subscribe to the TestMu AI YouTube channel for details guidance on various automation testing tools, Selenium testing, Cypress testing, Playwright testing, and more.
For demonstrating the usage of the WebElement commands, we have used the the demo sites given below as for Menu system and HTML form example

Note: Identify locators and perform seamless automation testing on the cloud platform Try TestMu AI Now!
1. Click
Using the Click() Selenium WebDriver command, you can click on a particular WebElement present on the web page. The Click operation can be performed on hyperlinks, buttons, checkboxes, or any other element that is clickable on the page. The element is first located on the page, after which the Click operation is performed.
Syntax:
void IWebElement.Click()
Example
/*Selenium Webdriver command for click*/
driver = new ChromeDriver();
driver.Url = "https://www.lambdatest.com/";
/* The Xpath of the Login Button on LambdaTest homepage */
IWebElement web_element = driver.FindElement(By.XPath("//*[@id="navbarSupportedContent"]/ul/li[6]/a"));
web_element.Click();
2. Enabled
You can check whether a particular WebElement is enabled or not with the Enabled Selenium WebDriver command. It returns true if the WebElement on the page is enabled else it returns false.
Syntax:
Bool IWebElement.Enabled{get;}
Example
/*Selenium Webdriver command to check whether a particular web element is enabled */
driver = new ChromeDriver();
driver.Url = "https://www.lambdatest.com/";
/* The Xpath of the Login Button on LambdaTest homepage */
IWebElement web_element = driver.FindElement(By.XPath("//*[@id="navbarSupportedContent"]/ul/li[6]/a"));
Boolean element_enabled = web_element.Enabled;
3. Displayed
This Selenium WebDriver command checks whether a particular WebElement is displayed or not. It returns true if the WebElement on the page is displayed else it returns false.
Syntax:
Bool IWebElement.Displayed{get;}
Example
/*Selenium Webdriver command to check whether a particular web element is displayed */
driver = new ChromeDriver();
driver.Url = "https://www.lambdatest.com/";
/* The Xpath of the Login Button on LambdaTest homepage */
IWebElement web_element = driver.FindElement(By.XPath("//*[@id="navbarSupportedContent"]/ul/li[6]/a"));
Boolean element_enabled = web_element.Displayed;
4. Clear
The Clear() Selenium WebDriver command clears the content in the WebElement present on the page. It is used for clearing the pre-loaded contents in a text box.
Syntax:
void IWebElement.Clear()
Example
driver = new ChromeDriver();
driver.Url = "https://www.lambdatest.com/";
/* The Xpath of the Email address text box on LambdaTest homepage */
IWebElement web_element = driver.FindElement(By.XPath("//*[@id='useremail']");
web_element.Clear();
5. SendKeys
This Selenium Webdriver command Inputs the values in an element like a textbox on the web page.
Syntax:
void IWebElement.SendKeys(string text)
Example
driver = new ChromeDriver();
driver.Url = "https://www.lambdatest.com/";
/* The Xpath of the Email address text box on LambdaTest homepage */
IWebElement web_element = driver.FindElement(By.XPath("//*[@id='useremail']");
web_element.SendKeys("test@email.com");
6. GetAttribute
There may be attributes and properties associated to WebElements present on a web page. These are added by the website developer. With GetAttribute() you get the value of a certain attribute as a string of the WebElement.
Syntax:
string IWebElement.GetAttribute(string attributename)
Example
driver = new ChromeDriver();
driver.Url = "https://www.lambdatest.com/";
/* The Xpath of the Email address text box on LambdaTest homepage */
IWebElement web_element = driver.FindElement(By.XPath("//*[@id='navbarSupportedContent']/ul/li[6]/a"));
String titleValue = web_element.GetAttribute("class");

7. GetCssValue
Gets the value of a CSS property of a WebElement present on the web page. Color values are returned in the form of rgba string. For example, a “background-color” property set as “green” in the HTML source, will return “#008000” for its value.
Syntax:
string IWebElement.GetCssValue(string propertyname)
Example:
driver = new ChromeDriver();
driver.Url = "https://www.lambdatest.com/";
/* The Xpath of the Login Button on LambdaTest homepage */
IWebElement web_element = driver.FindElement(By.XPath("//*[@id='navbarSupportedContent']/ul/li[6]/a"));
/* returns #000000 */
String cssvalue = web_element.GetCssValue("background-color");
To get demonstrate the functionality of GetCssValue() we will be performing inspection on platform called TestMu AI. In this example we will get the background color of the ‘Login’ button on TestMu AI homepage, we check the properties associated with the element using Inspect tool.
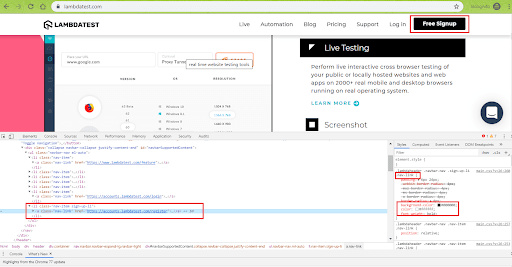
As seen in the snapshot, background-color is the property associated with Login button. The same is used with GetCssValue().
TestMu AI is an AI-powered test orchestration and execution platform that lets you run manual and automated tests at scale across real devices, browsers, and OS combinations. This platform allows you to perform web and mobile automation without having to worry about maintain infrastructure, security of your test data and more.
8. Submit
Performs a click on a button which is of the type submit.
Syntax:
void IWebElement.Submit()
Example
driver = new ChromeDriver();
driver.Url = "https://accounts.lambdatest.com/login";
/* The Xpath of the Login Button on which is of the type submit */
IWebElement web_element = driver.FindElement(By.XPath("//*[@id='app']/section/form/div/div/button"));
web_element.Submit();
9. Text
Gets the innerText of a WebElement, without any leading or trailing whitespace & other whitespaces collapsed.
Syntax:
string IWebElement.Text{get;}
Example
driver = new ChromeDriver();
driver.Url = "https://www.lambdatest.com/";
/* The Xpath of the Login Button on LambdaTest homepage */
IWebElement web_element = driver.FindElement(By.XPath("//*[@id='navbarSupportedContent']/ul/li[6]/a"));
String text_value = web_element.Text;
10. TagName
Gets the tag name of a WebElement on the web page.
Syntax:
string IWebElement.TagName{get;}
Example
driver = new ChromeDriver();
driver.Url = "https://www.lambdatest.com/";
/* The Xpath of the Login Button on LambdaTest homepage */
IWebElement web_element = driver.FindElement(By.XPath("//*[@id='navbarSupportedContent']/ul/li[6]/a"));
String tag_name = web_element.TagName;
11. Selected
Checks whether a WebElement is selected or not. The WebElement can be radio button, checkbox, etc.
Syntax:
bool IWebElement.Selected{get;}
Example
driver = new ChromeDriver();
driver.Url = "https://lambdatest.github.io/sample-todo-app/";
IWebElement web_element = driver.FindElement(By.XPath("/html/body/div/div/div/ul/li[1]/input"));
bool selected_status = web_element.Selected;
12. Size
Gets the height & width associated with a WebElement or the current browser window. The return type is of type struct size.
Syntax:
Size IWebElement.Size{get;}
Example
driver = new ChromeDriver();
driver.Url = "https://www.lambdatest.com/";
/* Get the window size */
Console.WriteLine(driver.Manage().Window.Size);
Drop Down Commands
Drop down elements are common in web pages, especially when a user is registering on a website and has to enter the country/city related information. In C#, drop down operations are performed using the SelectElement class. SelectElement is declared in using OpenQA.Selenium.Support.UI package which is imported before performing any operation on the drop down box.
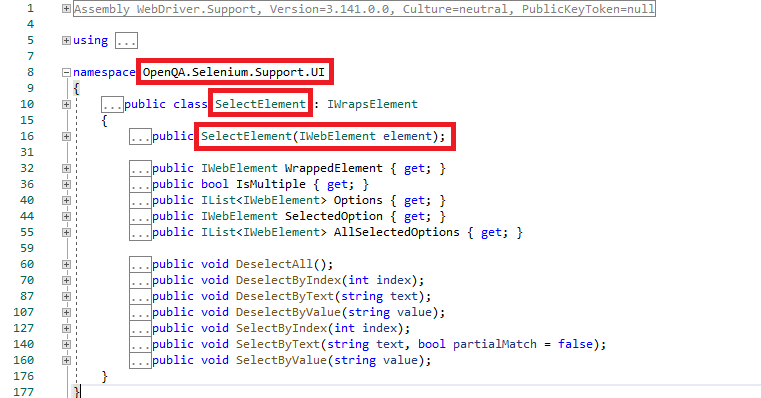
For demonstrating the usage of the WebElement commands, we have used the test URLs Menu and formex.
Below are drop down operations in C#:
1. SelectByIndex
Select a value based on the index value. The starting index in drop down is 0.
Syntax:
void SelectElement.SelectByIndex(int index)
Example
driver = new ChromeDriver();

driver.Url = "https://download.dojotoolkit.org/release-1.17.3/dojo-release-1.17.3/dijit/tests/test_Menu.html";
IWebElement element = driver.FindElement(By.XPath("//select[@aria-label='select']"));
SelectElement select_elem = new SelectElement(element);

/* Sleep for 4 seconds after page is displayed */
System.Threading.Thread.Sleep(4000);

select_elem.SelectByIndex(1);
2. DeselectByIndex
Deselect a selected value based on the index.
Syntax:
void SelectElement.DeselectByIndex(int index)
Example
driver = new ChromeDriver();

driver.Url = "https://download.dojotoolkit.org/release-1.17.3/dojo-release-1.17.3/dijit/tests/test_Menu.html";
IWebElement element = driver.FindElement(By.XPath("//select[@aria-label='select']"));
SelectElement select_elem = new SelectElement(element);

/* Sleep for 4 seconds after page is displayed */
System.Threading.Thread.Sleep(4000);

select_elem.DeselectByIndex(1);
3. SelectByText
Select an option based on the text of the options available in the drop down. There is an option to do partial matching of the text and by default partial matching is False.
Syntax:
void SelectElement.SelectByText(string text, [bool partialMatch = false])
Example
driver = new ChromeDriver();

driver.Url = "https://download.dojotoolkit.org/release-1.17.3/dojo-release-1.17.3/dijit/tests/test_Menu.html";
IWebElement element = driver.FindElement(By.XPath("//select[@aria-label='select']"));
SelectElement select_elem = new SelectElement(element);

/* Sleep for 4 seconds after page is displayed */
System.Threading.Thread.Sleep(4000);

select_elem.SelectByText("on IE6");
4. DeselectByText
Deselect an already selected option based on the text of the options available in the drop down.
Syntax:
void SelectElement.DeselectByText(string text)
Example
driver = new ChromeDriver();

driver.Url = "https://download.dojotoolkit.org/release-1.17.3/dojo-release-1.17.3/dijit/tests/test_Menu.html";
IWebElement element = driver.FindElement(By.XPath("//select[@aria-label='select']"));
SelectElement select_elem = new SelectElement(element);

/* Sleep for 4 seconds after page is displayed */
System.Threading.Thread.Sleep(4000);

select_elem.DeselectByText("on IE6");
5. SelectByValue
Select an option based on the value supplied as input.
Syntax:
void SelectElement.SelectByValue(string value)
Example
driver = new ChromeDriver();

driver.Url = "http://www.tizag.com/phpT/examples/formex.php";

IWebElement element = driver.FindElement(By.XPath("//*[@id='examp']/form/select[1]"));
SelectElement select_elem = new SelectElement(element);

/* Sleep for 4 seconds after page is displayed */
System.Threading.Thread.Sleep(4000);

select_elem.SelectByValue("HighSchool");
6. DeselectByValue
Deselect an already selected option based on the value supplied as input.
Syntax:
void SelectElement.DeselectByValue(string value)
Example
driver = new ChromeDriver();

driver.Url = "http://www.tizag.com/phpT/examples/formex.php";

IWebElement element = driver.FindElement(By.XPath("//*[@id='examp']/form/select[1]"));
SelectElement select_elem = new SelectElement(element);

/* Sleep for 4 seconds after page is displayed */
System.Threading.Thread.Sleep(4000);

select_elem.DeselectByValue("HighSchool");
7. DeselectAll
Used to clear the selected options in multi select drop down menus.
Syntax:
void SelectElement.DeselectAll()
Example
driver = new ChromeDriver();
driver.Url = "http://www.example-site.com";
IWebElement element = driver.FindElement(By.XPath("x-path"));
SelectElement select_elem = new SelectElement(element);
select_elem.DeselectAll();
8. IsMultiple
This Selenium Webdriver command gets a value showing if the parent element supports multiple selections. If the drop down is multi select capable it returns true else otherwise it returns false.
Syntax:
bool SelectElement.IsMultiple{get;}
Example
driver = new ChromeDriver();

driver.Url = "https://download.dojotoolkit.org/release-1.17.3/dojo-release-1.17.3/dijit/tests/test_Menu.html";
IWebElement element = driver.FindElement(By.XPath("//select[@aria-label='select']"));

SelectElement select_elem = new SelectElement(element);
bool is_multi_select = select_elem.IsMultiple;
Console.WriteLine("Multi Select {0}", is_multi_select);
9. Options
You can get the list of options for the select element with this Selenium WebDriver command.
Syntax:
IList<IWebElement> SelectElement.Options{ get; }
Example
using System;
using System.Collections.Generic;
using System.Linq;
using System.Text;
using System.Threading;
using System.Threading.Tasks;
using System.Drawing;
using NUnit.Framework;
using OpenQA.Selenium;
using OpenQA.Selenium.Chrome;
using OpenQA.Selenium.Support.UI;

namespace NUnitDemo
{
    class NUnit_Demo
    {
        IWebDriver driver;

        [Test]
        public void cssDemo()
        {
            driver = new ChromeDriver();
            driver.Url = "https://download.dojotoolkit.org/release-1.17.3/dojo-release-1.17.3/dijit/tests/test_Menu.html";

            IWebElement element = driver.FindElement(By.XPath("//select[@aria-label='select']"));

            SelectElement select_elem = new SelectElement(element);
            /* Sleep for 4 seconds after page is displayed */
            System.Threading.Thread.Sleep(4000);

            select_elem.SelectByText("on IE6");

            /* List will contain details of all the options */
            IList<IWebElement> avail_options = select_elem.Options;

            int ListSize = avail_options.Count;

            for (int loop_var = 0; loop_var < ListSize; loop_var++)
            {
                String text_value = select_elem.Options.ElementAt(loop_var).Text;
                System.Diagnostics.Debug.WriteLine("Selected item is " + text_value);
            }

        }

        driver.Close();
    }
}
10. AllSelectedOptions
Gets all of the selected options within the select element. It is similar to Options except that it should be used on a multi select drop down menu.
Syntax:
IList<IWebElement> AllSelectedOptions { get; }
Example
£
using System;
using System.Collections.Generic;
using System.Linq;
using System.Text;
using System.Threading;
using System.Threading.Tasks;
using System.Drawing;
using NUnit.Framework;
using OpenQA.Selenium;
using OpenQA.Selenium.Chrome;
using OpenQA.Selenium.Support.UI;

namespace NUnitDemo
{
    class NUnit_Demo
    {
        IWebDriver driver;

        [Test]
        public void cssDemo()
        {
            driver = new ChromeDriver();
            driver.Url = "https://download.dojotoolkit.org/release-1.17.3/dojo-release-1.17.3/dijit/tests/test_Menu.html";

            IWebElement element = driver.FindElement(By.XPath("//select[@aria-label='select']"));

            SelectElement select_elem = new SelectElement(element);
            /* Sleep for 4 seconds after page is displayed */
            System.Threading.Thread.Sleep(4000);

            select_elem.SelectByText("on IE6");

            /* List will contain details of all the options */
            IList<IWebElement> avail_options = select_elem.AllSelectedOptions;

            int ListSize = avail_options.Count;
            System.Diagnostics.Debug.WriteLine("List size is " + ListSize);

            for (int loop_var = 0; loop_var < ListSize; loop_var++)
            {
                String text_value = avail_options.ElementAt(loop_var).Text;
                System.Diagnostics.Debug.WriteLine("Selected item is " + text_value);
            }

        }
        driver.Close();
    }
}
How Do AI Agents Call Selenium WebDriver Commands in NUnit?
AI agents now call the same WebDriver commands covered above through a Model Context Protocol (MCP) server instead of a hardcoded C# script. Projects such as mcp-selenium expose commands like navigate, send_keys, and get_element_attribute as named tools an agent can call directly.
- Command exposure through MCP: an MCP server wraps IWebDriver methods, such as Navigate() and GetAttribute(), as callable tools, so an agent triggers each one without a developer writing the C# call first.
- Natural-language to command mapping: the agent turns an instruction such as "select United States from the country dropdown" into a SelectByText() call on the matching WebElement.
- Locator recovery on DOM change: when a FindElement call breaks after a page update, the agent retries with an alternate locator before a NUnit assertion fails, instead of stopping the run.
- Result feedback to the agent: the agent reads the pass or fail output of each NUnit [Test] method to decide whether to repeat a command or move to the next step.
- Scaffolding stays manual: an MCP server still needs an existing IWebDriver session and NUnit test fixture; agents extend command execution, they do not replace test structuring.
It’s A Wrap!
The IWebDriver interface is the base on which the browser interactions for Selenium test automation happens. In this NUnit tutorial, I had a look at the most widely used Selenium WebDriver commands in Nunit for automated browser testing.
Using these Selenium WebDriver Tutorial commands in Nunit, you can interact with different types (and categories) of WebElements such as text boxes, drop-downs, radio buttons, and more. This forms the basis of automated browser testing with Selenium, C#, and NUnit framework.
I hope you found this NUnit tutorial informative, In case of any questions feel free to t reach out to us in the comment section down below. That’s all for now. Happy Testing!!!
Author

Himanshu Sheth
Blogs: 141


Himanshu Sheth is the Director of Marketing (Technical Content) at TestMu AI, with over 8 years of hands-on experience in Selenium, Cypress, and other test automation frameworks. He has authored more than 130 technical blogs for TestMu AI, covering software testing, automation strategy, and CI/CD. At TestMu AI, he leads the technical content efforts across blogs, YouTube, and social media, while closely collaborating with contributors to enhance content quality and product feedback loops. He has done his graduation with a B.E. in Computer Engineering from Mumbai University. Before TestMu AI, Himanshu led engineering teams in embedded software domains at companies like Samsung Research, Motorola, and NXP Semiconductors. He is a core member of DZone and has been a speaker at several unconferences focused on technical writing and software quality.
Frequently asked questions
Did you find this page helpful?
More Related Blogs
TestMu AI forEnterprise
Get access to solutions built on Enterprise
grade security, privacy, & compliance
- Advanced access controls
- Advanced data retention rules
- Advanced Local Testing
- Premium Support options
- Early access to beta features
- Private Slack Channel
- Unlimited Manual Accessibility DevTools Tests