
Run Selenium Python Suites Up To 70% Faster
Orchestrate your Selenium tests on TestMu AI's HyperExecute cloud and cut runtime with one YAML file.

World's largest virtual agentic engineering & quality conference
WHEN
AUG 19-21
WHERE
VIRTUAL · GLOBAL
- TestMu AI (Formerly LambdaTest)
- /
- Blog
- /
- How To Create Automated Web Bot With Selenium In Python
How To Create Automated Web Bot With Selenium In Python
This Selenium Python tutorial deep dives into how to create an automated web bot in Selenium with Python; the learnings of which will be useful for multiple aspects of Selenium automation testing.

Vinayak Sharma
Author

Himanshu Sheth
Reviewer
Last Updated on: February 24, 2026
This article is a part of our Content Hub. For more in-depth resources, check out our content hub on Selenium Python Tutorial.
Selenium is one of the preferred test automation frameworks, primarily used for web automation testing. Though Selenium supports six popular programming languages, it can be used to weave magic with lesser implementation when used with Python such as creating web bot using Selenium with Python.
Beyond web automation testing, web scraping using Selenium Python is a very popular use case that you can do with fewer LOC with Python. As a QA engineer, I still use other programming languages like Java and JavaScript with Selenium, but Python has been my go-to language for simple/complex web automation tasks, like is this tutorial for web bot using selenium with python.
As mentioned in this Selenium Python tutorial, Python is the third-most-popular programming language after HTML/CSS and JavaScript. Web bot using Selenium with Python or Selenium Python bot can be used extensively for automating multiple scenarios (or tasks).
AI Overview
How to Create an Automated Web Bot with Selenium in Python
An automated web bot built with Selenium and Python is a browser automation script designed to replicate real user interactions on websites. It can navigate pages, click elements, fill forms, extract information, trigger workflows, and execute repetitive online tasks without human intervention.
By leveraging Python’s simplicity and Selenium WebDriver’s powerful browser control capabilities, developers and QA engineers can create scalable, reliable automation workflows for web testing, monitoring, data extraction, and scheduled operations.
Tools Required to Create a Web Bot
- Python: The programming language used to write automation logic.
- Selenium WebDriver: The core automation engine that interacts with web browsers.
- Browser Driver: A compatible driver such as ChromeDriver or GeckoDriver that enables communication between Selenium and the browser.
- Development Environment (IDE): A code editor or integrated development environment for writing and managing scripts.
- Testing Frameworks (Optional): Tools to organize, structure, and scale automation projects.
- Scheduling Tools: Utilities that allow automated execution at predefined intervals.
How to Build an Automated Web Bot
- Set Up the Environment: Install required dependencies and configure the automation environment.
- Initialize the Browser: Launch a browser instance through Selenium WebDriver.
- Navigate to the Target Website: Direct the bot to the webpage where automation tasks will be performed.
- Identify Web Elements: Locate interface elements using reliable selectors such as ID, class name, name attribute, CSS selector, or XPath.
- Simulate User Interactions: Perform actions including clicking buttons, entering text, scrolling, submitting forms, or interacting with dynamic components.
- Extract or Process Data: Capture relevant information, validate page behavior, or trigger predefined workflows.
- Terminate the Session: Close the browser instance once the automation process is complete.
This structured approach ensures efficient execution of repetitive web tasks while maintaining consistency, scalability, and reliability.
In this Selenium Python tutorial on Selenium Python bot, I deep dive into how to create a web bot in Selenium and Python; the learnings of which will be useful for multiple aspects of Selenium automation testing. If you are preparing for an interview you can learn more through Selenium interview questions.

Tools For Creating Web Bot using Selenium with Python
One of the primary objectives of creating a Selenium with Python bot is to leverage the capabilities offered by Selenium for automating interactions with WebElements in the DOM. There is a suite of Selenium testing tools for automating web browsers, which can be used for a range of automation tasks like web scraping, web automation testing, cross browser testing, and much more.
So, let’s look at the setup essentials that are required for creating a web bot using Selenium with Python.
Selenium
The Python library that wraps the Selenium WebDriver provides binding and a simple API to write functional tests for automating web tasks such as clicking buttons, navigating web pages, and filling out forms.
The test script does not interact directly with the web browser. Selenium WebDriver is the core of the Selenium framework. As mentioned in this Selenium WebDriver tutorial, Selenium WebDriver is instrumental in establishing the connection with the browser using its corresponding browser driver. However, you can further deep dive into what is Selenium, if you want to know more about Selenium and its components.
If the tests have to be run on a local Selenium grid, the corresponding browser driver has to be installed on the target machine:
Firefox | |
Chrome | |
Microsoft Edge | |
Safari |
Downloading and installing the browser drivers are required only when the tests have to be performed on the local Selenium Grid. In the case of a Remote Selenium WebDriver, the tests are executed on a cloud Selenium Grid (e.g. TestMu AI).
Python Automation Frameworks
Python for Selenium Automation Testing is a preferable choice since the language is less verbose, supports dynamic typing, supports hassle-free reporting, and much more. The wide range of Selenium with Python frameworks support parallel testing in Selenium; thereby expediting the time to market. Also, creating a Web Bot using Selenium with python is very Simple and easy to implement process.
In this Selenium with Python tutorial, I have touched upon the essentials of Selenium with Python, let’s me, deep dive, into the most popular Selenium with Python frameworks for automation testing:
PyUnit (Unittest)
Unittest (or PyUnit) is the default Python testing framework that comes with the Python package. This testing framework for Python is inspired by the popular JUnit framework. Creating a Web Bot using Selenium with Python Can be achieved with Unittest framework.
Unittest provides simple and flexible test case execution with the quick generation of test reports. Unittest uses camelCase naming conventions instead of Python’s snake_case naming conventions.
Selenium PyUnit tutorial can be a good starting point for someone looking to leverage the framework for web automation testing.
Read – Detailed JUnit Selenium Tutorial
PyTest
PyTest is an open-source testing framework that supports unit testing, functional testing, and API testing. It is available on Python version 3.5 (and higher). Making a Web Bot using Selenium with Python Can be accomplished with PyTest.
Page Object Model (POM) in Selenium Python is instrumental in improving the maintainability and reusability aspects of the source code. I prefer the PyTest framework over PyUnit due to the rich set of plugins that are a boon to the automation engineers.
Some of the most popular PyTest plugins for automation engineers are below:
- pytest-randomly
- pytest-cov
- pytest-django
- pytest-bdd
Selenium PyTest tutorial deep dives into all the integral aspects of web automation testing with Selenium and PyTest.
This PyTest Tutorial for beginners and professionals will help you learn how to use the PyTest framework with Selenium and Python for performing Selenium automation testing.
Robot Framework
The Robot Framework is an open-source automation framework that allows the creation of human-readable test cases using Gherkin.
Watch this video to learn the basics of the robot framework for automation testing. This video will give you an understanding of the various functionalities of the Robot Framework with live examples. Develoers and tester mainly use Robot Framework to make a Web Bot using Selenium with Python as it as various functionalities.
The Robot framework is best suited to leverage the benefits of Behaviour Driven Development (BDD) using Selenium and Gherkin. Robot is also used for acceptance of Test-Driven Development (TDD) and Robotic Process Automation (RPA).
Read – Robot Framework Tutorial For Web Automation Testing
The core implementation of Robot Framework is in Python but can also run on Jython and IronPython. It natively doesn’t support parallel testing but provides a variety of extensions and libraries which are easy to use.
Watch this video to learn about the built-in tools and standard libraries.
For demonstrating the implementation of Selenium Python bot, I am going to use the PyTest framework.
Behave
Behave is testing frameworks used for Behavior-Driven Development (BDD). It has a large amount of documentation and support from the community. To top it all, it provides inbuilt integrations of Django and Flask – two of the most popular web frameworks in Python. After Robot framework Behave to make a Web Bot using Selenium with Python.
Behave is also useful for black box testing. BDD with Python Behave comes with its own set of advantages & shortcomings but it is still a nifty Python automation testing framework for Selenium testing.
Apart from these frameworks that I normally use for web automation testing, there are a number of popular Selenium Python frameworks that can be looked into to leverage the capabilities of Selenium and Python.
Task Schedulers in Python
Task Schedulers are programs that enable scheduling of tasks or scripts after certain time intervals. Alternately, scripts can also be scheduled (or triggered) based on certain conditions.
Task Scheduler can be used extensively for running a batch (or .bat) file that triggers the corresponding Python script.
Some of the common programs that provide task scheduling in Python are:
Cron
Cron is a time-based job scheduler in Unix-like computer operating systems such as Linux and macOS. It allows users to schedule tasks such as taking backups, create logs, and run scripts
Windows Task Scheduler
Task Scheduler is a component of Windows OS that lets you create and run essentially any task in an automatic fashion. Usually, the system and certain apps are scheduled for automation and maintenance. Tasks like disk defragmentation, disk cleanup, and updates, etc. can be scheduled automatically using the Windows Task Scheduler.
Windows Task Scheduler works by keeping track of the time and events on the computers and executes the task if the necessary conditions are met.
For this blog, I am going to use the Windows Task Scheduler program, along with the Win32com Library – a thin Python wrapper that helps automate Windows applications. In this case, it’s the Task Scheduler.
Now that we have touched upon the integral aspects of building a web bot using Selenium with Python, let’s get our hands dirty with some implementation.
Austin Siewert
Co-Founder, Steadfast Systems
Discovered @TestMu AI yesterday. Best browser testing tool I've found for my use case. Great pricing model for the limited testing I do 👏
2M+ Devs and QAs rely on TestMu AI
Deliver immersive digital experiences with Next-Generation Mobile Apps and Cross Browser Testing Cloud
This certification is for professionals looking to develop advanced, hands-on expertise in Selenium automation testing with Python and take their career to the next level.
Here’s a short glimpse of the Selenium Python 101 certification from TestMu AI:
Building Automated Web Bot using Selenium with Python
Follow the below mentioned steps to create a development environment for the implementation:
Creating a Virtual environment and installing dependencies
Virtual environment (or virtualenv) is a tool for creating isolated Python environments. For this purpose, Python provides a venv module that supports creation of lightweight “virtual environments” with its isolated site directories.
You can check out this Selenium Python tutorial for a quick refresher on web automation testing with Selenium and Python.
python3 -m venv env
1. Run the below mentioned command to activate this virtual environment:
Windows
.envScriptsactivate
Linux
source env/bin/activate
2. Run the following command to install Selenium for Python:
pip install selenium
3. Run the following command to install the PyTest framework:
pip install pytest
4. Install the pywin32 package to for managing the Windows Task Scheduler:
pip install pywin32
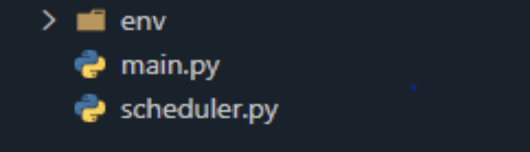
Folder structure of Test Scripts
The project majorly consists of two files:
- main.py – Contains the main script that enables logging on to the TestMu AI platform and fetching details of the respective tests.
- scheduler.py – Contains the implementation to schedule the test scripts.
Implementation of Automated Selenium Python bot
For demonstrating the creation of Web Bot using Selenium with Python, we automate the test scenario of logging on to the TestMu AI platform. The URL under test is https://accounts.lambdatest.com/login
Since the test is demonstrated on the TestMu AI Grid, I am using the Remote WebDriver in Selenium instead of the local WebDriver. To get started, we import the necessary packages.
from selenium import webdriver
We define two variables that point to the username and access key, the combination of which is used for accessing the TestMu AI cloud grid. The username and access key can be accessed from TestMu AI profile page.
username = "<YOUR USERNAME>"
access_key = "<YOUR ACCESS KEY>"
Define a class named ‘TestClass’ with the following functions:
- Setup_method – It is a function used for setting up the remote driver and its corresponding properties.
# Generate capabilities from here: https://www.lambdatest.com/capabilities-generator/
# setUp runs before each test case and
def setup_method(self):
desired_caps = {
       "build": "your build name",
       "name": "your test name",
       "platform": "Windows 10",
       "browserName": "Chrome",
       "version": "92.0",
       "selenium_version": "3.13.0",
       "geoLocation": "IN",
       "chrome.driver": "91.0",
}
"""
Setup remote driver
       -------
       username and access_key can be found on the lambdatest platform

"""
self.driver = webdriver.Remote(
       command_executor="https://{}:{}@hub.lambdatest.com/wd/hub".format(
       username, access_key
       ),
       desired_capabilities=desired_caps )
def teardown_method(self):
       self.driver.quit()
element.send_keys("text to enter")
For locating the respective WebElements, I have used the XPath locator in Selenium. However, you can use other popular Selenium locators like ID, Name, linktext, etc. for locating the WebElements.
Read – XPath Locators Cheat Sheet
Shown below is the syntax of find_element_by_xpath() method in Selenium Python. Alternatively, you can also use the driver.find_element(By.XPATH) method for locating the element using XPath locator.
element = driver.find_element_by_xpath("xpath_here")

driver.find_element(By.XPATH, "xpath")
Here is how the entire login method (i.e. test_login) looks like:
def test_login(self):
       """
       this function logins you in lambdatest dashboard
       """
       LOGIN_URL = "https://accounts.lambdatest.com/login"
       DASHBOARD_URL = "https://accounts.lambdatest.com/dashboard"
       self.driver.get(LOGIN_URL)
       login_email = self.driver.find_element_by_xpath(
           "//input[@id='email']"
       )
       login_password = self.driver.find_element_by_xpath(
           "//input[@id='password']"
       )
       login_button = self.driver.find_element_by_xpath(
           "//button[@id='login-button']"
       )

       login_email.send_keys(email)
       login_password.send_keys(password)
       login_button.click()

       # if we are on right page
       if self.driver.current_url == DASHBOARD_URL :
           assert True
           # time to get recent tests
           self.get_recent_tests()
       else:
           print(" something went wrong !!")
           assert False
- Get_recent_tests – Once I have logged into the TestMu AI Dashboard, I fetch all recent tests from the lambdatest dashboard.
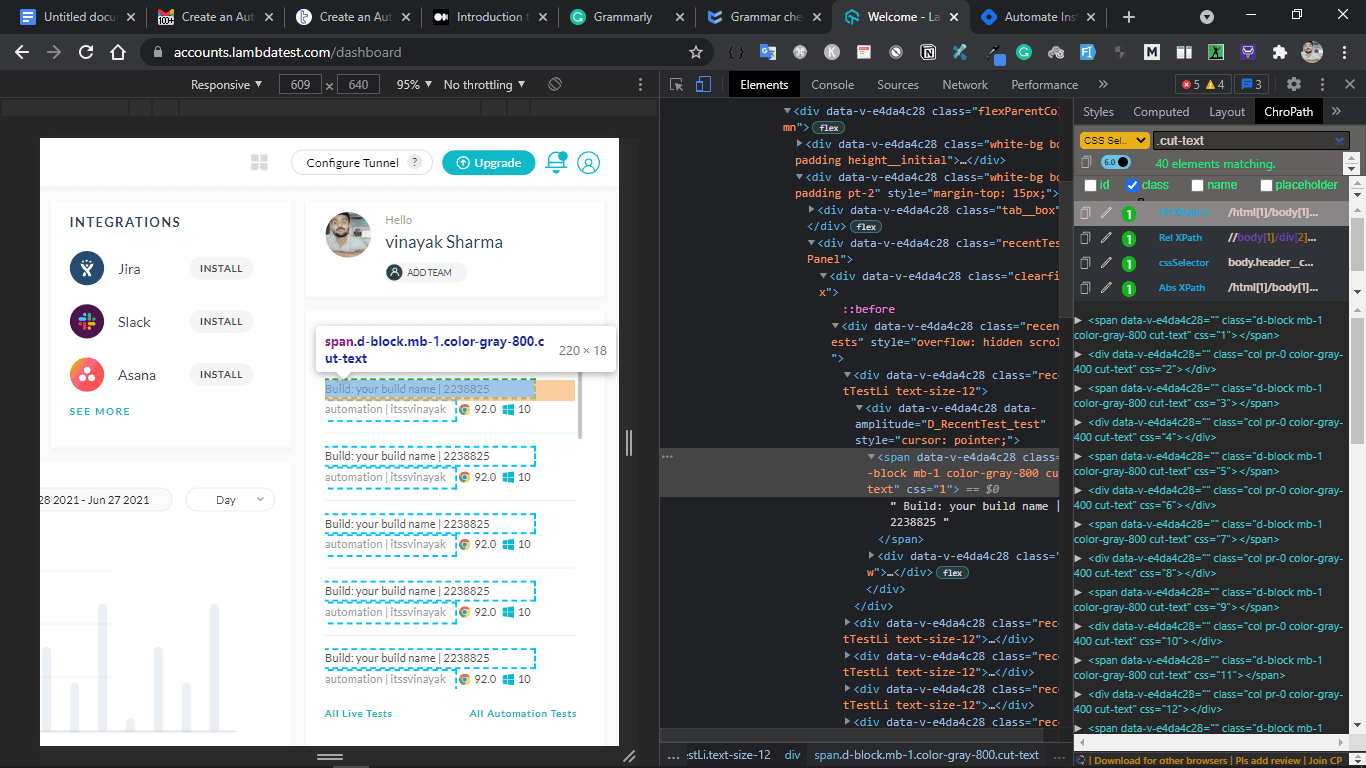
As seen above, .cut-text is a common class for all tags that we are interested to read. Next, I will perform web scraping using Selenium and Python for fetching the required information.
titles = self.driver.find_elements_by_class_name("cut-text")
Here, I clean and scrape text from the respective tags:
def get_recent_tests(self):
       titles = self.driver.find_elements_by_class_name("cut-text")
       titles_list = []
       for i in titles:
           titles_list.append(i.text)
       message = ' '.join(titles_list[0::2])
       print(message)
       send_email(message)
As seen in the implementation, we are using Selenium 3 Grid for testing. With the release of stable Selenium 4, many QA engineers are migrating Selenium automation tests to Selenium 4 grid. Before doing so, I recommend reading Selenium 3 vs Selenium 4 comparison so that tests can be migrated in a seamless manner.

Sending emails using Selenium for Python
Creating web bot using selenium with is not the only use. Python provides built-in smtplib library to send basic emails with secure connection using SMTP_SSL() and .starttls(). The smtplib library uses the RFC 821 protocol for Simple Mail Transfer Protocol (STMP).
For sending an email using the smtplib module, I have created a function that accepts a message as a string and subsequently sends an email.
def send_email(message):
   context = ssl.create_default_context()
   try:
       server = smtplib.SMTP(smtp_server,port)
       server.ehlo() # Can be omitted
       server.starttls(context=context) # Secure the connection
       server.ehlo() # Can be omitted
       server.login(sender_email, sender_password)
       server.sendmail(sender_email, receiver_email, message)
       server.close()
   except:
       print(" failed to send email ")
Putting all together, this is how the overall implementation looks like in main.py.
from selenium import webdriver
import smtplib, ssl

port = 587
smtp_server = "smtp.gmail.com"
sender_password = "<YOUR_PASSWORD>"
sender_email = "<YOUR_EMAIL>"
receiver_email = "<EMAIL_WHERE_YOU_WANT_TO_SEND>"

def send_email(message):
   context = ssl.create_default_context()
   try:
       server = smtplib.SMTP(smtp_server,port)
       server.ehlo() # Can be omitted
       server.starttls(context=context) # Secure the connection
       server.ehlo() # Can be omitted
       server.login(sender_email, sender_password)
       server.sendmail(sender_email, receiver_email, message)
       server.close()
   except:
       print(" failed to send email ")

username = "<YOUR_LAMBDATEST_USERNAME>"
access_key = "<YOUR__LAMBDATEST_ACCESS_KEY>"

class TestClass():
   def setup_method(self):
       desired_caps = {
           "build": "your build name",
           "name": "your test name",
           "platform": "Windows 10",
           "browserName": "Chrome",
           "version": "92.0",
           "selenium_version": "3.13.0",
           "geoLocation": "IN",
           "chrome.driver": "91.0",
       }
       """
       Setup remote driver
               -------
               username and access_key can be found on lt platform

       """
       self.driver = webdriver.Remote(
           command_executor="https://{}:{}@hub.lambdatest.com/wd/hub".format(
               username, access_key
           ),
           desired_capabilities=desired_caps,
       )

   # tearDown runs after each test case
   def teardown_method(self):
       self.driver.quit()

   def test_login(self):
       """
       this function logins you in lambdatest dashboard
       """
       LOGIN_URL = "https://accounts.lambdatest.com/login"
       DASHBOARD_URL = "https://accounts.lambdatest.com/dashboard"
       self.driver.get(LOGIN_URL)
       login_email = self.driver.find_element_by_xpath(
           "//input[@id='email']"
       )
       login_password = self.driver.find_element_by_xpath(
           "//input[@id='password']"
       )
       login_button = self.driver.find_element_by_xpath(
           "//button[@id='login-button']"
       )

       login_email.send_keys(email)
       login_password.send_keys(password)
       login_button.click()

       # if we are on the right page
       if self.driver.current_url == DASHBOARD_URL :
           assert True
           # time to get recent tests
           self.get_recent_tests()
       else:
           print("something went wrong !!")
           assert False

   def get_recent_tests(self):

       titles = self.driver.find_elements_by_class_name("cut-text")
       titles_list = []
       for i in titles:
           titles_list.append(i.text)
       message = ' '.join(titles_list[0::2])
       send_email(message)
Scheduling Selenium with Python Test Script
Making web bot using selenium python isn’t the main use. The scheduler allows to schedule test scripts to be run at a given point in time or under a given condition. For this task, I am using Windows Task Scheduler, which is a Windows GUI application. I am using the Win32com Library for programmatically scheduling the triggers.
Win32com is the API library, a very thin Python wrapper that allows automating Windows Applications as an instance of the Windows Task Scheduler.
Windows Task Scheduler uses COM (Component Object Model) objects. It allows controlling windows applications from another program or script. COM Objects are defined in the Windows registry. As COM objects are “objects”, they can be accessible to the test script and can be interacted with in a programmatic manner.

Here is the run down of the Python code for running the developed test script in Windows task scheduler:
- Defining win32com client from pywin32 library:
scheduler = win32com.client.Dispatch('Schedule.Service')
scheduler.Connect()
root_folder = scheduler.GetFolder('\')
task_def = scheduler.NewTask(0)
start time: Set the start time for the script
start_time = datetime.datetime.now() + datetime.timedelta(minutes=1)
Repetition.Duration: Time duration (in days) for which the program execution needs to be repeated. In this particular case, I want to run this script for 10 days.
#Repeat for 10 days
num_of_days = 10
trigger.Repetition.Duration = "P"+str(num_of_days)+"D"
Repetition.Interval: This variable tells after how much time the program needs to be executed. Here I have set to run the script after every 6 hours.
#For every 6 hour
trigger.Repetition.Interval = "PT6H"
action.Path: Path to the Python interpreter or pytest binary.
action.Path = r'C:Users
inayakselenium_testenvScriptspytest.exe'
action.Arguments: Path of the script that has to be executed.
action.Arguments = r'C:Users
inayakselenium_testmain.py'
For writing our scheduler code, let’s create a scheduler.py file.
import datetime
import win32com.client
scheduler = win32com.client.Dispatch('Schedule.Service')
scheduler.Connect()
root_folder = scheduler.GetFolder('\')
task_def = scheduler.NewTask(0)
# Start time of script
start_time = datetime.datetime.now() + datetime.timedelta(minutes=1)
# for running it one time
TASK_TRIGGER_DAILY = 1
trigger = task_def.Triggers.Create(TASK_TRIGGER_DAILY)
#Repeat for 10 day
num_of_days = 10
trigger.Repetition.Duration = "P"+str(num_of_days)+"D"
#For every 6 hour
trigger.Repetition.Interval = "PT6H"
trigger.StartBoundary = start_time.isoformat()
# Create action
TASK_ACTION_EXEC = 0
action = task_def.Actions.Create(TASK_ACTION_EXEC)
action.ID = 'TRIGGER BATCH'
action.Path = r'C:Users
inayakselenium_testenvScriptspytest.exe'
action.Arguments = r'C:Users
inayakselenium_testmain.py'
# Set parameters
task_def.RegistrationInfo.Description = 'Test Task'
task_def.Settings.Enabled = True
task_def.Settings.StopIfGoingOnBatteries = False
# Register task
# If task already running, it will be updated
TASK_CREATE_OR_UPDATE = 6
TASK_LOGON_NONE = 0
root_folder.RegisterTaskDefinition(
'Test Task', # Task name
task_def,
TASK_CREATE_OR_UPDATE,
'', # No user
'', # No password
TASK_LOGON_NONE
)

It’s A Wrap
Selenium webdriver with Python is used for applications like scraping websites or testing applications. But automation can also be used in many other ways as we have used it in our particular use-case. In this Selenium Python tutorial on web bot using selenium with python, we have seen how to create automated web bot using Selenium with Python.
In the same way, Windows Task Scheduler can be used in many ways, not just to schedule tasks for Windows applications, it also allows you to run scripts in the background without having any need to remember them.
Austin Siewert
Co-Founder, Steadfast Systems
Discovered @TestMu AI yesterday. Best browser testing tool I've found for my use case. Great pricing model for the limited testing I do 👏
2M+ Devs and QAs rely on TestMu AI
Deliver immersive digital experiences with Next-Generation Mobile Apps and Cross Browser Testing Cloud
Author
Vinayak Sharma
Blogs: 5
Vinayak Sharma is a community contributor with 4+ years of experience in backend engineering, DevOps, and technical writing. He specializes in building scalable payment and microservices systems, with hands-on experience using Node.js, Python, Kubernetes, Ansible, and Linux. Vinayak has contributed technical content on testing, automation, and backend engineering, including work as a freelance technical writer at TestMu AI and authoring 29+ articles for GeeksforGeeks. He is currently a Team Lead working on enterprise payment platforms and holds a Bachelor’s degree in Computer Science.
Reviewer
Himanshu Sheth
Reviewer
Himanshu Sheth is the Director of Marketing (Technical Content) at TestMu AI, with over 8 years of hands-on experience in Selenium, Cypress, and other test automation frameworks. He has authored more than 130 technical blogs for TestMu AI, covering software testing, automation strategy, and CI/CD. At TestMu AI, he leads the technical content efforts across blogs, YouTube, and social media, while closely collaborating with contributors to enhance content quality and product feedback loops. He has done his graduation with a B.E. in Computer Engineering from Mumbai University. Before TestMu AI, Himanshu led engineering teams in embedded software domains at companies like Samsung Research, Motorola, and NXP Semiconductors. He is a core member of DZone and has been a speaker at several unconferences focused on technical writing and software quality.


Web Bot with Selenium Python FAQs
Did you find this page helpful?
More Related Blogs
TestMu AI forEnterprise
Get access to solutions built on Enterprise
grade security, privacy, & compliance
- Advanced access controls
- Advanced data retention rules
- Advanced Local Testing
- Premium Support options
- Early access to beta features
- Private Slack Channel
- Unlimited Manual Accessibility DevTools Tests