

Power Your Software Testing with AI Agents and Cloud
The Native AI-Agentic Cloud Platform to Supercharge Quality Engineering. Test Intelligently and Ship Faster.


- TestMu AI (Formerly LambdaTest)
- /
- Blog
- /
- A Step-by-Step Robot Framework Tutorial
A Step-by-Step Robot Framework Tutorial
Master automation testing with Robot Framework Tutorial with Selenium and Python. Learn keyword-driven testing & achieve Agile, TDD goals with Robot Framework.
Last Updated on:
The Robot Framework is a popular Python-based open-source tool to automate websites and web applications. The combination of the Robot Framework and Selenium can be harnessed for web automation testing.
The SeleniumLibrary in the Robot Framework provides a set of keywords that help in writing high-level readable test cases for interacting with WebElements in the Document Object Model (DOM).
In this Robot Framework tutorial, we deep dive into the nuances of web automation testing with keyword-driven testing with Robot Framework in Python.
Overview
To automate web testing, write human-readable, keyword-driven test cases using Robot Framework and run them locally or scale them across real browsers on the TestMu AI cloud platform. This approach separates test logic from execution, enabling both technical and non-technical teams to build portable automation suites.
- Keyword-driven testing: Robot Framework is a Python-based, open-source framework that uses a four-layer model to separate test logic from execution, allowing technical and non-technical teams to write portable automation suites.
- Web element interaction: SeleniumLibrary provides high-level, readable keywords to interact with WebElements in the DOM, simplifying web browser automation without requiring raw Selenium scripting.
- Cloud grid execution: TestMu AI is an AI-powered test execution platform that runs automated tests on an online Selenium Grid across real browsers and operating systems using your account credentials.
- Development environment: VS Code is the preferred integrated development environment for setting up, writing, and managing Robot Framework projects and virtual environments.
- Alternative IDE: PyCharm supports Robot Framework test development when configured with the IntelliBot plugin, serving as an alternative integrated development environment.
- Core scripting: Python is the underlying programming language required to run Robot Framework, manage virtual environments, and write custom keyword libraries.
- Package management: pip is the package installer used to install Robot Framework, SeleniumLibrary, and other project dependencies from PyPI.
- Driver automation: webdriver-manager is a helper library that manages browser drivers like ChromeDriver, EdgeDriver, and GeckoDriver, which is required for Selenium 4.9 and above.
- Parallel execution: pabot is a library installed alongside webdriver-manager to support parallel test execution across different browsers to optimize test suite run times.
What Is Robot Framework?
Robot Framework is an open-source, keyword-driven test automation framework widely used for Robotic Process Automation (RPA) and acceptance testing.
Akin to the Gherkin syntax, the Robot Framework uses a simple, human-readable syntax, thereby enabling both technical and non-technical users to write effective test cases. Third-party Robot Framework libraries like SeleniumLibrary and AppiumLibrary can be leveraged for web browser testing and mobile app testing, respectively. For web testing there is a second option worth weighing, and the keyword sets differ, as our comparison of SeleniumLibrary vs the Browser library sets out.


Note: Run Robot Framework tests across 10,000+ real browsers and OS combinations on TestMu AI cloud. No local setup, instant parallel execution. Try TestMu AI free.
Robot Framework Architecture
Robot Framework is technology-independent and has a highly modular architecture. It allows you to create high-level keywords from the existing built-in keywords and test libraries in popular programming languages.
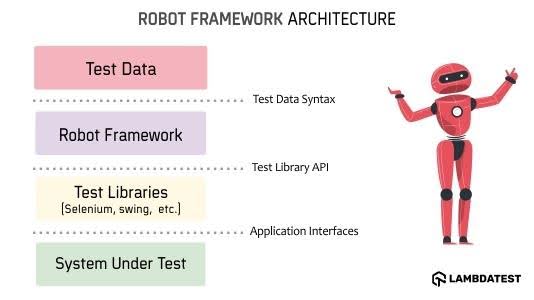
Here’s a high-level overview of its architecture:
- Test Data: The first layer of Robot Framework. Test data in tabular format is easy to maintain. RF processes it on execution and generates HTML and XML reports with detailed execution logs for every test case line.
- Robot Framework: The primary advantage of the Robot Framework is that it is agnostic of the target under test. The interaction with the layers below the framework can be done using the libraries [built-in or user-created] that make use of application interfaces.
- Test Libraries: The Robot Framework interacts only with the other layers in the system using libraries, which makes the implemented code more portable and maintainable.
- System Under Test: This is the actual target (i.e., website or web app) on which the testing activity is performed. Libraries act as an interface between the Robot Framework Core and the system under test.
Robot Framework for Beginners: What to Know Before Starting
Robot Framework has a gentler learning curve than raw Selenium scripting, but a few things will save you significant setup time if you know them upfront.
- Python basics are enough. You need to understand variables, functions, and loops. You do not need prior Selenium WebDriver experience. SeleniumLibrary wraps the browser API behind readable keywords like Click Element and Input Text.
- Tests live in .robot files, not .py files. The syntax uses four sections: Settings, Variables, Keywords, and Test Cases. Each section is separated by two or more spaces, not commas or brackets.
- The robot command does everything. Running robot Tests/ executes all test files in the folder, generates an HTML report (report.html), an XML log (output.xml), and a detailed log (log.html) automatically.
- Libraries extend what keywords are available. The built-in BuiltIn library handles logging and assertions. SeleniumLibrary adds browser keywords. OperatingSystem handles file operations. You import only what your tests need.
- Cloud execution requires two environment variables. Set LT_USERNAME and LT_ACCESS_KEY from your TestMu AI dashboard, then set EXEC_PLATFORM=cloud. No code changes are needed to switch from local to cloud.
Prerequisites for Robot Framework Testing
1. Install the VS Code IDE (Preferred) or PyCharm Community Edition. However, you need to install the Intellibot Plugin in case you opt for PyCharm Community Edition
To install the IntelliBot Plugin in PyCharm, go to File -> Settings -> Plugins -> Search for Intellibot in the plugins marketplace -> Install the plugin -> Restart the IDE
In our case, we will create the project in the VS Code IDE. For better management of dependencies and environments, it is recommended that we use a virtual environment (venv).
Note: Please replace pip3 with pip depending on the pip version installed on your machine.
2. Run the commands virtualenv venv and source venv/bin/activate on the terminal to create the virtual environment.
3. Now that the virtual environment is ready, let’s install the Robot Framework library by triggering pip3 install robotframework on the terminal.
For our example project, we will add all the required libraries in the requirements.txt file. Run the command robot --version to check the version of the installed Robot Framework. As of May 2026, the latest stable version of Robot Framework is 7.4.2 on PyPI.
4. Run the command pip3 install robotframework-seleniumlibrary on the terminal for installing the SeleniumLibrary. The latest version of the SeleniumLibrary is 6.9.0 on PyPI.
To verify the installation of the SeleniumLibrary, run the command pip3 show robotframework-seleniumlibrary.
5. Apart from Robot Framework and SeleniumLibrary, we will also install webdriver-manager and robotframework-pabot libraries. Add all dependencies to requirements.txt for reproducible installs.
Getting Started With Robot Framework Tutorial
In this Robot Framework tutorial, we will run four web automation tests using Robot Framework and SeleniumLibrary. Before doing so, we will set up the project and execution environment.
Understanding Project Structure
Test execution with the Robot Framework and SeleniumLibrary will be performed with frameworks installed on local machines and a cloud grid like TestMu AI. In later sections of this Robot Framework tutorial, we will discuss the integral nuances of cloud execution.
TestMu AI is an AI-powered test execution platform that lets you perform Python automated tests using Robot Framework on an online Selenium Grid of various real browsers and OS environments.
The tests demonstrating the usage of the SeleniumLibrary with Robot Framework are located in the Tests/Common folder.
- Resources/PageObject: Consists of three sub-directories mentioned below:
- Common: Contains the file LambdaTestStatus.py that helps in updating test execution status on the TestMu AI Web Automation dashboard.
- KeyDefs/Common.robot: Common.robot houses custom keywords for realizing actions like opening/closing browsers, clicking menu items, and more.
- KeyDefs/SeleniumDrivers.robot: Houses custom keywords for managing ChromeDriver, EdgeDriver, and GeckoDriver via the webdriver-manager library. Required for Selenium 4.9 and above (see Robot Community Thread). Full implementation: SeleniumDrivers.robot.
- Locators/Locators.py: As the name indicates, this file contains all the locators used for locating elements on the document under test. We will touch base on a few of these locators in the further sections of this Robot Framework tutorial.
- Tests/Common: Consists of four .robot files where we have implemented the actual tests
- pyproject.toml: Configuration file for build management purposes
- requirements.txt: File that contains dependencies (or external libraries) to be installed for the project
After creating a virtual environment (venv), run the commands poetry install --no-root and pip3 install -r requirements.txt to install the dependencies required for the project.
Lastly, all the tests that are a part of this Robot Framework project can be executed on the local machine as well as the TestMu AI cloud grid.
- Execution on the local machine: export EXEC_PLATFORM=local
- Execution on the TestMu AI cloud grid: export EXEC_PLATFORM=cloud
When executing tests on the TestMu AI cloud grid, you also need to export environment variables LT_USERNAME and LT_ACCESS_KEY, which can be obtained from the TestMu AI Security page. The combination of LT_USERNAME and LT_ACCESS_KEY are used for authentication when tests are run on TestMu AI.
Defining Variables and Resources
A Resource file provides modularization for your tests. It holds custom keywords, variable definitions, and paths to external libraries, all shareable across test suites. In the example project, Common.robot houses keywords for opening and closing the browser on both local machines and the TestMu AI cloud grid, while SeleniumDrivers.robot provides keywords for managing ChromeDriver, EdgeDriver, and GeckoDriver on Selenium 4.9 and above.
The Variables keyword defines global variables accessible across all test suites. In the example project, element locators are stored in Locators.py and imported into each test file using the Variables keyword in the Settings section.
Libraries are imported with the Library setting under Settings. Use BuiltIn for logging and assertions, SeleniumLibrary for browser keywords, and OperatingSystem for file operations. You can also import libraries at runtime with the Import Library keyword from BuiltIn.
Locating WebElements
Before handling WebElements in Selenium Python, it is essential to locate them using the appropriate web locator. Similar to web locators in Selenium, the SeleniumLibrary in Robot Framework also supports all popular locators such as ID, XPath, Name, Link Text, Partial Link Text, etc
The locator is mostly provided as a string using the locator syntax. As stated in the official documentation of SeleniumLibrary, the locator can either be specified with a prefix or it can just be implicit. The explicit locator is specified using either locator-strategy:value or strategy=value.
For example, the XPath of an element can be specified as xpath:
Test Scenario:
- Navigate to the TestMu AI Sample ToDo App.
- Check on the initial two ToDo items.
- Add a new item, “Yey Let’s add it to list”.
- Raise assert if the new item is not added to the list.
Implementation:
Filename: test_locate_elements.robot
*** Settings ***


Resource    ../../Resources/PageObject/KeyDefs/Common.robot
Resource    ../../Resources/PageObject/KeyDefs/SeleniumDrivers.robot
Variables   ../../Resources/PageObject/Locators/Locators.py


# Test Teardown  Common.Close local test browser


Library     BuiltIn
Library     OperatingSystem


*** Variables ***


${site_url}         https://lambdatest.github.io/sample-todo-app/


*** Comments ***
# Configuration for first test scenario


*** Variables ***
${EXEC_PLATFORM}  %{EXEC_PLATFORM}


&{lt_options_local_1}
   ...  browserName=Chrome


${BROWSER_LOCAL_1}        ${lt_options_local_1['browserName']}


*** Comments ***
# Configuration for second test scenario


*** Variables ***


&{lt_options_local_2}
   ...  browserName=Edge


${BROWSER_LOCAL_2}        ${lt_options_local_2['browserName']}


&{lt_options_local_3}
   ...  browserName=Firefox


${BROWSER_LOCAL_3}        ${lt_options_local_3['browserName']}


*** Variables ***


&{lt_options_cloud_1}
   ...  browserName=Chrome
   ...  platformName=Windows 11
   ...  browserVersion=latest
   ...  visual=true
   ...  w3c=true
   ...  console=true
   ...  geoLocation=US
   ...  name=[ToDoApp - 1] ToDoApp with Robot framework
   ...  build=[ToDoApp Demo - 1] ToDoApp with Robot framework
   ...  project=[ToDoApp Project - 1] ToDoApp with Robot framework


${BROWSER_CLOUD_1}        ${lt_options_cloud_1['browserName']}
&{CAPABILITIES_CLOUD_1}     LT:Options=&{lt_options_cloud_1}


*** Comments ***
# Configuration for second test scenario


*** Variables ***


&{lt_options_cloud_2}
   ...  browserName=Firefox
   ...  platformName=Windows 11
   ...  browserVersion=latest
   ...  visual=true
   ...  w3c=true
   ...  console=true
   ...  geoLocation=US
   ...  name=[ToDoApp - 2] ToDoApp with Robot framework
   ...  build=[ToDoApp Demo - 2] ToDoApp with Robot framework
   ...  project=[ToDoApp Project - 2] ToDoApp with Robot framework


${BROWSER_CLOUD_2}        ${lt_options_cloud_2['browserName']}
&{CAPABILITIES_CLOUD_2}     LT:Options=&{lt_options_cloud_2}


&{lt_options_cloud_3}
   ...  browserName=Chrome
   ...  platformName=Windows 10
   ...  browserVersion=latest-2
   ...  visual=true
   ...  w3c=true
   ...  console=true
   ...  geoLocation=US
   ...  name=[ToDoApp - 3] ToDoApp with Robot framework
   ...  build=[ToDoApp Demo - 3] ToDoApp with Robot framework
   ...  project=[ToDoApp Project - 3] ToDoApp with Robot framework


${BROWSER_CLOUD_3}        ${lt_options_cloud_3['browserName']}
&{CAPABILITIES_CLOUD_3}     LT:Options=&{lt_options_cloud_3}


*** Keywords ***


Test Teardown
   IF  '${EXEC_PLATFORM}' == 'local'
       Log To Console  Closing the browser on local machine
       Common.Close local test browser
   ELSE IF     '${EXEC_PLATFORM}' == 'cloud'
       Log To Console  Closing the browser on cloud grid
       Common.Close test browser
   END


*** Test Cases ***


Example 1: [ToDo] Demo with Robot framework
   [tags]  ToDo App Automation - 1
   [Timeout]   ${TIMEOUT}
   # Get Environment Variables
   Log To Console      Tests executed on: ${EXEC_PLATFORM}
   IF  '${EXEC_PLATFORM}' == 'local'
       ${chrome_driver_path}=    Update Chrome Webdriver
       # Open Browser    ${site_url}    chrome    executable_path=${chrome_driver_path}
       Open local test browser     ${site_url}     ${BROWSER_LOCAL_1}  ${chrome_driver_path}
   ELSE
       Open test browser   ${site_url}     ${BROWSER_CLOUD_1}      ${lt_options_cloud_1}
   END
   Maximize Browser Window
   Sleep  3s
   Page should contain element  ${FirstItem}
   Page should contain element  ${SecondItem}


   Click button  ${FirstItem}
   Click button  ${SecondItem}

   Input text  ${ToDoText}  ${NewItemText}
   Click button  ${AddButton}
   ${response}    Get Text    ${NewAdditionText}
   Should Be Equal As Strings    ${response}    ${NewItemText}
   Sleep  5s
       Log    Completed - Example 1: [ToDo] Parallel Testing with Robot framework
   [Teardown]  Test Teardown


Example 2: [ToDo] Demo with Robot framework
   [tags]  ToDo App Automation - 2
   [Timeout]   ${TIMEOUT}
   # Get Environment Variables
   Log To Console      Tests executed on: ${EXEC_PLATFORM}
   IF  '${EXEC_PLATFORM}' == 'local'
       ${edge_driver_path}=   Update Edge Webdriver
       # Open Browser    ${site_url}    edge   executable_path=${edge_driver_path}
       Open local test browser     ${site_url}     ${BROWSER_LOCAL_2}  ${edge_driver_path}
   ELSE IF  '${EXEC_PLATFORM}' == 'cloud'
       Open test browser   ${site_url}     ${BROWSER_CLOUD_2}      ${lt_options_cloud_2}
   END
   Maximize Browser Window
   Sleep  3s
   Page should contain element  ${FirstItem}
   Page should contain element  ${SecondItem}
   Page should contain element  ${FifthItem}


   Click button  ${FirstItem}
   Click button  ${SecondItem}
   Click button  ${FifthItem}

   Input text  ${ToDoText}  ${NewItemText}
   Click button  ${AddButton}
   ${response}    Get Text    ${NewAdditionText}
   Should Be Equal As Strings    ${response}    ${NewItemText}
   Sleep  5s
       Log    Completed - Example 2: [ToDo] Parallel Testing with Robot framework
   [Teardown]  Test Teardown


Example 3: [ToDo] Demo with Robot framework
   [tags]  ToDo App Automation - 3
   [Timeout]   ${TIMEOUT}
   # Get Environment Variables
   Log To Console      Tests executed on: ${EXEC_PLATFORM}
   IF  '${EXEC_PLATFORM}' == 'local'
       ${firefox_driver_path}=   Update Firefox Webdriver
       # Open Browser    ${site_url}    edge   executable_path=${edge_driver_path}
       Open local test browser     ${site_url}     ${BROWSER_LOCAL_3}  ${firefox_driver_path}
   ELSE IF  '${EXEC_PLATFORM}' == 'cloud'


       Open test browser   ${site_url}     ${BROWSER_CLOUD_3}      ${lt_options_cloud_3}
   END
   Maximize Browser Window
   Sleep  3s
   Page should contain element  ${FirstItem}
   Page should contain element  ${SecondItem}
   Page should contain element  ${FifthItem}


   Click button  ${FirstItem}
   Click button  ${SecondItem}
   Click button  ${FifthItem}

   Input text  ${ToDoText}  ${NewItemText}
   Click button  ${AddButton}
   ${response}    Get Text    ${NewAdditionText}
   Should Be Equal As Strings    ${response}    ${NewItemText}
   Sleep  5s
       Log    Completed - Example 3: [ToDo] Parallel Testing with Robot framework
   [Teardown]  Test Teardown

Code Walkthrough:
- Capabilities setup: lt_options_cloud_1 holds browser options from the TestMu AI Capabilities Generator, nested under LT:Options inside CAPABILITIES_CLOUD_1 and passed to Open test browser.
- Platform branching: The EXEC_PLATFORM environment variable controls execution path. Set to local to use a local driver path (required for Selenium 4.9+), or cloud to run on the TestMu AI grid with no code changes.
- Teardown: The Test Teardown keyword calls either Close local test browser or Close test browser based on EXEC_PLATFORM, ensuring browsers are cleaned up after each test.
- Assertions: Page Should Contain Element confirms elements are present; Input Text types into fields; Should Be Equal As Strings validates that the new ToDo item was added correctly. The test is replicated three times for parallel execution across Chrome, Firefox, and Edge.
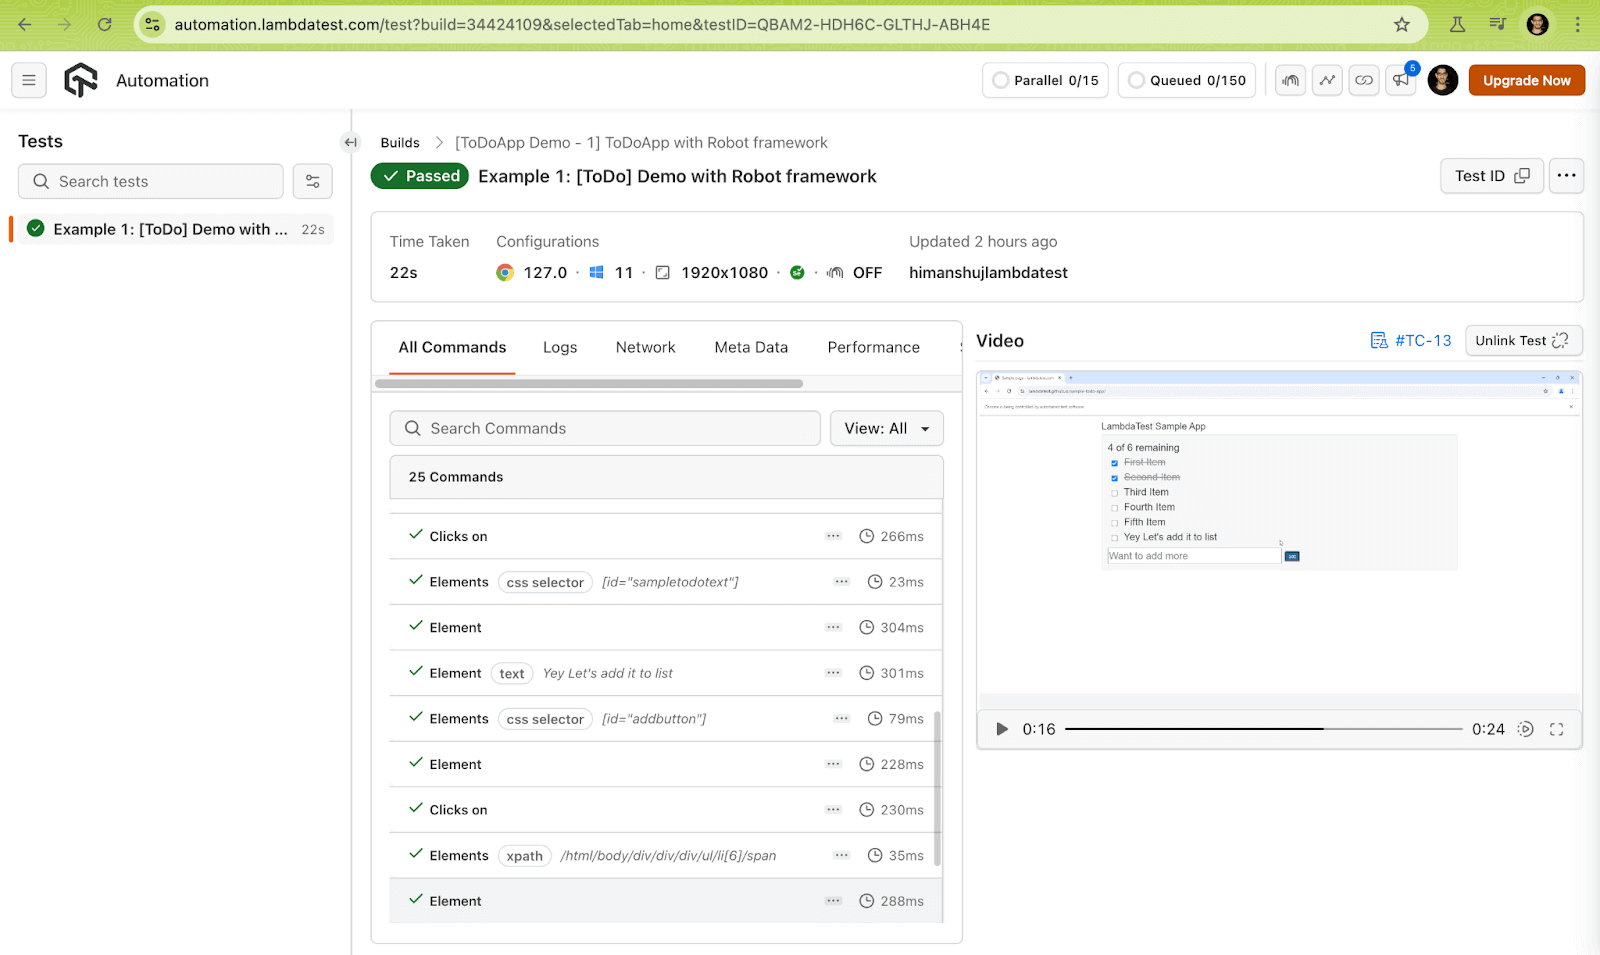
Test Execution: robot Tests/Common/test_locate_elements.robot
Handling Keyboard Actions
When handling keyboard actions in Selenium WebDriver, entering text in text boxes, simulating key presses, and performing other frequently used actions are common actions. Using appropriate keywords from the SeleniumLibrary, you can also navigate through different WebElements on the page.
The Press Keys keyword simulates key presses (or a combination of presses) on the WebElement or on the active browser. It can also be used to press special keys like RETURN, ALT, ARROW_DOWN, ARROW_UP, etc. or a combination of these normal and special keys.
Like SendKeys in Selenium, the Input Text keyword of SeleniumLibrary lets you enter text in the text field located with the appropriate locator. Similarly, the Input Text Into Alert keyword helps in entering text in the alert box once the context is switched to the alert box (or window).
Test Scenario:
- Navigate to the TestMu AI Selenium Playground website.
- Locate the element labeled Input Form Submit, click on the element
- Enter appropriate data (with Input Text and Press Keys keywords)
- Raise assert in case there is any failure.
Implementation:
Filename: test_keyboard_actions.robot
*** Settings ***


Resource    ../../Resources/PageObject/KeyDefs/Common.robot
Resource    ../../Resources/PageObject/KeyDefs/SeleniumDrivers.robot
Variables   ../../Resources/PageObject/Locators/Locators.py


Test Teardown  Common.Close local test browser


Library     BuiltIn
Library     OperatingSystem


*** Variables ***


${site_url_1}       https://www.testmuai.com/selenium-playground/


*** Comments ***
# Configuration for first test scenario


*** Variables ***
${EXEC_PLATFORM}  %{EXEC_PLATFORM}


&{lt_local_options}
   ...  browserName=Chrome


${BROWSER_LOCAL}            ${lt_local_options['browserName']}


&{lt_cloud_options}
   ...  browserName=Chrome
   ...  platformName=MacOS Monterey
   ...  browserVersion=latest-4
   ...  visual=true
   ...  w3c=true
   ...  geoLocation=US
   ...  name=[Playground - 1] Parallel Testing with Robot framework
   ...  build=[Playground Demo - 1] Parallel Testing with Robot framework
   ...  project=[Playground Project - 1] Parallel Testing with Robot framework


${BROWSER_CLOUD}            ${lt_cloud_options['browserName']}
&{CAPABILITIES_CLOUD}       LT:Options=&{lt_cloud_options}


*** Keywords ***


Test Teardown
   IF  '${EXEC_PLATFORM}' == 'local'
       Log To Console  Closing the browser on local machine
       Common.Close local test browser
   ELSE IF     '${EXEC_PLATFORM}' == 'cloud'
       Log To Console  Closing the browser on cloud grid
       Common.Close test browser
   END


*** Test Cases ***


Example 1: [Playground] Send Keys Demo with Robot Framework
   [tags]  Selenium Playground Automation
   [Timeout]   ${TIMEOUT}
   # Get Environment Variables
   Log To Console      Tests executed on: ${EXEC_PLATFORM}
   IF  '${EXEC_PLATFORM}' == 'local'
       ${chrome_driver_path}=   Update Chrome Webdriver
       # Open local test browser   ${site_url_1}       ${BROWSER}
       Open local test browser     ${site_url_1}       ${BROWSER_LOCAL}    ${chrome_driver_path}
   ELSE IF  '${EXEC_PLATFORM}' == 'cloud'
       # [ WARN ] desired_capabilities has been deprecated and removed.
       # Please use options to configure browsers as per documentation.
       # Open test browser ${site_url_1}       ${BROWSER_CLOUD}        ${CAPABILITIES_CLOUD}
       Open test browser   ${site_url_1}       ${BROWSER_CLOUD}        ${lt_cloud_options}
   END
   Maximize Browser Window
   Page should contain element  xpath://a[.='Input Form Submit']


   Click link  ${SubmitButton}
   Page should contain element  ${Name}
   # Enter details in the input form


   # Name
   Input text  ${Name}   TestName
   # Email
   Input text  ${email}       testing@gmail.com
       # Password
   Input text  ${passwd}       Password1
   # Company
   Input text  ${company}      LambdaTest
   # Website
   Input text  ${website}      https://www.testmuai.com
   # Country
   select from list by value    ${country}     US
       # City
   Input text  ${city}       San Jose
   # Address 1
   Input text  ${address1}      Googleplex, 1600 Amphitheatre Pkwy
   # Website
   Input text  ${address2}       Mountain View, CA 94043
   # State
   Input text    ${state}          California
       # City
   Input text  ${city}       San Jose
   # Zip Code
   Input text  ${zipcode}      94088
   Sleep  5s


   Click button      ${FinalSubmission}
   Execute JavaScript    window.scrollTo(0, 0)
   Page should contain  ${SuccessText}
   Sleep  2s
       Log    Completed - Example 2: [Playground] Parallel Testing with Robot framework


   [Teardown]  Test Teardown


# This example is repetitive, need to have better organization for actual code!
Example 2: [Playground] Press Keys Demo with Robot Framework
   [tags]  Selenium Playground Automation
   [Timeout]   ${TIMEOUT}
   # Get Environment Variables
   Log To Console      Tests executed on: ${EXEC_PLATFORM}
   IF  '${EXEC_PLATFORM}' == 'local'
       ${chrome_driver_path}=   Update Chrome Webdriver
       # Open local test browser   ${site_url_1}       ${BROWSER}
       Open local test browser     ${site_url_1}       ${BROWSER_LOCAL}    ${chrome_driver_path}
   ELSE IF  '${EXEC_PLATFORM}' == 'cloud'
       # [ WARN ] desired_capabilities has been deprecated and removed.
       # Please use options to configure browsers as per documentation.
       # Open test browser ${site_url_1}       ${BROWSER_CLOUD}        ${CAPABILITIES_CLOUD}
       Open test browser   ${site_url_1}       ${BROWSER_CLOUD}        ${lt_cloud_options}
   END
   Maximize Browser Window
   Page should contain element  xpath://a[.='Input Form Submit']


   Click link  ${SubmitButton}
   Page should contain element  ${Name}
   # Enter details in the input form


   # Name
   Press Keys  ${Name}   Himanshu+SPACE+Sheth
   # Email
   Press Keys  ${email}       testing@gmail.com
   # Password
   Press Keys  ${passwd}       Password1
   # Company
   Press Keys  ${company}      LambdaTest
   # Website
   Press Keys  ${website}      https://www.testmuai.com
   # Country
   select from list by value    ${country}     US
   # City
   Press Keys  ${city}       San Jose
   # Address 1
   Press Keys  ${address1}      Googleplex, 1600 Amphitheatre Pkwy
   # Website
   Press Keys  ${address2}       Mountain View, CA 94043
   # State
   Press Keys    ${state}          California
   # Zip Code
   Press Keys  ${zipcode}      94088
   Sleep  5s


   Click button      ${FinalSubmission}
   Execute JavaScript    window.scrollTo(0, 0)
   Page should contain  ${SuccessText}
   Sleep  2s
       Log    Completed - Example 2: [Playground] Parallel Testing with Robot framework


   [Teardown]  Test Teardown
Code Walkthrough:
Navigate to the TestMu AI Selenium Playground website and locate the element Input Form Submit with the XPath locator. Since maximizing the browser window is one of the best practices of Selenium, we first maximize the browser window with the Maximize Browser Window keyword.
Once the element is located, simulate the click operation by invoking the Click Link keyword on the located element. Since we are entering text in the text box, there is an option to use the Input text keyword with the element locator and the text to be entered in it.
Similarly, the Press Keys keyword with the element locator and text/key combination can be used to enter text. Here, we are entering the text Himanshu and Sheth with a space between the words. The Select From List By Value keyword is used to select the appropriate option (e.g., US) from the drop-down list located with the Name locator.
Click on the Submit button (located with the XPath locator) by invoking the Click Button keyword of the SeleniumLibrary. The JavaScript method window.scroll(0, 0) scrolls to the top of the page. The Execute JavaScript keyword helps in executing the JS code supplied to it as an argument.
Finally, the test is considered as passed if the web page contains the text Thanks for contacting us, we will get back to you shortly.
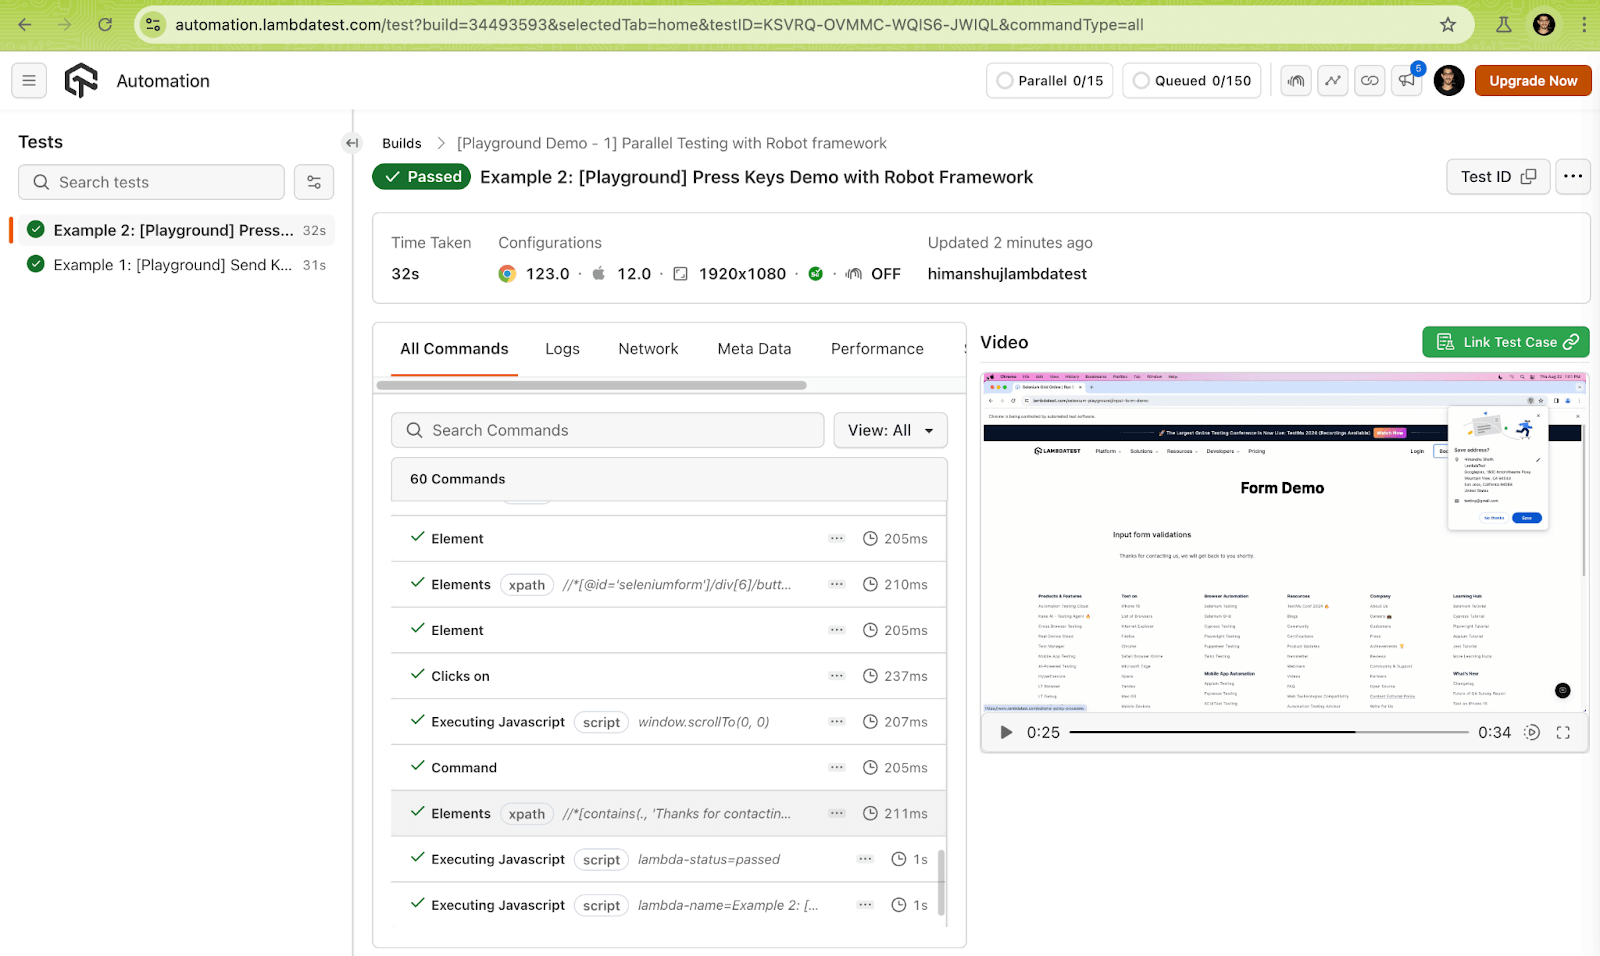
Test Execution: robot Tests/Common/test_keyboard_actions.robot

Handling Mouse Actions
For handling mouse actions in Selenium WebDriver, the Robot Framework offers flexibility to simulate mouse interactions in conjunction with SeleniumLibrary. It provides keywords that let you perform mouse actions like mouse click, mouse down, mouse over, drag and drop, etc. on the respective elements on the page.
A simple example of mouse action is moving over a WebElement and clicking on the respective element. In this section of the Robot Framework tutorial, we look at how to perform mouse actions like drag and drop and click on a sub-menu item using a combination of keywords provided by SeleniumLibrary.
Test Scenario 1 (Drag and Drop):
- Navigate to the Drag and Drop Demo page of the Selenium Playground website.
- Locate Draggable items.
- Drag and drop the located items in the droppable box.
Test Scenario 2 (Mouse Over Operations):
- Navigate to the TestMu AI eCommerce Playground website.
- Hover over the menu item with the text AddOns.
- Click on the sub-menu item with text Designs.
- Raise an assert if the target page does not open.
Implementation:
Filename: test_mouse_actions.robot
*** Settings ***


Resource    ../../Resources/PageObject/KeyDefs/Common.robot
Resource    ../../Resources/PageObject/KeyDefs/SeleniumDrivers.robot
Variables   ../../Resources/PageObject/Locators/Locators.py


Test Teardown  Common.Close local test browser


Library     BuiltIn
Library     Collections


*** Variables ***


${site_url_1}       https://www.testmuai.com/selenium-playground/drag-and-drop-demo/
${site_url_2}       https://ecommerce-playground.lambdatest.io/


*** Comments ***
# Configuration for first test scenario


*** Variables ***


${EXEC_PLATFORM}  %{EXEC_PLATFORM}


&{lt_local_options}
   ...  browserName=Chrome


${BROWSER_LOCAL}            ${lt_local_options['browserName']}


&{lt_cloud_options}
   ...  browserName=Chrome
   ...  platformName=MacOS Monterey
   ...  browserVersion=latest-1
   ...  visual=true
   ...  console=true
   ...  w3c=true
   ...  geoLocation=US
   ...  name=[ECommerce Test - 1] Action Chains with Robot framework
   ...  build=[ECommerce Demo - 1] Action Chains with Robot framework
   ...  project=[ECommerce Project - 1] Action Chains with Robot framework


${BROWSER_CLOUD}        ${lt_cloud_options['browserName']}
&{CAPABILITIES_CLOUD}     LT:Options=&{lt_cloud_options}


${expected_title}   Designs


*** Keywords ***


Test Teardown
   IF  '${EXEC_PLATFORM}' == 'local'
       Log To Console  Closing the browser on local machine
       Common.Close local test browser
   ELSE IF     '${EXEC_PLATFORM}' == 'cloud'
       Log To Console  Closing the browser on cloud grid
       Common.Close test browser
   END


*** Test Cases ***


Example 1: [Playground] Drag & Drop Mouse Operations Demo with Robot Framework
   [tags]  Drag & Drop Mouse Operations Demo
   [Timeout]   ${TIMEOUT}


   # Get Environment Variables
   Log To Console      Tests executed on: ${EXEC_PLATFORM}
   IF  '${EXEC_PLATFORM}' == 'local'
       ${chrome_driver_path}=   Update Chrome Webdriver
       # Open local test browser   ${site_url_1}       ${BROWSER}
       Open local test browser     ${site_url_1}       ${BROWSER_LOCAL}    ${chrome_driver_path}
   ELSE IF  '${EXEC_PLATFORM}' == 'cloud'
       Open test browser   ${site_url_1}       ${BROWSER_CLOUD}        ${lt_cloud_options}
   END
   Maximize Browser Window


   Wait Until Element Is Visible  ${xDraggableFrame_1}  timeout=2
   Wait Until Element Is Visible  ${xDraggableFrame_2}  timeout=2
   Wait Until Element Is Visible  ${xDroppableFrame}  timeout=2


   ${elem_draggable_1} =   Get WebElement  ${xDraggableFrame_1}
   ${elem_draggable_2} =   Get WebElement  ${xDraggableFrame_2}
   ${elem_droppable} =     Get WebElement  ${xDroppableFrame}


   Drag And Drop  ${elem_draggable_1}  ${elem_droppable}
   Sleep  2s
   Drag And Drop  ${elem_draggable_2}  ${elem_droppable}
   Sleep  2s
   Log    Completed - Drag & Drag Demo with Robot Framework


   [Teardown]  Test Teardown


Example 2: [Playground] Action Chains Robot framework
   [tags]  Action Chains Robot Framework
   [Timeout]   ${TIMEOUT}
   # Get Environment Variables
   Log To Console      Tests executed on: ${EXEC_PLATFORM}
   IF  '${EXEC_PLATFORM}' == 'local'
       # Open local test browser   ${site_url_2}       ${BROWSER}
       ${chrome_driver_path}=    Update Chrome Webdriver
       # Open Browser    ${site_url_2}    chrome    executable_path=${chrome_driver_path}
       Open local test browser     ${site_url_2}       ${BROWSER_LOCAL}    ${chrome_driver_path}
   ELSE IF  '${EXEC_PLATFORM}' == 'cloud'
       Open test browser   ${site_url_2}       ${BROWSER_CLOUD}        ${lt_cloud_options}
   END
   Maximize Browser Window
   Move to Element
   Sleep   3s
   Click Menu Item
   Sleep   2s
   #Check the new page title
   ${curr_page_title}  Get Title
   Log To Console      ${curr_page_title}
   Should Be Equal As Strings  ${curr_page_title}  ${expected_title}


   # Check if a particular element is present on the page
   ${status}=  Page should contain element     ${pageMessage}
   Log To Console      ${status}
   Run Keyword If  '${status}' != 'None'  Fail  Element not found on page


   [Teardown]  Test Teardown
Code Walkthrough (Drag and Drop):
Once the URL under test is loaded, the Wait Until Element Is Visible keyword is invoked to check if the two draggable and one droppable item are visible in the DOM.
Once we have checked that the elements are visible, the Get WebElement keyword is used for locating those elements with the XPath locator.
Now that the elements are located, we can drag them to the target location with the Drag And Drop keyword of SeleniumLibrary.
Code Walkthrough (Mouse Over Operations):
Once the TestMu AI eCommerce Playground is loaded, we first move to the element (or perform a mouse over) to the target menu. As seen in the implementation of the user-defined Move to Element keyword, the Menu element is located with the Get WebElement keyword and Partial Link Text locator.
Once the element is located, the Mouse Over keyword is invoked to simulate the hover operation on the located element.
Once the menu opens up, we first locate the sub-menu item in the located menu using the Partial Link locator. The Click Link keyword helps in clicking on the link/sub-menu item.
Finally, get the title of the opened page with the Get Title keyword. The Should Be Equal As Strings keyword of the BuiltIn library marks the result as Failed if the two strings are not equal.
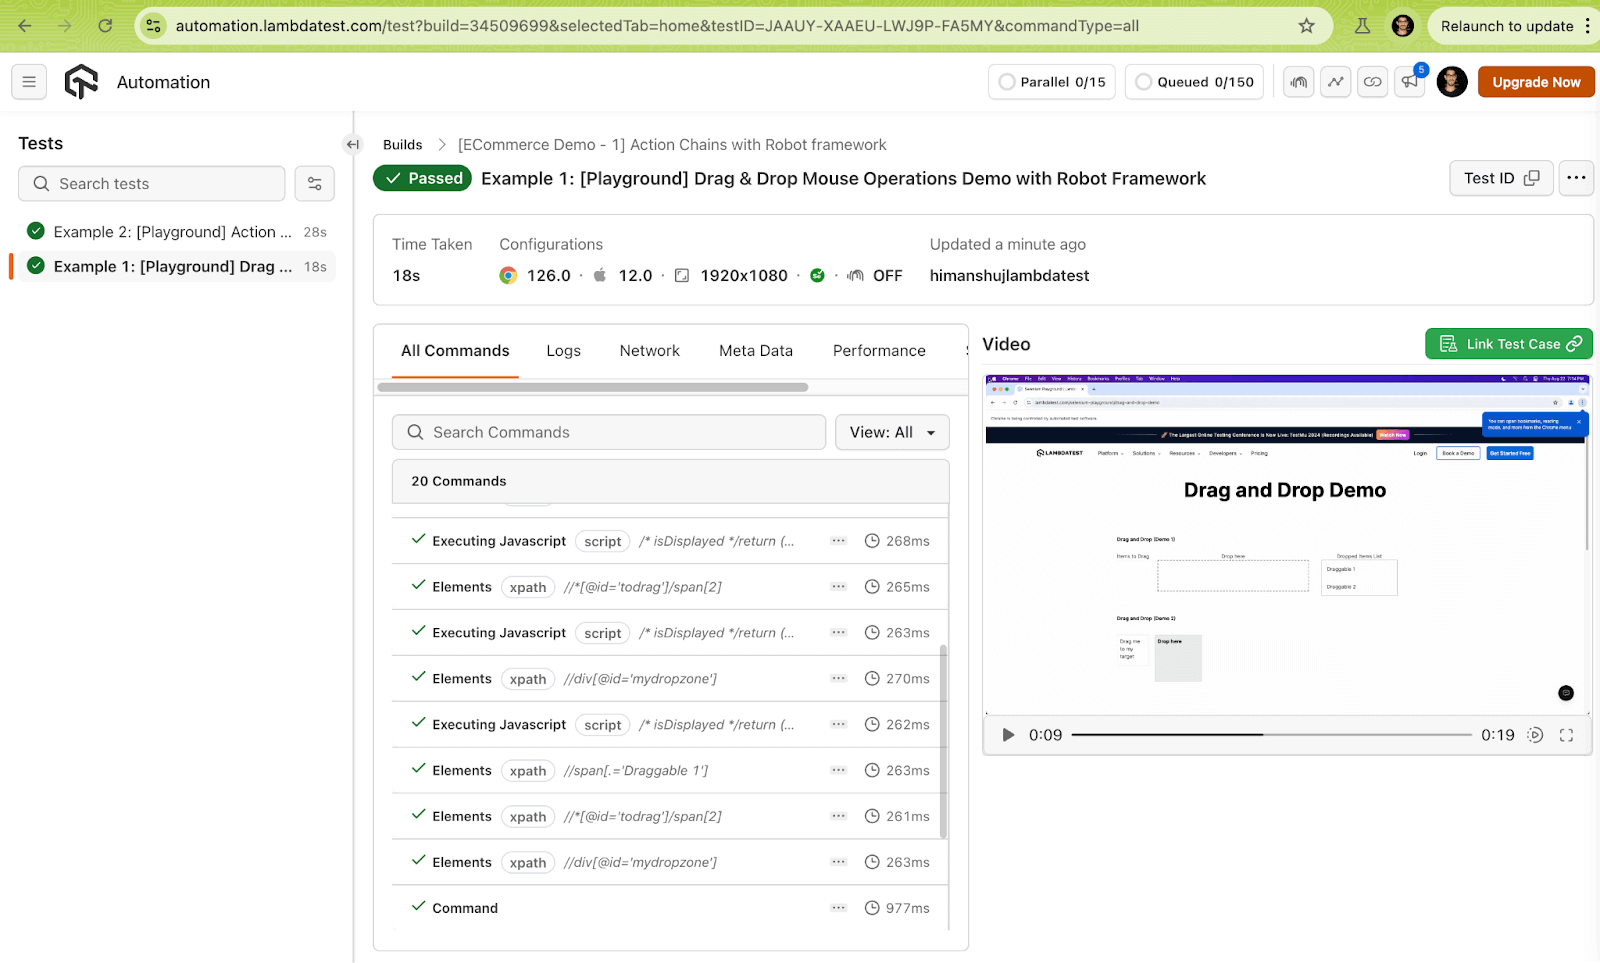
Test Execution: robot Tests/Common/test_mouse_actions.robot
Scrolling Web Page
When interacting with elements on dynamic web pages, it is important to check if the element is present in the DOM and visible in the viewport. To do this, we first scroll the page (a certain number of times) and then use the Scroll Element Into View keyword, which further scrolls until the specified element is visible within the browser’s viewport.
Interacting with elements on infinite-scrolling websites (e.g., eCommerce) can become challenging because the viewport does not provide much information about the element’s availability. Here, we need to scroll to the bottom of the page and then interact with the element once it is in the viewport.
Test Scenario:
- Navigate to the Scraping Infinite Scrolling page.
- Scroll till the end of the page.
- Locate the desired product and click on it.
- Assert if the page title does not match the expected title.
Implementation:
# Test is a replica of: https://github.com/hjsblogger/web-scraping-with-python/
# blob/main/tests/beautiful-soup/test_infinite_scraping.py
*** Settings ***


Resource    ../../Resources/PageObject/KeyDefs/Common.robot
Resource    ../../Resources/PageObject/KeyDefs/SeleniumDrivers.robot
Variables   ../../Resources/PageObject/Locators/Locators.py


Library     SeleniumLibrary
Library     OperatingSystem
Library     BuiltIn


*** Variables ***
${site_url}  https://scrapingclub.com/exercise/list_infinite_scroll/
${SCROLL_PAUSE_TIME}  2s


*** Keywords ***
Scroll Down
   Execute JavaScript  window.scrollTo(0, document.body.scrollHeight)


Get Window Height
   ${height} =  Execute JavaScript  return document.body.scrollHeight
   RETURN             ${height}


*** Variables ***


${EXEC_PLATFORM}  %{EXEC_PLATFORM}


&{lt_local_options}
   ...  browserName=Chrome


${BROWSER_LOCAL}            ${lt_local_options['browserName']}


&{lt_cloud_options}
   ...  browserName=Chrome
   ...  platformName=Windows 11
   ...  browserVersion=latest-1
   ...  visual=true
   ...  console=true
   ...  w3c=true
   ...  geoLocation=US
   ...  name=[Infinite Test - 1] Handling scroll with Robot framework
   ...  build=[Infinite Test Demo - 1] Handling scroll with Robot framework
   ...  project=[Infinite Test Project - 1] Handling scroll with Robot framework


${BROWSER_CLOUD}        ${lt_cloud_options['browserName']}
&{CAPABILITIES_CLOUD}     LT:Options=&{lt_cloud_options}


*** Keywords ***


Test Teardown
   IF  '${EXEC_PLATFORM}' == 'local'
       Log To Console  Closing the browser on local machine
       Common.Close local test browser
   ELSE IF     '${EXEC_PLATFORM}' == 'cloud'
       Log To Console  Closing the browser on cloud grid
       Common.Close test browser
   END


*** Test Cases ***
Click Element Infinite Scroll
   # Get Environment Variables
   Log To Console      Tests executed on: ${EXEC_PLATFORM}
   IF  '${EXEC_PLATFORM}' == 'local'
       ${chrome_driver_path} =   Update Chrome Webdriver
       Open local test browser     ${site_url}     ${BROWSER_LOCAL}    ${chrome_driver_path}
   ELSE IF  '${EXEC_PLATFORM}' == 'cloud'
       Open test browser   ${site_url}     ${BROWSER_CLOUD}        ${lt_cloud_options}
   END
   Maximize Browser Window
   # Refer - https://github.com/hjsblogger/web-scraping-with-python/
   # blob/main/tests/beautiful-soup/test_infinite_scraping.py#L67
   WHILE  ${True}
       ${start_height} =  Get Window Height
       Scroll Down
       Sleep  ${SCROLL_PAUSE_TIME}
       ${scroll_height} =  Get Window Height
       Run Keyword If  '${start_height}' == '${scroll_height}'  Exit For Loop
       # Refer - https://github.com/hjsblogger/web-scraping-with-python/
       # blob/main/tests/beautiful-soup/test_infinite_scraping.py#L78
   END


   # Now all the products are loaded since we have reached the end of site
   # Check if a the respective product is present in the DOM
   ${status}=  Page should contain element     ${xProduct}
   Log To Console      ${status}
   Run Keyword If  '${status}' != 'None'  Fail  Element not found on page
   # If it reaches here, the product is available on the page
   Scroll Element Into View    ${xProduct}
   Click Element       ${xProduct}
   Sleep   ${SCROLL_PAUSE_TIME}
   # Community Rocks :) https://forum.robotframework.org/t/
   # wait-for-complete-page-load-in-robot-framework/4597/2
   Wait For Condition  return document.readyState == "complete"
   Log To Console      Completed - Infinite Scroll with Robot Framework


   [Teardown]  Test Teardown
Code Walkthrough:
Navigate to the Scraping Infinite Scrolling page and maximize the browser window. Since the content is loaded dynamically (i.e., on page scroll), scroll till the end of the page is performed using the combination of the window.scroll() method with document.documentElement.scrollHeight as the input argument.
We create two user-defined keywords: Get Window Height and Scroll Down.
Get Window Height
The JavaScript method document.body.scrollHeight returns the height of the entire document. Once the height is calculated, its value is returned with the RETURN keyword.
Scroll Down
As the name suggests, the window.scroll() method in JavaScript performs a vertical scroll until it reaches the end of the page (i.e., document height calculated with document.body.scrollHeight).
For scrolling till the end of the page, a while loop is executed where the exit happens when there is no more room to scroll the page. First, the current window height (after maximizing the window) is calculated with Get Window Height and then assigned to a variable named ${start_height}.
After a single scroll down (via Scroll Down keyword) operation, the window height is again calculated (i.e., ${scroll_height}). The same cycle is repeated till the current window height is the same as ${scroll_height}.
Now that we have reached the end of the page, we check to see if the desired element locator (e.g., XPath) is present.
As discussed earlier, the Scroll Element Into View keyword of SeleniumLibrary is invoked for scrolling to the element identified by the locator (i.e. XPath) into the view. Now, the located element is clicked with the Click Element keyword.
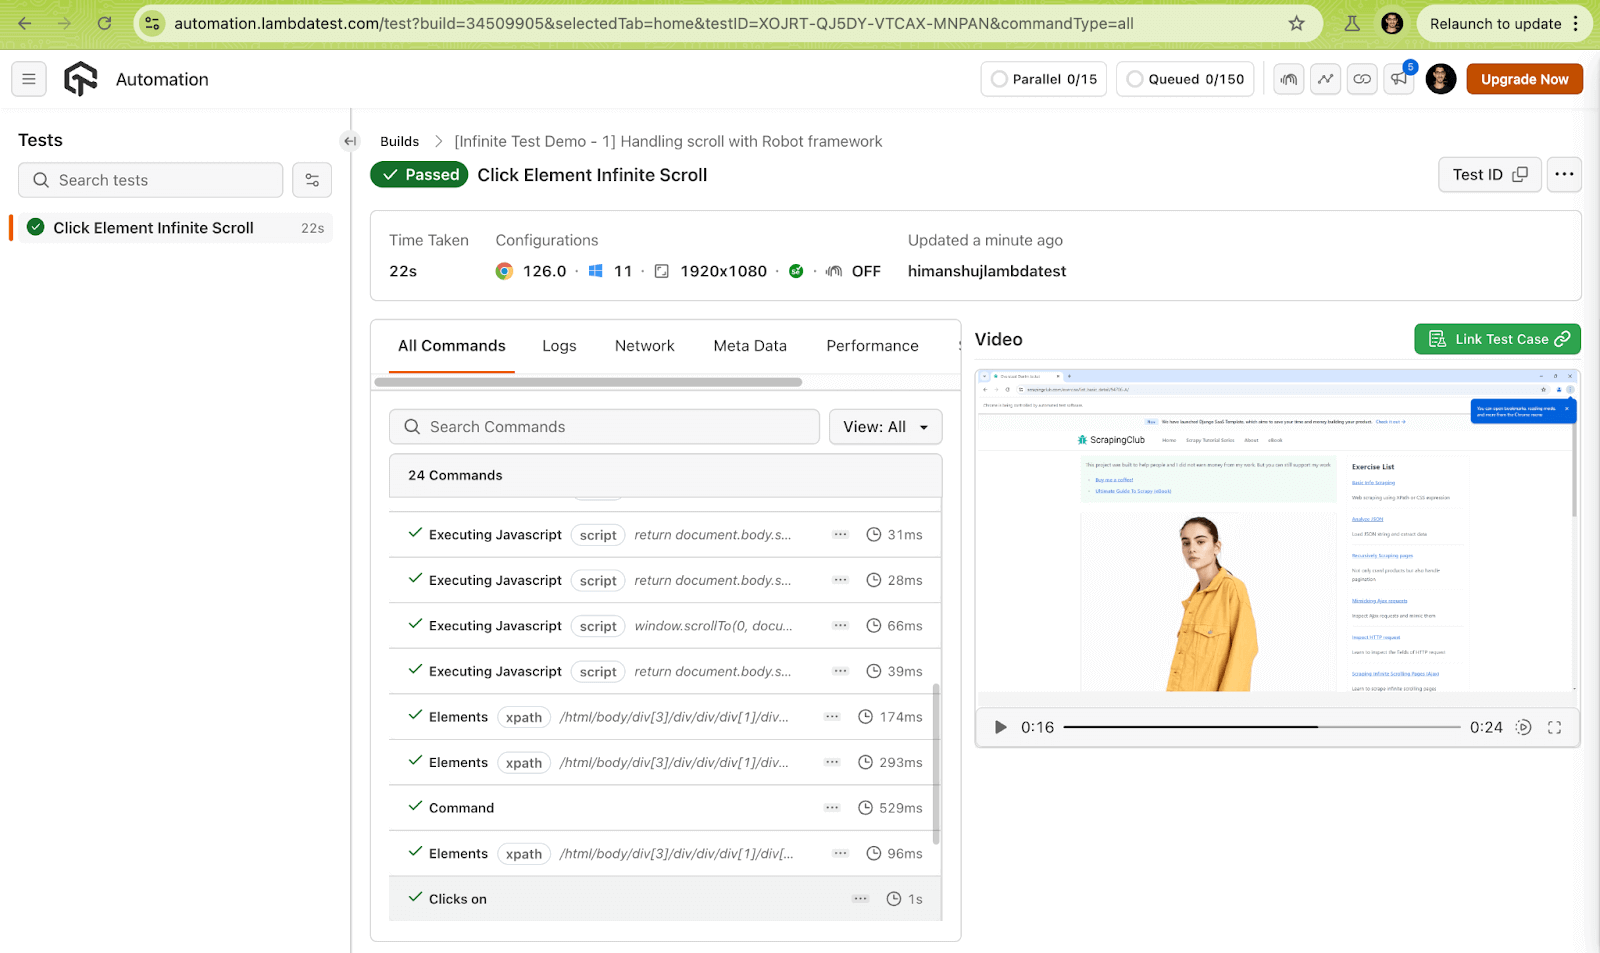
The JavaScript expression return document.readyState == “complete” checks if the web page (after the click operation) has loaded completely or not. The Wait For Condition keyword is invoked to check if the page load is complete. Post this, we mark the test as Passed.
Test Execution: robot Tests/Common/test_infinite_scroll.robot
Handling Dropdowns, Checkboxes, and Radio Buttons
SeleniumLibrary provides dedicated keywords for every standard form control. You do not need JavaScript workarounds for selects or checkboxes. The built-in keywords handle state verification as well as interaction.
Dropdowns (Select elements)
- Select From List By Label: selects by the visible option text
- Select From List By Value: selects by the value attribute
- List Selection Should Be: asserts the currently selected option
Test Scenario: Navigate to the Select Dropdown demo on the Selenium Playground, select an option by label, and assert the selection.
Filename: test_form_elements.robot (Dropdown)
*** Settings ***
Library     SeleniumLibrary
Resource    ../../Resources/PageObject/KeyDefs/Common.robot
Variables   ../../Resources/PageObject/Locators/Locators.py

*** Variables ***
${DROPDOWN_URL}    https://www.testmuai.com/selenium-playground/select-dropdown-demo/
${DROPDOWN_ID}     select-demo

*** Test Cases ***
Select Option From Dropdown
    Open test browser    ${DROPDOWN_URL}    Chrome    ${EMPTY}
    Select From List By Label    id:${DROPDOWN_ID}    Saturday
    List Selection Should Be     id:${DROPDOWN_ID}    Saturday
    [Teardown]    Close Browser
Checkboxes
- Select Checkbox: checks a checkbox if it is not already checked
- Unselect Checkbox: unchecks a checkbox
- Checkbox Should Be Selected / Checkbox Should Not Be Selected: state assertions
Filename: test_form_elements.robot (Checkbox)
*** Test Cases ***
Check And Verify Checkbox State
    Open test browser    https://www.testmuai.com/selenium-playground/checkbox-demo/    Chrome    ${EMPTY}
    Select Checkbox       id:isAgeSelected
    Checkbox Should Be Selected    id:isAgeSelected
    Unselect Checkbox     id:isAgeSelected
    Checkbox Should Not Be Selected    id:isAgeSelected
    [Teardown]    Close Browser
Radio Buttons
Radio buttons have no dedicated keyword. Use Click Element with the locator of the specific option, then assert with Element Should Be Enabled or check the selected attribute using Get Element Attribute.
*** Test Cases ***
Select Radio Button Option
    Open test browser    https://www.testmuai.com/selenium-playground/radiobuttons-demo/    Chrome    ${EMPTY}
    Click Element         xpath://input[@value='Male']
    ${checked}=          Get Element Attribute    xpath://input[@value='Male']    checked
    Should Be Equal As Strings    ${checked}    true
    [Teardown]    Close Browser
Note: Generate browser and OS capability configurations for your Robot Framework tests in seconds using the TestMu AI Automation Capabilities Generator. No manual JSON, no guesswork. Try it free.
Best Practices for Using Robot Framework
Follow these practices to keep your Robot Framework suites maintainable as they grow:
- Use Suite Setup and Suite Teardown: Run shared browser setup once per suite rather than opening and closing the browser in every test case. This mirrors pytest fixtures and halves execution time on suites with a single app under test.
- Write self-explanatory names: Keyword and test case names should read like a sentence. Verify that checkout total updates on quantity change tells you what failed at a glance; Test_003 does not.
- Keep tests independent: Each test case must set up its own preconditions rather than relying on state left by a previous test. Dependency chains mean a single early failure cascades into misleading failures downstream.
- Externalise variables: Store URLs, credentials, and locators in a separate Locators.py or variables.robot file and import them with the Variables setting. Pass environment-specific values at runtime with the --variable CLI flag instead of hardcoding them.
- Use Test Templates for data-driven testing: Instead of duplicating test logic for each input combination, define a Test Template keyword and provide a data table. Robot Framework runs the keyword once per row, grouping results under one test name in the report.
- Build a custom keyword library for complex logic: When a user-defined keyword exceeds ~10 lines or needs loops and conditionals, move it to a Python library. Mixing heavy scripting into .robot files makes them harder to read. The strength of Robot Framework is readable keywords, not embedded Python.
- Use Wait Until keywords, never bare Sleep: Sleep 3s adds fixed latency regardless of page state. Replace it with Wait Until Element Is Visible, Wait Until Page Contains, or Wait For Condition to make tests faster and less brittle on slow networks.
- Use skip conditions for in-progress tests: Tag unstable or environment-dependent tests with --skip rather than commenting them out. Commented-out tests get forgotten; skipped tests stay in the report with a visible status.
Running Robot Framework Tests in CI/CD
Robot Framework integrates cleanly into any CI/CD pipeline because the entire test run is triggered by a single robot command. The HTML and XML reports generated by each run can be archived as build artifacts or published directly in the pipeline UI.
GitHub Actions
Add a .github/workflows/robot-tests.yml file to your repository:
name: Robot Framework Tests

on:
  push:
    branches: [main]
  pull_request:
    branches: [main]

jobs:
  test:
    runs-on: ubuntu-latest
    steps:
      - uses: actions/checkout@v4
      - name: Set up Python
        uses: actions/setup-python@v5
        with:
          python-version: '3.11'
      - name: Install dependencies
        run: pip install -r requirements.txt
      - name: Run tests on TestMu AI cloud
        env:
          EXEC_PLATFORM: cloud
          LT_USERNAME: ${{ secrets.LT_USERNAME }}
          LT_ACCESS_KEY: ${{ secrets.LT_ACCESS_KEY }}
        run: robot --outputdir results Tests/
      - name: Upload test results
        uses: actions/upload-artifact@v4
        if: always()
        with:
          name: robot-results
          path: results/
Store your LT_USERNAME and LT_ACCESS_KEY as repository secrets under Settings > Secrets and variables > Actions. The upload-artifact step archives report.html and log.html so every CI run has a browsable test report.
Jenkins
Add the following stage to your Jenkinsfile:
pipeline {
    agent any
    environment {
        EXEC_PLATFORM = 'cloud'
        LT_USERNAME   = credentials('lt-username')
        LT_ACCESS_KEY = credentials('lt-access-key')
    }
    stages {
        stage('Install') {
            steps { sh 'pip install -r requirements.txt' }
        }
        stage('Test') {
            steps { sh 'robot --outputdir results Tests/' }
            post {
                always {
                    publishHTML(target: [
                        reportDir: 'results',
                        reportFiles: 'report.html',
                        reportName: 'Robot Framework Report'
                    ])
                }
            }
        }
    }
}
The publishHTML step requires the HTML Publisher plugin. It renders the Robot Framework report directly inside the Jenkins build page, giving your team pass/fail visibility without downloading the artifact manually.
Running tests on TestMu AI's real device cloud from CI means every push is verified against real browsers, without provisioning any infrastructure on your build agent.
How to Read Robot Framework Test Reports
Every robot run produces three output files in the directory set by --outputdir. Knowing which file to open first saves significant debugging time.
- report.html: Pass/fail summary showing total tests, pass rate, execution time, and a breakdown by suite and tag. Share this with stakeholders. It needs no RF knowledge to read. Open this first to confirm whether the run passed.
- log.html: Step-by-step execution trace. Every keyword call, argument, return value, and screenshot is logged here with timestamps. Find the first red keyword in the failing test and read the error message beneath it. This is your primary debugging file.
- output.xml: Machine-readable result file consumed by CI tools. Jenkins (HTML Publisher plugin) and GitHub Actions (artifact upload) use this to render results in the pipeline UI. You rarely open it manually.
Debugging a failing test step by step
- Open log.html and expand the failing test case.
- Find the first keyword highlighted in red. The error message below it shows the exact reason: element not found, assertion mismatch, timeout, etc.
- Check the keyword arguments. A wrong locator or undefined variable appears here before the failure line.
- If a test passed locally but failed in CI, compare keyword execution timestamps. A longer-than-usual execution time points to a timing issue. Replace Sleep calls with Wait Until Element Is Visible.
To rerun only failed tests without re-executing the full suite:
# Run full suite
robot --outputdir results Tests/

# Rerun only failed tests from the previous run
robot --rerunfailed results/output.xml --outputdir results/rerun Tests/
The --rerunfailed flag is especially useful in CI where a single flaky test should not trigger a full suite re-execution.
Conclusion
Robot Framework's keyword-driven syntax makes it one of the most readable automation frameworks available: non-technical stakeholders can follow the test logic, and QA engineers spend less time on boilerplate. The four hands-on examples in this tutorial cover the majority of real-world browser interactions: element location, keyboard input, mouse actions, and infinite scrolling.
To scale beyond a local machine, connect your existing .robot files to TestMu AI's real device cloud by setting EXEC_PLATFORM=cloud and exporting your LT_USERNAME and LT_ACCESS_KEY. Your tests will run in parallel across 10,000+ browser and OS combinations with no infrastructure changes.
Next steps:
- Run your first cloud test: set EXEC_PLATFORM=cloud, export your LT_USERNAME and LT_ACCESS_KEY, then point your test suite at the TestMu AI online Selenium Grid.
- Scale with parallel execution: read the companion post on Robot Framework parallel test execution.
- Explore the official docs: the Robot Framework documentation covers advanced features like data-driven templates, custom libraries, and listener plugins.
Note: This article was researched and drafted with AI assistance, then reviewed, fact-checked, and published by Himanshu Sheth, Director of Marketing (Technical Content) at TestMu AI, whose listed expertise includes Selenium and Automation Testing. Every statistic, link, and product claim was verified against primary sources. Read our editorial process and AI use policy for details.
Author

Himanshu Sheth
Blogs: 143


Himanshu Sheth is the Director of Marketing (Technical Content) at TestMu AI, with over 8 years of hands-on experience in Selenium, Cypress, and other test automation frameworks. He has authored more than 130 technical blogs for TestMu AI, covering software testing, automation strategy, and CI/CD. At TestMu AI, he leads the technical content efforts across blogs, YouTube, and social media, while closely collaborating with contributors to enhance content quality and product feedback loops. He has done his graduation with a B.E. in Computer Engineering from Mumbai University. Before TestMu AI, Himanshu led engineering teams in embedded software domains at companies like Samsung Research, Motorola, and NXP Semiconductors. He is a core member of DZone and has been a speaker at several unconferences focused on technical writing and software quality.
Reviewer

Srinivasan Sekar
Reviewer
Srinivasan Sekar is Director of Engineering at TestMu AI (formerly LambdaTest), where he leads engineering and open-source initiatives behind the Selenium and Appium automation grid and owns TestMu AI's MCP Server. A committer to Appium and a contributor to Selenium, WebdriverIO, Taiko, and AppiumTestDistribution, he brings over 15 years of experience in quality engineering and open-source technologies. He is the author of the Apress book 'The MCP Standard: A Developer's Guide to Building Universal AI Tools with the Model Context Protocol,' a Certified Kubernetes and Cloud Native Associate, and an international conference speaker. Before TestMu AI he spent over eight years at Thoughtworks as a Principal Consultant and Quality Architect. Srinivasan holds a B.Tech in Information Technology from Anna University.


Robot Framework Tutorial FAQs
Did you find this page helpful?
More Related Blogs
TestMu AI forEnterprise
Get access to solutions built on Enterprise
grade security, privacy, & compliance
- Advanced access controls
- Advanced data retention rules
- Advanced Local Testing
- Premium Support options
- Early access to beta features
- Private Slack Channel
- Unlimited Manual Accessibility DevTools Tests