

Power Your Software Testing with AI Agents and Cloud
The Native AI-Agentic Cloud Platform to Supercharge Quality Engineering. Test Intelligently and Ship Faster.


- TestMu AI (Formerly LambdaTest)
- /
- Learning Hub
- /
- Running Python Unit Tests With unittest: A Beginner's Guide
Running Python Unit Tests With unittest: A Beginner's Guide
In this tutorial, learn how to run Python unit tests using the unittest framework, along with real-world examples.
Last Updated on:
OVERVIEW
Python's built-in unittest module runs test methods named with a test_ prefix inside a TestCase class, executed with python -m unittest discover and reported as OK, FAIL, or ERROR, distinguishing a wrong assertion from a broken test. Fixtures like setUp, setUpClass, and setUpModule scope setup work, while unittest.mock isolates network calls that would otherwise make tests flaky.
What is Python Unit Testing?
Python lets developers and testers perform unit testing, offering a range of built-in libraries and frameworks like unittest, doctest, and more. These frameworks for Python automation testing simplify the creation and execution of unit tests with advanced features and functionalities, enhancing the testing workflow.
Among these, the unittest module—a core part of Python's standard library—is a complete framework for setting up and executing unit tests. It features test discovery, fixtures, suites, and various assertion methods to evaluate the expected versus actual results.
Why Use unittest Framework?
unittest is a Python-based framework inspired by the JUnit framework. It provides a framework for writing and running automated tests.
Some of its key features include:
- Easy Test Implementation: It provides a TestCase base class that identifies all tests and allows execution with a single command.
- Command-Line Interface: It offers a CLI to identify and run tests with a project. The code python -m unittest discover identifies and runs tests, including those in nested directories. The discovered tests can be executed by specifying a module, class, or a single test function.
- Resource Initialization and De-Allocation: It provides the SetUp() function to specify which resources are necessary for test execution. The tearDown() function is used to free up or delete the created resources after execution completes. These functions are pre and post-executed. They are used in the following fashion:
- Create Subtests: The subTest module creates multiple subtests for each parameter, allowing the test case to continue even if some parameters throw an error. This tests all parameters and shows which ones fail.
unittest vs pytest
The obvious question at this point is why use unittest at all when pytest is so widely recommended. Both are good, and the honest answer is that they optimise for different things.
| Parameters | unittest | pytest |
|---|---|---|
| Installation | Built into Python, nothing to install | pip install pytest |
| Test structure | Classes inheriting unittest.TestCase | Plain functions, classes optional |
| Assertions | self.assertEqual, self.assertTrue, and dozens more | The plain assert statement |
| Fixtures | setUp, tearDown, setUpClass, setUpModule | @pytest.fixture, with explicit scopes |
| Parameterized tests | subTest, more verbose | @pytest.mark.parametrize, concise |
| Failure output | Adequate | Richer, introspects the failing expression |
| Plugins | Few | A large ecosystem |
| Best when | No dependencies allowed, or a Java/xUnit background | You want less boilerplate and richer tooling |
The same calculator test shows the difference in feel. unittest needs a class and self.assertEqual(add(2, 3), 5); pytest needs a function and assert add(2, 3) == 5. That concision is the main reason people prefer pytest, and it compounds across a large suite.
Two facts make the choice less binding than it looks. pytest can run your unittest tests unchanged, so adopting it later is not a rewrite, and starting with unittest costs you nothing in optionality. And unittest being in the standard library genuinely matters in environments where adding a dependency needs approval, which is more common in enterprise and regulated work than most tutorials admit.
The practical recommendation: learn unittest first, because it is always there and its concepts (TestCase, fixtures, assertions) transfer directly. Reach for pytest when the boilerplate starts to cost you more than the dependency does.
How to Run Python Unit Tests?
Since the unittest framework comes pre-installed with Python, you'll need to install Python if you haven't already. Download the latest version of Python from the official Python website. After downloading, run the installer and follow the on-screen instructions.
To verify the installation, open your terminal and type:
python --versionTo verify if unittest is available, create a .py file and run the following line of code:
import unittestOnce all installations are verified, we can write our test cases.
Writing Your First Local Python Unit Test
Before any browsers, drivers, or cloud configuration, write one test that runs on your own machine in under a second. Nothing here is installed beyond Python itself, because unittest ships with the standard library.
Start with the code you want to test. Save this as calculator.py:
# calculator.py

def add(a, b):
    return a + b

def divide(a, b):
    if b == 0:
        raise ValueError("Cannot divide by zero")
    return a / b
Now the test. Save this as test_calculator.py in the same folder:
# test_calculator.py
import unittest
from calculator import add, divide

class TestCalculator(unittest.TestCase):

    def test_add_two_positive_numbers(self):
        self.assertEqual(add(2, 3), 5)

    def test_add_handles_negatives(self):
        self.assertEqual(add(-1, 1), 0)

    def test_divide_returns_a_float(self):
        self.assertEqual(divide(10, 4), 2.5)

    def test_divide_by_zero_raises(self):
        # assert that the right exception is raised
        with self.assertRaises(ValueError):
            divide(10, 0)

if __name__ == "__main__":
    unittest.main()
Three conventions are doing the work here, and they are the ones beginners trip over. The class inherits from unittest.TestCase, which is what gives you the assertion methods. Every test method name must start with test_, because that prefix is how the framework discovers them, so a method called check_add silently never runs. And self.assertEqual compares actual against expected, reporting both values when they differ rather than just saying False.
Run it from your terminal:
python -m unittest test_calculator.py

# or let unittest find every test_*.py file for you
python -m unittest discover

# -v prints each test name as it runs
python -m unittest -v test_calculator.py
You should see:
....
----------------------------------------------------------------------
Ran 4 tests in 0.001s

OK
That is a complete unit test suite. No WebDriver, no browser, no account, no configuration file. Get this working first, because everything that follows is the same idea with more infrastructure around it.
Understanding the Outcomes: OK, FAIL, and ERROR
Those dots matter. Each test produces exactly one of three outcomes, and telling them apart is the difference between debugging the right thing and the wrong thing.
| Outcome | Symbol | What happened | What it means |
|---|---|---|---|
| OK (Success) | . | Every assertion passed | The code behaved as expected |
| FAIL | F | An assertion failed, raising AssertionError | The code ran fine but produced the wrong answer |
| ERROR | E | An unexpected exception was raised outside any assertion | The code crashed before it could be judged |
The FAIL and ERROR distinction is the useful one. A FAIL means your assertion did its job: assertEqual(add(2, 3), 6) raises an AssertionError, and the test correctly reports that the code returned 5 when you expected 6. Your test is working; your expectation or your code is wrong.
An ERROR means something blew up before the assertion could be reached, such as a TypeError, an import that does not resolve, or a missing fixture. The test never got to judge anything. That distinction saves real time: a FAIL sends you to the logic under test, while an ERROR usually sends you to the test itself or its setup.
Configuring Tests
To achieve better scalability and reliability, we will run our tests on the cloud. For this, we will use cloud-based testing platforms such as TestMu AI. It is a reliable and scalable AI-Native test execution platform that empowers you to perform the unittest testing using Python across real browsers and operating systems.

Note: Run Selenium tests with Python on the cloud. Try TestMu AI Now!
You can get your TestMu AI Username and Access Key from your TestMu AI Account Settings > Password & Security. It is also required to install the python-dotenv package in order to read the .env file. Paste your TestMu AI credentials in the .env file as shown below:
LT_USERNAME= <username>
LT_ACCESS_KEY= <access_key>
In the following code snippet, we'll define the options related to Chrome, which will serve as metadata in a JSON format, as shown below:
//lt_options.json
{
"build": "Build: Python Unittest Demo",
"project": "Project: Python Unittest Demo",
"name": "Test: Python Unittest Demo",
"w3c": true,
"selenium_version": "latest",
"plugin": "python-python",
"platform": "Windows 11",
"browserName": "Chrome",
"version": "latest",
"visual": false,
"network": true,
"console": true,
"video": true
}

The JSON file defines configuration parameters for our testing environment in Chrome, such as the Selenium version to use and the platform to test on. The TestMu AI Automation Capabilities Generator can be used to generate the appropriate configurations for the test environment.
We'll load the provided JSON and pass it to ChromeOptions. Then, we'll execute a remote WebDriver instance to run Selenium tests on the TestMu AI platform, utilizing the credentials. You can find the code snippet in the pyunitsetup.py file.
self.driver = webdriver.Remote(


command_executor=f"https://{lt_username}:{lt_access_key}@hub.lambdatest.com/wd/hub",
    options=chrome_options
        )


    # self.driver = webdriver.Chrome()
Each test initializes the PyUnitTestSetup class, which includes instantiating a driver and passing the lt_options to configure remote test execution. This setup is particularly useful for cross browser testing and can be configured to work with cloud testing platforms like TestMu AI.
Writing Tests
Let’s use the TestMu AI eCommerce Playground to test different test scenarios to check different functionalities such as login, card badge update, add to cart, continue shopping, and logout.
You can find the test script for these test cases in the unittest_with_selenium.py file.
- Login: This login functionality checks valid credentials and confirms redirection to the My Account page of the TestMu AI eCommerce Playground. A teardown process ensures proper cleanup after test execution.
- Cart Badge Update: This test scenario involves adding an item to the cart and checking if the cart badge updates accordingly. It ensures that the cart count reflects the addition of items, providing validation for a working cart. Similar to other tests, it includes a teardown process to clean up afterward.
- Add to Cart: This test verifies the functionality of adding an item to the cart by ensuring that the correct item is displayed in the cart after addition. It confirms that the added item appears as expected. Like other tests, it concludes with a teardown process for cleanup.
It follows the same process as the cart badge update test by selecting and adding the item to the cart. After adding the item to the cart, we review the cart and validate the name of the item added to the cart with what was actually added.
- Continue Shopping: This test checks the workflow of adding items to the cart, viewing the cart, and then continuing shopping. It checks if users can effortlessly transition between adding items to the cart and browsing more products. Afterward, a clean-up process, like for other tests.
After adding the element to the cart, we go to the cart, press the Continue Shopping button, and validate if we are on the home page. We use the ActionChains object that allows you to create chains of actions (like mouse movements, clicks, etc.) and then execute them as a single action. It's useful for performing complex interactions that involve mouse movements or keyboard actions.
- Logout: This test evaluates the logout functionality of the application, ensuring that users can successfully log out. It verifies the effectiveness of the logout operation by confirming the presence of logout confirmation. Similar to other tests, this one also includes a teardown process to clean up after completion.
First, we'll log in using the previous credentials with the existing login function logic. After this, we will log out of the account.

Austin Siewert
Co-Founder, Steadfast Systems
Discovered @TestMu AI yesterday. Best browser testing tool I've found for my use case. Great pricing model for the limited testing I do 👏
2M+ Devs and QAs rely on TestMu AI
Deliver immersive digital experiences with Next-Generation Mobile Apps and Cross Browser Testing Cloud

Running Tests
Now, we will run our Python unit tests both sequentially and in parallel.
Sequential Execution
Before we run the tests sequentially, we will need to wrap our previous functions in a class inherited from TestCase. We can wrap all the functions in a single class, but since we also need to show parallel execution, we will create two classes.
class TestLoginPage(unittest.TestCase):


     def test_login(self):
         … … … …


     def test_logout(self):
         … … … …
Similarly, we can create for the other three functions:
class TestPlatform(unittest.TestCase):


  def test_cart_badge_update(self):
      … … … …


  def test_add_to_cart_functionality(self):
      … … … …


  def test_continue_shopping(self):
      … … … …
Now that we have the test case defined wrapped in a class inherited with the TestCase class, we can execute test cases from the terminal.
Run the following command to execute the test:
python -m unittest unittest_with_selenium.pyOutput:

Parallel Execution
To run the test cases in parallel, we will use a multiprocessing package in Python. We will create separate threads for our two test case suites and run them independently. A fair note using this approach is to make sure that the test cases are independent of each other.
import unittest
import multiprocessing


# Import your test classes here
from unittest_with_selenium import TestLoginPage,TestPlatform


# List of test classes to run
test_classes = [TestLoginPage, TestPlatform]


def run_tests(test_class):
    suite = unittest.TestLoader().loadTestsFromTestCase(test_class)
    unittest.TextTestRunner().run(suite)


if __name__ == '__main__':
    processes = []
    # for test_class in [MyTest, MyTest2]:  # Add more test classes here if needed
    for test_class in test_classes:  # Add more test classes here if needed
        process = multiprocessing.Process(target=run_tests, args=(test_class,))
        processes.append(process)
        process.start()


    for process in processes:
        process.join()
After running the scripts from above, the tests will also be logged on to the TestMu AI Web Automation dashboard as seen below:
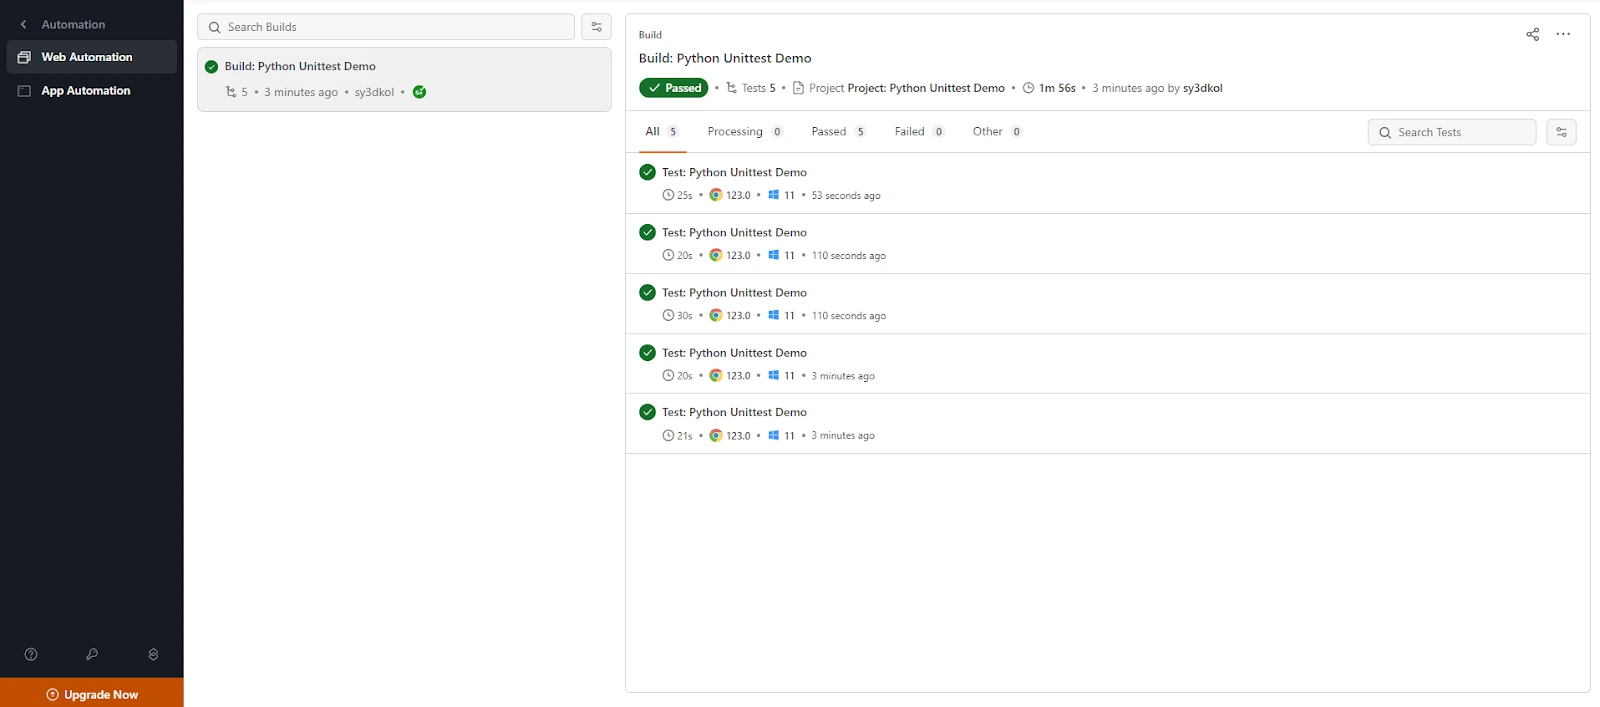
As we can see, all 5 tests are executed and are shown on the dashboard. This is what is displayed on the terminal for a sequential run.
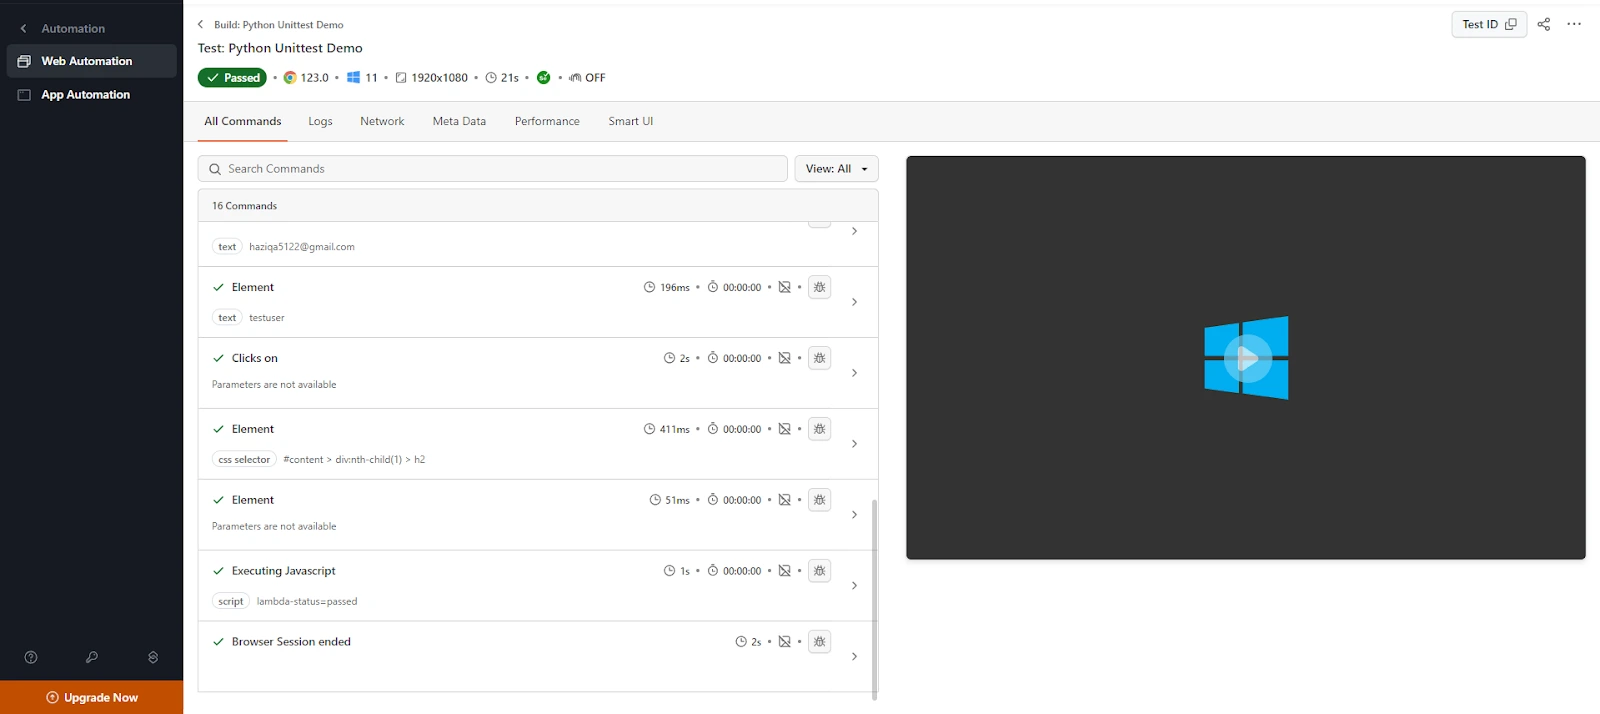
You can further deep dive into the tests and see the events executed.
Understanding the Python unittest Lifecycle and Fixtures
Tests rarely stay as simple as the calculator. As soon as they need a database connection, a browser, or a temporary file, you need somewhere to set that up and tear it down. That is what fixtures are for, and unittest gives you them at three levels.
The distinction that matters is how often each one runs:
| Fixture | Level | Runs | Typical use |
|---|---|---|---|
| setUpModule / tearDownModule | Module | Once per file | Start a server, seed a database |
| setUpClass / tearDownClass | Class | Once per TestCase class | Open a browser or a connection shared by the class |
| setUp / tearDown | Method | Before and after every single test | Fresh state per test |
Seeing the order printed makes it click:
import unittest

def setUpModule():
    print("setUpModule       - once for the whole file")

def tearDownModule():
    print("tearDownModule    - once for the whole file")

class TestLifecycle(unittest.TestCase):

    @classmethod
    def setUpClass(cls):
        print("  setUpClass      - once for this class")

    @classmethod
    def tearDownClass(cls):
        print("  tearDownClass   - once for this class")

    def setUp(self):
        print("    setUp         - before each test")

    def tearDown(self):
        print("    tearDown      - after each test")

    def test_one(self):
        print("      test_one")

    def test_two(self):
        print("      test_two")
Running it produces:
setUpModule       - once for the whole file
  setUpClass      - once for this class
    setUp         - before each test
      test_one
    tearDown      - after each test
    setUp         - before each test
      test_two
    tearDown      - after each test
  tearDownClass   - once for this class
tearDownModule    - once for the whole file
Note that setUp and tearDown wrap each test, while the class and module fixtures wrap the whole group once. Note also that setUpClass and tearDownClass must be decorated with @classmethod and take cls, whereas setUpModule and tearDownModule are plain module-level functions with no decorator at all. Forgetting the decorator is the single most common mistake here, and it fails in a confusing way.
Choosing the right level
This is a genuine trade-off between speed and isolation, and it is where flakiness gets introduced. setUp gives every test a clean slate, which is the safest default, but if it launches a browser for each of 50 tests you will pay 50 startup costs. setUpClass launches it once and shares it, which is dramatically faster and means the tests are no longer independent: whatever test one leaves behind, test two inherits.
The rule worth following: use setUp unless it is measurably too slow, and if you move to setUpClass, reset the shared state at the start of each test yourself. Tests that only pass in a particular order are one of the most common sources of flakiness, and this is usually where it starts.
What Are Flaky Unit Tests and How to Prevent Them?
A flaky test is one that passes and fails intermittently without anything changing in the code. Run it three times and you get two passes and a fail. Run it again and it passes. Nothing was edited in between.
The name comes from exactly that unreliability: the test is flaky in the everyday sense of something you cannot depend on to turn up. It is not describing the code under test, it is describing the test's own behavior.
Flaky tests are worse than failing tests, and that is not a figure of speech. A failing test tells you something true. A flaky test teaches your team to re-run the pipeline and move on, and once that habit forms, the real failure hiding among the noise gets re-run and ignored along with everything else. The suite stops being evidence.
Flaky vs brittle tests
These get used interchangeably and they are different problems with different fixes.
| Parameters | Flaky test | Brittle test |
|---|---|---|
| Behavior | Passes and fails at random, unchanged code | Fails consistently after any small change |
| Trigger | Timing, order, shared state, the network | A refactor that touched nothing it tests |
| Reproducible? | No, that is the defining trait | Yes, reliably |
| Root cause | Non-determinism | Coupling to implementation detail |
| Fix | Remove the non-determinism | Assert on behavior, not internals |
Put simply: a flaky test is unpredictable, a brittle test is over-sensitive. A brittle test breaks when you rename a private method; a flaky test breaks on a Tuesday.
Common causes in Python, and how to fix them
- Hardcoded sleeps: time.sleep(2) is simultaneously too long on a fast machine and too short on a loaded CI runner. In Selenium tests, replace it with an explicit wait that waits for a condition rather than a duration. Everywhere else, wait on the thing you actually need.
- Network and external dependencies: A test that calls a real API fails when the API is slow, rate limited, or down, and none of that is your code's fault. Use unittest.mock to replace the call, so the test verifies your handling of a response rather than the internet's mood.
- Shared state between tests: The classic symptom is a test that passes alone and fails in the suite. It usually traces back to a class-level fixture or a module global that one test mutates and the next inherits. Reset state in setUp, and never rely on tests running in a given order.
- Race conditions: Threads, async code, and background workers finishing in a different order than you assumed. Wait for the completion signal rather than assuming the work is done by the time you assert.
- Time and randomness: Tests using datetime.now() or unseeded random values that pass until they run at midnight, or on the 31st, or in another timezone. Freeze the clock and seed the generator.
Mocking the network dependency is the highest-value fix of the five:
import unittest
from unittest.mock import patch
from weather import get_temperature

class TestWeather(unittest.TestCase):

    @patch("weather.requests.get")
    def test_returns_temperature(self, mock_get):
        # no real network call: the response is controlled and instant
        mock_get.return_value.status_code = 200
        mock_get.return_value.json.return_value = {"temp": 21}

        self.assertEqual(get_temperature("London"), 21)

    @patch("weather.requests.get")
    def test_handles_api_failure(self, mock_get):
        # and now the failure path, which is impossible to trigger on demand for real
        mock_get.return_value.status_code = 500

        with self.assertRaises(ConnectionError):
            get_temperature("London")
That suite is deterministic, runs in milliseconds, and tests the error path as easily as the happy one.
One note on retries: re-running a failed test until it passes is a common reflex and it is a bandage, not a fix. It has a legitimate use at the edges of a system you do not control, but applied broadly it hides the non-determinism instead of removing it, and it will eventually hide a real bug that only manifests one run in ten.
Best Practices for Python Unit Testing
Now that we understand how unit testing is performed in Python, here are a few key best practices to follow for optimized results. With these best practices, you can make your unit tests using the unittest framework in Python more efficient, readable, and maintainable.
- Organize Test Cases With Test Suites: Use the TestSuite() method to group related tests, making it easier to manage and run specific subsets of tests.
 import unittest
 def suite():
       suite = unittest.TestSuite()
       suite.addTest(unittest.makeSuite(YourTestClass))
       return suite
class MyTest(unittest.TestCase):
    def setUp(self):
        self.driver = webdriver.Chrome()


    def tearDown(self):
        self.driver.quit()


    def test_example(self):
        self.driver.get("https://www.example.com")


if __name__ == "__main__":
    unittest.main()
self.assertEqual(a, b)
self.assertTrue(x)
self.assertFalse(x)
self.assertRaises(Exception, func, *args, **kwargs)
python -m unittest discoverfrom unittest.mock import MagicMock
mock = MagicMock(return_value=10)
mock.method()
In the below example, the @parameterized.expand decorator runs the test_parameterized method with different sets of parameters. Each tuple in the list represents an input `i` and expected output, allowing you to test the i % 2 operation with various values and verify the results.
import unittest
from parameterized import parameterized
class MyTest(unittest.TestCase):
    @parameterized.expand([
        (0, 0),
        (1, 1),
        (2, 0),
        (3, 1),
        (4, 0),
    ])
    def test_parameterized(self, i, expected):
        self.assertEqual(i % 2, expected)


if __name__ == "__main__":
    unittest.main()
loader = unittest.TestLoader()
tests = loader.loadTestsFromTestCase(MyTest)
testRunner = unittest.TextTestRunner()
testRunner.run(tests)
How Do AI Coding Agents Write and Run Python Unit Tests Now?
AI coding agents such as GitHub Copilot, Cursor, and Claude Code can draft a unittest.TestCase from a function's code, run it themselves, and read the OK, FAIL, or ERROR output to fix the next attempt.
- AI-drafted test skeletons: GitHub Copilot and Cursor read a function's signature and docstring inside the editor and generate a starting unittest.TestCase or pytest test, including assertion calls like self.assertEqual, cutting the boilerplate the Writing Your First Local Python Unit Test section above walks through by hand.
- Agentic test-and-fix loop: Claude Code and similar coding agents can call python -m unittest discover as a tool themselves, read the OK, FAIL, or ERROR result described earlier in this guide, and edit either the test or the code under test before trying again, without a person running the command.
- Tautological assertions: because the agent can see the implementation while writing the test, it tends to assert on what the code currently does rather than what it should do, producing the same brittle test problem this guide describes: the test passes today and breaks on the next honest refactor instead of catching a real regression.
- No judgment on flakiness: an agent rerunning a failing test until it passes cannot tell a genuine bug from the flaky causes covered earlier, hardcoded sleeps, shared state, network calls, so it can mask the same non-determinism this guide tells you to remove, not fix it.
Conclusion
Unit testing is one of the key testing practices that developers follow to ensure a robust codebase. It allows developers to test their code granularly and ensure that all modules (units) behave as expected.
Python provides a native unittest framework that comes natively installed with the language. This framework can be used to write and execute Python unit tests with a single command. The framework provides various functionalities, such as built-in logical assertions, executing all tests with a single command, and functions for resource initialization and deallocation.
Author

Idowu
Blogs: 3

Idowu Omisola is a technical writer and self-taught programmer with over 6 years of experience explaining software development and testing to developers. He is a Senior Technical Writer at ZenRows and has authored hundreds of articles across MakeUseOf, iGeeksBlog, ZenRows, and TestMu AI (formerly LambdaTest). On TestMu AI, he authored tutorials on Python load testing with Locust, Python unit testing with unittest, and pytest code coverage reports. He works with Python, JavaScript, and Go, and holds an MSc in Environmental Microbiology.


Frequently asked questions
Did you find this page helpful?
More Related Learning Hubs
TestMu AI forEnterprise
Get access to solutions built on Enterprise
grade security, privacy, & compliance
- Advanced access controls
- Advanced data retention rules
- Advanced Local Testing
- Premium Support options
- Early access to beta features
- Private Slack Channel
- Unlimited Manual Accessibility DevTools Tests