

Power Your Software Testing with AI Agents and Cloud
The Native AI-Agentic Cloud Platform to Supercharge Quality Engineering. Test Intelligently and Ship Faster.


- TestMu AI (Formerly LambdaTest)
- /
- Learning Hub
- /
- iOS VoiceOver: A Beginner’s Guide to Accessibility
iOS VoiceOver: A Beginner’s Guide to Accessibility
Discover iOS VoiceOver with this beginner’s guide. Learn setup, settings, gestures, testing, and shortcuts to improve mobile accessibility.
Last Updated on:
On This Page
For millions of users with visual impairments, the VoiceOver feature in iOS helps them to interact seamlessly with digital technologies. Understanding iOS VoiceOver fundamentals not only enhances usability for those users but also broadens your perspective on inclusive design.
Developers and testers must follow these standards to ensure their iOS apps are accessible, fully compatible with assistive technologies for visually impaired users, and rigorously tested using appropriate testing methods.
TL;DR
- VoiceOver is the screen reader built into iOS, and it describes what is on screen through speech and gestures.
- VoiceOver turns on under Settings, Accessibility, VoiceOver, or through an Accessibility Shortcut.
- VoiceOver uses its own gesture set, so a single tap speaks an item and a double tap activates it.
- Testing with VoiceOver reveals unlabelled controls and reading-order problems that an automated scan misses.
- A real device cloud lets a team run VoiceOver checks on iPhones it does not own.
What Is VoiceOver in iOS?
iOS VoiceOver is screen-reading software for iPhones, iPads, and Macs. On macOS devices, you can configure compatible environments to build and test applications that allow them to run iOS apps on macOS through supported frameworks and development tools.
It is designed for people with visual impairments, enabling them to navigate screens and use their devices with an experience equivalent to that of users without impairments.
VoiceOver supports Braille displays, describes images, announces device status updates like battery percentage, and works with iPhone gestures designed specifically for accessibility.
According to DemandSage, there are over 1 billion iPhone users worldwide, and considering that iPads and Macs also support VoiceOver, a significant number of users with visual challenges are likely to own an iOS device. This makes iOS app testing for VoiceOver an essential step in the testing cycle.
How to Turn On iOS VoiceOver?
Apple provides several methods to turn on the VoiceOver feature, so you can choose the one that best fits your use case.
1. From the Settings App
The Settings app is the most reliable place to toggle VoiceOver because it also gives you access to every related option in one place. To use this method:
1. Open the Settings app on your iPhone or iPad.
2. Scroll down and tap Accessibility.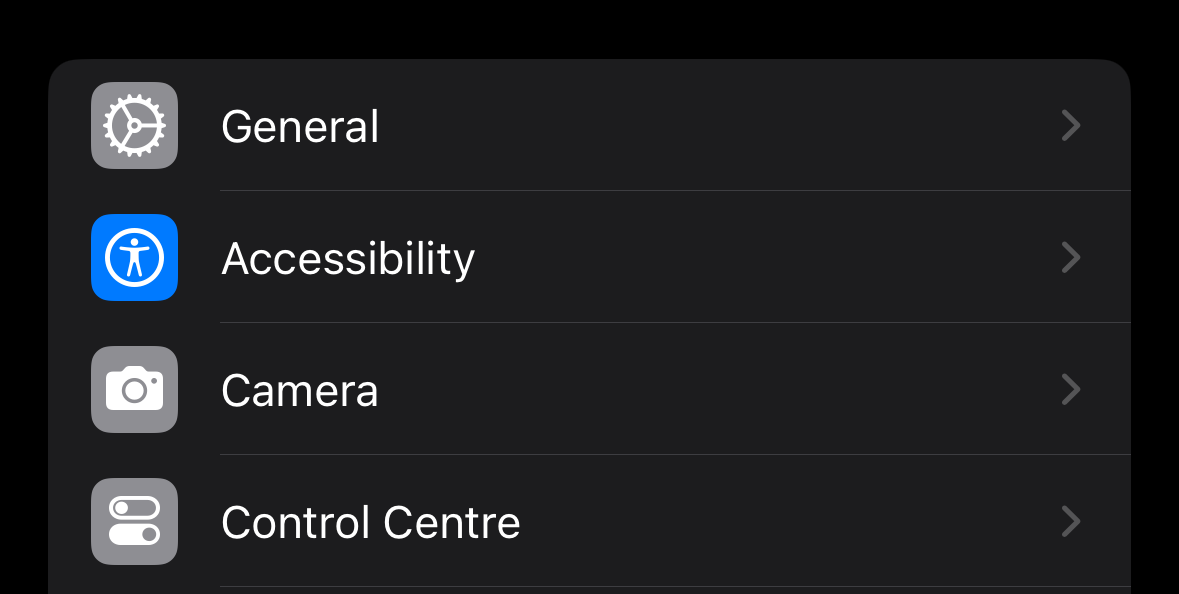
3. Tap VoiceOver from the VISION section.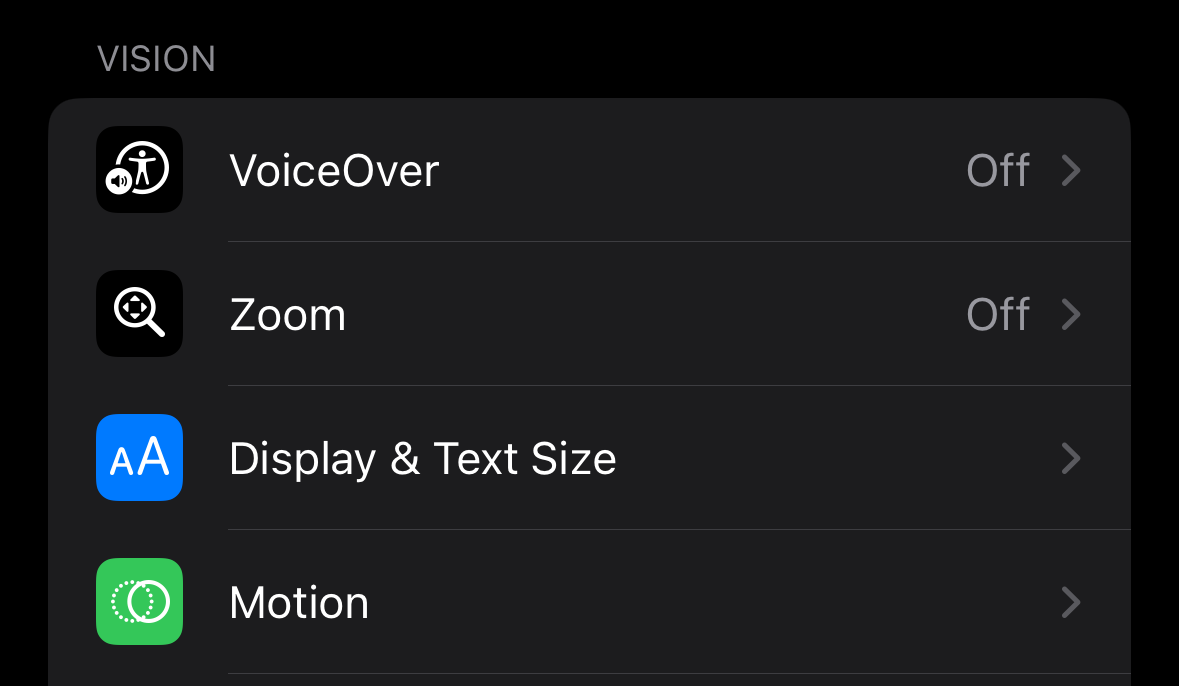
4. At the top of the screen, toggle the VoiceOver switch on or off.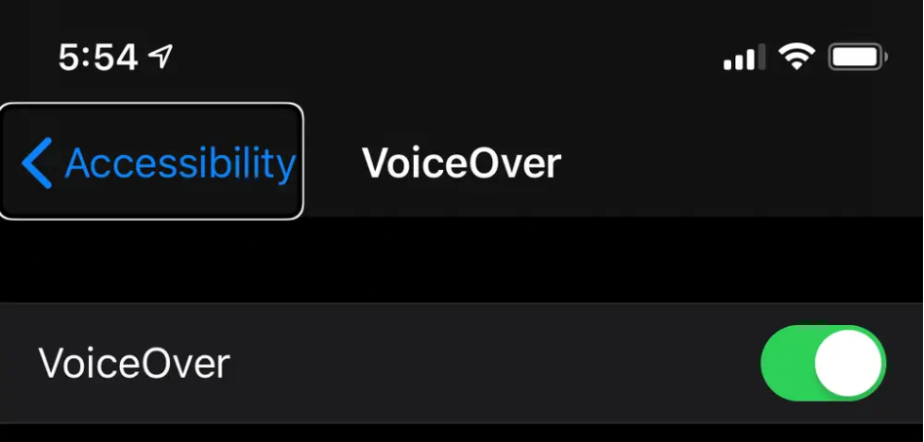
This method is particularly useful the first time you enable VoiceOver because you’re already in the menu where you can customize speaking rate, voices, verbosity, and other settings. It’s also the fallback method if shortcuts or Siri are disabled.
2. With Siri
Siri is by far the quickest way to control VoiceOver. All you need to do is press and hold the side button (or say “Hey Siri” if voice activation is enabled) and give a command like:
- “Turn VoiceOver on”
- “Turn VoiceOver off”
Siri will respond with confirmation and make the change instantly. This is extremely useful if you accidentally enabled VoiceOver and don’t know the gestures to navigate back into Settings. In fact, many support professionals recommend Siri as the first rescue method for new users who get stuck.
Another benefit is that Siri can toggle VoiceOver even from the lock screen, so you don’t need to unlock the device to fix accessibility settings. The only requirement is that Siri must be enabled in advance.
3. Using the Accessibility Shortcut
Apple built-in a shortcut to make accessibility features easier to toggle. Once configured, triple-clicking the side button on the latest iPhones (or the Home button on legacy models) will turn VoiceOver on or off immediately.
To set this up:
1. Open Settings > Accessibility > Accessibility Shortcut.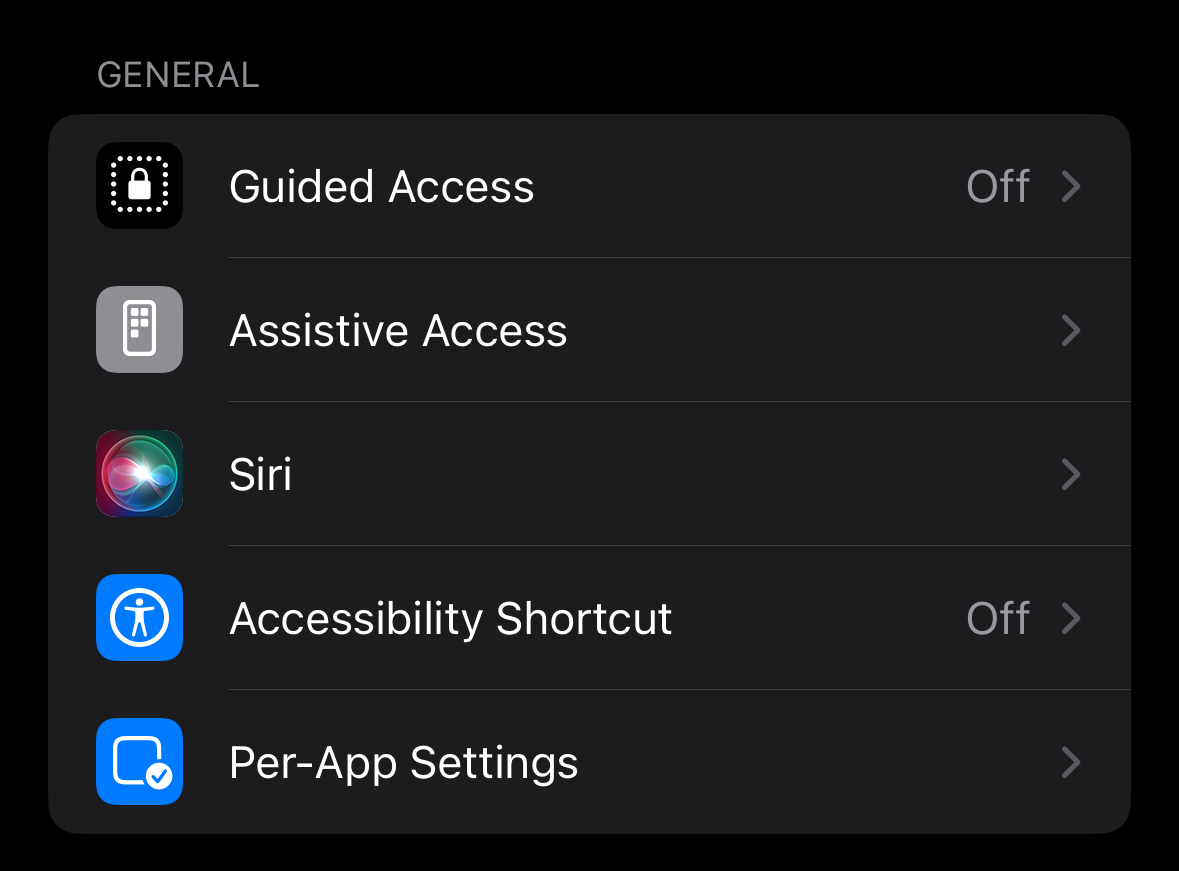
2. Select VoiceOver from the list.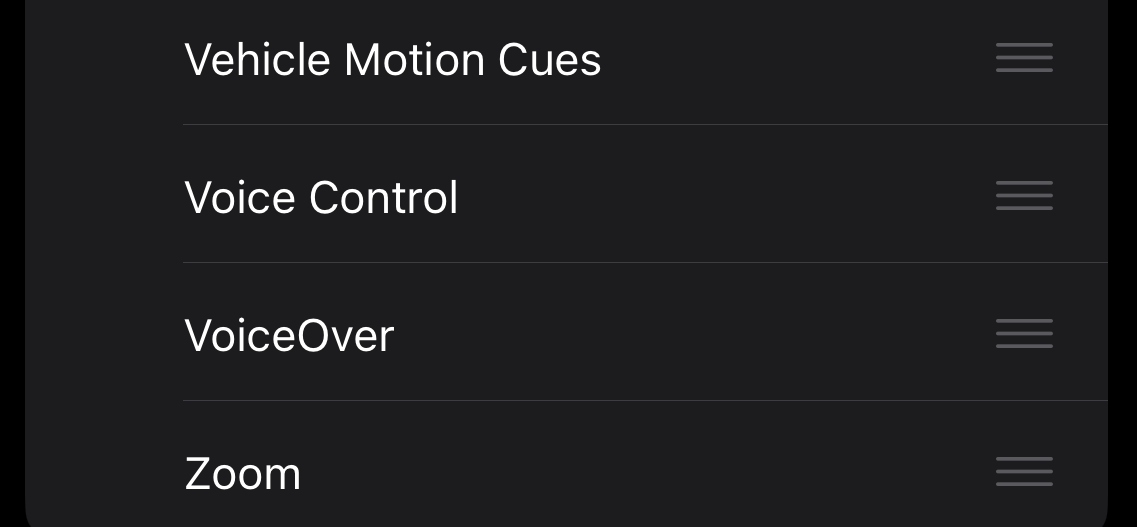
3. Now, whenever you triple-click the button, VoiceOver will toggle instantly.
This shortcut is the best option for people who rely on VoiceOver every day, since it works even when the phone is locked or when you’re inside an app. Professionals often set this up for clients as a backup in case Siri is unavailable.
4. From Control Center
Control Center offers another quick toggle method, but it requires setup:
1. Go to Settings > Control Center.
2. To use it, swipe down from the top right of the screen (or swipe up from the bottom on legacy iPhone devices) to open Control Center.
3. Search for Accessibility Shortcuts and add it to your Control Center.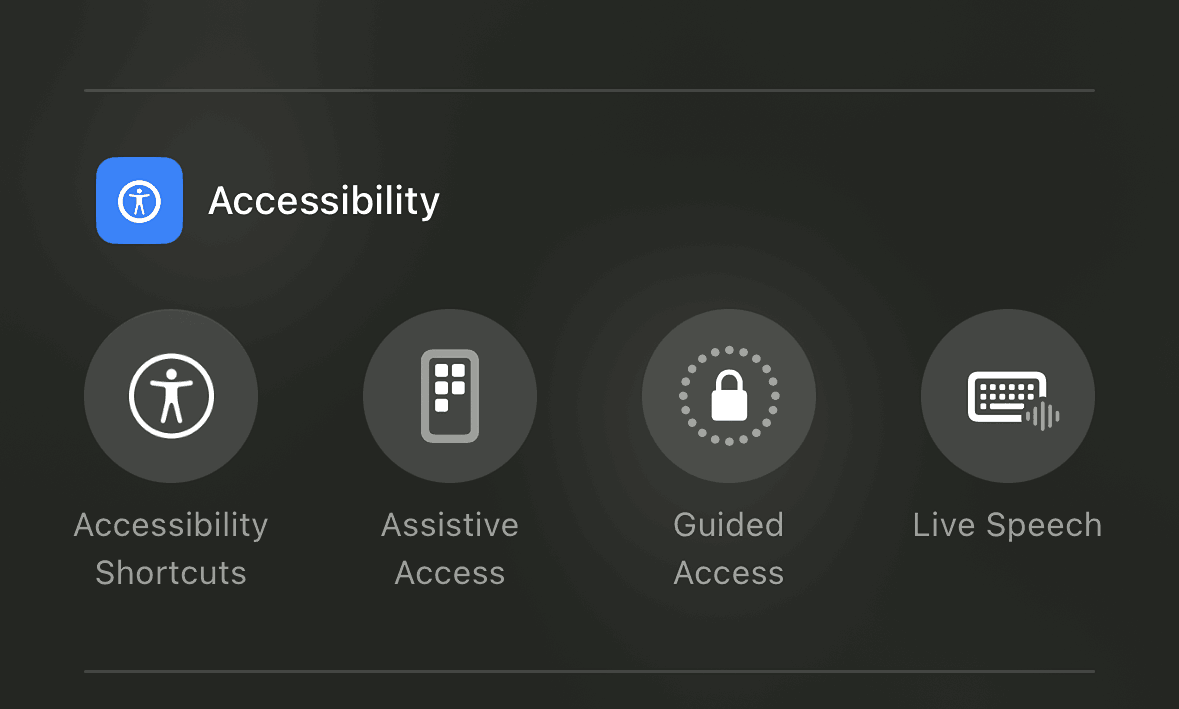
4. Once added, tap the Accessibility Shortcuts icon.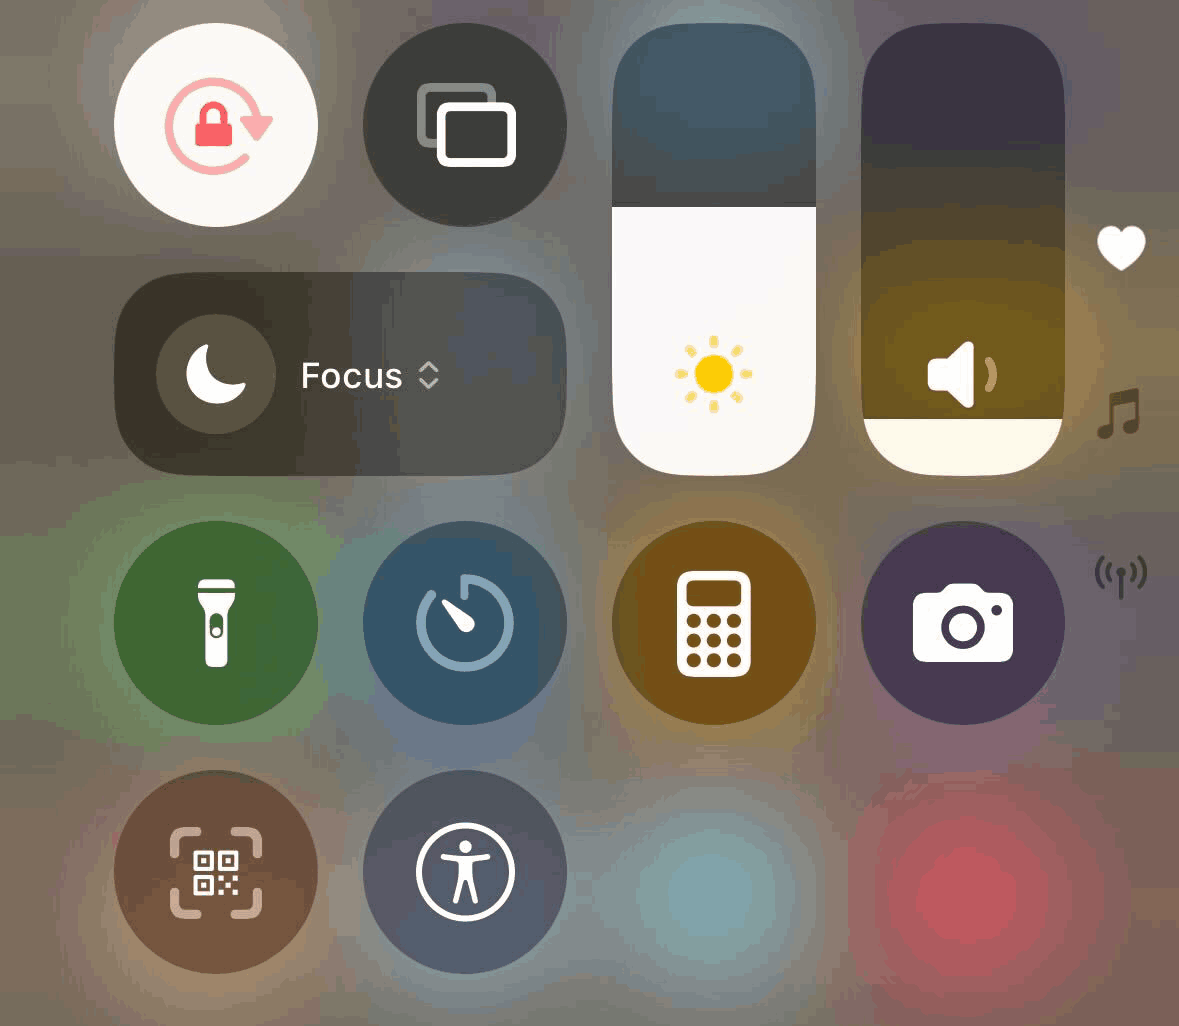
This method is ideal for users who prefer a visual button rather than remembering gestures or commands. It’s also useful for people who may occasionally need VoiceOver but don’t want to dedicate the side button shortcut to it.

Note: Test VoiceOver on real iOS device cloud. Try TestMu AI Now!
How to Change Settings for VoiceOver in iOS?
Mobile accessibility testing is not just about whether VoiceOver speaks; it’s about whether it speaks the right thing, in the right way, under any configuration.
You need to ensure that whatever setting may be turned on, an iOS app is compatible with it and presents no challenges to visually challenged people. Hence, it is important to traverse across the main settings Apple provides for VoiceOver in iOS before moving on to the testing part.
- Adjust Volume: VoiceOver volume by default is the same as the phone’s volume. However, background audio is lowered while VoiceOver speaks if you turn on “Audio Ducking” in Settings > Accessibility > VoiceOver > Audio.
- Auto-Select Speaker: This setting can turn on the speaker automatically during a call if the user is not holding the phone close to their ear. If the app contains a calling feature, the developers and testers need to test for it with this setting. This feature can be turned on/off in Settings > Accessibility > VoiceOver > Audio.
- Change VoiceOver Language: VoiceOver’s language is the same as the phone’s set language. To change it, select the language of choice from Settings > General > Language & Region > Add Language. If VoiceOver is reading text from a language other than the set language, it can detect it automatically and switch to the text’s language.
- Change Speaking Voice: The user can change the voice of VoiceOver in iOS by selecting from a bunch of options available at Settings > Accessibility > VoiceOver > Speech. Users can also add new voices from the same panel.
- Change the Speaking Rate: The speaking rate of VoiceOver can be changed in Settings > Accessibility > VoiceOver > Speaking Rate by adjusting the slider.
- Change Pitch: The pitch of the audio can be changed in the same setting menu, and also select an option to have a high pitch for the first item of the group and a low pitch for the last item.
- Change Verbosity: Verbosity defines how much VoiceOver needs to speak after selecting an option. It can be adjusted in Settings > Accessibility > VoiceOver > Verbosity.
The user can also make groups that change the way something is referred to by VoiceOver. For example, [ can be set as “left bracket”, which is how VoiceOver will refer to it from then on.
Key Controls for Using VoiceOver on iOS
Using VoiceOver in iOS is a different experience from using the iPhone when it is turned off. It takes over the meaning of default actions, gestures and modifies the real behavior of the device in some ways.
Hence, it makes sense for developers, testers, and users to understand the usage of VoiceOver in iOS using a few examples of common user behavior.
- Activating an Item: Tap an item once to select it and hear it spoken, then double-tap anywhere to activate the item in focus.
- Change Item in Focus: There are many items (options) listed on a screen, and the first item remains in focus after opening a new panel or scrolling. To change the item in focus, place your finger at any place and drag it upward or downward.
- Scrolling: Scrolling on an iOS device can be done by scrolling with three fingers in an up, down, or sideways direction. The device will speak out the item number, which is at the top after scrolling, such as “Item 6 of 16”.
- Navigate to Home Screen: Dragging up from the bottom of the screen until two rising tones are heard will take the user to the “Home Screen”.
- Read out the current item: Selecting an item will force VoiceOver in iOS to read it aloud, such as “Calendar March 26 Wednesday” when the “Calendar” icon is selected. This is also true for a section of text.
- Move Between Items: Swipe right to select the next item and swipe left for the previous one. Dragging a finger across the screen makes VoiceOver speak each item the finger passes over.
- Pause VoiceOver: The current reading of VoiceOver can be paused by tapping on the screen with two fingers. This is especially essential when VoiceOver is reading a long paragraph of text. Resuming the paused VoiceOver can be done with the same action.
- Unlock iPhone: When VoiceOver in iOS is on and the device is locked, the user can slide their finger from the bottom of the screen upward till two tones are heard. In case the FaceID is on, the phone will unlock normally (as with VoiceOver off), and the user will feel a haptic response.
- Open Control Center: To open “Control Center”, tap the status bar located on the top left of the screen. Then, slide up with three fingers anywhere on the screen to open “Control Center”. The VoiceOver voice speaking “Control Center” will confirm the action.
- Return to Previous Screen: To return to the previous screen, rub two fingers on the screen in a “Z” like motion.
- Open Notification Center: Tap on the status bar on the top left of the screen and slide down with three fingers anywhere on the screen to open “Notification Center”.
- Open App Switcher: The App Switcher or open applications can be seen by sliding up the finger from the bottom of the screen until three tones are heard.
How to Test VoiceOver on iOS?
Testing iOS VoiceOver is a little complex, time-intensive, and carefully executed job due to the variables involved. The following steps will help a tester get through.
1. Define Test Objectives: Define test objectives, outline measurable success criteria, and align the testing team. Include navigation, element selection, text readout, and interaction tests to track accessibility coverage effectively.
2. Enable VoiceOver for Testing: Enable VoiceOver using Settings, Accessibility Shortcut, Control Center, or Siri. Ensure testers understand VoiceOver gestures, as standard taps, swipes, and scrolls behave differently when active.
3. Initialize Application Under Test: Test the AUT by launching web apps in Safari for optimal VoiceOver compatibility or native apps from the home screen. Simulate real user interactions during tests.
4. Verify Navigation Components: Test all menus, navigation bars, and dropdowns using VoiceOver gestures. Check focus order, announcements, responsiveness, and logical traversal to confirm efficient navigation and accessibility compliance.
5. Validate Element Interaction: Test buttons, links, images, and interactive controls. Verify each element triggers the expected action and that VoiceOver provides accurate audio feedback aligned with gestures.
6. Assess Text Readout Accuracy: Test that VoiceOver accurately reads all text, labels, and image descriptions. Make sure that dynamic content updates, hints, and labels convey the correct context for visually impaired users.
7. Test Scrolling: Validate scrolling scenarios with three-finger gestures to ensure content accessibility, focus retention, and proper element announcements during VoiceOver navigation tests.
8. Test Link Behavior: Test link activation, including anchor navigation, pop-ups, and in-page transitions. Confirm VoiceOver provides correct feedback for all link interaction tests.
9. Validate Input Fields: Test input fields, including form entries and interactive controls. Ensure VoiceOver reads labels, hints, and errors correctly during input interaction tests.
10. Test With VoiceOver Configurations: Test the AUT under different VoiceOver settings, including pitch, speech rate, verbosity, and voices, to ensure consistent behavior during configuration tests.
11. Perform Cross-Device and Platform Testing: Test across multiple iOS devices, OS versions, and screen sizes. Ensure consistent VoiceOver behavior, UI rendering, and accessibility during cross-device tests.
12. Test With Assistive Technologies: Test interoperability with other assistive technologies, including switch controls, magnifiers, and external keyboards, ensuring VoiceOver functionality is unaffected during combined assistive tests.
Simplify iOS VoiceOver Testing With TestMu AI Real Device Cloud
For scaling accessibility testing, iOS VoiceOver was always one of the challenging areas. TestMu AI helps simplify this by letting you test VoiceOver on a real device cloud of real iOS devices.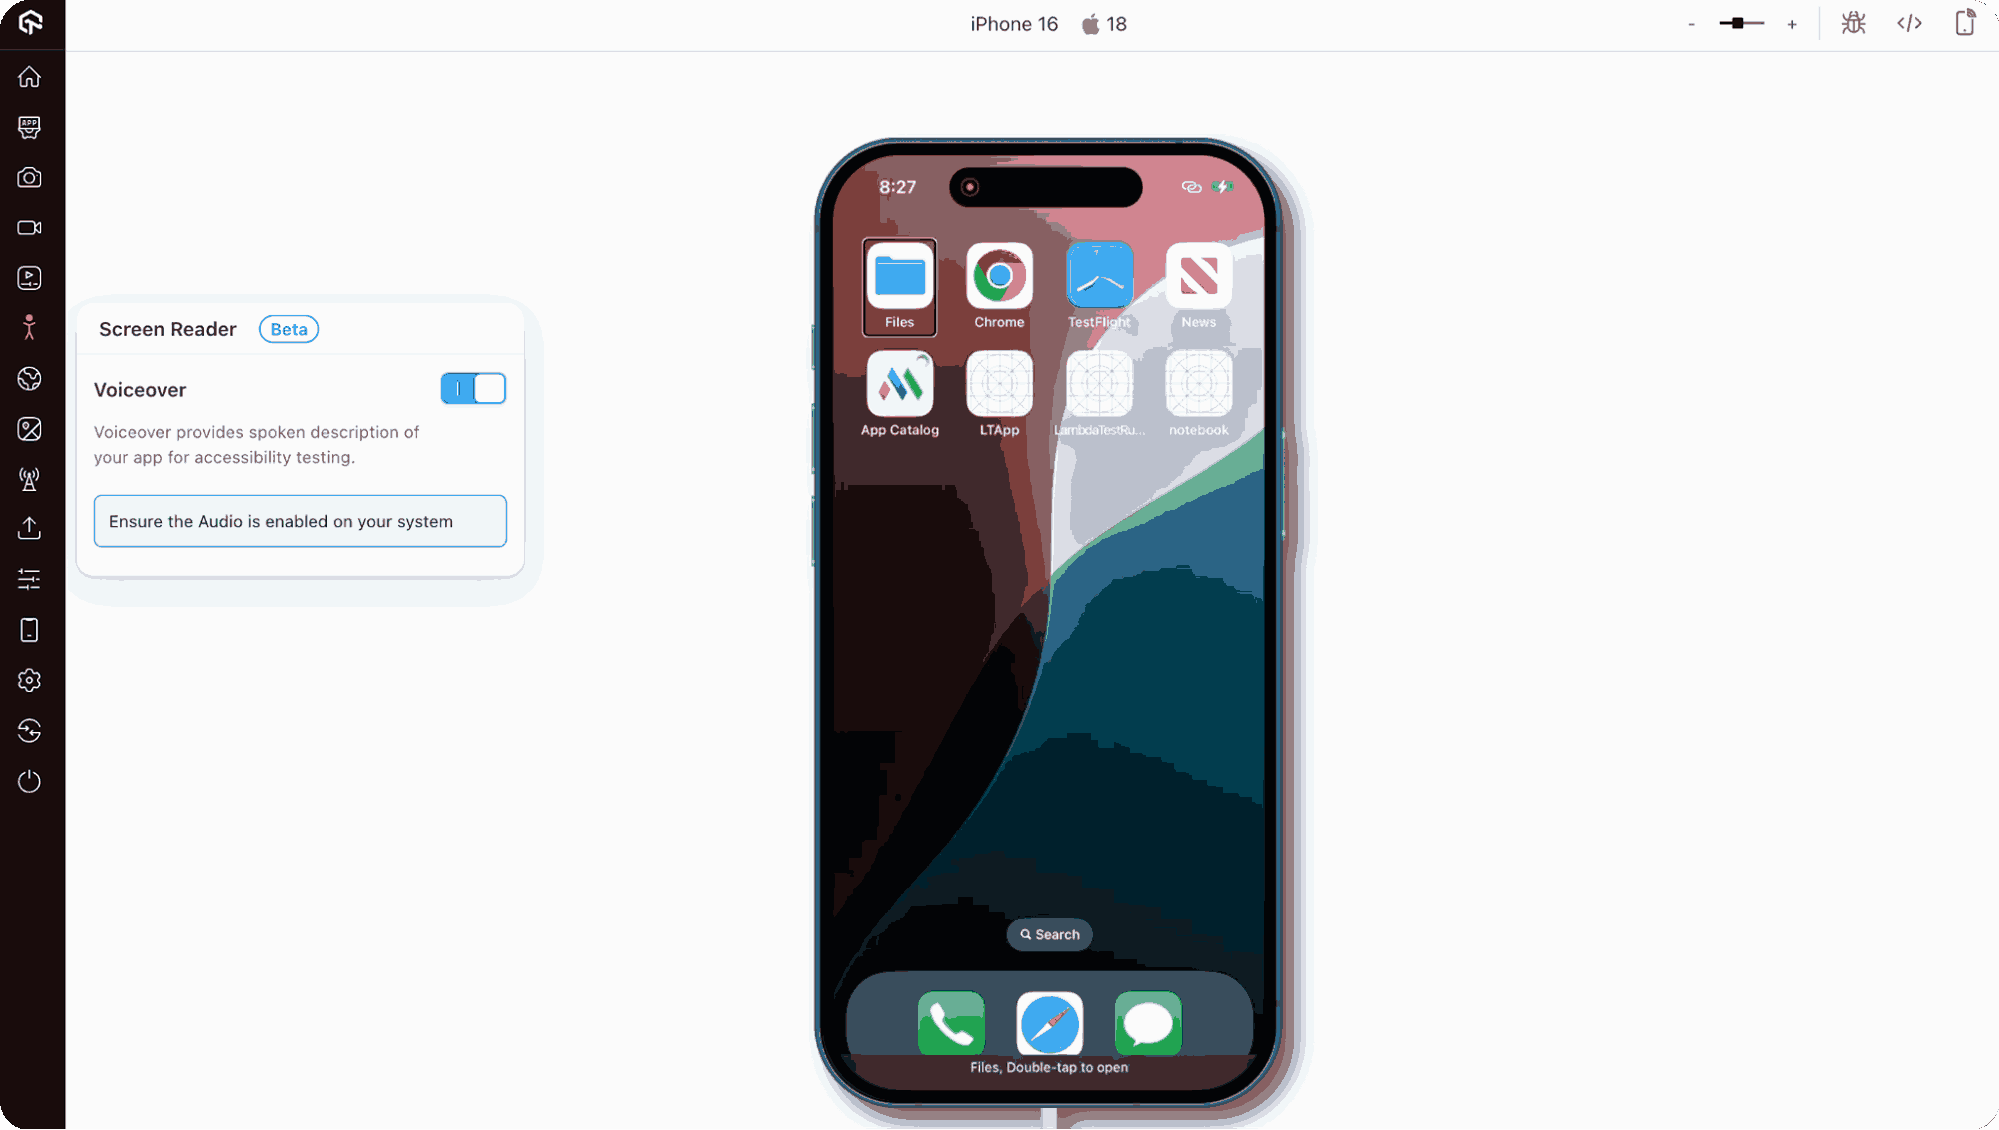
So this way, you’re not limited to a single in-house iPhone or iOS simulator. This matters because accessibility issues often appear differently depending on the device and iOS version.
To get started, check out this guide on iOS VoiceOver testing with TestMu AI.
Features:
- Localization & Accessibility: Test across multiple locales and validate VoiceOver or accessibility features. Ensure your app is inclusive, responsive, and consistent for diverse languages, regions, and user needs.
- Automation Frameworks: Run automation with Appium, XCUITest, Espresso, Playwright, and Detox. Validate UI and functionality across platforms, integrate with CI/CD pipelines, and accelerate deployments with large-scale cloud execution.
- Performance & Network Testing: Simulate real network conditions like 3G, 4G, or 5G. Validate responsiveness, run geolocation tests, and ensure smooth user experiences in varied bandwidths and regions.
- App Management & Uploads: Quickly upload .apk, .aab, or .ipa files, or fetch apps directly from stores. Install and test multiple apps in a single session.
- Debugging & Developer Tools: Use pre-installed DevTools, an intelligent UI inspector, and inspect hybrid or native apps, debug layouts, and relaunch effortlessly to speed up troubleshooting.
What Are the Shortcuts for iOS VoiceOver?
iOS VoiceOver can be controlled in two ways: gestures by touch or keyboard shortcuts.
Gestures like three-finger swipes are covered in the Key Controls for Using VoiceOver on iOS section above.
For keyboard (or Magic Keyboard) use, you need to first set a VoiceOver Modifier Key (VK) in Settings > Accessibility > VoiceOver > Typing > Modifier Keys. Once configured, VK is used with other keys to run VoiceOver commands.
The table below lists the common shortcuts.
| Action | Shortcut |
|---|---|
| Select next/previous item | VK + Right Arrow / VK + Left Arrow |
| Touch and hold the selected item | VK + Shift + M |
| Read from the current position | VK + A |
| Read from top | VK + B |
| Pause or resume reading | Control |
| Copy the last spoken text to the clipboard | VK + Shift + C |
| Search for text | VK + F |
| Mute or unmute VoiceOver | VK + S |
| Go to Home screen | VK + H |
| Open the Notifications screen | VK + M, then Option + Up Arrow |
| Open Search | Option + Up Arrow |
| Open App Switcher | VK + H, H |
| Swipe up or down | VK + Up Arrow / VK + Down Arrow |
| Turn the rotor left or right | VK + Command + Left/Right Arrow |
| Return to the previous screen | Esc |
| Tap an item | Up Arrow + Down Arrow |
| Move forward/back one word | Option + Right/Left Arrow |
| Move up/down one line | Up Arrow / Down Arrow |
| Previous/next paragraph | Option + Up/Down Arrow |
| Select all text | Command + A |
| Copy, cut, or paste | Command + C / Command + X / Command + V |
| Undo or redo the last change | Command + Z / Shift + Command + Z |

Conclusion
VoiceOver in iOS is an accessibility feature that transforms how visually challenged users interact with their devices. Understanding what VoiceOver is, how to turn it on or off, and how to adjust its settings is essential for both users and developers. Mastering key controls, from selecting items to navigating the Home Screen, ensures a smooth and efficient experience.
For developers and testers, conducting thorough VoiceOver testing, including with platforms like TestMu AI, helps ensure that iOS apps remain accessible. Leveraging shortcuts and custom gestures further enhances usability, making iOS devices more inclusive.
Citations
- Turn on and practice VoiceOver on iPhone: https://support.apple.com/en-in/guide/iphone/iph3e2e415f/ios
- Use VoiceOver gestures on iPhone: https://support.apple.com/en-in/guide/iphone/iph3e2e2281/ios
Author

Harish Rajora
Blogs: 100


Harish Rajora is a software developer at TestMu AI with over 6 years of hands-on experience in Python and cross-platform application development across Windows, macOS, and Linux. He has authored 800+ technical articles and worked on large-scale projects, including GenAI applications and core engineering features used by millions. Harish has led DevOps initiatives building CI/CD pipelines with Jenkins, AWS, GitLab, and GitHub, and holds an M.Tech in Software Engineering from IIIT Allahabad.
Reviewer

Rahul Mishra
Reviewer
Rahul Mishra is a Lead Member of Technical Staff at TestMu AI (formerly LambdaTest), leading frontend engineering and accessibility testing across the quality engineering platform. He mentors frontend engineers, runs code reviews and sprint planning, optimizes React.js rendering performance, and makes product features accessible to users with disabilities through WCAG and ADA-compliant accessibility audits. He brings 10+ years of experience across React.js, VueJS, TypeScript, Swift, Objective-C, and AWS, with earlier work as a Technical Lead at VectoScalar Technologies. Rahul holds a B.E. in Information Technology.


iOS VoiceOver FAQs
Did you find this page helpful?
More Related Learning Hubs
TestMu AI forEnterprise
Get access to solutions built on Enterprise
grade security, privacy, & compliance
- Advanced access controls
- Advanced data retention rules
- Advanced Local Testing
- Premium Support options
- Early access to beta features
- Private Slack Channel
- Unlimited Manual Accessibility DevTools Tests