

Power Your Software Testing with AI Agents and Cloud
The Native AI-Agentic Cloud Platform to Supercharge Quality Engineering. Test Intelligently and Ship Faster.


- TestMu AI (Formerly LambdaTest)
- /
- Blog
- /
- Smart Visual Testing with LLMs: Fewer False Positives
Smart Visual Testing with LLMs: Fewer False Positives
LLMs evaluate UI screenshots semantically, not pixel by pixel. This guide covers how smart visual testing with LLMs works, what it costs, and when to use it.
Last Updated on:
On This Page
- What Is Smart Visual Testing with LLMs?
- AI Pixel, Pattern & LLM Comparison
- LLM-Powered Visual Testing Benefits
- Smart LLM Visual Testing Workflow
- Scalable LLM Visual Testing Setup
- TestMu AI SmartUI Usage
- Cost-Performance Visual Trade-offs
- Real-World Visual Testing Example
- Modern Visual Testing Tools
- Challenges & Limits
- How to Measure Effectiveness
- Future-Ready Visual Testing
- Conclusion
You set up visual testing, ran it for two weeks, and then turned it off. Not because it failed, but because a Chrome update triggered 300 failures, all caused by rendering differences.
That's the false positive problem. Most teams either skip visual testing entirely or spend more time approving noise than catching real bugs. The CI pipeline blocks, developers start ignoring failures, and eventually, someone removes visual tests from required checks, and nobody argues.
LLMs change the comparison layer. Smart visual testing with LLMs stops asking "did these pixels change" and starts asking "did anything meaningful change?" That distinction is everything.
Overview
What Does Smart Visual Testing with LLMs Mean?
Smart visual testing with LLMs uses a multimodal model to evaluate screenshots the way a human reviewer would, focusing on the meaning of a UI change rather than counting pixel differences. It works as an analysis layer on top of your existing automation setup, interpreting the role of each element so that expected updates are ignored and genuine regressions are surfaced.
Where Do Pixel Diff, Pattern-Based AI, and LLM-Based Testing Differ?
- Traditional Pixel Diff: Relies on raw pixel-by-pixel comparison, produces a high volume of false positives, needs manual ignore regions, and best suits simple, stable interfaces.
- Pattern-Based AI: Trained on known UI patterns to filter common rendering noise automatically, keeps false positives low for familiar layouts, and fits mid-scale teams with predictable UIs.
- LLM-Based Smart Testing: Evaluates screenshots through semantic context, infers intent from unknown patterns, and delivers the most accurate signal in CI/CD at the cost of higher API usage and latency.
How Does the LLM-Based Workflow Operate?
- Interpreting the UI: The model identifies elements on the screen and assigns weight to each one, recognizing that a primary CTA matters more than a decorative icon or footer link.
- Understanding the Change: It examines layout, structure, content, and context to separate routine updates like timestamps from impactful regressions such as a missing checkout button.
- Making a Decision: The system classifies each comparison as expected, cosmetic, low-risk, or a real issue, leaving only meaningful results for human review.
What Does Implementation Actually Involve?
Implementation keeps your existing Playwright, Cypress, or Selenium tests intact and only changes how captured screenshots are analyzed. Both baseline and current images are sent to a multimodal model along with a structured prompt that defines what to check, what to ignore, and how to return the result, usually as a PASS, WARN, or FAIL with a short reason. Stable baselines, precise ignore rules, and gradual rollout from non-blocking to blocking checks keep results reliable as the prompt and UI evolve.
How Can You Run Visual AI Testing with TestMu AI SmartUI?
TestMu AI SmartUI plugs into your existing test framework so screenshot capture stays the same while its Smart Visual AI Agent handles the comparison and review. A Visual AI toggle inside the SmartUI dashboard highlights meaningful differences with interactive diff boxes and plain-English explanations, while Agent Skills help coding assistants like Claude Code, Cursor, and GitHub Copilot wire SmartUI into test suites with the right snapshot calls, viewport settings, and masking rules.
What Is Smart Visual Testing with LLMs?
Smart visual testing with LLMs means using a multimodal model to compare screenshots the way a human would. Instead of measuring how many pixels changed, it focuses on understanding what actually changed.
AI visual testing already goes beyond pixel diff. Models trained on UI patterns filter rendering noise and reduce false positives. That's a real improvement. But those models still rely on pattern recognition. They identify changes they've seen before, but they don't understand what those changes mean in context.
LLMs go a step further. Give an LLM two screenshots, and it can interpret what the UI elements are and whether a change actually matters. A timestamp update in the footer is expected. A primary CTA button disappearing is a critical failure. A pattern-based model has to be trained to recognize that difference. An LLM can infer it from context.
The "smart" part is semantic understanding. The LLM infers the role of UI elements based on visual and semantic context, and evaluates whether a change is likely significant. This isn't a better comparison algorithm. It's a different way of evaluating changes. It works on top of your existing test setup as an analysis layer. You don't rewrite your tests, and you don't change how screenshots are captured.

Note: Run smart visual testing with LLMs using SmartUI. Try SmartUI free
How Pixel Diff, Pattern-Based AI, and LLM-Based Testing Compare?
Before committing to an approach, it helps to understand where each one breaks down. Smart visual testing with LLMs sits at one end of this spectrum, the most contextually aware but also the most resource-intensive. This difference determines how much review time your team actually saves.
| Aspect | Traditional Pixel Diff | Pattern-Based AI | LLM-Based Smart Testing |
|---|---|---|---|
| Detection method | Pixel-by-pixel comparison | Trained in UI pattern recognition | Semantic context evaluation |
| False positive rate | High, every pixel counts | Low for known patterns | Low, including unknown patterns |
| Dynamic content handling | Manual ignore regions required | Automatic for common patterns | Prompt-driven ignore rules |
| Cross-browser rendering | Flags all rendering differences | Filters common rendering noise | Evaluates whether rendering difference affects UX |
| New UI patterns | Flags everything | May flag until trained | Infers from context |
| CI/CD suitability | Works, noisy | Works, manageable | Works, most accurate signal |
| Cost per run | Negligible | Low | Higher API calls per comparison |
| Best for | Simple, stable UIs | Mid-scale teams, known UI patterns | Teams with high false positive rates and varied UI |
Pattern-based AI handles the majority of real-world noise well. LLM-based analysis closes the remaining gap, the cases where context determines whether a change matters, but it comes with latency and cost that need to be managed deliberately.
Why Use LLMs for Visual Testing?
Smart visual testing with LLMs handles noise that pattern-based tools still struggle with. AI-powered visual testing already handles common noise like subpixel font shifts, anti-aliasing differences, and minor rendering variations across browsers. That reduces a large portion of false positives. But it doesn't eliminate them.
The gap shows up when changes need context.
A pattern-based system can recognize that something changed. It can even classify the type of change. What it can't do reliably is determine whether that change actually matters in the context of the page.
Cross-browser rendering is where this gap is most visible in practice. Chrome's font anti-aliasing renders text slightly differently from build to build after engine updates.
Safari's subpixel rendering produces different edge smoothing from Chrome on the same page. Firefox's layout engine handles fractional pixel values differently. None of these differences affects the user experience.
Traditional visual comparison tools and pixel-diff systems flag all of these changes as failures because they operate on raw pixel values rather than understanding visual intent. Pattern-based AI visual testing handles many of the most common rendering differences.
Chrome anti-aliasing behavior, for example, is well understood, but these systems still struggle when rendering differences are new, environment-specific, or appear in uncommon UI configurations.
This becomes a problem in other real-world visual regression testing scenarios as well. Dynamic content that does not follow consistent patterns gets flagged even when the change is expected. A layout shift that is intentional on mobile but a bug on desktop can appear identical to a traditional screenshot comparison tool. Coordinated updates, such as a design token change applied across dozens of pages, are often treated as separate failures instead of a single intentional UI update.
LLM-based and AI-powered visual testing systems address this by evaluating changes in context rather than isolation. Instead of only asking "what changed," the system can determine whether the change meaningfully affects the user experience. That shift is what reduces the remaining false positives that pattern-based visual comparison tools still struggle to handle.
This is the same principle behind visual testing AI agents, systems that automate not just comparison, but the full decision-making workflow from test trigger to review.
How Smart Visual Testing With LLMs Works?
In smart visual UI testing with LLMs, the test framework itself stays unchanged. LLMs do not replace your existing automation stack. They change how visual differences are interpreted during visual regression testing.
Everything up to screenshot capture remains the same. Your Playwright, Cypress, or Selenium tests navigate through the UI, wait for the page to stabilize, and capture screenshots at defined checkpoints. This process still resembles traditional snapshot testing workflows. The difference is what happens after the screenshots are captured. Instead of relying entirely on pixel-by-pixel comparison, the images are analyzed by an LLM.
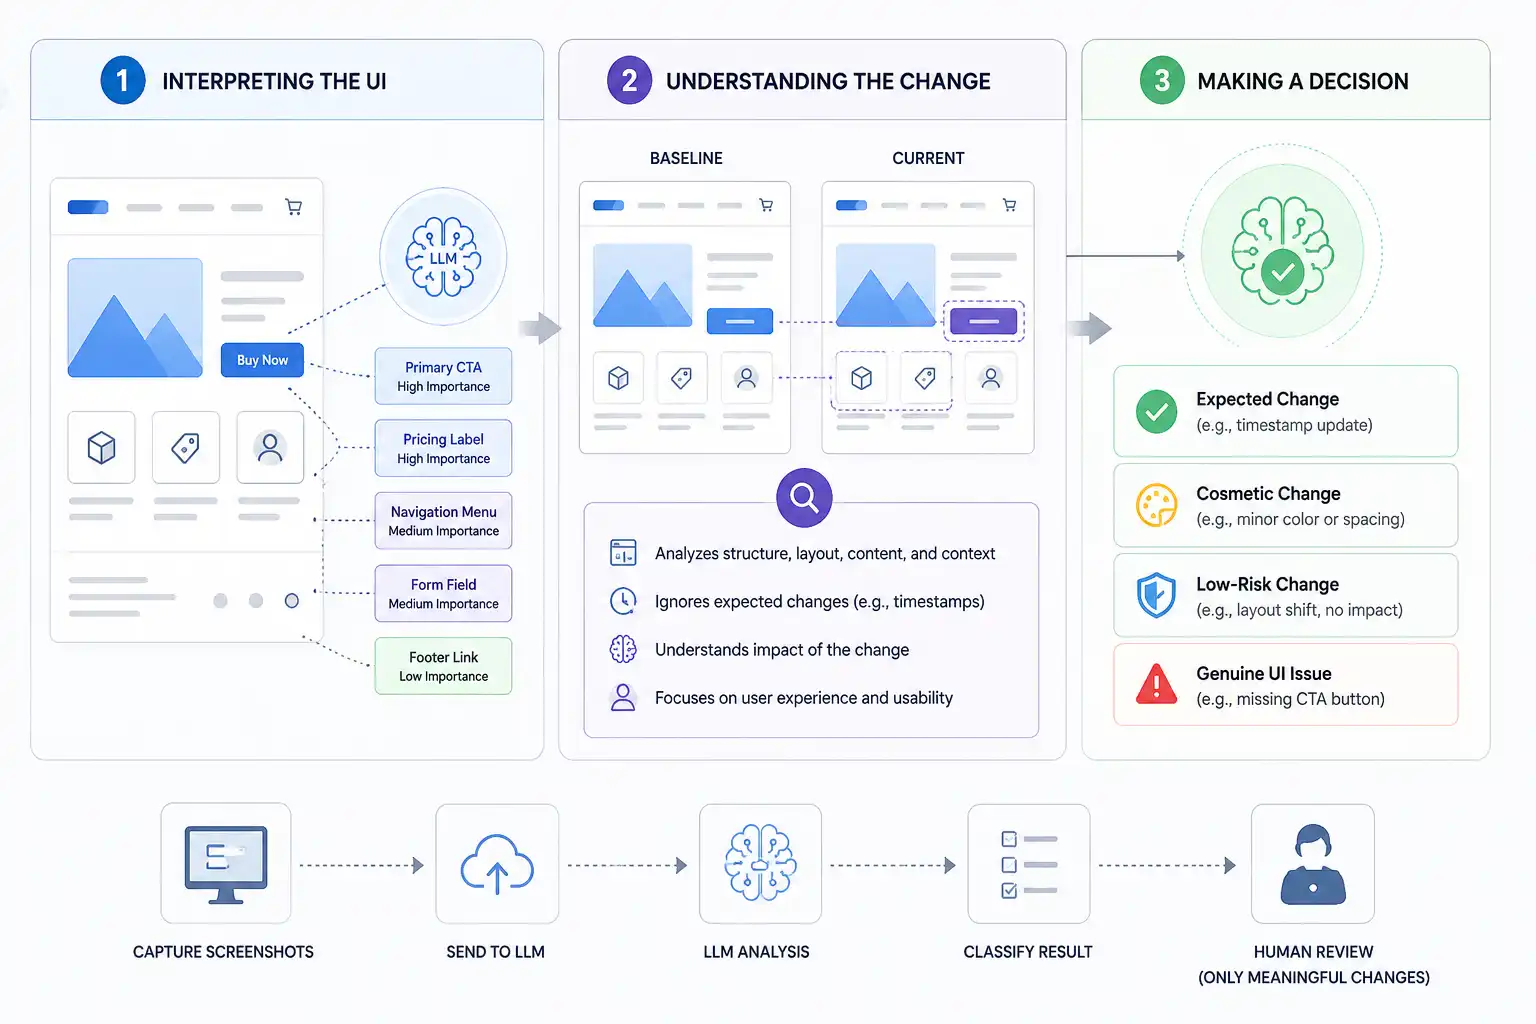
The LLM processes the interface more like a human reviewer. Instead of viewing the screen as raw pixels, it understands the UI as a collection of elements, structure, and relationships.
- Interpreting the UI: The LLM identifies what appears on the screen and understands the role of each element. Buttons, text blocks, navigation menus, forms, and images are not treated equally. A primary CTA button carries more importance than a footer link. A pricing label is more critical than a decorative icon. Traditional visual UI testing tools based on pixel comparison treat every visual difference the same. LLM-based systems do not.
- Understanding the Change: Next, the system evaluates what actually changed. It analyzes structure, layout, content, and context rather than isolated pixel differences. A timestamp updating dynamically is expected behavior. A layout shift that preserves usability is usually low impact. A missing checkout button, however, is a critical regression. The same visual difference can produce completely different outcomes depending on where it occurs and how it affects the user experience.
- Making a Decision: Based on that contextual evaluation, the LLM classifies the result. Changes can be marked as expected, cosmetic, low-risk, or genuine UI issues. By this stage, most low-value noise has already been filtered out. What remains are changes that genuinely require human review.
Your automation tests do not change. Your screenshot capture process does not change. What changes is the intelligence applied during the analysis phase. Instead of reviewing hundreds of noisy diffs, teams using smart visual testing receive a smaller, higher-quality set of actionable results.
How Do You Implement Smart Visual Testing with LLMs?
The entry point for smart visual testing with LLMs is lower than most teams expect. You don't need to rebuild your test suite to experiment with it. If you're already capturing screenshots in Playwright, Cypress, or Selenium, the setup stays the same. The only change is how those screenshots get analyzed.
In a typical setup, both the baseline and current screenshots are sent to a multimodal model in a single request, along with instructions on how to evaluate the difference. Instead of calculating pixel differences, the system asks the model to interpret the change and return a structured decision.
This follows the same structure used in OpenAI's multimodal API, where text and images are sent together as part of a single request.
content: [
  { type: "text", text: yourPrompt },
  { type: "image_url", image_url: { url: `data:image/png;base64,${baseline}` } },
  { type: "image_url", image_url: { url: `data:image/png;base64,${current}` } },
]
The prompt defines how the comparison should be performed, and the model returns a classification based on that instruction. The core idea is simple: instead of comparing pixels, you provide context and let the model evaluate the change.
Writing the Prompt
The prompt is the core of smart visual testing with LLMs. It controls how the model evaluates the screenshots. It needs to clearly state what to check, what to ignore, and how the result should be returned.
A typical prompt looks like this:
You are a QA engineer reviewing two UI screenshots for visual regressions.
The first image is the baseline. The second is the current state.

Ignore:
  - Timestamp or date updates
  - Minor font rendering differences
  - Animated elements still in transition.

Classify the result as PASS, WARN, or FAIL.
PASS: No meaningful changes.
WARN: Cosmetic differences that don't affect functionality.
FAIL: Missing elements, broken layouts, or content changes that affect the user.

Respond in JSON with the following fields: "result" and "reason".
The model returns one of the three values for result: "PASS", "WARN", or "FAIL", along with a "reason" string explaining the decision. A real response looks like this:
{
  "result": "FAIL",
  "reason": "The checkout button is missing from the bottom of the form."
}
You map that output directly to your test outcome:
const { result, reason } = JSON.parse(modelResponse);

if (result === "FAIL") throw new Error(`Visual regression: ${reason}`);
if (result === "WARN") console.warn(`Visual warning: ${reason}`);
FAIL blocks the test. WARN logs but still passes.
Baselines still matter. You're comparing against a known good state, so capture them on stable, merged code, not mid-sprint. Capturing baselines against half-finished UI states locks in incomplete work and creates noise on every subsequent run. For large redesigns, reset baselines completely after the new design merges. For incremental updates, capture in small batches tied to individual commits.
Dynamic content also needs to be handled carefully. Be surgical with ignoring rules: exclude the timestamp wrapper, not the entire product card. Rules that are too broad let real regressions through. Rules that are too narrow recreate the false positive problem you were trying to solve.
This step runs after screenshot capture and before the test result is finalized. Most teams start with non-blocking checks, then tighten the rules once the output is stable.
While smart visual testing with LLMs reduces noise compared to pixel-based comparison, production use still introduces challenges. Prompts often need continuous tuning as UI patterns change, and dynamic content or animations can lead to inconsistent results if the rules are not precise. Managing baselines across frequent UI updates is also difficult, since teams must avoid both stale baselines and accidental acceptance of broken changes. At scale, LLM cost and latency can also become a limitation in CI pipelines.
If maintaining these layers yourself becomes a burden, managed platforms like TestMu AI (formerly LambdaTest) bring screenshot orchestration, LLM-based comparison, and baseline management into a single workflow, as the next section shows.
How to Use TestMu AI SmartUI for Visual AI Testing?
Using TestMu AI SmartUI for visual AI testing stays simple because your existing test automation setup does not change. Frameworks like Playwright, Cypress, or Selenium continue to run tests and capture screenshots as usual, while SmartUI handles the analysis layer using its Smart Visual AI Agent, enabling more reliable automated visual testing without adding complexity to your workflow.
The SmartUI Visual AI Agent reviews screenshots in context, filtering out rendering noise and highlighting only meaningful UI changes. This reduces noisy visual diffs, unclear change interpretation, and manual review effort by converting raw comparisons into actionable insights.
TestMu AI's Visual AI Agent for Faster Review Cycles
TestMu AI SmartUI includes a Visual AI Agent that enhances how teams review and understand UI changes directly inside the comparison workflow.
In the SmartUI comparison page, users can enable Visual AI mode using the Visual AI toggle. Once activated, the system highlights meaningful UI differences on screenshots using interactive diff boxes.
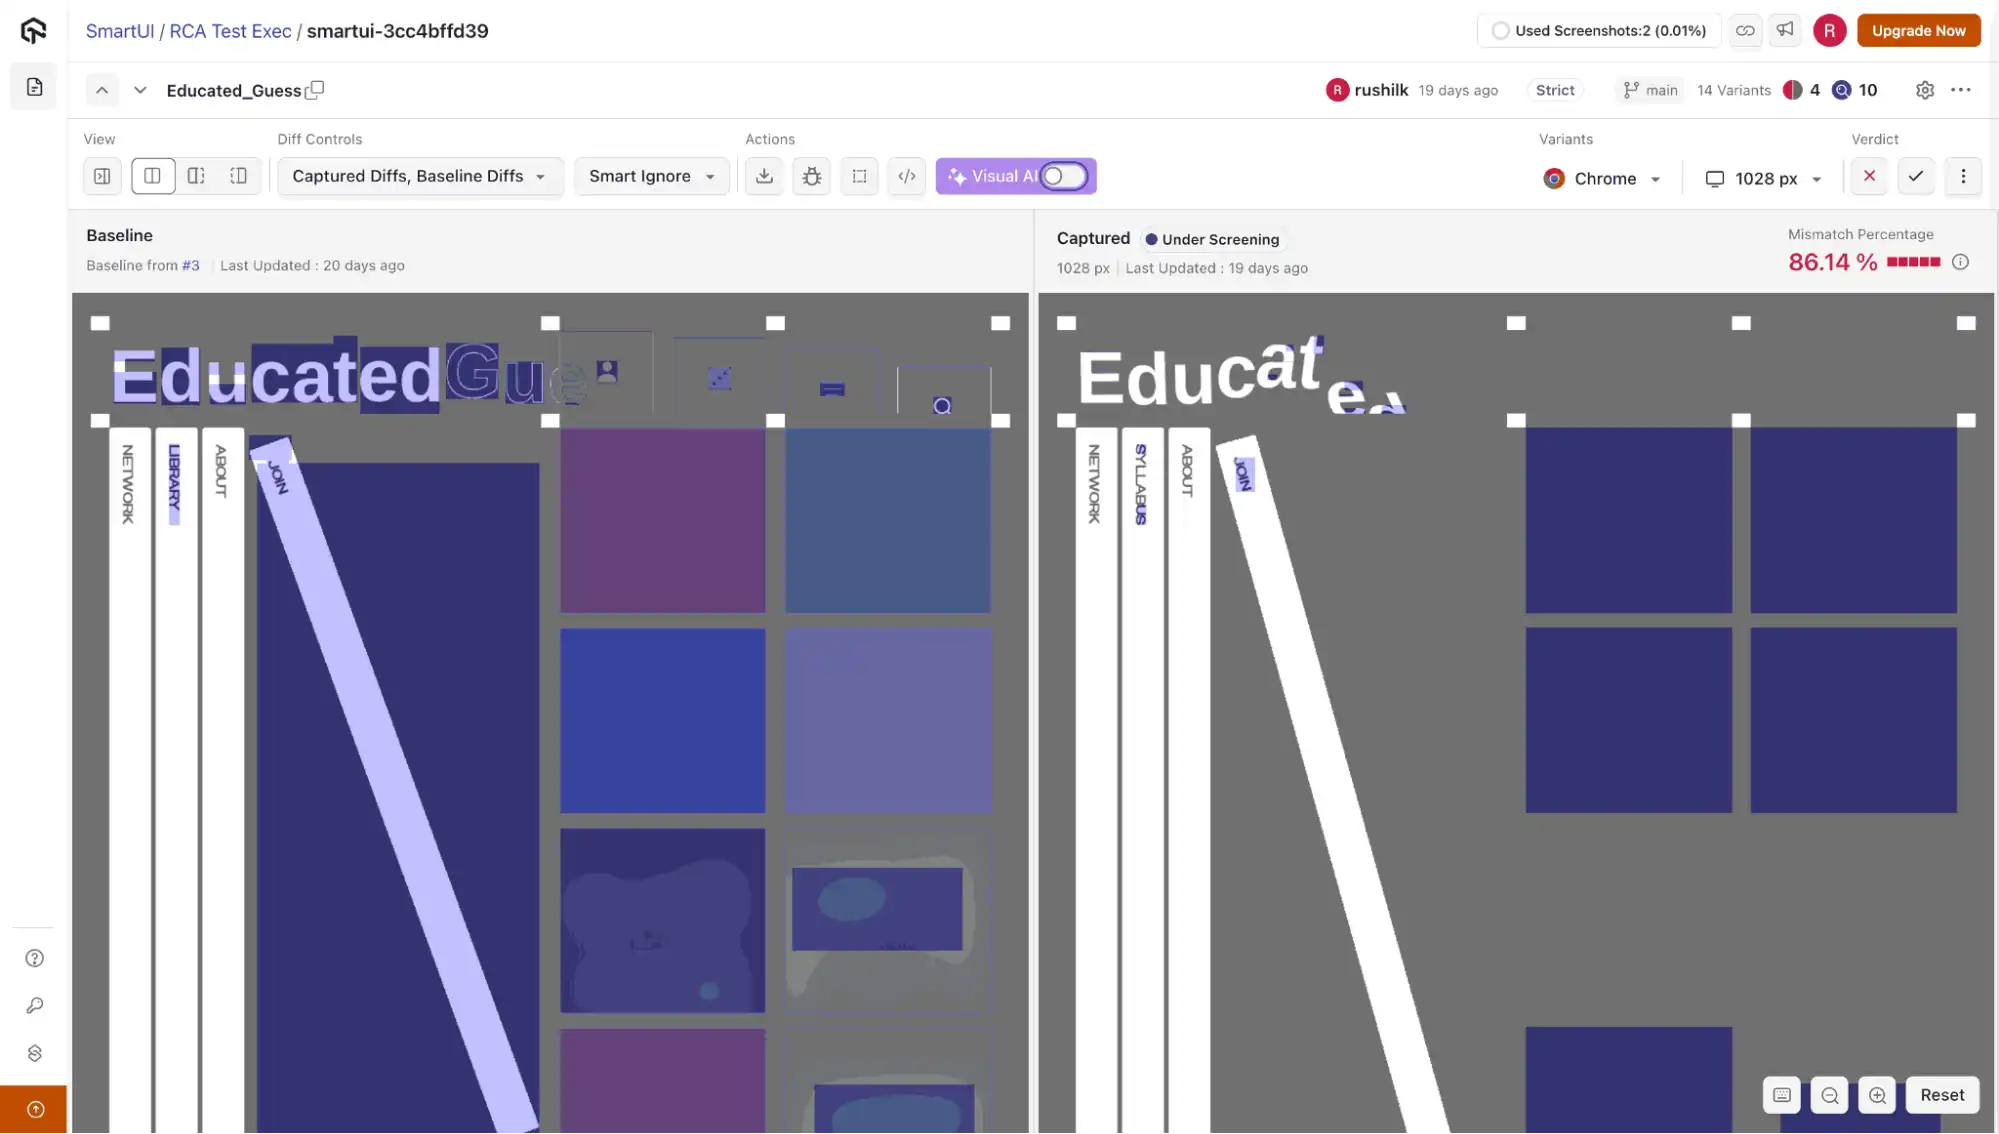
Each highlighted diff can be hovered over or clicked to understand what changed. The system provides a human-readable explanation of the UI change, helping quickly identify layout shifts, missing elements, or content updates without manually inspecting full screenshots.
This makes automated visual testing easier to interpret, reduces review effort, and improves confidence in decision-making during CI/CD runs. To get started, follow this support documentation on how to use SmartUI Visual Agent.
To simplify setup at scale, TestMu AI also provides Agent Skills through its TestMu AI agent-skills system. These smartui-skills for SmartUI help AI coding assistants like Claude Code, Cursor, and GitHub Copilot correctly integrate SmartUI into test suites.
Instead of writing setup code or fixing incorrect implementations, developers can use prompts like "add SmartUI to my Playwright tests and mask the timestamp," which produces smartuiSnapshot() at the correct points in the test flow, along with accurate configurations such as viewport settings and masking rules for dynamic content. This ensures a consistent SmartUI setup across projects with minimal manual effort.

Understanding the Cost and Performance Trade-off
LLM visual testing is not free, and it's not instant. Smart visual testing with LLMs adds API cost and latency that pixel diff does not. Before you scale it across your full test suite, understand what you're committing to.
- The cost math: Every comparison is an API call. A test suite with 200 screenshots across three browsers is 600 API calls per run. At GPT-4o pricing, that's roughly $0.01–$0.03 per call, depending on image size and token count. At 600 calls per run and 10 runs per day, you're looking at $60–$180 per day, before you factor in retries for non-deterministic results.
- The latency math: Each API call adds 1–3 seconds to your pipeline. 600 calls run sequentially add 10–30 minutes. Run them in parallel batches, and you bring that to 2–5 minutes, still meaningful overhead if your current visual suite runs in under a minute.
- The practical decision: Smart visual testing with LLMs is worth the cost on critical user flows where false positives have a real business cost, checkout, login, onboarding and pricing pages. On lower-traffic pages or internal tools where a few false positives per week are acceptable, pixel diff or pattern-based AI is sufficient and significantly cheaper.
A sensible starting configuration: apply LLM analysis to 20–30% of your screenshots, the highest-value paths, and pattern-based AI to the rest. Expand once you've validated the cost-to-signal ratio for your specific test suite.
How This Looks in Practice with SmartUI
The LLM-based approach above shows the mechanism: capture screenshots, send them for analysis, and classify the result.
The visual testing tool applies the same concept differently. You don't send screenshots manually or define prompts. The comparison runs as part of your test execution. Once visual testing is enabled in your configuration, you capture checkpoints directly inside your test:
await smartuiSnapshot(driver, "homepage");That call captures the current UI state and sends it to SmartUI for comparison against the baseline. The setup looks like this:
const capabilities = {
  browserName: "chrome",
  "LT:Options": {
    user: process.env.LT_USERNAME,
    accessKey: process.env.LT_ACCESS_KEY,
    visual: true,
    "smartUI.baseline": true
  }
};
Setting smartUI.baseline to true marks the entire build as the new baseline. Omit it or set it to false for regular comparison runs.
Visual testing is enabled at the capability level. From that point on, every snapshot you define becomes part of your visual test coverage.
SmartUI handles everything after capture: baseline management, noise filtering (dynamic content, anti-aliasing, layout shifts), and result classification and grouping. You're not writing comparison logic or tuning prompts. You're deciding where visual validation matters in your test flow.
Real-World Example of Smart Visual Testing With LLMs
Small visual differences are one of the most common sources of noise in visual testing, and the clearest demonstration of what smart visual testing with LLMs actually solves. Nothing breaks, but your test still flags a mismatch. This usually happens after a browser update, a minor CSS change, or even between two identical runs of the same test.
Here's what that looks like in practice.
The Scenario
You run a visual test on your homepage:
await smartuiSnapshot(driver, "homepage");This captures the UI at a stable point in your test flow and compares it against a baseline.
What Happens During Comparison
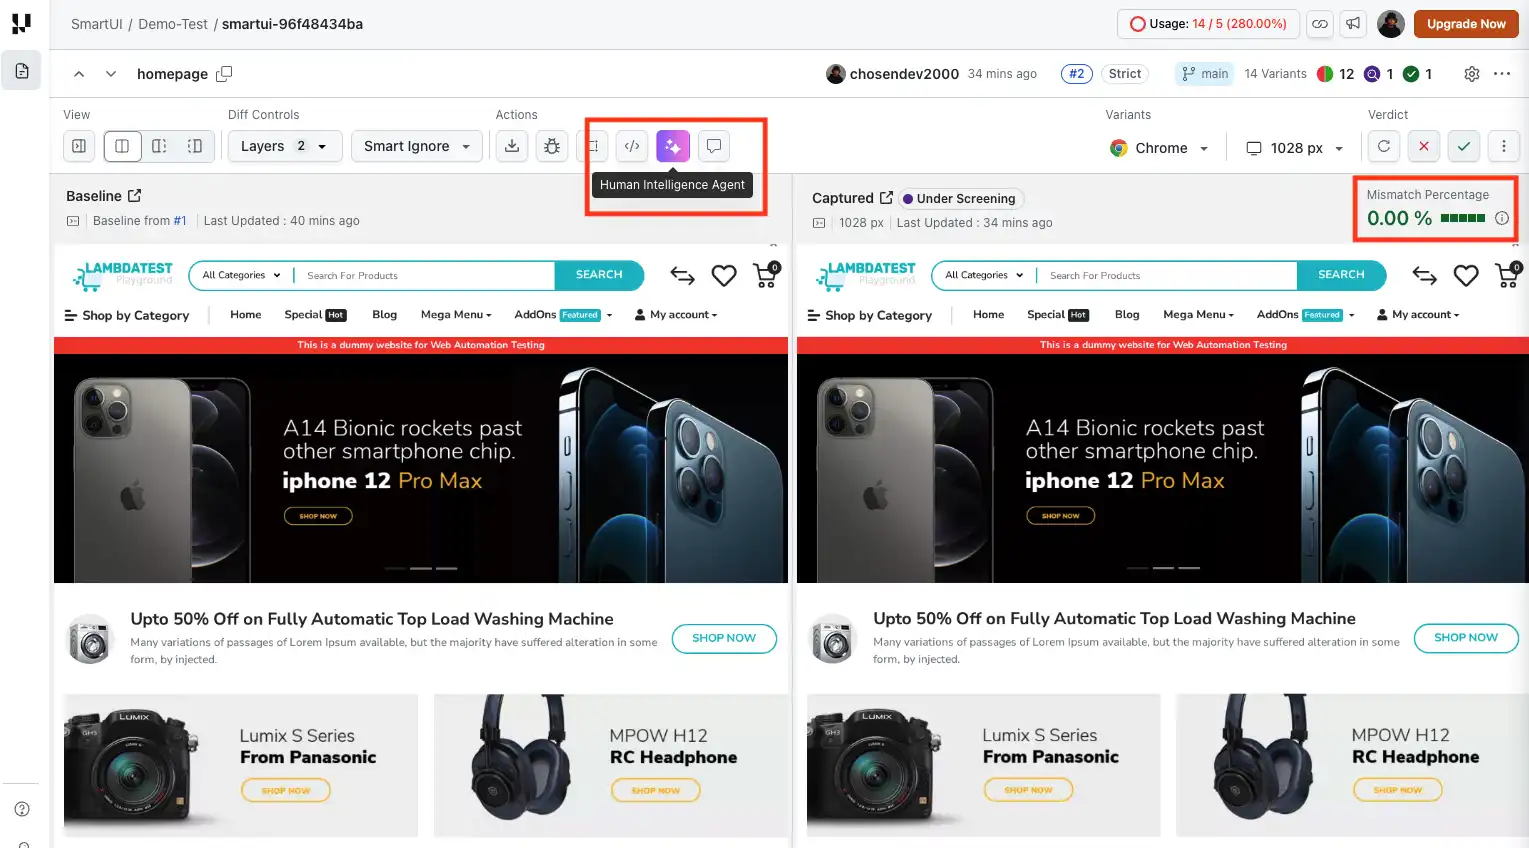
The test completes and flags a mismatch. When you open the result in the dashboard, you see a very small difference, around 0.05% mismatch. Visually, nothing looks broken. The layout is intact, the content is correct, and all elements are present. At this point, the failure doesn't tell you much. You still have to inspect it manually to decide whether it matters.
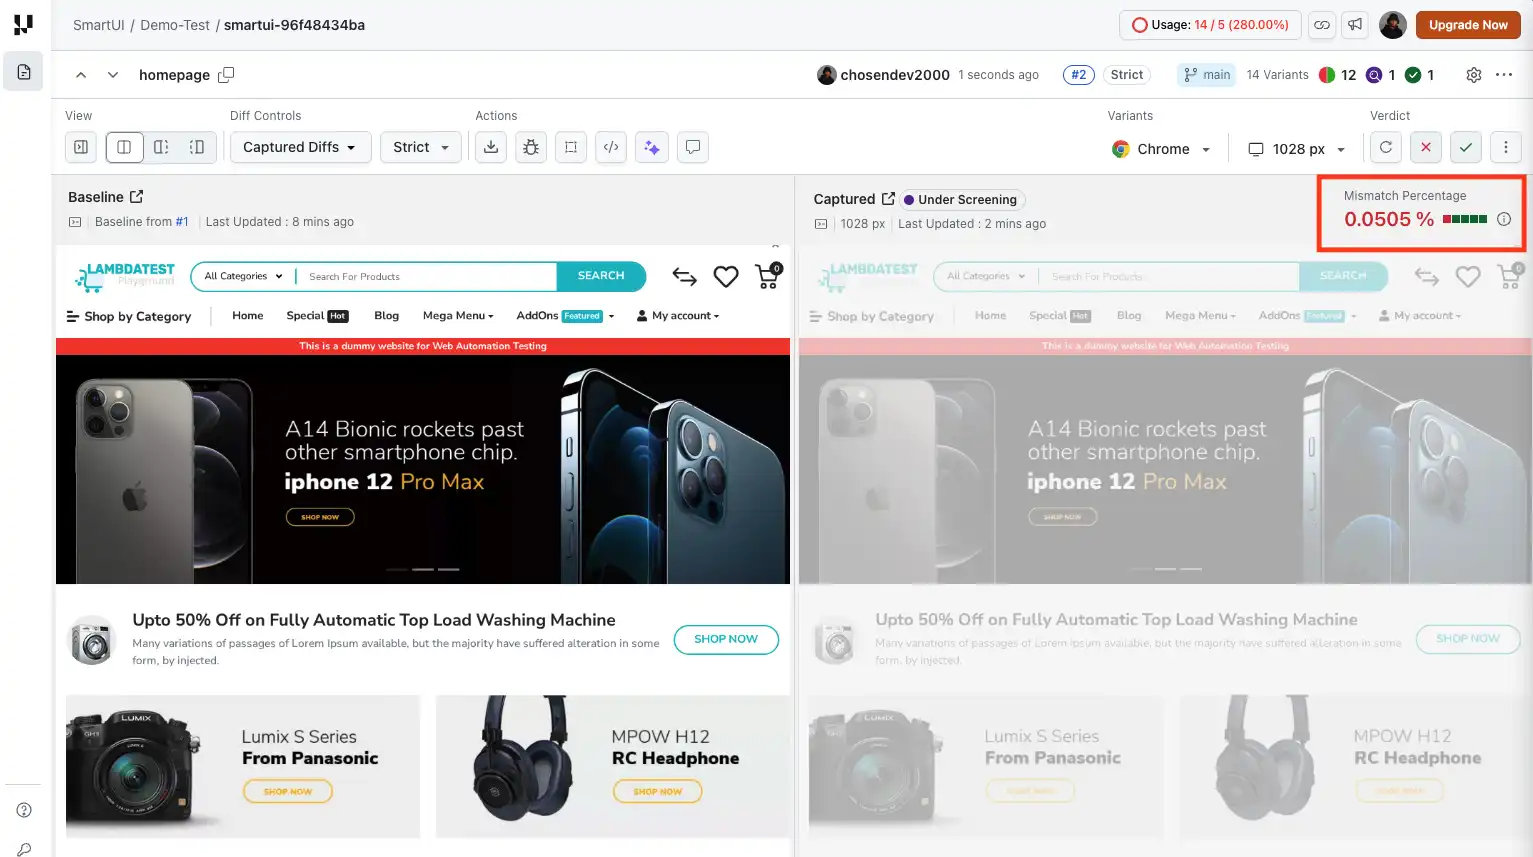
This kind of difference usually comes from rendering behavior, not actual UI changes. Fonts render slightly differently across environments. Anti-aliasing varies between browsers; Chrome and Safari handle subpixel rendering differently enough to produce consistent pixel mismatches on identical pages. Small layout shifts can happen during page load. None of these affect the user experience, but strict comparisons still flag them because they only detect pixel changes.
Now apply SmartUI's filtering to the same result.
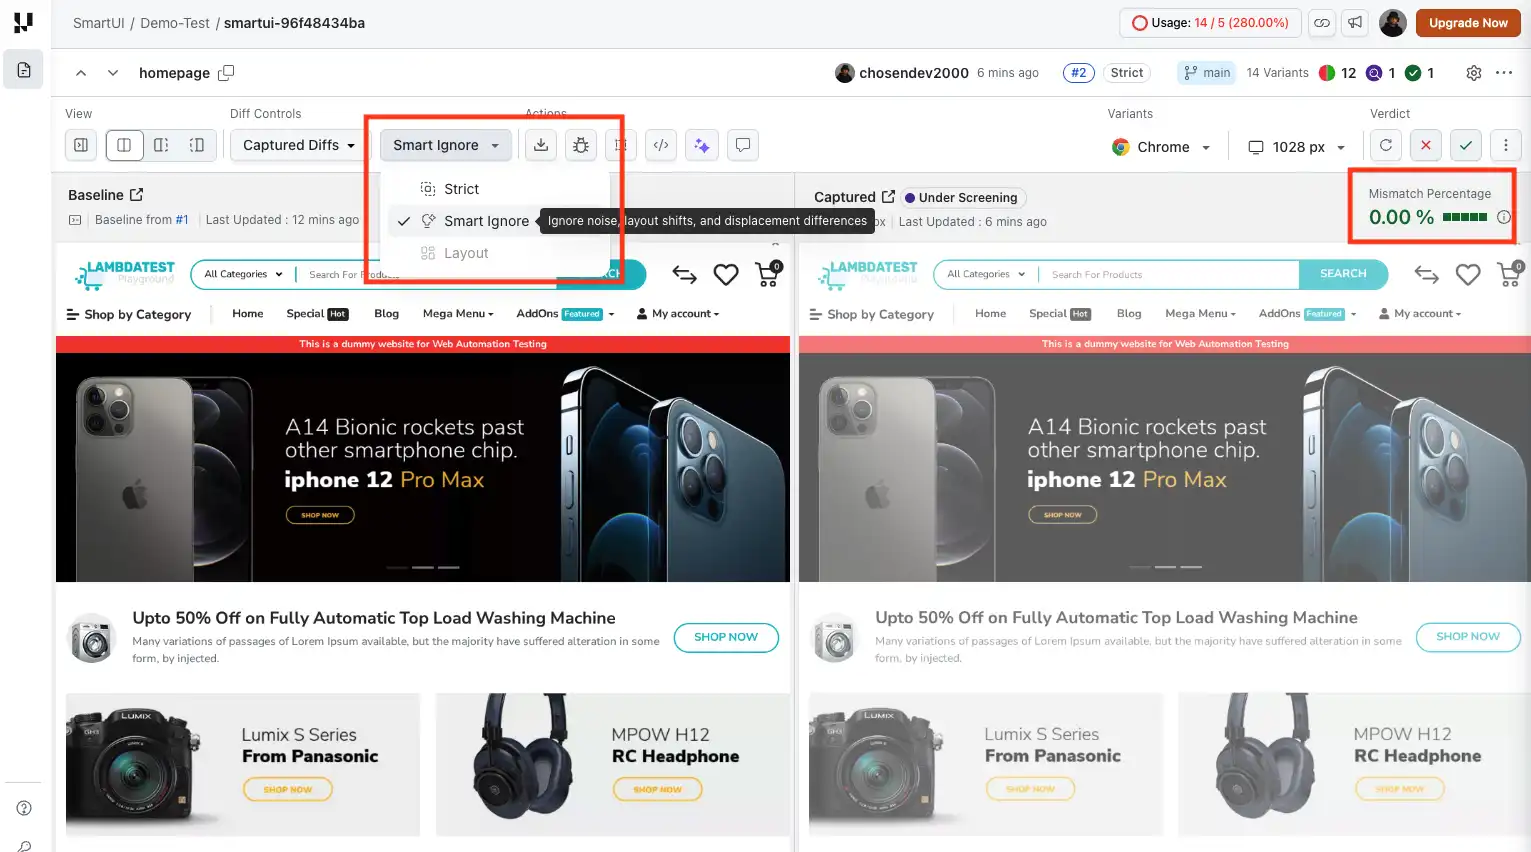
The mismatch drops to 0.00%.
The UI didn't change. The difference was noise, and it gets filtered out before being treated as a failure. This is the key shift. Instead of reacting to every pixel difference, the system evaluates whether the change actually affects the UI.
This works because the comparison layer doesn't operate on raw pixels alone. It applies filtering before deciding what to surface. SmartUI SmartIgnore feature by TestMu AI (formerly LambdaTest) removes layout displacement and dynamic regions. Rendering differences caused by anti-aliasing are normalized. Small, inconsistent visual shifts are filtered out so they don't trigger false positives.
From the same view, you can activate the Human Intelligence Agent. It highlights only the changes a human would notice and generates a plain-English summary of what changed, so you're not interpreting diffs manually. Instead of inspecting the diff yourself, you get a summary of what changed and whether it's meaningful. If the difference is purely visual noise, it tells you that. If something is actually broken, it highlights it in context.
What the Team Actually Does
The developer opens the result, sees that there is no meaningful change, and moves on. There's no need to inspect pixel-level differences or second-guess the output. What would normally require manual verification becomes a quick decision. The system filters out noise early, so the team only deals with changes that actually matter.
What Tools and Technologies Support Smart Visual Testing with LLMs?
You can build smart visual testing yourself, but this means putting together multiple layers and maintaining them as your test suite grows. This approach is often used alongside modern visual testing tools to reduce maintenance overhead.
At a high level, there are three parts:
- Test execution frameworks: Automation testing frameworks handle browser automation and screenshot capture. Playwright, Cypress, and Selenium are the common choices. They navigate your UI, wait for page stability, and capture screenshots at defined checkpoints. This layer is the same foundation used by most visual testing tools and UI comparison tools in traditional workflows.
- The comparison layer: The comparison layer is where decisions get made in custom setups. You send two screenshots, a prompt, and get back a classification from the LLM. The model evaluates whether the visual difference is expected, cosmetic, or a real issue based on UI context, not just pixel changes. This is the most important part of smart visual testing because it replaces traditional pixel-based comparison logic used in older UI comparison tools with semantic understanding.
- The reporting layer: The reporting layer is where most DIY setups fall apart. This layer is responsible for parsing model responses, logging what was sent and returned, surfacing results in a format your team can act on, integrating with your CI pipeline, and managing baselines across branches. Each part is manageable on its own. The complexity comes from keeping them working together as your test suite grows.
Where SmartUI Fits
SmartUI collapses these layers into one system. Your test framework stays the same. You define visual checkpoints where they matter:
await smartuiSnapshot(driver, "checkout-page");From that point on, SmartUI handles the comparison and reporting. Instead of a general-purpose LLM, it uses its Visual AI Engine, designed for visual regression testing. The focus is on consistency and reducing noise before results reach your team.
It isolates actual changes instead of flagging entire pages, filters rendering noise across browsers, and removes dynamic content that would otherwise trigger false positives. Results are grouped and explained, so you're not reviewing screenshots without context. When something changes, you see what changed and why, without having to inspect diffs manually. At that point, your role is to decide whether the change is expected or not.
What This Means in Practice
You can build your own pipeline if you need full control. That approach makes sense for very specific use cases or experimentation. For most teams, the challenge isn't capturing screenshots. It's keeping the comparison reliable and the review process manageable as coverage grows. SmartUI removes that overhead. You focus on where to place visual checks, not how to make them work.
What Challenges and Limitations Should You Expect?
LLM-based visual testing reduces false positives but introduces its own tradeoffs. Smart visual testing with LLMs is not a drop-in replacement for pixel diff; it's a deliberate architectural decision. Understanding the tradeoffs upfront saves you from building a pipeline that falls apart in production.
- Non-Deterministic Results: LLMs are probabilistic. Sending the same two screenshots twice can return different classifications. That's manageable in a chat interface. In a CI pipeline where a FAIL blocks a deployment, it's a reliability problem. Mitigate this by retrying borderline cases and requiring consistent results before marking a test as FAIL.
- Prompt Sensitivity: The prompt is load-bearing. A single word change can shift how the model classifies a result. "Ignore minor rendering differences" and "ignore all rendering differences" sound similar but produce different results at the edges. Build your prompt carefully, version it the same way you version code, and test changes against a set of known screenshots before pushing them to your pipeline. Prompts need maintenance. As your UI changes, your prompt needs to keep up.
- Limited Product Context: The model understands UI patterns generally, but knows nothing about your specific app. It doesn't know that a collapsed sidebar is intentional on your dashboard, or that a missing profile picture is a known placeholder state. Without that context, it guesses. Some of those decisions will be wrong. Closing this gap is the ongoing work of prompt tuning and ignore rule maintenance.
- Performance and Cost Overhead: Every comparison is an API call with latency and a price tag. Run LLM analysis on critical paths first. Expand coverage once you've validated the configuration and understand the cost profile. See the cost and performance section above for specific numbers.
- Limited Explainability: Pixel diff tools show you exactly which pixels changed. LLM output is a text classification with a reason field. That reason is useful, but it's not an audit trail. Add logging around every model call so you can reconstruct what was sent and what came back.
- Image Quality Constraints: Image quality affects analysis quality. Blurry images, heavy compression, and pages that aren't fully loaded all reduce what the model can see. Capture at consistent resolution and let the page finish loading before the screenshot fires.
- Data Privacy: Screenshots go to a third-party API. If your app displays personal data, payment information, or anything regulated, those details are in the image. Check your compliance requirements before routing production screenshots through an external model. For sensitive environments, look for tools that offer on-premise model options or redact sensitive regions before the image leaves your infrastructure.
How to Measure the Effectiveness of Smart Visual Testing?
Setting up smart visual testing with LLMs is one thing. Knowing whether it's actually working is another. Track these metrics to know whether the system is working or just adding steps to your pipeline.
- False Positive Rate: Track how many flagged failures turn out to be non-issues. If your false positive rate was 40% with pixel diff and drops to 5% after switching to LLM-based analysis, that's a result worth keeping. If it stays high, your prompt needs work, or your ignore rules aren't covering enough ground.
- False Negative Rate: A system with zero false positives is useless if it's missing real bugs. Review recent changes after each test run and check whether any visual regressions slipped through without a FAIL. A rising false positive and false negative rate usually means your prompt is too permissive or your ignore rules are too broad.
- Review Time per Build: Measure how long your team spends reviewing visual test results per run. If engineers are spending 45 minutes reviewing diffs before LLM analysis and 10 minutes after, the system is working. If review time hasn't moved, the noise reduction isn't landing where it should.
- Decision Quality: Track how often the model's PASS/WARN/FAIL decision matches what a human reviewer would have decided. Sample a set of results each week and compare them. Beyond accuracy, check whether flagged failures are actually actionable. A FAIL that leads to a real fix is a signal. A FAIL that gets immediately dismissed is noise wearing a different label.
- Pipeline Impact: LLM analysis adds latency and cost. Measure both. Log the time each API call adds to your test run and track your monthly API spend as coverage grows. The goal isn't to minimize cost at the expense of useful coverage. It's to understand the tradeoff so you can make informed decisions about where to run LLM analysis and where pixel diff is good enough.
- Override Rate: Track how often engineers disagree with and override the model's decision. A high override rate means the team doesn't trust the output, and a system nobody trusts doesn't reduce workload; it just adds a step. If overrides are frequent, it usually means the prompt needs work. Go back, tighten the classification criteria, and figure out where the model's judgment is consistently off.
What's Next: The Future of Smart Visual Testing with LLMs
Visual testing has already moved beyond pixel comparison. AI reduced noise. The next shift is improving how decisions get made. Smart visual testing with LLMs is what that looks like in practice: systems that understand the UI and judge whether a change actually matters, not just whether something changed.
This pushes visual testing closer to the developer workflow. Results show up earlier, in pull requests and CI, and increasingly inside the IDE. The gap between detecting a visual issue and understanding it keeps shrinking, which reduces the need for manual investigation.
Over time, manual review becomes the exception, not the default. Teams spend less time approving routine changes and more time focusing on real issues. That's where smart visual testing is heading: less noise, faster decisions, and tests that engineers actually trust.
Conclusion
The false positive problem did not come from bad tooling decisions. It came from the right tooling applied to the wrong comparison model. Pixel diff was built for a world where UIs changed slowly and browsers rendered consistently. Neither of those things is true anymore.
Smart visual testing with LLMs is the answer to that shift, not because it eliminates all noise automatically, but because it evaluates changes the way your team would: by looking at what the element is, where it sits in the flow, and whether the difference actually affects a user. That is a fundamentally different question from "how many pixels changed," and it produces fundamentally different results.
The setup is not zero-effort. Prompts need maintenance. Costs need to be managed. Baselines still matter. But teams that invest in getting these layers right stop spending sprints reviewing diffs that never mattered and start trusting their visual test results enough to let them block a deploy.
That is where most teams are trying to get. Smart visual testing with LLMs is how they get there.
Author

Chosen Vincent
Blogs: 4


Chosen Vincent is a community contributor with 3+ years of experience across frontend development, test automation, and technical writing. He specializes in test automation using Cypress and creates content around frontend testing practices and developer workflows. As a Technical Writer at TestMu AI, he contributes articles focused on practical automation strategies. Chosen holds a Bachelor’s degree in Computer Science and actively works at the intersection of development and quality engineering.


Frequently asked questions
Did you find this page helpful?
More Related Blogs
TestMu AI forEnterprise
Get access to solutions built on Enterprise
grade security, privacy, & compliance
- Advanced access controls
- Advanced data retention rules
- Advanced Local Testing
- Premium Support options
- Early access to beta features
- Private Slack Channel
- Unlimited Manual Accessibility DevTools Tests