

Power Your Software Testing with AI Agents and Cloud
The Native AI-Agentic Cloud Platform to Supercharge Quality Engineering. Test Intelligently and Ship Faster.


- TestMu AI (Formerly LambdaTest)
- /
- Blog
- /
- Tutorial on Python Read Config File Using Selenium [With Example]
How to Read Config File in Python using Selenium with Examples
This blog guides you on how to read a configuration file in Python using Selenium with examples and implementing the same on a cloud Selenium Grid.
Last Updated on:
Selenium reads configuration files in Python by loading driver and browser settings from a Python module, JSON, YAML, INI, or XML file instead of hardcoding them in the script. Python's built-in configparser module parses INI files directly, and the beautifulsoup module extracts values from XML configs. This guide covers creating configuration files in each format and writing a Selenium script that reads one on a cloud Selenium Grid.
Key Takeaways
- A Selenium test in Python can load driver and browser settings from a Python module, JSON, YAML, INI, or XML file instead of hardcoding them in the script.
- Python's built-in configparser module reads INI files by grouping key-value pairs under bracketed section names such as [drivers_config].
- The beautifulsoup module, installed as the bs4 package, parses XML configuration files in Python.
- A Selenium test can accept a configuration file name as a command-line argument through Python's sys module instead of hardcoding the file name.
- Running Selenium tests on a cloud grid lets a configuration file store grid credentials separately from the test logic.
- AI coding agents now favor environment variables read through python-dotenv over plaintext INI or YAML files for storing Selenium Grid credentials.

How to Create Configuration Files With Constant Parameters Using Python
Configuration files usually contain information that is organized in key:value pairs, where value is recognized by key. Configuration files usually have extensions like .ini, .cnf, .conf, .cfg, and .cf. There are several types of modules and techniques to create and parse configuration files in Python.
Here are some of the commonly used configuration files in Python:
- Python Configuration Files
- JSON Configuration Files
- YAML Configuration Files
- INI Configuration Files
- XML Configuration Files
How to Create python read config file
Though Python files are not used to store configuration information, the best part is that storing configuration in Python files is a simple task. The major advantage of this approach is the ease in the management of configuration variables. For example, to store these configurations, we can create a config.py file.
drivers_config = {
    "URL": "localhost.com",
    "FileName": "name.json",
}


# implementation comes here ...
You can use this config file in the actual implementation as shown below:
import config as cfg

driver = webdriver.Firefox()
driver.get(cfg.drivers_config["URL"])
As seen above, we simply imported the config file in the code before using the configuration parameters present in it. Now that we covered on python read config file, we now move to create JSON config files using the Python JSON module.
Note: If you are new to Python and want to get started step-by-step (with example), you can go through our Python Tutorial and become an expert in automation testing with Python.

Austin Siewert
Co-Founder, Steadfast Systems
Discovered @TestMu AI yesterday. Best browser testing tool I've found for my use case. Great pricing model for the limited testing I do 👏
2M+ Devs and QAs rely on TestMu AI
Deliver immersive digital experiences with Next-Generation Mobile Apps and Cross Browser Testing Cloud

This certification is for professionals looking to develop advanced, hands-on expertise in Selenium automation testing with Python and take their career to the next level.
Here’s a short glimpse of the Selenium Python 101 certification from TestMu AI:

How to Create JSON configuration file
JSON (JavaScript Object Notation) is a lightweight data-interchange format. It provides information in a human-readable format, making it easy for machines to parse the information stored in the JSON file. Shown below is an example that demonstrates how to use Python’s JSON module for creating a config.json file.
{
    "drivers_config":{
        "URL":"localhost.com",
        "FileName" : "file.json",
      },
}
You can use this config file in the actual implementation as demonstrated below:
import json

# reading config file
file = open("config.json",)
data = json.load(file)

# using config file
print(data["drivers_config"]["URL"])
How to create YAML configuration file
YAML (YAML Ain’t Markup Language) is a human-readable data serialization language. In Python, we use the YAML module to parse the YAML file.
drivers_config:
	URL: localhost.com
	FileName: file.json
other:
     Variable: “data “
Here is how you can read the YAML config file in Python:
import yaml

file = open("config.yml", "r")
cfg = yaml.load(file)


print(cfg["drivers_config"]["URL"])
# this will print "localhost.com"


print(cfg["drivers_config"])
# this will print

# drivers_config
# {
#     “URL” : “localhost.com”
#     “NameFile”: “file.json”
# }
How to create INI configuration file
INI configuration file is a text-based structured syntax file that comprises key-value pairs.
[drivers_config]
URL=localhost.com
FileName=file.json

[other]
# other variables
To read this config file in Python, we will use the ConfigParser module. Run the below command on the terminal to install the ConfigParser module:
$ pip install configparser
Here is how you can parse the INI configuration file in Python:
import configparser

file = open("config.ini","r")

config = configparser.RawConfigParser(allow_no_value=True)
config.read_file(file)

print( config.get("drivers_config","URL") )
# output will be localhost.com
How to create XML configuration file
XML (Extensible Markup Language) lets you define rules for encoding documents that are easy to understand by humans and machines. The beautifulsoup module in Python is used for leveraging the advantages of XML configuration files.
Run the below command on the terminal to install the beautifulsoup module:
$ pip install bs4
<config>
    <drivers_config>
        <URL>localhost.com</URL>
        <FileName>file.json</FileName>
    </drivers_config>
</config>
To parse this file, we will use the bs4 or beautifulsoup module in the implementation. Once parsed, the Python file will look like this:
from bs4 import BeautifulSoup as bs

file = open('config.xml','r')
# parsing xml file
data = bs(file)

print(data.drivers_config.url.text)
Each parsing technique has its share of advantages & disadvantages. Hence, it is recommended to choose a technique that meets the project needs and requirements.
In the remaining part of Python read config file tutorial, we would use the INI configuration file since INI is the widely preferred configuration file format by Python developers.
Writing Selenium scripts for testing “add” functionality on a cloud Selenium Grid
So far in this tutorial on Python read config file, we have covered the essentials of python read config file. So, how can you leverage the benefits offered by configuration files in Python to make Selenium tests more readable and maintainable? Well, first, you need to move to a scalable and reliable cloud-based Selenium Grid so that you can run Selenium tests across different browsers and platform combinations.
TestMu AI is a cloud-based platform that enables you to perform live, interactive, and automated cross browser testing across 2000+ browsers and operating systems online. There are umpteen benefits of cloud testing, something that cannot be achieved by running Selenium tests on a local test infrastructure. Porting existing Python code to the TestMu AI Selenium Grid involves minimal changes, making it easy for QA engineers to leverage the platform in the shortest possible time.
Read – Detailed Selenium Python Tutorial
For demonstrating Python config file usage with an example, we would use the TestMu AI ToDo App on which the relevant tests are performed. The desired browser capabilities are generated using the TestMu AI capabilities generator.

Here are the set of operations performed on the TestMu AI Sample ToDo App:
- Mark the first item and second items as complete. For this, we select the corresponding element using the Name locator (i.e., li1 and li2). You can check out our learning hub on Selenium Locators to ensure that you follow the best practices when using the appropriate web locators.
check_box_one = driver.find_element_by_name("li1")
check_box_one.click()

 check_box_two = driver.find_element_by_name("li2")
 check_box_two.click()
# Enter item in textfield
textfield = driver.find_element_by_id("sampletodotext")
textfield.send_keys("text we need to add")

# Click on add button
add_button = driver.find_element_by_id("addbutton")
add_button.click()
# saving screenshot
driver.save_screenshot(filename.png)
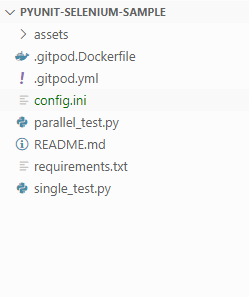
[USER_INFO]
LT_USERNAME=YOUR_LT_USERNAME
LT_ACCESS_KEY=YOUR_LT_ACCESS_KEY

[SCREENSHOT_FILE_INFO]
FILENAME=filename.png
You could either pass this configuration file as a Command-Line argument or directly define it in the code.
We will see both methods for parsing the configuration file:
- Pre-defining configuration file details in the implementation
- Passing config file name as a command-line argument
Though PyUnit is the default test automation framework in Python, QA engineers prefer PyTest for Selenium automation testing. To get started with PyTest, check out the below video from TestMu AI YouTube Channel.

Predefined configuration file name in Python implementation
In our case, we have named the Python configuration file as config.ini. This file will be parsed to read the relevant configuration information for usage in the code.
Here is how we open and read contents from the config file:
## getting config
with open("config.ini","r") as file:
    config = configparser.RawConfigParser(allow_no_value=True)
    config.read_file(file)
Here is the entire implementation where we read the LT_USERNAME and LT_ACCESS_KEY from the configuration file. The read information is further used in the code for accessing the TestMu AI Grid. We have the PyUnit framework for the entire demonstration. Please refer to our PyUnit Framework Tutorial to get more information on the said framework.
import configparser
import unittest
from selenium import webdriver

# getting config
with open("config.ini", "r") as file:
    config = configparser.RawConfigParser(allow_no_value=True)
    config.read_file(file)


username = config.get("USER_INFO", "LT_USERNAME")
access_key = config.get("USER_INFO", "LT_ACCESS_KEY")


class FirstSampleTest(unittest.TestCase):
    # Generate capabilities here https://www.lambdatest.com/capabilities-generator/
    # setUp runs before each test case and
    def setUp(self):
        desired_caps = {
            "build": config.get("CAPABILITIES", "build"),
            "name": config.get("CAPABILITIES", "name"),
            "platform": config.get("CAPABILITIES", "platform"),
            "browserName": config.get("CAPABILITIES", "browserName"),
            "version": config.get("CAPABILITIES", "version"),
            "selenium_version": config.get("CAPABILITIES", "selenium_version"),
            "visual": config.get("CAPABILITIES", "visual"),
            "geoLocation": config.get("CAPABILITIES", "geoLocation"),
            "chrome.driver": config.get("CAPABILITIES", "chrome_driver"),
        }
      """
       Setup remote driver
            -------
            username and access_key can be found on lt platform

      """
        self.driver = webdriver.Remote(
            command_executor="https://{}:{}@hub.lambdatest.com/wd/hub".format(
                username, access_key
            ),
            desired_capabilities=desired_caps,
        )

    # tearDown runs after each test case
    def tearDown(self):
        self.driver.quit()

    # """ You can write the test cases here """
    def test_unit_user_should_able_to_add_item(self):
        # try:
        driver = self.driver

        # Url
        driver.get("https://lambdatest.github.io/sample-todo-app/")

        # Click on checkbox
        check_box_one = driver.find_element_by_name("li1")
        check_box_one.click()

        # Click on checkbox
        check_box_two = driver.find_element_by_name("li2")
        check_box_two.click()

        # Enter item in textfield
        textfield = driver.find_element_by_id("sampletodotext")
        textfield.send_keys(config.get("ITEM_TO_ADD", "ITEM_VALUE"))

        # Click on add button
        add_button = driver.find_element_by_id("addbutton")
        add_button.click()

        # navigation to list to find the username to added item
        custom_xpath = (
            "//*[contains(text()," + config.get("ITEM_TO_ADD", "ITEM_VALUE") + ")]"
        )
        added_item = driver.find_element_by_xpath(custom_xpath).text

        # saving screenshot
        driver.save_screenshot(config.get("SCREENSHOT_FILE_INFO", "FILENAME"))


if __name__ == "__main__":
    unittest.main()
Pass configuration file name as a Command-Line argument
For accepting the command-line argument(s), we will use the sys module in Python to pass the configuration name.
Here are some of the Python modules that can be used for passing command-line argument(s):
- Using sys module
- Using argparse module
- Using optparse module and more
For demonstration, we have used the sys module to read the command-line argument(s):
import configparser
import unittest
import sys
from selenium import webdriver


class sampleTest(unittest.TestCase):
    # default file name in case no arg passed
    config_file = "config.ini"

    def setUp(self):
        self.config = configparser.RawConfigParser(allow_no_value=True)
        self.config.read(self.config_file)
        username = self.config.get("USER_INFO", "LT_USERNAME")
        access_key = self.config.get("USER_INFO", "LT_ACCESS_KEY")

        ## get CAPABILITIES from https://www.lambdatest.com/capabilities-generator/

        desired_caps = {
            "build": self.config.get("CAPABILITIES", "build"),
            "name": self.config.get("CAPABILITIES", "name"),
            "platform": self.config.get("CAPABILITIES", "platform"),
            "browserName": self.config.get("CAPABILITIES", "browserName"),
            "version": self.config.get("CAPABILITIES", "version"),
            "selenium_version": self.config.get("CAPABILITIES", "selenium_version"),
            "visual": self.config.get("CAPABILITIES", "visual"),
            "geoLocation": self.config.get("CAPABILITIES", "geoLocation"),
            "chrome.driver": self.config.get("CAPABILITIES", "chrome_driver"),
        }

        """
            Setup remote driver
            -------
            username and access_key can be found on lt platform

        """
        self.driver = webdriver.Remote(
            command_executor="https://{}:{}@hub.lambdatest.com/wd/hub".format(
                username, access_key
            ),
            desired_capabilities=desired_caps,
        )

    # tearDown runs after each test case
    def tearDown(self):
        self.driver.quit()

    # """ You can write the test cases here """
    def test_unit_user_should_able_to_add_item(self):
        # try:
        driver = self.driver

        # Url
        driver.get("https://lambdatest.github.io/sample-todo-app/")

        # Click on checkbox
        check_box_one = driver.find_element_by_name("li1")
        check_box_one.click()

        # Click on checkbox
        check_box_two = driver.find_element_by_name("li2")
        check_box_two.click()

        # Enter item in textfield
        textfield = driver.find_element_by_id("sampletodotext")
        textfield.send_keys(self.config.get("ITEM_TO_ADD", "ITEM_VALUE"))

        # Click on add button
        add_button = driver.find_element_by_id("addbutton")
        add_button.click()

        # navigation to list to find added item
        custom_xpath = (
            "//*[contains(text()," + self.config.get("ITEM_TO_ADD", "ITEM_VALUE") + ")]"
        )
        added_item = driver.find_element_by_xpath(custom_xpath).text

        # saving screenshot
        driver.save_screenshot(self.config.get("SCREENSHOT_FILE_INFO", "FILENAME"))


if __name__ == "__main__":
    if len(sys.argv) > 1:
        sampleTest.config_file = sys.argv.pop()
    unittest.main()
Trigger the following command on the terminal to read the command-line arguments:
$ python -m single_test.py config.ini
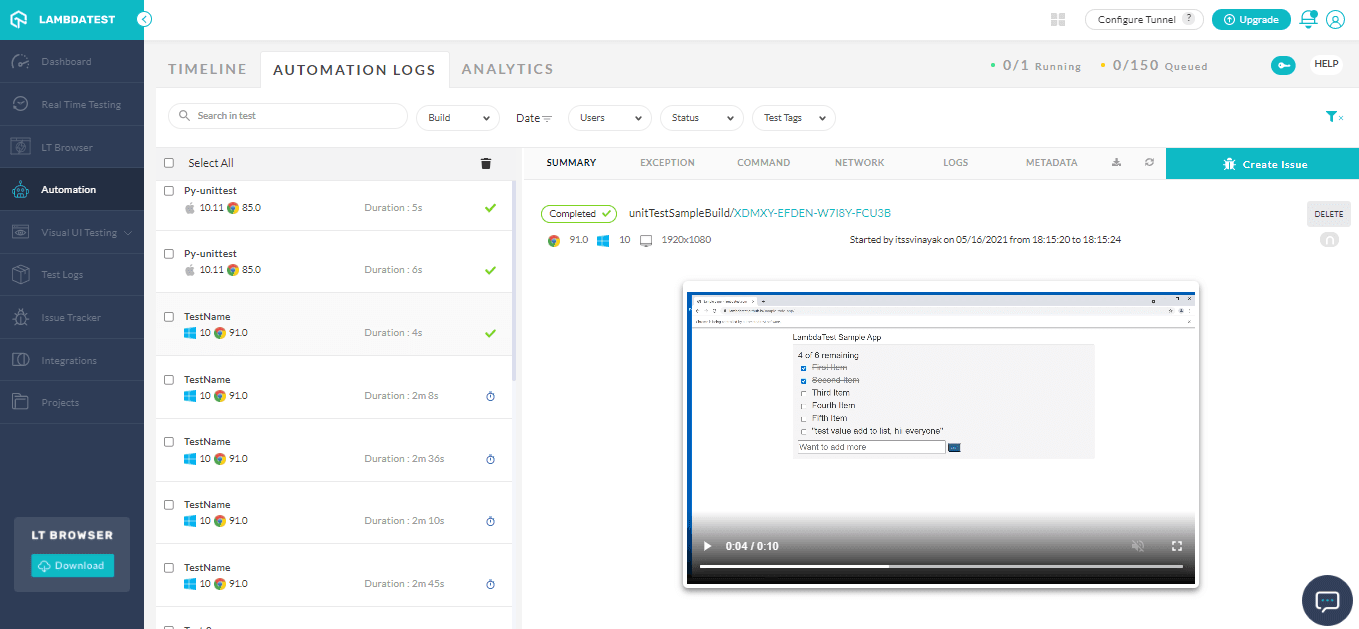
Visit the Automation Dashboard on TestMu AI to get further information about the execution of tests on the cloud grid:
Do you know how to upload and download a file in Selenium? Watch this video to learn how to upload and download files in Selenium WebDriver using different techniques.


How Do AI Coding Agents Handle Selenium Test Configuration Now?
AI coding agents now read Selenium test configuration through environment variables and MCP tool calls instead of parsing a static INI or YAML file checked into source control.
- Environment variables over INI files: AI assistants such as GitHub Copilot and Claude Code scaffold new Selenium projects with a .env file loaded by python-dotenv, keeping LT_USERNAME and LT_ACCESS_KEY out of a committed config.ini.
- MCP servers for live config: Model Context Protocol servers expose browser capabilities and grid credentials as callable tools, so an agent reads or updates them at runtime instead of opening a config file.
- Secrets managers in CI: a pipeline an agent triggers increasingly pulls LT_ACCESS_KEY from a repository secret store rather than from a checked-in INI, JSON, or YAML file.
- Config validation before a run: an agent can check a YAML or JSON config against a schema before Selenium starts, catching a missing browserName or version value that would otherwise fail mid-suite.
- Scaffolded config still needs a run: an agent can generate a config.py or pyproject.toml section in seconds, but the values still need a real test run against the Selenium Grid to confirm they work.
Conclusion
In this Selenium Python tutorial, we have learnt about python read config file using the common configuration file formats like .cnf, .conf, .cfg, .cf, and .ini. We have also seen how multiple configuration files are read together, and their results can be merged into a single configuration using ConfigParser.
We then performed Selenium automation testing to test the “add” functionality in the to-do list app and take a screenshot to verify our results using a cloud Selenium Grid.
Read - Selenium interview questions

Author

Vinayak Sharma
Blogs: 5


Vinayak Sharma is a community contributor with 4+ years of experience in backend engineering, DevOps, and technical writing. He specializes in building scalable payment and microservices systems, with hands-on experience using Node.js, Python, Kubernetes, Ansible, and Linux. Vinayak has contributed technical content on testing, automation, and backend engineering, including work as a freelance technical writer at TestMu AI and authoring 29+ articles for GeeksforGeeks. He is currently a Team Lead working on enterprise payment platforms and holds a Bachelor’s degree in Computer Science.


Python Read Config File FAQs
Did you find this page helpful?
More Related Blogs
TestMu AI forEnterprise
Get access to solutions built on Enterprise
grade security, privacy, & compliance
- Advanced access controls
- Advanced data retention rules
- Advanced Local Testing
- Premium Support options
- Early access to beta features
- Private Slack Channel
- Unlimited Manual Accessibility DevTools Tests