

Power Your Software Testing with AI Agents and Cloud
The Native AI-Agentic Cloud Platform to Supercharge Quality Engineering. Test Intelligently and Ship Faster.


- TestMu AI (Formerly LambdaTest)
- /
- Blog
- /
- Getting Started With Gatsby Testing
Getting Started With Gatsby Testing
Learn Gatsby testing with Jest, React Testing Library, Cypress, and axe-core, plus what Gatsby Cloud's shutdown means and how Gatsby compares to Next.js.
Last Updated on:
On This Page
- What is Gatsby?
- What makes Gatsby special?
- Top features offered by websites designed using Gatsby
- Why do you need to test the Gatsby site?
- Different Approaches for Gatsby Testing
- What Happened to Gatsby Cloud?
- End-to-End and Accessibility Testing for Gatsby
- How Do You Catch Visual Regressions in a Gatsby Site?
- Gatsby vs. Next.js: Which to Choose?
- How Do AI Coding Assistants Fit Into Gatsby Testing?
Gatsby testing verifies a Gatsby site at three levels: unit tests for components, end-to-end tests for user journeys, and accessibility checks on the built pages.
Jest with React Testing Library covers components, Cypress or Playwright drives the built site, and axe-core adds accessibility checks through cypress-axe.
This guide covers what Gatsby is, what makes it special, its top site features, why to test a Gatsby site, testing approaches, the Gatsby Cloud shutdown, end-to-end and accessibility testing, visual regression testing, Gatsby versus Next.js, and AI coding assistants.
Key Takeaways
- Gatsby is a React-based open-source static site generator that builds pages at build time and pulls content from any data source through a built-in GraphQL data layer.
- Gatsby unit tests run on Jest with React Testing Library, and a clean install also needs jest-environment-jsdom plus testEnvironment set to jsdom before a component that touches document or window will pass.
- Cypress and Playwright drive a built Gatsby site the way a real user would, covering navigation and form journeys that component unit tests cannot reach.
- Accessibility checks fit inside existing Cypress specs by adding axe-core through cypress-axe and calling cy.injectAxe() and cy.checkA11y() on each page test.
- Visual regression testing for a Gatsby site pairs Storybook with jest-image-snapshot, whose default failure threshold of 0 fails a run on a single changed pixel until the threshold is configured.
- The Gatsby Cloud shutdown that followed the Netlify acquisition ended the hosting service only, and the open-source Gatsby framework is still maintained and still builds on any host or CI pipeline.
What is Gatsby?
Gatsby is a React-based free and open-source framework that allows developers to create lightning-fast web pages and apps. This means that developers can develop and test React applications and work with any data source (Markdown etc.) of their preferred choice.
To sum up, it is a static site generator with more features and capabilities that makes building websites easier than ever. Gatsby allows you to integrate different content, APIs, and services providing a holistic web experience.
Open source is at the core of Gatsby's success, which means that things are done in the open with a knowledge-sharing approach. This suggests you're attempting to create an active community with a large number of contributors who continue to provide significant value to the development ecosystem. Gatsby's vision is to make website development fun by following a simplistic approach.
Key Takeaway: Gatsby is a free, open-source React framework that generates fast static pages and can work with any data source, such as Markdown files or a content management system.
What makes Gatsby special?
Gatsby has certain unique characteristics that set it apart from other static site generators. First and foremost, Gatsby makes use of React, making it an excellent alternative for individuals who are familiar with and enjoy the framework.
You can easily enable Gatsby to build and deploy your site every time you commit and push to GitHub using technologies like Netlify.
Gatsby also comes with a robust ecosystem of plugins to meet a variety of requirements. These plugins can assist you in obtaining data from CMSs such as WordPress or Contentful, integrating with programs such as Algolia, and managing your photos by lazy-loading and optimizing them.
Gatsby also comes with a slew of APIs that make creating static web pages a breeze, including one that converts markdown files into static pages with a template at build time.
Finally, Gatsby includes a number of useful components that simplify tasks such as routing, linking, and image handling that isn't available in the main React library.
Key Takeaway: Gatsby stands apart from other static site generators by building on React, shipping a large plugin ecosystem for CMS, image, and search integrations, and adding routing, linking, and image components that the core React library does not provide.
Top features offered by websites designed using Gatsby
Every day, the number of Gatsby website users climbs. Companies are looking for innovative ways to expand their operations online and outrank competitors in rankings; thus, this was expected. Here are some of the top features offered by websites using Gatsby.
- Build Best in Class Web ExperiencesGatsby works on a unified data layer that allows the developers to easily combine data from different sources and render them as well. You can also add content from different websites without having to think twice with utmost precision and consistency.
- Great Response Time Gatsby works on the concept of intelligent page rendering functionality that preloads the selective content parts of the page. There will always be trouble with response time when you are loading different components of a page simultaneously. This limitation is no longer applicable with Gatsby websites as it is fast and fully optimized when it comes to performance.
- Delightful Developer ExperienceGatsby uses React and cutting-edge technologies like GraphQL, Webpack, etc., to provide a top-notch developer experience. If your developers enjoy working with the frameworks and methodologies that simplify their tasks, they will have to spend less time maintaining and optimizing them.
- High ScalabilityGatsby's website is deployed using cutting-edge technologies, which means that you can quickly scale your operations despite the vulnerabilities or traffic congestion. Your data is always protected, and the end-user experience improves in the long run.
- Adopt Content Mesh SystemThe Content Management System (CMS) was developed keeping in mind the content-related sites. But it was working on a traditional approach where the content was stored, built, and delivered to the end-users. To tackle the new changes in the modular CMS architecture, Gatsby works on a content-mesh approach. This means that you deliver high performance without manual integrations.

Note: Start Testing your CMS Applications. Try TestMu AI Now!
Static websites have existed for a long time. There are no server-side dynamics or functionality involved. This is where you need a static site generator to generate these static sites. The static site generators help to generate content at build time. This is entirely different from server-side rendering, where the code is available on the server-side. Gatsby does not render any code on the server-side.
Key Takeaway: Websites built with Gatsby gain a unified data layer, intelligent page preloading for faster response times, high scalability, and a content mesh approach that removes manual CMS integrations.
Why do you need to test the Gatsby site?
You are required to test the Gatsby site to make sure:
- Functionality changes are working as per the requirements.
- Validate the code changes so that developers can get timely feedback on the code quality.
- Ensure the code quality and code coverage metrics are tracked and followed by development teams.
- The plugin and third-party integrations are working fine.
- Final changes are tested before being pushed to the production server.
Key Takeaway: Testing a Gatsby site confirms that functionality matches the requirements, that plugins and third-party integrations still work, and that code changes are validated before they reach the production server.
Different Approaches for Gatsby Testing
To preserve code quality over time, you may want to add testing to your Gatsby site. There are a number of potential approaches for Gatsby testing.
- A/B Testing Approach for Gatsby Testing
- Testing Your Gatsby Application Using Jest and React Testing Library
- Gatsby Testing using cloud-based platform
A/B Testing Approach for Gatsby Testing
You can use traditional A/B testing tools such as Optimizely for Gatsby testing. This can have a performance impact as the website can observe slowness.
Other ways are gaining traction. One native method of edge-based HTML file serving is to produce multiple copies of a page and serve one or the other from the CDN based on the user. This can be set up in two different ways.
First branch-based edge A/B testing, in which some users are offered a site compiled from the main branch, while others are served a site compiled from a different branch.
- This was an early tool, and it has a following, although it has a few flaws. For starters, it creates technical debt because development teams must maintain two "primary" code branches throughout the test.
- Two, storing and referring to the variant can be inconvenient if the source of truth for content is in a headless CMS rather than version-controlled code.
Second, page-based edge A/B testing involves creating several copies of specific pages on edge based on the A/B test settings. This is a promising strategy, and there are two options for implementing it.
- This enables both A/B testing and content customization at the edge. These methods are currently only available at enterprise-level prices, making them out of reach for most teams.
- Second, teams can do it themselves by building two variations, selecting users at random to view each variant, and persisting the variant decision to the client via cookies or localStorage. While some configuration is required, this may be accomplished without the inclusion of any new vendors.

Gatsby Testing using Jest and React Testing Library
Let us add unit tests to a Gatsby project using the Jest and React testing library. Let us consider that this Gatsby site is your personal website, and you started adding more features and enhancements going forward. We will add basic unit tests to verify different functionalities and make sure that they are working as expected.
Follow these steps to perform unit testing with Jest and React:
Creating a new Gatsby App
We can start our testing by using an out-of-box Gatsby starter template. To use a Gatsby starter, open the Command Line Interface(CLI) and execute the following command:
npx gatsby new my-blog-starter https://github.com/gatsbyjs/gatsby-starter-blog
You can remove npx if Gatsby CLI is already installed on your machine.
Setting up our Testing Environment
Execute the below commands on the CLI to install the required libraries for testing a Gatsby site.
npm install -D jest babel-jest @testing-library/jest-dom @testing-library/react babel-preset-gatsby identity-obj-proxy

    yarn add -D jest babel-jest @testing-library/jest-dom @testing-library/react babel-preset-gatsby identity-obj-proxy
Install one more package before you run the suite. Current Jest releases do not bundle the browser-like test environment, and the Jest configuration reference lists node as the default testEnvironment. A Gatsby component test that touches document or window fails on a clean install until you add jest-environment-jsdom as a dev dependency and set testEnvironment: "jsdom" in jest.config.js. React Testing Library also declares @testing-library/dom as a peer dependency, so add it explicitly if your package manager does not install peers for you.
Once all the required dependencies are installed, you can create a new folder TestResults at the root of the project. Here is the folder structure that has been created:
// my-gatsby-project
    ├── jest-preprocess.js
    ├── setup-test-env.js
    └── __mocks__
        ├── file-mock.js
        └── gatsby.js
Once the folder structure is finalized, we will configure Jest. Jest-process.js is the first element in the directory structure.
Writing the Unit Tests
We perform unit testing to ensure that the required module or functionality works as per the expected behavior. For example, if we are trying to test the see component whose corresponding JavaScript file is see.js and the home page is index.js.
You can use .spec or .test to create a testing file or put the required files in the _tests_ folder. Jest will execute only the files that are defined _tests_folder.
// components/sample.js
import React from "react"
import PropTypes from "prop-types"
import { Helmet } from "react-helmet"
import { useStaticQueryParameters, graphql } from "gatsby"

const sample = ({ description, lang, meta, title }) => {
  const { site } = useStaticQueryParameters(
    graphql`
      query {
        site {
          siteMetadata {
            title
            description
            social {
              skype
            }
          }
        }
      }
    `
  )

  const metaDescriptionDetails = description || site.siteMetadata.description
  const defaultTitleDetails = site.siteMetadata?.title

  return (
    <Helmet
      htmlAttributes={{
        lang,
      }}
      title={title}
      titleTemplate={defaultTitle ? `%s | ${defaultTitle}` : null}
      meta={[
        {
          name: `description`,
          content: metaDescriptionDetails,
        },
        {
          property: `og:title`,
          content: title,
        },
        {
          property: `og:description`,
          content: metaDescriptionDetails,
        },
        {
          property: `og:type`,
          content: `website`,
        },
        {
          name: `skype:card`,
          content: `summary`,
        },
        {
          name: `skype:creator`,
          content: site.siteMetadata?.social?.skype || ``,
        },
        {
          name: `skype:title`,
          content: title,
        },
        {
          name: `skype:description`,
          content: metaDescriptionDetails,
        },
      ].concat(meta)}
    />
  )
}

Sample.defaultProps = {
  lang: `en`,
  meta: [],
  description: ``,
}

Sample.propTypes = {
  description: PropTypes.string,
  lang: PropTypes.string,
  meta: PropTypes.arrayOf(PropTypes.object),
  title: PropTypes.string.isRequired,
}

export default Sample
Let us write the unit tests for the Sample component.
// components/__tests__/sample.js
import React from "react"
import { render } from "@testing-library/react"
import { useStaticQuery } from "gatsby"

import Helmet from "react-helmet"
import Sample from "../sample"

describe("Sample component", () => {
  beforeAll(() => {
    useStaticQuery.mockReturnValue({
      site: {
        siteMetadata: {
          title: `Gatsby Starter Blog for Freshers`,
          description: `A starter blog demonstrating what Gatsby can do and the features offered.`,
          social: {
            twitter: `irshad`,
          },
        },
      },
    })
  })

  it("renders the tests correctly", () => {
    const mockTitle = "All posts | Gatsby Starter Blog for Freshers"
    const mockDescription = "A starter blog demonstrating what Gatsby can do and the features offered."
    const mockTwitterHandler = "Irshad"

    render(<SEO title="All posts" />)
    const { title, metaTags } = Helmet.peek()

    expect(title).toBe(mockTitle)
    expect(metaTags[0].content).toBe(mockDescription)
    expect(metaTags[5].content).toBe(mockTwitterHandler)
    expect(metaTags.length).toBe(10)
  })
})
We will import React Testing library and mock the GraphQL query with useStaticQuery to provide the data to the SEE component. We will then rely on the render method to render the required component and pass in the title as props. The helmet.peek() is used to pull the metadata from the mocked GraphQL query that has been passed. It is required to understand the programming language before you execute the above codes provided in the samples.
The sample component uses react-helmet, which still works, but Gatsby has shipped a built-in Head API since gatsby@4.19.0 and the documentation recommends it over react-helmet for bundle size and performance. The Head export can only be defined in pages and page templates created through createPage, so if you adopt it, drop the Helmet.peek() assertion and check the rendered head markup in an end-to-end test instead.
Finally, we have four test cases as per the sample:
- It tests the title from the metadata to be equal to
"All posts | Gatsby Starter Blog for Freshers". - It checks the description from the metadata to be equal to
"A starter blog demonstrating what Gatsby can do and the features offered". - It tests if the length from the metadata is equal to
"Irshad". - It checks if the length of the
metaTags array is equal to 10.
To run the tests, we need to execute the below command on the CLI:
#npm npm test #yarn yarn test
All the required test cases should be in the pass state now. Let us execute the code on the index page now.
//pages/index.js
import React from "react"
import { Link, graphql } from "gatsby"

import Bio from "../components/bio"
import Layout from "../components/layout"
import Sample from "../components/sample"

  const BlogIndexDetails = ({ data, location }) => {
  const siteTitle = data.site.siteMetadata?.title || `Title`
  const posts = data.allMarkdownRemark.nodes
  if (posts.length === 0) {
    return (
      <Layout location={location} title={siteTitle}>
        <SEO title="All posts" />
        <Bio />
        <p>
          No required blogs found. Add markdown posts to "content/blog" (or the
          directory you specified for the "gatsby-source-filesystem" plugin in
          gatsby-config.js).
        </p>
      </Layout>
    )
  }

  return (
    <Layout location={location} title={siteTitle}>
      <SEO title="All posts" />
      <Bio />
      <ul style={{ listStyle: `none` }}>
        {posts.map(post => {
          const title = post.frontmatter.title || post.fields.slug
          return (
            <li key={post.fields.slug}>
              <article
                className="post-list-item"
                itemScope
                itemType="http://schema.org/Article"
              >
                <header>
                  <h2>
                    <Link
                      data-testid={post.fields.slug + "-link"}
                      to={post.fields.slug}
                      itemProp="url"
                    >
                      <span itemProp="headline">{title}</span>
                    </Link>
                  </h2>
                  <small>{post.frontmatter.date}</small>
                </header>
                <section>
                  <p
                    data-testid={post.fields.slug + "-desc"}
                    dangerouslySetInnerHTML={{
                      __html: post.frontmatter.description || post.excerpt,
                    }}
                    itemProp="description"
                  />
                </section>
              </article>
            </li>
          )
        })}
      </ul>
    </Layout>
  )
}

export default BlogIndexDetails
export const pageQuery = graphql`
  query {
    site {
      siteMetadata {
        title
      }
    }
    allMarkdownRemark(sort: { frontmatter: { date: DESC } }) {
      nodes {
        excerpt
        fields {
          slug
        }
        frontmatter {
          date(formatString: "MMMM DD, YYYY")
          title
          description
        }
      }
    }
  }
The page query above uses the Gatsby 5 sort syntax. Gatsby 5 dropped the old enum form sort: { fields: [date], order: DESC }, and the current GraphQL query reference documents the nested object form instead, such as sort: { frontmatter: { date: DESC } }, so a query copied from an older tutorial will not compile on Gatsby 5. Fix the query first, then update the test that asserts on its result.
We have used data-testid on some elements so that they can be selected from the testing file. Let us write the unit tests for the home page.
//pages/__tests__/index.js
import React from "react"
import { render } from "@testing-library/react"
import { useStaticQuery } from "gatsby"

import BlogIndexDetails from "../index"

describe("BlogIndex component", () => {
  beforeEach(() => {
    useStaticQuery.mockReturnValue({
      site: {
        siteMetadata: {
          title: `Gatsby Starter Blog for Freshers`,
          description: A starter blog demonstrating what Gatsby can do and the features offered. `,
          social: {
            twitter: `Irshad`,
          },
        },
      },
    })
  })
  it("renders the tests correctly", async () => {
    const mockData = {
      site: {
        siteMetadata: {
          author: "xyz",
        },
      },
      allMarkdownRemark: {
        nodes: [
          {
            excerpt: "This is my first attempt at excerpt writing",
            fields: {
              slug: "first-slug",
            },
            frontmatter: {
              date: "May 3, 2022",
              title: "My first blog post for readers",
              description: "My awesome blog description for readers",
            },
          },
          {
            excerpt: "This is my second attempt at excerpt writing",
            fields: {
              slug: "second-slug",
            },
            frontmatter: {
              date: "Nov 12, 2022",
              title: "My second blog post for reader friends",
              description: "My awesome second blog description for reader friends",
            },
          },
        ],
      },
    }

    const { getByTestId } = render(
      <BlogIndex data={mockData} location={window.location} />
    )

    const { nodes } = mockData.allMarkdownRemark
    const post1 = "first-slug-link"
    const post2 = "second-slug-desc"

    expect(getByTestId(post1)).toHaveTextContent(nodes[0].frontmatter.title)
    expect(getByTestId(post2)).toHaveTextContent(
      nodes[1].frontmatter.description
    )
    expect(nodes.length).toEqual(5)
  })
})
We start by mocking the GraphQL query and then create the dummy data and then pass in the object to the BlogIndex component.
We will explain the different test cases that are explained in the above code sample:
- It tests if the title of the Link component of the first article is equal to "My awesome blog description for readers".
- It tests if the description of the second article is equal to "My awesome second blog description for reader friends"
- It tests if the array of articles is equal to "5".
The below command is executed on the CLI:
#npm npm test
#yarn yarn test
All the required test cases are passed, and we can test the Gatsby site with Jest and React testing library.
Gatsby Testing using a cloud-based platform
The testing requirements are changing dynamically, and you need a unified platform when it comes to Gatsby testing. This is where cloud-based testing platforms like TestMu AI come into the picture.
TestMu AI, one of the leading cloud platforms for Gatsby testing, allows you to perform browser compatibility testing on an online browser farm of 3000+ browsers and operating systems.
It is also a scalable cross browser testing platform that can assist teams all around the globe in making a transition to cloud infrastructure. Test your Gatsby CSS framework-based websites across 3000+ different desktop and mobile browsers. TestMu AI is a reliable online testing cloud for both manual and automation testing of Gatsby websites.

You can also test responsiveness of web applications and take full page screenshots while performing your unique testing activity.
If you are looking for different testing options for your Gatsby website, you can opt for the following different options that include:
- Real Time Testing: Perform online browser testing and app testing to make sure Gatsby applications are performing exceptionally well on different supported browsers, operating systems, and devices.
- Native Mobile App Testing: You can test your Gatsby apps on Android as well as iOS devices to ensure that the functional aspects are covered on different platforms.
- Testing on Real Devices: You can perform tests on a real device cloud of Gatsby websites and mobile apps to check the overall performance and scalability in real-world scenarios.
- Automation Testing: You can perform automated browser testing or scripts to automate the testing requirements related to the Gatsby website.
Features offered by the TestMu AI platform:
Here are some of the top features which make this platform even more popular from a functionalist perspective:
- Inbuilt Issue Tracker
- Continuous Online Support
- Improved Collaboration
With TestMu AI, you do not have to rely on third-party management tools to detect issues or bugs in web applications. The inbuilt issue tracker allows you to manage bugs effectively. There is a TestMu AI console that provides this functionality and makes this platform even more user-friendly.
Continuous tech support is available 24*7 for all the customers in case of any queries related to the tool or testing requirements. This shows how proactive the team is regarding customer problems or queries.
Being a cloud-based platform, it is very easy for testers to collaborate and share quick status updates easily. This platform also allows smart integrations with bug tracking tools so you can share issues with utmost ease. This not only ensures that different teams are working in collaboration, but they are delivering quality outcomes with a quick turnaround time.
Performing Real Time Gatsby Testing on TestMu AI
For performing real-time Gatsby browser and app testing on the TestMu AI platform, these are the steps you need to follow:
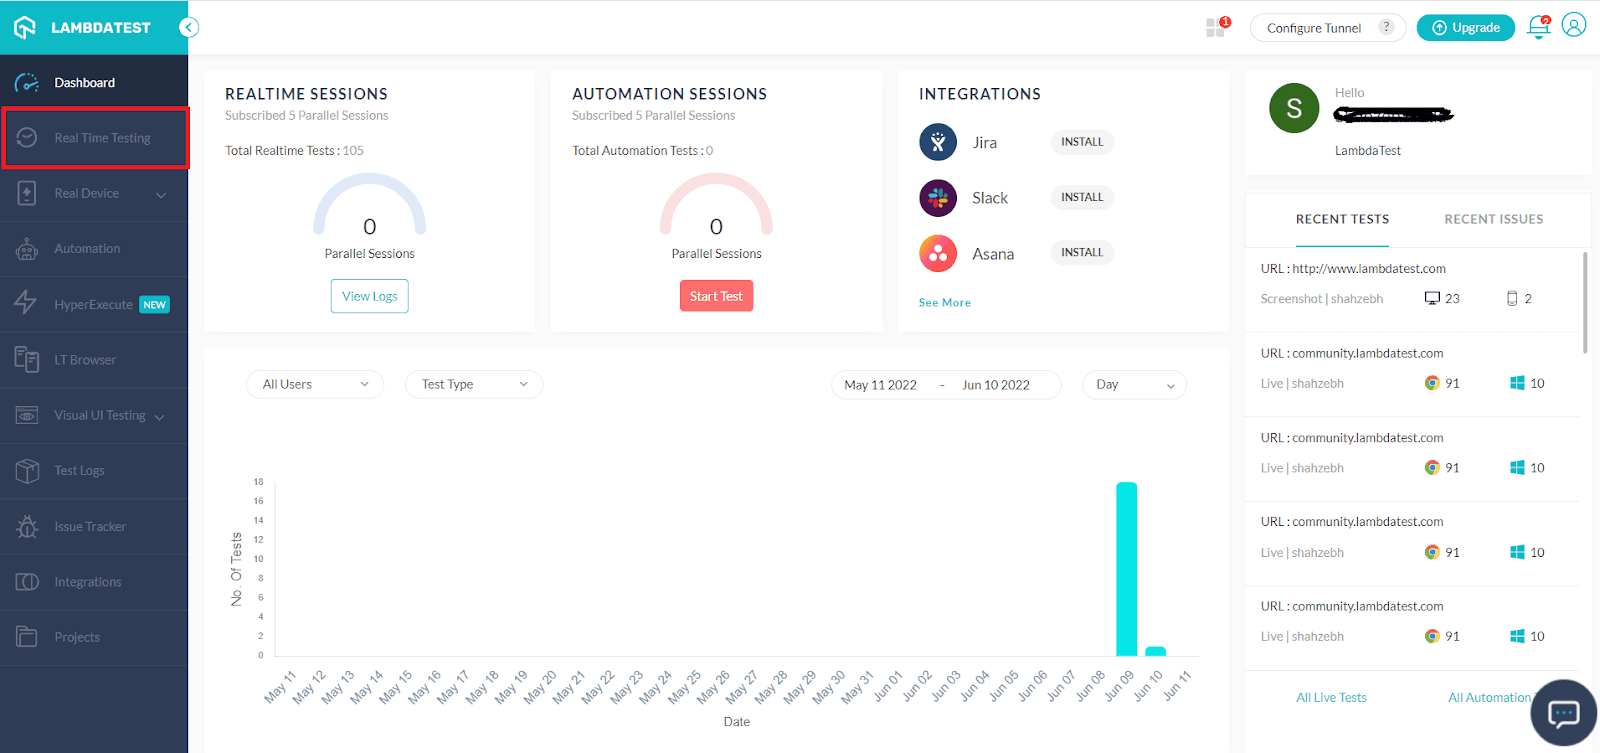
- Go to the Real Time Testing section present in the left menu bar.
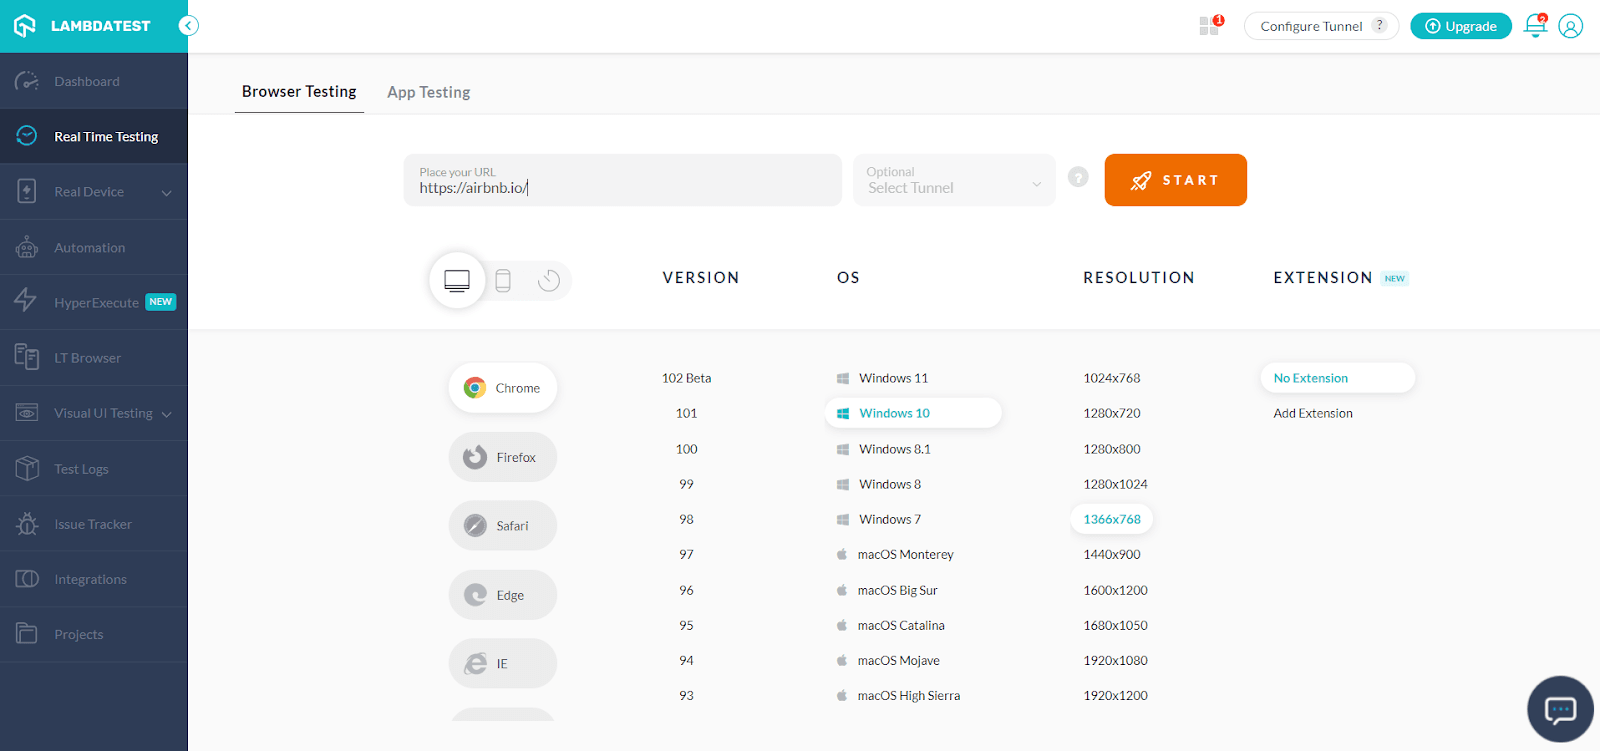
- Type the website URL in the Real Time Testing for testing. Choose the browser, VERSION, OS, RESOLUTION from the below screenshot:
- After you select it, click on START. You can then launch your website on the selected configuration you need.
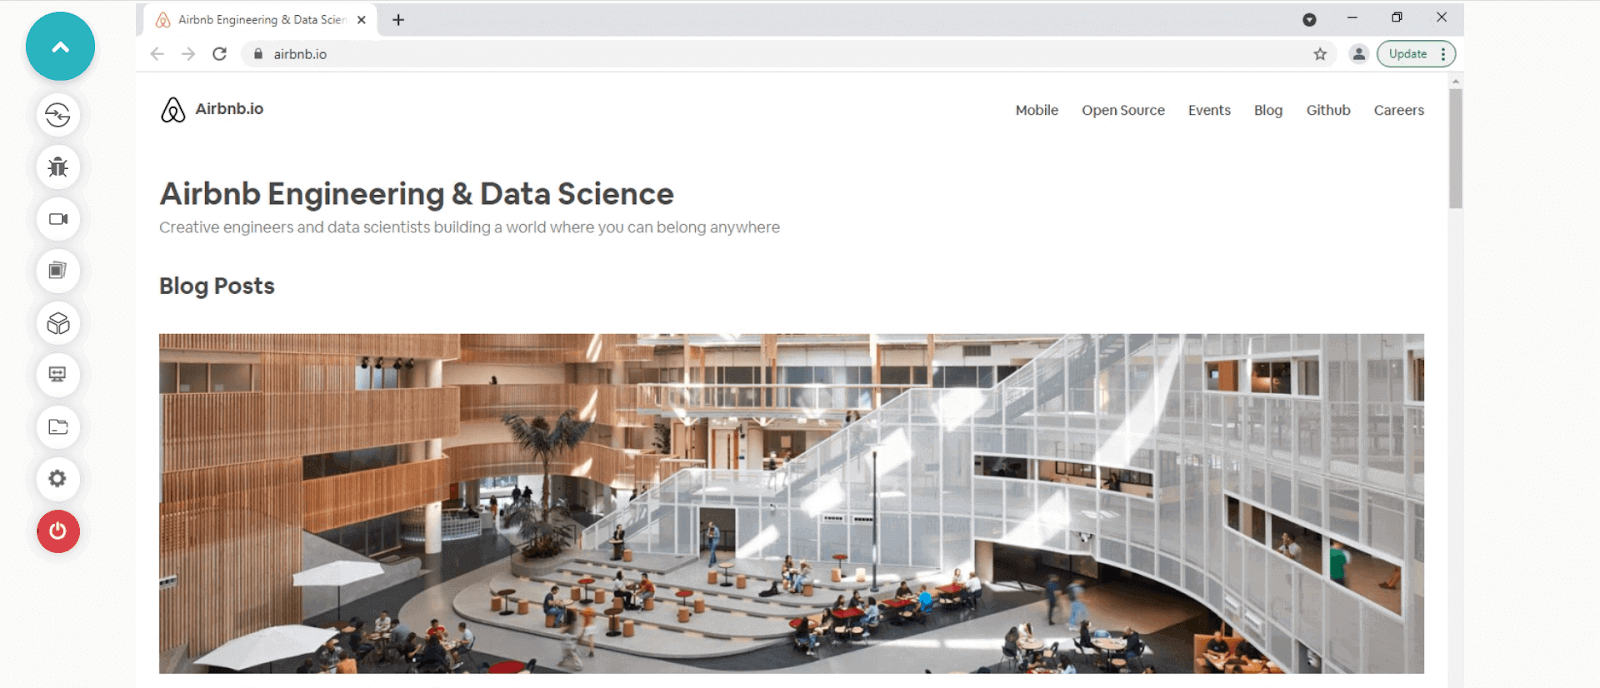
- After launching the website, you get access to a number of features like capture screenshots, video recording of a test session, one-click bug logging, etc.
Take a look at this video to learn more about real-time testing on TestMu AI:

You can also test the website responsiveness using the LT Browser. The browser has been developed to manage mobile-oriented testing. It consists of a number of features such as network throttling, hot reloading, two-device interaction, and much more.
Performing Mobile App Testing of Gatsby Apps on TestMu AI
It's possible that we'll need to test our mobile application. There are two methods for Gatsby testing. Emulators and simulators & real device testing are used. To start testing the Gatsby app, move to the TestMu AI Dashboard post logging in.
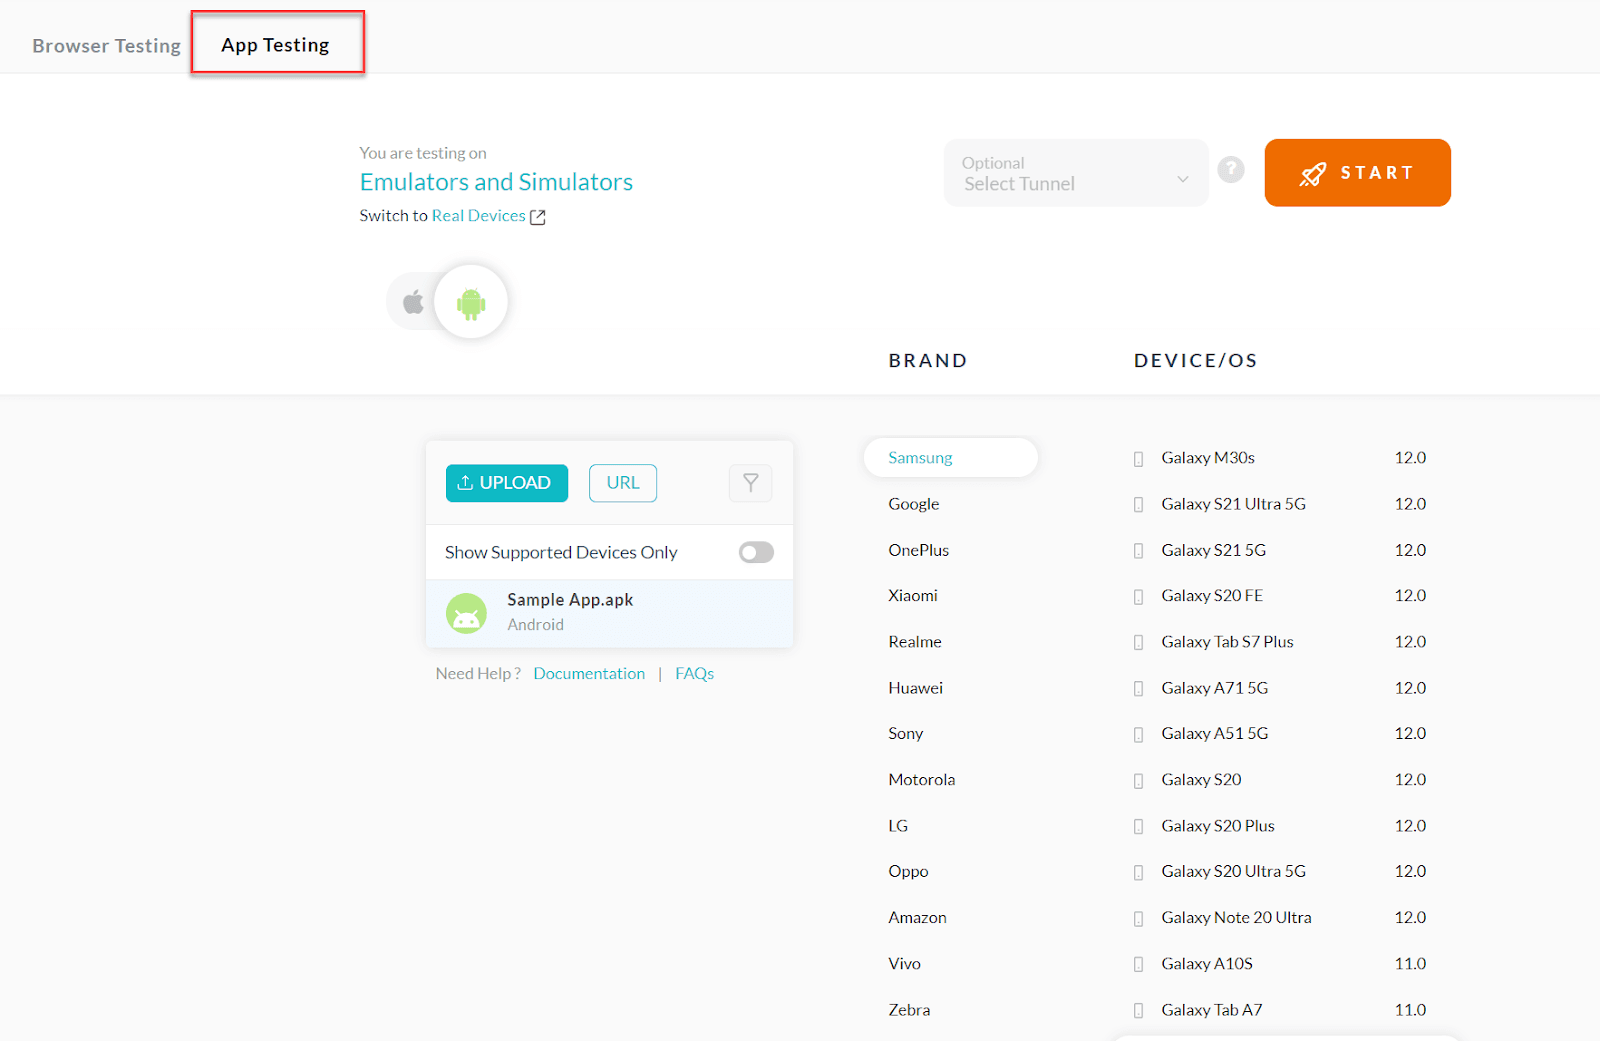
- Go to the Real Time Testing section from the left menu bar to test your mobile application developed using Gatsby.
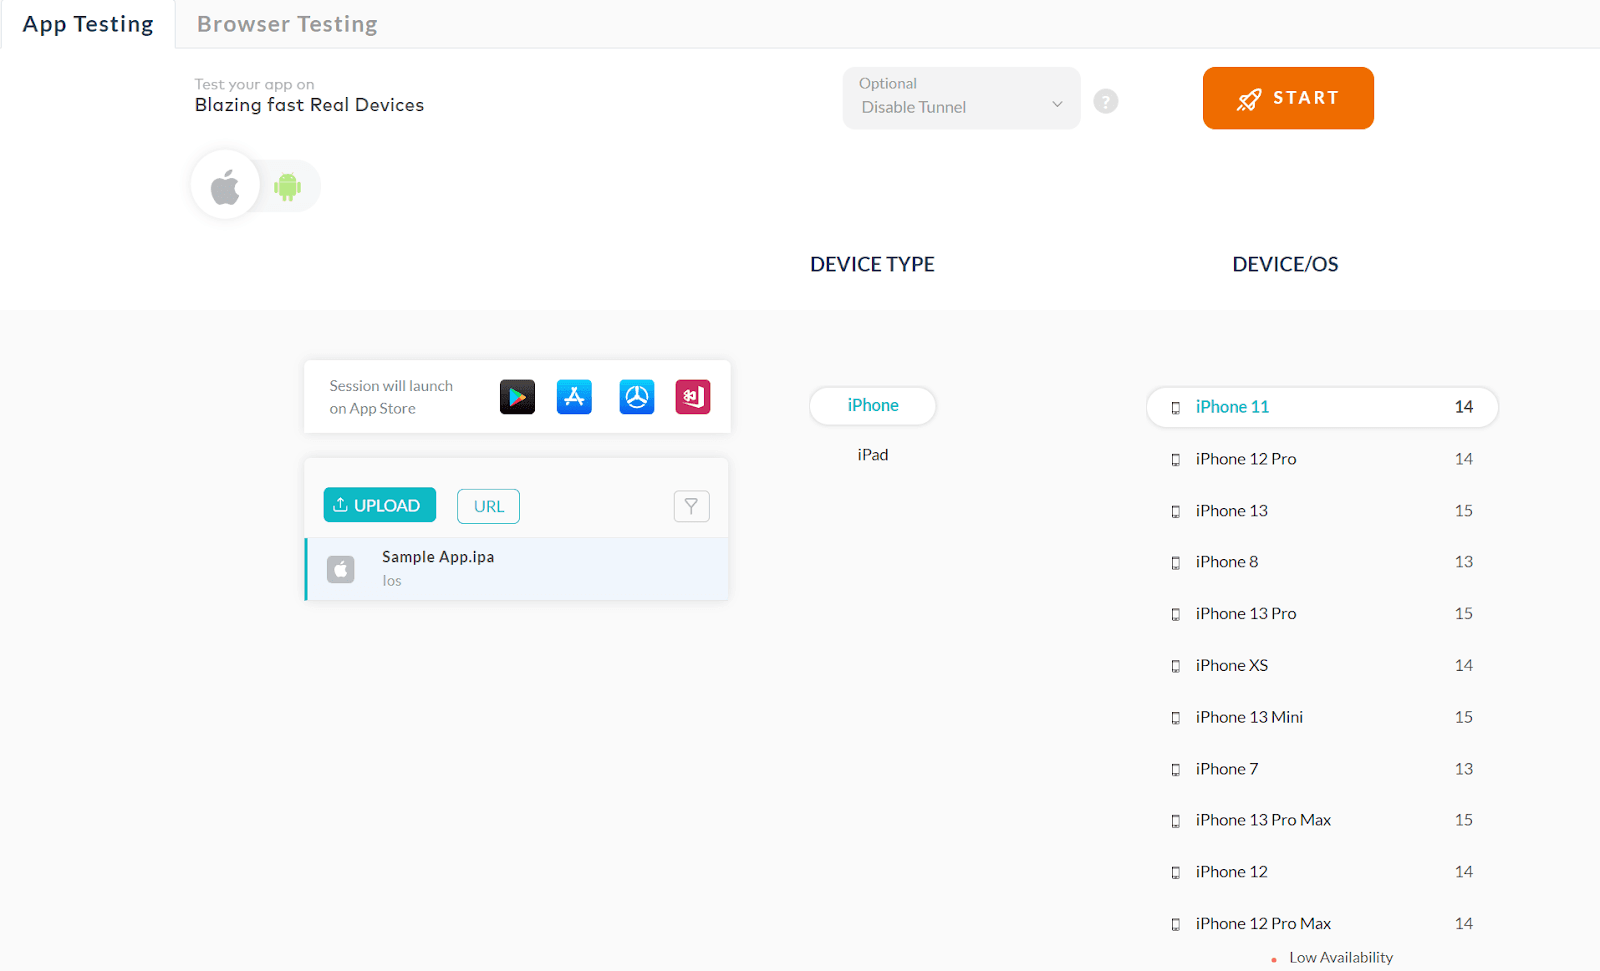
- From the App Testing tab, upload the Gatsby app, and select BRAND, DEVICE/OS, which needs to be tested.
- Press START to launch the test session on the selected configuration.
Performing Gatsby Testing on Real Devices using TestMu AI
For testing your mobile app using Gatsby, you have two options:
- Test using emulators and simulators.
- Test using real devices.
TestMu AI supports both of these options thankfully. We have already covered testing the Gatsby app on emulators and simulators in the previous section.
For performing Gatsby testing on real devices:
- Go to Real Device. Choose Real Time or App Automation
- The focus of Real Time is on manual inspection when you install the application on any real device. You can also perform app test automation via multiple mobile app testing frameworks like Appium, Espresso, and more.
- Let's choose Real Time. You need to choose the needed OS and device version for installing the app.
Now the app interaction can happen from your end.
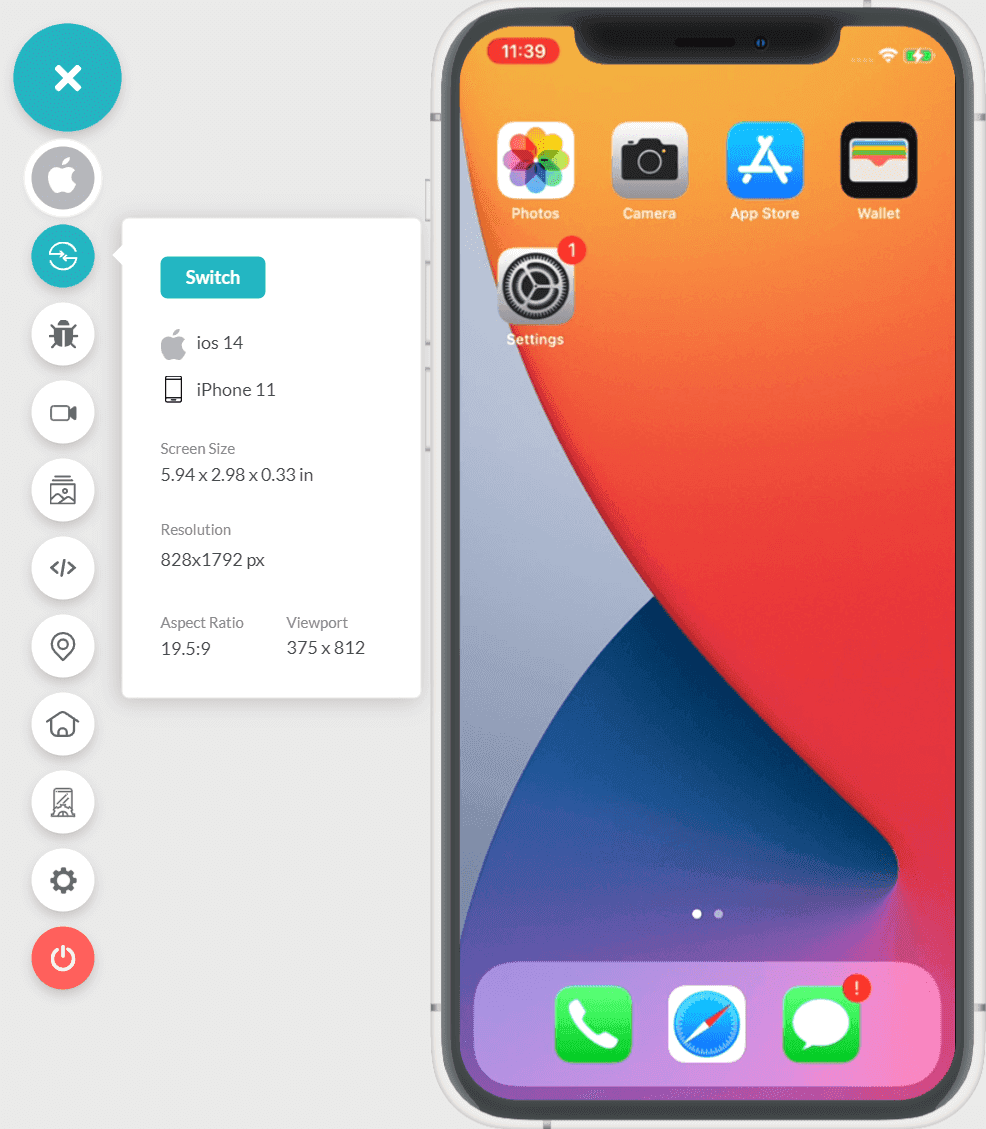
TestMu AI acts as a gateway for you to perform Gatsby testing on a real device cloud using different operating systems and real browsers. Take a look at this video to learn about real-time testing on Cloud:

You can also subscribe to the TestMu AI YouTube Channel to get the latest updates on tutorials and videos on web app testing.

TestMu AI also offers the option to test an unpublished website with the help of a secure tunnel, but with Gatsby, you might not need it. You will get a public IP along with your VMs.
Performing Gatsby Automation Testing on the TestMu AI Platform
To perform automation testing for Gatsby websites on the TestMu AI platform, follow the below steps:
- Go to the Automation section in the left menu bar to perform Gatsby automation testing.
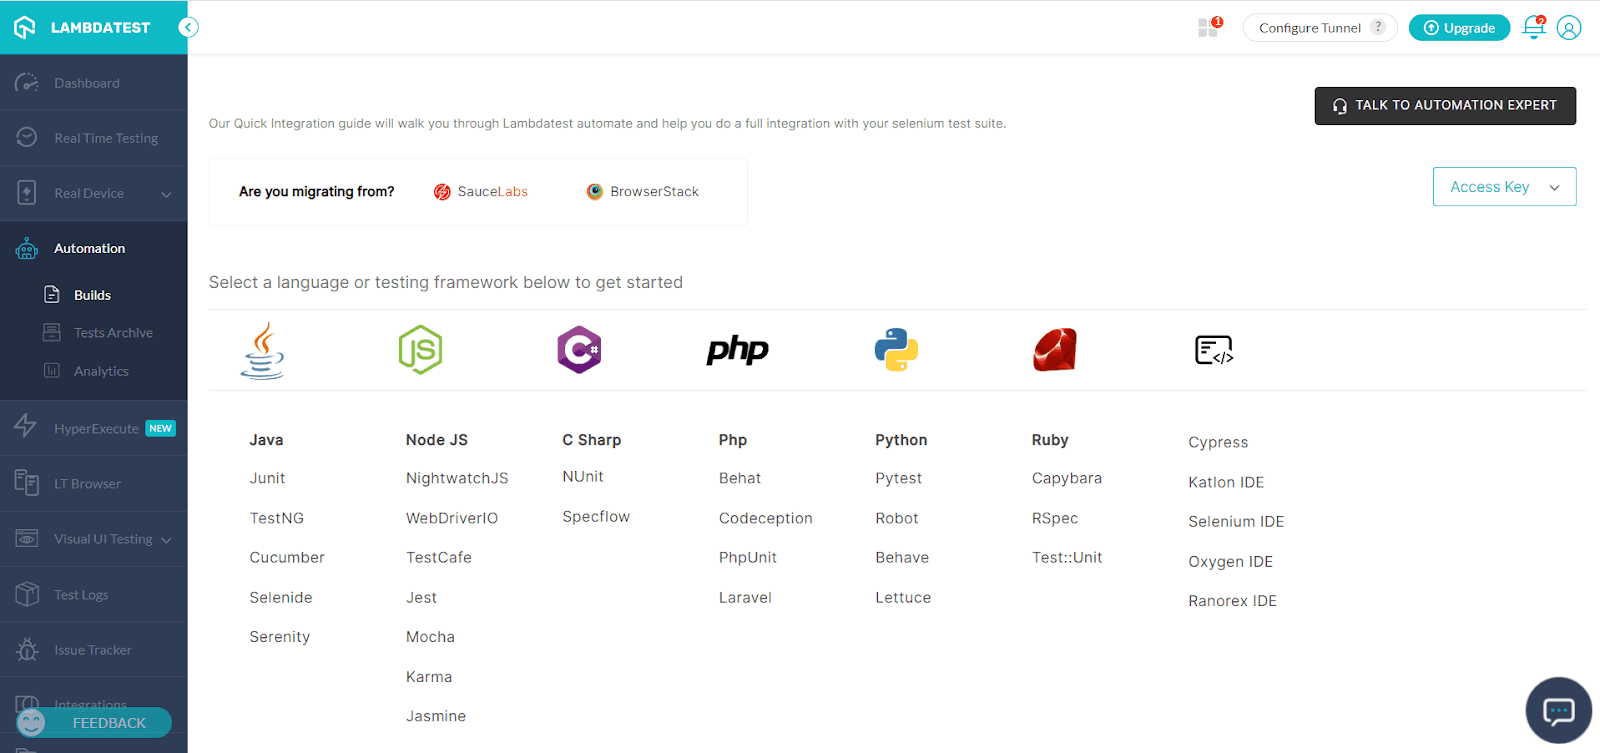
The screenshot above shows the Automation testing that can be done on the TestMu AI platform. You can migrate an existing test suite over from another cloud testing platform. If you don't want to import or migrate your modifications, you can use the options on the screen to select the desired language or testing framework.
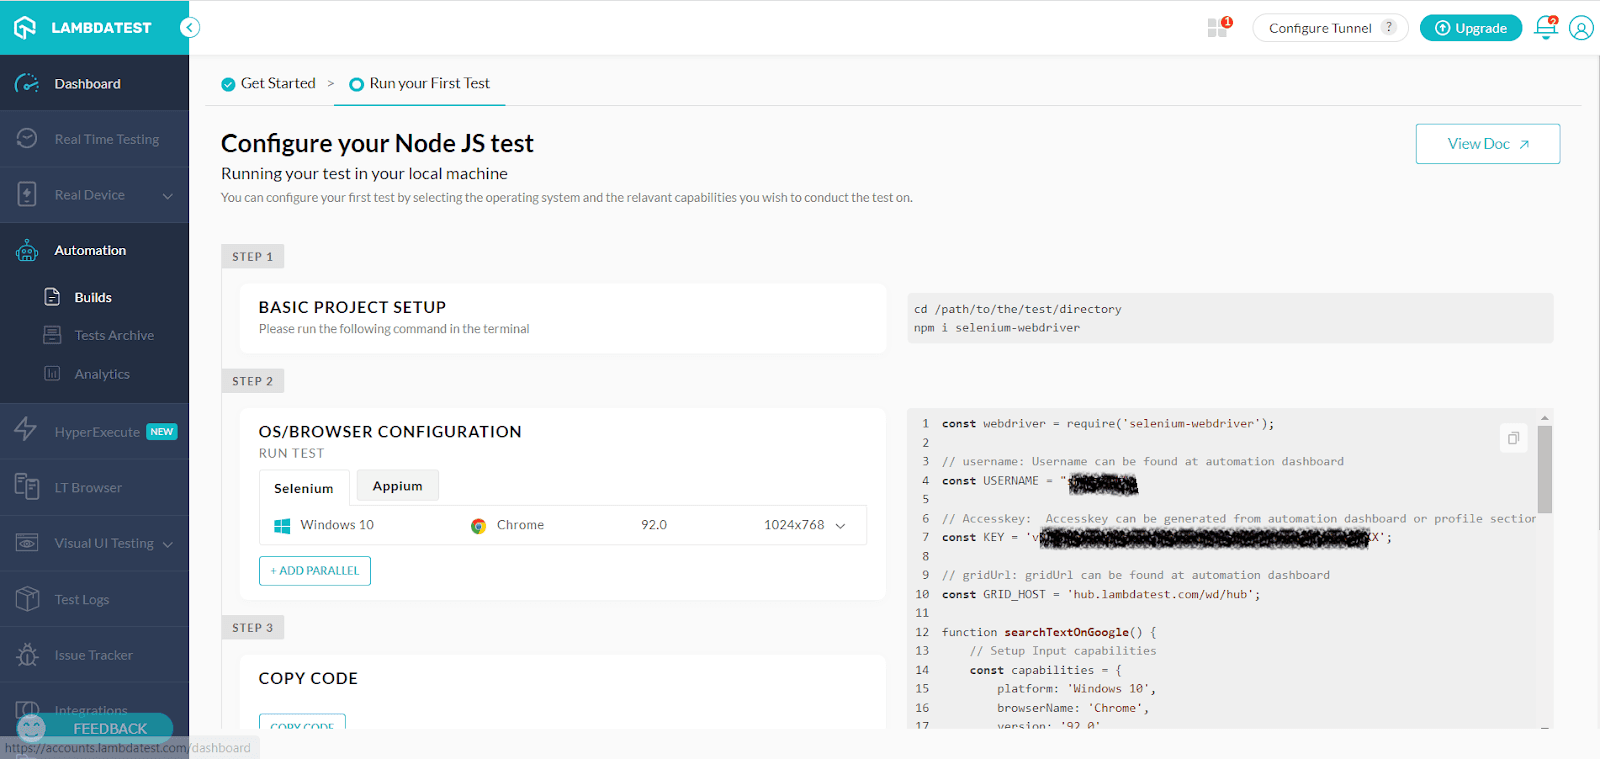
- Once you have chosen the desired options, you'll have to configure the project, add OS/Browser information, set the desired capabilities, and run the test cases.
Key Takeaway: Gatsby testing follows three main approaches: A/B testing of page variants at the edge, unit testing with Jest and React Testing Library, and running the same suites on a cloud platform across thousands of browser and operating system combinations.
What Happened to Gatsby Cloud?
If you are researching Gatsby today, you will run into news about Gatsby Cloud shutting down, so it is worth being precise about what changed. Gatsby Cloud was a dedicated hosting and build platform for Gatsby sites, known for fast incremental builds, deploy previews, and tight CMS integrations. After Netlify acquired Gatsby, it announced an end of service date for Gatsby Cloud and moved customers onto Netlify.
The critical distinction: this will not impact the open-source Gatsby JS framework. Gatsby the framework is still maintained, and Gatsby sites continue to build and deploy on Netlify or any other host and CI pipeline. Nothing about the shutdown changes how you write or run the unit, end-to-end, and accessibility tests covered in this guide, they run against your Gatsby build regardless of where it is hosted.
The framework itself is still published and still installable. Gatsby 5 is the current major line on npm, with version 5.16.1 released in February 2026 and no Gatsby 6 line, and its published peer dependencies accept React 18 or React 19. Check the version npm actually serves before you pin a release, and record the Node.js version your build runs on so a CI image upgrade does not change the result without you noticing.
Gatsby 5 also raised the runtime floor. The v4 to v5 migration guide sets the minimum Node.js version at 18.0.0 and the minimum React version at 18, and the package npm serves today declares an engines range of Node.js 18 or newer and below Node 26. A project still pinned to Node 16 or React 17 fails on the current line, so check the runtime before you debug a failing test suite.
Key Takeaway: Gatsby Cloud was shut down after Netlify acquired Gatsby, while the open-source Gatsby framework remains maintained, is still published on npm on the Gatsby 5 line, and still builds on any host or CI pipeline.
End-to-End and Accessibility Testing for Gatsby
Unit tests confirm that individual components behave, but they cannot tell you whether a real user can navigate your Gatsby site or whether it is usable with a screen reader. That is where end-to-end (E2E) and accessibility testing come in, and both run in a real browser rather than a mocked Node environment.
End-to-end testing with Cypress and Playwright
End-to-end testing drives the built Gatsby site the way a user would, clicking links, submitting forms, and asserting that pages navigate and render correctly. Cypress and Playwright are the two most common choices. You point them at your local gatsby develop server or a preview deploy and script the critical journeys. The official Gatsby guide wires Cypress into the build so the suite runs against production-like output rather than a dev-only bundle.
The Gatsby end-to-end testing guide installs cypress, start-server-and-test, and gatsby-cypress, and places a cypress.config.ts file at the project root with the base URL set to http://localhost:8000, so every cy.visit() call resolves against the local site. The CYPRESS_SUPPORT environment variable exposes the Gatsby test utilities to the run. In continuous integration you call cypress run rather than cypress open, and you serve the site with gatsby build and gatsby serve so the suite exercises the output users will get.
Accessibility testing with axe-core and cypress-axe
Accessibility testing is a first-class quality concern, not an afterthought. The axe-core engine audits rendered pages against WCAG rules, and cypress-axe wraps it so you can assert zero critical violations inside your existing Cypress E2E specs. Adding a quick cy.injectAxe() and cy.checkA11y() to each page test catches missing labels, poor contrast, and broken keyboard flows before they ship. For deeper coverage across browsers and assistive-technology combinations, pair these automated checks with real-device runs.
Key Takeaway: End-to-end tests with Cypress or Playwright and accessibility audits with axe-core and cypress-axe both run a Gatsby site in a real browser, catching broken user journeys and WCAG violations that mocked unit tests never see.
How Do You Catch Visual Regressions in a Gatsby Site?
Visual regression testing compares a screenshot of each page or component against an approved baseline image, so it catches layout and styling breaks that unit tests and end-to-end selector checks do not detect. Gatsby documents this route through Storybook. The official visual testing guide tells you to run npx @storybook/cli@latest init --builder webpack5 from the project root, then edit .storybook/main.js so Gatsby source files are transpiled with the right Babel plugins, and .storybook/preview.js for decorators and parameters. One documented limitation is worth knowing first: stories for components that use StaticImage from gatsby-plugin-image are not supported.
Storybook only renders the components. To turn a render into a pass or a fail you add an image comparison layer. jest-image-snapshot adds a toMatchImageSnapshot() matcher to Jest, stores baselines in an __image_snapshots__ directory, and compares with pixelmatch by default. Its comparisonMethod option also accepts ssim for structural similarity, and failureThreshold with failureThresholdType set to percent or pixel lets you tolerate small rendering differences. The default threshold is 0, so an unconfigured run fails on a single changed pixel.
The community gatsby-starter-testing project shows the full stack wired together: Jest with React Testing Library, Jest snapshot tests, Cypress with Cypress Testing Library, axe with cypress-axe, and two visual paths, Storybook with jest-puppeteer plus jest-image-snapshot, and Cypress with Cypress Image Snapshot. It also ships a GitHub Actions workflow, and that last piece matters. A baseline image is only trustworthy when every pull request re-renders it on the same runner, because font rendering differences between a laptop and a CI container produce diffs that have nothing to do with your code.
Key Takeaway: Visual regression testing for a Gatsby site renders components in Storybook and compares screenshots with jest-image-snapshot, and the baseline images are only trustworthy when every pull request re-renders them on the same CI runner.
Gatsby vs. Next.js: Which to Choose?
Gatsby is often weighed against Next.js, the other major React framework. They share a testing toolchain but differ in architecture and ideal use case. This comparison helps you pick the right one, and understand why the testing strategy is largely portable between them.
| Dimension | Gatsby | Next.js |
|---|---|---|
| Type | Static-site generator (React) | Full-stack React framework |
| Rendering | Static generation at build time; client hydration | Static, server-side rendering, and incremental regeneration |
| Data layer | Built-in GraphQL data layer | Fetch data your own way (no enforced layer) |
| Ecosystem | Large plugin ecosystem for CMS, images, SEO | Fewer plugins; more built-in framework features |
| Best for | Content-heavy, mostly static sites and blogs | Dynamic, application-style products with server logic |
| Testing tools | Jest, React Testing Library, Cypress/Playwright | Jest, React Testing Library, Cypress/Playwright |
The key takeaway: the unit, E2E, and accessibility testing patterns in this guide transfer directly to Next.js. What changes is the build and data layer, not how you verify components and user flows.
Key Takeaway: Gatsby suits content-heavy, mostly static sites with its built-in GraphQL data layer, while Next.js suits dynamic, application-style products that need server-side rendering and API routes.
How Do AI Coding Assistants Fit Into Gatsby Testing?
AI coding assistants draft Gatsby tests, and you verify what they produce. GitHub Copilot Chat ships a /tests slash command that the GitHub Copilot reference documents as generating unit tests for the selected code, so a Gatsby component can become a first Jest and React Testing Library spec without typing the boilerplate by hand.
Agentic runs go a step further. The Playwright MCP server gives an assistant browser automation through structured accessibility snapshots, driving the page from Playwright's accessibility tree rather than pixel input, and it needs Node.js 18 or newer plus an MCP client such as VS Code. That lets a model walk a built Gatsby site and propose selectors and assertions from what the page actually exposes. The same repository states that Playwright MCP is not a security boundary, so point it at a local build or a preview deploy rather than at production with live credentials.
The generated test still has to survive Gatsby's own setup. Generated component tests fail on a clean setup until the gatsby module is mocked in __mocks__/gatsby.js and testEnvironment is set to jsdom, because the assistant assumes a plain React project. Models trained on older Gatsby code also still emit the Gatsby 4 sort syntax that Gatsby 5 removed. Run every generated test, then break the component on purpose and confirm the test fails, because a test that passes against broken code is worse than no test at all.
Key Takeaway: AI assistants such as GitHub Copilot and the Playwright MCP server can draft Gatsby unit and end-to-end tests, but a generated spec still needs the gatsby module mock, a jsdom test environment, and a deliberate failure check before it is trusted.
Wrap Up!
We have discussed different ways to perform Gatsby testing. It is all about using the right methodologies and supported platforms to simplify your requirements. We have moved beyond the traditional ways of testing our web and mobile apps, and automation is rapidly picking up. Organizations around the globe need to improve and improvise their existing Gatsby testing practices to stay ahead of the rest of their competition and serve the end customers better.
Happy Testing!
Author

Irshad Ahamed
Blogs: 11


Irshad Ahamed is a Technical Writer and Information Architect with over 4 years of experience working across notable companies like Amazon, IBM, and Symantec. He specializes in crafting high-quality documentation, technical writing, and content strategies for software development, APIs, and process documentation. Irshad’s expertise spans across product documentation, creating instructional content, and collaborating with cross-functional teams to ensure clear, concise, and easily understandable outputs. His certifications include PMI-ACP and Camtasia 2019 Essentials.
Reviewer

Rahul Mishra
Reviewer
Rahul Mishra is a Lead Member of Technical Staff at TestMu AI (formerly LambdaTest), leading frontend engineering and accessibility testing across the quality engineering platform. He mentors frontend engineers, runs code reviews and sprint planning, optimizes React.js rendering performance, and makes product features accessible to users with disabilities through WCAG and ADA-compliant accessibility audits. He brings 10+ years of experience across React.js, VueJS, TypeScript, Swift, Objective-C, and AWS, with earlier work as a Technical Lead at VectoScalar Technologies. Rahul holds a B.E. in Information Technology.


Gatsby Testing FAQs
Did you find this page helpful?
More Related Blogs
TestMu AI forEnterprise
Get access to solutions built on Enterprise
grade security, privacy, & compliance
- Advanced access controls
- Advanced data retention rules
- Advanced Local Testing
- Premium Support options
- Early access to beta features
- Private Slack Channel
- Unlimited Manual Accessibility DevTools Tests